Page 190 of 304

190
1. PHONE OPERATION (HANDS-FREE SYSTEM FOR CELLULAR PHONES)
AVA L O N _ N a v i _ U
1Display the message inbox screen.
(P.189)
2Select the desired message from the
list.
3Check that the message is displayed.
RECEIVING A MESSAGE
When an e-mail/SMS/MMS is re-
ceived, the incoming message screen
pops up with sound and is ready to be
operated on the screen.
No.Function
Select to check the message.
Select to not open the message.
Select to call the message sender.
INFORMATION
●Depending on the cellular phone used
for receiving messages, or its registra-
tion status with the system, some infor-
mation may not be displayed.
● The pop up screen is separately avail-
able for incoming e-mail and SMS/MMS
messages under the following condi-
tions:
E-mail:
• “Incoming E-mail Display” is set to “Full
Screen”. ( P.204)
• “E-mail Notification Popup” is set to on. ( P.204)
SMS/MMS:
• “Incoming SMS/MMS Display” is set to “Full Screen”. ( P.204)
• “SMS/MMS Notification Popup” is set to on. ( P.204)
CHECKING MESSAGES
No.Function
*
Select “Mark Unread” or “Mark
Read” to mark mail unread or read
on the message inbox screen.
This function is available when “Up-
date Read Status on Phone” is set to
on. ( P.204)
Select to reply the message.
( P.191)
Select to display the previous or
next message.
Select to have messages read out.
To cancel this function, select
“Stop” .
When “Automatic Message Read-
out” is set to on, messages will be
automatically read out. ( P.204)
Select to make a call to the sender.
*: E-mail only
Page 192 of 304
192
1. PHONE OPERATION (HANDS-FREE SYSTEM FOR CELLULAR PHONES)
AVA L O N _ N a v i _ U
■EDITING QUICK REPLY MESSAG-
ES
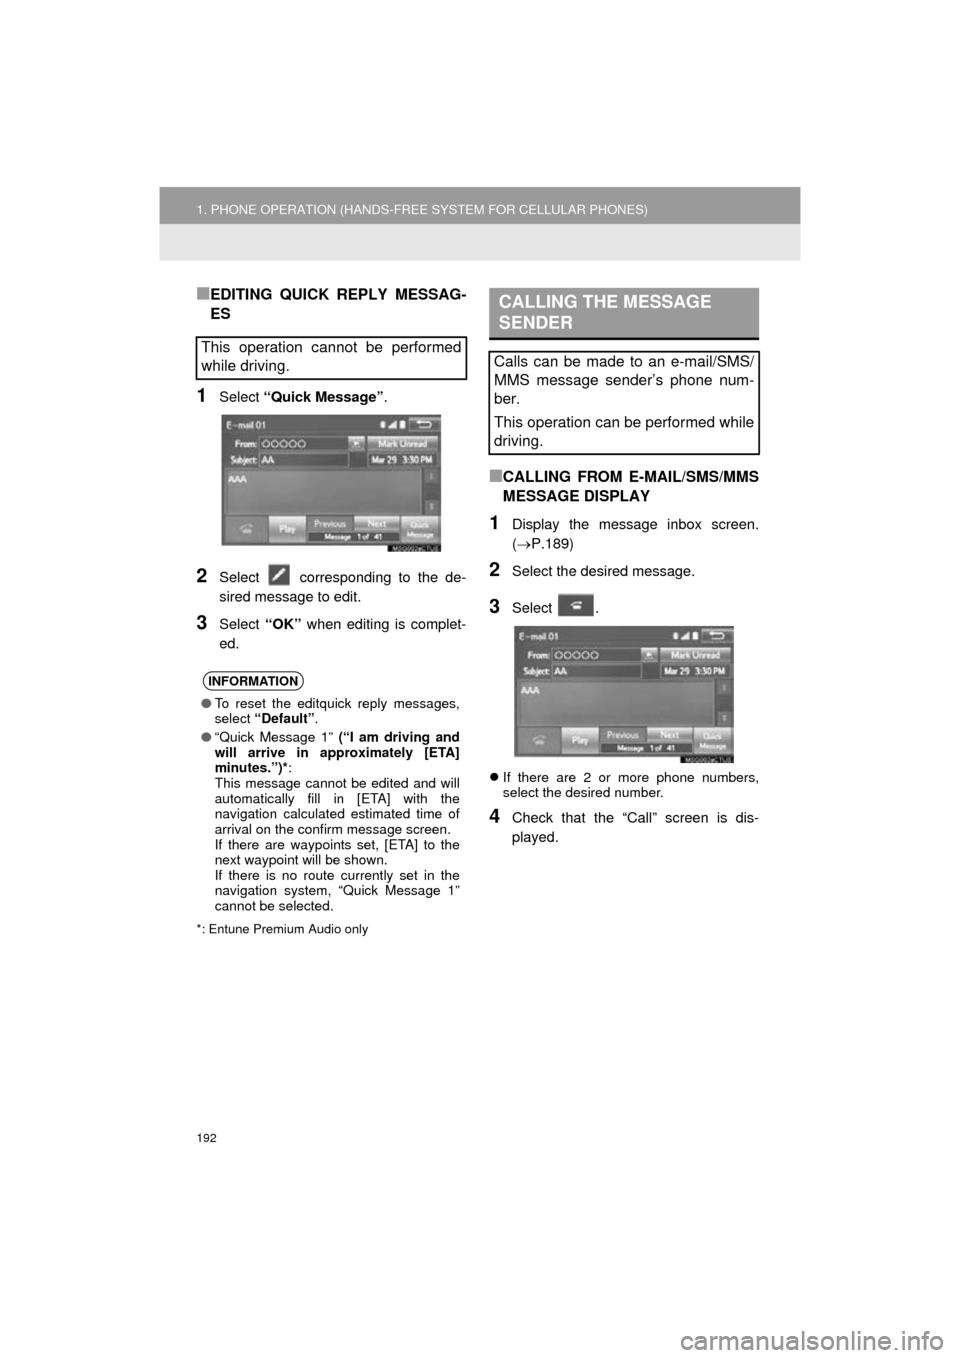
1Select “Quick Message” .
2Select corresponding to the de-
sired message to edit.
3Select “OK” when editing is complet-
ed.
*: Entune Premium Audio only
■CALLING FROM E-MAIL/SMS/MMS
MESSAGE DISPLAY
1Display the message inbox screen.
(P.189)
2Select the desired message.
3Select .
If there are 2 or more phone numbers,
select the desired number.
4Check that the “Call” screen is dis-
played.
This operation cannot be performed
while driving.
INFORMATION
●To reset the editquick reply messages,
select “Default” .
● “Quick Message 1” (“I am driving and
will arrive in approximately [ETA]
minutes.”)* :
This message cannot be edited and will
automatically fill in [ETA] with the
navigation calculated estimated time of
arrival on the confirm message screen.
If there are waypoints set, [ETA] to the
next waypoint will be shown.
If there is no route currently set in the
navigation system, “Quick Message 1”
cannot be selected.
CALLING THE MESSAGE
SENDER
Calls can be made to an e-mail/SMS/
MMS message sender’s phone num-
ber.
This operation can be performed while
driving.
Page 196 of 304
196
2. SETUP
AVA L O N _ N a v i _ U
1Display the “Phone/Message Settings”
screen. (P.194)
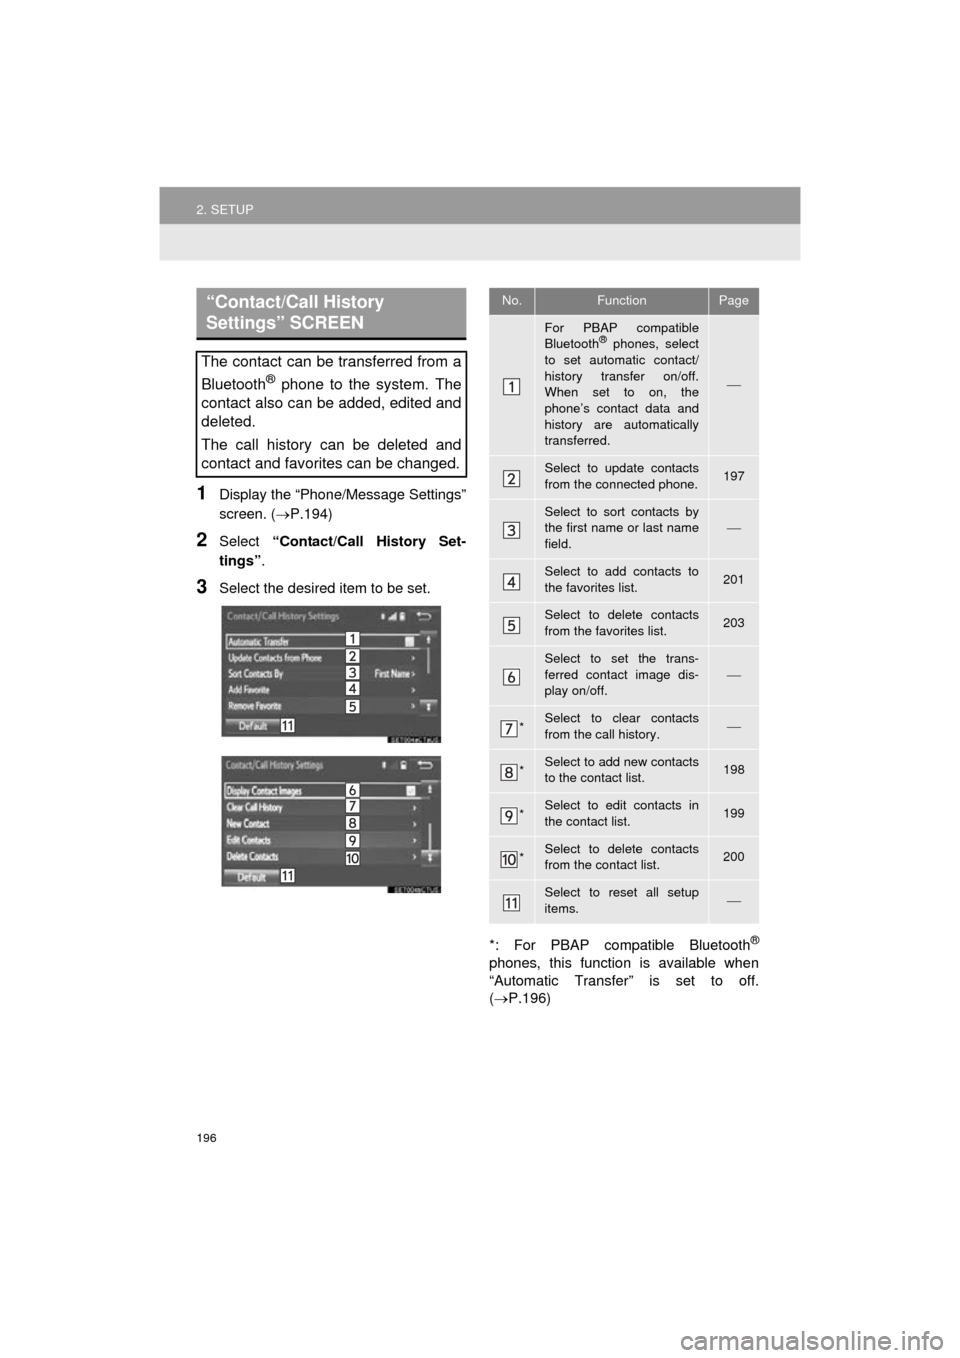
2Select “Contact/Call History Set-
tings” .
3Select the desired item to be set.
*: For PBAP compatible Bluetooth
®
phones, this function is available when
“Automatic Transfer” is set to off.
(P.196)
“Contact/Call History
Settings” SCREEN
The contact can be transferred from a
Bluetooth
® phone to the system. The
contact also can be added, edited and
deleted.
The call history can be deleted and
contact and favorites can be changed.
No.FunctionPage
For PBAP compatible
Bluetooth® phones, select
to set automatic contact/
history transfer on/off.
When set to on, the
phone’s contact data and
history are automatically
transferred.
Select to update contacts
from the connected phone.197
Select to sort contacts by
the first name or last name
field.
Select to add contacts to
the favorites list. 201
Select to delete contacts
from the favorites list. 203
Select to set the trans-
ferred contact image dis-
play on/off.
*Select to clear contacts
from the call history.
*Select to add new contacts
to the contact list.198
*Select to edit contacts in
the contact list.199
*Select to delete contacts
from the contact list.200
Select to reset all setup
items.
Page 197 of 304
197
2. SETUP
AVA L O N _ N a v i _ U
PHONE
7
■FOR PBAP COMPATIBLE
Bluetooth
® PHONES
1Select “Update Contacts from
Phone” .
Contacts are transferred automatically.
2Check that a confirmation screen is
displayed when the operation is com-
plete.
This operation may be unnecessary
depending on the type of cellular phone.
Depending on the type of cellular phone,
OBEX authentication may be required
when transferring contact data. Enter
“1234” into the Bluetooth
® phone.
If another Bluetooth
® device is connected
when transferring contact data, depending
on the phone, the connected Bluetooth
®
device may need to be disconnected.
Depending on the type of Bluetooth
®
phone being connected, it may be neces-
sary to perform additional steps on the
phone.
■FOR PBAP INCOMPATIBLE BUT
OPP COMPATIBLE Bluetooth
®
PHONES
1Select “Update Contacts from
Phone” .
2Transfer the contact data to the system
using a Bluetooth
® phone.
This operation may be unnecessary
depending on the type of cellular phone.
Depending on the type of cellular phone,
OBEX authentication may be required
when transferring contact data. Enter
“1234” into the Bluetooth
® phone.
To cancel this function, select “Cancel”.
3Check that a confirmation screen is
displayed when the operation is com-
plete.
INFORMATION
●Depending on the type of phone, certain
functions may not be available.
● Contact data is managed independently
for every registered phone. When one
phone is connected, another phone’s
registered data cannot be read.
UPDATE CONTACTS FROM
PHONE
Operation methods differ between
PBAP compatible and PBAP incom-
patible but OPP compatible Bluetooth
®
phones.
If your cellular phone is neither PBAP
nor OPP compatible, the contacts can-
not be transferred.
This operation cannot be performed
while driving.
Page 198 of 304
198
2. SETUP
AVA L O N _ N a v i _ U
■UPDATING THE CONTACTS IN A
DIFFERENT WAY (FROM THE “Call
History” SCREEN)
1Display the phone top screen.
(P.179)
2Select the “Call History” tab and se-
lect a contact not yet registered in the
contact list.
3Select “Update Contact” .
4Select the desired contact.
5Select a phone type for the phone
number.
1Select “New Contact” .
2Enter the name and select “OK”.
3Enter the phone number and select
“OK”.
4Select the phone type for the phone
number.
5To add another number to this contact,
select “Yes”.
For PBAP compatible Bluetooth®
phones, this function is available when
“Automatic Transfer” is set to off.
(P.196)
REGISTERING A NEW
CONTACT TO THE CONTACT
LIST
New contact data can be registered.
Up to 4 numbers per person can be
registered. For PBAP compatible
Bluetooth
® phones, this function is
available when “Automatic Transfer” is
set to off. ( P.196)
Page 199 of 304
199
2. SETUP
AVA L O N _ N a v i _ U
PHONE
7
■REGISTERING A NEW CONTACT IN
A DIFFERENT WAY (FROM THE
“Call History” SCREEN)
1Display the phone top screen.
(P.179)
2Select the “Call History” tab and se-
lect a contact not ye t registered in the
contact list.
3Select “Add to Contacts” .
4Follow the steps in “REGISTERING A
NEW CONTACT TO THE CONTACT
LIST” from “STEP 2”. ( P.198)
1Select “Edit Contacts” .
2Select the desired contact.
3Select corresponding to the de-
sired name or number.
For editing the name
4Follow the steps in “REGISTERING A
NEW CONTACT TO THE CONTACT
LIST” from “STEP 2”. ( P.198)
For editing the number
4Follow the steps in “REGISTERING A
NEW CONTACT TO THE CONTACT
LIST” from “STEP 3”. ( P.198)
EDITING THE CONTACT DATA
For PBAP compatible Bluetooth
®
phones, this function is available when
“Automatic Transfer” is set to off.
( P.196)
Page 200 of 304
200
2. SETUP
AVA L O N _ N a v i _ U
■EDITING THE CONTACT IN A DIF-
FERENT WAY (FROM THE “Contact
Details” SCREEN)
1Display the phone top screen.
(P.179)
2Select the “Contacts” , “Call History”
tab or the “Favorites” tab and select
the desired contact.
3Select “Edit Contact” .
“E-mail Addresses” : Select to display all
registered e-mail addresses for the con-
tact.
4Follow the steps in “EDITING THE
CONTACT DATA” from “STEP 3”.
(P.199)
1Select “Delete Contacts” .
2Select the desired contact and select
“Delete”.
3Select “Yes” when the confirmation
screen appears.
DELETING THE CONTACT
DATA
For PBAP compatible Bluetooth
®
phones, this function is available when
“Automatic Transfer” is set to off.
( P.196)
INFORMATION
● Multiple data can be selected and
deleted at the same time.
Page 204 of 304
204
2. SETUP
AVA L O N _ N a v i _ U
1Display the “Phone/Message Settings”
screen. (P.194)
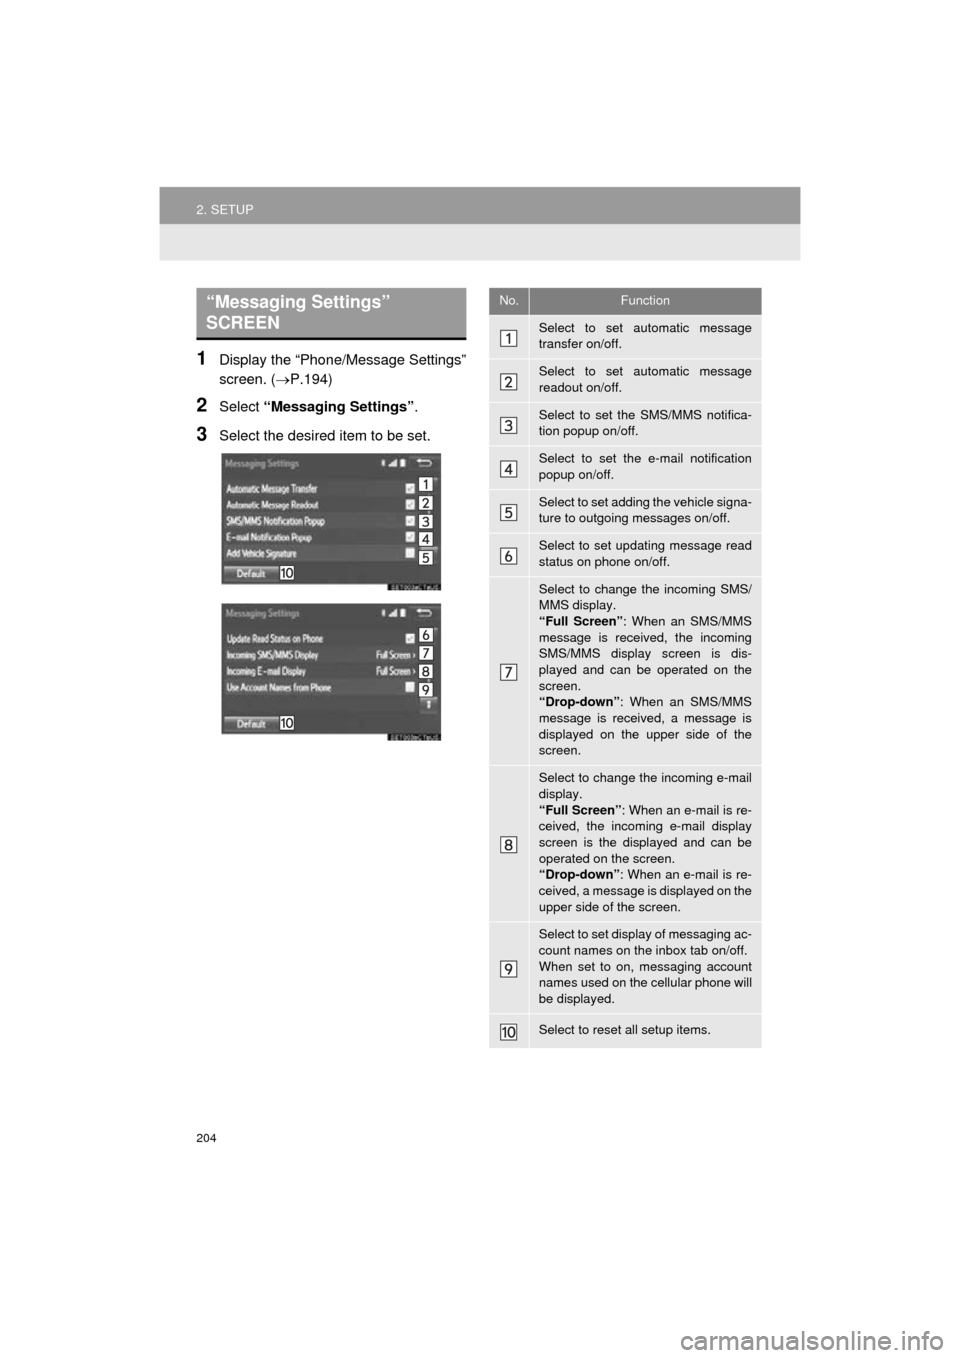
2Select “Messaging Settings” .
3Select the desired item to be set.
“Messaging Settings”
SCREEN No.Function
Select to set automatic message
transfer on/off.
Select to set automatic message
readout on/off.
Select to set the SMS/MMS notifica-
tion popup on/off.
Select to set the e-mail notification
popup on/off.
Select to set adding the vehicle signa-
ture to outgoing messages on/off.
Select to set updating message read
status on phone on/off.
Select to change the incoming SMS/
MMS display.
“Full Screen”: When an SMS/MMS
message is received, the incoming
SMS/MMS display screen is dis-
played and can be operated on the
screen.
“Drop-down” : When an SMS/MMS
message is received, a message is
displayed on the upper side of the
screen.
Select to change the incoming e-mail
display.
“Full Screen” : When an e-mail is re-
ceived, the incoming e-mail display
screen is the displayed and can be
operated on the screen.
“Drop-down” : When an e-mail is re-
ceived, a message is displayed on the
upper side of the screen.
Select to set display of messaging ac-
count names on the inbox tab on/off.
When set to on, messaging account
names used on the cellular phone will
be displayed.
Select to reset all setup items.


