2016 TESLA MODEL X instrument panel
[x] Cancel search: instrument panelPage 83 of 179
Note: Auto Lane Change assists in movingModel X one lane at a time. Moving into an
additional lane requires you to engage the
turn signal a second time when the
first lane
change is complete.
Warning: If Auto Lane Change can not
detect the outside of the target lane
midway through the lane change, both
Auto Lane Change and Autosteer will cancel. The instrument panel displays a
message instructing you to take over the
steering wheel immediately.
When Auto Lane Change is active, it is
important to monitor its performance by
watching the driving path in front of you. Stay
prepared to take over steering at any time. On the instrument panel, the lane you are crossing
over displays as a dashed blue line and once in your new lane, the lane markings display as
solid blue lines.
In situations where Auto Lane Change is
unable to operate at optimal performance, or
can not operate due to inadequate data, the
instrument panel displays a series of warnings.
Therefore, when using Auto Lane Change,
always pay attention to the instrument panel
and be prepared to manually steer Model X.
Warning: When Auto Lane Change is
actively assisting in steering Model X, the steering wheel moves accordingly.
Although you must have your hands on
the steering wheel, any
significantrestriction of the steering wheel
Page 89 of 179

alert and always pay attention to the area
in front of Model X so you can anticipate whether any action is required.Warning: Forward Collision Warning does
not operate when Model X is traveling less than 7 km/h.
Automatic Emergency Braking
The forward looking camera and the radar
sensor are designed to determine the distance
from any object (vehicle, motorcycle, bicycle,
or pedestrian) traveling in front of Model X. When a frontal collision is considered
unavoidable, Automatic Emergency Braking is
designed to automatically apply the brakes to
reduce the severity of the impact.
When Automatic Emergency Braking applies
the brakes, the instrument panel displays a visual warning and you
Page 91 of 179
How Speed Assist Works
If Model X is equipped with Autopilot
components (see About Driver Assistance on
page 72), the forward looking camera detects
speed limit signs. The signs are then analyzed
and compared against GPS data to determine
the speed limit at your current driving
location. For routes where no signs are
present, speed limits are determined using GPS data (if available). Instead of determining
the speed limit based on signs and GPS data,
you can also manually enter an arbitrary speed limit.
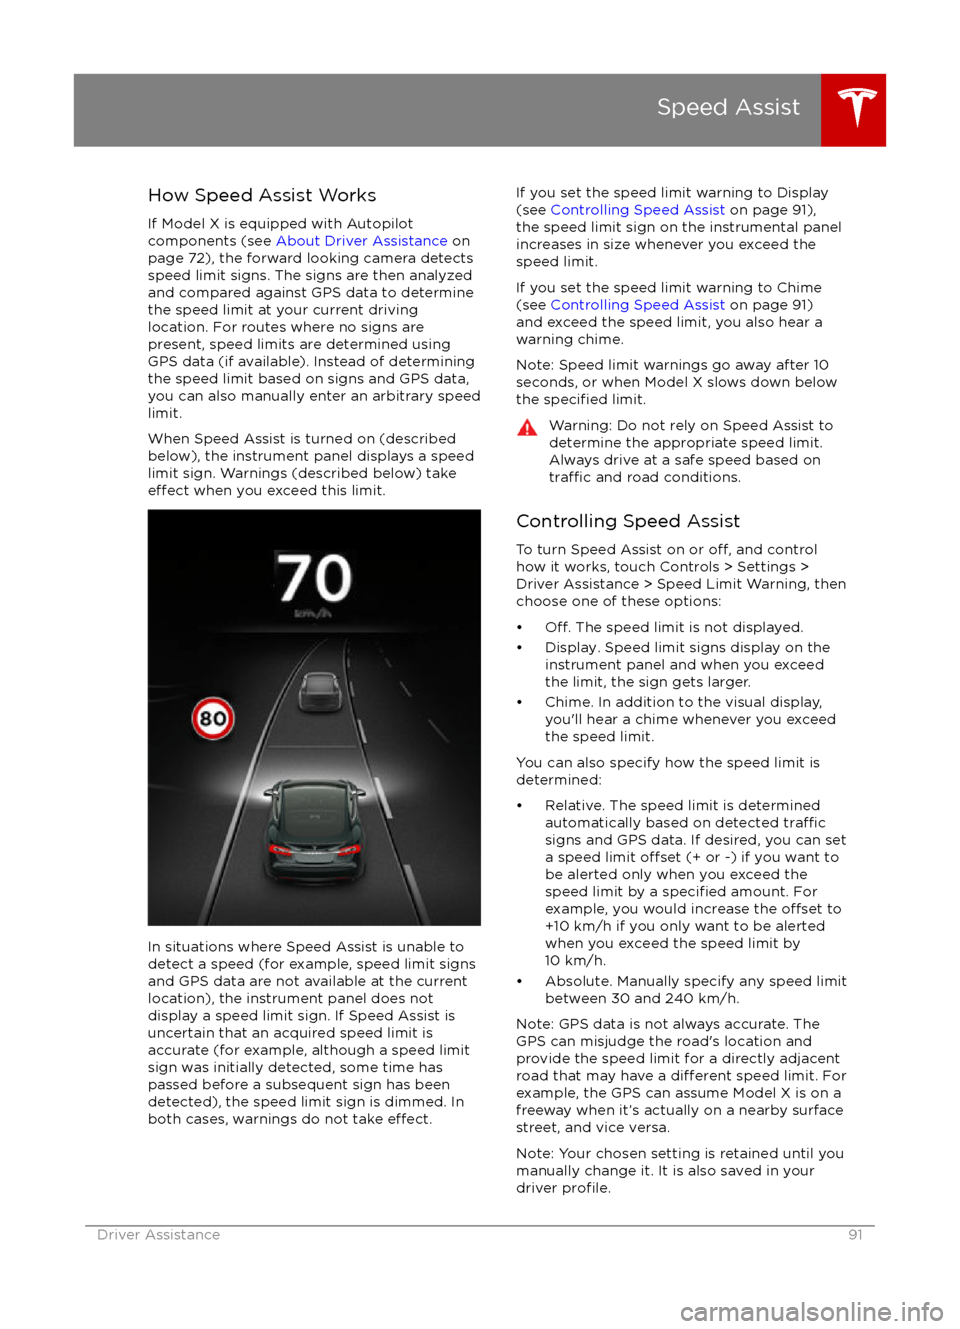
When Speed Assist is turned on (described
below), the instrument panel displays a speed
limit sign. Warnings (described below) take
effect when you exceed this limit.
In situations where Speed Assist is unable to
detect a speed (for example, speed limit signs
and GPS data are not available at the current
location), the instrument panel does not display a speed limit sign. If Speed Assist is
uncertain that an acquired speed limit is
accurate (for example, although a speed limit sign was initially detected, some time has
passed before a subsequent sign has been
detected), the speed limit sign is dimmed. In both cases, warnings do not take
effect.
If you set the speed limit warning to Display
(see Controlling Speed Assist on page 91),
the speed limit sign on the instrumental panel
increases in size whenever you exceed the
speed limit.
If you set the speed limit warning to Chime (see Controlling Speed Assist on page 91)
and exceed the speed limit, you also hear a warning chime.
Note: Speed limit warnings go away after 10 seconds, or when Model X slows down below
the
specified limit.
Warning: Do not rely on Speed Assist to
determine the appropriate speed limit. Always drive at a safe speed based on
traffic and road conditions.
Controlling Speed Assist
To turn Speed Assist on or
off, and control
how it works, touch Controls > Settings > Driver Assistance > Speed Limit Warning, then
choose one of these options:
Page 112 of 179
Overview
Touch the Media icon to listen to the radio or
play audio
files. The touchscreen displays the
Media Player. Media Player has two tabs. Use the Browse tab to select what you want to
play and use the Now Playing tab to view and
control what is currently playing. You can play
FM radio (including HD). You can also play Internet radio (such as TuneIn), and audio
filesfrom a Bluetooth-connected device or a USB-
connected flash drive.
Volume Control To adjust the media volume, roll the scroll
wheel on the left side of the steering wheel up
or down. To mute the volume, tap the scroll
wheel.
Note: The scroll wheel adjusts the volume for
media, navigation instructions and phone calls
based on what is currently in use. As you
adjust volume, the instrument panel displays
the volume level and whether you are
adjusting volume for media, navigation or phone.
Note: Muting the volume during a phone call
also mutes the microphone.
FM Radio Model X provides FM radio services. FM radio
can be selected from the Browse tab or using
the Source Picker, located in the upper right corner of the Media Player window.
You can manually tune the radio to any
frequency by touching and dragging the
channel selector bar on the Now Playing
screen. The channel selector bar allows you to
move from one available radio station to the next.
Internet Radio
Internet radio services are accessed over a
data connection. To use Internet radio, touch Media > Browse > Internet.
Choose your desired Internet radio service (for
example, TuneIn), then browse through the
available categories and/or stations. When
you select a
specific station or episode, Media
Player starts playing it and displays the Now
Playing screen.
To play the next (and in some cases previous)
available station, episode, or track being
provided by the Internet radio service, touch
the arrows on the Now Playing screen, or use
the buttons on the left side of the steering wheel (see Using Left Steering Wheel Buttons
on page 37). The exact function of these
controls vary depending on the
specificInternet service you are listening to.
Internet Radio Account Registration
Model X provides you with one or more
Internet radio services. To enter your log in
information, touch Controls > Settings > Apps > Media Player. Enter the email and
password associated with the Internet radio account(s) you want to use, then touch Log In.
TuneIn
TuneIn does not require an account for it to work. But if you have a TuneIn account (go to www.tunein.com ), you can log in as described
above.
When playing a TuneIn podcast, you can rewind or fast forward to any location in the
podcast by dragging the slider bar on the Now Playing tab.
Media and Audio
112Model X Owner
Page 114 of 179
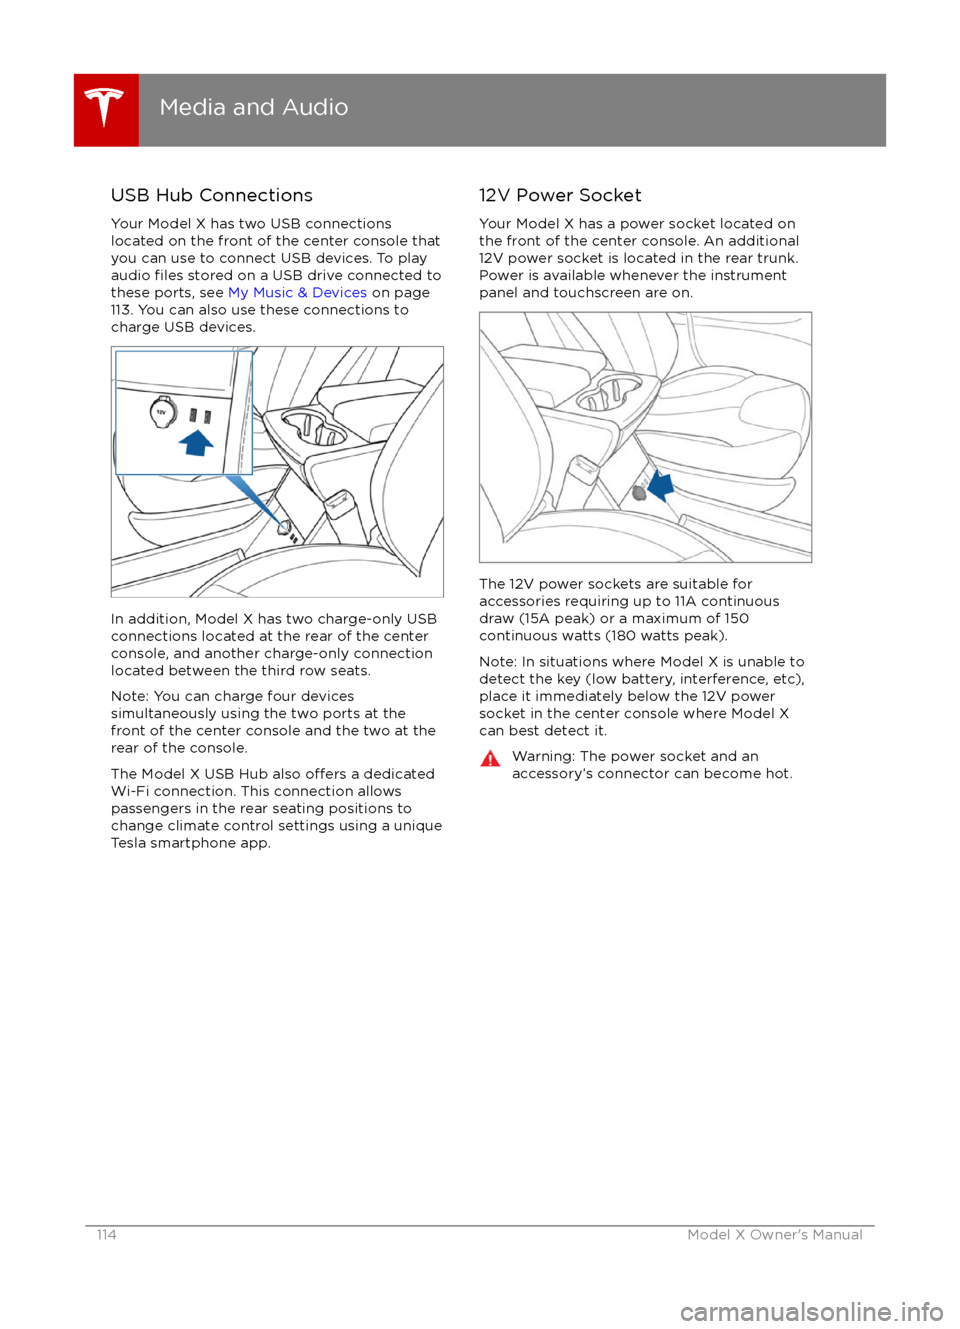
USB Hub Connections
Your Model X has two USB connections
located on the front of the center console that
you can use to connect USB devices. To play
audio
files stored on a USB drive connected to
these ports, see My Music & Devices on page
113. You can also use these connections to
charge USB devices.
In addition, Model X has two charge-only USB
connections located at the rear of the center
console, and another charge-only connection located between the third row seats.
Note: You can charge four devices
simultaneously using the two ports at the
front of the center console and the two at the
rear of the console.
The Model X USB Hub also
offers a dedicated
Wi-Fi connection. This connection allows passengers in the rear seating positions tochange climate control settings using a unique
Tesla smartphone app.
12V Power Socket
Your Model X has a power socket located on
the front of the center console. An additional
12V power socket is located in the rear trunk.
Power is available whenever the instrument
panel and touchscreen are on.
The 12V power sockets are suitable for
accessories requiring up to 11A continuous
draw (15A peak) or a maximum of 150
continuous watts (180 watts peak).
Note: In situations where Model X is unable to detect the key (low battery, interference, etc),
place it immediately below the 12V power
socket in the center console where Model X
can best detect it.
Warning: The power socket and an
accessory
Page 118 of 179
The route overview icon is available
on the right side of the search bar
whenever a navigation route is
active. You can toggle between
North Up, Heading Up, and Route
Overview (see Using Maps on page
117). As you travel on your
navigation route, the zoom level
adjusts to display an overview of
the route and zooms in on your
destination as you make progress
on your trip.
The touchscreen also displays a turn-by-turn
direction list that includes estimated driving
time and arrival time.
During navigation, the instrument panel also
displays the turn-by-turn directions and you
will hear spoken instructions. To change the
language of spoken instructions, touch
Controls > Settings > Units & Format. To
change the volume of the spoken instructions
touch the volume button located on the turn- by-turn direction list displayed on the
touchscreen.
Favorite Destinations
Add any destination to your list of
Favorites by either touching its flagwhile navigating to it, or by
displaying it on the map then
touching its pin. Then, in the popup
dialog that appears, touch the
Favorites icon. When a destination is
on your Favorites list, the icon is
blue. To remove a favorite
destination, touch the Favorites icon
again.
If you frequently navigate to a destination, you
may want to add it as a Favorite to avoid
having to enter the location
Page 129 of 179

During ChargingDuring charging, the charge port pulses green
and charging status displays on the instrument
panel. The frequency at which the charge
port
Page 130 of 179
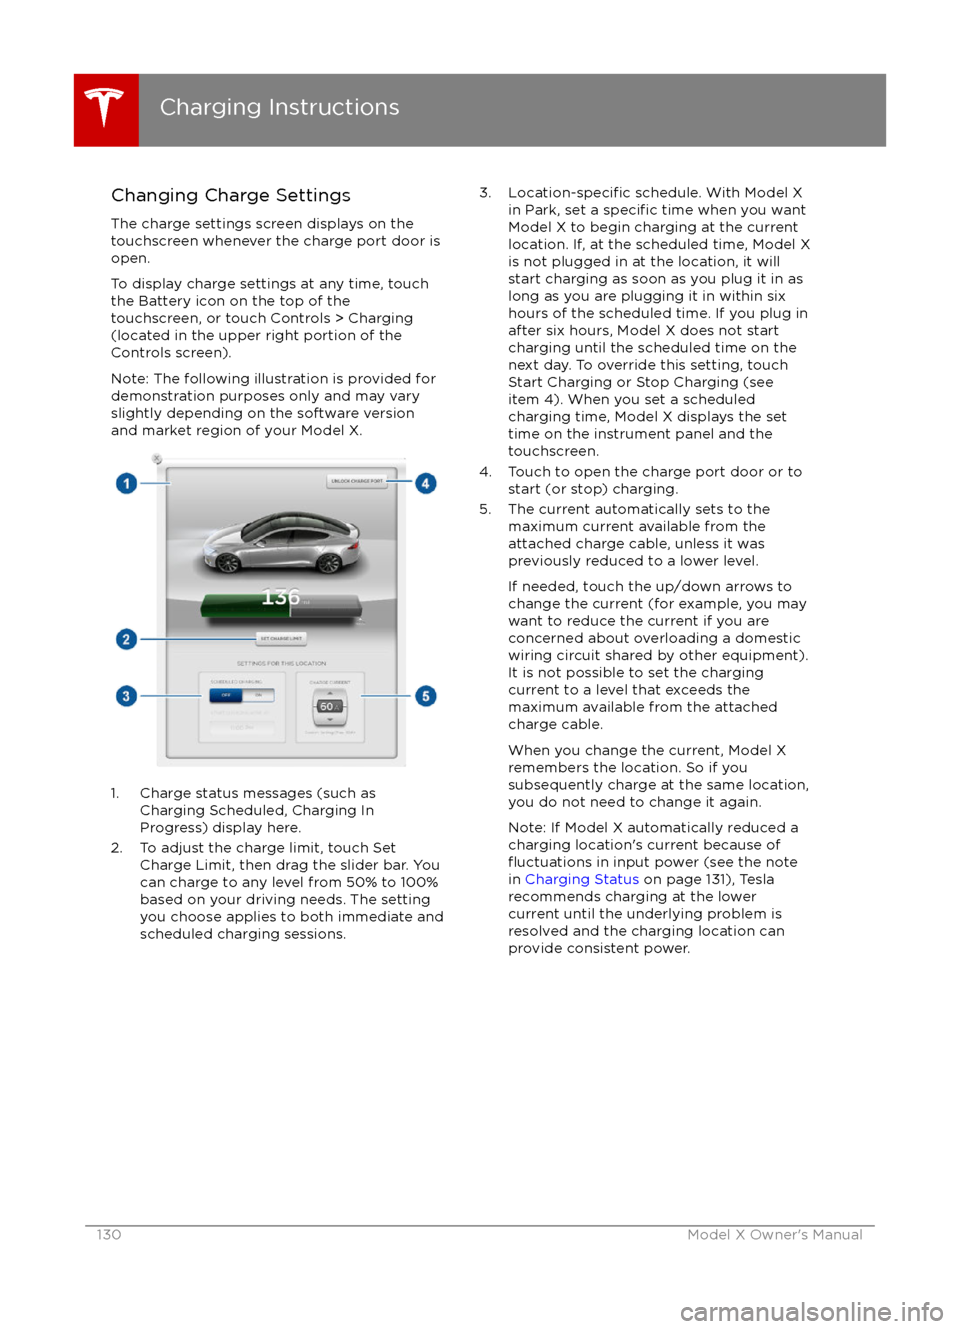
Changing Charge SettingsThe charge settings screen displays on the
touchscreen whenever the charge port door is
open.
To display charge settings at any time, touch the Battery icon on the top of the
touchscreen, or touch Controls > Charging
(located in the upper right portion of the
Controls screen).
Note: The following illustration is provided for
demonstration purposes only and may vary
slightly depending on the software version
and market region of your Model X.
1. Charge status messages (such as
Charging Scheduled, Charging In
Progress) display here.
2. To adjust the charge limit, touch Set Charge Limit, then drag the slider bar. You
can charge to any level from 50% to 100%
based on your driving needs. The setting
you choose applies to both immediate and scheduled charging sessions.
3.Location-specific schedule. With Model X
in Park, set a specific time when you want
Model X to begin charging at the current
location. If, at the scheduled time, Model X
is not plugged in at the location, it will
start charging as soon as you plug it in as
long as you are plugging it in within six
hours of the scheduled time. If you plug in
after six hours, Model X does not start
charging until the scheduled time on the
next day. To override this setting, touch Start Charging or Stop Charging (see
item 4). When you set a scheduled
charging time, Model X displays the set
time on the instrument panel and the
touchscreen.
4. Touch to open the charge port door or to start (or stop) charging.
5. The current automatically sets to the maximum current available from the
attached charge cable, unless it was
previously reduced to a lower level.
If needed, touch the up/down arrows to change the current (for example, you may
want to reduce the current if you are
concerned about overloading a domestic wiring circuit shared by other equipment).
It is not possible to set the charging
current to a level that exceeds the
maximum available from the attached
charge cable.
When you change the current, Model X
remembers the location. So if you
subsequently charge at the same location,
you do not need to change it again.
Note: If Model X automatically reduced a charging location