2016 TESLA MODEL X warning lights
[x] Cancel search: warning lightsPage 2 of 179
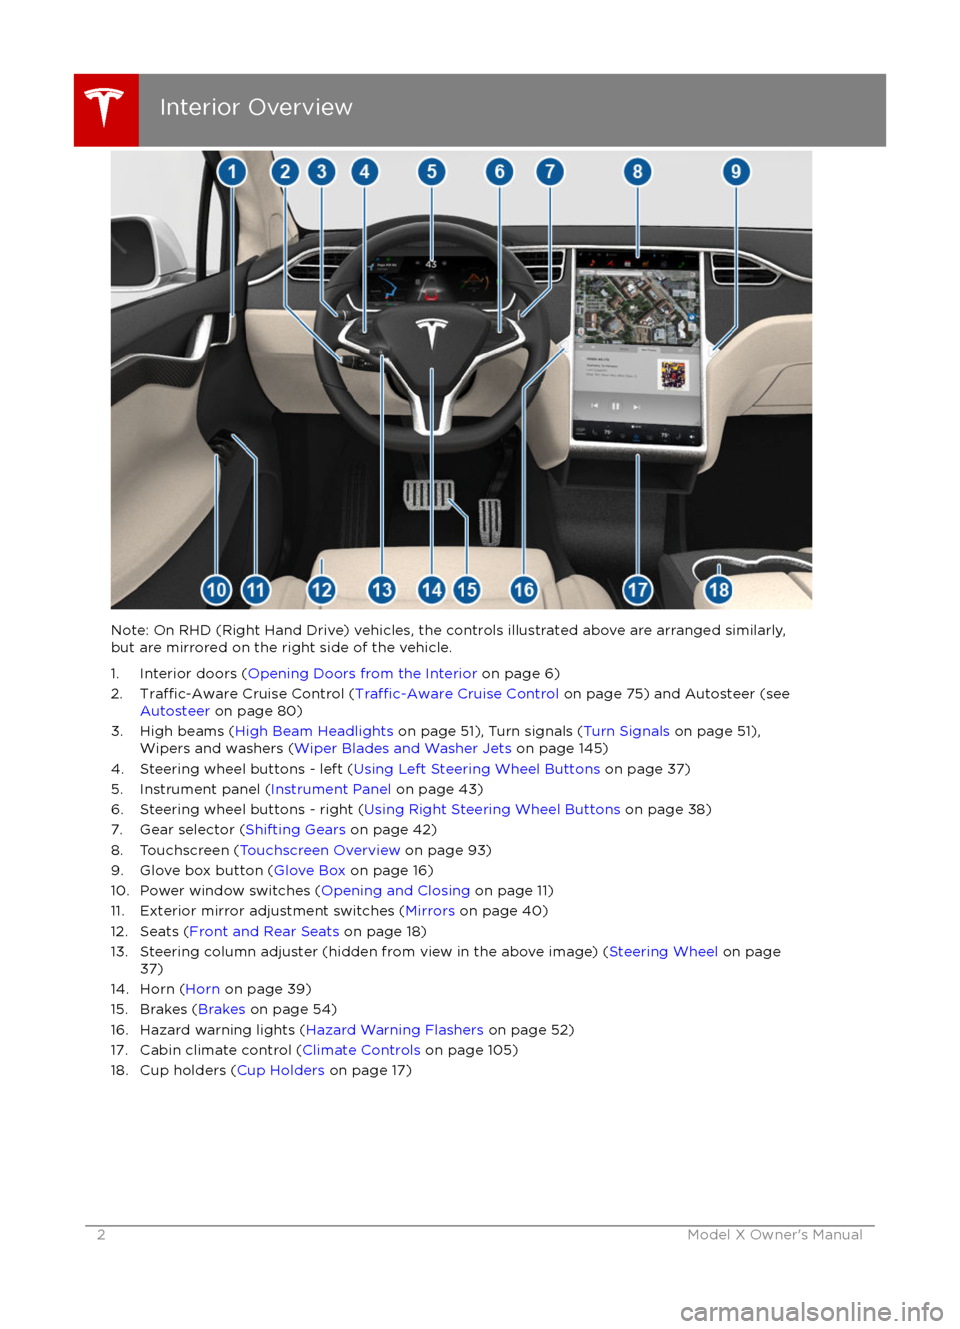
Note: On RHD (Right Hand Drive) vehicles, the controls illustrated above are arranged similarly,but are mirrored on the right side of the vehicle.
1. Interior doors ( Opening Doors from the Interior on page 6)
2.
Traffic-Aware Cruise Control (Traffic-Aware Cruise Control on page 75) and Autosteer (see
Autosteer on page 80)
3. High beams ( High Beam Headlights on page 51), Turn signals ( Turn Signals on page 51),
Wipers and washers ( Wiper Blades and Washer Jets on page 145)
4. Steering wheel buttons - left ( Using Left Steering Wheel Buttons on page 37)
5. Instrument panel ( Instrument Panel on page 43)
6. Steering wheel buttons - right ( Using Right Steering Wheel Buttons on page 38)
7. Gear selector ( Shifting Gears on page 42)
8. Touchscreen ( Touchscreen Overview on page 93)
9. Glove box button ( Glove Box on page 16)
10. Power window switches ( Opening and Closing on page 11)
11. Exterior mirror adjustment switches ( Mirrors on page 40)
12. Seats ( Front and Rear Seats on page 18)
13. Steering column adjuster (hidden from view in the above image) ( Steering Wheel on page
37)
14. Horn ( Horn on page 39)
15. Brakes ( Brakes on page 54)
16. Hazard warning lights ( Hazard Warning Flashers on page 52)
17. Cabin climate control ( Climate Controls on page 105)
18. Cup holders ( Cup Holders on page 17)
Interior Overview
2Model X Owner
Page 50 of 179
6. Headlights are set to AUTO each time you start Model X. Touch these options to temporarilychange the exterior light setting:OFFAll exterior lights (headlights, tail lights, side marker lights,parking lights, and license plate lights) turn off until you manually
turn them back on or until the next time you drive Model X.PARKINGOnly the side marker lights, parking lights, tail lights and license
plate lights turn on.ONAll exterior lights (headlights, tail lights, side marker lights,
parking lights, and license plate lights) turn on.AUTOAll exterior lights (headlights, tail lights, side marker lights,
parking lights, and license plate lights) turn on automatically when driving in low lighting conditions. If you change to a
different setting, lights always revert to this AUTO setting on your
next drive.
Note: Model X has a series of lights along the lower rim of the headlights. These lights automatically turn on whenever Model X is powered on and a driving gear is engaged unless Model X is in Range Mode. These lights can not be turned on and
off.
Note: For countries where Daytime Running Lights (DRLs) are required (for example, Canada),
there is a separate LED in the headlamp to fulfill the DRL requirements.
Warning: Always ensure that your headlamps are switched to AUTO or ON, as
appropriate, during all low visibility conditions. Failure to do so may result in a collision.
7. If you turn on AUTO HIGH BEAM, high beam headlights turn on and off automatically based
on whether or not light is detected in front of Model S (see High Beam Headlights on page
51). This feature is available only if Model X is equipped with the optional Autopilot Tech Package.
Lights
50Model X Owner
Page 51 of 179
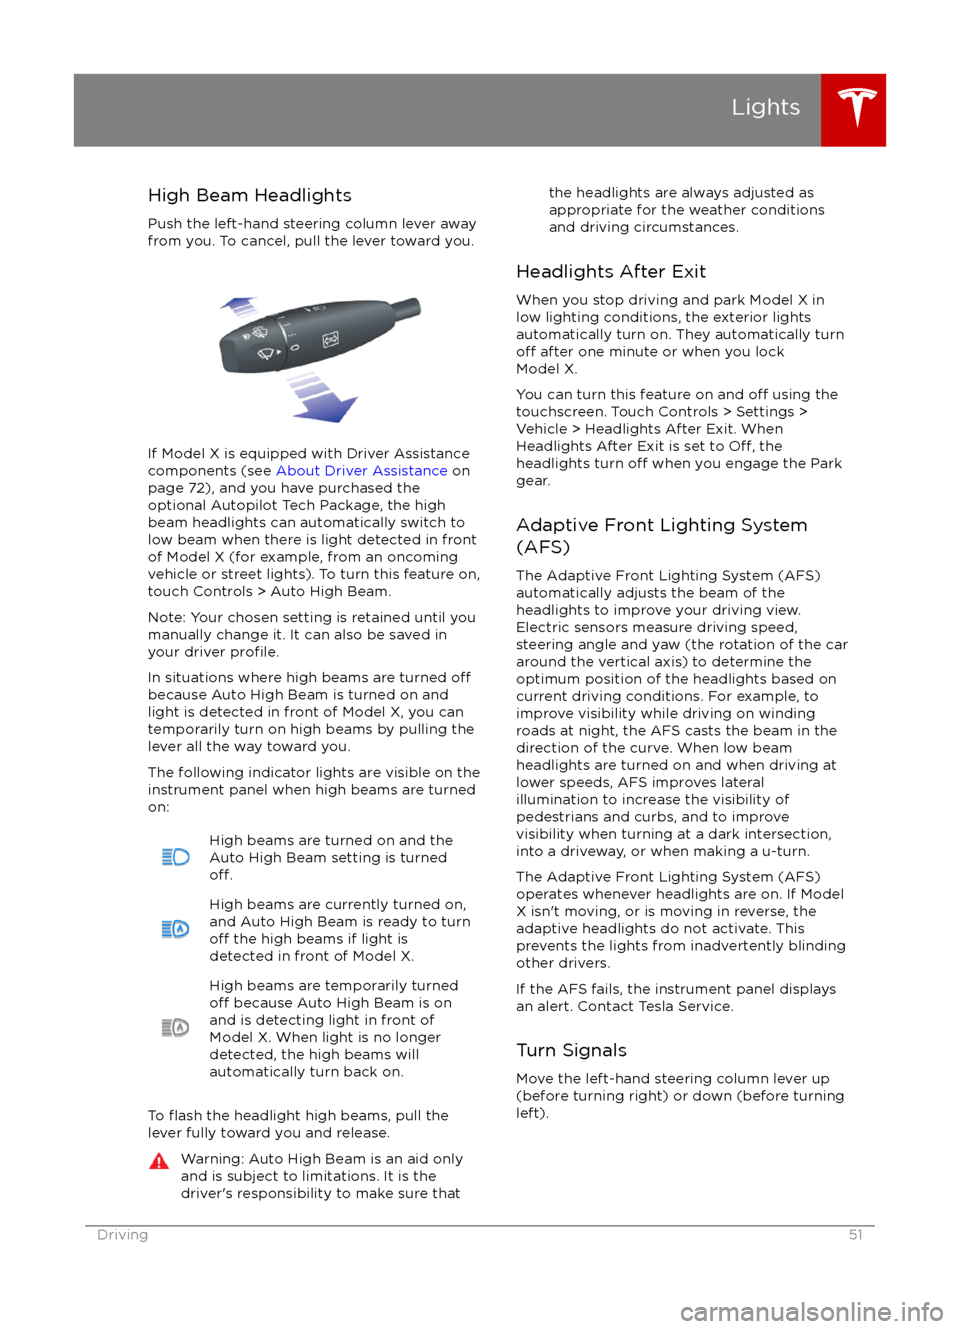
High Beam HeadlightsPush the left-hand steering column lever away
from you. To cancel, pull the lever toward you.
If Model X is equipped with Driver Assistance
components (see About Driver Assistance on
page 72), and you have purchased the
optional Autopilot Tech Package, the high
beam headlights can automatically switch to low beam when there is light detected in front
of Model X (for example, from an oncoming vehicle or street lights). To turn this feature on,touch Controls > Auto High Beam.
Note: Your chosen setting is retained until you manually change it. It can also be saved in
your driver
profile.
In situations where high beams are turned offbecause Auto High Beam is turned on and
light is detected in front of Model X, you can
temporarily turn on high beams by pulling the
lever all the way toward you.
The following indicator lights are visible on the
instrument panel when high beams are turned
on:
High beams are turned on and the
Auto High Beam setting is turned
off.
High beams are currently turned on,
and Auto High Beam is ready to turn
off the high beams if light is
detected in front of Model X.
High beams are temporarily turnedoff because Auto High Beam is on
and is detecting light in front of
Model X. When light is no longer
detected, the high beams will
automatically turn back on.
To flash the headlight high beams, pull the
lever fully toward you and release.
Warning: Auto High Beam is an aid only and is subject to limitations. It is the
driver
Page 52 of 179
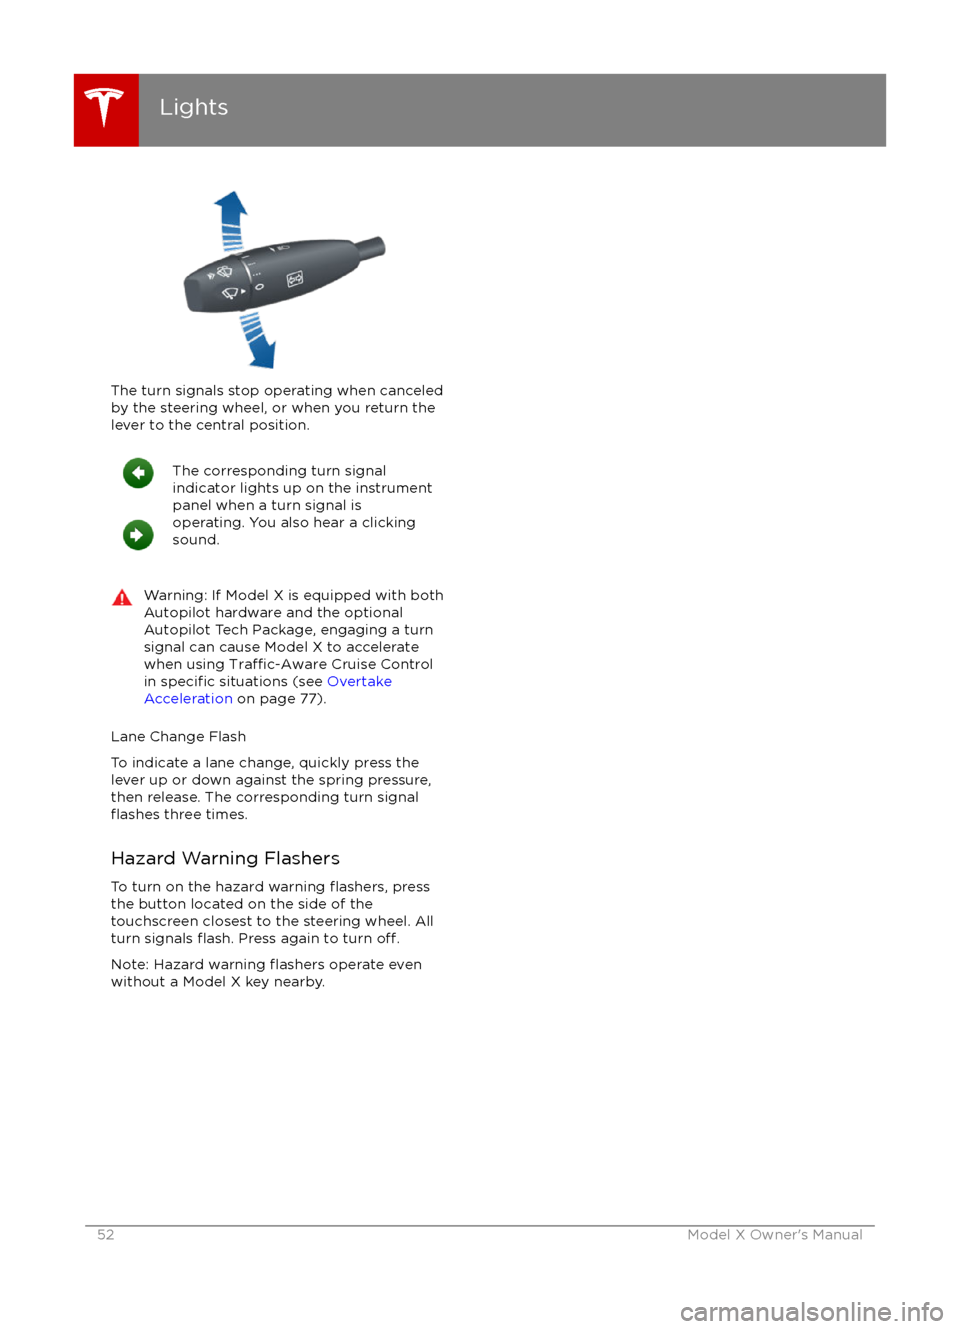
The turn signals stop operating when canceledby the steering wheel, or when you return the
lever to the central position.
The corresponding turn signal
indicator lights up on the instrument
panel when a turn signal is
operating. You also hear a clicking
sound.Warning: If Model X is equipped with both
Autopilot hardware and the optional
Autopilot Tech Package, engaging a turn
signal can cause Model X to accelerate
when using
Traffic-Aware Cruise Control
in specific situations (see Overtake
Acceleration on page 77).
Lane Change Flash
To indicate a lane change, quickly press the
lever up or down against the spring pressure,
then release. The corresponding turn signal
flashes three times.
Hazard Warning Flashers To turn on the hazard warning
flashers, press
the button located on the side of the
touchscreen closest to the steering wheel. All turn signals
flash. Press again to turn off.
Note: Hazard warning flashers operate even
without a Model X key nearby.
Lights
52Model X Owner
Page 54 of 179
Braking Systems
Model X has an anti-lock braking system
(ABS) that prevents the wheels from locking when you apply maximum brake pressure. This
improves steering control during heavy
braking in most road conditions.
During emergency braking conditions, the
ABS constantly monitors the speed of each
wheel and varies the brake pressure according to the grip available.
The alteration of brake pressure can be felt as
a pulsing sensation through the brake pedal.
This demonstrates that the ABS is operating
and is not a cause for concern. Keep
firm and
steady pressure on the brake pedal while
experiencing the pulsing.
The ABS indicator flashes briefly on
the instrument panel when you firststart Model X. If this indicator lights
up at any other time, an ABS fault
has occurred and the ABS is not
operating. Contact Tesla. The braking system remains fully operational and
is not
affected by an ABS failure.
However, braking distances may increase.
If the instrument panel displays this
indicator at any time other than
displaying
briefly when you first start
Model X, a brake system fault is
detected or the brake
fluid level is
low. Contact Tesla immediately.
Emergency Braking
In an emergency, fully press the brake pedal
and maintain
firm pressure, even on low
traction surfaces. The ABS varies the braking
pressure to each wheel according to the
amount of traction available. This prevents
wheels from locking and ensures that you stop
as safely as possible.
Warning: Do not pump the brake pedal.
Doing so interrupts operation of the ABS
and can increase braking distance.Warning: Always maintain a safe distance
from the vehicle in front of you and be
aware of hazardous driving conditions.
While the ABS can improve stopping
distance, it cannot overcome the laws of physics. It also does not prevent the
danger of hydroplaning (where a layer of
water prevents direct contact between the tires and the road).
If Model X is equipped with Autopilot
hardware, Automatic Emergency Braking
automatically applies full braking in situations
where a collision is considered imminent (see
Automatic Emergency Braking on page 89).
Brake Wear Model X brake pads are equipped with wearindicators. A wear indicator is a thin metal
strip attached to the brake pad that squeals as
it rubs against the rotor when the pad wears
down. This squealing sound indicates that the
brake pads have reached the end of their
service life and require replacement. To stop
the squealing, contact Tesla Service.
Brakes must be periodically inspected visually by removing the tire and wheel. For detailed
specifications and service limits for rotors and
brake pads, see Brakes on page 158.
Warning: Neglecting to replace worn
brake pads results in damage to the
braking system and can create a braking
hazard.
Brakes
54Model X Owner
Page 71 of 179

Supported Bicycle Carriers
To support the installation of a carrier (such as
a bicycle rack) on the rear of Model X, the
optional towing package is required. Do not
attempt to install a carrier on a Model X that is
not equipped with the towing package. Doing
so can cause damage.
Model X is designed to support a bicycle
carrier of up to 120 lbs (55 kg). When carry
bicycles on Model X, always check to ensure
that the maximum weight is not exceeded. For
example, this weight threshold is
sufficient for
carrying two bicycles weighing approximately
40 lbs (18 kg) each, or four bicycles weighting
approximately 20 lbs (9 kg) each, assuming
the carrier weighs approximately 33 lbs (15
kg).
Warning: The accessory hitch is designed
to attach a 1.25“ hitch accessory only. Do
not use the accessory hitch for trailer
towing, transportation or vehicle recovery.
Installing a Bicycle Carrier
1. Carefully follow the instructions provided by the manufacturer of the bicycle carrier.
2. Connect the electrical connector (if equipped). When Model X detects the
electrical connector, the touchscreen may
prompt you to enter Trailer Mode. To
ensure availability of Autopilot features, it
is recommended that you do not activate
Trailer Mode.
3. Check that the lights are functioning properly (if equipped).
Note: Bicycle carriers or other accessories
mounted on the rear trunk are likely to
obscure the rear view camera
Page 76 of 179
When following a vehicle, Traffic-Aware Cruise
Control remains active at low speeds, even if
Model X comes to a standstill while following a vehicle. When
traffic is moving again, Traffic-
Aware Cruise Control resumes operating at
your currently set speed. However, if a
pedestrian or object is detected in front of
Model X,
Traffic-Aware Cruise Control goes
into a HOLD state and the instrument panel
displays a message indicating that you need
to resume cruise control. To resume, press the
accelerator pedal or pull the cruise control lever toward you (see Canceling and
Resuming on page 78).
Note: If you double-pull the cruise control
lever, Autosteer activates and the set speed changes to your current driving speed.
When
Traffic-Aware Cruise Control is actively
slowing down Model X to maintain the
selected distance from the vehicle ahead, the
brake lights turn on to alert other road users
that you are slowing down. You may also notice slight movement of the brake pedal.
Warning: Traffic-Aware Cruise Control
can not detect all objects and may not
brake/decelerate for stationary vehicles,
especially in situations when you are
driving over 80 km/h and a vehicle you
are following moves out of your driving path and a stationary vehicle or object,bicycle, or pedestrian is in front of you
instead. Always pay attention to the road
ahead and stay prepared to take
immediate corrective action. Depending
on
Traffic-Aware Cruise Control to avoid
a collision can result in serious injury or death. In addition,
Traffic-Aware Cruise
Control may react to vehicles or objects
that either do not exist or are not in the
lane of travel, causing Model X to slow
down unnecessarily or inappropriately.
Warning: Traffic-Aware Cruise Control
may be unable to provide adequate
speed control because of limited braking
capability and hills. It can also misjudge the distance from a vehicle ahead. Driving
downhill can increase driving speed, causing Model X to exceed your set
speed. Never depend on
Traffic-AwareCruise Control to slow down the vehicle
enough to prevent a collision. Always
keep your eyes on the road when driving
and be prepared to take corrective action
as needed. Depending on
Traffic-AwareCruise Control to slow the vehicle down
enough to prevent a collision can result in
serious injury or death.
Warning: Traffic-Aware Cruise Control
may occasionally brake Model X when not
required or you are not expecting it. This can be caused by closely following a
vehicle ahead, detecting vehicles or
objects in adjacent lanes (especially on curves), etc.
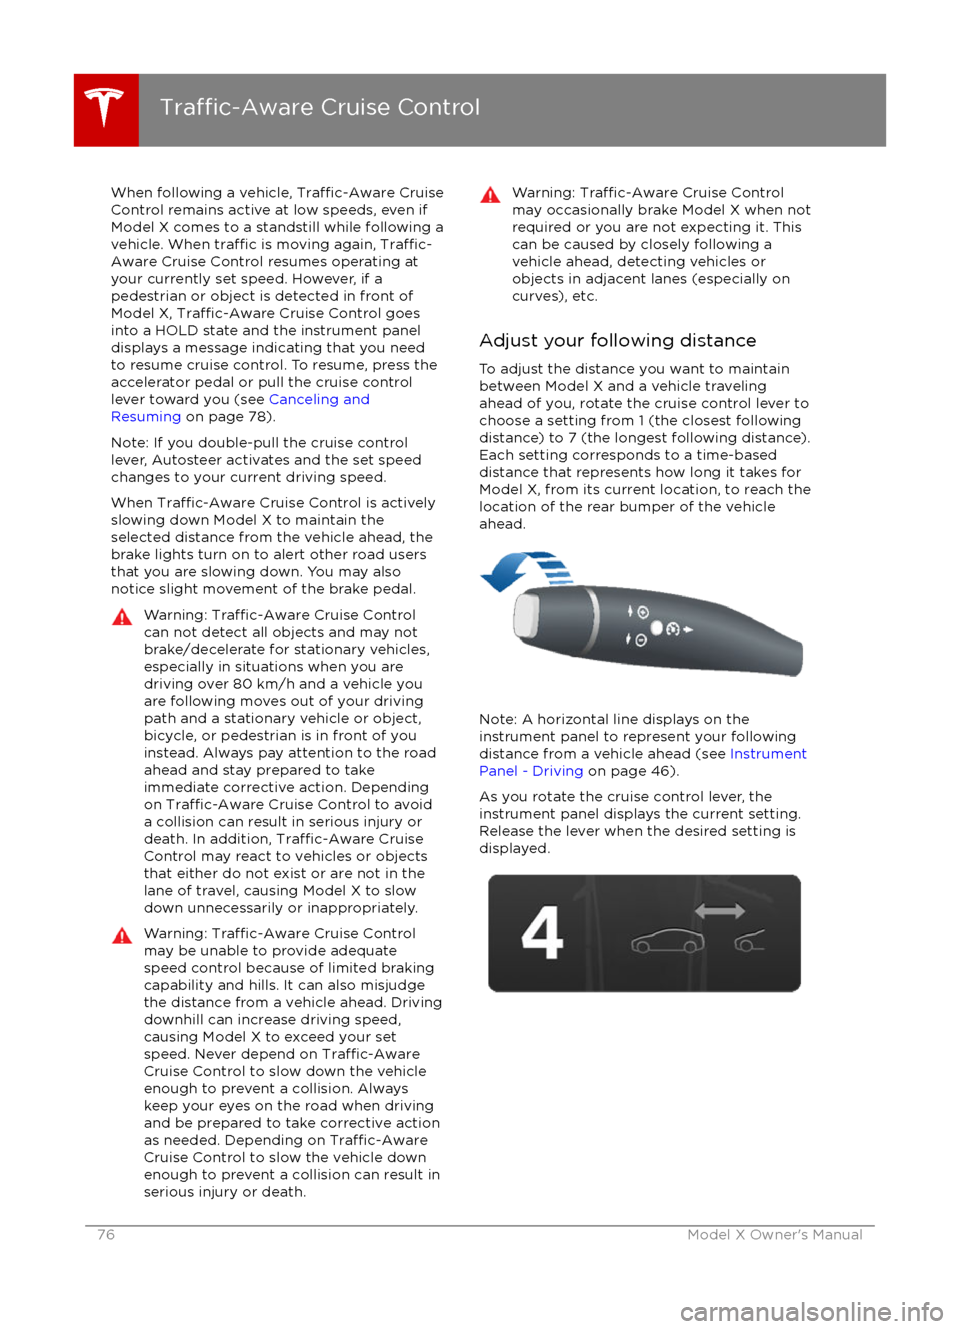
Adjust your following distance
To adjust the distance you want to maintain
between Model X and a vehicle traveling
ahead of you, rotate the cruise control lever to
choose a setting from 1 (the closest following distance) to 7 (the longest following distance).
Each setting corresponds to a time-based
distance that represents how long it takes for
Model X, from its current location, to reach the
location of the rear bumper of the vehicle
ahead.
Note: A horizontal line displays on the
instrument panel to represent your following distance from a vehicle ahead (see Instrument
Panel - Driving on page 46).
As you rotate the cruise control lever, the
instrument panel displays the current setting.
Release the lever when the desired setting is
displayed.
Traffic-Aware Cruise Control
76Model X Owner
Page 96 of 179

3. Main viewing areaThe main viewing area changes depending on the app you have chosen (in the example, the
Nav and Media apps are displayed). For some apps (such as Nav and Web), you can zoom in and out using standard touchscreen
finger gestures.
4. Maximize/minimize app
Touch the small rectangle to expand the associated app to
fill the entire main viewing area
(some apps are not expandable). Touch again to display two apps in half-screen view.
5. Volume control
Touch the up and down arrows to increase or decrease the volume of the speakers. You can
also adjust the volume using the scroll wheel on the left side of the steering wheel.
6. Climate controls (see Climate Controls on page 105).
7. Controls
Touch to access all Model X controls and settings (doors, locks, lights, etc).
8. Reverse the position of the two currently displayed apps.
Warning: Paying attention to road and traffic conditions must always be the driver