2016 SUBARU IMPREZA warning light
[x] Cancel search: warning lightPage 243 of 594
Instruments and controls/Wiper and washer
For a single wipe of the wipers, push the
lever up. The wipers operate until you
release the lever.
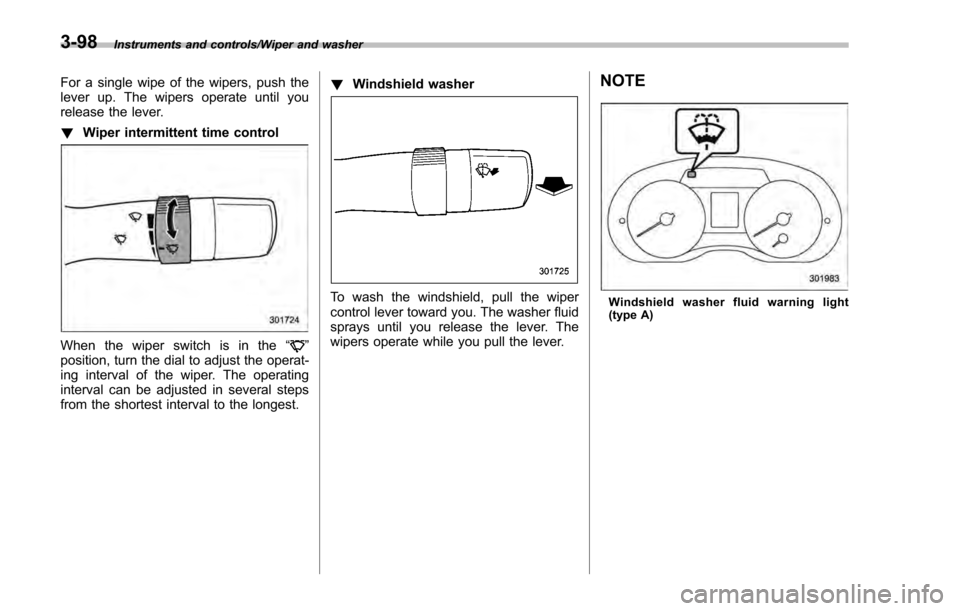
!Wiper intermittent time control
When the wiper switch is in the “”
position, turn the dial to adjust the operat-
ing interval of the wiper. The operating
interval can be adjusted in several steps
from the shortest interval to the longest. !
Windshield washer
To wash the windshield, pull the wiper
control lever toward you. The washer fluid
sprays until you release the lever. The
wipers operate while you pull the lever.
NOTE
Windshield washer fluid warning light
(type A)
3-98
Page 244 of 594
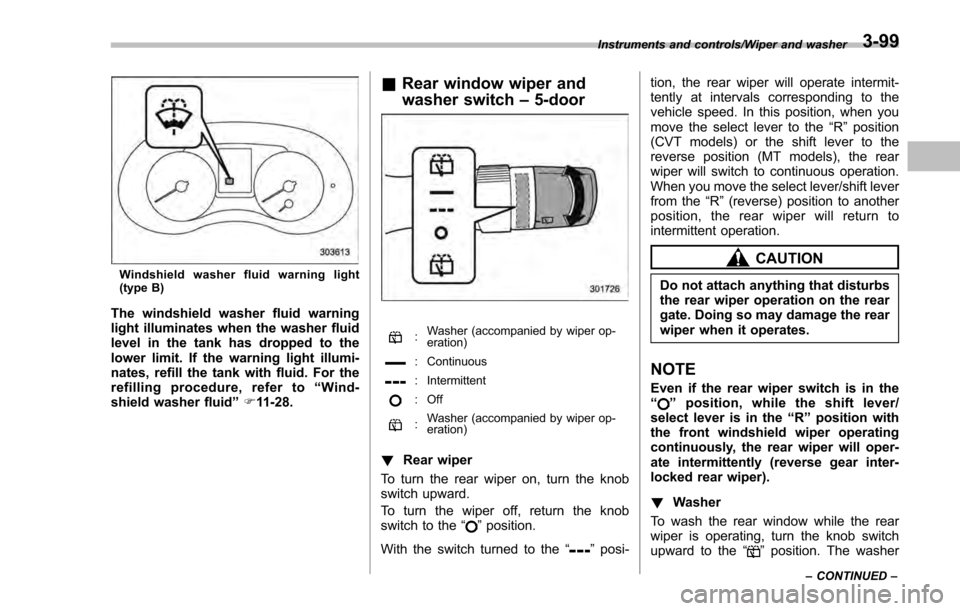
Windshield washer fluid warning light
(type B)
The windshield washer fluid warning
light illuminates when the washer fluid
level in the tank has dropped to the
lower limit. If the warning light illumi-
nates, refill the tank with fluid. For the
refilling procedure, refer to“Wind-
shield washer fluid ”F 11-28.
& Rear window wiper and
washer switch –5-door
: Washer (accompanied by wiper op-
eration)
: Continuous
: Intermittent
: Off
:Washer (accompanied by wiper op-
eration)
!
Rear wiper
To turn the rear wiper on, turn the knob
switch upward.
To turn the wiper off, return the knob
switch to the “
”position.
With the switch turned to the “
”posi- tion, the rear wiper will operate intermit-
tently at intervals corresponding to the
vehicle speed. In this position, when you
move the select lever to the
“R”position
(CVT models) or the shift lever to the
reverse position (MT models), the rear
wiper will switch to continuous operation.
When you move the select lever/shift lever
from the “R”(reverse) position to another
position, the rear wiper will return to
intermittent operation.
CAUTION
Do not attach anything that disturbs
the rear wiper operation on the rear
gate. Doing so may damage the rear
wiper when it operates.
NOTE
Even if the rear wiper switch is in the
“” position, while the shift lever/
select lever is in the “R”position with
the front windshield wiper operating
continuously, the rear wiper will oper-
ate intermittently (reverse gear inter-
locked rear wiper).
! Washer
To wash the rear window while the rear
wiper is operating, turn the knob switch
upward to the “
”position. The washer
Instruments and controls/Wiper and washer
–CONTINUED –3-99
Page 248 of 594
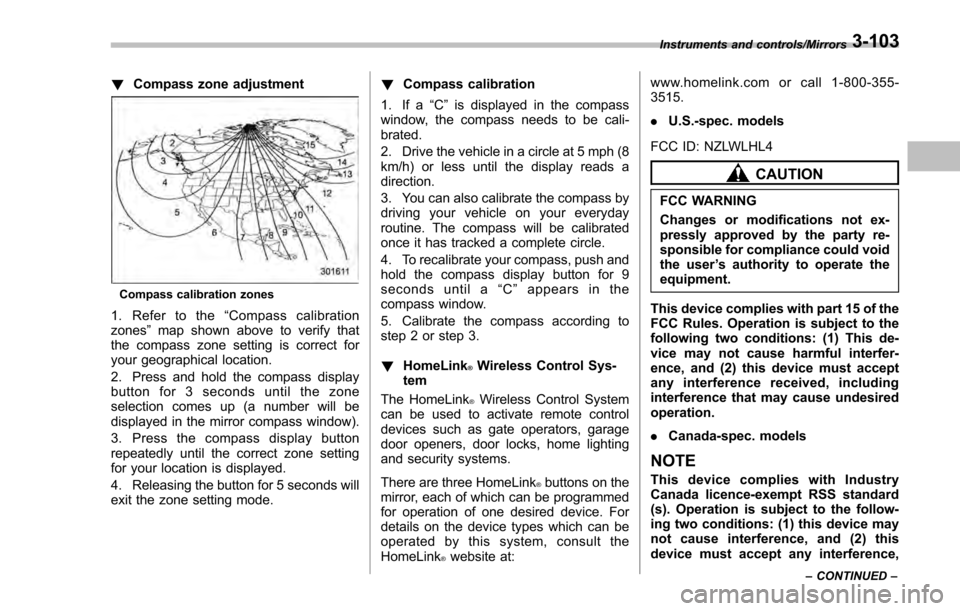
!Compass zone adjustment
Compass calibration zones
1. Refer to the “Compass calibration
zones” map shown above to verify that
the compass zone setting is correct for
your geographical location.
2. Press and hold the compass display
button for 3 seconds until the zone
selection comes up (a number will be
displayed in the mirror compass window).
3. Press the compass display button
repeatedly until the correct zone setting
for your location is displayed.
4. Releasing the button for 5 seconds will
exit the zone setting mode. !
Compass calibration
1. If a “C”is displayed in the compass
window, the compass needs to be cali-
brated.
2. Drive the vehicle in a circle at 5 mph (8
km/h) or less until the display reads a
direction.
3. You can also calibrate the compass by
driving your vehicle on your everyday
routine. The compass will be calibrated
once it has tracked a complete circle.
4. To recalibrate your compass, push and
hold the compass display button for 9
seconds until a “C ” appears in the
compass window.
5. Calibrate the compass according to
step 2 or step 3.
! HomeLink
®Wireless Control Sys-
tem
The HomeLink
®Wireless Control System
can be used to activate remote control
devices such as gate operators, garage
door openers, door locks, home lighting
and security systems.
There are three HomeLink
®buttons on the
mirror, each of which can be programmed
for operation of one desired device. For
details on the device types which can be
operated by this system, consult the
HomeLink
®website at: www.homelink.com or call 1-800-355-
3515.
.
U.S.-spec. models
FCC ID: NZLWLHL4
CAUTION
FCC WARNING
Changes or modifications not ex-
pressly approved by the party re-
sponsible for compliance could void
the user ’s authority to operate the
equipment.
This device complies with part 15 of the
FCC Rules. Operation is subject to the
following two conditions: (1) This de-
vice may not cause harmful interfer-
ence, and (2) this device must accept
any interference received, including
interference that may cause undesired
operation.
. Canada-spec. models
NOTE
This device complies with Industry
Canada licence-exempt RSS standard
(s). Operation is subject to the follow-
ing two conditions: (1) this device may
not cause interference, and (2) this
device must accept any interference,
Instruments and controls/Mirrors
–CONTINUED –3-103
Page 267 of 594
Climate control/Manual climate control operation
!“DUAL ”mode (type D)
You can change the setting of the driver ’s
side and front passenger ’s side tempera-
ture independently by selecting the
“ DUAL ”mode.
You can select the “DUAL ”mode by
performing either of the following proce-
dures.
. Press the “DUAL”button
. Turn the passenger ’s side temperature
control dial
The “DUAL ”mode can be canceled by
pressing the “DUAL”button.
When the “DUAL”mode is selected:
Turn the driver ’ssidedialtosetthe
driver ’s side temperature. Turn the front
passenger ’ssidedialtosetthefront
passenger ’s side temperature.
When the “DUAL”mode is canceled:
Set the desired temperature by turning the
driver ’s side dial.
& Fan speed control
The fan operates only when the ignition
switch is in the “ON ”position. Select the
preferred fan speed by turning the fan
speed control dial.
& Air conditioner control
The air conditioner operates only when
the engine is running.
Press the air conditioner button while the
fan is in operation to turn on the air
conditioner. When the air conditioner is
on, the “A/C ”indicator light illuminates.
To turn off the air conditioner, press the
button again.
NOTE
For efficient defogging or dehumidify-
ing in cold weather, turn on the air
conditioner. However, if the ambient
temperature decreases to approxi-
mately 32 8F(0 8C), the air conditioner
compressor will stop operating.
& Air inlet selection
Select the air inlet by pressing the air inlet
selection button.
ON position (recirculation): Interior air is
recirculated inside the vehicle. Press the
air inlet selection button to the ON position
for fast cooling with the air conditioner or
when driving on a dusty road.
OFF position (outside air): Outside air is
drawn into the passenger compartment.
Press the air inlet selection button to the
OFF position when the interior has cooled to a comfortable temperature and the road
is no longer dusty.
WARNING
Continued operation in the ON posi-
tion may fog up the windows. Switch
to the OFF position as soon as the
outside conditions are no longer
dusty.
NOTE
.
When the indicator light on the air
inlet selection button is flashing at
engine starting, a malfunction might
be occurring in the electrical system.
Contact your SUBARU dealer for in-
spection.
. The indicator light on the air inlet
selection button may flash in the
following cases. However, this does
not indicate a malfunction.
–After the vehicle battery has been
disconnected and reconnected.
– When the vehicle battery voltage
is low.
4-10
Page 286 of 594
&Basic information before use
WARNING
When the vehicle is stopped with the
engine running, always apply the
parking brake for safety. Failure to
do so may result in loss of control of
your vehicle and cause an accident
or serious injury.
CAUTION
. To prevent damaging the screen,
touch the screen keys with your
finger lightly.
. Wipe off fingerprints using a
glass cleaning cloth. Do not use
chemical cleaners to clean the
screen, as they may damage the
touch screen. !
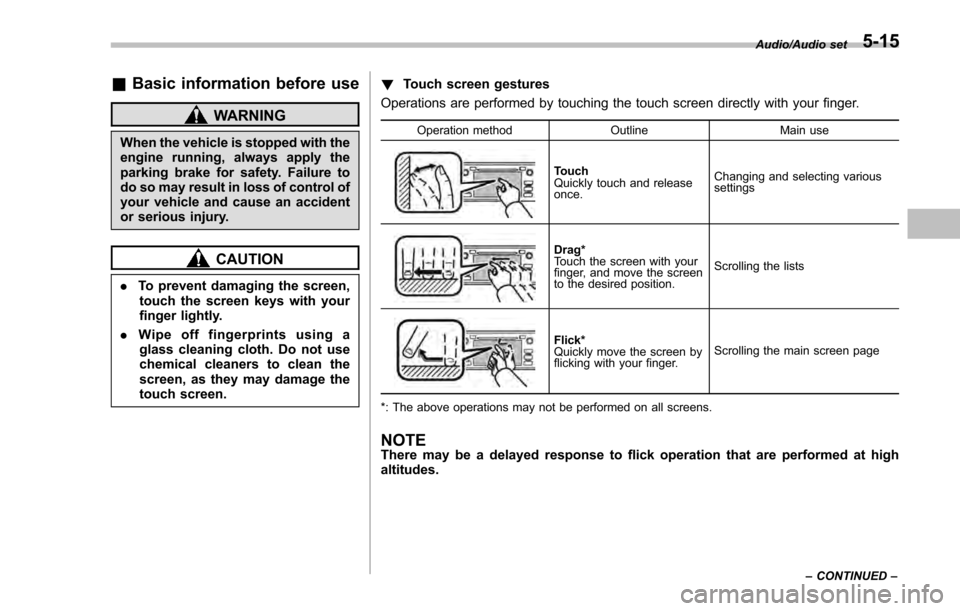
Touch screen gestures
Operations are performed by touching the touch screen directly with your finger.
Operation method OutlineMain use
Touch
Quickly touch and release
once.Changing and selecting various
settings
Drag*
Touch the screen with your
finger, and move the screen
to the desired position.
Scrolling the lists
Flick*
Quickly move the screen by
flicking with your finger.
Scrolling the main screen page
*: The above operations may not be performed on all screens.
NOTEThere may be a delayed response to flick operation that are performed at high
altitudes.
Audio/Audio set
–CONTINUED –5-15
Page 296 of 594
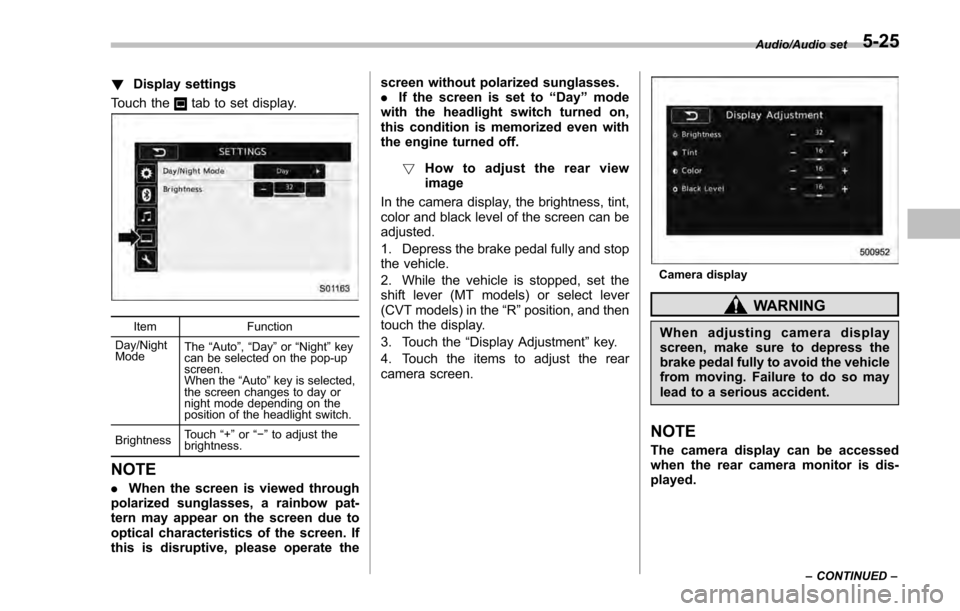
!Display settings
Touch the
tab to set display.
Item Function
Day/Night
Mode The
“Auto ”, “Day ”or “Night ”key
can be selected on the pop-up
screen.
When the “Auto ”key is selected,
the screen changes to day or
night mode depending on the
position of the headlight switch.
Brightness Touch
“+” or“−” to adjust the
brightness.
NOTE
. When the screen is viewed through
polarized sunglasses, a rainbow pat-
tern may appear on the screen due to
optical characteristics of the screen. If
this is disruptive, please operate the screen without polarized sunglasses.
.
If the screen is set to “Day”mode
with the headlight switch turned on,
this condition is memorized even with
the engine turned off.
! How to adjust the rear view
image
In the camera display, the brightness, tint,
color and black level of the screen can be
adjusted.
1. Depress the brake pedal fully and stop
the vehicle.
2. While the vehicle is stopped, set the
shift lever (MT models) or select lever
(CVT models) in the “R”position, and then
touch the display.
3. Touch the “Display Adjustment ”key.
4. Touch the items to adjust the rear
camera screen.
Camera display
WARNING
When adjusting camera display
screen, make sure to depress the
brake pedal fully to avoid the vehicle
from moving. Failure to do so may
lead to a serious accident.
NOTE
The camera display can be accessed
when the rear camera monitor is dis-
played.
Audio/Audio set
–CONTINUED –5-25
Page 374 of 594
appliance that can be connected
is 120W. Do not use an appliance
which exceeds the indicated wat-
tage for each outlet.
When using appliances con-
nected to two outlets simulta-
neously, the total power con-
sumed by them must not exceed
120W. Overloading the accessory
power outlet can cause a short
circuit. Do not use double adap-
ters or more than one electrical
appliance.
. If the plug on your electric appli-
ance is either too loose or too
tight for the accessory power
outlet, this can result in a poor
contact or cause the plug to get
stuck. Only use plugs that fit
properly.
. Use of an electric appliance in the
accessory power outlet for a long
period of time while the engine is
not running can cause battery
discharge.
. Before driving your vehicle, make
sure that the plug and the cord
on your electrical appliance will
not interfere with your shifting
gears and operating the accel-
erator and brake pedals. If they do, do not use the electrical
appliance while driving.
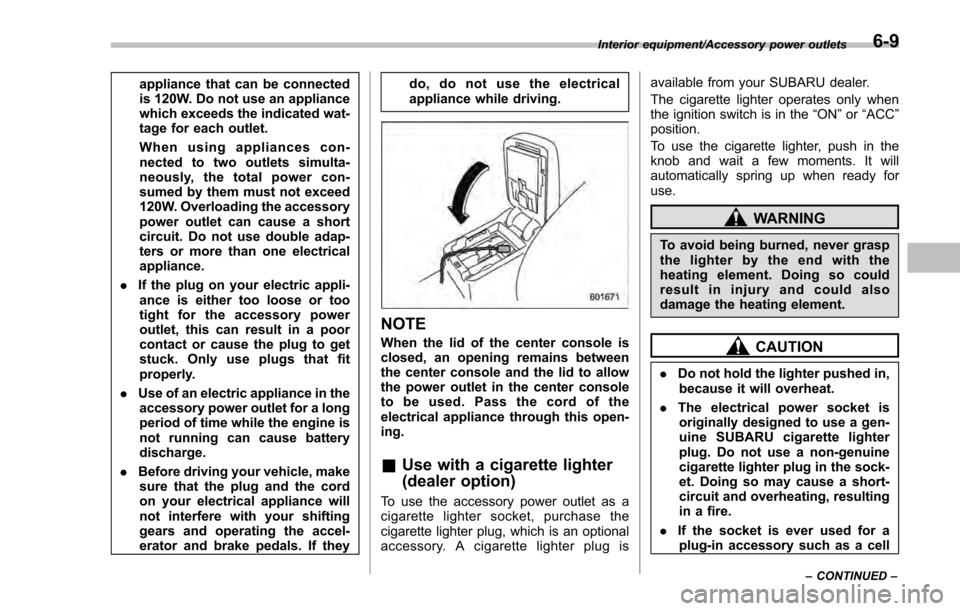
NOTE
When the lid of the center console is
closed, an opening remains between
the center console and the lid to allow
the power outlet in the center console
to be used. Pass the cord of the
electrical appliance through this open-
ing.
&
Use with a cigarette lighter
(dealer option)
To use the accessory power outlet as a
cigarette lighter socket, purchase the
cigarette lighter plug, which is an optional
accessory. A cigarette lighter plug is available from your SUBARU dealer.
The cigarette lighter operates only when
the ignition switch is in the
“ON”or “ACC ”
position.
To use the cigarette lighter, push in the
knob and wait a few moments. It will
automatically spring up when ready for
use.
WARNING
To avoid being burned, never grasp
the lighter by the end with the
heating element. Doing so could
result in injury and could also
damage the heating element.
CAUTION
. Do not hold the lighter pushed in,
because it will overheat.
. The electrical power socket is
originally designed to use a gen-
uine SUBARU cigarette lighter
plug. Do not use a non-genuine
cigarette lighter plug in the sock-
et. Doing so may cause a short-
circuit and overheating, resulting
in a fire.
. If the socket is ever used for a
plug-in accessory such as a cell
Interior equipment/Accessory power outlets
–CONTINUED –6-9
Page 377 of 594
Interior equipment/Shopping bag hook (5–door)
WARNING
Hang clothing directly on the coat
hooks without using hangers. Do
not hang coat hangers or other hard
or pointed objects on the coat
hooks. If such items are hanging
on the coat hooks, when the SRS
curtain airbags deploy, they could
cause serious injuries by coming off
the coat hooks and being thrown
through the cabin or by preventing
correct airbag deployment. Before
hanging clothing on the coat hooks,
make sure there are no pointed
objects in the pockets.
CAUTION
Never hang anything on the coat
hook that might obstruct the driver’s
view or that could cause injury in
sudden stops or in a collision.
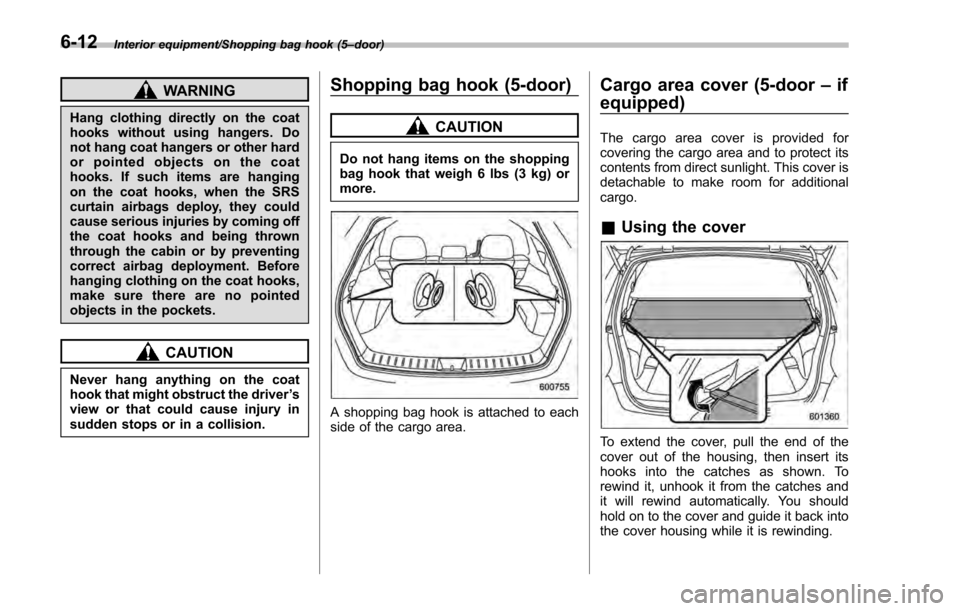
Shopping bag hook (5-door)
CAUTION
Do not hang items on the shopping
bag hook that weigh 6 lbs (3 kg) or
more.
A shopping bag hook is attached to each
side of the cargo area.
Cargo area cover (5-door –if
equipped)
The cargo area cover is provided for
covering the cargo area and to protect its
contents from direct sunlight. This cover is
detachable to make room for additional
cargo.
& Using the cover
To extend the cover, pull the end of the
cover out of the housing, then insert its
hooks into the catches as shown. To
rewind it, unhook it from the catches and
it will rewind automatically. You should
hold on to the cover and guide it back into
the cover housing while it is rewinding.
6-12