Page 73 of 168

Selecting a waveband
Select the desired waveband (FM1,
FM2, DR1, DR2, AM, FM1, etc.) by
pressing 3 repeatedly.
Choose an FM or AM radio
station
There are several")
GB.15
LISTENING TO THE RADIO (1/3)
Selecting a waveband
Select the desired waveband (FM1,
FM2, DR1, DR2, AM, FM1, etc.) by
pressing 3 repeatedly.
Choose an FM or AM radio
station
There are several different ways to
select and seek a radio station.
Automatic search
This mode performs an automatic scan
to search for stations. Long press 7.
When you release 7, the frequency of
the nearest radio station is displayed.
So long as you press 7, the radio in-
creases or decreases without stopping. Manual search
This mode allows you to search for sta-
tions manually, scrolling through the
frequencies by pressing
7.
Press 7 and the frequency increases or
decreases.Storage of radio stations
This operating mode allows you to
listen to your pre-set radio stations.
Select a waveband, then select a radio
station using the methods described
above.
To store a station, press and hold one
of the buttons of the keypad 11 until you
hear a beep.
Up to 6 stations can be saved per
waveband.
To recall a stored station, briefly press
one of the keys on the keypad 11.
Choose according to the
name of the station (FM / DR)
To select a radio station turn 5 or the
knob 20 or 25 on the steering column
control.
This list can include up to 100 radio sta-
tions having the strongest frequencies
in your area.
To get the most recent list of stations,
update the radio list (FM or DR).
Refer to «Updating the radio list (FM or
DR)" in this section.
Page 74 of 168

– display the settings menu by pres-sing 9 and select «Radio» by turning
and pressing 5;
– select «Ref. FM List» by turning 5,
then short press 5 to")
GB.16
LISTENING TO THE RADIO (2/3)
– display the settings menu by pres-sing 9 and select «Radio» by turning
and pressing 5;
– select «Ref. FM List» by turning 5,
then short press 5 to validate this
choice.
The automatic update of the FM sta-
tions in the area starts. The message
«Updating FM List» is displayed on the
screen.
The automatic frequency scanning is
complete. The message «FM List upda-
ted» is displayed on the screen.
Note: if another source is selected, the
FM radio list update continues in the
background.
To switch from one saved frequency to
another, press one of the buttons 7.
Note: you can also update the FM radio
list by pressing and holding 3.Radio settings
Display the settings menu by pres-
sing 9 and select «Radio» by turning
and pressing 5. The available functions
are as follows:
– «TA»;
– «DR Interrupt…»;
– «Ref. FM List»;
– «Ref. DR List».
«TA»
When this feature is activated, your
audio system allows traffic bulletins to
play automatically as new reports are
issued by some FM or DR radio sta-
tions.
NB: On waveband AM, this feature is
not available.
Select the information station and then
choose whether you want another lis-
tening source. Traffic information is broadcast au-
tomatically and has priority over the
source being listened to at the time.
To activate or deactivate this feature,
refer to the «Radio settings» paragraph
under «System settings».
«DR Interrupt…» (newscasts)
When this function is activated, it is
possible to automatically listen to news
as it is broadcast by certain «FM» or
«DR» radio stations.
If you then select other sources, when
a broadcast of the selected programme
type is made, it will interrupt the other
sources.
To activate or deactivate this function,
please refer to the information on «DR
Interrupt…» in the «System settings»
section.
«Ref. FM List»
This feature allows you to perform an
update of all FM stations in your area.
Page 75 of 168
 by pressing 3
repeatedly.
– turn 5, 20 or 25 to scroll through the
radio stations on the FM/DR list or
the AM r")
GB.17
Selecting a station
Select the desired waveband (FM1,
FM2, DR1, DR2 or AM) by pressing 3
repeatedly.
– turn 5, 20 or 25 to scroll through the
radio stations on the FM/DR list or
the AM radio frequencies.
– press 7 to scroll through the FM/AM
radio frequencies or the DR radio
stations.
Display radio text
To display the text menu, briefly
press 14 or press and hold 9. The avai-
lable functions are as follows:
– «Radiotext»;
– «Intellitext»;
– «EPG».
NB: If no information is provided, the
message “No message” is displayed on
the screen.
LISTENING TO THE RADIO (3/3)
«Ref. DR List»
This feature allows you to perform an
update of all DR stations in your area.
– Display the settings menu by pres- sing 9 and select «Radio» by turning
and pressing 5 ;
– select «Ref. DR List» by turning 5,
then short press 5 to validate this
choice;
– the automatic update of the list of di- gital terrestrial radio stations in your
area begins. The message «Updating
DR List» is displayed on the screen.
With the automatic frequency scan fi-
nished, the message «DR List upda-
ted» is displayed on the screen.
Note: you can update the DR radio list
by pressing and holding 3. Text information «Radiotext» (FM)
Some FM radio stations broadcast
text information related to the program
being listened to (e.g. the title of a song,
artist name).
NB: This information is only available
for certain radio stations.
«Intellitext» (DR) function
This feature allows access to text in-
formation recorded on some radio sta-
tions. You can scroll through the text to
display new updates on business, poli-
tics, health, weather and sports.
«EPG» (DR) program guide
When this feature is activated, your
audio system will display the station’s
upcoming programs of the day.
Note: This information is only available
for the selected station’s next three
time slots.
Page 76 of 168

Specifications of readable
formats
Only files with an CDA/MP3> extension
can be played.
If a CD contains both audio CD files
and compressed audio files, the com-")
GB.18
LISTENING TO A CD/CDMP3 (1/2)
Specifications of readable
formats
Only files with an CDA/MP3> extension
can be played.
If a CD contains both audio CD files
and compressed audio files, the com-
pressed audio files will not be recogni-
sed.
Note: some protected files (copyright)
cannot be read.
Note: to ensure that folder and file
names are easy to read, we recom-
mend that you use names with fewer
than 64 characters, and avoid the use
of special characters.
CD/CD MP3 maintenance
To protect its readability, never expose
a CD CD MP3 to heat or direct sunlight.
To clean a CDCD MP3, use a soft cloth
and clean from the centre towards the
edge of the CD.
As a general rule, refer to the CD ma-
nufacturer's advice concerning mainte-
nance and storage.
Note: some scratched or dirty CDs
cannot be read.
Inserting a CD/CD MP3
Refer to the section entitled
«Precautions during use».
Check that there is no CD in the player,
then insert the CD with the printed side
upwards.
Listening to a CD/CD MP3
When a CD/CD MP3 is inserted (prin-
ted surface upward), the audio system
automatically switches to CD/CD MP3
source and starts to play the first track.
If the audio system is switched off and
the ignition is on, inserting a CD/CD
MP3 switches on the audio system and
the CD/CD MP3 starts to play. If the
ignition is not on, the audio system will
not switch on.
If you are listening to the radio and a
CD/CD MP3 is in the player, you can
choose to listen to the CD/CD MP3 by
pressing 4. Playback starts as soon as
the audio system switches to the CD/
CD MP3 source.
Searching for a track
Press 7 to switch from one track to the
next.
Fast winding
Long press 7 to fast forward or rewind.
Playback resumes when the button is
released.
Page 77 of 168

Random playback «Mix»
Once a CD/CD MP3 is inserted, press
button «2» on the keypad 11 to turn on
the shuffle function for all the tracks on
the CD/CD MP3.
Th")
GB.19
LISTENING TO A CD/CDMP3 (2/2)
Random playback «Mix»
Once a CD/CD MP3 is inserted, press
button «2» on the keypad 11 to turn on
the shuffle function for all the tracks on
the CD/CD MP3.
The symbol «MIX» appears on the
screen. A track is then selected at
random. The transition from one track
to another takes place randomly.
Press button «2» again on the
keypad 11 to turn the shuffle function
off; the symbol «MIX» goes out. Turning off the audio system and eject-
ing the CD/CD MP3 deactivates the
shuffle function.
Note: on a CD MP3, random play runs
on the folder currently being played.
Change folder to run random playback
on another folder.
Repeat «RPT»
This feature allows you to repeat a
track.
Press button «1» on the keypad
11
to activate the repeat function. The
symbol «RPT» appears on the screen.
Press button «1» again on the
keypad 11 to turn off the repeat func-
tion; the symbol «RPT» goes out.
Note: if the shuffle function is activated,
enabling the repeat function will deac-
tivate it; the symbol «MIX» will go out.
Pause
Press 17 and 19 simultaneously, or 18
or 24 on the steering column control to
mute the sound temporarily. This function is automatically deacti-
vated if you change the volume, change
the program source or if an automatic
newscast comes on.
Display text (CD-Text or ID3
tag)
Press
14 to scroll through the ID3 tag
information (artist name, album name,
elapsed time, track name).
To display all the ID3 tag information on
a single page, press and hold 14.
Ejecting a CD/CD MP3
Eject a CD/CD MP3 from the player by
pressing 12.
Note: if an ejected disc is not removed
within 20 seconds, it will automatically
be reinserted into the CD player.
Page 78 of 168
.
You have several ways of connecting
your player:")
GB.20
Your audio system has inputs to
connect one or more external audio
sources (USB key, MP3 player, iPod®,
Bluetooth® portable player, etc.).
You have several ways of connecting
your player:
– USB connection;
– Jack socket;
– Bluetooth® connection.
Note: the auxiliary audio source for-
mats can be MP3, WMA or AAC.
USB connection;
Connection
Connect the iPod® or USB stick to the
USB socket.
Once the device is connected, the track
will be displayed automatically.
AUXILIARY AUDIO SOURCES (1/3)
Use
– iPod®:
After connecting your iPod®, the menus
are accessible from your audio system.
The system keeps the same playlists
as on your iPod®.
– USB key:
The audio files will start playing auto-
matically.
To access the hierarchy of your audio
source, turn or press 5, 20 or 25 on the
steering column control.
Note: random play on a USB key works
in the same way as for a CD MP3.
Refer to the information on “Random
playback Mix” in the section “Listening
to a CD/CD MP3”.
Note: the repeat function on a USB
key works in the same way as for a CD
MP3. Please refer to the paragraph on
“Repeat” under “Listening to a CD/CD
MP3”. Charging using the USB port
Once your audio player’s USB connec-
tor is plugged into the USB port of the
unit, you can charge or maintain the
battery during use.
Note: some devices do not recharge
or maintain battery charge level when
they are connected to the USB port on
the audio system.
Page 79 of 168
, connect the Jack socket of the
auxiliary input 13 to the device head-
phones socket (usually a 3.5 mm jack).
Note: you c")
GB.21
Jack connection
Connection
Using the appropriate cable (not sup-
plied), connect the Jack socket of the
auxiliary input 13 to the device head-
phones socket (usually a 3.5 mm jack).
Note: you cannot select a track directly
from your audio system. To select a
track, you must do so directly via your
portable audio player, when the vehicle
is stationary.
Use
Only the text “AUX” is displayed on the
system screen. No artist or track name
is visible.
NB: To adjust the sensitivity of the jack
Jack,, refer to the “System settings”
section. Connection
For a device already paired, perform
the following steps:
– activate the Bluetooth® connec-
tion of the portable audio player and
make it visible to other devices (refer
to the audio player manual);
– select the Bluetooth® audio source by pressing 4.
Bluetooth® audio playback
In order to use a Bluetooth® digital
device, you must pair it to the vehicle
when it is first used (refer to the infor-
mation on the “Bluetooth® function” in
the “General description” section).
Pairing allows the audio system to re-
cognise and store a Bluetooth® digital
device.
Note: if your Bluetooth® digital device
has telephone and portable audio
player functions, pairing one of these
functions will automatically pair the
other.
AUXILIARY AUDIO SOURCES (2/3)
Only handle the personal
stereo when traffic condi-
tions permit.
Store the portable audio
player safely while driving (risk of
being thrown in the event of sudden
braking or impact).
Page 80 of 168
GB.22
AUXILIARY AUDIO SOURCES (3/3)
Use
Your portable audio player must be
connected to the audio system to
enable all its functions to be accessed.
Note: no digital device can be connec-
ted to the audio system unless it has
previously been paired.
Once the Bluetooth® digital portable
audio player is connected, you can
control it from your audio system.
Press 17 and 19 simultaneously or 18
or 24 on the steering column control to
pause the audio track (press again to
resume play).
Press 7 to go to the previous or next
track.
Note: the number of accessible func-
tions varies depending on the type of
portable audio player and its compatibi-
lity with the audio system.
Note: in some cases, you will need to refer to your device’s manual to finalise
the connection procedure.
Only handle the personal
stereo when traffic condi-
tions permit.
Store the portable audio
player safely while driving (risk of
being thrown in the event of sudden
braking or impact).
 1
1 2
2 3
3 4
4 5
5 6
6 7
7 8
8 9
9 10
10 11
11 12
12 13
13 14
14 15
15 16
16 17
17 18
18 19
19 20
20 21
21 22
22 23
23 24
24 25
25 26
26 27
27 28
28 29
29 30
30 31
31 32
32 33
33 34
34 35
35 36
36 37
37 38
38 39
39 40
40 41
41 42
42 43
43 44
44 45
45 46
46 47
47 48
48 49
49 50
50 51
51 52
52 53
53 54
54 55
55 56
56 57
57 58
58 59
59 60
60 61
61 62
62 63
63 64
64 65
65 66
66 67
67 68
68 69
69 70
70 71
71 72
72 73
73 74
74 75
75 76
76 77
77 78
78 79
79 80
80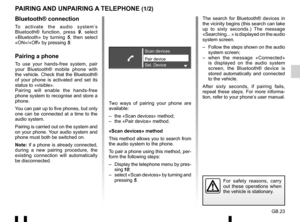 81
81 82
82 83
83 84
84 85
85 86
86 87
87 88
88 89
89 90
90 91
91 92
92 93
93 94
94 95
95 96
96 97
97 98
98 99
99 100
100 101
101 102
102 103
103 104
104 105
105 106
106 107
107 108
108 109
109 110
110 111
111 112
112 113
113 114
114 115
115 116
116 117
117 118
118 119
119 120
120 121
121 122
122 123
123 124
124 125
125 126
126 127
127 128
128 129
129 130
130 131
131 132
132 133
133 134
134 135
135 136
136 137
137 138
138 139
139 140
140 141
141 142
142 143
143 144
144 145
145 146
146 147
147 148
148 149
149 150
150 151
151 152
152 153
153 154
154 155
155 156
156 157
157 158
158 159
159 160
160 161
161 162
162 163
163 164
164 165
165 166
166 167
167
Use
Your portable audio player must be
connected to the audio system to
enable all its functions to be accessed.
Note: no digital device can be connec-
ted to the")