Page 25 of 32

23
PHONEBOOK
Depending on your cellular phone, the system may automatically download \
your
cellular phone’s entire phonebook to the vehicle’s Bluetooth®,2 system.
If the phonebook does not download
automatically, the vehicle phonebook may be
set for up to 40 entries.
To manually download entries:
1.
Press the
button on the steering wheel and
touch the “Quick Dial” key.
2.
T
ouch the “Add New” key at the top of the
display. There are different methods to input a phone number. Select one of the
following options:
•
“Copy from Call History” to s
ave a number from the Outgoing, Incoming or
Missed Calls list.
•
“Copy from the Handset” to s
ave a number
that has been downloaded from your
handset to the vehicle.
•
“Enter Number by K
eypad” to input the
number and name manually.
MAKING A CALL
To make a call, follow this procedure:
1.
Press the
button on the steering wheel.
The “Phone” menu will appear on the control
panel display.
2.
T
ouch the “Quick Dial”, “Call History,”
“Phonebook” or “Dial Number” key.
3.
Select the desired entry from the list.
4.
Dialing begins when the entry is selected or
when the “O
K” key is selected.
RECEIVING/ENDING A CALL
To accept the call, press the button on the
steering wheel or touch the “Answer” key.
To reject the call, press and hold the button on
the steering wheel or touch the “Reject Call” key.
To hang up, press the button on the steering
wheel or touch the “Hang up” key.
1 Some jurisdictions prohibit the use of cellular telephones while drivin\
g.2 Availability of specific features is dependent upon the phone’s Bluetooth® support. Please refer to your phone owner’s manual for
details. Bluetooth® word mark and logos are owned by Bluetooth SIG,
Inc., and any use of such marks by NISSAN is under license. See
www.NissanUSA.com/bluetooth for details.
3 Laws in some jurisdictions may restrict the use of “T ext-to-Speech”. Some applications and features such as social
networking and texting, may also be restricted. Check local regulations for any requirements before using these features.
Compatible smartphone required. Text rates and/or data usage may apply.
To view detailed instructional videos regarding these and other features, please go\
to www.nissanownersinfo.mobi.
For more information, refer to the “Monitor, climate, audio, phone and voice recognition systems (section 4) ” of
your Owner’s Manual.
2009259_16b_Pathfinder_US_pQRG_121715.indd 2312/17/15 5:02 PM
To view detailed instructional videos regarding these and other features, please go to www.nissanownersinfo.mobi.
Page 26 of 32

CONNECTING PROCEDURE3
The vehicle must be stationary when connecting the cellular phone.
1.
Press the
button on the steering w")
24
BLUETOOTH® SYSTEM WITHOUT NAVIGATION1,2 (if so equipped)
CONNECTING PROCEDURE3
The vehicle must be stationary when connecting the cellular phone.
1.
Press the
button on the steering wheel. The
system announces the available commands.
2.
S
ay: “Connect Phone.” The system
acknowledges the command and announces
the next set of available commands.
3.
S
ay: “Add Phone”. The system acknowledges
the command and asks you to initiate connecting
from the cellular phone handset.
4.
Initiate connecting from the cellular phone:
•
T
he connecting procedure varies according to each cellular phone model. For
detailed connecting instructions and a list of compatible cellular phones, \
please
visit www.NissanUSA.com/bluetooth.
•
W
hen prompted for a PIN, enter “1234” from the handset. (The PIN is assigned by
NISSAN and cannot be changed.)
5.
S
ay the name for the cellular phone when the system asks you to provide o\
ne. You can
give the cellular phone a name of your choice.
PHONEBOOK
The phonebook stores up to 1,000 entries for each cellular phone paired with the system.
Depending on your cellular phone, the system may automatically download \
your
cellular phone’ s entire phonebook to the vehicle’s Bluetooth®,2 system.
If the phonebook does not download automatically , 40 entries can be
individually downloaded.
To manually download entries:
1.
Press the button on the steering wheel.
2.
After the tone, s
ay “Phonebook”.
3.
After the next tone, s
ay “Transfer Entry”. The system acknowledges the command
and asks you to initiate the transfer from the cellular phone handset. T\
he new
contact phone number will be transferred from the cellular phone to the vehi\
cle.
•
T
he transfer procedure varies according to each cellular phone. See your cellular
phone’s Owner’s Manual for details. You can also visit
www.NissanUSA.com/bluetooth for instructions on transferring phone
numbers from NISSAN-recommended cellular phones.
4.
T
he system repeats the number and prompts you for the next command. When you
have finished entering numbers or transferring an entry, choose “Store”.
5.
T
he system confirms the name, location and number.
SYSTEM GUIDE
2009259_16b_Pathfinder_US_pQRG_121715.indd 2412/17/15 5:02 PM
To view detailed instructional videos regarding these and other features, please go to www.nissanownersinfo.mobi.
Page 27 of 32

25
MAKING A CALL FROM THE PHONEBOOK
In some cases, names stored in all UPPERCASE letters may not be recognized by the
Voice Recognition system.
1.
Press the button on the steering wheel.
2.
After waiting for the tone, s
ay “Call.”
3.
After the next tone, speak the name of a phonebook entry
. For example,
“Michael Smith.”
4.
Confirm that the correct name is recognized by s
aying “Dial” after the tone.
MAKING A CALL BY PHONE NUMBER
1.
Press the button on the steering wheel. A tone will sound.
2.
S
ay: “Call.” The system acknowledges the command and announces the next set of
available commands.
3.
S
ay: “Phone Number.” The system acknowledges the command and announces the
next set of available commands.
4.
S
ay the number you wish to call starting with the area code in single digit format.
5.
W
hen you have finished speaking the phone number, the system repeats it back and
announces the available commands.
6.
S
ay: “Dial.” The system acknowledges the command and makes the call.
RECEIVING/ENDING A CALL
When you receive a phone call, a ring tone sounds through the audio syste\
m.
To accept the call, press the button on the steering wheel.
To reject the call, press the button on the steering wheel.
To hang up the cellular phone at the end of a call or to disconnect durin\
g call placement, press the
button on the steering wheel.
1 Some jurisdictions prohibit the use of cellular telephones while drivin\
g.2 Availability of specific features is dependent upon the phone’s Bluetooth® support. Please refer to your phone owner’s
manual for details. Bluetooth® word mark and logos are owned by Bluetooth SIG, Inc., and any use of such marks by
NISSAN is under license. See www.NissanUSA.com/bluetooth for details.
3 Laws in some jurisdictions may restrict the use of “T ext-to-Speech”. Some applications and features such as social
networking and texting, may also be restricted. Check local regulations for any requirements before using these features.
Compatible smartphone required. Text rates and/or data usage may apply.
To view detailed instructional videos regarding these and other features, please go\
to www.nissanownersinfo.mobi.
For more information, refer to the “Monitor, climate, audio, phone and voice recognition systems (section 4) ” of
your Owner’s Manual.
2009259_16b_Pathfinder_US_pQRG_121715.indd 2512/17/15 5:02 PM
To view detailed instructional videos regarding these and other features, please go to www.nissanownersinfo.mobi.
Page 28 of 32

If you have a compatible Bluetooth® device with streaming audio (A2DP and AVRCP
profiles), you can set up the wireless connectio")
26
BLUETOOTH® STREAMING AUDIO WITH NAVIGATION
(if so equipped)
If you have a compatible Bluetooth® device with streaming audio (A2DP and AVRCP
profiles), you can set up the wireless connection between your Blueto\
oth® device and
your vehicle’s audio system. This connection allows you to listen to audio from the
Bluetooth
® device using your vehicle’s speakers.
A cellular telephone should not be used while driving so full attention \
may be given to
vehicle operation. *
To use your connected Bluetooth® device to stream audio, it will need to be connected
as an audio device. The following procedure will initially connect a Bluetooth® device
as an audio player and allow you to switch between devices.
1.
Press the SETTING button on the control panel and touch the “Bluetooth” key on
the display.
2.
Select “Connected Devices”.
3.
Select “
Audio Player”.
4.
Select the name of the device that you are
attempting to connect as an audio player
.
5.
Select “Select”.
6.
V
erify that the system confirms that
the device has been selected as an
audio player.
Once your Bluetooth® device has been
connected as an audio device, press the
DISC•AUX button on the control panel to select
the Bluetooth
® Streaming Audio player.
Bluetooth® connectivity issues can usually be
resolved with a reboot of your cellular phone if
you do not regularly turn off your cellular phone.
Otherwise, try updating your cellular phone with
the latest software.
*Some jurisdictions prohibit the use of cellular telephones while drivin\
g.
For more information, refer to the “Monitor, climate, audio, phone and voice recognition systems (section 4) ” of
your Owner’s Manual or visit www.NissanUSA.com/bluetooth.
SYSTEM GUIDE
2009259_16b_Pathfinder_US_pQRG_121715.indd 2612/17/15 5:03 PM
To view detailed instructional videos regarding these and other features, please go to www.nissanownersinfo.mobi.
Page 29 of 32

Your Navigation System can calculate a route
from your current location
to a preferred destination.
The real-time map display
and turn-by-turn voice
guida")
27
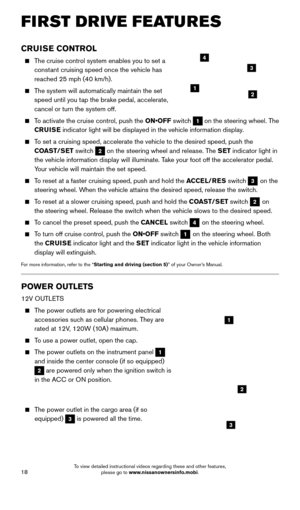
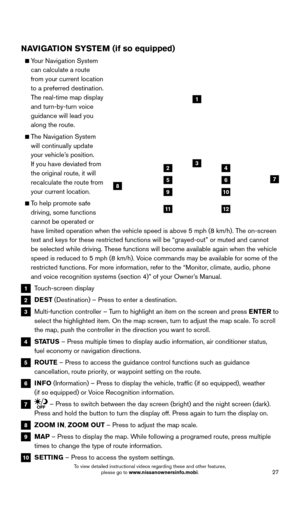
NAVIGATION SYSTEM (if so equipped)
Your Navigation System can calculate a route
from your current location
to a preferred destination.
The real-time map display
and turn-by-turn voice
guidance will lead you
along the route.
The Navigation System will continually update
your vehicle’s position.
If you have deviated from
the original route, it will
recalculate the route from
your current location.
To help promote safe driving, some functions
cannot be operated or
have limited operation when the vehicle speed is above 5 mph (8 km/h).\
The on-screen
text and keys for these restricted functions will be “grayed-out” \
or muted and cannot
be selected while driving. These functions will become available again when the vehicle
speed is reduced to 5 mph (8 km/h). Voice commands may be available for some of the
restricted functions. For more information, refer to the “Monitor, climate, audio, phone
and voice recognition systems (section 4)” of your Owner’s Manual.
1 Touch-screen display
2 DEST (Destination) – Press to enter a destination.
3 Multi-function controller – T urn to highlight an item on the screen and press ENTER to
select the highlighted item. On the map screen, turn to adjust the map s\
cale. To scroll
the map, push the controller in the direction you want to scroll.
4 STATUS – Press multiple times to display audio information, air conditioner\
status,
fuel economy or navigation directions.
5 ROUTE – Press to access the guidance control functions such as guidance
cancellation, route priority, or waypoint setting on the route.
6 INFO (Information) – Press to display the vehicle, traffic (if so eq\
uipped), weather
(if so equipped) or Voice Recognition information.
7 – Press to switch between the day screen (bright) and the night screen (dark).
Press and hold the button to turn the display off. Press again to turn t\
he display on.
8 ZOOM IN, ZOOM OUT – Press to adjust the map scale.
9 MAP – Press to display the map. While following a programed route, press multiple
times to change the type of route information.
10 SETTING – Press to access the system settings.
1
3
7
9
24
56
10
1112
8
2009259_16b_Pathfinder_US_pQRG_121715.indd 2712/17/15 5:03 PM
To view detailed instructional videos regarding these and other features, please go to www.nissanownersinfo.mobi.
Page 30 of 32

(if so equipped)
With this Dual Head Restraint DVD system, you can play video files via a DVD or CD, providing
images and sound both from the front a")
28
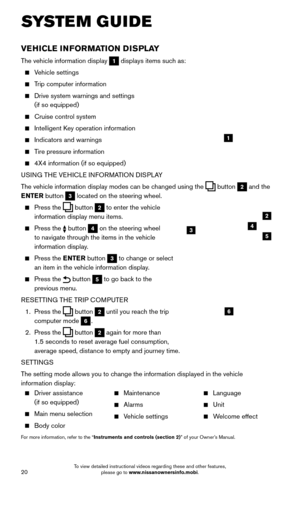
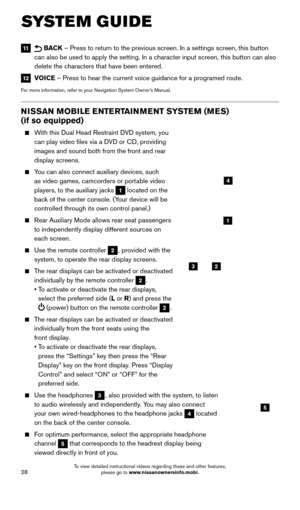
NISSAN MOBILE ENTERTAINMENT SYSTEM (MES)
(if so equipped)
With this Dual Head Restraint DVD system, you can play video files via a DVD or CD, providing
images and sound both from the front and rear
display screens.
You can also connect auxiliary devices, such as video games, camcorders or portable video
players, to the auxiliary jacks
1 located on the
back of the center console. (Your device will be
controlled through its own control panel.)
Rear Auxiliary Mode allows rear seat passengers
to independently display different sources on
each screen.
Use the remote controller 2, provided with the
system, to operate the rear display screens.
The rear displays can be activated or deactivated individually by the remote controller
2.
•
T
o activate or deactivate the rear displays,
select the preferred side (L or R) and press the
(power) button on the remote controller 2.
The rear displays can be activated or deactivated individually from the front seats using the
front display.
•
T
o activate or deactivate the rear displays,
press the “Settings” key then press the “Rear
Display” key on the front display. Press “Display
Control” and select “ON” or “OFF” for the
preferred side.
Use the headphones 3, also provided with the system, to listen
to audio wirelessly and independently. You may also connect
your own wired-headphones to the headphone jacks
4 located
on the back of the center console.
For optimum performance, select the appropriate headphone channel
5 that corresponds to the headrest display being
viewed directly in front of you.
3
5
2
1
4
11 BACK – Press to return to the previous screen. In a settings screen, this\
button
can also be used to apply the setting. In a character input screen, this button can also
delete the characters that have been entered.
12 VOICE – Press to hear the current voice guidance for a programed route.
For more information, refer to your Navigation System Owner’s Manual.
SYSTEM GUIDE
2009259_16b_Pathfinder_US_pQRG_121715.indd 2812/17/15 5:03 PM
To view detailed instructional videos regarding these and other features, please go to www.nissanownersinfo.mobi.
Page 31 of 32

The HomeLink® Universal Transceiver system can
learn and consolidate the functions of up to three
different hand-held transmitters, operati")
29
HOMELINK® UNIVERSAL TRANSCEIVER (if so equipped)
The HomeLink® Universal Transceiver system can
learn and consolidate the functions of up to three
different hand-held transmitters, operating items
such as garage doors, property gates, outdoor
and indoor lights or alarm systems.
To program the HomeLink® Universal Transceiver:
•
P
osition the handheld transceiver 1-3 in (26-76
mm) away from the HomeLink surface, keeping
the HomeLink indicator light in view.
•
Press and hold the desired HomeLink button and the handheld transmitter \
button
simultaneously until the HomeLink indicator light flashes slowly and then ra\
pidly.
•
B
oth buttons may be released when the indicator light flashes rapidly.
To verify the programing is complete, press and hold the HomeLink button \
and observe the indicator light:
•
A solid, continuous light indicates the programing is complete and the H\
omeLink
button will activate your device.
•
A blinking light that turns to a solid, continuous light after 2 seconds\
indicates
additional steps are required to complete the programing.
An additional person may make the remaining steps easier . To complete the
programing process:
•
At the receiver of the device that you are programing to the HomeLink bu\
tton, press
and release the learn or smart button (the name may vary by manufacture\
r
, but it is
usually located near where the hanging antenna wire is attached to the unit). You
have approximately 30 seconds to initiate the following step.
•
Press and hold the programed HomeLink button for 2 seconds and release.
You may have to repeat the previous two steps up to three times to comple\
te the programing process. HomeLink should now activate your device.
For more information, refer to the “Instruments and controls (section 2)” of your Owner’s Manual, the HomeLink
website at www.homelink.com or call 1-800-355-3515.
HOMELINK
To watch or control videos on the front display, make sure the vehicle is in the P (PARK) position and the parking brake is applied.
To reduce driver distraction, the wireless headphones will not operate wh\
ile located in the front seats and movies will not be shown on the front display while \
the vehicle is in
any drive position.
To access standard DVD controls on the front display while playing a DVD on the rear display, press the DISC•AUX button on the audio control panel while the vehicle is in
the P (PARK) position and the parking brake is applied.
For more information, refer to the “Monitor, climate, audio, phone and voice recognition systems (section 4) ” of
your Owner’s Manual.
2009259_16b_Pathfinder_US_pQRG_121715.indd 2912/17/15 5:03 PM
To view detailed instructional videos regarding these and other features, please go to www.nissanownersinfo.mobi.
Page 32 of 32

To view detailed instructional videos,")
Nissan, the Nissan Brand Symbol, Z and
Nissan model names are Nissan trademarks.
© 2016 Nissan North America, Inc.
QR16EA 0R52U1
Printing: February 2016 (09)
To view detailed instructional videos,
go to www.nissanownersinfo.mobi/2016/pathfinder or snap this barcode with an appropriate barcode reader.
This Quick Reference Guide is intended to provide an overview of some of the uniq\
ue features of your new vehicle. Please see
your Owner’s Manual for important safety information and system operation limitations. Features and equipment in your vehicle
may vary depending on model, trim level, options selected, order, date of production, region or availability. Therefore, you may find
information about features or equipment that are not included or installed on your vehicle.
All information, specifications and illustrations in this Quick Reference Guide are those in effect at the time of printing.
NISSAN reserves the right to change specifications, performance, design or component suppliers witho\
ut notice and without
obligation. From time to time, NISSAN may update or revise this Quick Reference Guide to provide owners with the most
accurate information currently available. Please carefully read and retain with this Quick Reference Guide all revision updates sent
to you by NISSAN to ensure you have access to accurate and up-to-date information reg\
arding your vehicle. Current versions
of vehicle Quick Reference Guides, Owner’s Manuals and any updates can also be found in the Owner section of the \
NISSAN
website at https://owners.nissanusa.com/nowners/navigation/manualsGuide. If you have questions concerning any
information in your Owner’s Manual, contact NISSAN Consumer Affairs. See the NISSAN CUSTOMER CARE PROGRAM page
in the Owner’s Manual for contact information.
Helpful Resources
Below is a list of helpful resources that can be used to learn
more about the vehicle’s systems and feature operations.
Vehicle Owner’s Manual
Navigation Owner ’s Manual (if so equipped)
Printed Quick Reference Guide (this document)
www.NissanUSA.com/bluetooth
www.NissanUSA.com/connect
www.youtube.com/user/NissanUSA
Nissan Consumer Affairs: 1-800-647-7261
Electronic Quic k Reference Guide
(Use Quick Response (QR) code or URL below.)
Nissan Quick Guide (available in the iPhone
App Store or Android Google Play Store for
download to your smartphone)
2009259_16b_Pathfinder_US_pQRG_121715.indd 212/17/15 5:01 PM