2016 NISSAN NOTE engine
[x] Cancel search: enginePage 2346 of 3641

CHASSIS AND BODY MAINTENANCEMA-31
< PERIODIC MAINTENANCE >
C
DE
F
G H
I
J
K L
M B
MA
N
O A
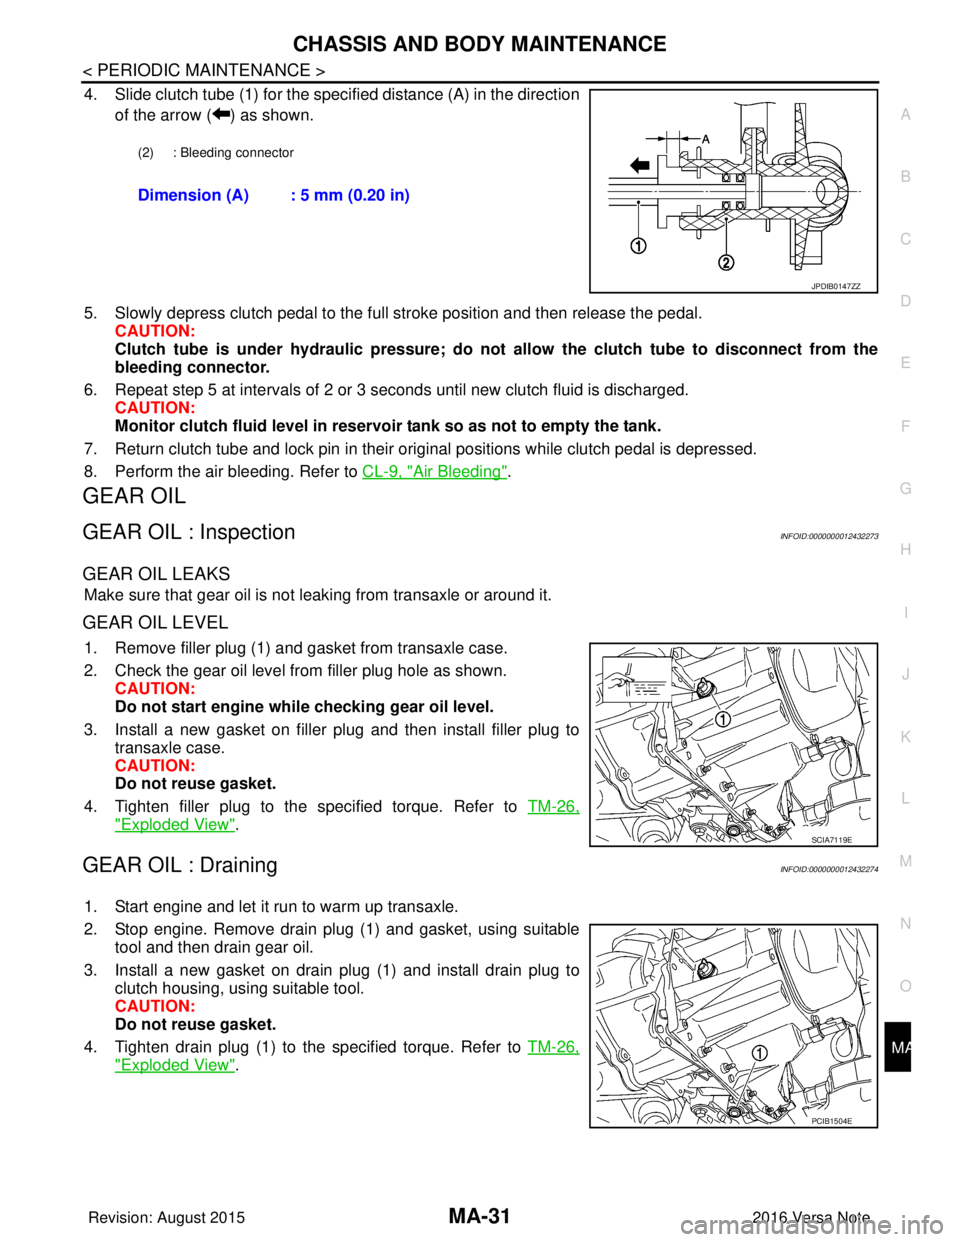
4. Slide clutch tube (1) for the specified distance (A) in the direction
of the arrow ( ) as shown.
5. Slowly depress clutch pedal to the full stroke position and then release the pedal. CAUTION:
Clutch tube is under hydraulic pressure; do not allow the clutch tube to disconnect from the
bleeding connector.
6. Repeat step 5 at intervals of 2 or 3 seconds until new clutch fluid is discharged. CAUTION:
Monitor clutch fluid level in reservoir tank so as not to empty the tank.
7. Return clutch tube and lock pin in their original positions while clutch pedal is depressed.
8. Perform the air bleeding. Refer to CL-9, "
Air Bleeding".
GEAR OIL
GEAR OIL : InspectionINFOID:0000000012432273
GEAR OIL LEAKS
Make sure that gear oil is not leaking from transaxle or around it.
GEAR OIL LEVEL
1. Remove filler plug (1) and gasket from transaxle case.
2. Check the gear oil level from filler plug hole as shown.
CAUTION:
Do not start engine whil e checking gear oil level.
3. Install a new gasket on filler plug and then install filler plug to transaxle case.
CAUTION:
Do not reuse gasket.
4. Tighten filler plug to the specified torque. Refer to TM-26,
"Exploded View".
GEAR OIL : DrainingINFOID:0000000012432274
1. Start engine and let it run to warm up transaxle.
2. Stop engine. Remove drain plug (1) and gasket, using suitable
tool and then drain gear oil.
3. Install a new gasket on drain plug (1) and install drain plug to clutch housing, using suitable tool.
CAUTION:
Do not reuse gasket.
4. Tighten drain plug (1) to the specified torque. Refer to TM-26,
"Exploded View".
(2) : Bleeding connector
Dimension (A) : 5 mm (0.20 in)
JPDIB0147ZZ
SCIA7119E
PCIB1504E
Revision: August 2015 2016 Versa Note
cardiagn.com
Page 2347 of 3641

MA-32
< PERIODIC MAINTENANCE >
CHASSIS AND BODY MAINTENANCE
GEAR OIL : Refilling
INFOID:0000000012432275
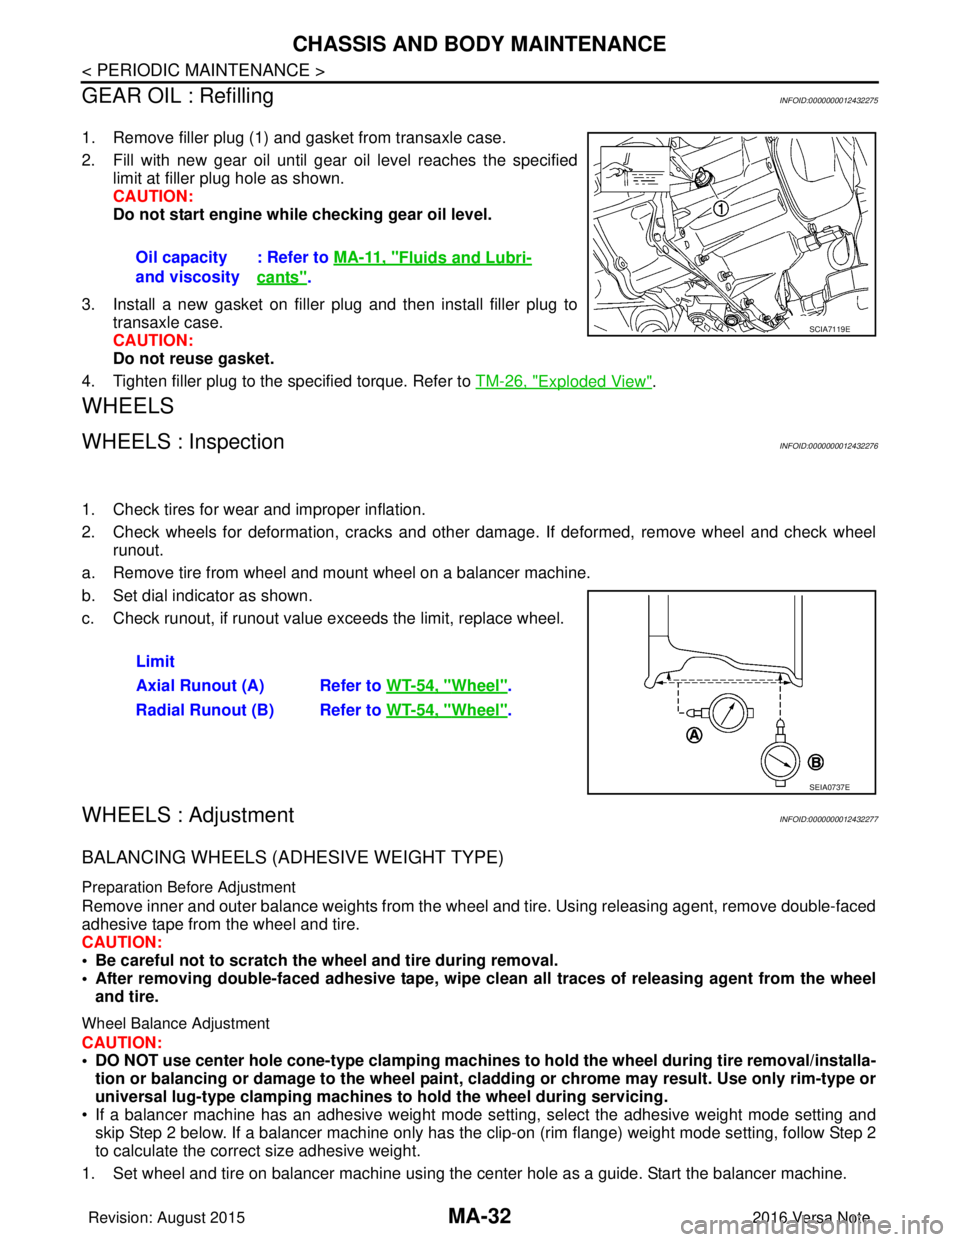
1. Remove filler plug (1) and gasket from transaxle case.
2. Fill with new gear oil until gear oil level reaches the specified limit at filler plug hole as shown.
CAUTION:
Do not start engine whil e checking gear oil level.
3. Install a new gasket on filler plug and then install filler plug to transaxle case.
CAUTION:
Do not reuse gasket.
4. Tighten filler plug to the specified torque. Refer to TM-26, "
Exploded View".
WHEELS
WHEELS : InspectionINFOID:0000000012432276
1. Check tires for wear and improper inflation.
2. Check wheels for deformation, cracks and other dam age. If deformed, remove wheel and check wheel
runout.
a. Remove tire from wheel and mount wheel on a balancer machine.
b. Set dial indicator as shown.
c. Check runout, if runout value exceeds the limit, replace wheel.
WHEELS : AdjustmentINFOID:0000000012432277
BALANCING WHEELS (ADHESIVE WEIGHT TYPE)
Preparation Before Adjustment
Remove inner and outer balance weights from the wheel and tire. Using releasing agent, remove double-faced
adhesive tape from the wheel and tire.
CAUTION:
• Be careful not to scratch the wheel and tire during removal.
• After removing double-faced adh esive tape, wipe clean all traces of releasing agent from the wheel
and tire.
Wheel Balance Adjustment
CAUTION:
• DO NOT use center hole cone-type clamping machines to hold the wheel during tire removal/installa-
tion or balancing or damage to the wheel paint, cladding or chrome may result. Use only rim-type or
universal lug-type clamping machines to hold the wheel during servicing.
• If a balancer machine has an adhesive weight mode se tting, select the adhesive weight mode setting and
skip Step 2 below. If a balancer machine only has the clip -on (rim flange) weight mode setting, follow Step 2
to calculate the correct size adhesive weight.
1. Set wheel and tire on balancer machine using the center hole as a guide. Start the balancer machine. Oil capacity
and viscosity
: Refer to
MA-11, "
Fluids and Lubri-
cants".
SCIA7119E
Limit
Axial Runout (A) Refer to WT-54, "
Wheel".
Radial Runout (B) Refer to WT-54, "
Wheel".
SEIA0737E
Revision: August 2015 2016 Versa Note
cardiagn.com
Page 2349 of 3641

MA-34
< PERIODIC MAINTENANCE >
CHASSIS AND BODY MAINTENANCE
TIRE ROTATION
• Follow the maintenance schedule for tire rotation service intervals.Refer to MA-7, "
Introduction of Periodic Maintenance".
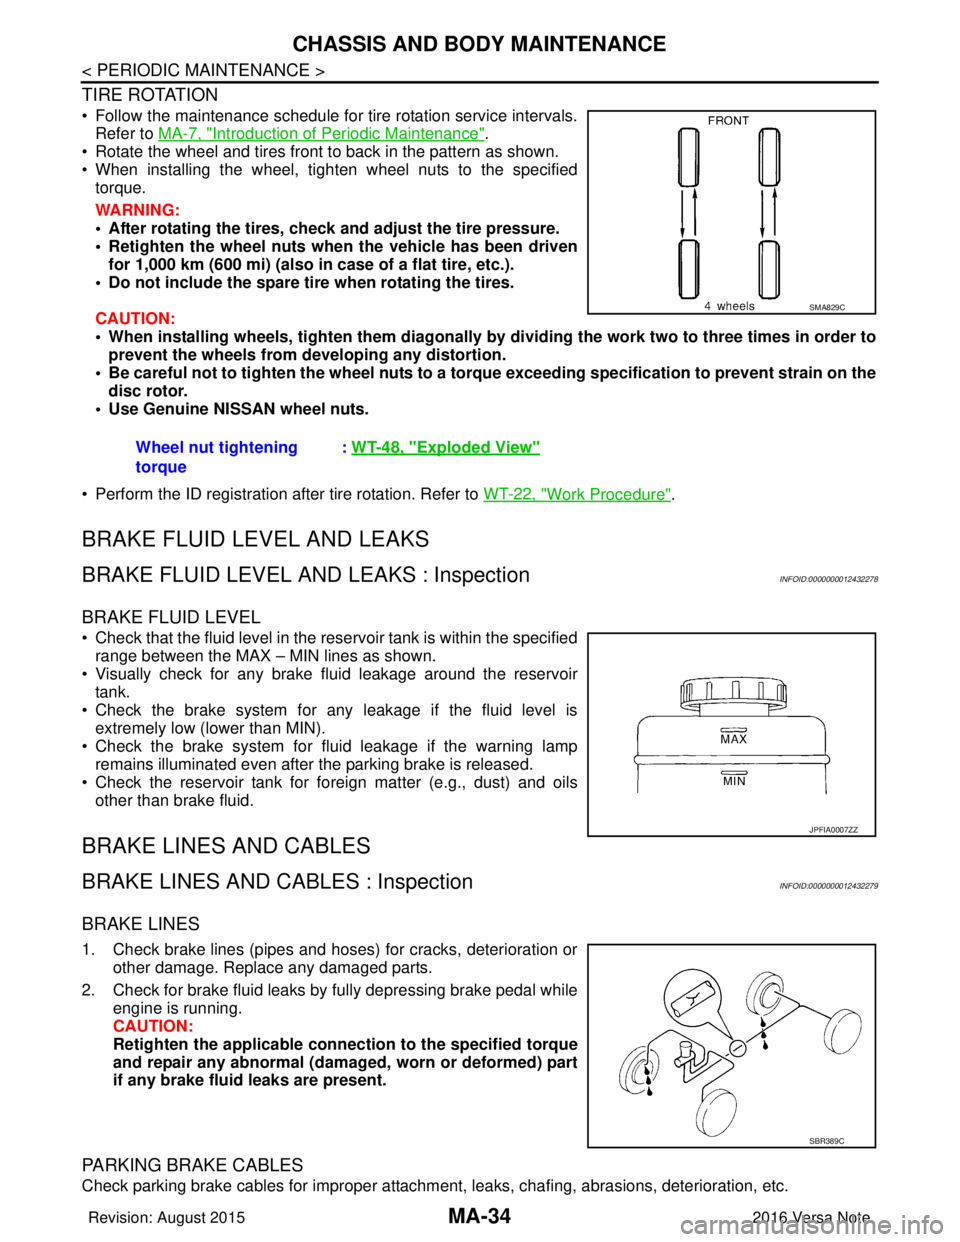
• Rotate the wheel and tires front to back in the pattern as shown.
• When installing the wheel, tighten wheel nuts to the specified torque.
WARNING:
• After rotating the tires, check and adjust the tire pressure.
• Retighten the wheel nuts when the vehicle has been driven
for 1,000 km (600 mi) (also in case of a flat tire, etc.).
• Do not include the spare tire when rotating the tires.
CAUTION:
• When installing wheels, ti ghten them diagonally by dividing the work two to three times in order to
prevent the wheels from d eveloping any distortion.
• Be careful not to tighten the wh eel nuts to a torque exceeding speci fication to prevent strain on the
disc rotor.
• Use Genuine NISSAN wheel nuts.
• Perform the ID registration after tire rotation. Refer to WT-22, "
Work Procedure".
BRAKE FLUID LEVEL AND LEAKS
BRAKE FLUID LEVEL AND LEAKS : InspectionINFOID:0000000012432278
BRAKE FLUID LEVEL
• Check that the fluid level in the reservoir tank is within the specified
range between the MAX – MIN lines as shown.
• Visually check for any brake fluid leakage around the reservoir tank.
• Check the brake system for any leakage if the fluid level is extremely low (lower than MIN).
• Check the brake system for fluid leakage if the warning lamp
remains illuminated even after the parking brake is released.
• Check the reservoir tank for foreign matter (e.g., dust) and oils other than brake fluid.
BRAKE LINES AND CABLES
BRAKE LINES AND CABLES : InspectionINFOID:0000000012432279
BRAKE LINES
1. Check brake lines (pipes and hoses) for cracks, deterioration or other damage. Replace any damaged parts.
2. Check for brake fluid leaks by fully depressing brake pedal while engine is running.
CAUTION:
Retighten the applicable conn ection to the specified torque
and repair any abnormal (damag ed, worn or deformed) part
if any brake fluid leaks are present.
PARKING BRAKE CABLES
Check parking brake cables for improper attachment , leaks, chafing, abrasions, deterioration, etc.
Wheel nut tightening
torque
:
WT-48, "
Exploded View"
SMA829C
JPFIA0007ZZ
SBR389C
Revision: August 2015 2016 Versa Note
cardiagn.com
Page 2350 of 3641

CHASSIS AND BODY MAINTENANCEMA-35
< PERIODIC MAINTENANCE >
C
DE
F
G H
I
J
K L
M B
MA
N
O A
BRAKE FLUID
BRAKE FLUID : InspectionINFOID:0000000012432280
BRAKE FLUID LEVEL
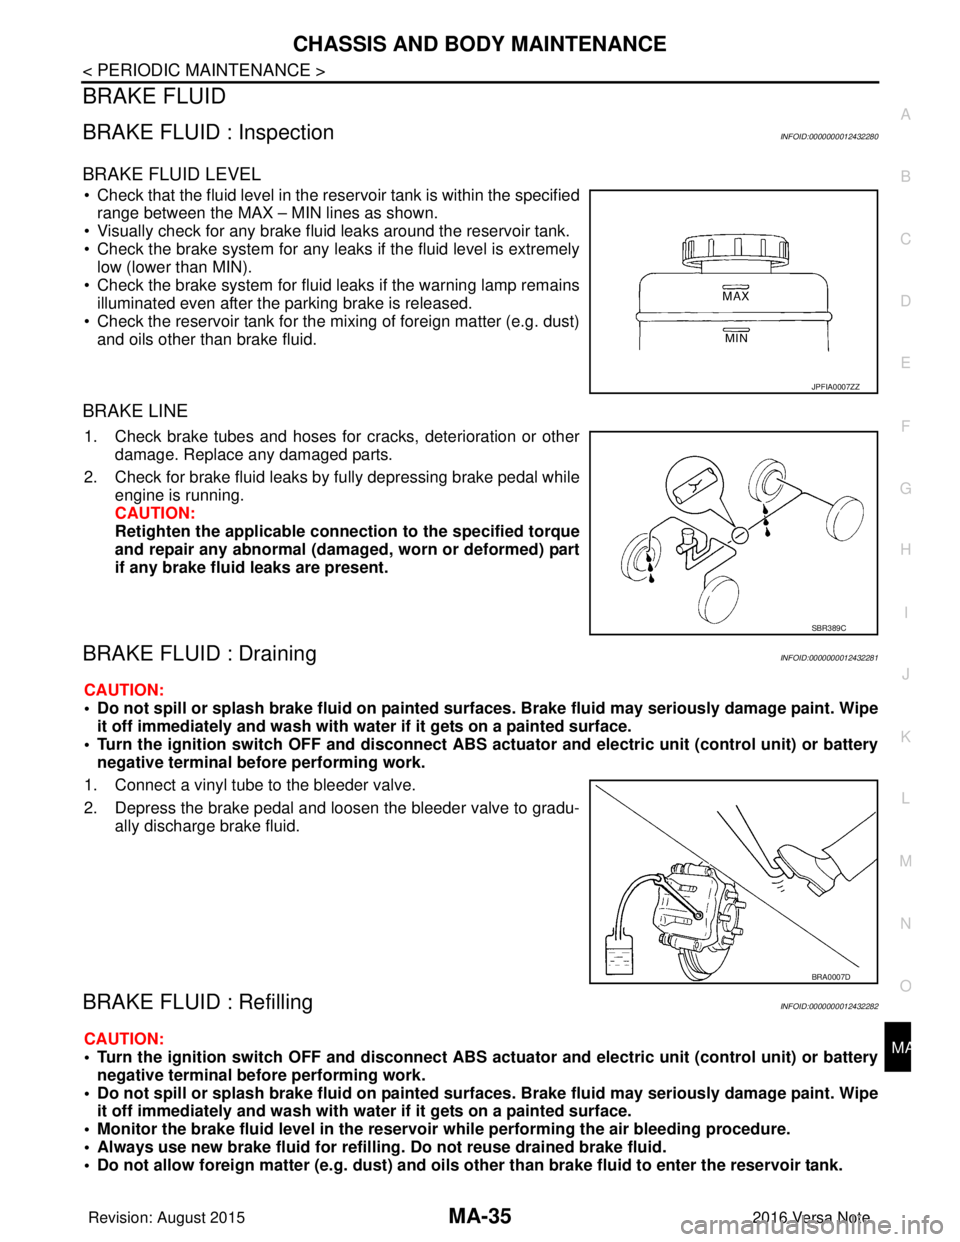
• Check that the fluid level in the re
servoir tank is within the specified
range between the MAX – MIN lines as shown.
• Visually check for any brake fluid leaks around the reservoir tank.
• Check the brake system for any leak s if the fluid level is extremely
low (lower than MIN).
• Check the brake system for fluid leaks if the warning lamp remains
illuminated even after the parking brake is released.
• Check the reservoir tank for the mixing of foreign matter (e.g. dust) and oils other than brake fluid.
BRAKE LINE
1. Check brake tubes and hoses for cracks, deterioration or other
damage. Replace any damaged parts.
2. Check for brake fluid leaks by fully depressing brake pedal while engine is running.
CAUTION:
Retighten the applicable conn ection to the specified torque
and repair any abnormal (damag ed, worn or deformed) part
if any brake fluid leaks are present.
BRAKE FLUID : DrainingINFOID:0000000012432281
CAUTION:
• Do not spill or splash brake fluid on painted su rfaces. Brake fluid may seriously damage paint. Wipe
it off immediately and wash with wa ter if it gets on a painted surface.
• Turn the ignition switch OFF an d disconnect ABS actuator and electric unit (control unit) or battery
negative terminal before performing work.
1. Connect a vinyl tube to the bleeder valve.
2. Depress the brake pedal and loosen the bleeder valve to gradu- ally discharge brake fluid.
BRAKE FLUID : RefillingINFOID:0000000012432282
CAUTION:
• Turn the ignition switch OFF an d disconnect ABS actuator and electric unit (control unit) or battery
negative terminal before performing work.
• Do not spill or splash brake fluid on painted su rfaces. Brake fluid may seriously damage paint. Wipe
it off immediately and wash with wa ter if it gets on a painted surface.
• Monitor the brake fluid level in the reservoir while performing the air bleeding procedure.
• Always use new brake fluid for refillin g. Do not reuse drained brake fluid.
• Do not allow foreign matter (e.g. dust) and oils ot her than brake fluid to enter the reservoir tank.
JPFIA0007ZZ
SBR389C
BRA0007D
Revision: August 2015 2016 Versa Note
cardiagn.com
Page 2360 of 3641

MWI-2
U1010 CONTROL UNIT (CAN) .........................39
Description ........................................................... ...39
DTC Logic ...............................................................39
Diagnosis Procedure ..............................................39
B2205 VEHICLE SPEED ...................................40
Description ........................................................... ...40
DTC Logic ...............................................................40
Diagnosis Procedure .............................................40
B2267 ENGINE SPEED .....................................41
Description ........................................................... ...41
DTC Logic ...............................................................41
Diagnosis Procedure ..............................................41
B2268 WATER TEMP ........................................42
Description ........................................................... ...42
DTC Logic ...............................................................42
Diagnosis Procedure ..............................................42
POWER SUPPLY AND GROUND CIRCUIT .....43
COMBINATION METER ........................................ ...43
COMBINATION METER : Diagnosis Procedure ....43
BCM (BODY CONTROL MODULE) ...................... ...43
BCM (BODY CONTROL MODULE) : Diagnosis
Procedure ...............................................................
44
FUEL LEVEL SENSOR SIGNAL CIRCUIT .......45
Description ........................................................... ...45
Component Function Check ...................................45
Diagnosis Procedure .............................................45
Component Inspection ............................................46
WASHER FLUID LEVEL SWITCH CIRCUIT ....47
Description ........................................................... ...47
Diagnosis Procedure ..............................................47
Component Inspection ............................................47
SYMPTOM DIAGNOSIS .............................48
THE FUEL GAUGE INDICATOR DOES NOT
OPERATE ....................................................... ...
48
Description ........................................................... ...48
Diagnosis Procedure ..............................................48
THE OIL PRESSURE WARNING LAMP
DOES NOT TURN ON .......................................
49
Description ..............................................................49
Diagnosis Procedure ..............................................49
THE OIL PRESSURE WARNING LAMP
DOES NOT TURN OFF .....................................
50
Description ........................................................... ...50
Diagnosis Procedure ..............................................50
THE DOOR OPEN WARNING CONTINUES
DISPLAYING, OR DOES NOT DISPLAY ..........
51
Description ........................................................... ...51
Diagnosis Procedure ..............................................51
THE PARKING BRAKE RELEASE WARNING
CONTINUES DISPLAYING, OR DOES NOT
DISPLAY ............................................................
52
Description ........................................................... ...52
Diagnosis Procedure ...............................................52
THE LOW WASHER FLUID WARNING CON-
TINUES DISPLAYING, or DOES NOT DIS-
PLAY ..................................................................
53
Description ........................................................... ...53
Diagnosis Procedure ...............................................53
REMOVAL AND INSTALLATION ..............54
COMBINATION METER ................................. ...54
Removal and Installation .........................................54
TYPE B
HOW TO USE THIS MANU AL ...................
55
APPLICATION NOTICE ................................. ...55
Information ........................................................... ...55
PRECAUTION ............................................56
PRECAUTIONS .............................................. ...56
Precaution for Supplemental Restraint System
(SRS) "AIR BAG" and "SEAT BELT PRE-TEN-
SIONER" .............................................................. ...
56
PREPARATION ..........................................57
PREPARATION .............................................. ...57
Commercial Service Tools ................................... ...57
SYSTEM DESCRIPTION ...........................58
COMPONENT PARTS .................................... ...58
METER SYSTEM .......................................................58
METER SYSTEM : Component Parts Location ... ...58
METER SYSTEM : Combination Meter ..................59
SYSTEM ............................................................61
METER SYSTEM .......................................................61
METER SYSTEM : System Description ............... ...61
METER SYSTEM : Fail-safe ...................................62
SPEEDOMETER .................................................... ...63
SPEEDOMETER : System Description ..................63
TACHOMETER ....................................................... ...63
TACHOMETER : System Description .....................64
SHIFT POSITION INDICATOR .............................. ...64
SHIFT POSITION INDICATOR : System Descrip-
tion ....................................................................... ...
64
HIGH WATER TEMPERATURE WARNING LAMP ...64
HIGH WATER TEMPERATURE WARNING
LAMP : System Description ....................................
64
Revision: August 2015 2016 Versa Note
cardiagn.com
Page 2361 of 3641

MWI
MWI-3
C
DE
F
G H
I
J
K L
M B
A
O P
OIL PRESSURE WARNING
LAMP ...........................
65
OIL PRESSURE WARNING LAMP : System De-
scription ............................................................... ....
65
METER ILLUMINATION CONTROL ..................... ....65
METER ILLUMINATION CONTROL : System De-
scription ...................................................................
66
INFORMATION DISPLAY ..................................... ....66
INFORMATION DISPLAY : System Description .....66
OPERATION ................................................... ....68
Switch Name and Function ................................. ....68
DIAGNOSIS SYSTEM (COMBINATION
METER) ..............................................................
69
On Board Diagnosis Function ............................. ....69
CONSULT Function (METER/M&A) .......................71
ECU DIAGNOSIS INFORMATION ..............74
COMBINATION METER ................................. ....74
Reference Value ................................................. ....74
Fail-safe ..................................................................77
DTC Index ...............................................................77
BCM (BODY CONTROL MODULE) ...................78
List of ECU Reference ........................................ ....78
WIRING DIAGRAM ......................................79
METER SYSTEM ............................................ ....79
Wiring Diagram ................................................... ....79
BASIC INSPECTION ...................................92
DIAGNOSIS AND REPAIR WORK FLOW .... ....92
Work Flow ........................................................... ....92
DTC/CIRCUIT DIAGNOSIS .........................93
U1000 CAN COMM CI RCUIT .............................93
DTC Logic ........................................................... ....93
Diagnosis Procedure ..............................................93
U1010 CONTROL UNIT (CAN) ..........................94
Description ..............................................................94
DTC Logic ...............................................................94
Diagnosis Procedure ...............................................94
B2205 VEHICLE SPEED ....................................95
Description ..............................................................95
DTC Logic ...............................................................95
Diagnosis Procedure ..............................................95
B2267 ENGINE SPEED .....................................96
Description .......................................................... ....96
DTC Logic ...............................................................96
Diagnosis Procedure ...............................................96
B2268 WATER TEMP ........................................97
Description .......................................................... ....97
DTC Logic ...............................................................97
Diagnosis Procedure ........................................... ....97
POWER SUPPLY AND GROUND CIRCUIT ....98
COMBINATION METER ........................................ ....98
COMBINATION METER : Diagnosis Procedure .....98
BCM (BODY CONTROL SYSTEM) (WITHOUT IN-
TELLIGENT KEY SYSTEM) .................................. ....
98
BCM (BODY CONTROL SYSTEM) (WITHOUT
INTELLIGENT KEY SYSTEM) : Diagnosis Proce-
dure ..................................................................... ....
98
BCM (BODY CONTROL SYSTEM) (WITH INTEL-
LIGENT KEY SYSTEM) .............................................
99
BCM (BODY CONTROL SYSTEM) (WITH INTEL-
LIGENT KEY SYSTEM) : Diagnosis Procedure .. ....
99
FUEL LEVEL SENSOR SIGNAL CIRCUIT ....101
Description .............................................................101
Component Function Check ..................................101
Diagnosis Procedure ............................................101
Component Inspection ...........................................102
STEERING SWITCH .......................................103
Diagnosis Procedure .............................................103
AMBIENT SENSOR SIGNAL CIRCUIT ..........104
Description .............................................................104
Diagnosis Procedure ............................................104
Component Inspection ...........................................105
WASHER FLUID LEVEL SWITCH CIRCUIT ..106
Description .............................................................106
Diagnosis Procedure .............................................106
Component Inspection ...........................................106
SYMPTOM DIAGNOSIS ............................107
THE FUEL GAUGE INDICATOR DOES NOT
OPERATE .......................................................
107
Description ........................................................... ..107
Diagnosis Procedure .............................................107
THE OIL PRESSURE WARNING LAMP
DOES NOT TURN ON .....................................
108
Description .............................................................108
Diagnosis Procedure .............................................108
THE OIL PRESSURE WARNING LAMP
DOES NOT TURN OFF ...................................
109
Description .............................................................109
Diagnosis Procedure .............................................109
THE DOOR OPEN WARNING CONTINUES
DISPLAYING, OR DOES NOT DISPLAY .......
110
Description .............................................................110
Diagnosis Procedure .............................................110
THE PARKING BRAKE RELEASE WARNING
CONTINUES DISPLAYING, OR DOES NOT
DISPLAY .........................................................
111
Revision: August 2015 2016 Versa Note
cardiagn.com
Page 2364 of 3641
![NISSAN NOTE 2016 Service Repair Manual MWI-6
< PRECAUTION >[TYPE A]
PRECAUTIONS
PRECAUTION
PRECAUTIONS
Precaution for Supplemental Restraint Syst
em (SRS) "AIR BAG" and "SEAT BELT
PRE-TENSIONER"
INFOID:0000000012432539
The Supplemental Re NISSAN NOTE 2016 Service Repair Manual MWI-6
< PRECAUTION >[TYPE A]
PRECAUTIONS
PRECAUTION
PRECAUTIONS
Precaution for Supplemental Restraint Syst
em (SRS) "AIR BAG" and "SEAT BELT
PRE-TENSIONER"
INFOID:0000000012432539
The Supplemental Re](/manual-img/5/57363/w960_57363-2363.png)
MWI-6
< PRECAUTION >[TYPE A]
PRECAUTIONS
PRECAUTION
PRECAUTIONS
Precaution for Supplemental Restraint Syst
em (SRS) "AIR BAG" and "SEAT BELT
PRE-TENSIONER"
INFOID:0000000012432539
The Supplemental Restraint System such as “A IR BAG” and “SEAT BELT PRE-TENSIONER”, used along
with a front seat belt, helps to reduce the risk or severity of injury to the driver and front passenger for certain
types of collision. Information necessary to service the system safely is included in the SR and SB section of
this Service Manual.
WARNING:
• To avoid rendering the SRS inopera tive, which could increase the risk of personal injury or death in
the event of a collision which would result in air bag inflation, all maintenance must be performed by
an authorized NISSAN/INFINITI dealer.
• Improper maintenance, including in correct removal and installation of the SRS, can lead to personal
injury caused by unintent ional activation of the system. For re moval of Spiral Cable and Air Bag
Module, see the SR section.
• Do not use electrical test equipmen t on any circuit related to the SRS unless instructed to in this
Service Manual. SRS wiring harn esses can be identified by yellow and/or orange harnesses or har-
ness connectors.
PRECAUTIONS WHEN USING POWER TOOLS (AIR OR ELECTRIC) AND HAMMERS
WARNING:
• When working near the Airbag Diagnosis Sensor Unit or other Airbag System sensors with the Igni-
tion ON or engine running, DO NOT use air or electri c power tools or strike near the sensor(s) with a
hammer. Heavy vibration could activate the sensor( s) and deploy the air bag(s), possibly causing
serious injury.
• When using air or electric power tools or hammers , always switch the Ignition OFF, disconnect the
battery and wait at least three minutes before performing any service.
Revision: August 2015 2016 Versa Note
cardiagn.com
Page 2366 of 3641
![NISSAN NOTE 2016 Service Repair Manual MWI-8
< SYSTEM DESCRIPTION >[TYPE A]
COMPONENT PARTS
SYSTEM DESCRIPTION
COMPONENT PARTS
METER SYSTEM
METER SYSTEM : Component Parts LocationINFOID:0000000012432541
A. Combination meter
B. View with re NISSAN NOTE 2016 Service Repair Manual MWI-8
< SYSTEM DESCRIPTION >[TYPE A]
COMPONENT PARTS
SYSTEM DESCRIPTION
COMPONENT PARTS
METER SYSTEM
METER SYSTEM : Component Parts LocationINFOID:0000000012432541
A. Combination meter
B. View with re](/manual-img/5/57363/w960_57363-2365.png)
MWI-8
< SYSTEM DESCRIPTION >[TYPE A]
COMPONENT PARTS
SYSTEM DESCRIPTION
COMPONENT PARTS
METER SYSTEM
METER SYSTEM : Component Parts LocationINFOID:0000000012432541
A. Combination meter
B. View with rear lower seat cushion and inspection hole
cover removed.
No. Component Function
1. Parking brake switch Transmits the parking brake switch signal to the combination meter.
2. ABS actuator and electric unit
(control unit) Transmits the vehicle speed signal to the combination meter via CAN communication.
Refer to BRC-7, "
Component Parts Location" for detailed installation location.
3. Washer fluid level switch Transmits the washer fluid level switch signal to the combination meter (for Canada).
Refer to WW-6, "
Component Parts Location" for detailed installation location.
4. Engine oil pressure sensor Transmits the engine oil pressure sensor signal to the ECM.
Refer to EM-93, "
Exploded View" for detailed installation location.
5. TCM Transmits the shift position signal to the combination meter via CAN communication
(with CVT).
Refer to TM-61, "
CVT CONTROL SYSTEM : Co
mponent Parts Location" for detailed
installation location.
AWNIA3135ZZ
Revision: August 2015 2016 Versa Note
cardiagn.com