Page 1138 of 3641
PRECAUTIONSEC-11
< PRECAUTION > [HR16DE]
C
D
E
F
G H
I
J
K L
M A
EC
NP
O
•
When installing C.B. ham radio or a mobile phone, be sure to
observe the following as it may adversely affect electronic
control systems depending on installation location.
- Keep the antenna as far as possible from the electronic con-
trol units.
- Keep the antenna feeder line more than 20 cm (8 in) away
from the harness of electronic controls.
Do not let them run para llel for a long distance.
- Adjust the antenna and feeder line so that the standing-wave
ratio can be kept smaller.
- Be sure to ground the radio to vehicle body.
SEF708Y
Revision: August 2015 2016 Versa Note
cardiagn.com
Page 2181 of 3641
INT-30
< REMOVAL AND INSTALLATION >
HEADLINING
HEADLINING
Exploded ViewINFOID:0000000012431873
1. Headlining2. Rear assist grip (RH)3. Front assist grip (RH)
4. Microphone (if equipped) 5. Sun visor holder (RH) 6. Sun visor holder (LH)
7. Map lamp 8. Sun visor (RH)9. Sun visor (LH)
10. Interior room lamp 11. Rear assist grip (LH)A. Headlining clip
Pawl Metal clip
AWJIA1907ZZ
Revision: August 2015 2016 Versa Note
cardiagn.com
Page 2182 of 3641

HEADLININGINT-31
< REMOVAL AND INSTALLATION >
C
DE
F
G H
I
K L
M A
B
INT
N
O P
Removal and InstallationINFOID:0000000012431874
REMOVAL
1. Remove front pillar finishers (LH/RH). Refer to INT-21, "FRONT PILLAR FINISHER : Removal and Instal-
lation".
2. Remove sun visor screws and sun visors (LH/RH).
3. Remove map lamp. Refer to INL-51, "
Removal and Installation".
4. Remove interior room lamp. Refer to INL-53, "
Removal and Installation".
5. Remove microphone (if equipped). Refer to AV-59, "
Removal and Installation".
6. Remove center pillar upper finishers (LH/RH). Refer to INT-25, "
CENTER PILLAR UPPER FINISHER :
Removal and Installation".
7. Remove luggage side upper finishers (LH/RH). Refer to INT-35, "
LUGGAGE SIDE UPPER FINISHER :
Removal and Installation".
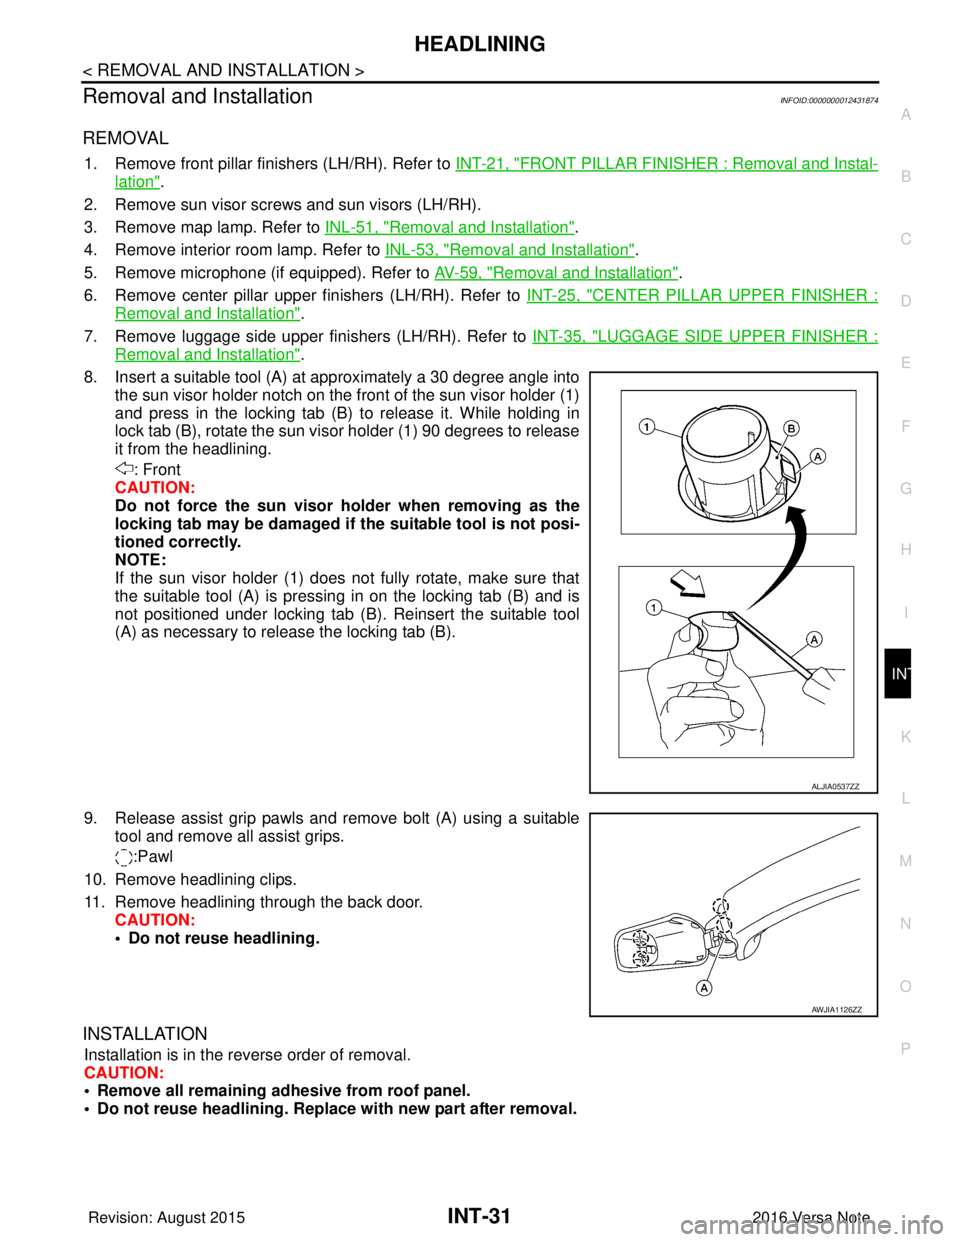
8. Insert a suitable tool (A) at approximately a 30 degree angle into the sun visor holder notch on the front of the sun visor holder (1)
and press in the locking tab (B) to release it. While holding in
lock tab (B), rotate the sun visor holder (1) 90 degrees to release
it from the headlining.
: Front
CAUTION:
Do not force the sun visor ho lder when removing as the
locking tab may be damaged if the suitable tool is not posi-
tioned correctly.
NOTE:
If the sun visor holder (1) does not fully rotate, make sure that
the suitable tool (A) is pressing in on the locking tab (B) and is
not positioned under locking tab (B). Reinsert the suitable tool
(A) as necessary to release the locking tab (B).
9. Release assist grip pawls and remove bolt (A) using a suitable tool and remove all assist grips.
:Pawl
10. Remove headlining clips.
11. Remove headlining through the back door. CAUTION:
• Do not reuse headlining.
INSTALLATION
Installation is in the reverse order of removal.
CAUTION:
• Remove all remaining adhesive from roof panel.
• Do not reuse headlini ng. Replace with new part after removal.
ALJIA0537ZZ
AWJIA1126ZZ
Revision: August 2015 2016 Versa Note
cardiagn.com
Page 2639 of 3641
PG-52
< WIRING DIAGRAM >
HARNESS
ROOM LAMP HARNESS
AAMIA0190ZZ
D 5 R 1 W / 8 : To M 1E 1 R 7 W / 3 : I n t e r i o r r o o m l a m p
C2 R2 W/6 : Map lamp D2 R15 W/4 : Microphone
Revision: August 2015 2016 Versa Note
cardiagn.com