2016 NISSAN NOTE steering wheel adjustment
[x] Cancel search: steering wheel adjustmentPage 1852 of 3641
WHEEL ALIGNMENTFSU-7
< PERIODIC MAINTENANCE >
C
DF
G H
I
J
K L
M A
B
FSU
N
O P
WHEEL ALIGNMENT
InspectionINFOID:0000000012430301
PRELIMINARY INSPECTION
WARNING:
Always adjust the wheel alignment with the vehicle on a flat surface.
NOTE:
If the wheel alignment is out of s pecification, inspect and replace any damaged or worn rear suspension parts
before making any adjustments.
1. Check and adjust the wheel alignment with the vehicle under unladen conditions. “Unladen conditions”
means that the fuel, engine coolant, and lubricants are full; the spare tire, jack, hand tools and mats are in
designated positions.
2. Check the tires for incorrect air pressure and excessive wear.
3. Check the wheels for run out and damage. Refer to WT-54, "
Wheel".
4. Check the wheel bearing axial end play. Refer to FAX-27, "
Wheel Bearing".
5. Check the shock absorbers for leaks or damage.
6. Check each mount point of the suspension co mponents for any excessive looseness or damage.
7. Check each link, arm, and the suspension member for any damage.
8. Check the vehicle height. Refer to FSU-21, "
Wheelarch Height (Unladen*)".
GENERAL INFORMATION AND RECOMMENDATIONS
1. A Four-Wheel Thrust Alignment should be performed.
• This type of alignment is recomm ended for any NISSAN/INFINITI vehicle.
• The four-wheel “thrust” process helps ensure that the vehicle is properly aligned and the steering wheel
is centered.
• The alignment machine itself should be capabl e of accepting any NISSAN/INFINITI vehicle.
• The alignment machine should be checked to ensure that it is level.
2. Make sure the alignment machine is properly calibrated. • Your alignment machine should be regularly calibrated in order to give correct information.
• Check with the manufacturer of your specific a lignment machine for their recommended Service/Cali-
bration Schedule.
ALIGNMENT PROCESS
IMPORTANT: Use only the alignment specifications listed in this Service Manual. Refer to FSU-20, "Wheel
Alignment (Unladen*1)".
• When displaying the alignment settings, many alignment machines use “indicators”: (Green/red, plus or
minus, Go/No Go). Do NOT use these indicators.
- The alignment specifications programmed into your alignment machine that operate these indicators may
not be correct.
- This may result in an ERROR.
• Most camera-type alignment machines are equipped with "Rolling Compensation" method and optional
"Jacking Compensation" method to "compensate" the alignment targets or head units.
"Rolling Compensation" is the preferred method.
- If using the "Rolling Compensation" method, after inst alling the alignment targets or head units, push or pull
on the rear wheel to move the vehicle. Do not push or pull on the vehicle body.
- If using the "Jacking Compensation" method, after inst alling the alignment targets or head units, raise the
vehicle and rotate the wheels 1/2 turn in either direction.
NOTE:
Do not use the "Rolling Compensation" method if you are using sensor-type alignment equipment.
• Follow all instructions for the alignment machine you're using for more information.
CAMBER, CASTER AND KINGPIN INCLINATION ANGLES INSPECTION
• Camber, caster, kingpin inclination angles cannot be adjusted.
• Before inspection, set the front wheels onto a turning radius gauge. Set the rear wheels onto a pad that has
the same height so the vehicle will remain horizontal.
TOTAL TOE-IN INSPECTION
Measure the total toe-in using the following procedure.
Revision: August 2015 2016 Versa Note
cardiagn.com
Page 1853 of 3641
FSU-8
< PERIODIC MAINTENANCE >
WHEEL ALIGNMENT
WARNING:
• Always perform the following procedure on a flat surface.
• Make sure that no person is in fr ont of vehicle before pushing it.
1. Bounce the front of vehicle up and down to stabilize the vehicle height (posture).
2. Push on the rear wheel to move the vehicle straight ahead about 5 m (16 ft).
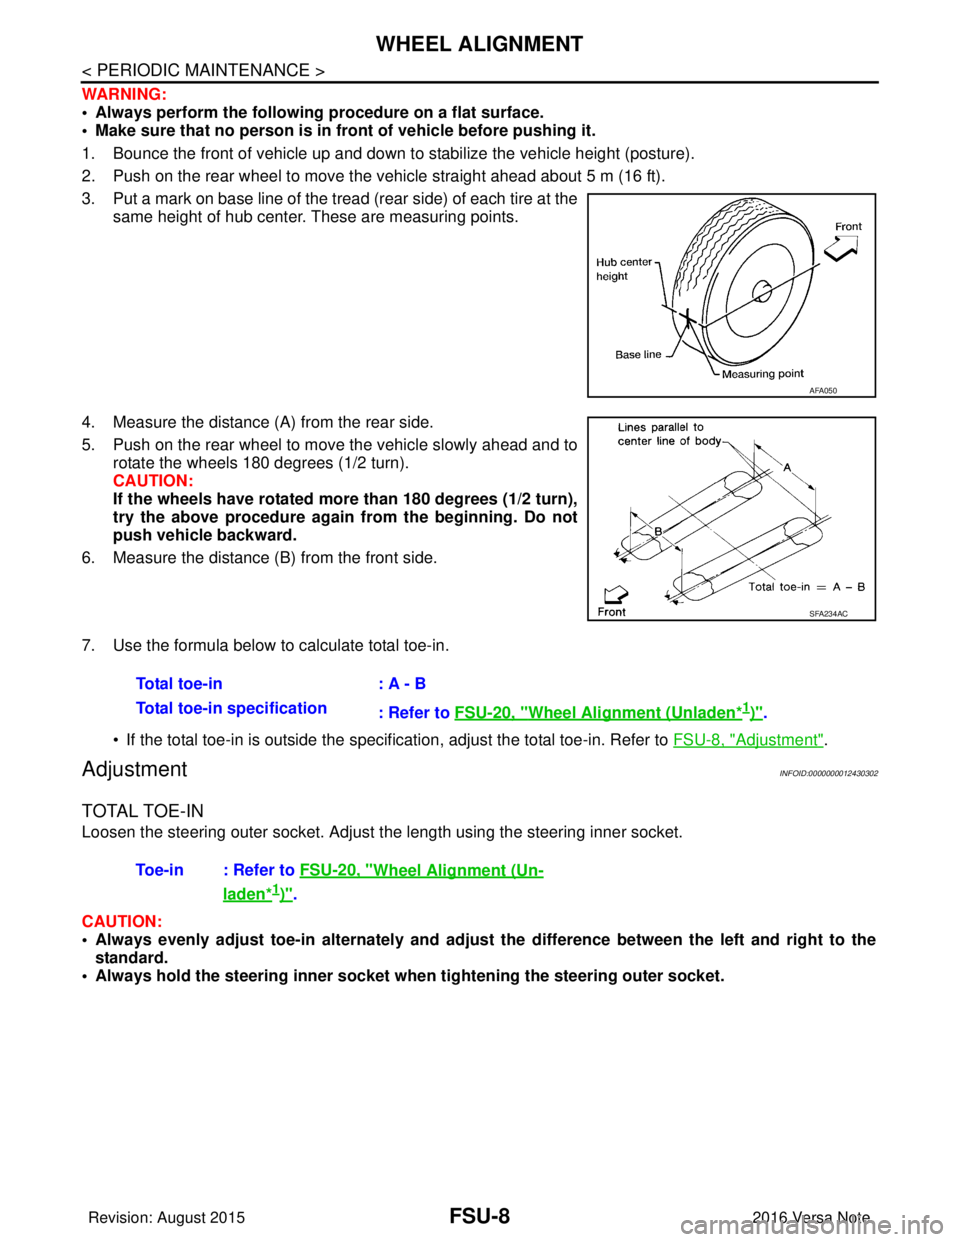
3. Put a mark on base line of the tread (rear side) of each tire at the same height of hub center. These are measuring points.
4. Measure the distance (A) from the rear side.
5. Push on the rear wheel to move the vehicle slowly ahead and to rotate the wheels 180 degrees (1/2 turn).
CAUTION:
If the wheels have rotated more than 180 degrees (1/2 turn),
try the above procedure again from the beginning. Do not
push vehicle backward.
6. Measure the distance (B) from the front side.
7. Use the formula below to calculate total toe-in.
• If the total toe-in is outside the specification, adjust the total toe-in. Refer to FSU-8, "
Adjustment".
AdjustmentINFOID:0000000012430302
TOTAL TOE-IN
Loosen the steering outer socket. Adjust the length using the steering inner socket.
CAUTION:
• Always evenly adjust toe-in alternately and adjust the difference be tween the left and right to the
standard.
• Always hold the steering inner socket wh en tightening the steering outer socket.
AFA050
SFA234AC
Total toe-in: A - B
Total toe-in specification : Refer to FSU-20, "
Wheel Alignment (Unladen*1)".
Toe-in : Refer to FSU-20, "
Wheel Alignment (Un-
laden*1)".
Revision: August 2015 2016 Versa Note
cardiagn.com
Page 1856 of 3641
TRANSVERSE LINKFSU-11
< REMOVAL AND INSTALLATION >
C
DF
G H
I
J
K L
M A
B
FSU
N
O P
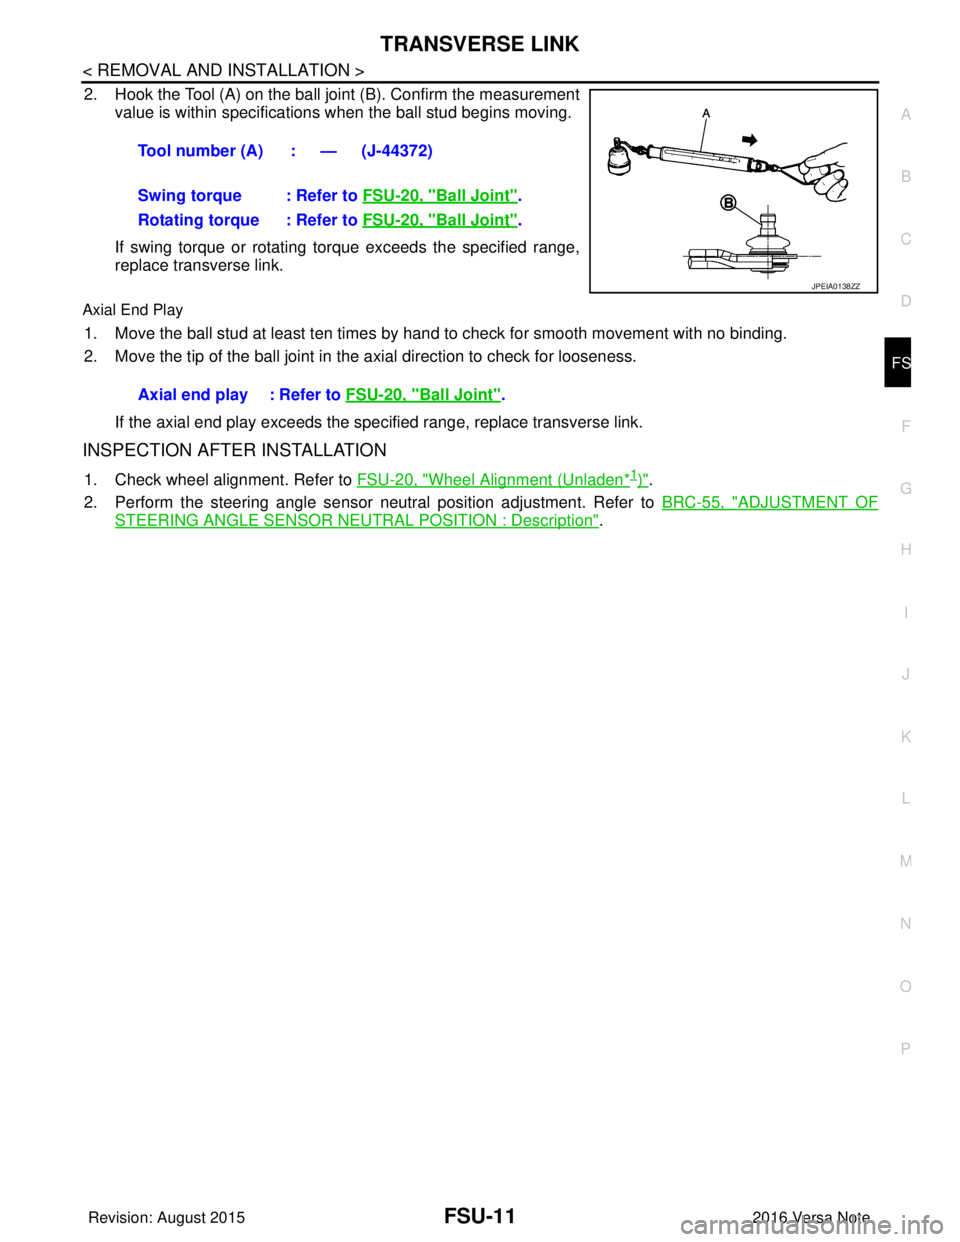
2. Hook the Tool (A) on the ball joint (B). Confirm the measurement value is within specifications when the ball stud begins moving.
If swing torque or rotating torque exceeds the specified range,
replace transverse link.
Axial End Play
1. Move the ball stud at least ten times by hand to check for smooth movement with no binding.
2. Move the tip of the ball joint in the axial direction to check for looseness.
If the axial end play exceeds the specified range, replace transverse link.
INSPECTION AFTER INSTALLATION
1. Check wheel alignment. Refer to FSU-20, "Wheel Alignment (Unladen*1)".
2. Perform the steering angle sensor neutral position adjustment. Refer to BRC-55, "
ADJUSTMENT OF
STEERING ANGLE SENSOR NEUTRAL POSITION : Description".
Tool number (A) : — (J-44372)
Swing torque : Refer to
FSU-20, "
Ball Joint".
Rotating torque : Refer to FSU-20, "
Ball Joint".
JPEIA0138ZZ
Axial end play : Refer to FSU-20, "Ball Joint".
Revision: August 2015 2016 Versa Note
cardiagn.com
Page 1858 of 3641
FRONT STABILIZERFSU-13
< REMOVAL AND INSTALLATION >
C
DF
G H
I
J
K L
M A
B
FSU
N
O P
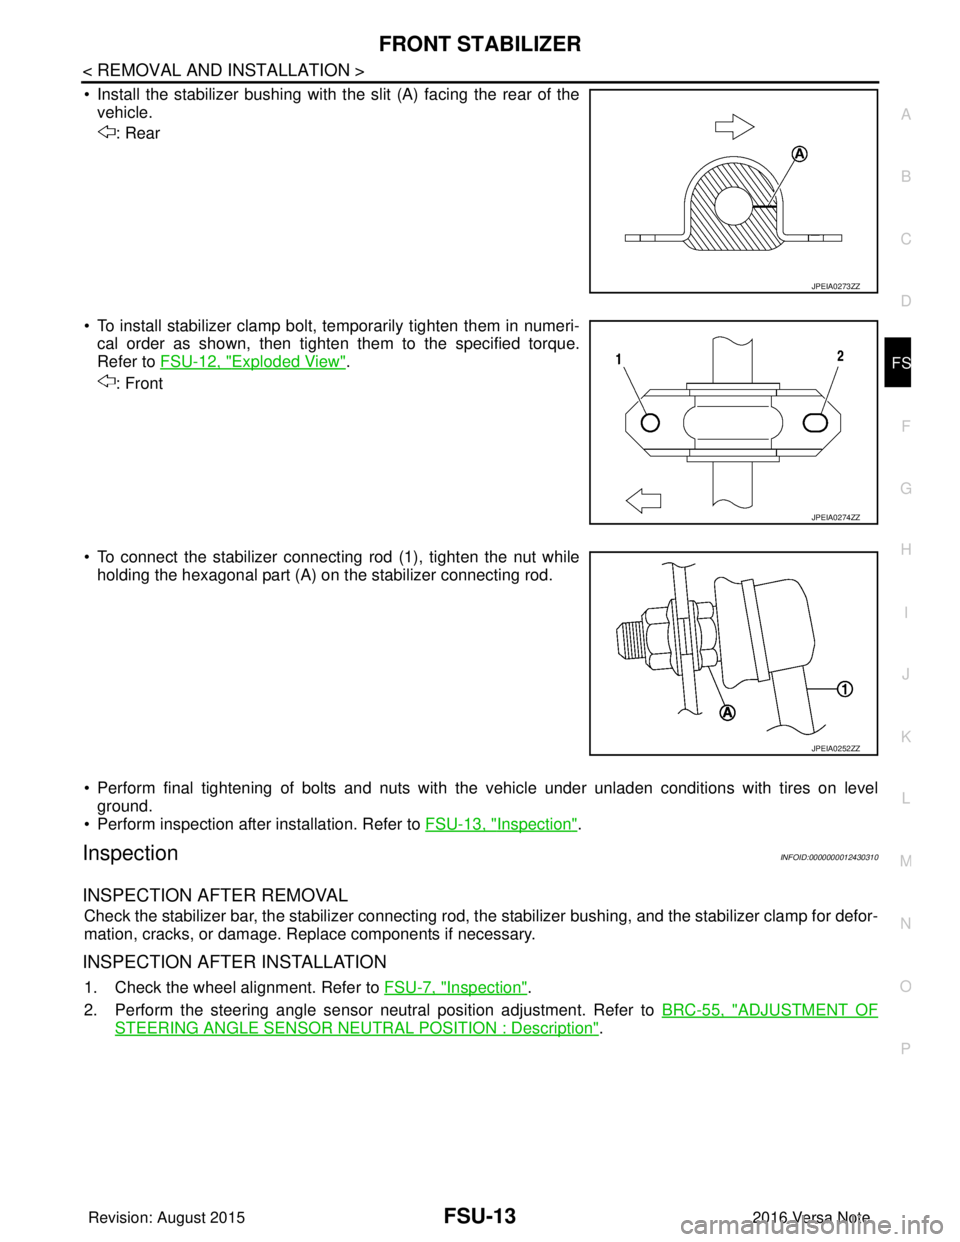
• Install the stabilizer bushing with the slit (A) facing the rear of the vehicle.
: Rear
• To install stabilizer clamp bolt, temporarily tighten them in numeri- cal order as shown, then tighten them to the specified torque.
Refer to FSU-12, "
Exploded View".
: Front
• To connect the stabilizer connecting rod (1), tighten the nut while holding the hexagonal part (A) on the stabilizer connecting rod.
• Perform final tightening of bolts and nuts with the vehicle under unladen conditions with tires on level ground.
• Perform inspection after installation. Refer to FSU-13, "
Inspection".
InspectionINFOID:0000000012430310
INSPECTION AFTER REMOVAL
Check the stabilizer bar, the stabilizer connecting rod, t he stabilizer bushing, and the stabilizer clamp for defor-
mation, cracks, or damage. Replace components if necessary.
INSPECTION AFTER INSTALLATION
1. Check the wheel alignment. Refer to FSU-7, "Inspection".
2. Perform the steering angle sensor neutral position adjustment. Refer to BRC-55, "
ADJUSTMENT OF
STEERING ANGLE SENSOR NEUTRAL POSITION : Description".
JPEIA0273ZZ
JPEIA0274ZZ
JPEIA0252ZZ
Revision: August 2015 2016 Versa Note
cardiagn.com
Page 1860 of 3641
FRONT SUSPENSION MEMBERFSU-15
< UNIT REMOVAL AND INSTALLATION >
C
DF
G H
I
J
K L
M A
B
FSU
N
O P
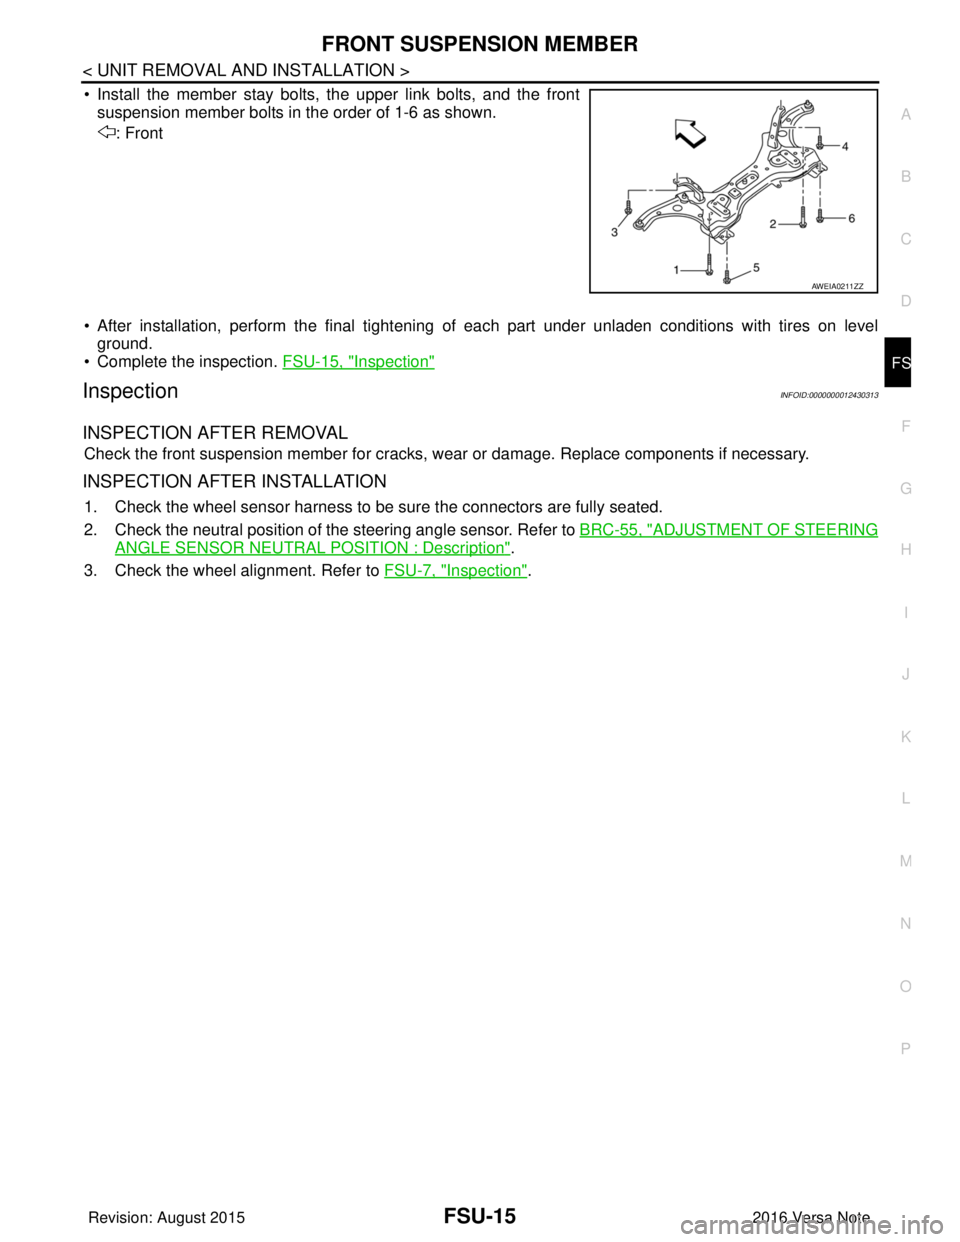
• Install the member stay bolts, the upper link bolts, and the front suspension member bolts in the order of 1-6 as shown.
: Front
• After installation, perform the final tightening of each part under unladen conditions with tires on level
ground.
• Complete the inspection. FSU-15, "
Inspection"
InspectionINFOID:0000000012430313
INSPECTION AFTER REMOVAL
Check the front suspension member for cracks, wear or damage. Replace components if necessary.
INSPECTION AFTER INSTALLATION
1. Check the wheel sensor harness to be sure the connectors are fully seated.
2. Check the neutral position of the steering angle sensor. Refer to BRC-55, "
ADJUSTMENT OF STEERING
ANGLE SENSOR NEUTRAL POSITION : Description".
3. Check the wheel alignment. Refer to FSU-7, "
Inspection".
AWEIA0211ZZ
Revision: August 2015 2016 Versa Note
cardiagn.com
Page 1864 of 3641
FRONT COIL SPRING AND STRUTFSU-19
< UNIT DISASSEMBLY AND ASSEMBLY >
C
DF
G H
I
J
K L
M A
B
FSU
N
O P
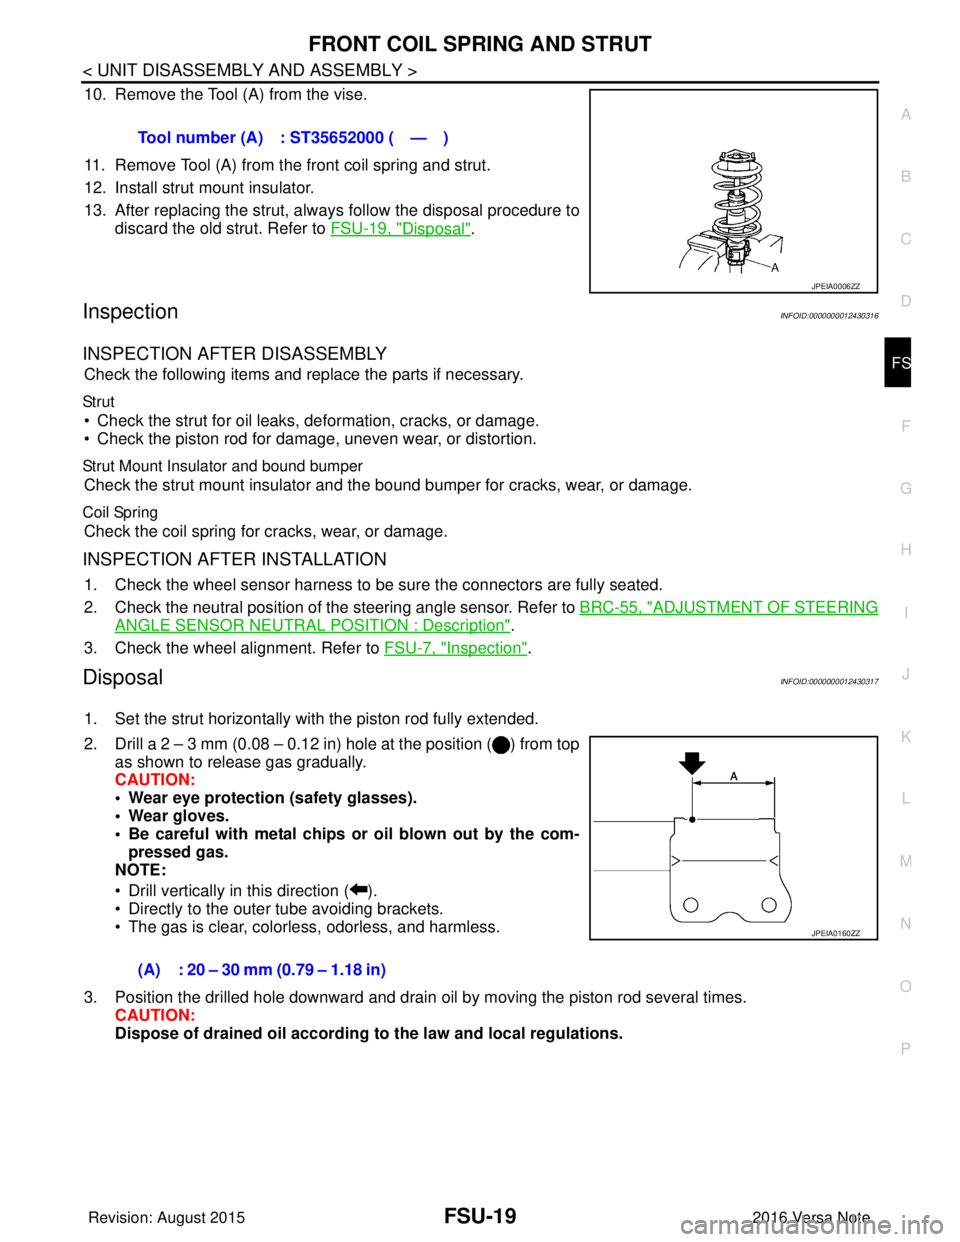
10. Remove the Tool (A) from the vise.
11. Remove Tool (A) from the front coil spring and strut.
12. Install strut mount insulator.
13. After replacing the strut, always follow the disposal procedure to discard the old strut. Refer to FSU-19, "
Disposal".
InspectionINFOID:0000000012430316
INSPECTION AFTER DISASSEMBLY
Check the following items and replace the parts if necessary.
Str ut
• Check the strut for oil leaks, deformation, cracks, or damage.
• Check the piston rod for damage, uneven wear, or distortion.
Strut Mount Insulator and bound bumper
Check the strut mount insulator and t he bound bumper for cracks, wear, or damage.
Coil Spring
Check the coil spring for cracks, wear, or damage.
INSPECTION AFTER INSTALLATION
1. Check the wheel sensor harness to be sure the connectors are fully seated.
2. Check the neutral position of the steering angle sensor. Refer to BRC-55, "
ADJUSTMENT OF STEERING
ANGLE SENSOR NEUTRAL POSITION : Description".
3. Check the wheel alignment. Refer to FSU-7, "
Inspection".
DisposalINFOID:0000000012430317
1. Set the strut horizontally with the piston rod fully extended.
2. Drill a 2 – 3 mm (0.08 – 0.12 in) hole at the position ( ) from top
as shown to release gas gradually.
CAUTION:
• Wear eye protection (safety glasses).
• Wear gloves.
• Be careful with metal chips or oil blown out by the com-
pressed gas.
NOTE:
• Drill vertically in this direction ( ).
• Directly to the outer tube avoiding brackets.
• The gas is clear, colorless, odorless, and harmless.
3. Position the drilled hole downward and drain oil by moving the piston rod several times. CAUTION:
Dispose of drained oil according to the law and local regulations.
Tool number (A) : ST35652000 ( — )
JPEIA0006ZZ
(A) : 20 – 30 mm (0.79 – 1.18 in)
JPEIA0160ZZ
Revision: August 2015
2016 Versa Note
cardiagn.com
Page 2742 of 3641
RSU-14
< REMOVAL AND INSTALLATION >
REAR SUSPENSION BEAM
• Perform the final tightening of the rear suspension beam nuts and bolts under unladen conditions with thetires on level ground.
• Adjust the parking brake. Refer to PB-4, "
Inspection and Adjustment".
• Fill the hydraulic brake system. Refer to BR-12, "
Refilling".
• Bleed the hydraulic brake system. Refer to BR-13, "
Bleeding Brake System".
• Complete the inspection. Refer to BR-12, "
Inspection".
InspectionINFOID:0000000012431932
INSPECTION AFTER REMOVAL
Check the rear suspension beam for deformation, cracks or damage. Replace the parts if necessary.
INSPECTION AFTER INSTALLATION
1. Check the wheel sensor harness to be sure the connectors are fully seated.
2. Check the neutral position of the steering angle sensor. Refer to BRC-55, "
ADJUSTMENT OF STEERING
ANGLE SENSOR NEUTRAL POSITION : Description".
3. Check the wheel alignment. Refer to RSU-6, "
Inspection".
Revision: August 2015 2016 Versa Note
cardiagn.com
Page 3134 of 3641
SR-18
< REMOVAL AND INSTALLATION >
SPIRAL CABLE
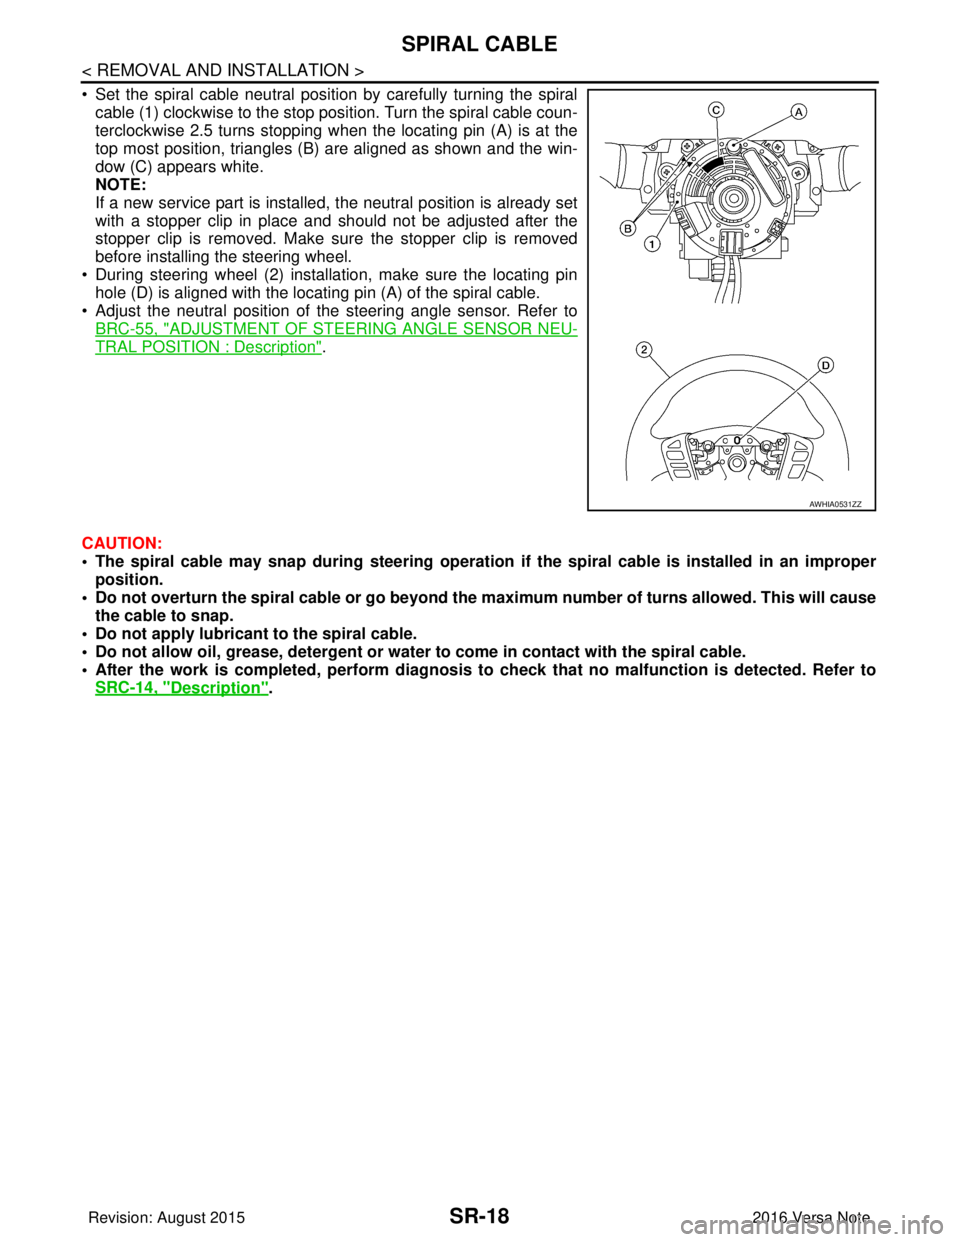
• Set the spiral cable neutral position by carefully turning the spiralcable (1) clockwise to the stop position. Turn the spiral cable coun-
terclockwise 2.5 turns stopping when the locating pin (A) is at the
top most position, triangles (B) are aligned as shown and the win-
dow (C) appears white.
NOTE:
If a new service part is installed, the neutral position is already set
with a stopper clip in place and should not be adjusted after the
stopper clip is removed. Make sure the stopper clip is removed
before installing the steering wheel.
• During steering wheel (2) installation, make sure the locating pin hole (D) is aligned with the locating pin (A) of the spiral cable.
• Adjust the neutral position of the steering angle sensor. Refer to
BRC-55, "
ADJUSTMENT OF STEERI NG ANGLE SENSOR NEU-
TRAL POSITION : Description".
CAUTION:
• The spiral cable may snap during steering operation if the spiral cable is installed in an improper
position.
• Do not overturn the spiral cable or go beyond the maximum number of turns allowed. This will cause
the cable to snap.
• Do not apply lubricant to the spiral cable.
• Do not allow oil, grease, detergent or water to come in contact with the spiral cable.
• After the work is completed, perform diagnosis to check that no malfunction is detected. Refer to
SRC-14, "
Description".
AWHIA0531ZZ
Revision: August 2015 2016 Versa Note
cardiagn.com