2016 NISSAN NOTE steering wheel
[x] Cancel search: steering wheelPage 3226 of 3641
STEERING WHEELST-5
< BASIC INSPECTION >
C
DE
F
H I
J
K L
M A
B
ST
N
O P
BASIC INSPECTION
STEERING WHEEL
InspectionINFOID:0000000012430497
CONDITION OF INSTALLATION
• Check installation conditions of steering gear, front suspension, axle and steering column.
• Check if movement exists when steering wheel is mo ved up and down, to the left and right and to the axial
direction.
• Verify that the steering gear nuts are tightened to specification. Refer to ST-14, "
Exploded View".
STEERING WHEEL PLAY
1. Set the front wheels and tires in the straight-ahead position, start engine, then lightly turn steering wheel
to the left and right until the front wheels start to move. Measure steering wheel movement on the outer
circumference.
2. When the measurement value is outside the standard va lue, check backlash for each joint of steering col-
umn and installation condition of steering gear.
STEERING WHEEL NEUTRAL POSITION
Check steering wheel neutral position using the following procedure:
1. Confirm that front wheel alignment is correct. Refer to FSU-8, "
Adjustment".
2. Set the front wheels and tires in the straight-ahead posit ion, check if steering wheel is in the neutral posi-
tion.
3. If it is not in the neutral position, remo ve steering wheel and reinstall it correctly.
4. If the neutral position cannot be attained by repositi oning the steering wheel two teeth or less on steering
stem, loosen the steering gear outer socket lock nuts, then adjust the inner sockets by the same amount
in the opposite direction.
5. Re-check the front wheel alignment. Refer to FSU-8, "
Adjustment".
STEERING WHEEL TURNING FORCE
1. Park vehicle on a level and dry surface, set parking brake.
2. Tires need to be inflated normal pressure. Refer to WT-54, "
Tire Air Pressure".
3. Start engine.
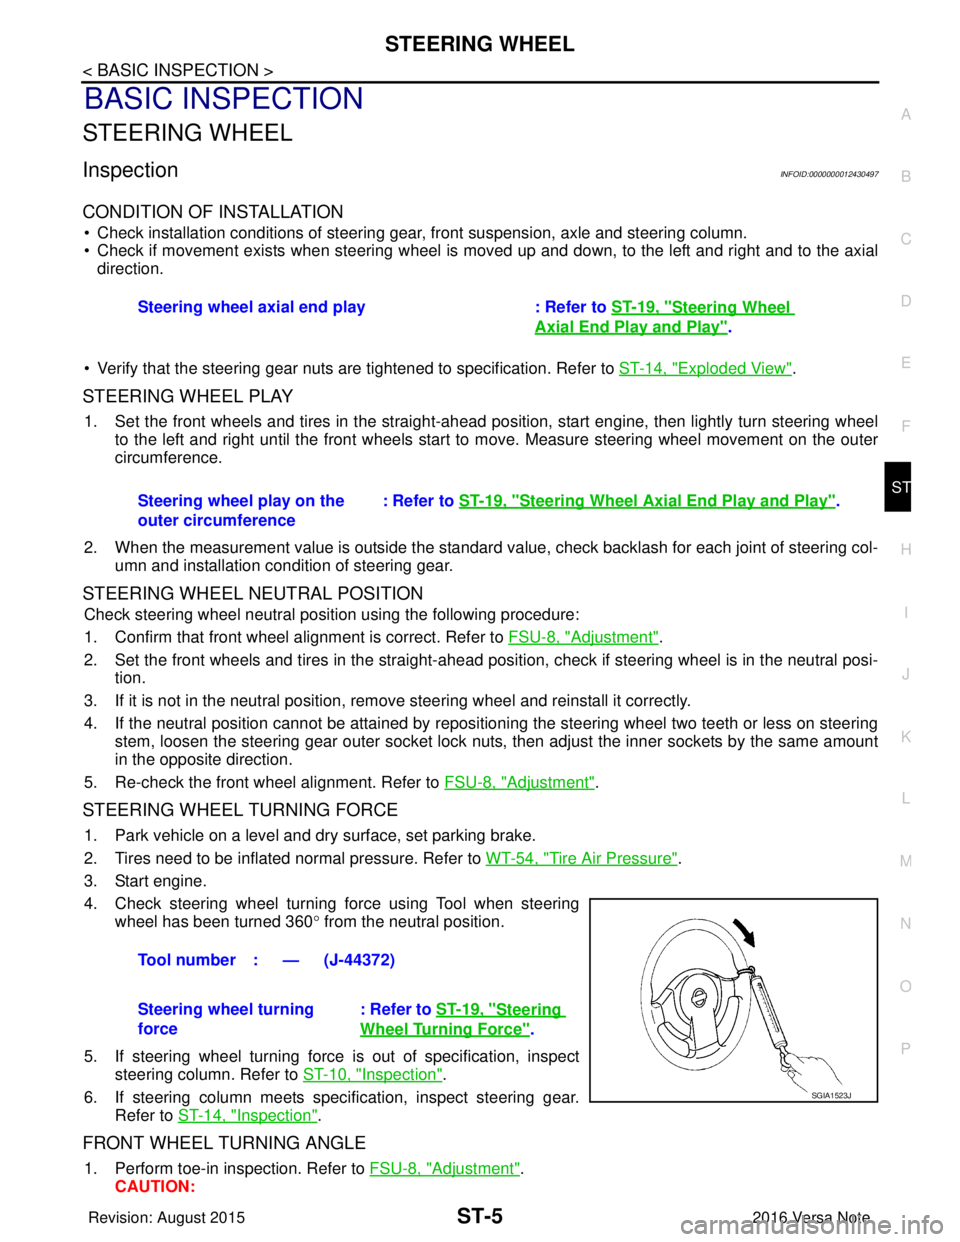
4. Check steering wheel turning force using Tool when steering wheel has been turned 360 ° from the neutral position.
5. If steering wheel turning force is out of specification, inspect steering column. Refer to ST-10, "
Inspection".
6. If steering column meets specification, inspect steering gear. Refer to ST-14, "
Inspection".
FRONT WHEEL TURNING ANGLE
1. Perform toe-in inspection. Refer to FSU-8, "Adjustment".
CAUTION: Steering wheel axial end play : Refer to
ST-19, "
Steering Wheel
Axial End Play and Play".
Steering wheel play on the
outer circumference : Refer to
ST-19, "
Steering Wheel Axia l End Play and Play".
Tool number : — (J-44372)
Steering wheel turning
force : Refer to
ST-19, "
Steering
Wheel Turning Force".
SGIA1523J
Revision: August 2015 2016 Versa Note
cardiagn.com
Page 3227 of 3641
ST-6
< BASIC INSPECTION >
STEERING WHEEL
Perform front wheel turning angle inspection, after toe-in inspection.
2. Place front wheels on turning radius gauges and rear wheels on stands, so that vehicle can be level.
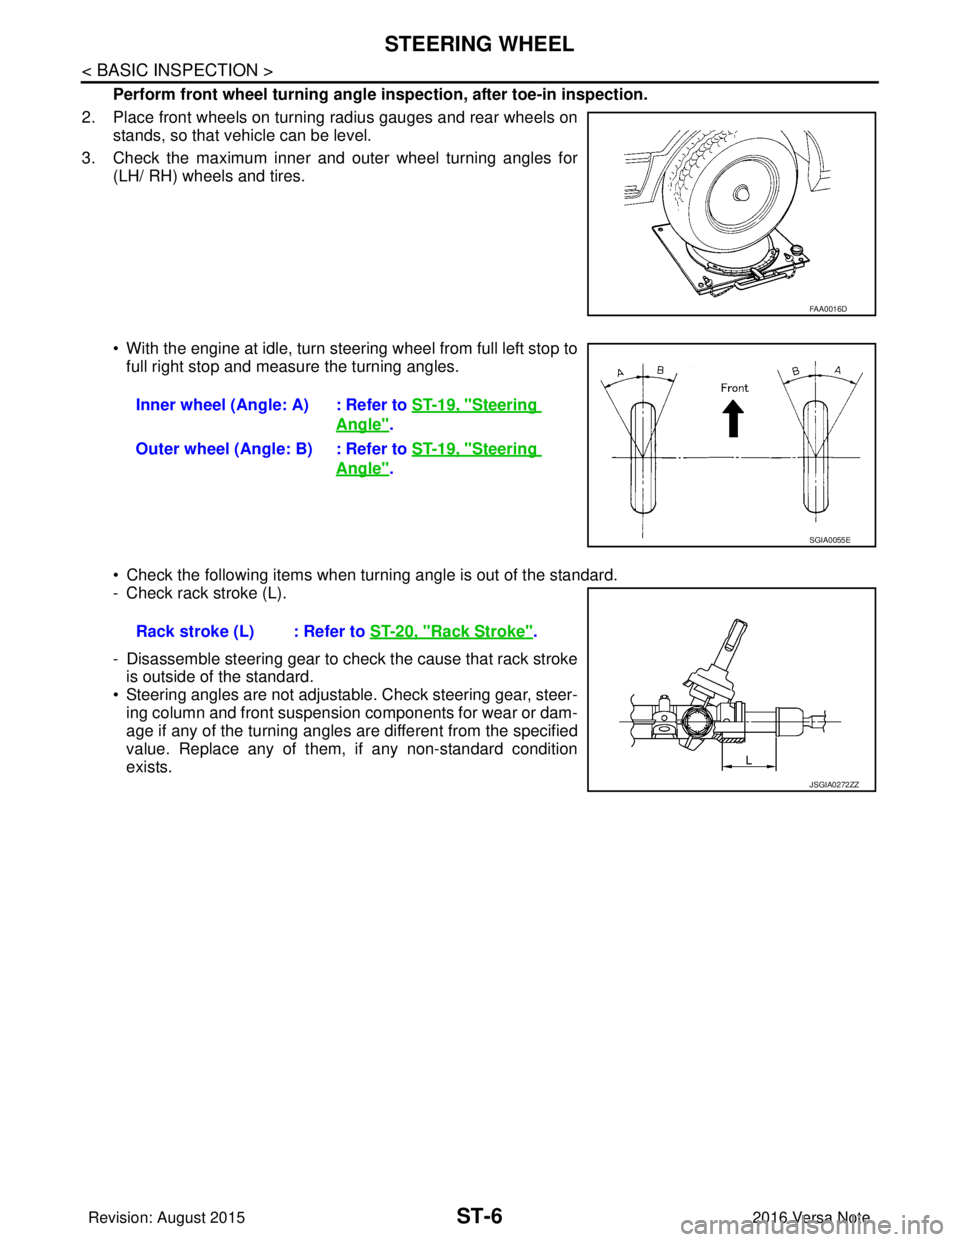
3. Check the maximum inner and outer wheel turning angles for (LH/ RH) wheels and tires.
• With the engine at idle, turn steering wheel from full left stop tofull right stop and measure the turning angles.
• Check the following items when turning angle is out of the standard.
- Check rack stroke (L).
- Disassemble steering gear to check the cause that rack stroke is outside of the standard.
• Steering angles are not adjustable. Check steering gear, steer- ing column and front suspension components for wear or dam-
age if any of the turning angles are different from the specified
value. Replace any of them, if any non-standard condition
exists.
FAA0016D
Inner wheel (Angle: A) : Refer to ST-19, "Steering
Angle".
Outer wheel (Angle: B) : Refer to ST-19, "
Steering
Angle".
SGIA0055E
Rack stroke (L) : Refer to ST-20, "Rack Stroke".
JSGIA0272ZZ
Revision: August 2015 2016 Versa Note
cardiagn.com
Page 3228 of 3641
NOISE, VIBRATION AND HARSHNESS (NVH) TROUBLESHOOTINGST-7
< SYMPTOM DIAGNOSIS >
C
DE
F
H I
J
K L
M A
B
ST
N
O P
SYMPTOM DIAGNOSIS
NOISE, VIBRATION AND HARSHN ESS (NVH) TROUBLESHOOTING
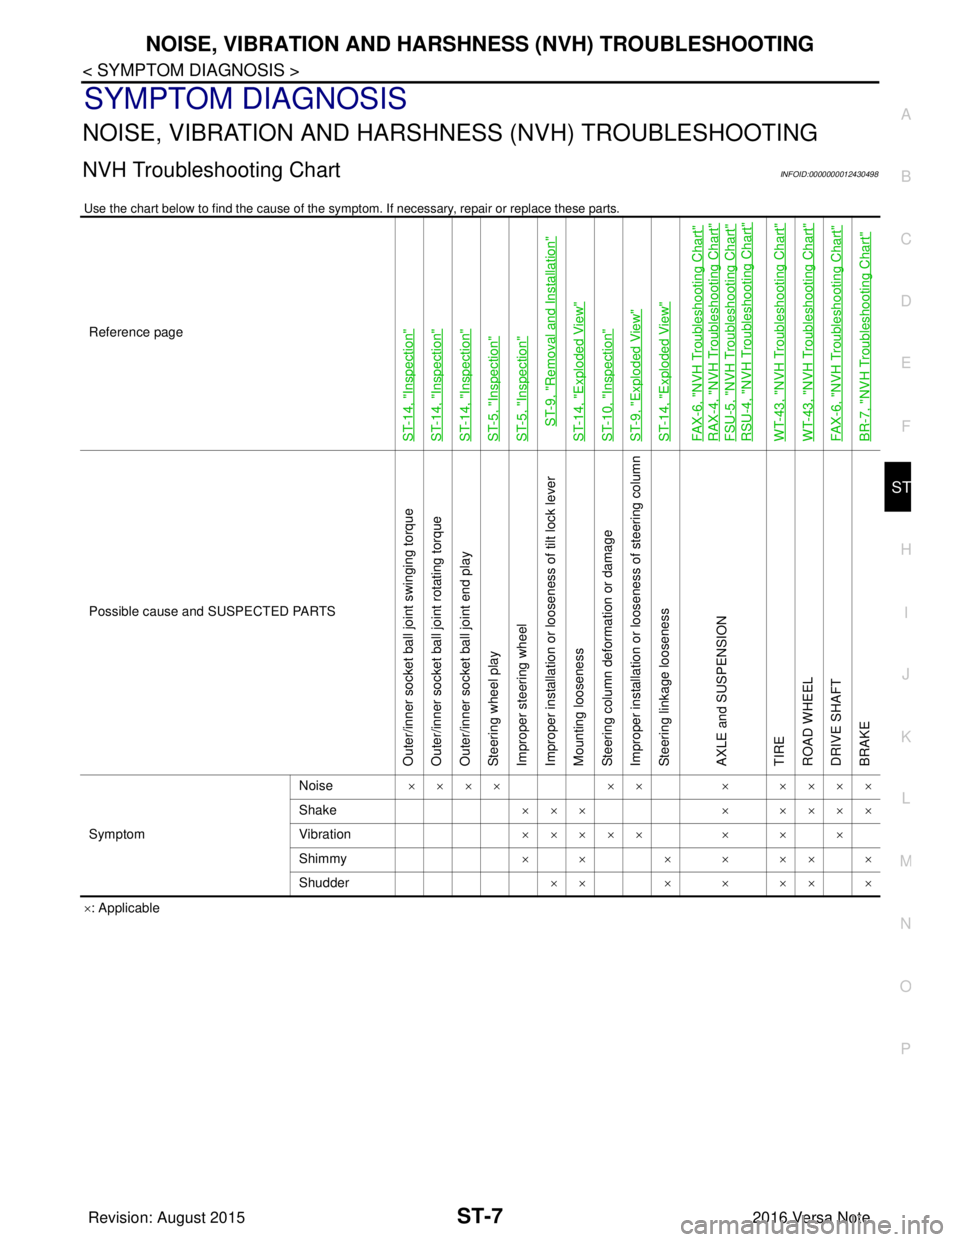
NVH Troubleshooting ChartINFOID:0000000012430498
Use the chart below to find the cause of the symp tom. If necessary, repair or replace these parts.
×: Applicable
Reference page
ST-14, "
Inspection
"
ST-14, "
Inspection
"
ST-14, "
Inspection
"
ST-5, "
Inspection
"
ST-5, "
Inspection
"
ST-9, "
Removal and Installation
"
ST-14, "
Exploded View
"
ST-10, "
Inspection
"
ST-9, "
Exploded View
"
ST-14, "
Exploded View
"
FAX-6, "
NVH Troubleshooting Chart
"
RAX-4, "
NVH Troubleshooting Chart
"
FSU-5, "
NVH Troubleshooting Chart
"
RSU-4, "
NVH Troubleshooting Chart
"
WT-43, "
NVH Troubleshooting Chart
"
WT-43, "
NVH Troubleshooting Chart
"
FAX-6, "
NVH Troubleshooting Chart
"
BR-7, "
NVH Troubleshooting Chart
"
Possible cause and
SUSPECTED PARTS
Outer/inner socket ball joint swinging torque
Outer/inner socket ball joint rotating torque
Outer/inner socket ball joint end play
Steering wheel play
Improper steering wheel
Improper installation or looseness of tilt lock lever
Mounting looseness
Steering column deformation or damage
Improper installation or looseness of steering column
Steering linkage looseness
AXLE and SUSPENSION
TIRE
ROAD WHEEL
DRIVE SHAFT
BRAKE
Symptom Noise
×××× ×× × ××××
Shake ×××× ××××
Vibration ××××× × × ×
Shimmy ×× × ××××
Shudder ×× × × ×× ×
Revision: August 2015 2016 Versa Note
cardiagn.com
Page 3229 of 3641
ST-8
< REMOVAL AND INSTALLATION >
STEERING WHEEL
REMOVAL AND INSTALLATION
STEERING WHEEL
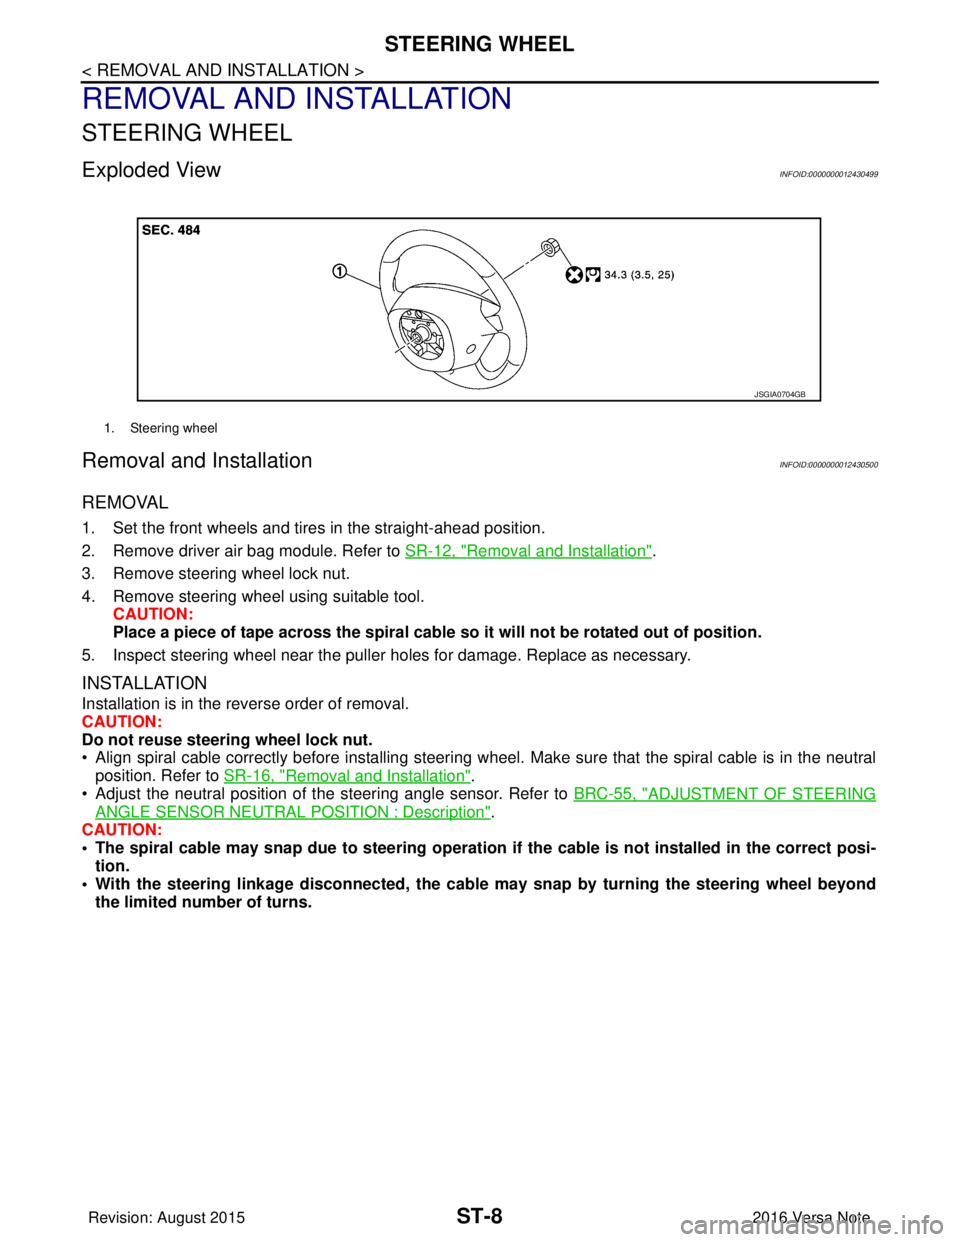
Exploded ViewINFOID:0000000012430499
Removal and InstallationINFOID:0000000012430500
REMOVAL
1. Set the front wheels and tires in the straight-ahead position.
2. Remove driver air bag module. Refer to SR-12, "
Removal and Installation".
3. Remove steering wheel lock nut.
4. Remove steering wheel using suitable tool. CAUTION:
Place a piece of tape across the spiral cable so it will not be rotated out of position.
5. Inspect steering wheel near the puller holes for damage. Replace as necessary.
INSTALLATION
Installation is in the reverse order of removal.
CAUTION:
Do not reuse steering wheel lock nut.
• Align spiral cable correctly before installing steering wheel . Make sure that the spiral cable is in the neutral
position. Refer to SR-16, "
Removal and Installation".
• Adjust the neutral position of the steering angle sensor. Refer to BRC-55, "
ADJUSTMENT OF STEERING
ANGLE SENSOR NEUTRAL POSITION : Description".
CAUTION:
• The spiral cable may snap due to steering operation if the cable is not installed in the correct posi-
tion.
• With the steering linkag e disconnected, the cable may snap by turning the steering wheel beyond
the limited number of turns.
1. Steering wheel
JSGIA0704GB
Revision: August 2015 2016 Versa Note
cardiagn.com
Page 3230 of 3641
STEERING COLUMNST-9
< REMOVAL AND INSTALLATION >
C
DE
F
H I
J
K L
M A
B
ST
N
O P
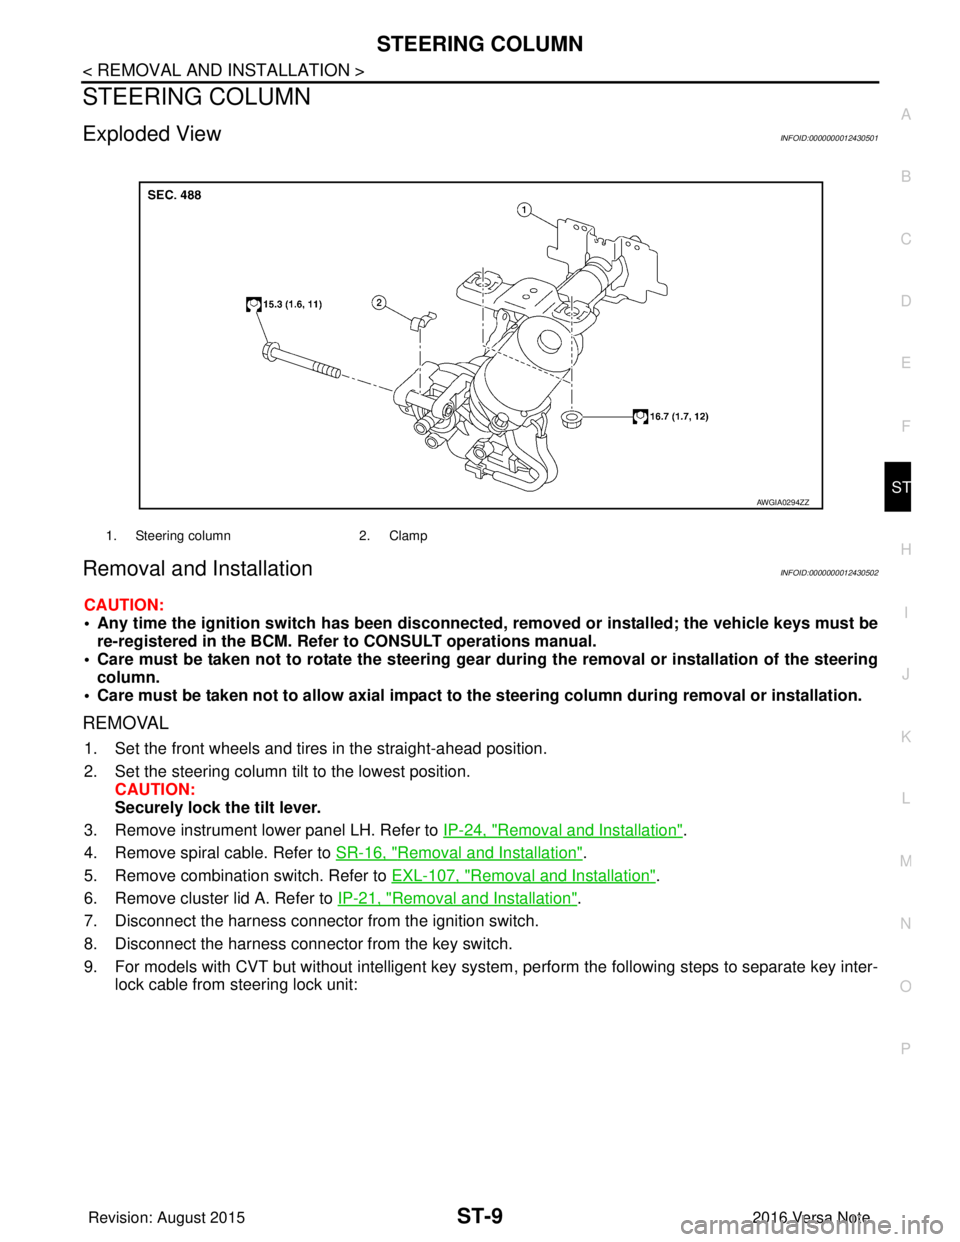
STEERING COLUMN
Exploded ViewINFOID:0000000012430501
Removal and InstallationINFOID:0000000012430502
CAUTION:
• Any time the ignition switch has been disconnected, removed or installed; the vehicle keys must be
re-registered in the BCM. Refer to CONSULT operations manual.
• Care must be taken not to rotate the steering gear during the removal or inst allation of the steering
column.
• Care must be taken not to allow axial impact to the steering column during removal or installation.
REMOVAL
1. Set the front wheels and tires in the straight-ahead position.
2. Set the steering column tilt to the lowest position.
CAUTION:
Securely lock the tilt lever.
3. Remove instrument lower panel LH. Refer to IP-24, "
Removal and Installation".
4. Remove spiral cable. Refer to SR-16, "
Removal and Installation".
5. Remove combination switch. Refer to EXL-107, "
Removal and Installation".
6. Remove cluster lid A. Refer to IP-21, "
Removal and Installation".
7. Disconnect the harness connector from the ignition switch.
8. Disconnect the harness connector from the key switch.
9. For models with CVT but without intelligent key system , perform the following steps to separate key inter-
lock cable from steering lock unit:
1. Steering column 2. Clamp
AWGIA0294ZZ
Revision: August 2015 2016 Versa Note
cardiagn.com
Page 3232 of 3641
STEERING COLUMNST-11
< REMOVAL AND INSTALLATION >
C
DE
F
H I
J
K L
M A
B
ST
N
O P
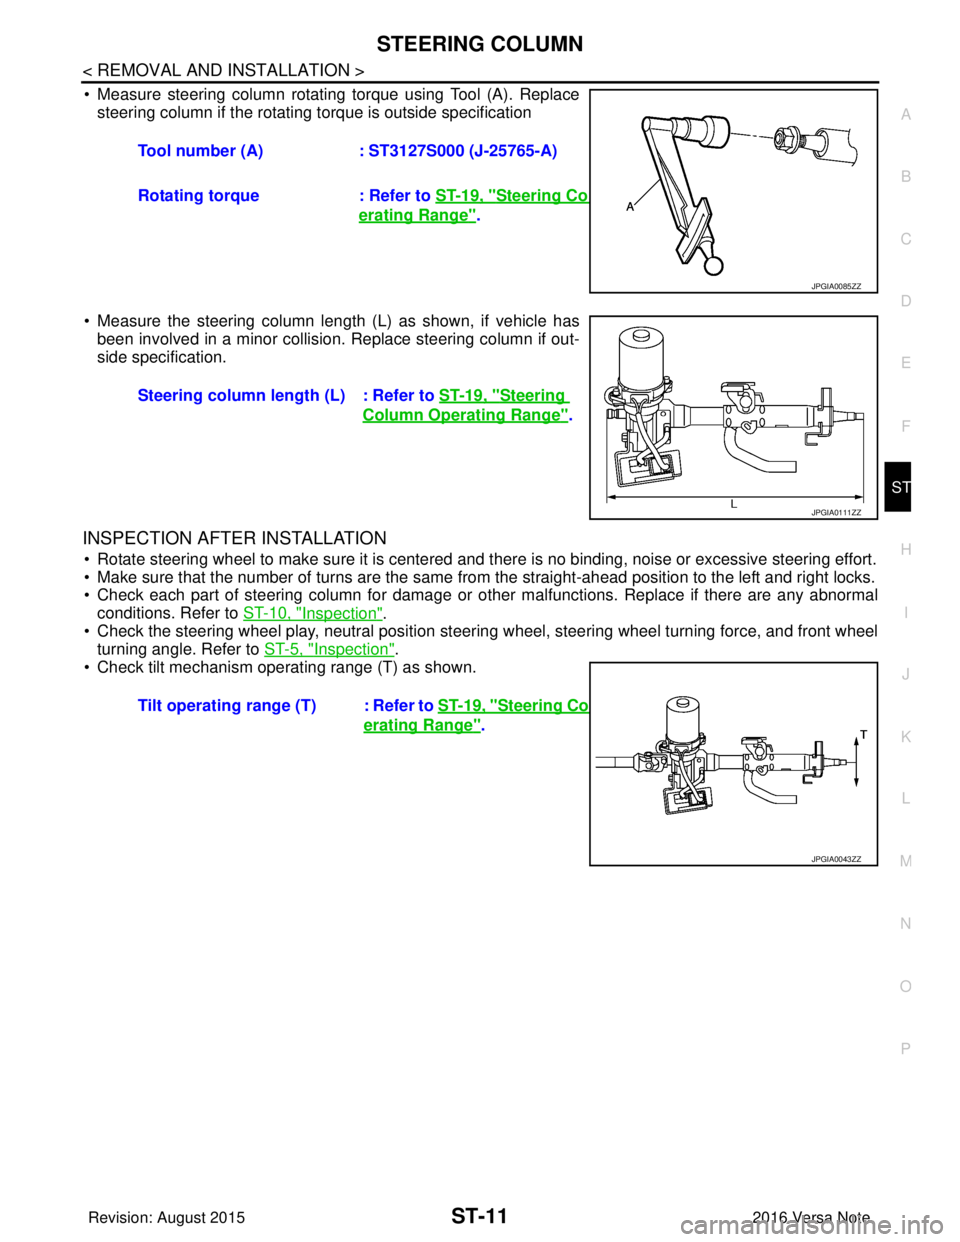
• Measure steering column rotating torque using Tool (A). Replace steering column if the rotating torque is outside specification
• Measure the steering column length (L) as shown, if vehicle has been involved in a minor collision. Replace steering column if out-
side specification.
INSPECTION AFTER INSTALLATION
• Rotate steering wheel to make sure it is centered and there is no binding, noise or excessive steering effort.
• Make sure that the number of turns are the same from the straight-ahead position to the left and right locks.
• Check each part of steering column for damage or other malfunctions. Replace if there are any abnormal
conditions. Refer to ST-10, "
Inspection".
• Check the steering wheel play, neutral position steering wheel, steering wheel turning force, and front wheel turning angle. Refer to ST-5, "
Inspection".
• Check tilt mechanism operating range (T) as shown. Tool number (A)
: ST3127S000 (J-25765-A)
Rotating torque : Refer to ST-19, "
Steering Column Op-
erating Range".
JPGIA0085ZZ
Steering column length (L) : Refer to ST-19, "Steering
Column Operating Range".
JPGIA0111ZZ
Tilt operating range (T) : Refer to ST-19, "Steering Column Op-
erating Range".
JPGIA0043ZZ
Revision: August 2015 2016 Versa Note
cardiagn.com
Page 3233 of 3641
ST-12
< REMOVAL AND INSTALLATION >
STEERING SHAFT
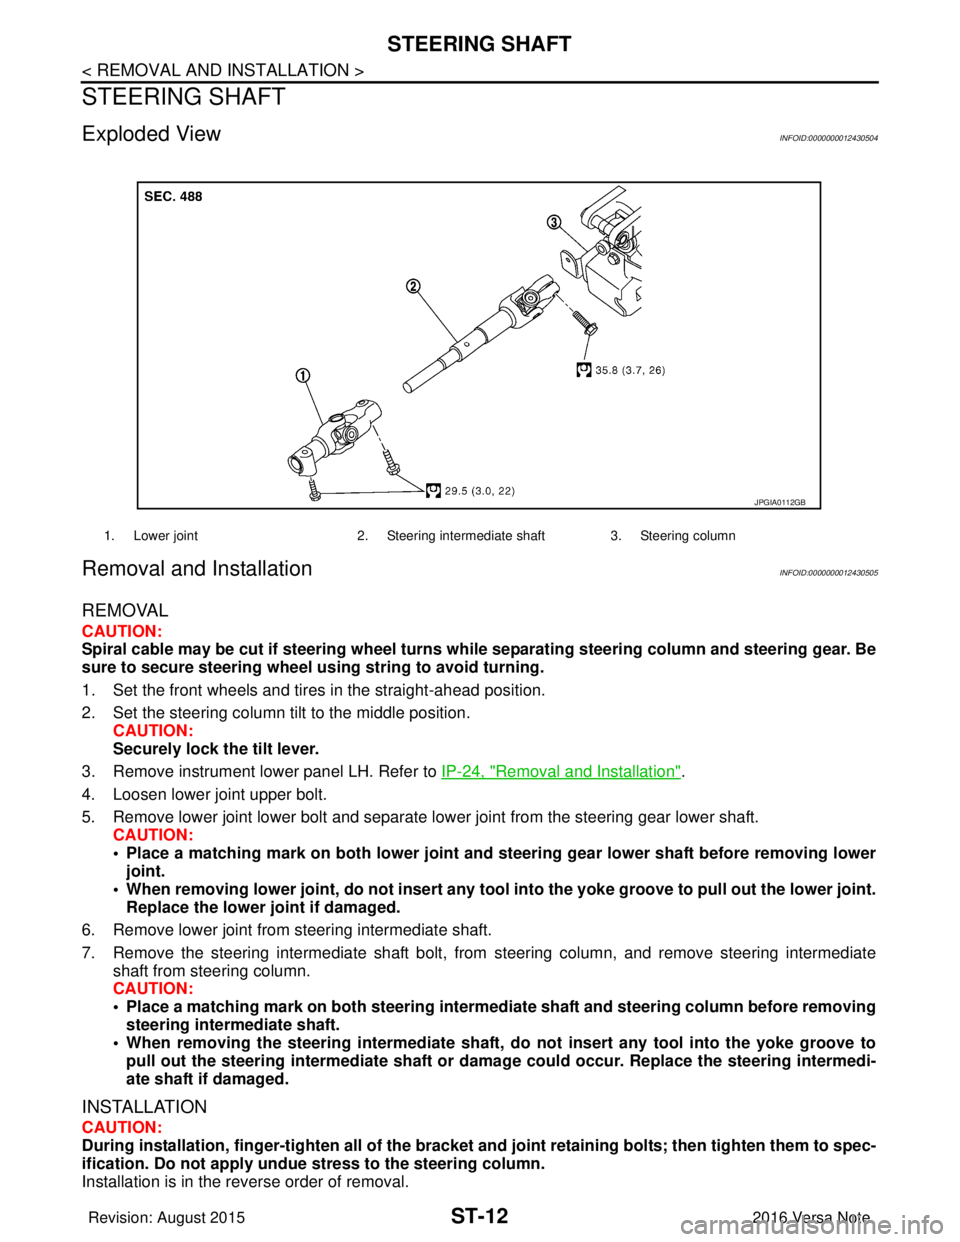
STEERING SHAFT
Exploded ViewINFOID:0000000012430504
Removal and InstallationINFOID:0000000012430505
REMOVAL
CAUTION:
Spiral cable may be cut if steering wheel turns while separating steering column and steering gear. Be
sure to secure steering wheel us ing string to avoid turning.
1. Set the front wheels and tires in the straight-ahead position.
2. Set the steering column tilt to the middle position. CAUTION:
Securely lock the tilt lever.
3. Remove instrument lower panel LH. Refer to IP-24, "
Removal and Installation".
4. Loosen lower joint upper bolt.
5. Remove lower joint lower bolt and separate lower joint from the steering gear lower shaft. CAUTION:
• Place a matching mark on both lower joint and st eering gear lower shaft before removing lower
joint.
• When removing lower joint, do not insert any tool into the yoke groove to pull out the lower joint.
Replace the lower joint if damaged.
6. Remove lower joint from steering intermediate shaft.
7. Remove the steering intermediate shaft bolt, from steering column, and remove steering intermediate
shaft from steering column.
CAUTION:
• Place a matching mark on both steering interme diate shaft and steering column before removing
steering intermediate shaft.
• When removing the steering intermediate shaft, do not insert any tool into the yoke groove to pull out the steering intermediate shaft or dama ge could occur. Replace the steering intermedi-
ate shaft if damaged.
INSTALLATION
CAUTION:
During installation, finger-tighten all of the bracket and joint retainin g bolts; then tighten them to spec-
ification. Do not ap ply undue stress to the steering column.
Installation is in the reverse order of removal.
1. Lower joint 2. Steering intermediate shaft 3. Steering column
JPGIA0112GB
Revision: August 2015 2016 Versa Note
cardiagn.com
Page 3234 of 3641
STEERING SHAFTST-13
< REMOVAL AND INSTALLATION >
C
DE
F
H I
J
K L
M A
B
ST
N
O P
• Before installation, check that steering column tilt is in the middle position.
• For intermediate shaft bolt, and lower joint bolt direction, refer to ST-12, "
Exploded View".
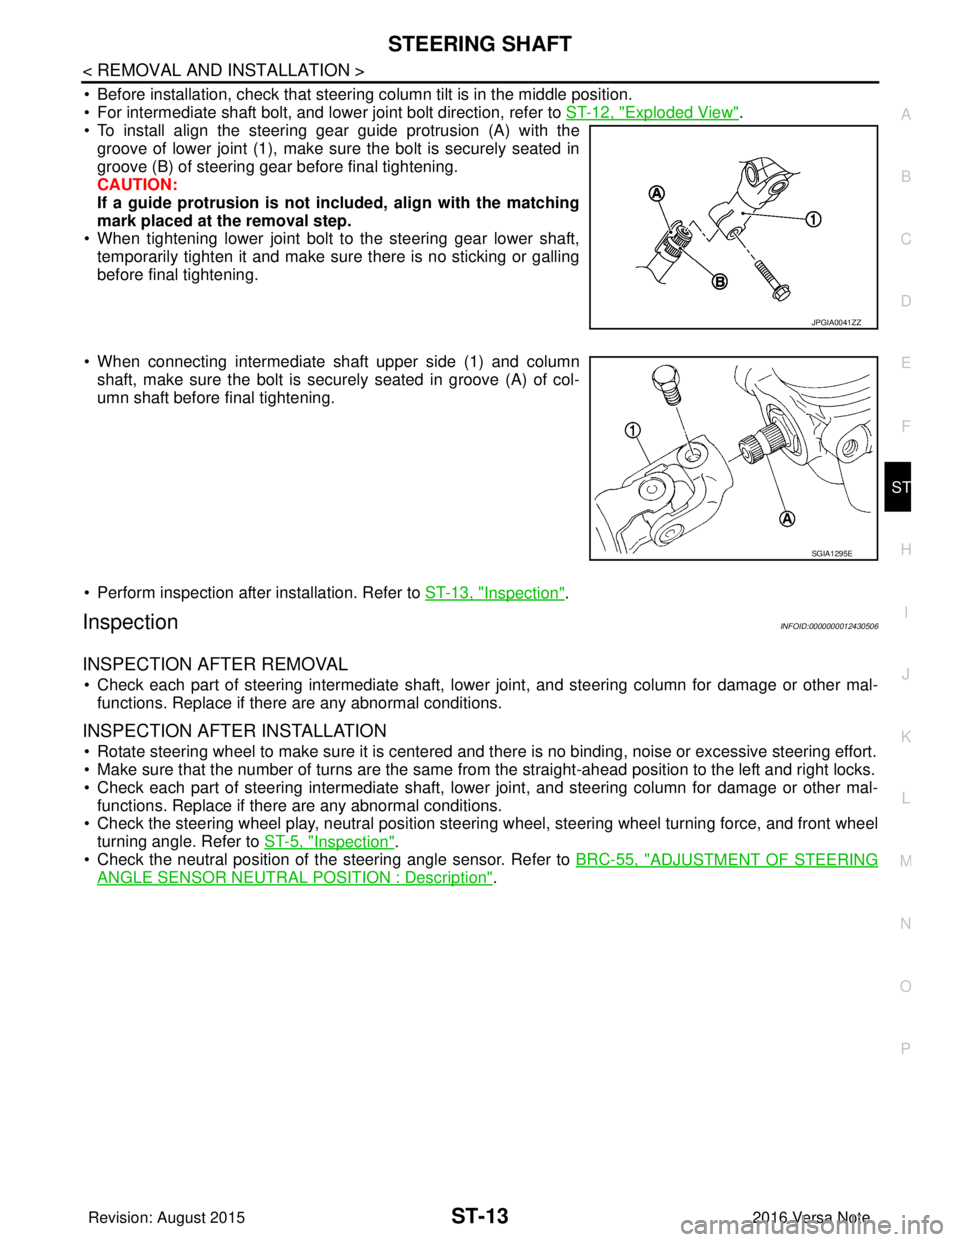
• To install align the steering gear guide protrusion (A) with the
groove of lower joint (1), make sure the bolt is securely seated in
groove (B) of steering gear before final tightening.
CAUTION:
If a guide protrusion is not included, align with the matching
mark placed at the removal step.
• When tightening lower joint bolt to the steering gear lower shaft,
temporarily tighten it and make sure there is no sticking or galling
before final tightening.
• When connecting intermediate shaft upper side (1) and column shaft, make sure the bolt is securely seated in groove (A) of col-
umn shaft before final tightening.
• Perform inspection after installation. Refer to ST-13, "
Inspection".
InspectionINFOID:0000000012430506
INSPECTION AFTER REMOVAL
• Check each part of steering intermediate shaft, lowe r joint, and steering column for damage or other mal-
functions. Replace if there are any abnormal conditions.
INSPECTION AFTER INSTALLATION
• Rotate steering wheel to make sure it is centered and there is no binding, noise or excessive steering effort.
• Make sure that the number of turns are the same from the straight-ahead position to the left and right locks.
• Check each part of steering intermediate shaft, lowe r joint, and steering column for damage or other mal-
functions. Replace if there are any abnormal conditions.
• Check the steering wheel play, neutral position steeri ng wheel, steering wheel turning force, and front wheel
turning angle. Refer to ST-5, "
Inspection".
• Check the neutral position of the steering angle sensor. Refer to BRC-55, "
ADJUSTMENT OF STEERING
ANGLE SENSOR NEUTRAL POSITION : Description".
JPGIA0041ZZ
SGIA1295E
Revision: August 2015 2016 Versa Note
cardiagn.com