2016 MERCEDES-BENZ SL ROADSTER warning light
[x] Cancel search: warning lightPage 149 of 333
Vehicles with adaptive adjustable damp-
ing: drive program E (Economy)
Drive program Eis characterised by the follow-
ing:
R the vehicle exhibits particularly economical
driving characteristics.
R the vehicle pulls away more gently in forward
and reverse gears unless the accelerator
pedal is depressed fully.
R optimal fuel consumption resulting from the
automatic transmission shifting up sooner.
The vehicle is driven in the low engine speed
range and the wheels are less likely to spin.
R the suspension exhibits comfortable damping
settings.
R the steering exhibits a comfortable steering
curve.
R during deceleration, the engine is disconnec-
ted from the drive train. The vehicle uses
kinetic energy and consumes less fuel (gliding
mode).
R ESP ®
provides the optimum compromise
between traction and stability. Further infor-
mation on ESP ®
(Y page 67).
Vehicles with Active Body Control: drive
program CURVE
Drive program CURVEis characterised by the
following:
R increased driving comfort on bends.
R the vehicle tilts actively into the bend. Further
information on the cornering function
(Y page 176).
R the vehicle exhibits particularly economical
driving characteristics.
R the vehicle pulls away more gently in forward
and reverse gears unless the accelerator
pedal is depressed fully.
R comfortable suspension setting.
R the steering exhibits a comfortable steering
curve.
R optimal fuel consumption resulting from the
automatic transmission shifting up sooner.
R the automatic transmission shifts up sooner.
This results in the vehicle being driven at
lower engine speeds and the wheels being
less likely to spin.
R during deceleration, the engine is disconnec-
ted from the drive train. The vehicle uses kinetic energy and consumes less fuel (gliding
mode).
R ESP ®
provides the optimum compromise
between traction and stability. Further infor-
mation on ESP ®
(Y page 67).
Mercedes-AMG vehicles Drive program RACE
Drive program RACEis characterised by the fol-
lowing:
R the vehicle exhibits driving characteristics
suitable for the racetrack.
R all vehicle systems are set for maximum
sportiness.
R the gearshift recommendation gives you
information for slowly warming up the drive
assemblies and for adopting a fuel-efficient
driving style (Y page 147). You can follow the
gearshift recommendations at all times and
change gear accordingly using the steering
wheel gearshift paddles. On the basis of the
gearshift recommendation, using the steering
wheel gearshift paddles, you can optimise the drive train and engine operating mode at any
time.
R if you have selected a gear manually, this will
be maintained until the vehicle speed signifi-
cantly increases or decreases.
R the vehicle pulls away in first gear.
R the automatic transmission shifts up later. As
a result of the later automatic transmission
shift points, the fuel consumption may be
higher.
R the suspension exhibits particularly firm
damping settings.
R gliding mode is not available.
R the ECO start/stop function is not available.
R ESP ®
switches to SPORT handling mode. The
M handling mode warning lamp in the
instrument cluster lights up. The SPORT SPORThan‐
han‐
dling mode
dling mode message appears in the multi-
function display. Observe the important
safety notes for the SPORT handling mode
(Y page 70).
R ESP ®
only improves driving stability to a limi-
ted degree. The engine's torque is only
restricted to a limited degree and the drive
wheels can spin. Further information on ESP ®
(Y page 70). 146
Automatic transmissionDriving and parking
Page 157 of 333
cle from rolling away by applying the parking
brake.
X Apply the electric parking brake.
X Shift the transmission to position P
(Y page 142).
X With the key: turn the key to position 0in the
ignition lock and remove it.
The immobiliser is activated.
X With KEYLESS-GO: press the Start/Stop
button (Y page 132).
The engine stops and all the indicator lamps in the instrument cluster go out.
When the driver's door is closed, this corre-
sponds to key position 1. When the driver's
door is open, this corresponds to key position
0 (Y page 132).
The engine can be switched off while the vehicle is in motion by pressing and holding the Start/
Stop button for about three seconds. This func-
tion operates independently of the ECO start/
stop automatic engine switch-off function. Electric parking brake
General notes G
WARNING
If you leave children unattended in the vehi-
cle, they may be able to set the vehicle in
motion if, for example, they:
R release the parking brake
R shift the automatic transmission out of park
position P
R start the engine
In addition, they may operate vehicle equip-
ment and become trapped. There is a risk of
an accident and injury.
When leaving the vehicle, always take the key
with you and lock the vehicle. Never leave
children unattended in the vehicle. The function of the electric parking brake is
dependent on the on-board voltage. If the on-
board voltage is low or if there is a malfunction
in the system, it may not be possible to apply the
released parking brake.
X If this is the case, only park the vehicle on
level ground and secure it to prevent it from
rolling away.
X Shift the automatic transmission to position
P.
It may not be possible to release an applied
parking brake if the on-board voltage is low or if there is a malfunction in the system. Contact a
qualified specialist workshop.
The electric parking brake carries out a function
check at regular intervals when the engine is
switched off. Noises that occur are normal.
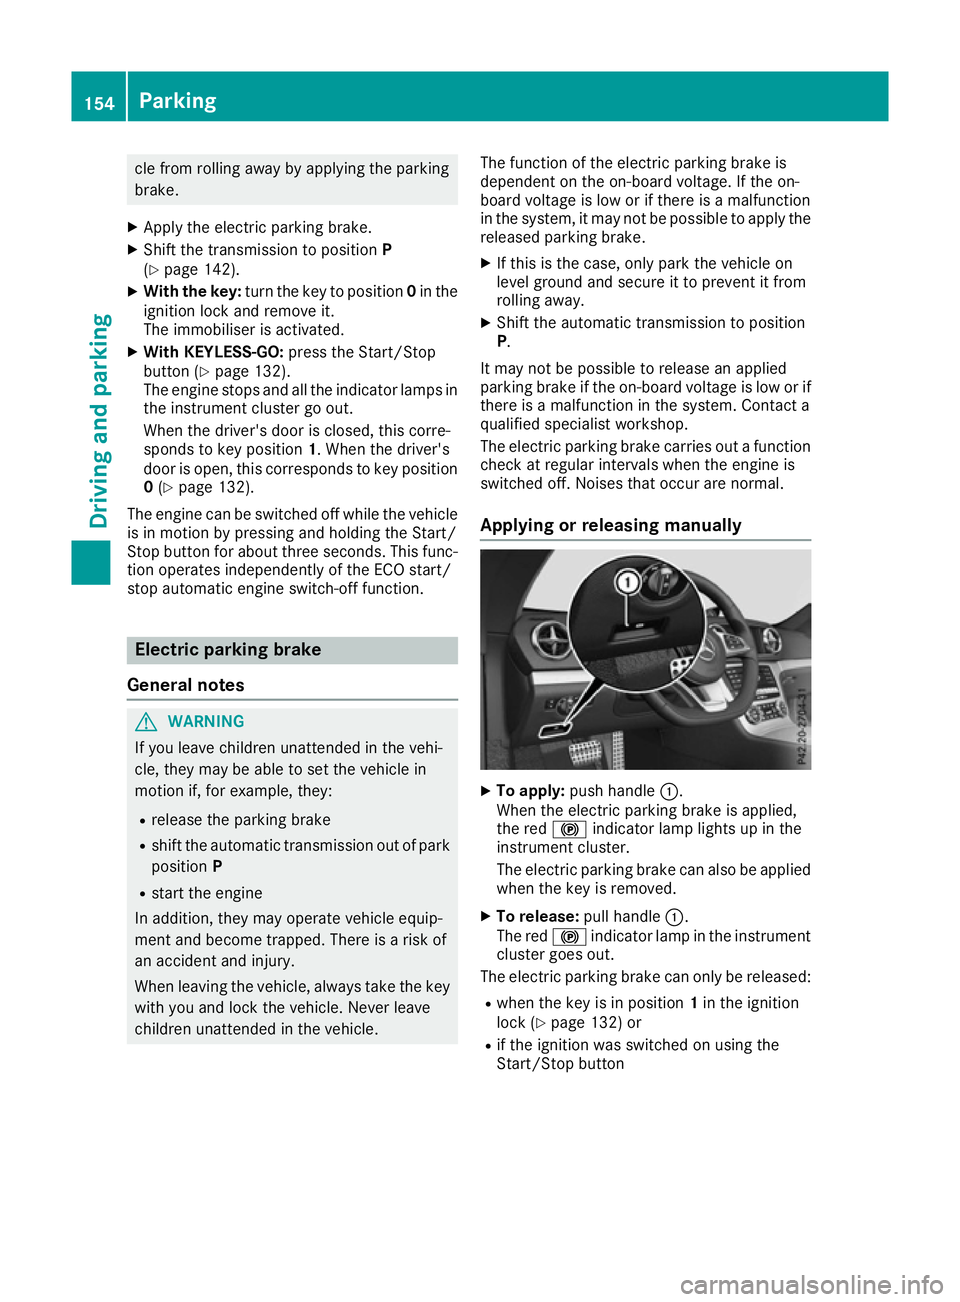
Applying or releasing manually X
To apply: push handle :.
When the electric parking brake is applied,
the red !indicator lamp lights up in the
instrument cluster.
The electric parking brake can also be applied when the key is removed.
X To release: pull handle:.
The red !indicator lamp in the instrument
cluster goes out.
The electric parking brake can only be released:
R when the key is in position 1in the ignition
lock (Y page 132) or
R if the ignition was switched on using the
Start/Stop button 154
ParkingDriving and parking
Page 158 of 333
Applying automatically
The electric parking brake is automatically
applied when the transmission is in position P
and:
R the engine is switched off or
R the driver is not wearing a seat belt and the
driver's door is opened
To prevent the electric parking brake from being automatically applied, pull handle :.
The electric parking brake is also applied auto-
matically if:
R Distance Pilot DISTRONIC brings the vehicle
to a standstill or
R the HOLD function is keeping the vehicle sta-
tionary
In addition, at least one of the following condi-
tions must be fulfilled:
R the engine is switched off
R the driver is not wearing a seat belt and the
driver's door is opened
R there is a system malfunction
R the power supply is insufficient
R the vehicle is stationary for a lengthy period
The red !indicator lamp in the instrument
cluster lights up.
The electric parking brake is not automatically
applied if the engine is switched off by the ECO start/stop function.
Releasing automatically The electric parking brake is released automat-
ically when all of the following conditions are
fulfilled:
R the engine is running
R the transmission is in position Dor R
R the driver's seat belt is fastened
R you depress the accelerator pedal
If the transmission is in position R, the boot lid
must be closed.
If your seat belt is not fastened, the following
conditions must be fulfilled to automatically
release the electric parking brake:
R the driver's door is closed
R you have shifted out of Por you have previ-
ously driven faster than 3 km/h
Ensure that you do not depress the accelerator
pedal unintentionally. Otherwise, the parking brake will be released and the vehicle will start
to move.
Emergency braking The vehicle can also be braked during an emer-
gency by using the electric parking brake.
X While driving, push handle :of the electric
parking brake.
The vehicle is braked for as long as the handle of the electric parking brake is pressed. The
longer the electric parking brake handle is
depressed, the greater the braking force.
During braking:
R a warning tone sounds
R the Release parking brake
Release parking brake message
appears
R the red !indicator lamp in the instrument
cluster flashes
When the vehicle has been braked to a stand-
still, the electric parking brake is applied. Parking up the vehicle
If you leave the vehicle parked up for longer than
four weeks, the battery may be damaged by
exhaustive discharging.
If you leave the vehicle parked up for longer than
six weeks, it may suffer from lack of use.
X Contact a qualified specialist workshop and
seek advice.
i You can obtain information about trickle
chargers from a qualified specialist work-
shop. Driving tips
General notes
Important safety notes G
WARNING
If you switch off the ignition while driving,
safety-relevant functions are only available
with limitations, or not at all. This could affect, for example, the power steering and the brake
boosting effect. You will require considerably Driving tips
155Driving and pa rking
Z
Page 159 of 333
more effort to steer and brake. There is a risk
of an accident.
Do not switch off the ignition while driving.
Drive sensibly – save fuel Observe the following tips to save fuel:
R The tyres should always be inflated to the rec-
ommended tyre pressure.
R Remove unnecessary loads.
R Warm up the engine at low engine speeds.
R Avoid frequent acceleration or braking.
R Observe the service intervals in the Service
Booklet or in the service interval display. Have all the maintenance work carried out in
accordance with Daimler AG regulations.
Fuel consumption also increases when driving in
cold weather, in stop-start traffic, on short jour- neys and in hilly terrain. ECO display
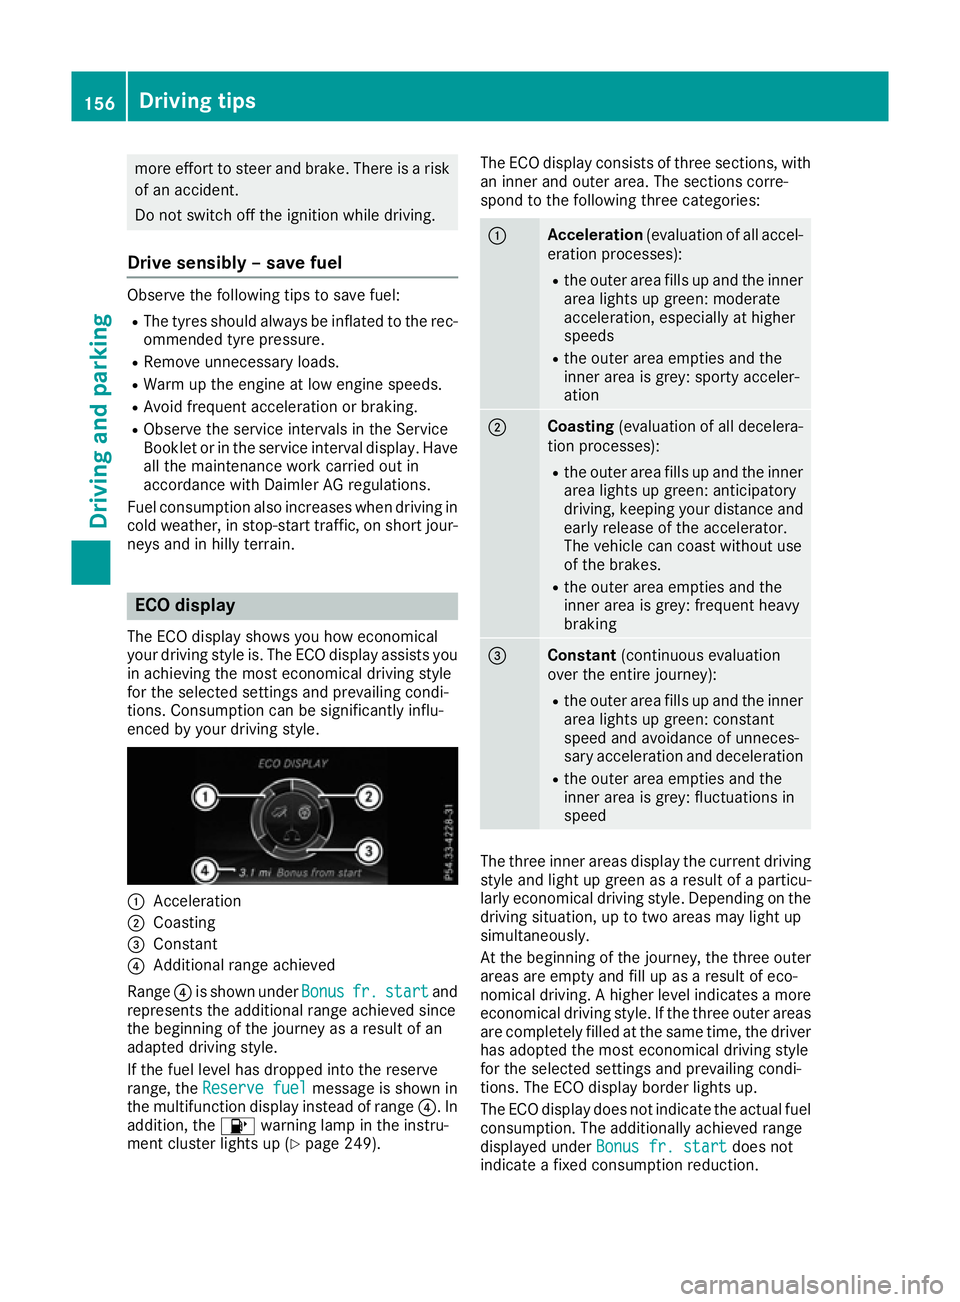
The ECO display shows you how economical
your driving style is. The ECO display assists you
in achieving the most economical driving style
for the selected settings and prevailing condi-
tions. Consumption can be significantly influ-
enced by your driving style. :
Acceleration
; Coasting
= Constant
? Additional range achieved
Range ?is shown under Bonus Bonusfr.
fr.start
start and
represents the additional range achieved since
the beginning of the journey as a result of an
adapted driving style.
If the fuel level has dropped into the reserve
range, the Reserve fuel Reserve fuel message is shown in
the multifunction display instead of range ?. In
addition, the 8warning lamp in the instru-
ment cluster lights up (Y page 249).The ECO display consists of three sections, with
an inner and outer area. The sections corre-
spond to the following three categories: :
Acceleration
(evaluation of all accel-
eration processes):
R the outer area fills up and the inner
area lights up green: moderate
acceleration, especially at higher
speeds
R the outer area empties and the
inner area is grey: sporty acceler-
ation ;
Coasting
(evaluation of all decelera-
tion processes):
R the outer area fills up and the inner
area lights up green: anticipatory
driving, keeping your distance and
early release of the accelerator.
The vehicle can coast without use
of the brakes.
R the outer area empties and the
inner area is grey: frequent heavy
braking =
Constant
(continuous evaluation
over the entire journey):
R the outer area fills up and the inner
area lights up green: constant
speed and avoidance of unneces-
sary acceleration and deceleration
R the outer area empties and the
inner area is grey: fluctuations in
speed The three inner areas display the current driving
style and light up green as a result of a particu-
larly economical driving style. Depending on the driving situation, up to two areas may light up
simultaneously.
At the beginning of the journey, the three outer
areas are empty and fill up as a result of eco-
nomical driving. A higher level indicates a more
economical driving style. If the three outer areas
are completely filled at the same time, the driver
has adopted the most economical driving style
for the selected settings and prevailing condi-
tions. The ECO display border lights up.
The ECO display does not indicate the actual fuel consumption. The additionally achieved range
displayed under Bonus fr. start Bonus fr. start does not
indicate a fixed consumption reduction. 156
Driving tipsDriving and parking
Page 160 of 333

In addition to driving style, the actual consump-
tion is affected by other factors, such as:
R load
R tyre pressure
R cold start
R choice of route
R the use of electrical consumers
These factors are not included in the ECO dis-
play.
An economical driving style involves driving at a
moderate engine speed.
To achieve a higher value in the categories
"Acceleration" and "Constant":
R observe the gearshift recommendation
R drive the vehicle in drive program Cor E.
On long journeys at a constant speed, e.g. on the motorway, only the outer area for "Constant"
will change.
The ECO display summarises the driving style
from the start of the journey to its completion.
Therefore, there are more marked changes in
the outer areas at the start of a journey. During
a prolonged driving time, these changes are
smaller. For more marked changes, perform a
manual reset (Y page 203).
Further information on the ECO display
(Y page 202). Braking
Important safety notes G
WARNING
If you shift down on a slippery road surface in an attempt to increase the engine's braking
effect, the drive wheels could lose their grip.
This increases the risk of skidding and having
an accident.
Do not shift down for additional engine brak-
ing on a slippery road surface.
Downhill gradients Change into a lower gear in good time on long
and steep downhill gradients. Take particular
note of this when driving a laden vehicle.
This also applies if you have activated cruise
control, the limiter or Distance Pilot DISTRONIC. This will use the braking effect of the engine, so
less braking will be required to maintain vehicle
speed. This relieves the load on the brake sys-
tem and prevents the brakes from overheating
and wearing too quickly.
Heavy and light loads G
WARNING
The braking system can overheat if you leave your foot on the brake pedal while driving.
This increases the braking distance and could
even cause the braking system to fail. There is
a risk of an accident.
Never use the brake pedal as a footrest. Do
not simultaneously depress both the brake
pedal and the accelerator pedal while driving.
! Depressing the brake pedal constantly
results in excessive and premature wear to
the brake pads.
If the brakes have been subjected to a heavy
load, do not stop the vehicle immediately, but
drive on for a short while. This allows the airflow
to cool the brakes more quickly.
If the brakes have been used only moderately,
you should occasionally test their effectiveness.
To do this, brake more firmly from a higher
speed while paying attention to the traffic con-
ditions. This improves the grip of the brakes.
Wet road surfaces If you have driven for a long time in heavy rain
without braking, there may be a delayed reac-
tion from the brakes when braking for the first
time. This may also occur after a car wash or
after driving through deep water.
You will have to depress the brake pedal more
firmly. Maintain a greater distance to the vehicle in front.
After driving on a wet road or having the vehicle
washed, brake firmly while paying attention to
the traffic conditions. This will warm up the
brake discs, thereby drying them more quickly
and protecting them against corrosion. Driving tips
157Driving and parking Z
Page 163 of 333
If there is a change of drivers, advise the new
driver of the stored speed.
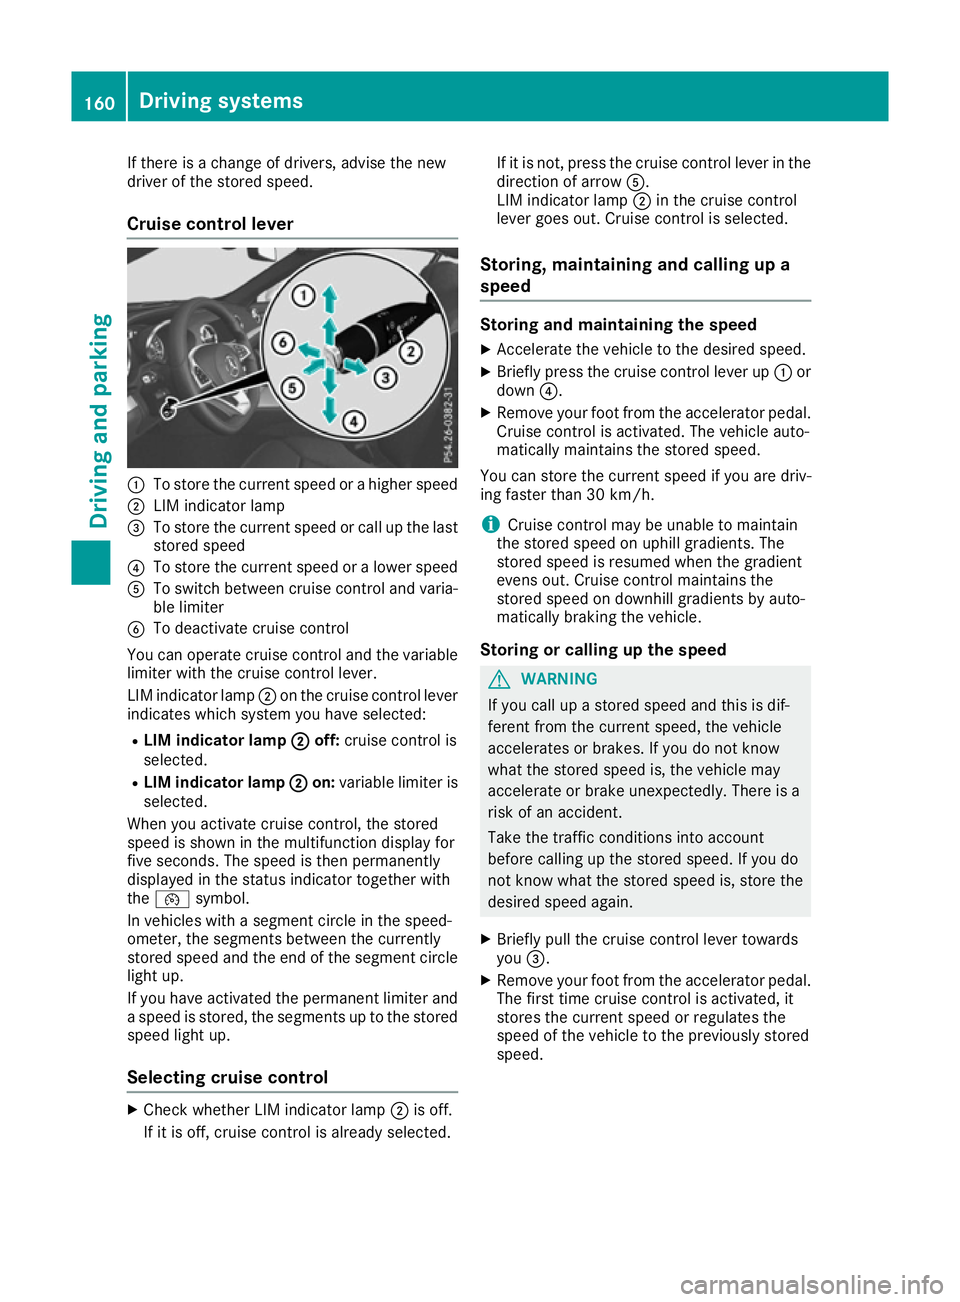
Cruise control lever :
To store the current speed or a higher speed
; LIM indicator lamp
= To store the current speed or call up the last
stored speed
? To store the current speed or a lower speed
A To switch between cruise control and varia-
ble limiter
B To deactivate cruise control
You can operate cruise control and the variable limiter with the cruise control lever.
LIM indicator lamp ;on the cruise control lever
indicates which system you have selected:
R LIM indicator lamp ;
; off: cruise control is
selected.
R LIM indicator lamp ;
;on: variable limiter is
selected.
When you activate cruise control, the stored
speed is shown in the multifunction display for
five seconds. The speed is then permanently
displayed in the status indicator together with
the ¯ symbol.
In vehicles with a segment circle in the speed-
ometer, the segments between the currently
stored speed and the end of the segment circle
light up.
If you have activated the permanent limiter and
a speed is stored, the segments up to the stored speed light up.
Selecting cruise control X
Check whether LIM indicator lamp ;is off.
If it is off, cruise control is already selected. If it is not, press the cruise control lever in the
direction of arrow A.
LIM indicator lamp ;in the cruise control
lever goes out. Cruise control is selected.
Storing, maintaining and calling up a
speed Storing and maintaining the speed
X Accelerate the vehicle to the desired speed.
X Briefly press the cruise control lever up :or
down ?.
X Remove your foot from the accelerator pedal.
Cruise control is activated. The vehicle auto-
matically maintains the stored speed.
You can store the current speed if you are driv-
ing faster than 30 km/h.
i Cruise control may be unable to maintain
the stored speed on uphill gradients. The
stored speed is resumed when the gradient
evens out. Cruise control maintains the
stored speed on downhill gradients by auto-
matically braking the vehicle.
Storing or calling up the speed G
WARNING
If you call up a stored speed and this is dif-
ferent from the current speed, the vehicle
accelerates or brakes. If you do not know
what the stored speed is, the vehicle may
accelerate or brake unexpectedly. There is a
risk of an accident.
Take the traffic conditions into account
before calling up the stored speed. If you do
not know what the stored speed is, store the
desired speed again.
X Briefly pull the cruise control lever towards
you =.
X Remove your foot from the accelerator pedal.
The first time cruise control is activated, it
stores the current speed or regulates the
speed of the vehicle to the previously stored
speed. 160
Driving systemsDriving and parking
Page 164 of 333
Setting a speed
X
Press the cruise control lever up :for a
higher speed or down ?for a lower speed.
X Keep the cruise control lever pressed until the
desired speed is reached.
X Release the cruise control lever.
The new speed is stored.
X To adjust the set speed in 1 km/h incre-
ments:
briefly press the cruise control lever
up : to the pressure point for a higher speed
or down ?for a lower speed.
The last speed stored is increased or reduced.
X To adjust the set speed in 10 km/h incre-
ments: briefly press the cruise control lever
up : beyond the pressure point for a higher
speed, or down ?for a lower speed.
The last speed stored is increased or reduced.
i The speed indicated in the speedometer
may differ slightly from the speed stored.
i Cruise control is not deactivated if you
depress the accelerator pedal. For example, if you accelerate briefly to overtake, cruise con-
trol adjusts the vehicle's speed to the last
speed stored after you have finished overtak-
ing.
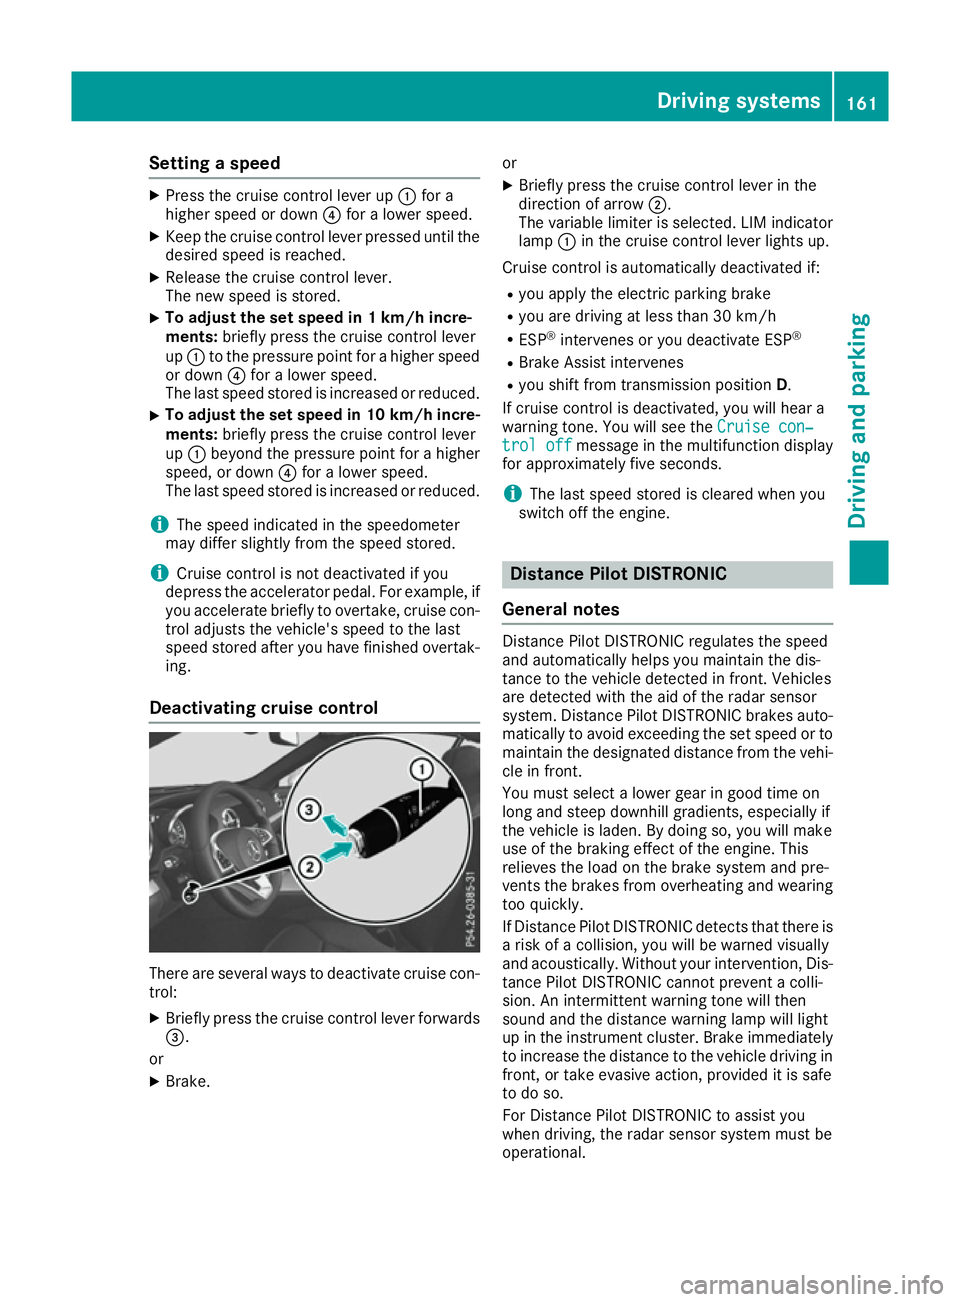
Deactivating cruise control There are several ways to deactivate cruise con-
trol:
X Briefly press the cruise control lever forwards
=.
or
X Brake. or
X Briefly press the cruise control lever in the
direction of arrow ;.
The variable limiter is selected. LIM indicator lamp :in the cruise control lever lights up.
Cruise control is automatically deactivated if:
R you apply the electric parking brake
R you are driving at less than 30 km/h
R ESP ®
intervenes or you deactivate ESP ®
R Brake Assist intervenes
R you shift from transmission position D.
If cruise control is deactivated, you will hear a
warning tone. You will see the Cruise con‐
Cruise con‐
trol off trol off message in the multifunction display
for approximately five seconds.
i The last speed stored is cleared when you
switch off the engine. Distance Pilot DISTRONIC
General notes Distance Pilot DISTRONIC regulates the speed
and automatically helps you maintain the dis-
tance to the vehicle detected in front. Vehicles
are detected with the aid of the radar sensor
system. Distance Pilot DISTRONIC brakes auto-
matically to avoid exceeding the set speed or to
maintain the designated distance from the vehi- cle in front.
You must select a lower gear in good time on
long and steep downhill gradients, especially if
the vehicle is laden. By doing so, you will make
use of the braking effect of the engine. This
relieves the load on the brake system and pre-
vents the brakes from overheating and wearing
too quickly.
If Distance Pilot DISTRONIC detects that there is a risk of a collision, you will be warned visually
and acoustically. Without your intervention, Dis-tance Pilot DISTRONIC cannot prevent a colli-
sion. An intermittent warning tone will then
sound and the distance warning lamp will light
up in the instrument cluster. Brake immediately
to increase the distance to the vehicle driving in
front, or take evasive action, provided it is safe
to do so.
For Distance Pilot DISTRONIC to assist you
when driving, the radar sensor system must be
operational. Driving systems
161Driving and parking Z
Page 170 of 333
Deactivating Distance Pilot DISTRONIC
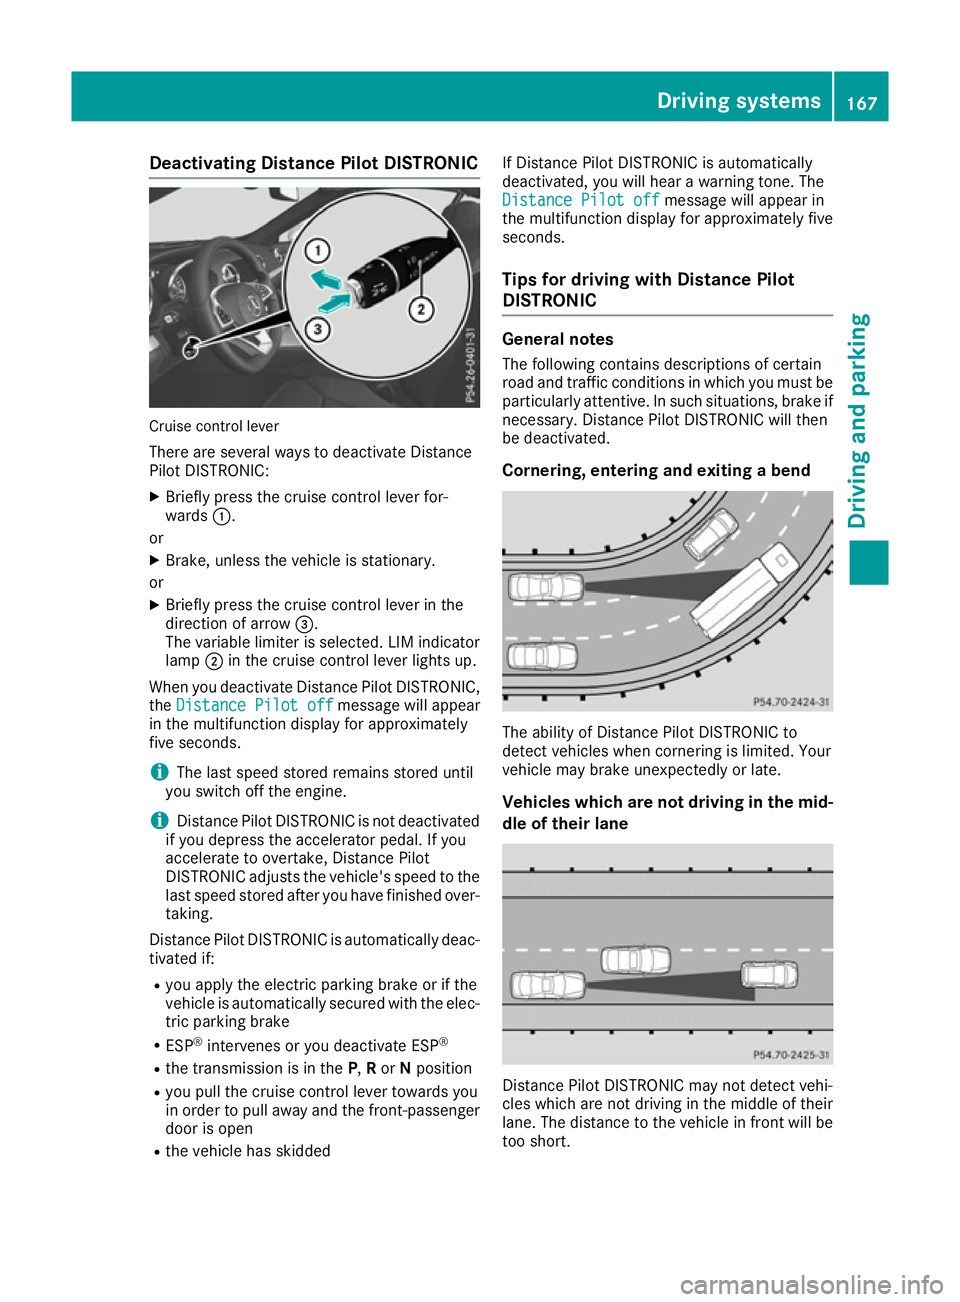
Cruise control lever
There are several ways to deactivate Distance
Pilot DISTRONIC:
X Briefly press the cruise control lever for-
wards :.
or
X Brake, unless the vehicle is stationary.
or X Briefly press the cruise control lever in the
direction of arrow =.
The variable limiter is selected. LIM indicator lamp ;in the cruise control lever lights up.
When you deactivate Distance Pilot DISTRONIC,
the Distance Pilot off
Distance Pilot off message will appear
in the multifunction display for approximately
five seconds.
i The last speed stored remains stored until
you switch off the engine.
i Distance Pilot DISTRONIC is not deactivated
if you depress the accelerator pedal. If you
accelerate to overtake, Distance Pilot
DISTRONIC adjusts the vehicle's speed to the last speed stored after you have finished over-
taking.
Distance Pilot DISTRONIC is automatically deac- tivated if:
R you apply the electric parking brake or if the
vehicle is automatically secured with the elec-
tric parking brake
R ESP ®
intervenes or you deactivate ESP ®
R the transmission is in the P,Ror Nposition
R you pull the cruise control lever towards you
in order to pull away and the front-passenger
door is open
R the vehicle has skidded If Distance Pilot DISTRONIC is automatically
deactivated, you will hear a warning tone. The
Distance Pilot off
Distance Pilot off message will appear in
the multifunction display for approximately five
seconds.
Tips for driving with Distance Pilot
DISTRONIC General notes
The following contains descriptions of certain
road and traffic conditions in which you must be particularly attentive. In such situations, brake if
necessary. Distance Pilot DISTRONIC will then
be deactivated.
Cornering, entering and exiting a bend The ability of Distance Pilot DISTRONIC to
detect vehicles when cornering is limited. Your
vehicle may brake unexpectedly or late.
Vehicles which are not driving in the mid-
dle of their lane Distance Pilot DISTRONIC may not detect vehi-
cles which are not driving in the middle of their
lane. The distance to the vehicle in front will be
too short. Driving syste
ms
167Driving an d parking Z