2016 MERCEDES-BENZ SL ROADSTER warning light
[x] Cancel search: warning lightPage 172 of 333

In a speed range from 0 - 60 km/h, Stop&Go
Pilot focuses on the vehicle in front, taking into
account lane markings, e.g. when following vehi-
cles in a traffic jam.
At speeds of more than 60 km/h, the Steering
Pilot focuses on detected lane markings (left
and right), only focusing on the vehicle in front if detected lane markings are not present at
speeds of up to 130 km/h.
If these conditions are not present, Steering
Pilot and Stop&Go Pilot cannot provide assis-
tance.
Distance Pilot DISTRONIC must be active in
order for the function to be available.
Important safety notes If you fail to adapt your driving style, Distance
Pilot DISTRONIC with Steering Pilot and
Stop&Go Pilot can neither reduce the risk of an
accident nor override the laws of physics. It can-
not take into account road, weather or traffic
conditions. Distance Pilot DISTRONIC with
Steering Pilot and Stop&Go Pilot is only an aid.
You are responsible for the distance to the vehi- cle in front, for vehicle speed, for braking in good
time and for staying in lane.
Distance Pilot DISTRONIC with Steering Pilot
and Stop&Go Pilot does not detect road and
traffic conditions and does not detect all road
users. If you are following a vehicle which is
driving towards the edge of the carriageway,
your vehicle could come into contact with the
kerb or other road boundaries. Be particularly
aware of other road users, e.g. cyclists, that are directly next to your vehicle.
Obstacles such as traffic pylons on the lane or
projecting into the lane are not detected.
An inappropriate steering intervention, e.g. after
intentionally driving over a lane marking, can be
corrected at any time if you steer slightly in the opposite direction.
Distance Pilot DISTRONIC with Steering Pilot
and Stop&Go Pilot cannot continuously keep
your vehicle in the lane. In some cases, the
steering intervention is not sufficient to bring
the vehicle back to the lane. In such cases, youmust steer the vehicle yourself to ensure that it
does not leave the lane. The support offered by the system may be
impaired if:
R
there is poor visibility, e.g. due to insufficient
illumination of the road, or due to snow, rain,fog or spray
R there is glare, e.g. from oncoming traffic, the
sun or reflection from other vehicles (e.g. if
the road surface is wet)
R the windscreen is dirty, misted up, damaged
or covered, for instance by a sticker, in the
vicinity of the camera
R there are no lane markings, or several unclear
lane markings are present, e.g. around con-
struction sites
R the lane markings are worn away, dark or cov-
ered up, e.g. by dirt or snow
R the distance to the vehicle in front is too short
and thus the lane markings cannot be detec-
ted
R the lane markings change quickly, e.g. lanes
branch off, cross one another or merge
R the road is narrow and winding
R there are highly variable shade conditions on
the road
The system is switched to passive and no longer assists you by performing steering interventions
if:
R you actively change lanes
R you switch on the turn signal
R you take your hands off the steering wheel or
do not steer for a prolonged period of time
i After you have finished changing lanes,
Steering Pilot and Stop&Go Pilot are auto-
matically active again.
Steering Pilot and Stop&Go Pilot cannot provide
assistance:
R on very sharp corners
R a loss of tyre pressure or a defective tyre has
been detected and displayed
Pay attention also to the important safety notes
on Distance Pilot DISTRONIC (Y page 162).
The steering interventions are carried out with a
limited steering moment. The system requires
the driver to keep his hands on the steering
wheel and to steer himself.
If you do not steer yourself or if you take your
hands off the steering wheel for a prolonged
period of time, the system will first alert you with a visual warning. A steering wheel symbol
appears in the multifunction display. If you have Driving systems
169Driving and parking Z
Page 173 of 333
still not started to steer and have not taken hold
of the steering wheel after five seconds at the
latest, a warning tone also sounds to remind you to take control of the vehicle. Steering Pilot and
Stop&Go Pilot then switch to passive mode. Dis-
tance Pilot DISTRONIC remains active.
Activating Steering Pilot and Stop&Go
Pilot
X Activate Distance Pilot DISTRONIC with
Steering Pilot and Stop&Go Pilot function
using the on-board computer (Y page 207).
The Steering
Steering Pilot Piloton
onmessage appears in
the multifunctional display. The Steering Pilot and Stop&Go Pilot are switched on.
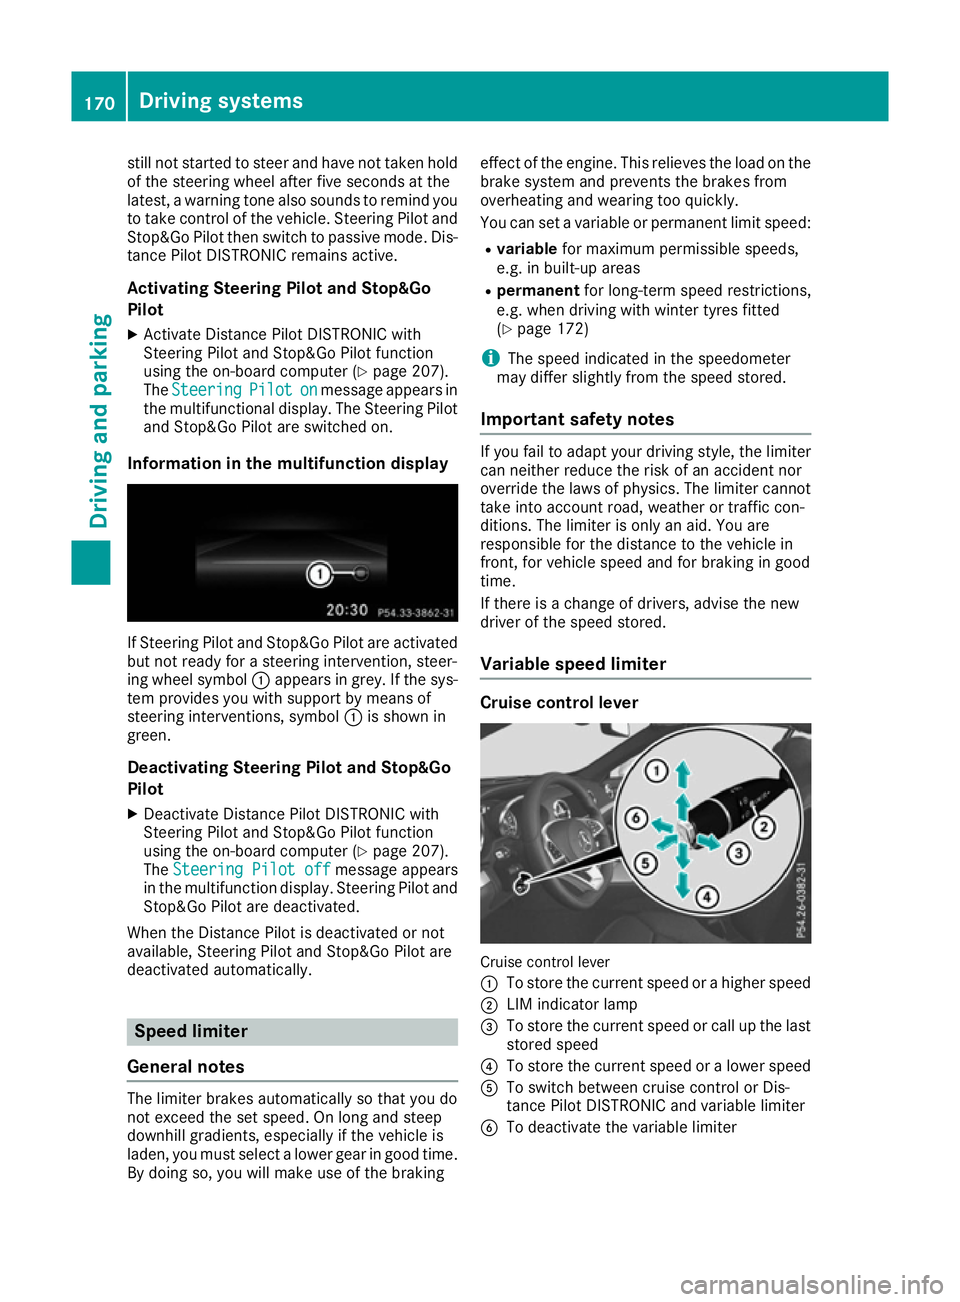
Information in the multifunction display If Steering Pilot and Stop&Go Pilot are activated
but not ready for a steering intervention, steer-
ing wheel symbol :appears in grey. If the sys-
tem provides you with support by means of
steering interventions, symbol :is shown in
green.
Deactivating Steering Pilot and Stop&Go
PilotX Deactivate Distance Pilot DISTRONIC with
Steering Pilot and Stop&Go Pilot function
using the on-board computer (Y page 207).
The Steering Pilot off
Steering Pilot off message appears
in the multifunction display. Steering Pilot and Stop&Go Pilot are deactivated.
When the Distance Pilot is deactivated or not
available, Steering Pilot and Stop&Go Pilot are
deactivated automatically. Speed limiter
General notes The limiter brakes automatically so that you do
not exceed the set speed. On long and steep
downhill gradients, especially if the vehicle is
laden, you must select a lower gear in good time.
By doing so, you will make use of the braking effect of the engine. This relieves the load on the
brake system and prevents the brakes from
overheating and wearing too quickly.
You can set a variable or permanent limit speed:
R variable for maximum permissible speeds,
e.g. in built-up areas
R permanent for long-term speed restrictions,
e.g. when driving with winter tyres fitted
(Y page 172)
i The speed indicated in the speedometer
may differ slightly from the speed stored.
Important safety notes If you fail to adapt your driving style, the limiter
can neither reduce the risk of an accident nor
override the laws of physics. The limiter cannot take into account road, weather or traffic con-
ditions. The limiter is only an aid. You are
responsible for the distance to the vehicle in
front, for vehicle speed and for braking in good
time.
If there is a change of drivers, advise the new
driver of the speed stored.
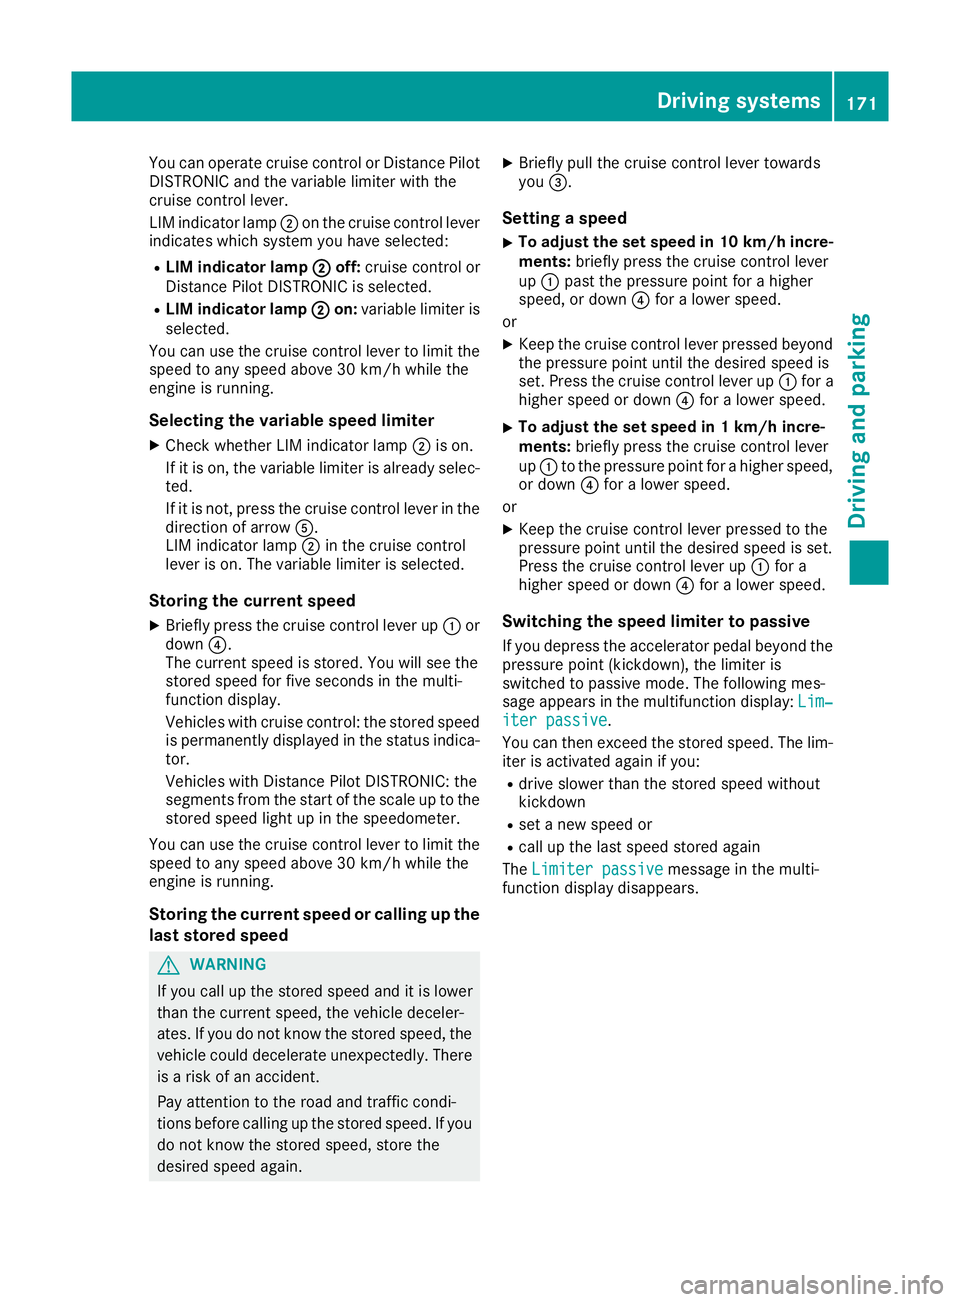
Variable speed limiter Cruise control lever
Cruise control lever
:
To store the current speed or a higher speed
; LIM indicator lamp
= To store the current speed or call up the last
stored speed
? To store the current speed or a lower speed
A To switch between cruise control or Dis-
tance Pilot DISTRONIC and variable limiter
B To deactivate the variable limiter 170
Driving systemsDriving and parking
Page 174 of 333
You can operate cruise control or Distance Pilot
DISTRONIC and the variable limiter with the
cruise control lever.
LIM indicator lamp ;on the cruise control lever
indicates which system you have selected:
R LIM indicator lamp ; ;off: cruise control or
Distance Pilot DISTRONIC is selected.
R LIM indicator lamp ;
; on: variable limiter is
selected.
You can use the cruise control lever to limit the
speed to any speed above 30 km/h while the
engine is running.
Selecting the variable speed limiter
X Check whether LIM indicator lamp ;is on.
If it is on, the variable limiter is already selec-
ted.
If it is not, press the cruise control lever in the
direction of arrow A.
LIM indicator lamp ;in the cruise control
lever is on. The variable limiter is selected.
Storing the current speed
X Briefly press the cruise control lever up :or
down ?.
The current speed is stored. You will see the
stored speed for five seconds in the multi-
function display.
Vehicles with cruise control: the stored speed
is permanently displayed in the status indica-
tor.
Vehicles with Distance Pilot DISTRONIC: the
segments from the start of the scale up to the
stored speed light up in the speedometer.
You can use the cruise control lever to limit the
speed to any speed above 30 km/h while the
engine is running.
Storing the current speed or calling up the
last stored speed G
WARNING
If you call up the stored speed and it is lower
than the current speed, the vehicle deceler-
ates. If you do not know the stored speed, the vehicle could decelerate unexpectedly. There
is a risk of an accident.
Pay attention to the road and traffic condi-
tions before calling up the stored speed. If you do not know the stored speed, store the
desired speed again. X
Briefly pull the cruise control lever towards
you =.
Setting a speed
X To adjust the set speed in 10 km/h incre-
ments: briefly press the cruise control lever
up : past the pressure point for a higher
speed, or down ?for a lower speed.
or
X Keep the cruise control lever pressed beyond
the pressure point until the desired speed is
set. Press the cruise control lever up :for a
higher speed or down ?for a lower speed.
X To adjust the set speed in 1 km/h incre-
ments:
briefly press the cruise control lever
up : to the pressure point for a higher speed,
or down ?for a lower speed.
or
X Keep the cruise control lever pressed to the
pressure point until the desired speed is set.
Press the cruise control lever up :for a
higher speed or down ?for a lower speed.
Switching the speed limiter to passive
If you depress the accelerator pedal beyond the pressure point (kickdown), the limiter is
switched to passive mode. The following mes-
sage appears in the multifunction display: Lim‐
Lim‐
iter passive iter passive.
You can then exceed the stored speed. The lim-
iter is activated again if you:
R drive slower than the stored speed without
kickdown
R set a new speed or
R call up the last speed stored again
The Limiter passive Limiter passive message in the multi-
function display disappears. Driving systems
171Driving and parking Z
Page 179 of 333
13 mm compared to the normal vehicle level. In
the Comfort andCURVE drive programs, it is
lowered by up to 5 mm compared to the normal vehicle level. As the speed is reduced, the vehi-
cle is raised to the set vehicle height.
Select the normal level for normal road surfaces and the raised level for driving with snow chains
or on particularly poor road surfaces.
Important safety notes G
WARNING
The vehicle is slightly lowered if you:
R have selected the SPORT suspension tun-
ing at normal level and
R switch off the engine
Persons in the vicinity of the wheel arch or the underbody may thus become trapped. There
is a risk of injury.
Make sure that nobody is in the vicinity of thewheel arch or the underbody when you switch
off the engine.
! When the engine is switched off, the vehicle
is lowered if SPORT suspension tuning has
been selected at the normal level. The vehicle
is automatically lowered by approximately
10 mm. Make sure when parking that you
position your vehicle so that it does not make
contact with the kerb as the vehicle is low-
ered. Your vehicle could otherwise be dam-
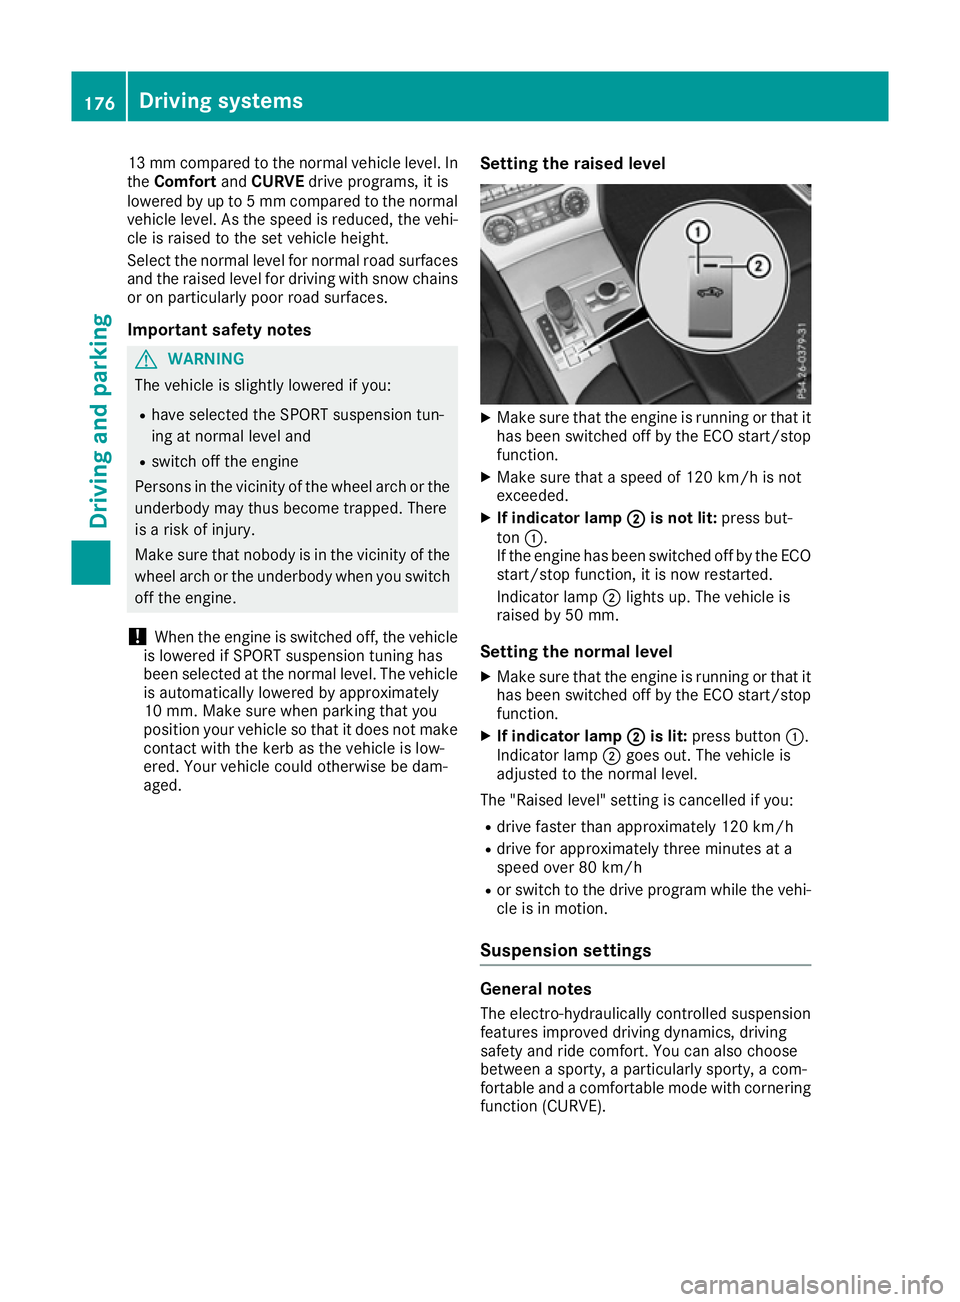
aged. Setting the raised level X
Make sure that the engine is running or that it
has been switched off by the ECO start/stop
function.
X Make sure that a speed of 120 km/h is not
exceeded.
X If indicator lamp ; ;is not lit: press but-
ton :.
If the engine has been switched off by the ECO
start/stop function, it is now restarted.
Indicator lamp ;lights up. The vehicle is
raised by 50 mm.
Setting the normal level
X Make sure that the engine is running or that it
has been switched off by the ECO start/stop
function.
X If indicator lamp ; ;is lit: press button :.
Indicator lamp ;goes out. The vehicle is
adjusted to the normal level.
The "Raised level" setting is cancelled if you:
R drive faster than approximately 120 km/h
R drive for approximately three minutes at a
speed over 80 km/h
R or switch to the drive program while the vehi-
cle is in motion.
Suspension settings General notes
The electro-hydraulically controlled suspension
features improved driving dynamics, driving
safety and ride comfort. You can also choose
between a sporty, a particularly sporty, a com-
fortable and a comfortable mode with cornering function (CURVE). 176
Driving systemsDriving and parking
Page 181 of 333

X
Switch on the multimedia system. You can
find further information in the separate
COMAND Online operating instructions.
X Press button :.
The driving dynamics display appears in the
multimedia system display.
The following information on the vehicle's oper- ating status is displayed in the driving dynamics display:
R Drive program selected (Y page 139)
R Accelerator pedal position shown in %
R Brake pedal position shown in %
R Steering angle
R Activity of the ABC spring struts
R Vehicle level display (Y page 175)
R Level settings animation
R G-FORCE cross displaying longitudinal and
lateral acceleration (only available in Sportor
Sport Plus drive programs) Active Body Control ABC (Mercedes-
AMG vehicles)
Setting the vehicle level General notes
The vehicle level can be set using the DYNAMIC SELECT controller (Y page 140) or the on-board
computer (Y page 178). The setting always cor-
responds to the last selected function.
In order to reduce fuel consumption and
improve the driving dynamics, the vehicle is low-
ered as its speed increases. In the Sportand
Sport Plus drive programs it is lowered by up to
13 mm, and in the Comfortdrive program by up
to 5 mm compared to the normal vehicle level.
As the speed is reduced, the vehicle is raised to
the set vehicle height.
If the ignition is switched off for less than four
hours, the previously selected drive program is
activated when the engine is next started. If the
ignition is switched off for more than four hours,
the Comfort drive program is activated when
the engine is next started.
Select the normal level for normal road surfaces and the raised level for driving with snow chains
or on particularly poor road surfaces. Important safety notes
The vehicle is slightly lowered when the engine
is switched off. G
WARNING
People's limbs may become trapped if they
are located underneath the vehicle or
between the vehicle body and the tyres when the vehicle is lowering. There is a danger of
injury.
When lowering the vehicle, make sure no one
is underneath the vehicle or in the immediate vicinity of the wheel arches.
! If you have selected the normal level and
switched the engine off, the vehicle is low-
ered. The vehicle is automatically lowered by approximately 10 mm. Make sure when park- ing that you position your vehicle so that it
does not make contact with the kerb as the
vehicle is lowered. Your vehicle could other-
wise be damaged.
Setting the raised level X
Make sure that the engine is running or that it
has been switched off by the ECO start/stop
function.
X Make sure that a speed of 120 km/h is not
exceeded.
X If symbol ; ;is not shown: press=
or ; on the steering wheel to select the
Assist. Assist. menu.
X Press the 9or: button to select
Vehicle level
Vehicle level.
X Press the abutton.
The following message appears: :Vehicle
Vehicle
level Raise with OK
level Raise with OK.
X Press the abutton.
If the engine has been switched off by the ECO
start/stop function, it is now restarted. 178
Driving systemsDriving and parking
Page 184 of 333
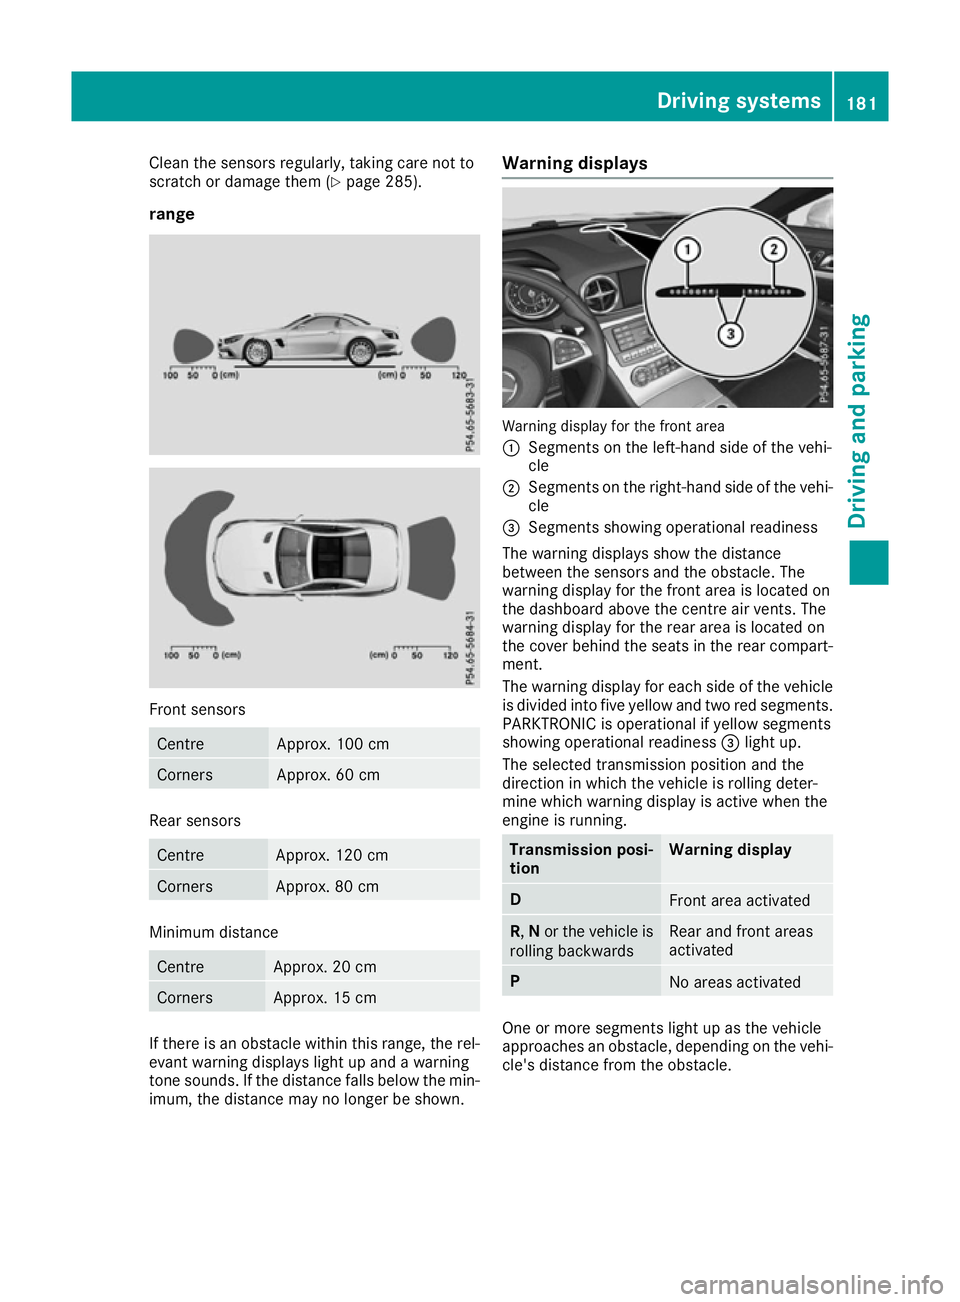
Clean the sensors regularly, taking care not to
scratch or damage them (Y page 285).
range Front sensors
Centre Approx. 100 cm
Corners Approx. 60 cm
Rear sensors
Centre Approx. 120 cm
Corners Approx. 80 cm
Minimum distance
Centre Approx. 20 cm
Corners Approx. 15 cm
If there is an obstacle within this range, the rel-
evant warning displays light up and a warning
tone sounds. If the distance falls below the min- imum, the distance may no longer be shown. Warning displays
Warning display for the front area
:
Segments on the left-hand side of the vehi-
cle
; Segments on the right-hand side of the vehi-
cle
= Segments showing operational readiness
The warning displays show the distance
between the sensors and the obstacle. The
warning display for the front area is located on
the dashboard above the centre air vents. The
warning display for the rear area is located on
the cover behind the seats in the rear compart-
ment.
The warning display for each side of the vehicle is divided into five yellow and two red segments.
PARKTRONIC is operational if yellow segments
showing operational readiness =light up.
The selected transmission position and the
direction in which the vehicle is rolling deter-
mine which warning display is active when the
engine is running. Transmission posi-
tion Warning display
D
Front area activated
R,
Nor the vehicle is
rolling backwards Rear and front areas
activated P
No areas activated
One or more segments light up as the vehicle
approaches an obstacle, depending on the vehi-
cle's distance from the obstacle. Driving systems
181Driving and parking Z
Page 185 of 333
From the:
R sixth segment onwards, you will hear an inter-
mittent warning tone for approximately two
seconds.
R seventh segment onwards, you will hear a
warning tone for approximately two seconds.
This indicates that you have now reached the minimum distance.
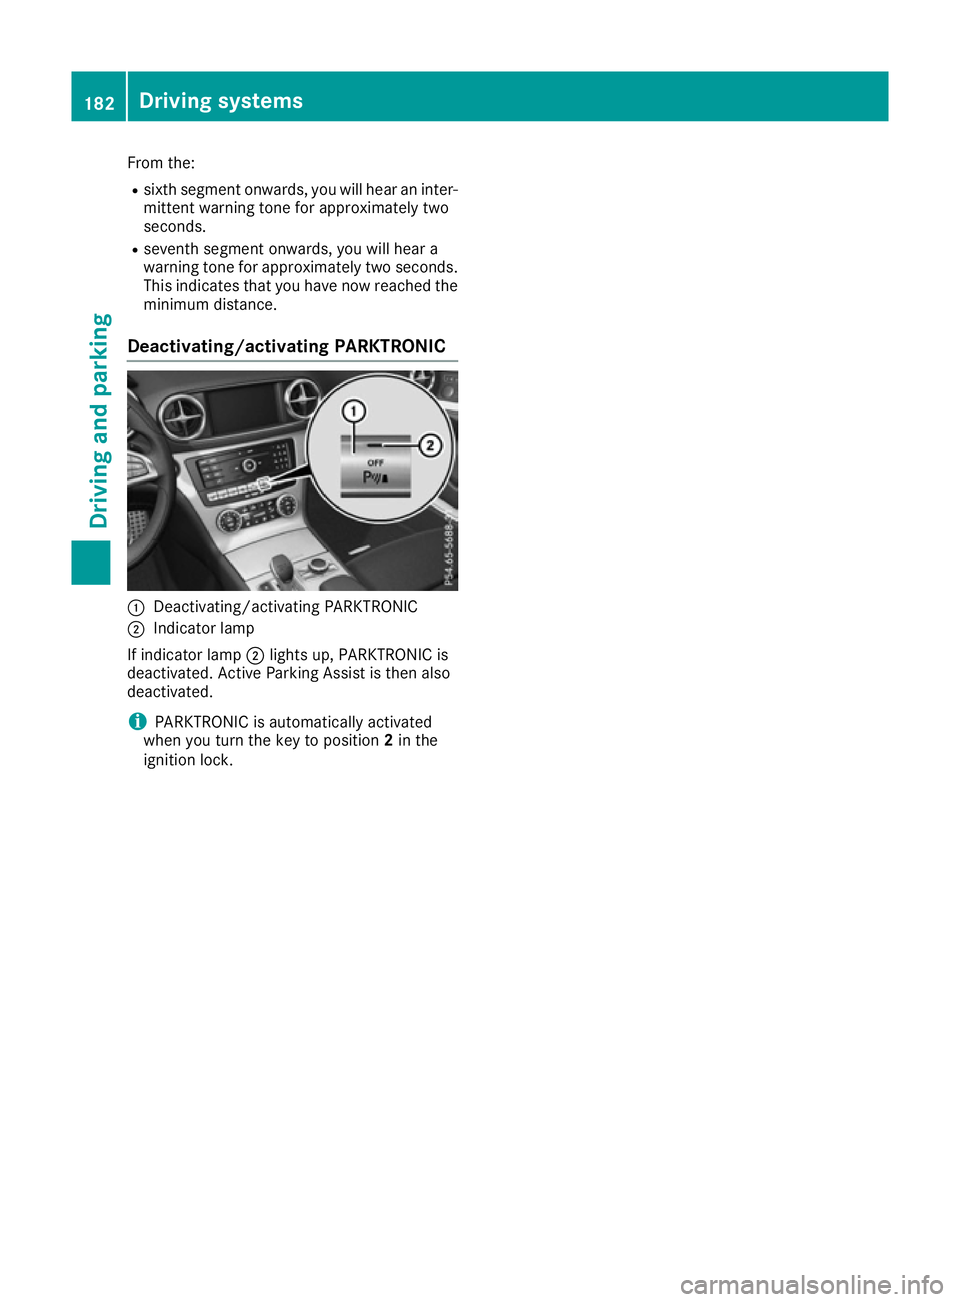
Deactivating/activating PARKTRONIC :
Deactivating/activating PARKTRONIC
; Indicator lamp
If indicator lamp ;lights up, PARKTRONIC is
deactivated. Active Parking Assist is then also
deactivated.
i PARKTRONIC is automatically activated
when you turn the key to position 2in the
ignition lock. 182
Driving systemsDriving and parking
Page 186 of 333
Problems with PARKTRONIC
Problem
Possible causes/consequences and
M
MSolutions Only the red segments in
the PARKTRONIC warn-
ing displays are lit. You
also hear a warning tone
for approximately two
seconds.
PARKTRONIC is deacti-
vated after approx-
imately five seconds,
and the indicator lamp in
the PARKTRONIC button
lights up. PARKTRONIC has malfunctioned and has switched off.
X If problems persist, have PARKTRONIC checked at a qualified spe-
cialist workshop. Only the red segments in
the PARKTRONIC warn-
ing displays are lit.
PARKTRONIC is deacti-
vated after approx-
imately five seconds. The PARKTRONIC sensors are dirty or there is interference.
X
Clean the PARKTRONIC sensors (Y page 285).
X Switch the ignition back on. The problem may be caused by an external source of radio or ultra-
sound waves.
X See if PARKTRONIC functions in a different location. Active Parking Assist
General notes Active Parking Assist is an electronic parking aid
with ultrasound. It measures the road on both
sides of the vehicle. A parking symbol indicates a suitable parking space. Active steering inter-
vention can assist you during manoeuvring and
parking. You may also use PARKTRONIC
(Y page 180).
Important safety notes Active Parking Assist is only an aid. It is not a
substitute for your attention to the immediate
surroundings. The responsibility for safe
manoeuvring and parking remains with you.
Make sure that no persons, animals or objects
are in the manoeuvring range.
When PARKTRONIC is deactivated, Active Park-
ing Assist is also unavailable. G
WARNING
While parking or pulling out of a parking
space, the vehicle swings out and can drive
onto areas of the oncoming lane. This could cause you to collide with other road users.
There is a risk of an accident.
Pay attention to other road users. Stop the
vehicle if necessary or cancel the Active Park-
ing Assist parking procedure.
! If unavoidable, you should drive over obsta-
cles such as kerbs slowly and not at a sharp
angle. Otherwise, you may damage the
wheels or tyres.
Active Parking Assist may also display spaces
not suitable for parking, e.g.: R parking or stopping restrictions
R in front of driveways or entrances and exits
R unsuitable surfaces
Parking tips:
R on narrow roads, drive as closely as possible
past the parking space
R parking spaces that are littered or overgrown
might be identified or measured incorrectly
R parking spaces that are partially occupied by
trailer drawbars might not be identified as
such or be measured incorrectly Driving systems
183Driving and parking Z