2016 MERCEDES-BENZ SL ROADSTER oil dipstick
[x] Cancel search: oil dipstickPage 13 of 333

Removing ......................................
.318
Storage location ............................ 318
Technical data ............................... 318
Emergency unlocking
Vehicle ............................................. 84
Engine
Display message ............................ 229
ECO start/stop function ................ 135
Jump-starting ................................. 296
Running irregularl y......................... 138
Starting problems .......................... 138
Starting the engine with the key .... 134
Starting with KEYLESS GO ............. 134
Stopping ........................................ 153
Tow-starting (vehicle) ..................... 301
Warning lamp (engine diagnos-
tics) ............................................... 249
Engine electronics
Notes ............................................. 320
Problem (fault) ............................... 138
Engine oil
Additives ........................................ 325
Checking the oil level ..................... 277
Checking the oil level using the
dipstick .......................................... 278
Display message ............................ 230
Filling capacity ............................... 325
General notes ................................ 324
Notes about oil grade s................... 324
Notes on oil level/consumption .... 277
Temperature (on-board computer, Mercedes-AMG vehicles) ............... 213
Topping up ..................................... 278
Entering an address
See also Digital Owner's Manua l... 253
Environmental protection
Returning an end-of-life vehicle ....... 23
ESP ®
(Electronic Stability Pro-
gram)
AMG menu (on-board computer) ... 213
Characteristics ................................. 67
Deactivating/activating (button
in Mercedes-AMG vehicles) ............. 70
Deactivating/activating (except
Mercedes‑ AMG vehicles) ................. 69
Display message ............................ 217
Function/note s................................ 67
General notes .................................. 67 Important safety guidelines ............. 67
Warning lamp ................................. 246
ETS/4ETS (Electronic Traction Sys-
tem) ...................................................... 67
Exhaust pipe (cleaning instruc-
tions) .................................................. 285
Exterior lighting
Settings options ............................. 113
see Lights
Exterior mirrors
Adjusting ....................................... 108
Anti-dazzle mode (automatic) ........ 109
Folding in when locking (on-board computer) ...................................... 212
Folding in/out (automatically )....... 109
Folding in/out (electrically) ........... 109
Out of position (troubleshooting) ... 109
Parking position ............................. 110
Resetting ....................................... 109
Storing settings (memory func-
tion) ............................................... 111 F
Fault message see Display messages
Favourites
Overview ........................................ 254
Filler cap
see Fuel filler flap
Fire extinguisher ............................... 287
First-aid kit ......................................... 287
Fitting a wheel
Fitting a wheel ............................... 316
Lowering the vehicle ...................... 316
Preparing the vehicle ..................... 313
Raising the vehicle ......................... 313
Removing a wheel .......................... 315
Securing the vehicle against roll-
ing away ........................................ 313
Flat tyre
MOExtended tyre s......................... 289
Preparing the vehicle ..................... 289
TIREFIT kit ...................................... 290
see Emergency spare wheel
Floormat ............................................. 274
Foglamps
Extended rang e.............................. 116 10
Index
Page 281 of 333

when the vehicle is new or if you frequently drive
at high engine speeds.
Depending on the engine, the oil dipstick may be
installed at a different location.
When checking the oil level:
R park the vehicle on a level surface
R the engine should be switched off for approx-
imately five minutes if the engine is at normal
operating temperature
R if the engine is not at normal operating tem-
perature, e.g. if the engine was only started
briefly, wait approximately 30 minutes before
carrying out the measurement
Checking the oil level using the oil dip-
stick G
WARNING
Certain components in the engine compart-
ment could be very hot, e.g. the engine, the
radiator and parts of the exhaust system.
There is a risk of injury when accessing the
engine compartment.
As far as possible, allow the engine to cool
down and only touch the components descri- bed in the following. Example
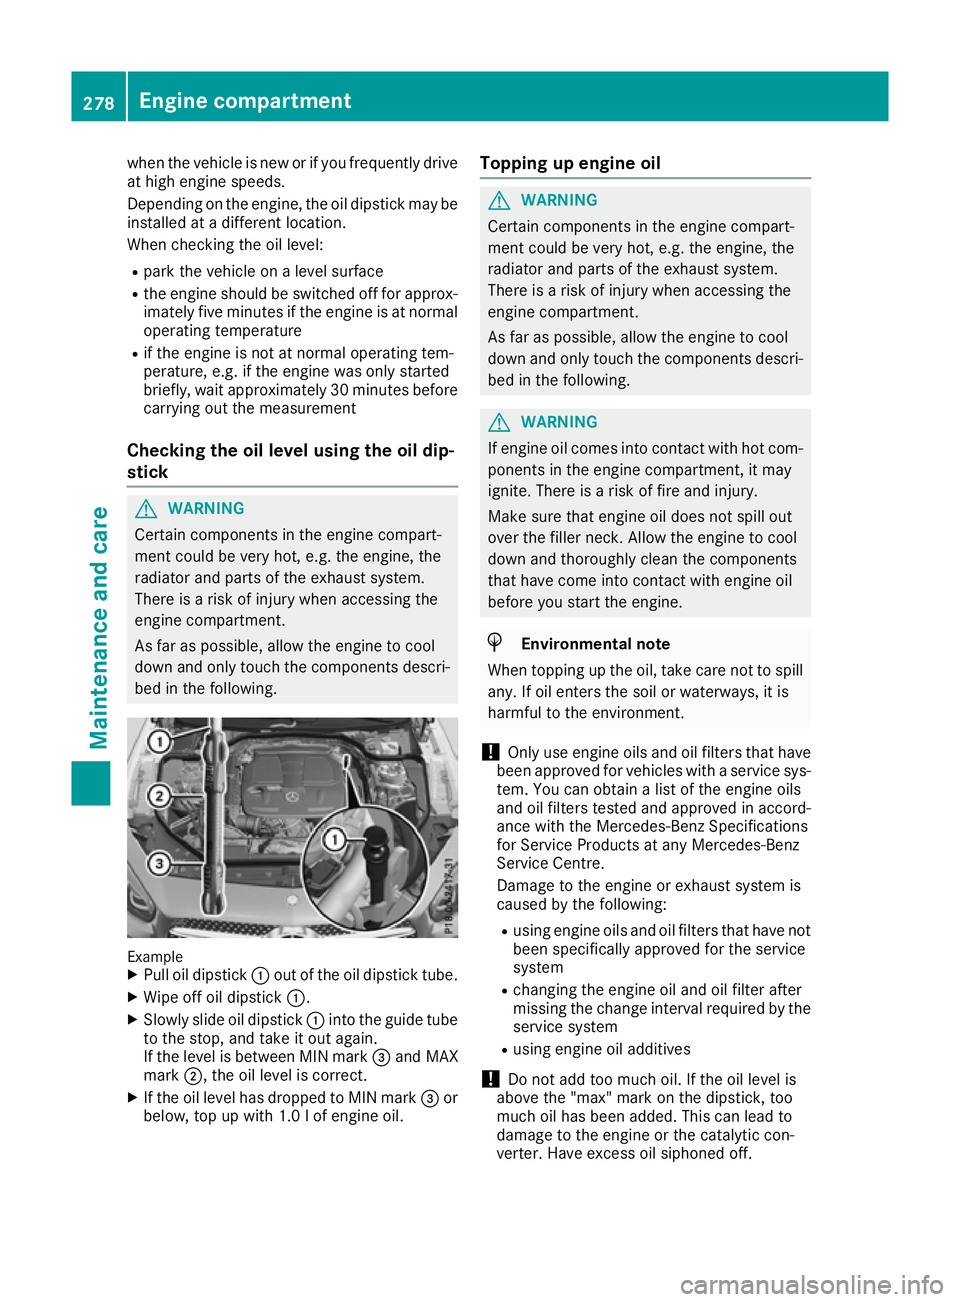
X Pull oil dipstick :out of the oil dipstick tube.
X Wipe off oil dipstick :.
X Slowly slide oil dipstick :into the guide tube
to the stop, and take it out again.
If the level is between MIN mark =and MAX
mark ;, the oil level is correct.
X If the oil level has dropped to MIN mark =or
below, top up with 1.0 l of engine oil. Topping up engine oil G
WARNING
Certain components in the engine compart-
ment could be very hot, e.g. the engine, the
radiator and parts of the exhaust system.
There is a risk of injury when accessing the
engine compartment.
As far as possible, allow the engine to cool
down and only touch the components descri- bed in the following. G
WARNING
If engine oil comes into contact with hot com- ponents in the engine compartment, it may
ignite. There is a risk of fire and injury.
Make sure that engine oil does not spill out
over the filler neck. Allow the engine to cool
down and thoroughly clean the components
that have come into contact with engine oil
before you start the engine. H
Environmental note
When topping up the oil, take care not to spill
any. If oil enters the soil or waterways, it is
harmful to the environment.
! Only use engine oils and oil filters that have
been approved for vehicles with a service sys-
tem. You can obtain a list of the engine oils
and oil filters tested and approved in accord-
ance with the Mercedes-Benz Specifications
for Service Products at any Mercedes-Benz
Service Centre.
Damage to the engine or exhaust system is
caused by the following:
R using engine oils and oil filters that have not
been specifically approved for the service
system
R changing the engine oil and oil filter after
missing the change interval required by the
service system
R using engine oil additives
! Do not add too much oil. If the oil level is
above the "max" mark on the dipstick, too
much oil has been added. This can lead to
damage to the engine or the catalytic con-
verter. Have excess oil siphoned off. 278
Engine compartmentMaintenance and care
Page 282 of 333

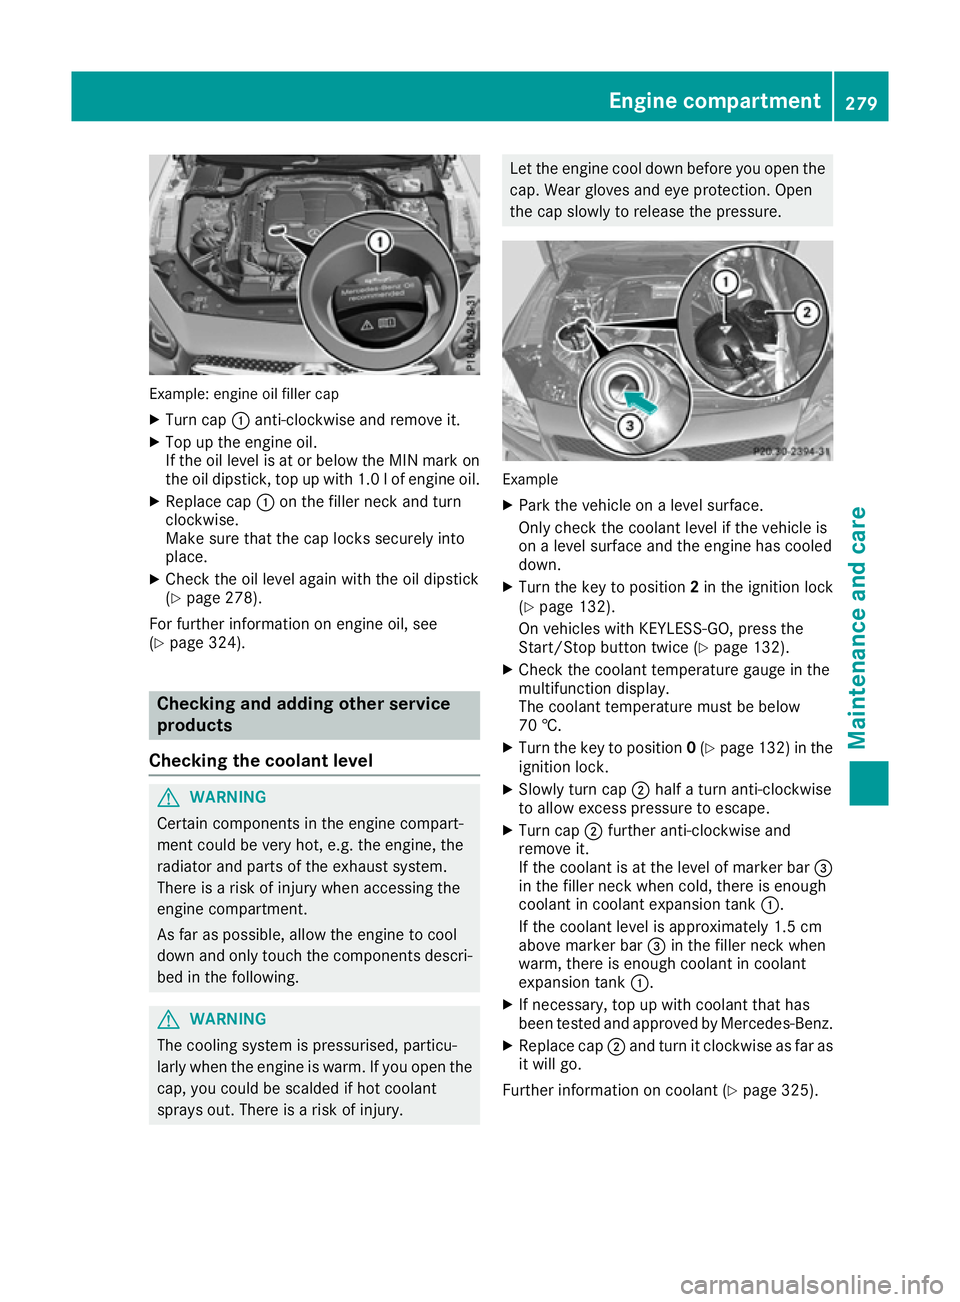
Example: engine oil filler cap
X Turn cap :anti-clockwise and remove it.
X Top up the engine oil.
If the oil level is at or below the MIN mark on
the oil dipstick, top up with 1.0 lof engine oil.
X Replace cap :on the filler neck and turn
clockwise.
Make sure that the cap locks securely into
place.
X Check the oil level again with the oil dipstick
(Y page 278).
For further information on engine oil, see
(Y page 324). Checking and adding other service
products
Checking the coolant level G
WARNING
Certain components in the engine compart-
ment could be very hot, e.g. the engine, the
radiator and parts of the exhaust system.
There is a risk of injury when accessing the
engine compartment.
As far as possible, allow the engine to cool
down and only touch the components descri- bed in the following. G
WARNING
The cooling system is pressurised, particu-
larly when the engine is warm. If you open the cap, you could be scalded if hot coolant
sprays out. There is a risk of injury. Let the engine cool down before you open the
cap. Wear gloves and eye protection. Open
the cap slowly to release the pressure. Example
X Park the vehicle on a level surface.
Only check the coolant level if the vehicle is
on a level surface and the engine has cooled
down.
X Turn the key to position 2in the ignition lock
(Y page 132).
On vehicles with KEYLESS-GO, press the
Start/Stop button twice (Y page 132).
X Check the coolant temperature gauge in the
multifunction display.
The coolant temperature must be below
70 †.
X Turn the key to position 0(Y page 132) in the
ignition lock.
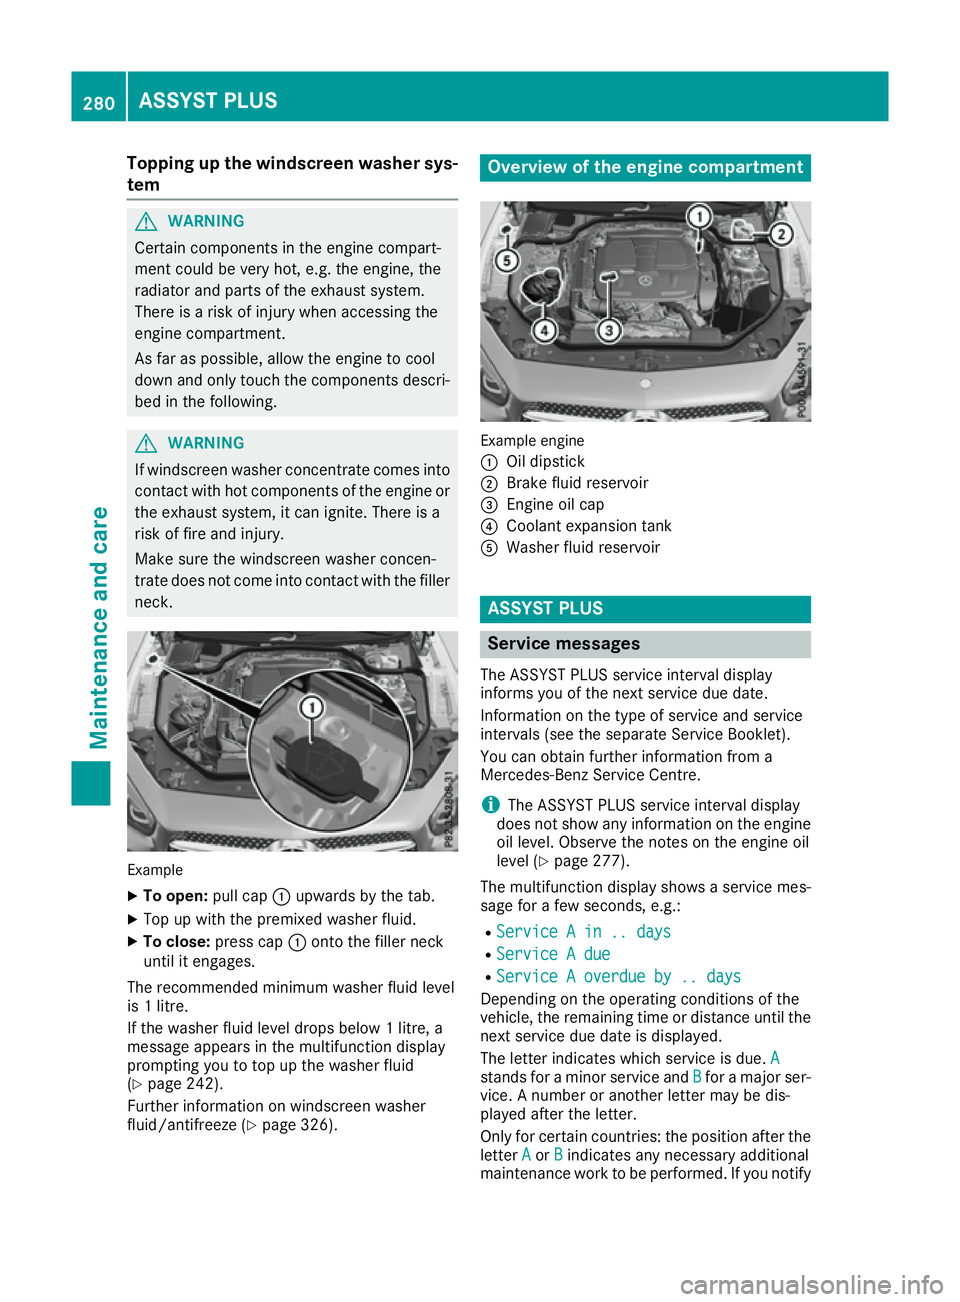
X Slowly turn cap ;half a turn anti-clockwise
to allow excess pressure to escape.
X Turn cap ;further anti-clockwise and
remove it.
If the coolant is at the level of marker bar =
in the filler neck when cold, there is enough
coolant in coolant expansion tank :.
If the coolant level is approximately 1.5 cm
above marker bar =in the filler neck when
warm, there is enough coolant in coolant
expansion tank :.
X If necessary, top up with coolant that has
been tested and approved by Mercedes-Benz.
X Replace cap ;and turn it clockwise as far as
it will go.
Further information on coolant (Y page 325). Engine compartment
279Maintenance and care Z
Page 283 of 333

Topping up the windscreen washer sys-
tem G
WARNING
Certain components in the engine compart-
ment could be very hot, e.g. the engine, the
radiator and parts of the exhaust system.
There is a risk of injury when accessing the
engine compartment.
As far as possible, allow the engine to cool
down and only touch the components descri- bed in the following. G
WARNING
If windscreen washer concentrate comes into contact with hot components of the engine or
the exhaust system, it can ignite. There is a
risk of fire and injury.
Make sure the windscreen washer concen-
trate does not come into contact with the filler neck. Example
X To open: pull cap:upwards by the tab.
X Top up with the premixed washer fluid.
X To close: press cap :onto the filler neck
until it engages.
The recommended minimum washer fluid level
is 1 litre.
If the washer fluid level drops below 1 litre, a
message appears in the multifunction display
prompting you to top up the washer fluid
(Y page 242).
Further information on windscreen washer
fluid/antifreeze (Y page 326). Overview of the engine compartment
Example engine
:
Oil dipstick
; Brake fluid reservoir
= Engine oil cap
? Coolant expansion tank
A Washer fluid reservoir ASSYST PLUS
Service messages
The ASSYST PLUS service interval display
informs you of the next service due date.
Information on the type of service and service
intervals (see the separate Service Booklet).
You can obtain further information from a
Mercedes-Benz Service Centre. i The ASSYST PLUS service interval display
does not show any information on the engine oil level. Observe the notes on the engine oil
level (Y page 277).
The multifunction display shows a service mes-
sage for a few seconds, e.g.:
R Service A in .. days Service A in .. days
R Service A due
Service A due
R Service A overdue by .. days
Service A overdue by .. days
Depending on the operating conditions of the
vehicle, the remaining time or distance until the
next service due date is displayed.
The letter indicates which service is due. A A
stands for a minor service and B
Bfor a major ser-
vice. A number or another letter may be dis-
played after the letter.
Only for certain countries: the position after the
letter A
A or B Bindicates any necessary additional
maintenance work to be performed. If you notify 280
ASSYST PLUSMaintenance and care