2016 MERCEDES-BENZ SL ROADSTER transmission oil
[x] Cancel search: transmission oilPage 8 of 333
Automatic headlamp mode
.............. 113
Automatic transmission
Accelerator pedal position ............ .144
Changing gear ............................... 144
Display message ............................ 239
Drive program displa y.................... 142
Drive programs .............................. 145
Driving tips .................................... 144
DYNAMIC SELECT button (all vehi-
cles except Mercedes-AMG vehi-
cles) ............................................... 139
DYNAMIC SELECT controller
(Mercedes-AMG vehicles) .............. 140
Emergency running mod e.............. 151
Engaging drive position .................. 143
Engaging neutral ............................ 143
Engaging park position automati-
cally ............................................... 143
Engaging reverse gear ................... 143
Engaging the park position ............ 142
Gearshift recommendation ............ 149
Kickdown ....................................... 145
Manual shifting .............................. 147
Oil temperature (on-board com-
puter, Mercedes-AMG vehicles) ..... 213
Overview ........................................ 141
Problem (fault) ............................... 151
Pulling away ................................... 134
Selector lever ................................ 141
Starting the engine ........................ 134
Steering wheel gearshift paddle s... 147
Transmission position display ........ 142
Transmission positions .................. 144
Automatic transmission emer-
gency running mode ......................... 151B
Back button ....................................... 254
BAS (Brake Assist System) ................. 62
Battery (key)
Checking .......................................... 80
Important safety notes .................... 79
Replacing ......................................... 80
Battery (vehicle)
Charging ........................................ 295
Display message ............................ 230
Important safety notes .................. 293 Jump starting ................................. 296
Overview ........................................ 293
Belt
see Seat belts
Belt tensioner
Activation ......................................... 51
Blind Spot Assist
see Active Blind Spot Assist
Bluetooth ®
Connecting another mobile
phone ............................................ 257
Searching for a mobile phone ........ 256
See also Digital Owner's Manua l... 253
Telephony ...................................... 256
Bonnet
Active bonnet (pedestrian protec-tion) ............................................... 276
Closing ........................................... 277
Display message ............................ 241
Important safety notes .................. 276
Opening ......................................... 277
Boot
Emergency release .......................... 89
Important safety notes .................... 85
Locking separately ........................... 89
Opening/closing (automatically
from inside) ...................................... 88
Opening/closing (automatically
from outside) ................................... 86
Opening/closing (from the out-
side, HANDS-FREE ACCESS) ............ 87
Opening/closing (manually from
outside) ............................................ 85
Overview .......................................... 85
Power closing .................................. 84
Boot lid
Display message ............................ 240
Opening dimensions ...................... 327
Boot load (maximum) ........................ 327
Boot separator
Display message ............................ 241
Fitting .............................................. 96
General notes .................................. 95
Opening/closing .............................. 95
Removing ......................................... 96
Bottle holders .................................... 267 Index
5
Page 17 of 333
Reversing camera .......................... 187
Traffic Sign Assist .......................... 191
Mercedes-Benz Service Centre
see Qualified specialist workshop
Message memory (on-board com-
puter) .................................................. 216
Messages
see Display messages
Mirrors
see Exterior mirrors
see Rear-view mirror
Mobile phone
Connecting (Bluetooth ®
inter-
face) .............................................. 256
Connecting another mobile
phone ............................................ 257
Connecting the telephone module
with Bluetooth ®
(SAP profile ) ......... 259
Freq uencies .................................. .320
Installation ..................................... 320
Menu (on-board computer) ............ 205
Notes/placing in the bracket ......... 268
Transmission output (maximum) .... 320
Modifying the programming (key) ..... 78
MOExtended tyres .............................289
Motorway mode ................................ 116
MP3
Operating ....................................... 205
See also Digital Owner's Manual ... 253
Multifunction display
Function/notes ............................ .201
Permanent display ......................... 209
Multifunction steering wheel
Operating the on-board computer .. 200
Overview .......................................... 33
Music files
See also Digital Owner's Manual ... 253 N
Navigation Menu (on-board computer) ............ 203
See also Digital Owner's Manual ... 253
NECK-PRO head restraints
Important safety notes .................... 52
Operation ......................................... 53
Resetting triggered .......................... 53
Notes on running in a new vehicle .. 131 O
Occupant safety Airbags ............................................ 43
Automatic front-passenger front
airbag deactivatio n .......................... 46
Automatic measures after an acci-
dent ................................................. 54
Children in the vehicle ..................... 54
Important safety notes .................... 39
PASSENGER AIRBAG indicator
lamp ................................................. 40
Pets in the vehicle ........................... 61
PRE-SAFE ®
(anticipatory occu-
pant protection) ............................... 53
PRE-SAFE ®
PLUS (anticipatory
occupant protection PLUS) .............. 53
Restraint system introduction .......... 39
Restraint system warning lamp ....... .40
Odometer
see Total distance recorder
see Trip meter
Oil
see Engine oil
On-board computer
AMG menu .....................................2 13
Assistance menu ........................... 207
Audio menu ................................... 204
Convenience submenu .................. 211
Display messages .......................... 216
Displaying a service message ....... .281
Factory setting submenu .............. .212
Important safety notes .................. 199
Instrument cluster submenu .......... 209
Light submenu ............................... 209
Menu overview .............................. 202
Message memory .......................... 216
Navigation menu ............................ 203
Operating the TV ............................ 205
Operating video DVD ..................... 205
Operation ....................................... 200
RACETIMER ................................... 213
Service menu ................................. 208
Settings menu ............................... 208
Standard display ............................ 202
Telephone menu ............................ 205
Trip menu ...................................... 202
Vehicle submenu ........................... 211 14
Index
Page 22 of 333
Introduction ................................... 257
Saving/deleting the PIN for the
SIM card ........................................ 259
Settings .........................................2 59
SIM card mode .............................. 258
Text messages ............................... 260
Transferring the phone book .......... 259
Temperature
Coolant .......................................... 200
Coolant (on-board computer,
Mercedes-AMG vehicles) .............. .213
Engine oil (on-board computer,
Mercedes-AMG vehicles) .............. .213
Outside temperature ..................... .199
Setting (climate control) ................ 125
Transmission oil (on-board com-
puter, Mercedes-AMG vehicles) ..... 213
TEMPOMAT
Function/notes ............................ .159
Text messages
Telephone module with Blue-
tooth ®
(SAP profile) ....................... 260
Timing (RACETIMER) ......................... 213
TIREFIT kit .......................................... 290
Declaration of conformity ................ 26
Important safety notes .................. 290
Storage location ............................ 288
Tyre pressure not reached ............. 291
Tyre pressure reached ................... 292
Total distance recorder .................... 202
Tow-away protection
Activating ......................................... 75
Deactivating ..................................... 75
Function .......................................... .75
Tow-starting
Emergency engine starting ............ 301
Important safety notes .................. 298
Towing
Important safety notes .................. 298
Transporting the vehicle ................ 300
With the rear axle raised ................ 300
Towing away
Fitting the towing ey e.................... 299
Removing the towing eye ............... 299
With both axles on the ground ....... 300 Traffic Sign Assist
Activating/deactivating the warn-ing function .................................... 207
Display message ............................ 232
Function/note s............................. 191
Important safety notes .................. 192
Instrument cluster display ............. 192
Transmission
Selector lever ................................ 141
see Automatic transmission
Transmission position display ......... 142
Transporting the vehicle .................. 300
Trip computer (on-board com-
puter) .................................................. 202
Trip meter
Calling up ....................................... 202
Resetting (on-board computer) ...... 203
Turn signals
Switching on/of f........................... 115
TV
Operating (on-board computer) ..... 205
see Separate operating instructions
Two-way radio
Frequencies ................................... 320
Installation ..................................... 320
Transmission output (maximum) .... 320
Type identification plate
see Vehicle identification plate
Tyre changing tool kit ....................... 288
Tyre inflation compressor
see TIREFIT kit
Tyre pressure
Calling up (on-board computer) ..... 309
Display message ............................ 237
Not reached (TIREFIT) .................... 291
Reached (TIREFIT) .......................... 292
Recommended ............................... 307
Tyre pressure loss warning
General notes ................................ 308
Important safety notes .................. 309
Restarting ...................................... 309
Tyre pressure monitor
Checking the tyre pressure elec-
tronically ........................................ 310
Function/note s............................. 309
General notes ................................ 309
Important safety notes .................. 310 Index
19
Page 135 of 333
boosting effect. You will require considerably
more effort to steer and brake. There is a riskof an accident.
Do not switch off the ignition while driving. G
WARNING
If the parking brake has not been fully
released when driving, the parking brake can:
R overheat and cause a fire
R lose its hold function.
There is a risk of fire and an accident. Release
the parking brake fully before driving off.
! Do not warm up the engine when the vehicle
is stationary. Drive off immediately. Avoid
high engine speeds and driving at full throttle
until the engine has reached its operating
temperature.
Only shift the automatic transmission to the
desired drive position when the vehicle is sta-
tionary.
Where possible, avoid spinning the drive
wheels when pulling away on slippery roads.
You could otherwise damage the drive train.
! Mercedes-AMG vehicles:
at low engine oil
temperatures (below +20 †), the maximum
engine speed is restricted in order to protect the engine. To protect the engine and main-
tain smooth engine operation, avoid driving at
full throttle when the engine is cold. Key positions
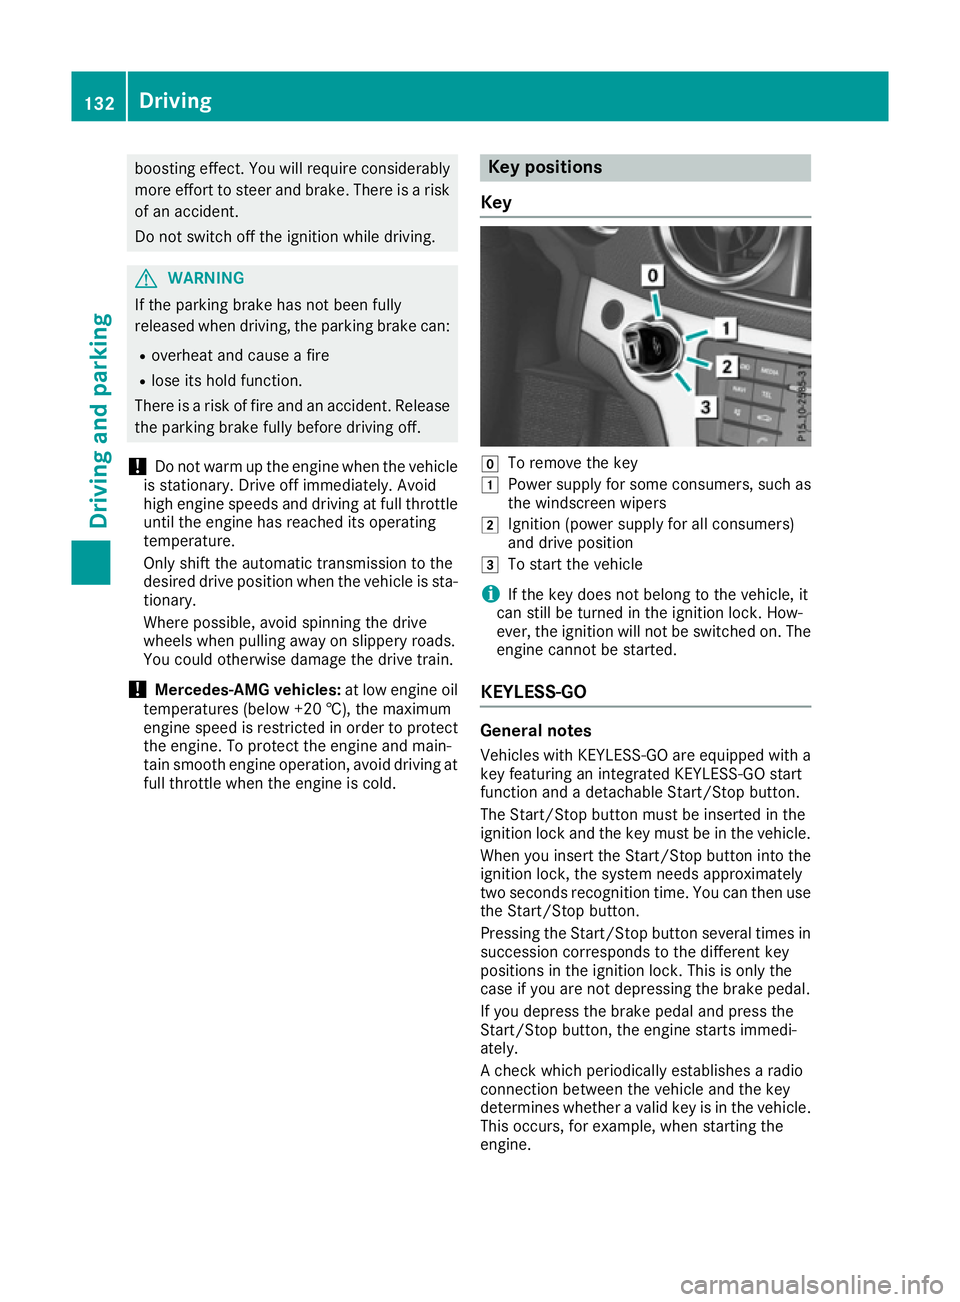
Key g
To remove the key
1 Power supply for some consumers, such as
the windscreen wipers
2 Ignition (power supply for all consumers)
and drive position
3 To start the vehicle
i If the key does not belong to the vehicle, it
can still be turned in the ignition lock. How-
ever, the ignition will not be switched on. The
engine cannot be started.
KEYLESS-GO General notes
Vehicles with KEYLESS-GO are equipped with a
key featuring an integrated KEYLESS-GO start
function and a detachable Start/Stop button.
The Start/Stop button must be inserted in the
ignition lock and the key must be in the vehicle.
When you insert the Start/Stop button into the
ignition lock, the system needs approximately
two seconds recognition time. You can then use the Start/Stop button.
Pressing the Start/Stop button several times insuccession corresponds to the different key
positions in the ignition lock. This is only the
case if you are not depressing the brake pedal.
If you depress the brake pedal and press the
Start/Stop button, the engine starts immedi-
ately.
A check which periodically establishes a radio
connection between the vehicle and the key
determines whether a valid key is in the vehicle.
This occurs, for example, when starting the
engine. 132
DrivingDriving and parking
Page 154 of 333

Problems with the transmission
Problem
Possible causes/consequences and
M
MSolutions The transmission has
problems shifting gear. The transmission is losing oil.
X Have the transmission checked at a qualified specialist workshop
immediately. The acceleration ability
is deteriorating.
The transmission no lon-
ger changes gear. The transmission is in emergency mode.
All vehicles (except Mercedes-AMG vehicles):
it is only partially
possible to engage the gears, or the transmission is in position N.
Mercedes-AMG vehicles: it is only possible to shift into secondgear
and reverse gear.
X Stop.
X Shift the transmission to position P.
X Switch off the engine.
X Wait at least ten seconds before restarting the engine.
X Shift the transmission to position Dor R.
Mercedes-AMG vehicles: ifD is selected, the transmission shifts
into second gear; ifRis selected, the transmission shifts into
reverse gear.
X Have the transmission checked at a qualified specialist workshop
immediately. Refuelling
Important safety notes
G
WARNING
Fuel is highly flammable. If you handle fuel
incorrectly, there is a risk of fire and explo-
sion.
You must avoid fire, naked flames, creating
sparks and smoking. Switch off the engine
and, if applicable, the auxiliary heating before refuelling. G
WARNING
Fuels are poisonous and hazardous to health. There is a danger of injury.
Do not swallow fuel or let it come into contact
with skin, eyes or clothing. Do not inhale fuel
vapours. Keep fuels out of the reach of chil-
dren. If you or others come into contact with fuel,
observe the following:
R Wash the fuel off any affected areas of skin
with water and soap immediately.
R If you get fuel in your eyes, rinse them thor-
oughly with clean water immediately. Seek
immediate medical attention.
R If fuel is swallowed, seek immediate medi-
cal attention. Do not induce vomiting.
R Change any clothing that has come into
contact with fuel immediately. G
WARNING
Electrostatic charge can cause sparks and
thereby ignite fuel vapours. There is a risk of
fire and explosion.
Always touch the vehicle body before opening the fuel filler flap or touching the fuel pump
nozzle. This discharges any electrostatic
charge that may have built up. Refuelling
151Driving and parking Z
Page 177 of 333
Activation conditions
You can activate RACE START if:
R the doors are closed
R the engine is running and the engine and
transmission are at operating temperature.
This is the case when the oil temperature
gauge in the multifunction display is shown in
white (Y page 213).
R ESP ®
is functioning correctly (Y page 67)
R the drive program S,S+ orRace is selected
(Y page 140)
R the steering wheel is in the straight-ahead
position
R the vehicle is stationary and the brake pedal is
depressed (left foot)
R the transmission is in position D
Activating RACE START i
When manual mode (Y
page 147) is active,
the transmission automatically shifts up to
RACE START in the drive program. This func-
tion supports maximum acceleration with
RACE START. After going through an acceler- ating process once from a stationary position,
this function is automatically deactivated.
X Depress the brake pedal with your left foot
and keep it depressed.
X Pull and hold both steering wheel gearshift
paddles.
X The RACE START Confirm: Paddle UP
RACE START Confirm: Paddle UP
Cancel: Paddle DOWN Cancel: Paddle DOWN message appears in
the multifunction display.
X Release both steering wheel gearshift pad-
dles.
i If the activation conditions are no longer ful-
filled, RACE START is cancelled. The RACE RACE
START not possible See Owner's Man‐
START not possible See Owner's Man‐
ual
ual message appears in the multifunction
display.
X To cancel: pull the left steering wheel shift
paddle (Y page 147).
or X To confirm: pull the right steering wheel shift
paddle (Y page 147).
The RACE START available Depress
RACE START available Depress
accelerator
accelerator message appears in the multi-
function display.
i If you do not depress the accelerator pedal
within a few seconds, RACE START is cancel- led. The
RACE START cancelled
RACE START cancelled message
appears in the multifunction display.
X Fully depress the accelerator pedal.
The engine speed increases.
The RACE
RACE START START Release
Release brake
braketo
tostart
start
message appears in the multifunction display.
i If the brake pedal is not released after a
short while, RACE START is cancelled. The
RACE RACE START
START cancelled
cancelled message appears in
the multifunction display.
X Take your foot off the brake, but keep the
accelerator pedal depressed.
The vehicle pulls away at maximum acceler-
ation.
The RACE RACE START
START active
active message appears in
the multifunction display.
RACE START is deactivated when the vehicle
reaches a speed of approximately 50 km/h.
RACE START is deactivated immediately if you
release the accelerator pedal during RACE
START or if any of the activation conditions are
no longer fulfilled. The RACE START not pos‐
RACE START not pos‐
sible See Owner's Manual sible See Owner's Manual orRACE START
RACE START
cancelled
cancelled message appears in the multifunc-
tion display.
i After using it several times in short succes-
sion, RACE START will be unavailable until a
certain distance has been driven. Adaptive Damping System
General notes Suspension with the adaptive adjustable damp-
ing provides improved driving comfort and con-
tinuously controls the calibration of the damp-
ers. The damping characteristics adapt to the
current operating and driving situation.
The damping is tuned individually to each wheel
and depends on:
R your driving style, e.g. sporty
R the road surface conditions
R the selected drive program (Y page 139).174
Driving systemsDriving and pa
rking
Page 216 of 333
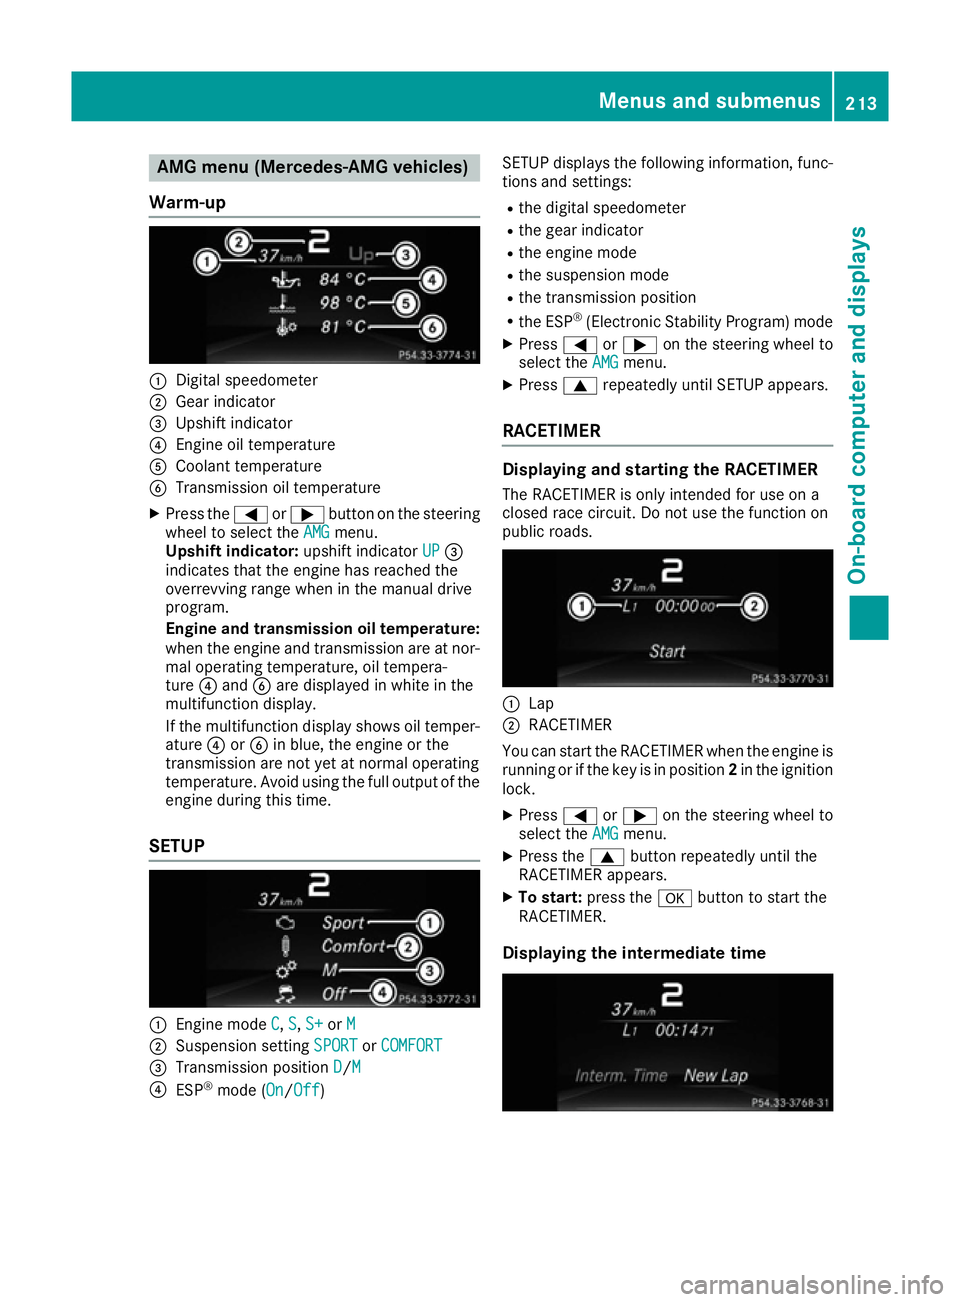
AMG menu (Mercedes-AMG vehicles)
Warm-up :
Digital speedometer
; Gear indicator
= Upshift indicator
? Engine oil temperature
A Coolant temperature
B Transmission oil temperature
X Press the =or; button on the steering
wheel to select the AMG
AMG menu.
Upshift indicator: upshift indicatorUP
UP=
indicates that the engine has reached the
overrevving range when in the manual drive
program.
Engine and transmission oil temperature:
when the engine and transmission are at nor-
mal operating temperature, oil tempera-
ture ?and Bare displayed in white in the
multifunction display.
If the multifunction display shows oil temper- ature ?orB in blue, the engine or the
transmission are not yet at normal operating
temperature. Avoid using the full output of the engine during this time.
SETUP :
Engine mode C C,S
S,S+
S+ orM
M
; Suspension setting SPORT
SPORTorCOMFORT
COMFORT
= Transmission position D
D/ M
M
? ESP ®
mode ( On
On/OffOff) SETUP displays the following information, func-
tions and settings:
R the digital speedometer
R the gear indicator
R the engine mode
R the suspension mode
R the transmission position
R the ESP ®
(Electronic Stability Program) mode
X Press =or; on the steering wheel to
select the AMG
AMG menu.
X Press 9repeatedly until SETUP appears.
RACETIMER Displaying and starting the RACETIMER
The RACETIMER is only intended for use on a
closed race circuit. Do not use the function on
public roads. :
Lap
; RACETIMER
You can start the RACETIMER when the engine is running or if the key is in position 2in the ignition
lock.
X Press =or; on the steering wheel to
select the AMG AMGmenu.
X Press the 9button repeatedly until the
RACETIMER appears.
X To start: press the abutton to start the
RACETIMER.
Displaying the intermediate time Menus and sub
menus
213On-board computer and displays Z
Page 316 of 333
An arrow on the sidewall of the tyre indicates its
correct direction of rotation. Storing wheels
Store wheels that are not being used in a cool,
dry and preferably dark place. Protect the tyres
against oil, grease, petrol and diesel. Fitting a wheel
Preparing the vehicle X
Stop the vehicle on solid, non-slippery and
level ground.
X Unload the vehicle. The jack can only be used
when the vehicle is unladen.
X Apply the electric parking brake manually.
X Move the front wheels to the straight-ahead
position.
X Shift the transmission to position P.
X Switch off the engine.
X Vehicles without KEYLESS-GO: remove the
key from the ignition lock.
X Vehicles with KEYLESS-GO: open the driv-
er's door.
The vehicle electronics now have status 0.
This is the same as the key having been
removed.
X Vehicles with KEYLESS-GO: remove the
Start/Stop button from the ignition lock
(Y page 132).
X If included in the vehicle equipment, remove
the tyre-change tool kit from the vehicle.
X Safeguard the vehicle against rolling away.
i Apart from certain country-specific varia-
tions, vehicles are not equipped with a tyre-
change tool kit. For information on which
tools are required to perform a wheel change
on your vehicle, consult a Mercedes-Benz
Service Centre.
Necessary tyre-changing tools may include,
for example:
R jack
R wheel chock
R wheel wrench Securing the vehicle against rolling
away
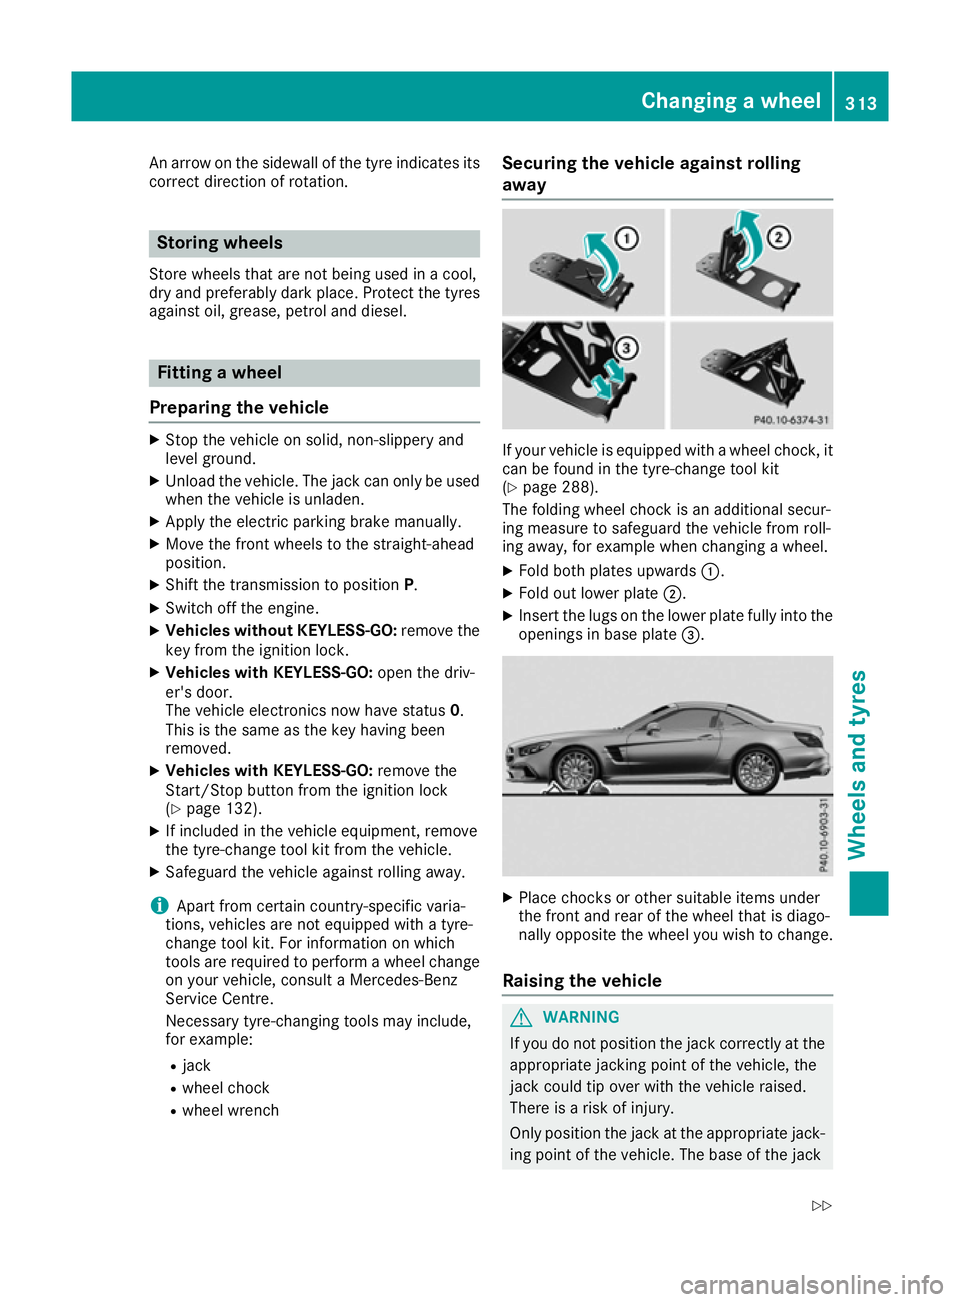
If your vehicle is equipped with a wheel chock, it
can be found in the tyre-change tool kit
(Y page 288).
The folding wheel chock is an additional secur-
ing measure to safeguard the vehicle from roll-
ing away, for example when changing a wheel.
X Fold both plates upwards :.
X Fold out lower plate ;.
X Insert the lugs on the lower plate fully into the
openings in base plate =. X
Place chocks or other suitable items under
the front and rear of the wheel that is diago-
nally opposite the wheel you wish to change.
Raising the vehicle G
WARNING
If you do not position the jack correctly at the appropriate jacking point of the vehicle, the
jack could tip over with the vehicle raised.
There is a risk of injury.
Only position the jack at the appropriate jack-
ing point of the vehicle. The base of the jack Changing a wheel
313Wheels and tyres
Z