2016 MERCEDES-BENZ SL ROADSTER buttons
[x] Cancel search: buttonsPage 21 of 333

SPORT handling mode
Deactivating/activating
(Mercedes-AMG vehicles) ................70
Warning lamp ................................. 248
Start/stop function
see ECO start/stop function
Starting (engine) ................................ 133
STEER CONTROL ..................................74
Steering
Display message ............................2 41
Steering Assist and Stop&Go Pilot
(DISTRONIC PLUS)
Activating/deactivating ................. 207
Steering assistant STEER CON-
TROL
see STEER CONTROL
Steering Pilot and Stop&Go Pilot
Display message ............................ 235
Steering wheel
Adjusting (electrically) ................... 106
Button overview ............................... 33
Buttons (on-board computer) ......... 200
Important safety notes .................. 106
Storing settings (memory func-
tion) ............................................... 111
Steering wheel gearshift paddles .... 147
Stopwatch (RACETIMER) ................... 213
Stowage areas ................................... 262
Stowage compartments
Armrest (under) ............................ .262
Centre console .............................. 263
Centre console (rear) ..................... 263
Cup holder ..................................... 266
Glove compartment ....................... 262
Important safety information ......... 262
Rear ............................................... 264
Spectacles compartment .............. .263
Stowage net ....................................... 264
Stowage space
Display message ............................ 241
Stowage net ................................... 264
Umbrella holder ............................ .263
Stowage well beneath the boot
floor .................................................... 266
Summer tyres ................................... .306
Sun visor ............................................ 267 Surround lighting (on-board com-
puter)
................................................. .210
Suspension settings
Active Body Control (ABC) (exceptMercedes-AMG vehicles) .............. .176
Active Body Control (ABC)
(Mercedes-AMG vehicles) .............. 179
SETUP (on-board computer) .......... 213
Switching on media mode
Via the device lis t.......................... 260 T
Tail lamps Display message ............................ 228
see Lights
Technical data
Capacities ...................................... 322
Emergency spare wheel ................. 318
Information .................................... 320
Tyres/wheels ................................. 317
Vehicle data ................................... 327
Telephone
Accepting a call (multifunction
steering wheel) .............................. 206
Authorising a mobile phone (con-
necting) ......................................... 256
Connecting a Mobile phone (gen-
eral information) ............................ 256
Display message ............................ 241
Menu (on-board computer) ............ 205
Number from the phone book ........ 206
Redialling ....................................... 206
Rejecting/ending a call ................. 206
See also Digital Owner's Manua l... 253
Switching between mobile
phones ........................................... 257
Telephone compartment ................ 262
Telephone module with Bluetooth ®
(SAP profile) Activating and connecting the
module ........................................... 258
Charging a mobile phone ............... 260
Connecting the mobile phone ........ 259
Connecting the module using a
USB cable ...................................... 258
Data modem mode ........................ 259
Installing the module ..................... 258 18
Index
Page 25 of 333
Introduction
The printed Owner's Manual provides informa-
tion about the safe operation of your vehicle.
The Digital Owner's Manual provides compre-
hensive and specifically adapted information on
the equipment in your vehicle and your multi-
media system. You can call up the Digital Own-
er's Manual using the multimedia system.
i You will not incur any costs when calling up
the Digital Owner's Manual. The Digital Own-
er's Manual works without connecting to the
Internet.
There are three ways to access the topics of the Digital Owner's Manual:
R Visual search
The visual search allows you to explore your
vehicle "virtually". Starting from either the
vehicle exterior view or interior view, you can access many of the different topics covered
by the Digital Owner's Manual. To access the
vehicle interior section, select the "Vehicle
interior" view.
R Keyword search
The keyword search allows you to search for a
keyword by entering characters.
R Contents
You can select individual sections in the con-
tents.
i The Digital Owner's Manual is deactivated
for safety reasons while driving. Operation
Calling up the Digital Owner's Manual
X Press the Øbutton in the centre console.
The overview relating to the vehicle appears.
X Select the "Owner's Manual" menu item by
turning 3or pressing 7the controller.
X Confirm 7the message about the warning
and safety notes.
The basic menu for the Digital Owner's Man-
ual appears. Operating the Digital Owner's Manual
General notes Please observe the information about the oper-
ation of the controller (Y page 254).
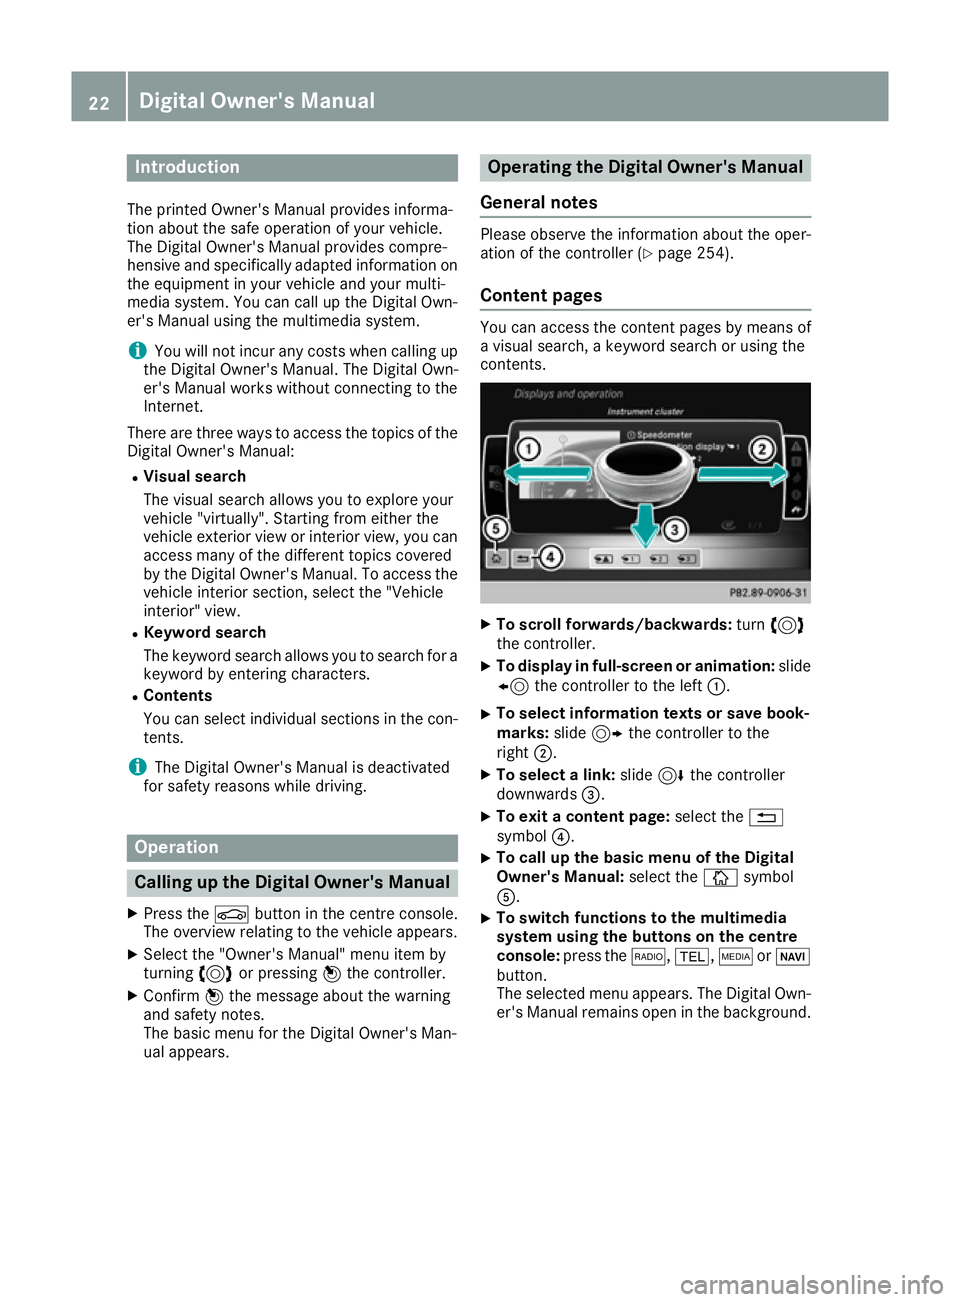
Content pages You can access the content pages by means of
a visual search, a keyword search or using the
contents.
X
To scroll forwards/backwards: turn3
the controller.
X To display in full-screen or animation: slide
8 the controller to the left :.
X To select information texts or save book-
marks: slide9 the controller to the
right ;.
X To select a link: slide6the controller
downwards =.
X To exit a content page: select the%
symbol ?.
X To call up the basic menu of the Digital
Owner's Manual:
select theÞsymbol
A.
X To switch functions to the multimedia
system using the buttons on the centre
console: press the $,%,ÕorØ
button.
The selected menu appears. The Digital Own- er's Manual remains open in the background. 22
Digital Owner's Manual
Page 40 of 333
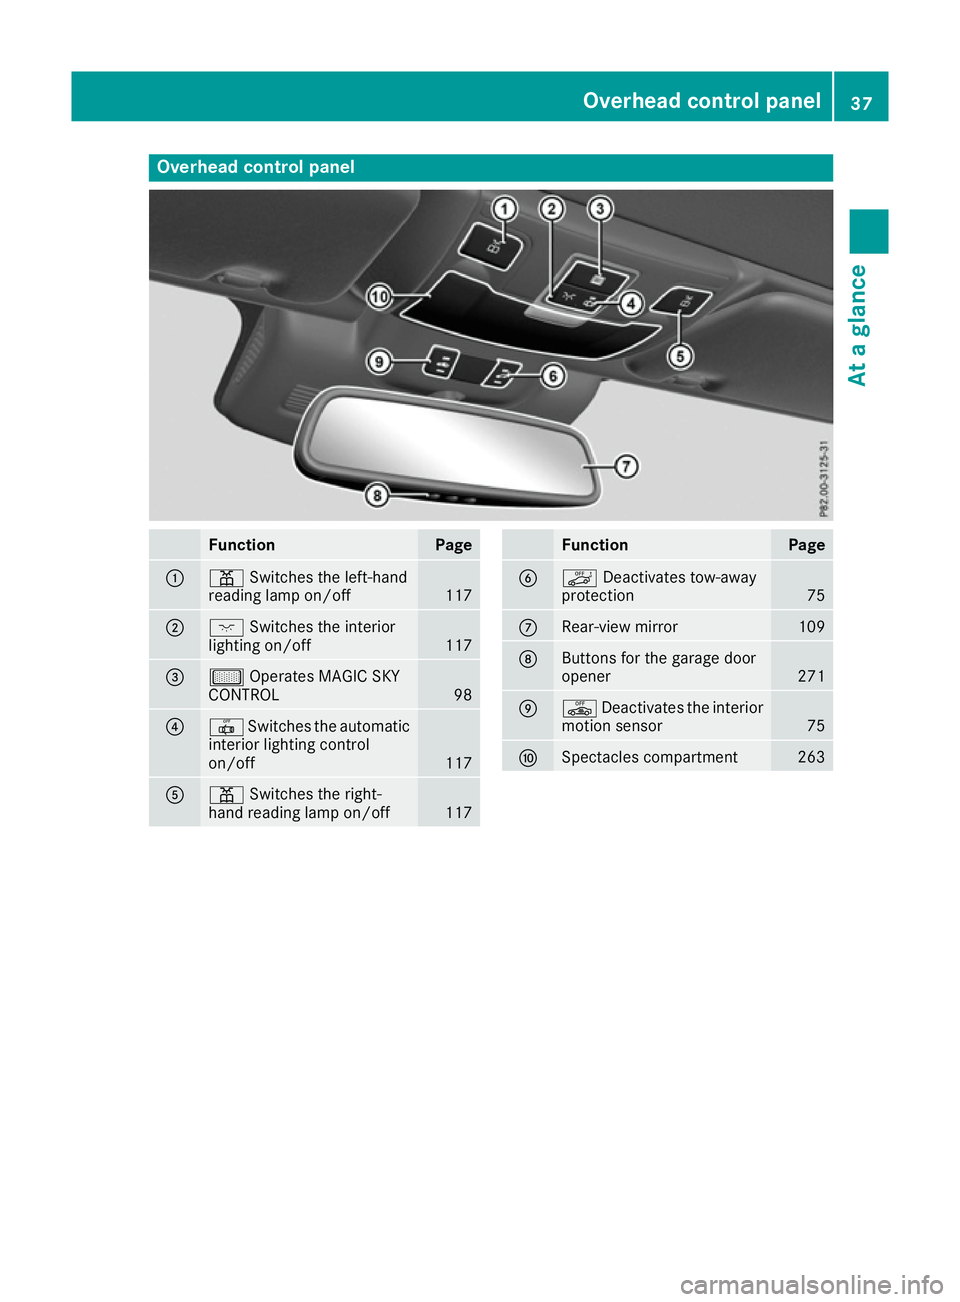
Overhead control panel
Function Page
:
p
Switches the left-hand
reading lamp on/off 117
;
c
Switches the interior
lighting on/off 117
=
µ
Operates MAGIC SKY
CONTROL 98
?
|
Switches the automatic
interior lighting control
on/off 117
A
p
Switches the right-
hand reading lamp on/off 117 Function Page
B
ë
Deactivates tow-away
protection 75
C
Rear-view mirror 109
D
Buttons for the garage door
opener
271
E
ê
Deactivates the interior
motion sensor 75
F
Spectacles compartment 263Overhead control panel
37At a glance
Page 82 of 333
the vehicle is unlocked. This is useful if you fre-
quently travel alone.
X To change the setting: press and hold down
the % and& buttons simultaneously
for about six seconds until the battery indica- tor lamp flashes twice (Y page 80).
If the setting of the locking system is changed
within the signal range of the vehicle, pressing
the & or% button:
R locks or
R unlocks the vehicle
The key now functions as follows:
X To unlock: press the%button once.
X To unlock centrally: press the%button
twice.
X To lock centrally: press the&button.
The KEYLESS-GO function is changed as fol-
lows:
X To unlock the driver's door: touch the inner
surface of the door handle on the driver's
door.
X To unlock centrally: touch the inner surface
of the driver or front-passenger door handle.
X To lock centrally: touch the outer sensor
surface on one of the door handles.
X To restore the factory settings: press and
hold down the %and& buttons simul-
taneously for approximately six seconds until
the battery check lamp flashes twice
(Y page 80). Emergency key element
General notes If the vehicle can no longer be locked or
unlocked with the key or with KEYLESS-GO, use the emergency key element.
If you use the emergency key element to unlock
and open the driver's door or the boot lid, the
anti-theft alarm system will be triggered. Switch
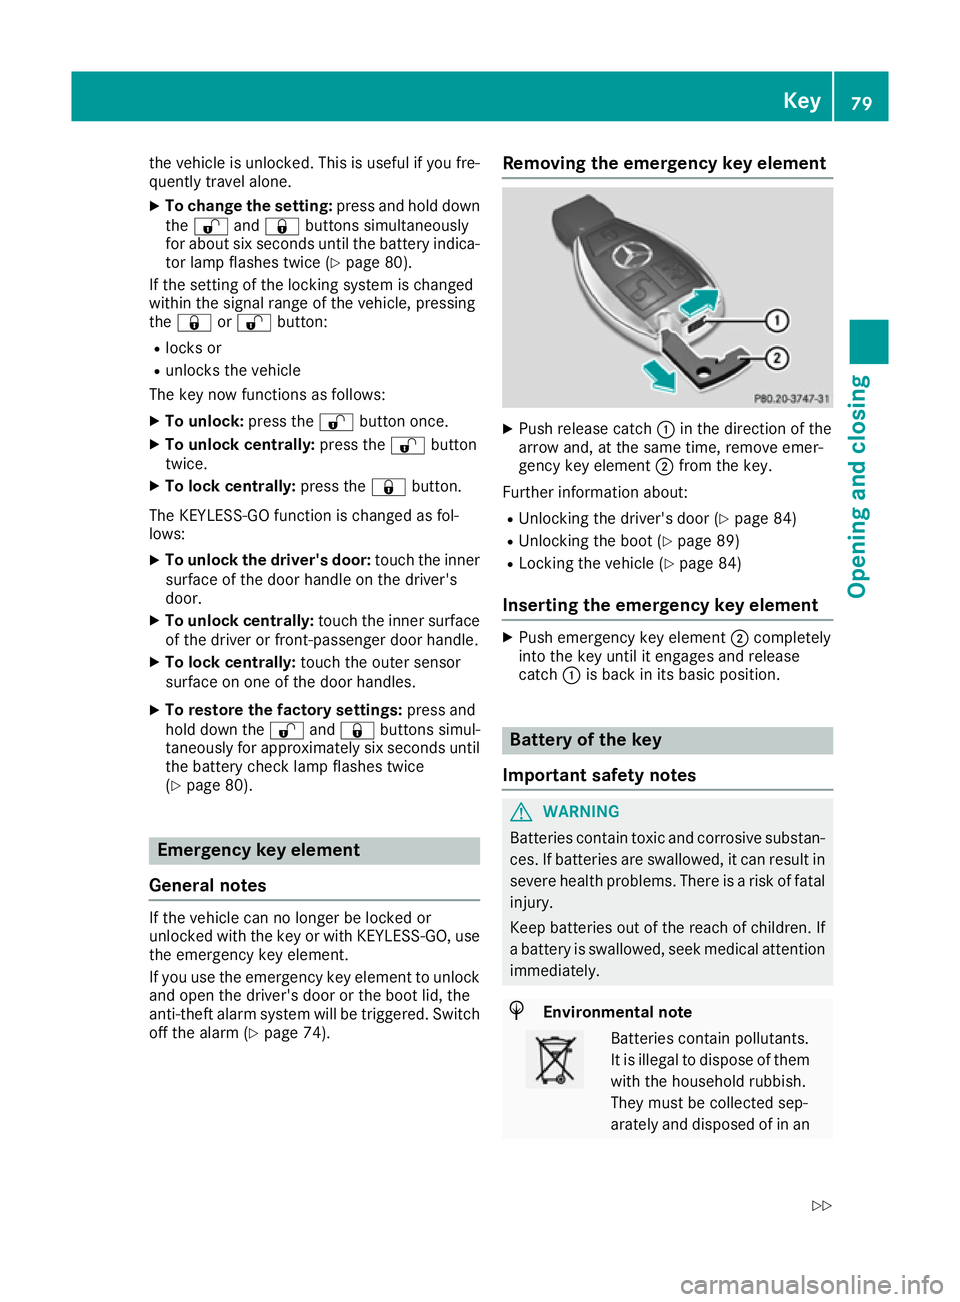
off the alarm (Y page 74). Removing the emergency key element X
Push release catch :in the direction of the
arrow and, at the same time, remove emer-
gency key element ;from the key.
Further information about: R Unlocking the driver's door (Y page 84)
R Unlocking the boot (Y page 89)
R Locking the vehicle (Y page 84)
Inserting the emergency key element X
Push emergency key element ;completely
into the key until it engages and release
catch :is back in its basic position. Battery of the key
Important safety notes G
WARNING
Batteries contain toxic and corrosive substan- ces. If batteries are swallowed, it can result in
severe health problems. There is a risk of fatal injury.
Keep batteries out of the reach of children. If
a battery is swallowed, seek medical attention immediately. H
Environmental note Batteries contain pollutants.
It is illegal to dispose of them
with the household rubbish.
They must be collected sep-
arately and disposed of in an Key
79Opening and closing
Z
Page 83 of 333
environmentally responsible
recycling system. Dispose of batteries in an
environmentally responsible
manner. Take discharged
batteries to a qualified spe-
cialist workshop or to a col-
lection point for used batter-
ies.
Mercedes-Benz recommends that you have the
batteries replaced at a qualified specialist work- shop.
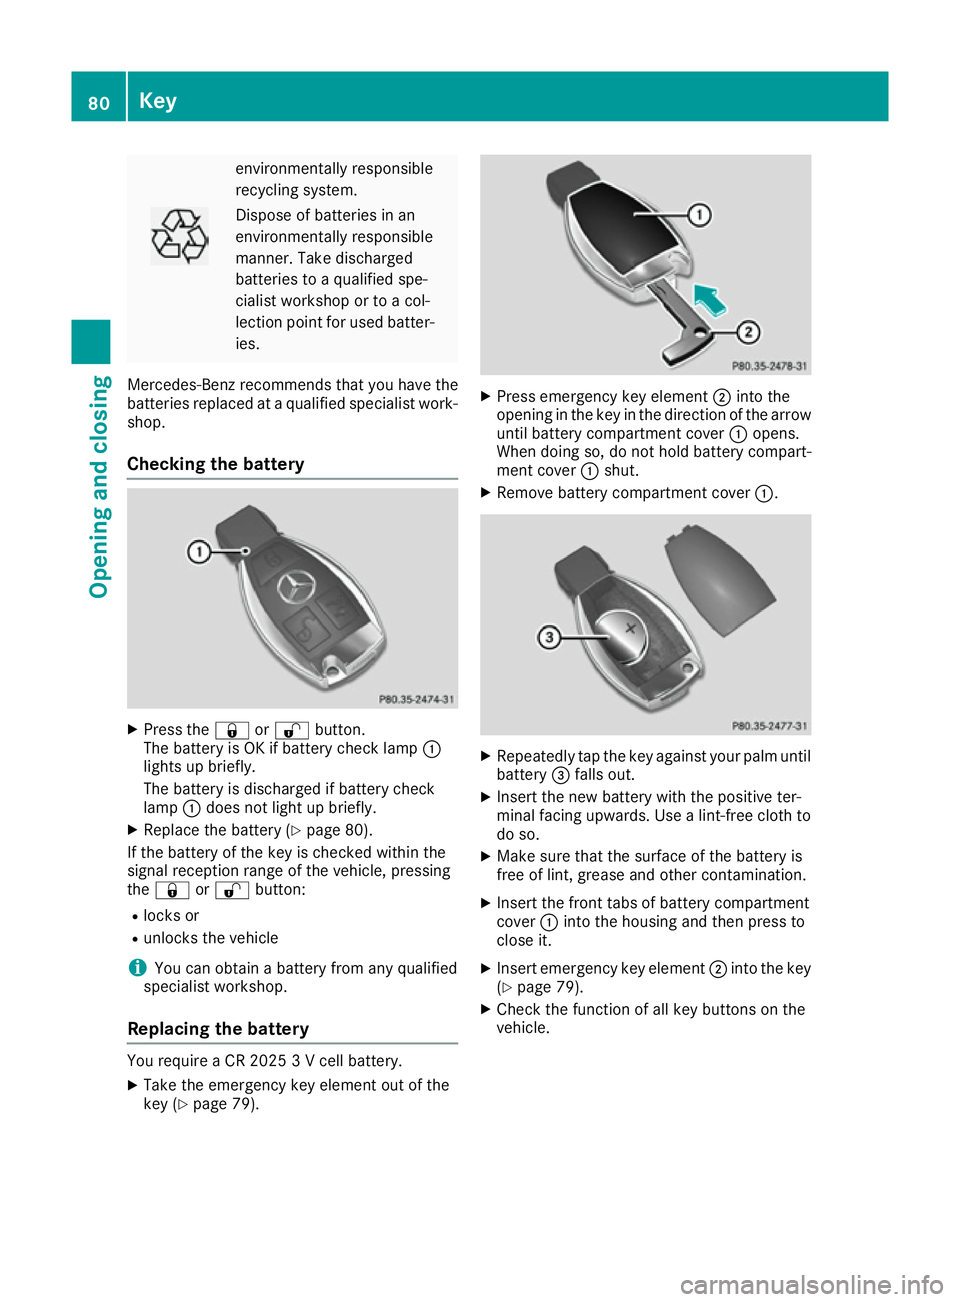
Checking the battery X
Press the &or% button.
The battery is OK if battery check lamp :
lights up briefly.
The battery is discharged if battery check
lamp :does not light up briefly.
X Replace the battery (Y page 80).
If the battery of the key is checked within the
signal reception range of the vehicle, pressing
the & or% button:
R locks or
R unlocks the vehicle
i You can obtain a battery from any qualified
specialist workshop.
Replacing the battery You require a CR 2025 3 V cell battery.
X Take the emergency key element out of the
key (Y page 79). X
Press emergency key element ;into the
opening in the key in the direction of the arrow
until battery compartment cover :opens.
When doing so, do not hold battery compart-
ment cover :shut.
X Remove battery compartment cover :. X
Repeatedly tap the key against your palm until
battery =falls out.
X Insert the new battery with the positive ter-
minal facing upwards. Use a lint-free cloth to
do so.
X Make sure that the surface of the battery is
free of lint, grease and other contamination.
X Insert the front tabs of battery compartment
cover :into the housing and then press to
close it.
X Insert emergency key element ;into the key
(Y page 79).
X Check the function of all key buttons on the
vehicle. 80
KeyOpening and closing
Page 87 of 333

For all countries except the United Kingdom:
you can open a door from inside the vehicle evenif it has been locked.
United Kingdom only: you can only open a
door from inside the vehicle if the double-lock
function has been deactivated. You can deacti-
vate the double lock function by deactivating the
interior motion sensor (Y page 75).
When a locked door is opened from inside the
vehicle, the previous unlocking process will be
observed if the vehicle has been:
R locked with the locking button for the central
locking or
R locked automatically
The vehicle will be fully unlocked if it had previ-
ously been fully unlocked. Only the door which
has been opened from the inside is unlocked if
only the driver's door had been previously
unlocked. Automatic locking feature
X
To deactivate: press and hold button :for
about five seconds until a tone sounds.
X To activate: press and hold button ;for
about five seconds until a tone sounds.
If you press one of the two buttons and do not
hear a tone, the relevant setting has already
been selected.
The vehicle is locked automatically when the
ignition is switched on and the wheels are turn-
ing.
You could therefore be locked out if:
R the vehicle is being pushed
R the vehicle is being towed
R the vehicle is being tested on a dynamometer You can also activate and deactivate the auto-
matic locking function using the on-board com-
puter (Y page 211). Power closing
Power closing pulls the doors and boot lid into
their locks automatically even if they are only
partly closed. X Power closing feature (doors): push the
door past the first detent position into the
lock.
Power closing will pull the door fully closed.
X To power close the boot lid: lightly push the
boot lid closed.
The power closing function pulls the boot lid
closed. Unlocking/locking the driver's door
using the emergency key element
i In order to lock all of the vehicle's locks,
begin by pressing the button for locking the
vehicle from the inside while the driver's door
is open. Then proceed to unlock the driver's
door using the emergency key element. X
To unlock: turn the emergency key element
anti-clockwise as far as it will go to position
1.
X To lock: turn the emergency key element
clockwise as far as it will go to position 1.
Right-hand-drive vehicle: turn the emergency
key element in the opposite direction in both
cases.
If you use the emergency key element to unlock
and open the driver's door, the anti-theft alarm
system will be triggered. Switch off the alarm
(Y page 74). 84
DoorsOpening and closing
Page 105 of 333

G
WARNING
When adjusting a seat, you or another vehicle occupant could become trapped by the guiderail of the seat, for instance. There is a risk of
injury.
Make sure that no one has any part of their
body within the sweep of the seat when
adjusting it.
Observe the safety notes on "Airbags"
(Y page 43) and "Children in the Vehicle"
(Y page 54). G
WARNING
If you adjust the seat height carelessly, you or other vehicle occupants could be trapped andthereby injured. Children in particular could
accidentally press the electrical seat adjust-
ment buttons and become trapped. There is a
risk of injury.
While moving the seats, make sure that your
hands or other body parts do not get under the
lever assembly of the seat adjustment sys-
tem. G
WARNING
The head restraints cannot provide the inten-
ded protection unless they are fitted and
adjusted correctly. There is an increased risk of injury to the head and neck in the event of
an accident or sudden braking, for example.
Always drive with the head restraints fitted.
Ensure that the centre of the head restraints
support the back of each vehicle occupant's
head at eye level before driving off. G
WARNING
You could lose control of the vehicle while
driving if you:
R adjust the driver's seat, steering wheel or
mirrors
R fasten the seat belt
There is a risk of an accident.
Adjust the driver's seat, head restraint, steer-
ing wheel and mirrors and fasten your seat
belt before starting the engine. !
To avoid damage to the seats and the seat
heating, observe the following information:
R do not spill any liquids on the seats. If liquid
is spilled on the seats, dry them as soon as possible.
R if the seat covers are damp or wet, do not
switch on the seat heating. The seat heat-
ing should also not be used to dry the seats.
R clean the seat covers as recommended;
see the "Interior care" section.
R do not transport heavy loads on the seats.
Do not place sharp objects on the seat
cushions, e.g. knives, nails or tools. The
seats should only be occupied by passen-
gers, if possible.
R when the seat heating is in operation, do
not cover the seats with insulating materi-
als, e.g. blankets, coats, bags, seat covers,
child seats or booster seats.
! Make sure that there are no objects in the
footwell under or behind the seats when mov- ing the seats back. There is a risk that the
seats and/or the objects could be damaged.
i The head restraints cannot be removed.
For more information, contact a qualified spe-
cialist workshop. Adjusting the seats electrically
:
Head restraint height
; Seat height
= Seat cushion angle
? Seat cushion length
A Seat fore-and-aft adjustment
B Backrest angle 102
SeatsSeats, steering wheel and mirrors
Page 108 of 333
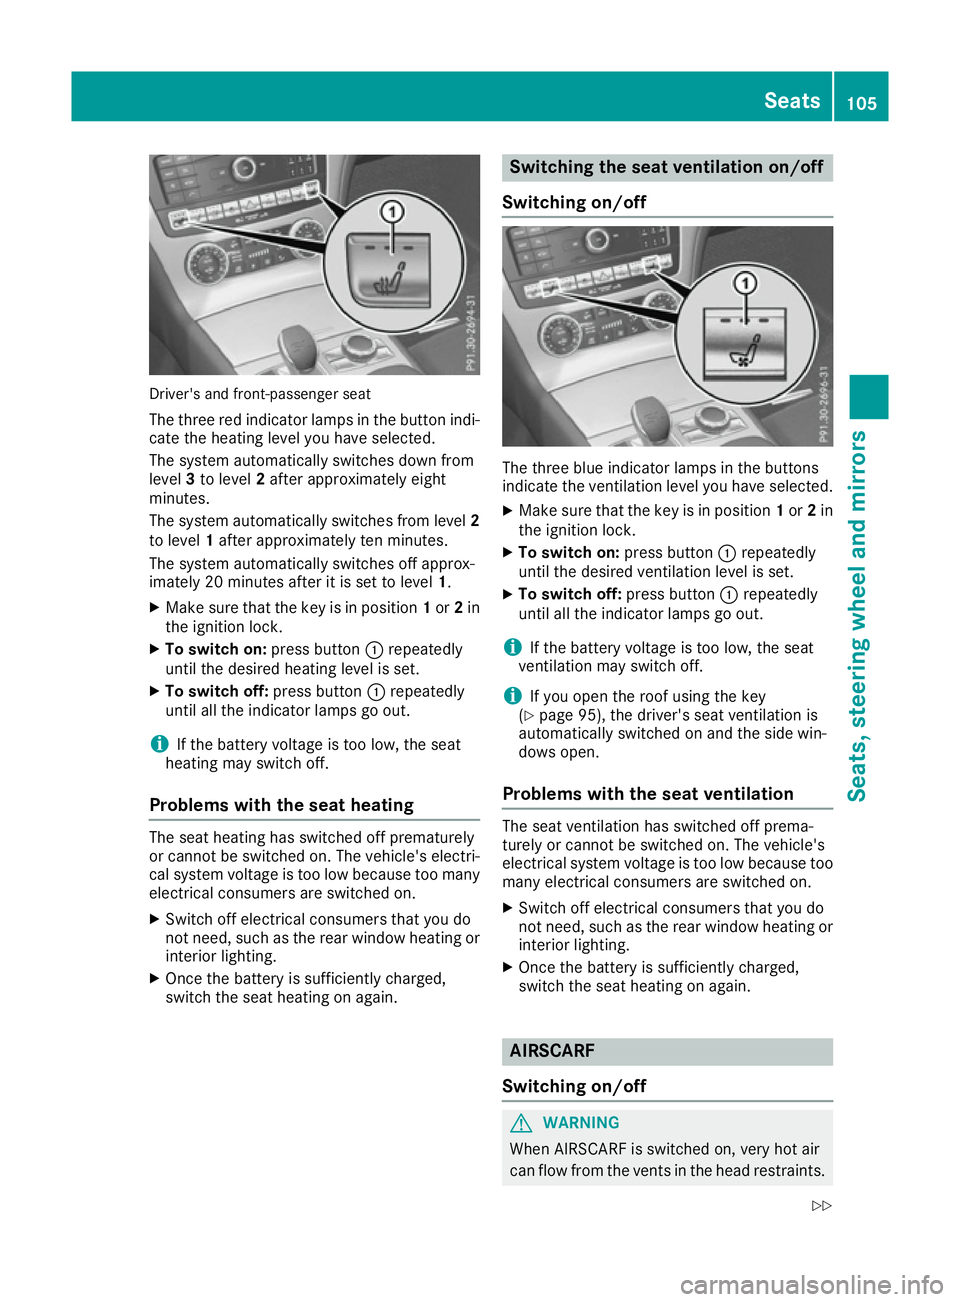
Driver's and front-passenger seat
The three red indicator lamps in the button indi-
cate the heating level you have selected.
The system automatically switches down from
level 3to level 2after approximately eight
minutes.
The system automatically switches from level 2
to level 1after approximately ten minutes.
The system automatically switches off approx-
imately 20 minutes after it is set to level 1.
X Make sure that the key is in position 1or 2in
the ignition lock.
X To switch on: press button:repeatedly
until the desired heating level is set.
X To switch off: press button:repeatedly
until all the indicator lamps go out.
i If the battery voltage is too low, the seat
heating may switch off.
Problems with the seat heating The seat heating has switched off prematurely
or cannot be switched on. The vehicle's electri-
cal system voltage is too low because too many
electrical consumers are switched on.
X Switch off electrical consumers that you do
not need, such as the rear window heating or
interior lighting.
X Once the battery is sufficiently charged,
switch the seat heating on again. Switching the seat ventilation on/off
Switching on/off The three blue indicator lamps in the buttons
indicate the ventilation level you have selected.
X Make sure that the key is in position 1or 2in
the ignition lock.
X To switch on: press button:repeatedly
until the desired ventilation level is set.
X To switch off: press button:repeatedly
until all the indicator lamps go out.
i If the battery voltage is too low, the seat
ventilation may switch off.
i If you open the roof using the key
(Y page 95), the driver's seat ventilation is
automatically switched on and the side win-
dows open.
Problems with the seat ventilation The seat ventilation has switched off prema-
turely or cannot be switched on. The vehicle's
electrical system voltage is too low because too
many electrical consumers are switched on.
X Switch off electrical consumers that you do
not need, such as the rear window heating or
interior lighting.
X Once the battery is sufficiently charged,
switch the seat heating on again. AIRSCARF
Switching on/off G
WARNING
When AIRSCARF is switched on, very hot air
can flow from the vents in the head restraints. Seats
105Seats, steering wheel and mirrors
Z