2016 MERCEDES-BENZ SL ROADSTER buttons
[x] Cancel search: buttonsPage 110 of 333

control of the vehicle. There is a risk of an
accident.
Always wait until the adjustment process is
complete before driving off. G
WARNING
When the EASY-ENTRY/EXIT feature adjusts
the steering wheel, you and other vehicle
occupants – particularly children – could
become trapped. There is a risk of injury.
While the EASY-ENTRY/EXIT feature is mak-
ing adjustments, make sure that no one has
any body parts in the sweep of the steering
wheel.
If someone is trapped:
R press one of the memory function position
buttons, or
R move the switch for steering wheel adjust-
ment in the opposite direction to that in
which the steering wheel is moving.
The adjustment process is stopped. G
WARNING
When the EASY-ENTRY/EXIT feature adjusts
the steering wheel and the driver's seat, you
and other vehicle occupants – particularly
children – could become trapped. There is a
risk of injury.
While the EASY-ENTRY/EXIT feature is mak-
ing adjustments, make sure that no one has
any body parts in the sweep of the seat and
the steering wheel.
If someone is trapped:
R press one of the memory function position
buttons, or
R press one of the memory function memory
buttons, or
R move the switch for steering wheel adjust-
ment in the opposite direction to that in
which the steering wheel is moving.
The adjustment process is stopped. G
WARNING
If you use openings in the bodywork or
detachable parts as steps, you could:
R slip and/or fall
R damage the vehicle and cause yourself to
fall.
There is a danger of injury.
Always use secure climbing aids, e.g. a suita-
ble ladder.
The EASY-ENTRY/EXIT feature makes getting in
and out of your vehicle easier.
You can activate and deactivate the EASY-
ENTRY/EXIT feature in the on-board computer
(Y page 211).
Position of the steering wheel when the EASY-ENTRY/EXIT feature is active The steering wheel tilts upwards if you:
R remove the key from the ignition lock
R open the driver's door and KEYLESS-GO is in
position 1
R open the driver's door and the key is in posi-
tion 0or 1in the ignition lock
i The steering wheel only moves upwards if it
has not already reached the upper end stop.
Position of the steering wheel for driv-
ing The steering wheel is moved to the previously
set position if:
R the driver's door is closed and
R you insert the key into the ignition lock
or
R you press the Start/Stop button once on vehi-
cles with KEYLESS-GO
If you close the driver's door with the key inser- ted in the ignition lock, the steering wheel is
automatically moved to the previously set posi-
tion.
The last position of the steering wheel is stored when you switch off the ignition or when you
store the setting with the memory function
(Y page 111). Steering wheel
107Seats, steering wheel and mirrors Z
Page 126 of 333
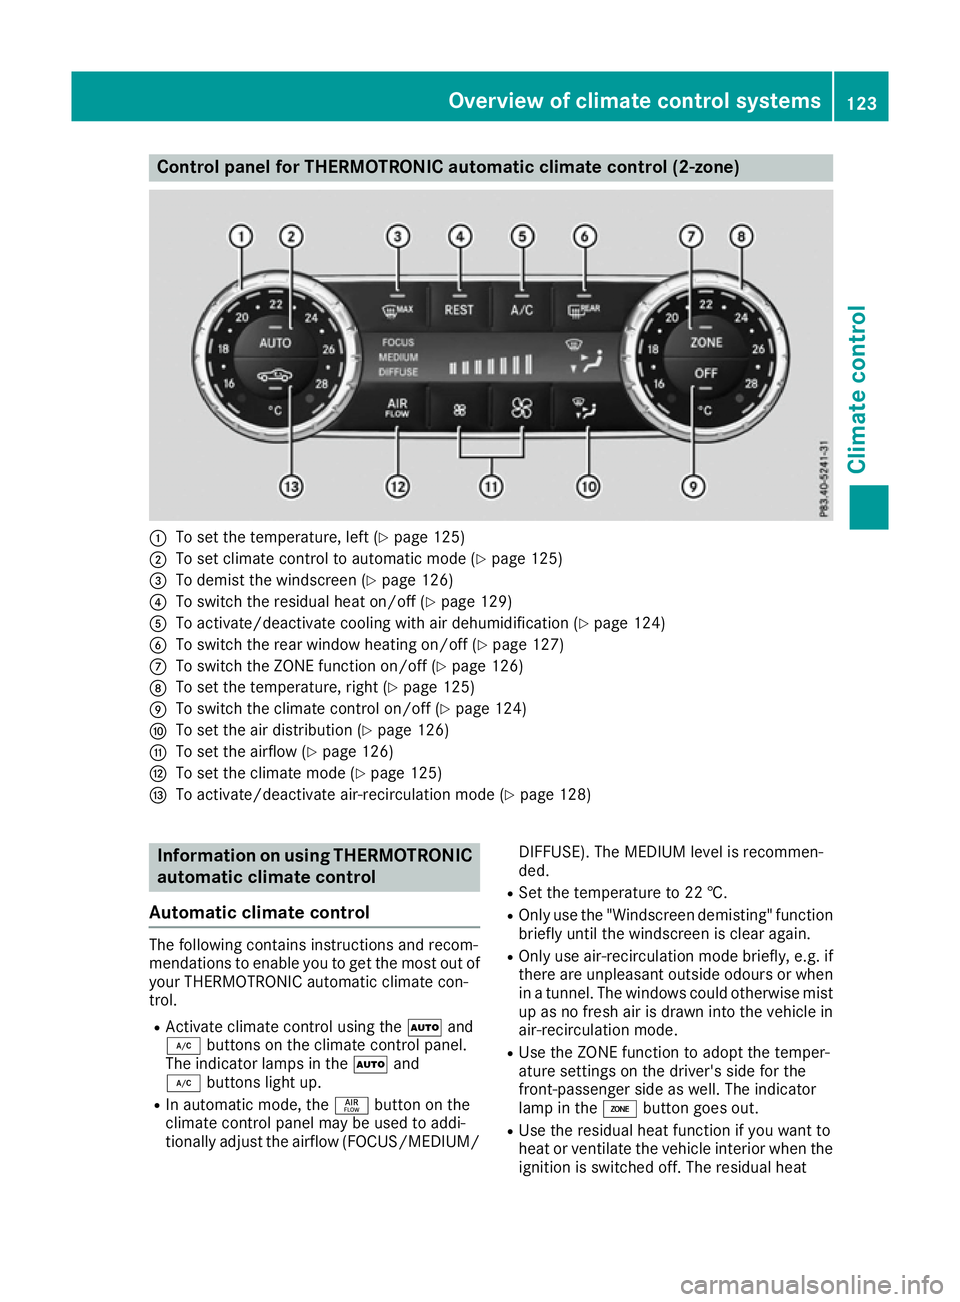
Control panel for THERMOTRONIC automatic climate control (2-zone)
:
To set the temperature, left (Y page 125)
; To set climate control to automatic mode (Y page 125)
= To demist the windscreen (Y page 126)
? To switch the residual heat on/off (Y page 129)
A To activate/deactivate cooling with air dehumidification (Y page 124)
B To switch the rear window heating on/off (Y page 127)
C To switch the ZONE function on/off (Y page 126)
D To set the temperature, right (Y page 125)
E To switch the climate control on/off (Y page 124)
F To set the air distribution (Y page 126)
G To set the airflow (Y page 126)
H To set the climate mode (Y page 125)
I To activate/deactivate air-recirculation mode (Y page 128)Information on using THERMOTRONIC
automatic climate control
Automatic climate control The following contains instructions and recom-
mendations to enable you to get the most out of
your THERMOTRONIC automatic climate con-
trol.
R Activate climate control using the Ãand
¿ buttons on the climate control panel.
The indicator lamps in the Ãand
¿ buttons light up.
R In automatic mode, the ñbutton on the
climate control panel may be used to addi-
tionally adjust the airflow (FOCUS/MEDIUM/ DIFFUSE). The MEDIUM level is recommen-
ded.
R Set the temperature to 22 †.
R Only use the "Windscreen demisting" function
briefly until the windscreen is clear again.
R Only use air-recirculation mode briefly, e.g. if
there are unpleasant outside odours or when
in a tunnel. The windows could otherwise mist
up as no fresh air is drawn into the vehicle in air-recirculation mode.
R Use the ZONE function to adopt the temper-
ature settings on the driver's side for the
front-passenger side as well. The indicator
lamp in the ábutton goes out.
R Use the residual heat function if you want to
heat or ventilate the vehicle interior when the
ignition is switched off. The residual heat Overview of climate control systems
123Climate control
Page 144 of 333
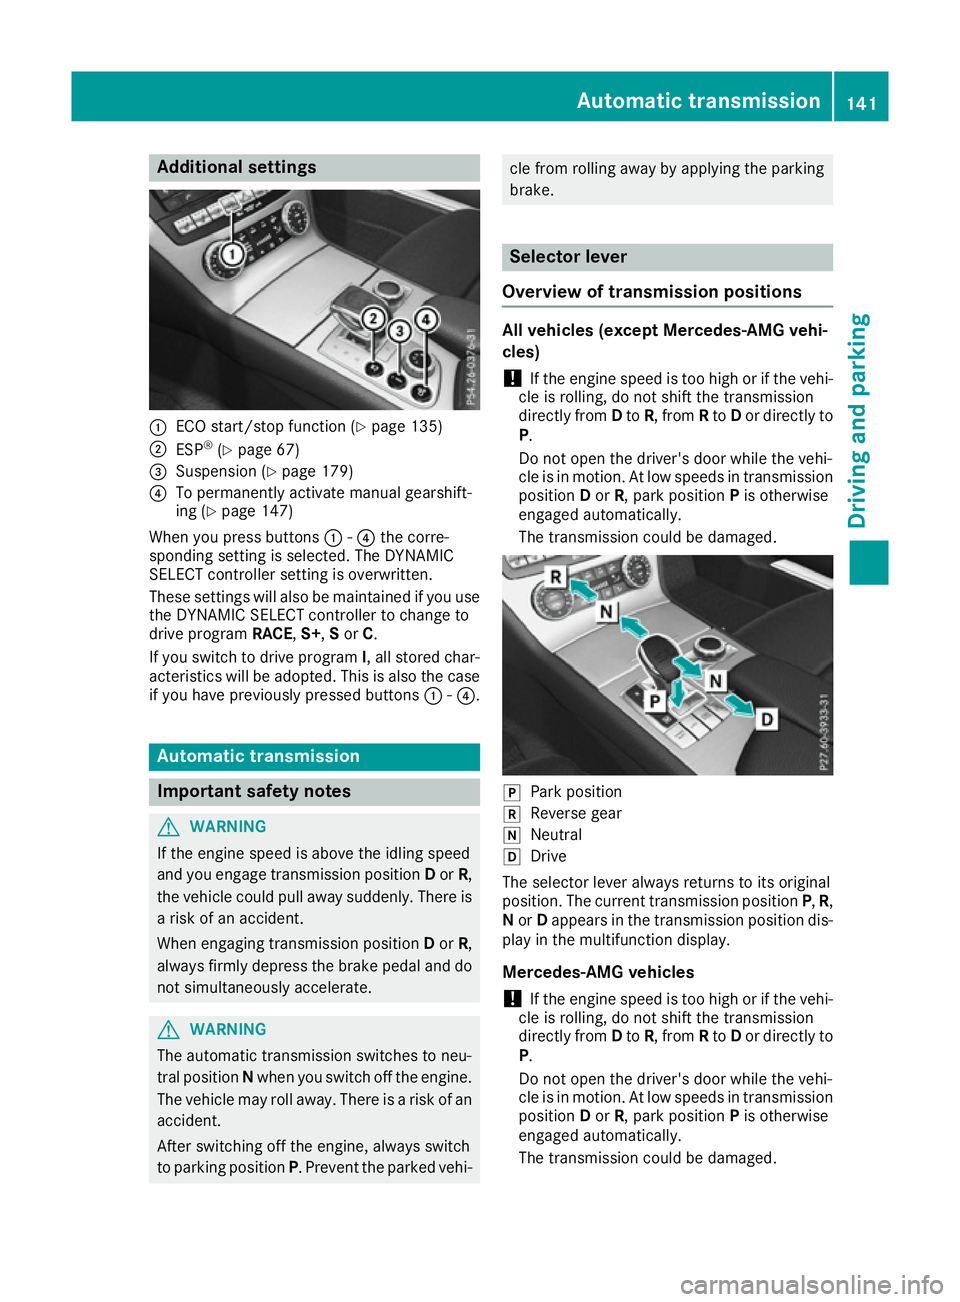
Additional settings
:
ECO start/stop function (Y page 135)
; ESP ®
(Y page 67)
= Suspension (Y page 179)
? To permanently activate manual gearshift-
ing (Y page 147)
When you press buttons :-? the corre-
sponding setting is selected. The DYNAMIC
SELECT controller setting is overwritten.
These settings will also be maintained if you use
the DYNAMIC SELECT controller to change to
drive program RACE,S+ ,S or C.
If you switch to drive program I, all stored char-
acteristics will be adopted. This is also the case
if you have previously pressed buttons :-?. Automatic transmission
Important safety notes
G
WARNING
If the engine speed is above the idling speed
and you engage transmission position Dor R,
the vehicle could pull away suddenly. There is a risk of an accident.
When engaging transmission position Dor R,
always firmly depress the brake pedal and do not simultaneously accelerate. G
WARNING
The automatic transmission switches to neu-
tral position Nwhen you switch off the engine.
The vehicle may roll away. There is a risk of an
accident.
After switching off the engine, always switch
to parking position P. Prevent the parked vehi- cle from rolling away by applying the parking
brake.
Selector lever
Overview of transmission positions All vehicles (except Mercedes-AMG vehi-
cles)
! If the engine speed is too high or if the vehi-
cle is rolling, do not shift the transmission
directly from Dto R, from Rto Dor directly to
P.
Do not open the driver's door while the vehi-
cle is in motion. At low speeds in transmission position Dor R, park position Pis otherwise
engaged automatically.
The transmission could be damaged. j
Park position
k Reverse gear
i Neutral
h Drive
The selector lever always returns to its original
position. The current transmission position P,R,
N or Dappears in the transmission position dis-
play in the multifunction display.
Mercedes-AMG vehicles
! If the engine speed is too high or if the vehi-
cle is rolling, do not shift the transmission
directly from Dto R, from Rto Dor directly to
P.
Do not open the driver's door while the vehi-
cle is in motion. At low speeds in transmission position Dor R, park position Pis otherwise
engaged automatically.
The transmission could be damaged. Automatic trans
mission
141Driving an d parking Z
Page 203 of 333
The outside temperature display is in the multi-
function display (Y page 201).
A change in the outside temperature is shown in
the multifunction display after a delay. Coolant temperature gauge
G
WARNING
If you open the bonnet while the engine is
overheating or while there is a fire in the
engine compartment, you could come into
contact with hot gases or other leaking ser-
vice products. There is a danger of injury.
Allow an overheating engine to cool down
before opening the bonnet. If there is a fire in the engine compartment, leave the bonnet
closed and notify the fire brigade.
The coolant temperature gauge is in the instru-
ment cluster on the right-hand side (Y page 32).
Under normal operating conditions and at the
correct coolant level, the coolant temperature
may rise to 120 †.
At high outside temperatures and when driving
uphill, the coolant temperature may rise to the
end of the scale. Operating the on-board computer
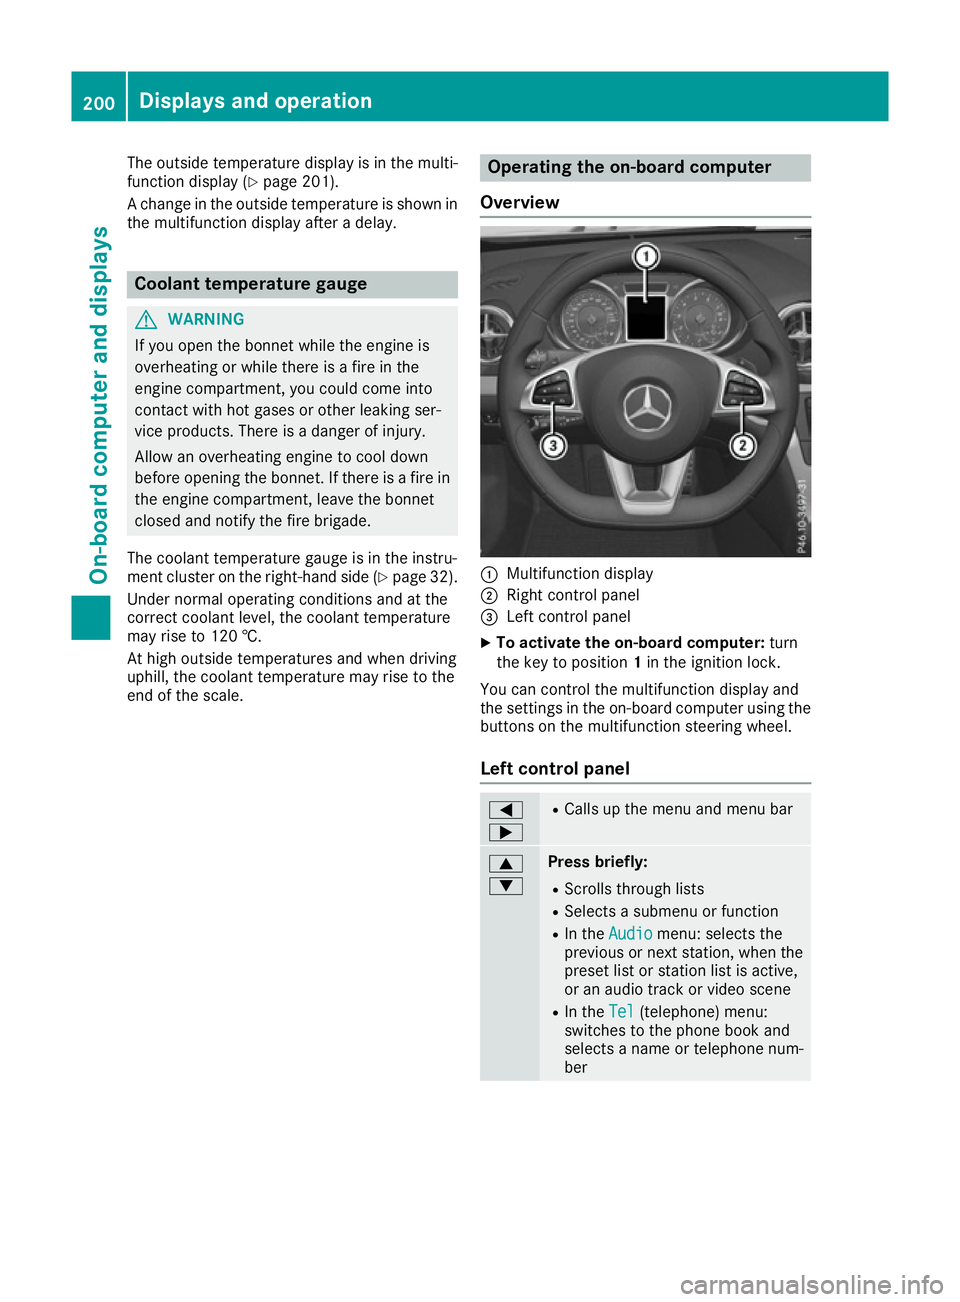
Overview :
Multifunction display
; Right control panel
= Left control panel
X To activate the on-board computer: turn
the key to position 1in the ignition lock.
You can control the multifunction display and
the settings in the on-board computer using the buttons on the multifunction steering wheel.
Left control panel =
; R
Calls up the menu and menu bar 9
: Press briefly:
R Scrolls through lists
R Selects a submenu or function
R In the Audio Audio menu: selects the
previous or next station, when the preset list or station list is active,
or an audio track or video scene
R In the Tel Tel(telephone) menu:
switches to the phone book and
selects a name or telephone num-
ber 200
Displays and operationOn-board computer and displays
Page 204 of 333
9
: Press and hold:
R
In the Audio Audio menu: selects a pre-
set list or a station list in the
desired frequency range, or an
audio track or video scene using
rapid scrolling
R In the Tel Tel(Telephone) menu:
starts rapid scrolling if the phone
book is open a R
Confirms the selection or display
message
R In the Tel Tel(Telephone) menu:
switches to the telephone book
and starts dialling the selected
number % Press briefly:
R Back
R Switches off LINGUATRONIC
R Hides display messages or calls up
the last Trip Tripmenu function used
R Exits the telephone book/redial
memory % Press and hold:
R
Calls up the standard display in the
Trip
Trip menu Right control panel
~ R
Rejects or ends a call
R Exits the telephone book/redial
memory 6 R
Makes or accepts a call
R Switches to the redial memory W
X R
Adjusts the volume 8 R
Mute ? R
Switches on LINGUATRONIC Further information on LINGUATRONIC is avail-
able in the separate operating instructions. Multifunction display
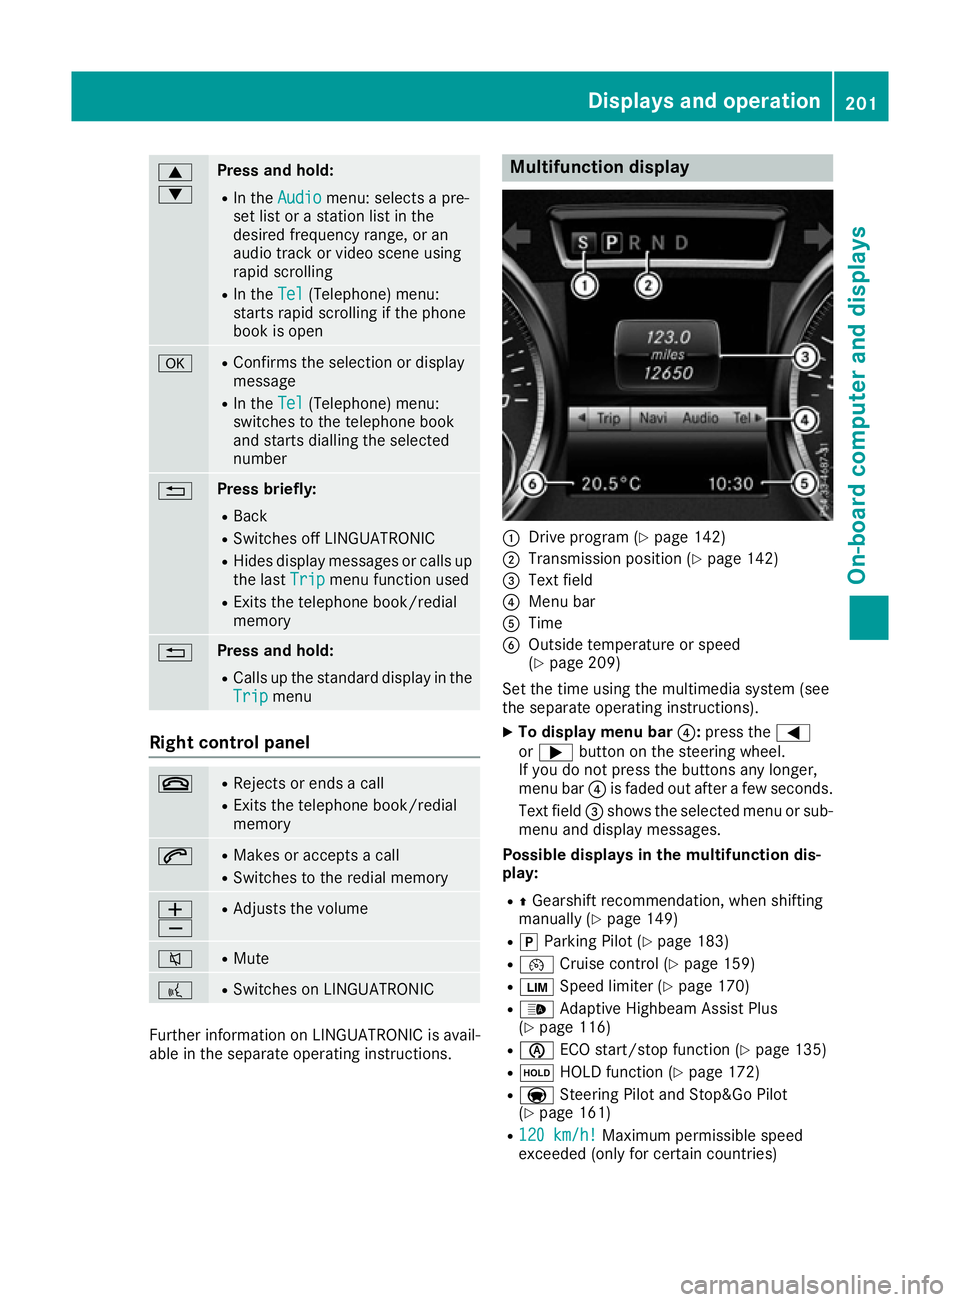
:
Drive program (Y page 142)
; Transmission position (Y page 142)
= Text field
? Menu bar
A Time
B Outside temperature or speed
(Ypage 209)
Set the time using the multimedia system (see
the separate operating instructions). X To display menu bar ?:press the =
or ; button on the steering wheel.
If you do not press the buttons any longer,
menu bar ?is faded out after a few seconds.
Text field =shows the selected menu or sub-
menu and display messages.
Possible displays in the multifunction dis-
play:
R ZGearshift recommendation, when shifting
manually (Y page 149)
R j Parking Pilot (Y page 183)
R ¯ Cruise control (Y page 159)
R È Speed limiter (Y page 170)
R _ Adaptive Highbeam Assist Plus
(Y page 116)
R è ECO start/stop function (Y page 135)
R ë HOLD function (Y page 172)
R a Steering Pilot and Stop&Go Pilot
(Y page 161)
R 120 km/h! 120 km/h! Maximum permissible speed
exceeded (only for certain countries) Displays and operation
201On-board computer and displays Z
Page 215 of 333
any body parts in the sweep of the steering
wheel.
If someone is trapped:
R press one of the memory function position
buttons, or
R move the switch for steering wheel adjust-
ment in the opposite direction to that in
which the steering wheel is moving.
The adjustment process is stopped.
X Press the =or; button on the steering
wheel to select the Settings
Settings menu.
X Press the :or9 button to select the
Convenience Convenience submenu.
X Press ato confirm.
X Using :or9, select the Easy
Easy Entry/
Entry/
Exit
Exit function.
If the Easy
Easy Entry/Exit
Entry/Exit function is activated,
the multifunction display shows the steering
wheel in orange.
X Press the abutton to save the setting.
Further information on the EASY-ENTRY/EXIT
feature (Y page 106).
Switching belt adjustment on/off
X Press the =or; button on the steering
wheel to select the Settings
Settings menu.
X Press the :or9 button to select the
Convenience
Convenience submenu.
X Press ato confirm.
X Press the :or9 button to select the
Belt adjustment
Belt adjustment function.
When the Belt adjustment
Belt adjustment function is acti-
vated, the seat belt is displayed in orange in
the multifunction display.
X Press the abutton to save the setting.
Further information on belt adjustment
(Y page 43).
Switching the fold mirrors in when lock-
ing function on/off
This function is only available when the vehicle is
equipped with the electrical fold-in function.
When you activate the Auto. fold-in mir‐
Auto. fold-in mir‐
rors rors function, the exterior mirrors are folded in
when the vehicle is locked.
If you have switched on the Auto. fold-in
Auto. fold-in
mirrors mirrors function and you fold in the exterior
mirrors using the button on the door (Y
page 109), they will not fold out automati-
cally. The exterior mirrors can then only be fol-
ded out using the button on the door.
X Press the =or; button on the steering
wheel to select the Settings Settingsmenu.
X Press the :or9 button to select the
Convenience
Convenience submenu.
X Press ato confirm.
X Press the :or9 button to select the
Auto. fold-in mirrors
Auto. fold-in mirrors function.
If the Auto. fold-in mirrors
Auto. fold-in mirrors function is
switched on, the multifunction display shows the exterior mirror in orange.
X Press the abutton to save the setting.
Resetting to factory settings X
Press the =or; button on the steering
wheel to select the Settings
Settingsmenu.
X Press the :or9 button to select the
Factory setting
Factory setting submenu.
X Press ato confirm.
The Reset all settings?
Reset all settings? function
appears.
X Press the :or9 button to select No
Noor
Yes
Yes .
X Press the abutton to confirm the selec-
tion.
If you have selected Yes
Yes and confirmed, the
multifunction display shows a confirmation
message.
For safety reasons, not all functions are reset:
the Limit speed (winter tyres): Limit speed (winter tyres): function
of the permanent speed limiter can only be set in
the Vehicle
Vehicle submenu. If you want to reset the
Daytime driving lights
Daytime driving lights function in the
Lights
Lights submenu, you must turn the key to posi-
tion 1in the ignition lock. 212
Menus and submenusOn-board computer and displays
Page 272 of 333
cause you to lose control of the vehicle. There
is a risk of an accident.
Use this device only when the vehicle is sta-
tionary.
i You must observe the legal requirements for
the country in which you are currently driving
when operating mobile communications
equipment in the vehicle.
If it is permitted by law to operate communi-
cations equipment while the vehicle is in
motion, you may only do so if the traffic sit-
uation permits. You may otherwise be dis-
tracted from the traffic conditions, cause an
accident and injure yourself and others.
Excessive levels of electromagnetic radiation
may cause damage to your health and to the
health of others. The use of an exterior aerial
takes into consideration the scientific discus-
sion surrounding the possible health risk posed
by electromagnetic fields.
Mercedes-Benz recommends the use of an
approved exterior aerial. This ensures:
R optimal mobile phone reception quality in the
vehicle
R that mutual interference between the vehicle
electronics and mobile phones is minimised
An exterior aerial has the following advantages:
R it conducts the electromagnetic fields gener-
ated by a wireless device to the exterior
R the field strength in the vehicle interior is
lower than in a vehicle that does not have an
exterior aerial
Information on retrofitting two-way radios and
mobile phones (RF transmitters) (Y page 320).
General notes There are various mobile phone brackets that
may be fitted in your vehicle; in some cases,
these are country-specific.
You can connect a Bluetooth ®
-capable mobile
phone with COMAND Online through the Blue-
tooth ®
interface. This also applies if your vehicle
is equipped with convenience telephony. More information on suitable mobile phones,
mobile phone brackets and on connecting Blue-
tooth ®
-capable mobile phones with COMAND
Online can be obtained:
R at your Mercedes-Benz Service Centre
R on the Internet at https://www.mercedes-
benz.com/de/mercedes-me/
konnektivitaet/
i The functions and services available when
you use the phone depend on your mobile
phone model and service provider.
Using a mobile phone If the mobile phone is inserted in the mobile
phone bracket, the mobile phone will be
charged and connected with the exterior aerial.
X Open the telephone compartment
(Y page 262).
X Place the mobile phone bracket into the pre-
installed fitting; see the separate installation
instructions for the mobile phone fitting.
X Insert the mobile phone into the mobile phone
bracket; see the separate installation instruc-
tions for the mobile phone fitting.
Operating the mobile phone You can operate the telephone using the
6
and ~ buttons on the multifunction steering
wheel. You can operate other mobile phone
functions via the on-board computer
(Y page 205).
When you remove the key from the ignition lock,
the mobile phone is disconnected from the
hands-free system. Active calls will first be
transferred to the mobile phone directly. Garage door opener
General notes The HomeLink
®
garage door opener integrated
in the rear-view mirror allows you to operate up
to three different door and gate systems.
Once programmed, the integrated garage door
opener in the rear-view mirror will assume the
function of the garage door system's remote
control. Please also read the operating instruc-
tions for the garage door system. Features
269Stowing and features Z
Page 273 of 333
When programming a garage door opener, park
the vehicle outside the garage. Do not run the
engine while programming.
The garage door opener is only available for cer- tain countries. Observe the legal requirements
for each individual country.
The HomeLink ®
garage door opener is compat-
ible with most European garage and gate opener
drives. More information on HomeLink ®
and/or
compatible products is available:
R at a qualified specialist workshop
R via the HomeLink ®
Hotline
(0) 08000 466 354 65 or alternatively
+49 (0) 6838 907-277
R on the Internet at http://www.homelink.com
Important safety notes G
WARNING
When you operate or program the garage door with the integrated garage door opener, per-
sons in the range of movement of the garage
door can become trapped or struck by the
garage door. There is a risk of injury.
When using the integrated garage door
opener, always make sure that nobody is
within the range of movement of the garage
door. G
WARNING
Combustion engines emit poisonous exhaust
gases such as carbon monoxide. Inhaling
these exhaust gases leads to poisoning. There is a risk of fatal injury. Therefore never leave
the engine running in enclosed spaces with-
out sufficient ventilation.
Programming Programming buttons
Pay attention to the "Important safety notes"
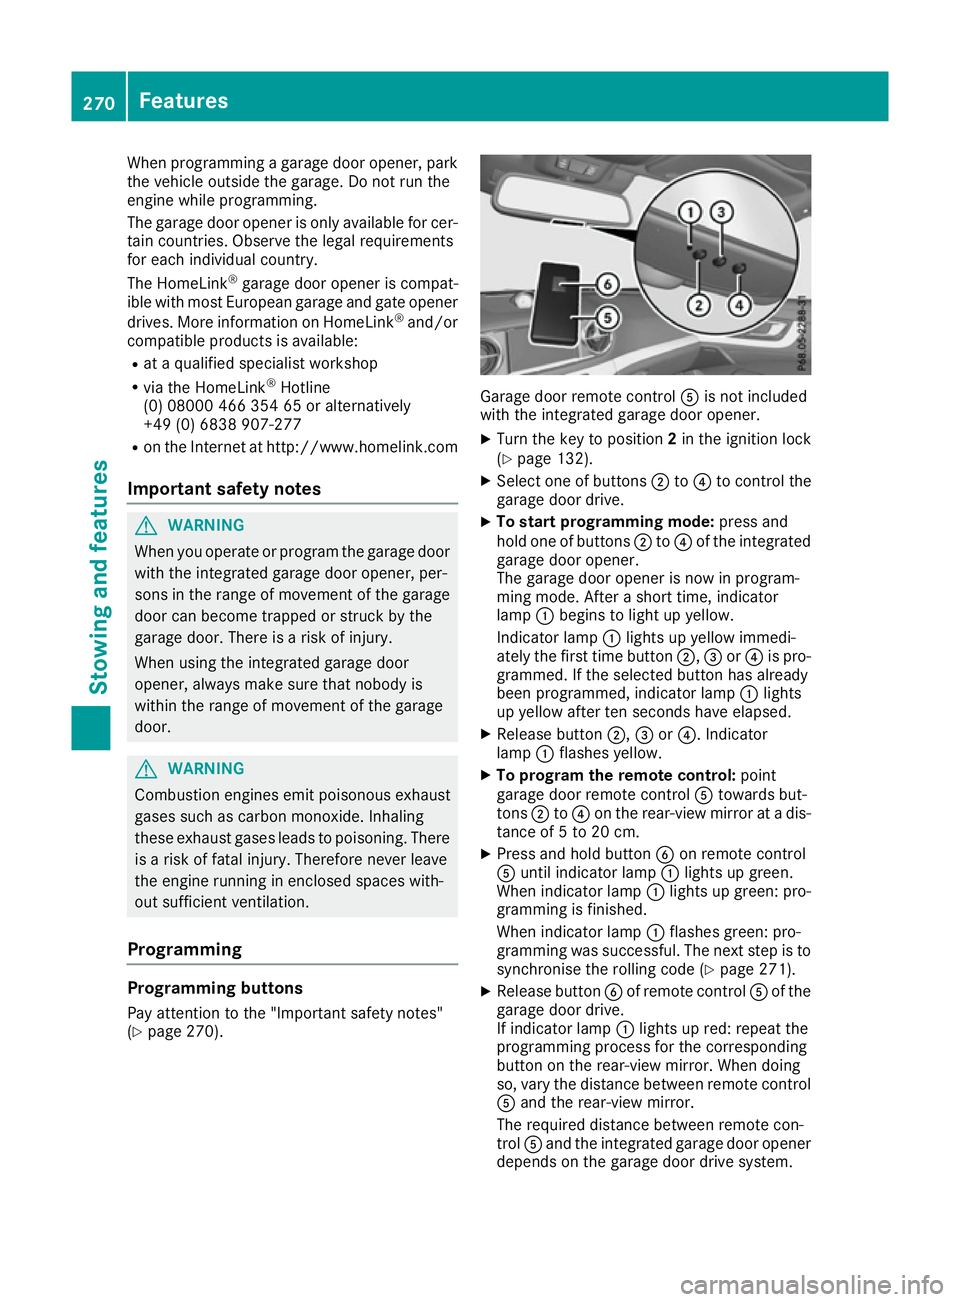
(Y page 270). Garage door remote control
Ais not included
with the integrated garage door opener.
X Turn the key to position 2in the ignition lock
(Y page 132).
X Select one of buttons ;to? to control the
garage door drive.
X To start programming mode: press and
hold one of buttons ;to? of the integrated
garage door opener.
The garage door opener is now in program-
ming mode. After a short time, indicator
lamp :begins to light up yellow.
Indicator lamp :lights up yellow immedi-
ately the first time button ;,=or? is pro-
grammed. If the selected button has already
been programmed, indicator lamp :lights
up yellow after ten seconds have elapsed.
X Release button ;,=or?. Indicator
lamp :flashes yellow.
X To program the remote control: point
garage door remote control Atowards but-
tons ;to? on the rear-view mirror at a dis-
tance of 5 to 20 cm.
X Press and hold button Bon remote control
A until indicator lamp :lights up green.
When indicator lamp :lights up green: pro-
gramming is finished.
When indicator lamp :flashes green: pro-
gramming was successful. The next step is to
synchronise the rolling code (Y page 271).
X Release button Bof remote control Aof the
garage door drive.
If indicator lamp :lights up red: repeat the
programming process for the corresponding
button on the rear-view mirror. When doing
so, vary the distance between remote control A and the rear-view mirror.
The required distance between remote con-
trol Aand the integrated garage door opener
depends on the garage door drive system. 270
FeaturesStowing and features