2016 MERCEDES-BENZ S-Class SEDAN display
[x] Cancel search: displayPage 178 of 438
Switching on the manual drive program
In manual drive programM, you can change gear
using the steering wheel paddle shifters if the
transmission is in position D. You can see the
currently selected drive program and which gear
is engaged in the multifunction display.
XPress the program selector button
(Ypage 173) repeatedly until Mappears in
the multifunction display.
Upshifting
!In manual drive program M, the automatic
transmission does not shift up automatically
even when the engine limiting speed for the
current gear is reached. When the engine lim-
iting speed is reached, the fuel supply is cut to
prevent the engine from overrevving. Always
make sure that the engine speed does not
reach the red area of the tachometer. There is
otherwise a risk of engine damage.
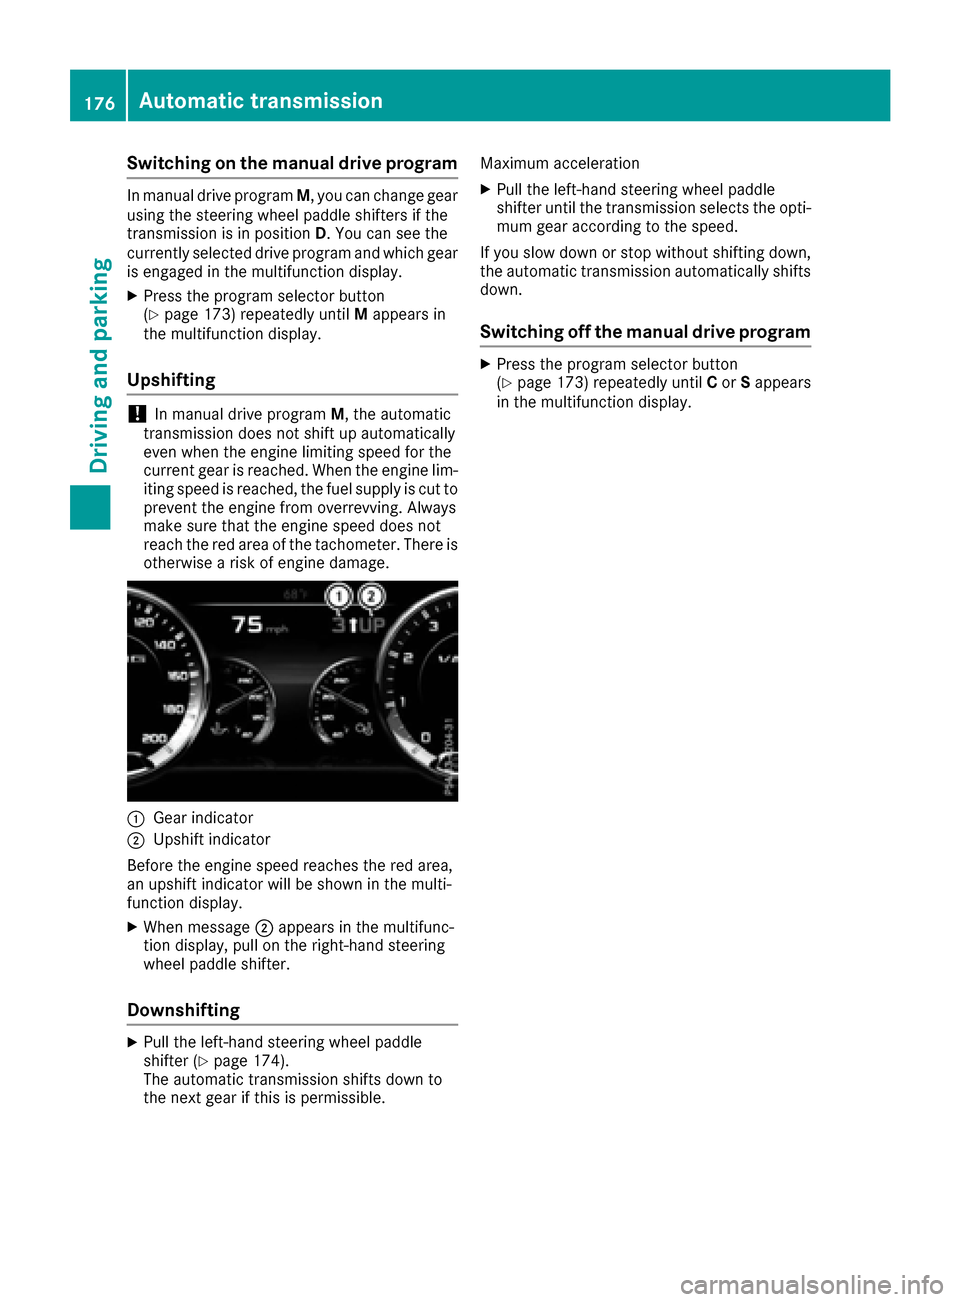
:Gear indicator
;Upshift indicator
Before the engine speed reaches the red area,
an upshift indicator will be shown in the multi-
function display.
XWhen message ;appears in the multifunc-
tion display, pull on the right-hand steering
wheel paddle shifter.
Downshifting
XPull the left-hand steering wheel paddle
shifter (Ypage 174).
The automatic transmission shifts down to
the next gear if this is permissible. Maximum acceleration
XPull the left-hand steering wheel paddle
shifter until the transmission selects the opti-
mum gear according to the speed.
If you slow down or stop without shifting down,
the automatic transmission automatically shifts
down.
Switching off the manual drive program
XPress the program selector button
(Ypage 173) repeatedly until Cor Sappears
in the multifunction display.
176Automatic transmission
Driving and parking
Page 180 of 438
and that it is not swallowed. Do not inhale fuelvapors. Keep fuel away from children.
If you or others come into contact with fuel,
observe the following:
RWash away fuel from skin immediately
using soap and water.
RIf fuel comes into contact with your eyes,
immediately rinse them thoroughly with
clean water. Seek medical assistance with-
out delay.
RIf fuel is swallowed, seek medical assis-
tance without delay. Do not induce vomit-
ing.
RImmediately change out of clothing which
has come into contact with fuel.
GWARNING
Electrostatic buildup can create sparks and
ignite fuel vapors. There is a risk of fire and
explosion.
Always touch the vehicle body before opening
the fuel filler flap or touching the fuel pump
nozzle. Any existing electrostatic buildup is
thereby discharged.
Do not get into the vehicle again during the refu-
eling process. Otherwise, electrostatic charge
could build up again.
!Do not use diesel to refuel vehicles with a
gasoline engine. Do not switch on the ignition
if you accidentally refuel with the wrong fuel.
Otherwise, the fuel will enter the fuel system. Even small amounts of the wrong fuel could
result in damage to the fuel system and the
engine. Notify a qualified specialist workshop
and have the fuel tank and fuel lines drained
completely.
!Overfilling the fuel tank could damage the
fuel system.
!Take care not to spill any fuel on painted
surfaces. You could otherwise damage the
paintwork.
!Use a filter when refueling from a fuel can.
Otherwise, the fuel lines and/or injection sys-
tem could be blocked by particles from the
fuel can. If you overfill the fuel tank, fuel could spray out
when the fuel pump nozzle is removed.
For further information on fuel and fuel quality
(
Ypage 428).
Refueling
General information
Pay attention to the important safety notes
(Ypage 177).
PLUG-IN HYBRID vehicles: pressure in the fuel
tank must be released before refueling.
Except PLUG-IN HYBRID vehicles: if you
unlock/lock the vehicle from the outside, the
fuel filler flap also unlocks/locks.
The position of the fuel filler cap is displayed in
the instrument cluster 8. The arrow next to
the filling pump indicates the side of the vehicle.
Preparing to refuel
XSwitch off the engine.
XOpen the driver's door.
The on-board electronics now have status 0.
This is the same as the SmartKey having been
removed.
or, if the SmartKey is inserted in the ignition
lock:
XRemove the SmartKey from the ignition lock.
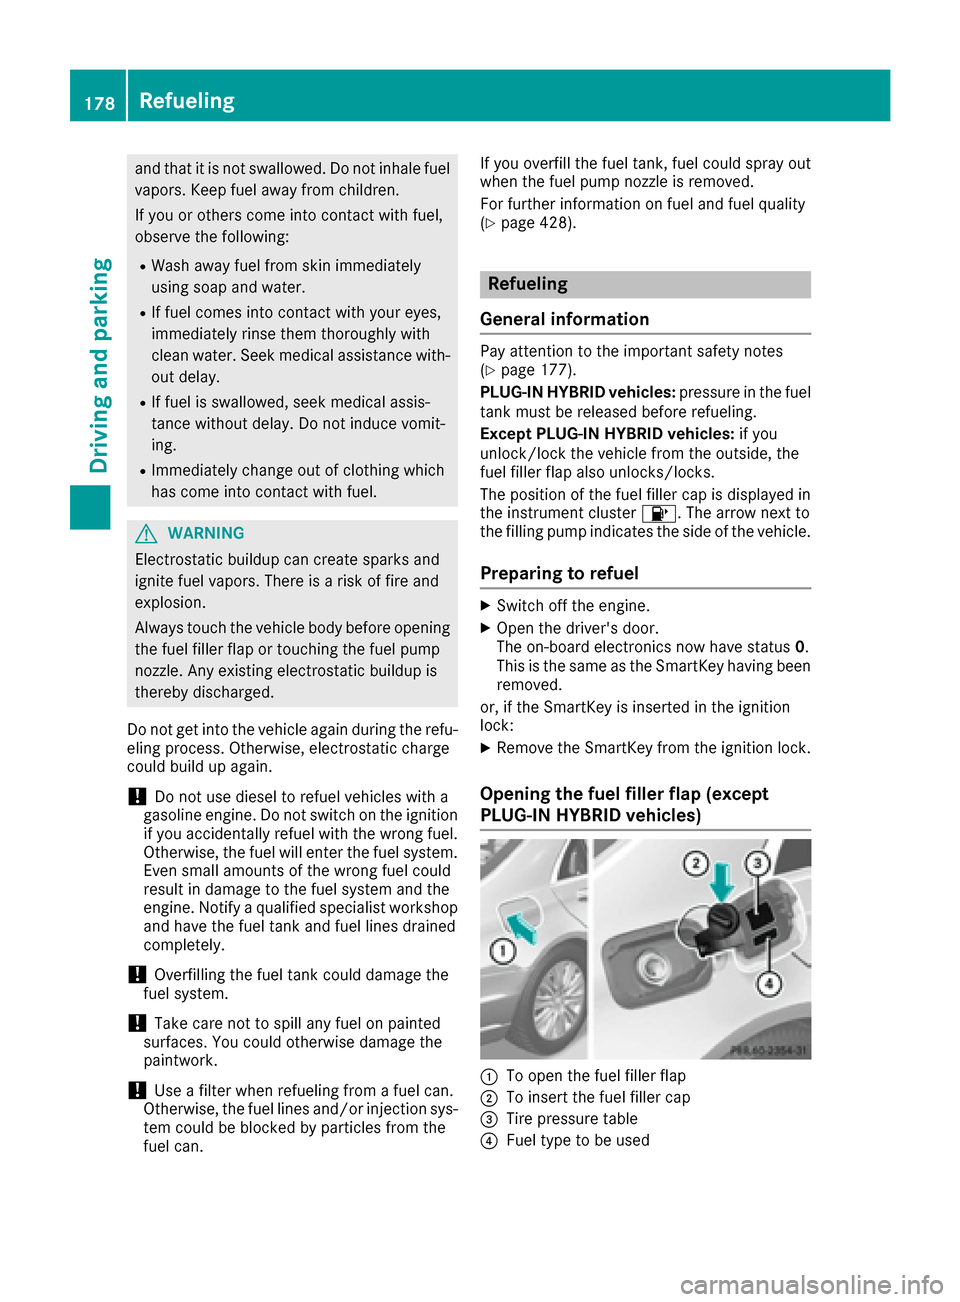
Opening the fuel filler flap (except
PLUG-IN HYBRID vehicles)
:To open the fuel filler flap
;To insert the fuel filler cap
=Tire pressure table
?Fuel type to be used
178Refueling
Driving and parking
Page 181 of 438
XPress the fuel filler flap in the direction of
arrow:.
The fuel filler flap swings up.
XTurn the fuel filler cap counterclockwise and
remove it.
XInsert the fuel filler cap into the holder on the
inside of the fuel filler flap.
XCompletely insert the filler neck of the fuel
pump nozzle into the tank, hook in place and
refuel.
XOnly fill the tank until the pump nozzle
switches off.
Do not add any more fuel after the pump stops
filling for the first time. Otherwise, fuel may
leak out.
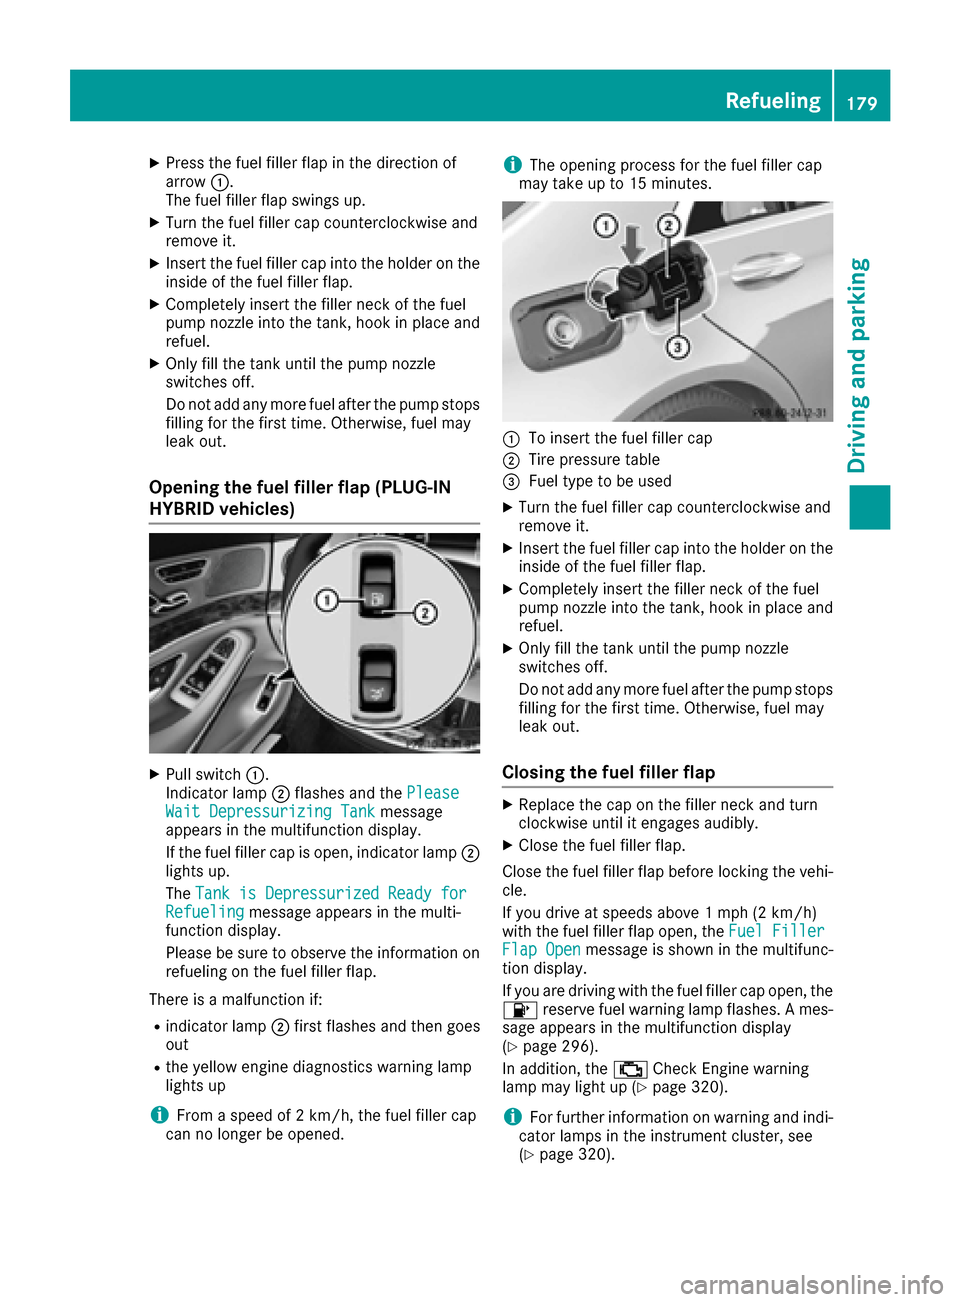
Opening the fuel filler flap (PLUG-IN
HYBRID vehicles)
XPull switch :.
Indicator lamp ;flashes and the Please
Wait Depressurizing Tankmessage
appears in the multifunction display.
If the fuel filler cap is open, indicator lamp ;
lights up.
The Tank is Depressurized Ready for
Refuelingmessage appears in the multi-
function display.
Please be sure to observe the information on
refueling on the fuel filler flap.
There is a malfunction if:
Rindicator lamp ;first flashes and then goes
out
Rthe yellow engine diagnostics warning lamp
lights up
iFrom a speed of 2 km/h, the fuel filler cap
can no longer be opened.
iThe opening process for the fuel filler cap
may take up to 15 minutes.
:To insert the fuel filler cap
;Tire pressure table
=Fuel type to be used
XTurn the fuel filler cap counterclockwise and
remove it.
XInsert the fuel filler cap into the holder on the inside of the fuel filler flap.
XCompletely insert the filler neck of the fuel
pump nozzle into the tank, hook in place andrefuel.
XOnly fill the tank until the pump nozzle
switches off.
Do not add any more fuel after the pump stopsfilling for the first time. Otherwise, fuel may
leak out.
Closing the fuel filler flap
XReplace the cap on the filler neck and turn
clockwise until it engages audibly.
XClose the fuel filler flap.
Close the fuel filler flap before locking the vehi-
cle.
If you drive at speeds above 1 mph (2 km/h)
with the fuel filler flap open, the Fuel Filler
Flap Openmessage is shown in the multifunc-
tion display.
If you are driving with the fuel filler cap open, the
8 reserve fuel warning lamp flashes. A mes-
sage appears in the multifunction display
(
Ypage 296).
In addition, the ;Check Engine warning
lamp may light up (
Ypage 320).
iFor further information on warning and indi-
cator lamps in the instrument cluster, see
(
Ypage 320).
Refueling179
Driving and parking
Z
Page 183 of 438
To avoid hazardous situations, observe the
following:
ROnly connect the charging cable to mains
sockets that:
-are installed correctly and
-have been approved by an electrical spe-
cialist.
RFor safety reasons, only use the charging
cables supplied with the vehicle, or charg-
ing cables which have been approved for
use with this vehicle.
RNever use a damaged charging cable.
RDonot use:
-Extension cables
-Cable drums
-Multiple sockets
RDo not use a socket adapter to connect the
charging cable to the mains socket. The
only exception is if the adapter has been
tested and approved by the manufacturer
for charging the high-voltage battery in an
electric vehicle.
RAlways observe the safety notes in the
socket adapter's operating instructions.
GDANGER
Connecting the charging cable to the vehicle
via an incorrectly installed wallbox or by
means of adapters, extension cables or simi-
lar could cause a fire or an electric shock.
There is a risk of fatal injury.
To avoid hazardous situations, observe the
following:
ROnly connect the charging cable to a wall-
box if:
-the wallbox is installed correctly
-the wallbox has been inspected by a
qualified electrician and
-the charging cable is undamaged
RDo not extend the charging cable
RDo not use an adapter
RAlways observe the safety notes in the wall-
box's operating instructions The vehicle's high voltage electrical system is
under high voltage.
RDo not tamper with the high-voltage compo-
nents or the orange cables of the high-voltage
electrical system.
RDo not touch high-voltage components or the
orange cables of the high-voltage electrical
system when a vehicle has been involved in a
crash.
RNever touch damaged components or the
damaged orange cables of the high-voltage
electrical system.
RDo not remove the covers of the high-voltage
electrical system components that are
marked with a warning sticker.
General notes
Method of operation
The vehicle is equipped with a high-voltage bat-
tery for driving. The high-voltage battery stores
the energy needed to operate the electric motor
and releases it again.
The electric motor uses energy that has been
stored in the high-voltage battery when pulling
away, accelerating and during the journey.
In overrun mode, kinetic energy is converted by
means of energy recuperation into electrical
energy and stored in the high-voltage battery.
Information on overrun mode (
Ypage 253).
The high-voltage battery can be charged as fol-
lows:
Rthrough energy recuperation while the vehicle is in motion
Rthrough the combustion engine while driving
in CHARGE operating mode (Ypage 243)
Rwith the relevant charging cable at an electri-
cal outlet while the vehicle is stationary
Rat a wallbox while the vehicle is stationary
Rat a charging station while the vehicle is sta-
tionary
The high-voltage battery can be charged in a
nominal voltage range from 100 V to 240 V.
You can view the condition of charge of the high-
voltage battery in the multifunction display. You
can find information in "PLUG-IN HYBRID oper-
ation", section "Menus and submenus" under
"Energy flow display" (
Ypage 245).
Charging the high-voltage battery (PLUG-IN HYBRID vehicles)181
Driving and parking
Z
Page 185 of 438
Switch on the building protection system again
after it has been triggered. Otherwise, the
charging process cannot be continued.
General information about the charging
procedure
Pay attention to the "Important safety notes"
(Ypage 180).
The vehicle socket is located in the rear bumper on the right below the tail lamp.
The charge socket flap and the vehicle are cen-
trally locked or unlocked simultaneously.
Charging the high-voltage battery via
the electrical outlet
Charging cable for electrical outlets
Important safety notes
!Only use the charging cable to charge the
high-voltage battery. Do not use the charging
cable for other purposes. It may otherwise be damaged.
The vehicle is supplied with a country-specific
charging cable for connection to a mains socket.
Only use the charging cable supplied with the
vehicle or a charging cable approved for the
vehicle.
iIf you use the supplied 12 A charging cable
to charge a high-voltage battery:
Rthe charge time increases considerably
Relectrical consumption increases consider-
ably
Where possible, charge the high-voltage bat-
tery at a charging station (
Ypage 186). Only
then can certified electrical energy consump-
tion levels be reached.
iThe charging process can vary depending on
the power supply. Therefore, always observe
the local information.
Information about charging from a wallbox can
be found at (
Ypage 185).
Information about charging at a charging station
can be found at (
Ypage 186).
Stowing the charging cable
The charging cable can be stowed and held in
place in the bag provided in the trunk of the
vehicle.
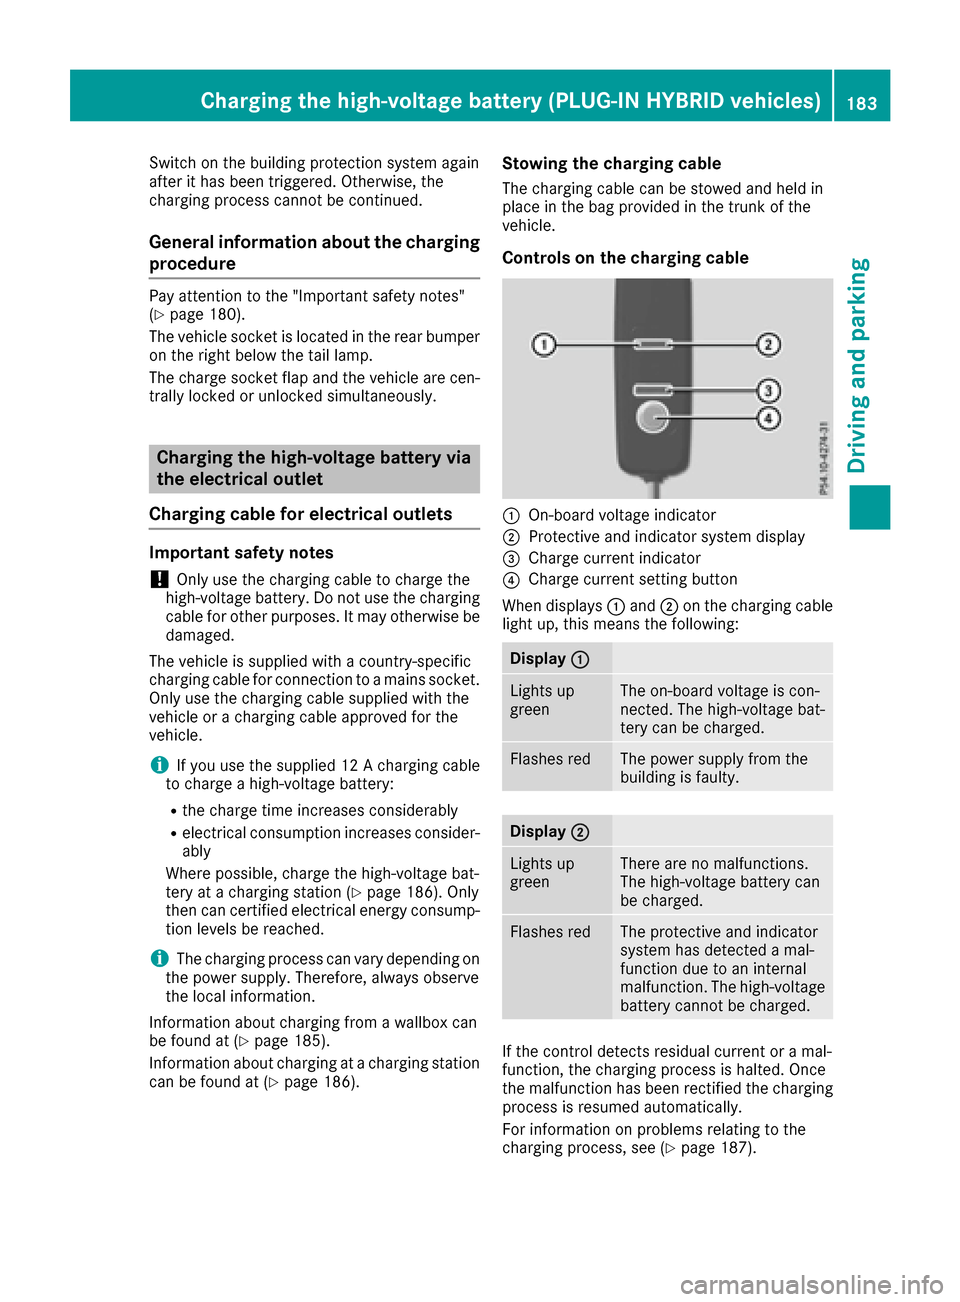
Controls on the charging cable
:On-board voltage indicator
;Protective and indicator system display
=Charge current indicator
?Charge current setting button
When displays :and ;on the charging cable
light up, this means the following:
Display :
Lights up
greenThe on-board voltage is con-
nected. The high-voltage bat-
tery can be charged.
Flashes redThe power supply from the
building is faulty.
Display;
Lights up
greenThere are no malfunctions.
The high-voltage battery can
be charged.
Flashes redThe protective and indicator
system has detected a mal-
function due to an internal
malfunction. The high-voltage
battery cannot be charged.
If the control detects residual current or a mal-
function, the charging process is halted. Once
the malfunction has been rectified the charging
process is resumed automatically.
For information on problems relating to the
charging process, see (
Ypage 187).
Charging the high-voltage battery (PLUG-IN HYBRID vehicles)183
Driving and parking
Z
Page 186 of 438
Setting the maximum charge current
GWARNING
If the charge current draw via a mains socket
is too high during the charging process, the
external electrical system may overheat.
There is a risk of fire.
Before beginning the charging process, check
the maximum permissible charge current
locally. Consult a qualified expert to do so
where necessary.
If necessary, adjust your vehicle's settings.
!An excessive charge current can blow a fuse
or lead to overheating of the external power
supply. Check whether the external power
supply is compatible with the set charge cur-
rent. If necessary, lower the set charge cur-
rent or use another power socket.
Before starting the charging process at a power
socket, check the maximum permissible charge current for the relevant power socket or the
building.
You can set the maximum permissible charge
current:
Ron the controls of the charging cable
Rin the on-board computer menu
(Ypage 272).
The lower value of the two charge current set-
tings – on the charge cable controls and in the
on-board computer – determines the maximum
charge current. If you cannot set the precise
maximum permitted charge current, select the
next lowest available value.
Only set the maximum permitted charge current in the on-board computer menu if:
Rit is not possible to set the charge current on
the charging cable
Rthe precise maximum permitted charge cur-
rent can only be set via the on-board com-
puter
How to set the maximum permissible charge
current on the charging cable, is described as
follows.
XTo adjust the setting: press button?
repeatedly until the desired setting is selec-
ted in display =.
RTwo LEDs are flashing: minimum setting
RAll LEDs are flashing: maximum setting If, after the charging process, the charging cable
is:
Rleft connected to the power socket, the cur-
rently selected values will be used for the next
charging process.
Rremoved from the power socket, the values
will be reset to the minimum setting for the
next charging process. You may then need to
reset the values of the maximum charge cur-
rent.
iIf the vehicle requires more time than usual
when charging, check the maximum charge
current settings using the controls on the
charging cable or in the on-board comput
er's
menu.
Indicator lamp on the vehicle socket
When the indicator lamp on the vehicle socket
lights up, this means the following:
Indicator
lamp
Flashes
orangeThe connection between the
vehicle and the current
source is being established
before charging begins.
Flashes
greenThe high-voltage battery is
being charged.
Flashes redA malfunction has occurred
while charging.
The indicator lamp goes out
after approximately
90 seconds.
Lights up
orangeA charging break for the high-
voltage battery is taking
place.
The indicator lamp goes out
after approximately
90 seconds.
Lights up
greenThe high-voltage battery is
fully charged.
The indicator lamp goes out
after approximately
90 seconds.
iIf the indicator lamp is off, lock or unlock the
vehicle. The indicator lamp then displays the
current status of the charging process again.
184Charging the high-voltage battery (PLUG-IN HYBRID vehicles)
Driving and parking
Page 187 of 438
Connecting the charging cable
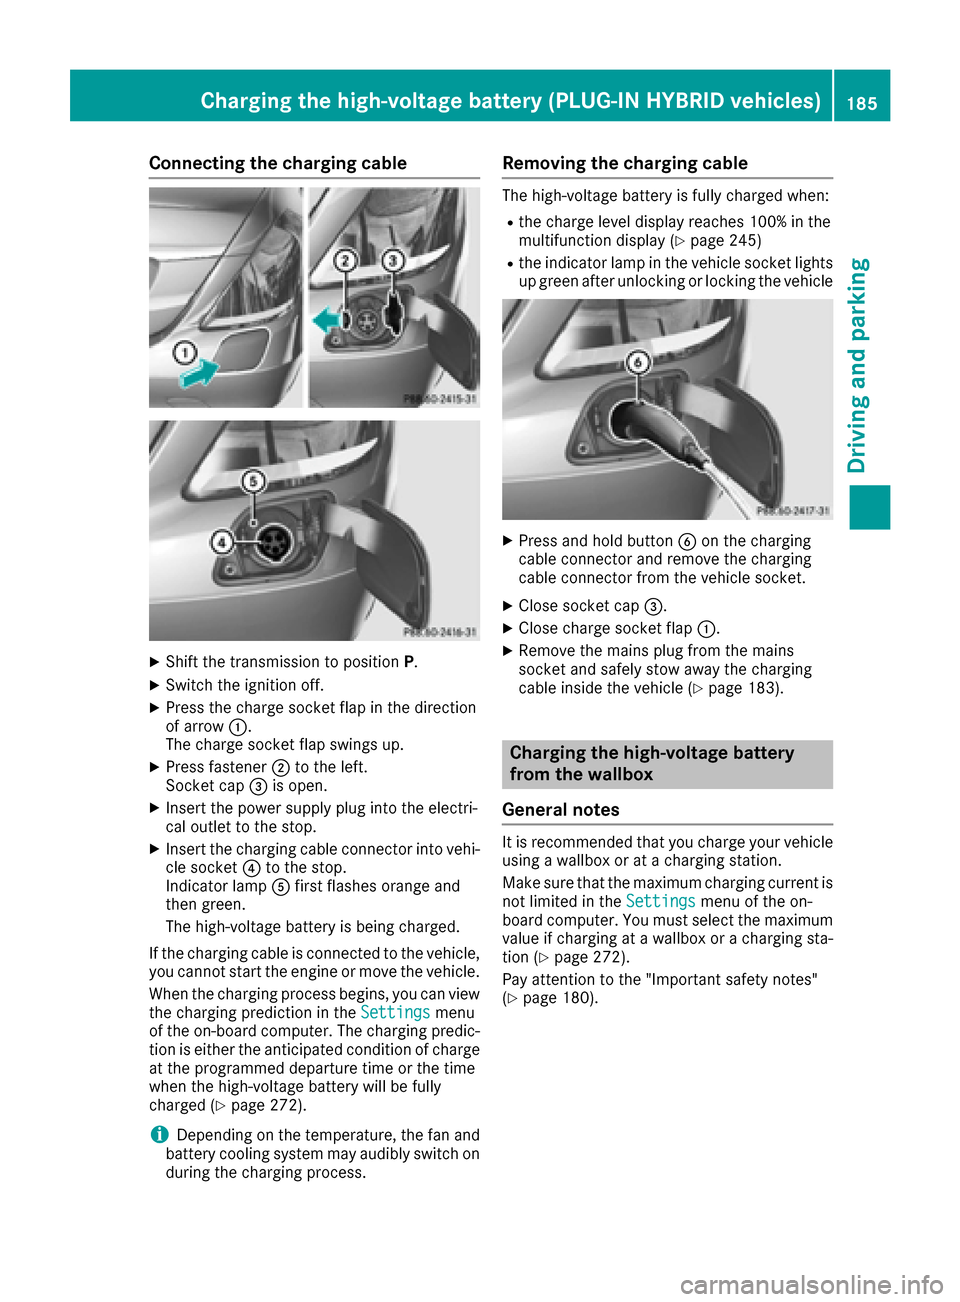
XShift the transmission to positionP.
XSwitch the ignition off.
XPress the charge socket flap in the direction
of arrow:.
The charge socket flap swings up.
XPress fastener ;to the left.
Socket cap =is open.
XInsert the power supply plug into the electri-
cal outlet to the stop.
XInsert the charging cable connector into vehi-
cle socket ?to the stop.
Indicator lamp Afirst flashes orange and
then green.
The high-voltage battery is being charged.
If the charging cable is connected to the vehicle,
you cannot start the engine or move the vehicle.
When the charging process begins, you can view
the charging prediction in the Settings
menu
of the on-board computer. The charging predic-
tion is either the anticipated condition of charge
at the programmed departure time or the time
when the high-voltage battery will be fully
charged (
Ypage 272).
iDepending on the temperature, the fan and
battery cooling system may audibly switch on
during the charging process.
Removing the charging cable
The high-voltage battery is fully charged when:
Rthe charge level display reaches 100% in the
multifunction display (Ypage 245)
Rthe indicator lamp in the vehicle socket lights up green after unlocking or locking the vehicle
XPress and hold button Bon the charging
cable connector and remove the charging
cable connector from the vehicle socket.
XClose socket cap =.
XClose charge socket flap :.
XRemove the mains plug from the mains
socket and safely stow away the charging
cable inside the vehicle (
Ypage 183).
Charging the high-voltage battery
from the wallbox
General notes
It is recommended that you charge your vehicle
using a wallbox or at a charging station.
Make sure that the maximum charging current is
not limited in the Settings
menu of the on-
board computer. You must select the maximum
value if charging at a wallbox or a charging sta-
tion (
Ypage 272).
Pay attention to the "Important safety notes"
(
Ypage 180).
Charging the high-voltage battery (PLUG-IN HYBRID vehicles)185
Driving and parking
Z
Page 188 of 438
Connecting the charging cable
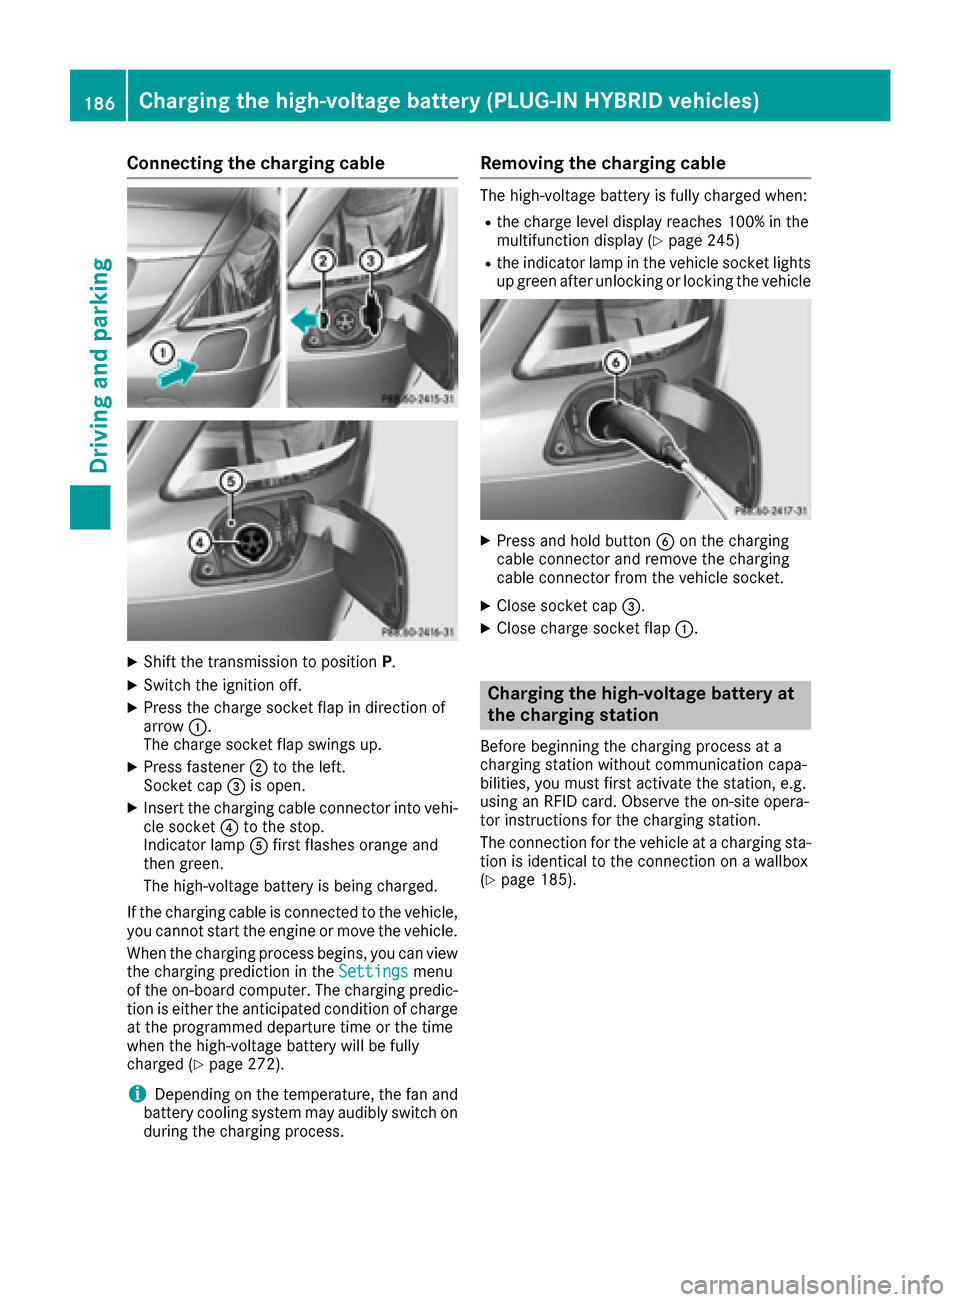
XShift the transmission to positionP.
XSwitch the ignition off.
XPress the charge socket flap in direction of
arrow:.
The charge socket flap swings up.
XPress fastener ;to the left.
Socket cap =is open.
XInsert the charging cable connector into vehi-
cle socket ?to the stop.
Indicator lamp Afirst flashes orange and
then green.
The high-voltage battery is being charged.
If the charging cable is connected to the vehicle,
you cannot start the engine or move the vehicle.
When the charging process begins, you can view
the charging prediction in the Settings
menu
of the on-board computer. The charging predic-
tion is either the anticipated condition of charge
at the programmed departure time or the time
when the high-voltage battery will be fully
charged (
Ypage 272).
iDepending on the temperature, the fan and
battery cooling system may audibly switch on
during the charging process.
Removing the charging cable
The high-voltage battery is fully charged when:
Rthe charge level display reaches 100% in the
multifunction display (Ypage 245)
Rthe indicator lamp in the vehicle socket lights up green after unlocking or locking the vehicle
XPress and hold button Bon the charging
cable connector and remove the charging
cable connector from the vehicle socket.
XClose socket cap =.
XClose charge socket flap :.
Charging the high-voltage battery at
the charging station
Before beginning the charging process at a
charging station without communication capa-
bilities, you must first activate the station, e.g.
using an RFID card. Observe the on-site opera-
tor instructions for the charging station.
The connection for the vehicle at a charging sta-
tion is identical to the connection on a wallbox
(
Ypage 185).
186Charging the high-voltage battery (PLUG-IN HYBRID vehicles)
Driving and parking