2016 MERCEDES-BENZ S-Class SEDAN sunblind rear
[x] Cancel search: sunblind rearPage 16 of 438

Operation ......................................... 54
System self-test ...............................56
Occupant safety
Air bags ...........................................5 0
Automatic measures after an acci-
dent ................................................. 61
Children in the vehicle ..................... 61
Important safety notes .................... 45
Introduction to the restraint sys-
tem .................................................. 44
Occupant Classification System
(OCS) ............................................... 53
PASSENGER AIR BAG indicator
lamps ............................................... 46
Pets in the vehicle ........................... 67
PRE-SAFE
®(anticipatory occu-
pant protection) ............................... 59
PRE-SAFE
®PLUS (anticipatory
occupant protection PLUS) .............. 60
Restraint system warning lamp ........ 45
OCS
Conditions ....................................... 53
Faults ............................................... 57
Operation ......................................... 54
System self-test ............................... 56
Odometer ........................................... 261
Oil
see Engine oil
On-board computer
AMG menu ..................................... 275
Assistance graphic menu ............... 268
Assistance menu ........................... 269
Display messages .......................... 277
Displaying a service message ........ 358
DISTRONIC PLUS ........................... 204
Factory settings ............................. 275
Head-up display ............................. 259
HYBRID menu ................................ 272
Important safety notes .................. 256
Instrument cluster menu ............... 274
Lights menu ................................... 274
Media menu ................................... 265
Menu overview .............................. 261
Message memory .......................... 277
Navigation menu ............................ 263
Operation ....................................... 257
Radio menu ................................... 265 Service menu ................................. 269
Settings menu ............................... 269
Standard display ............................ 261
Telephone menu ............................ 267
Trip menu ...................................... 261
Video DVD operation ..................... 267
Online access to the vehicle
Data protection .............................. 188
Functions ....................................... 189
General informa tion ....................... 188
Inte
rnet .......................................... 189
Opening the fuel filler flap
(PLUG-IN HYBRID vehicles) ............ 179
Operating safety
Declaration of conformity ................ 28
Important safety notes .................... 27
Operating system
see On-board computer
Operator's Manual
Overview .......................................... 25
Vehicle equipment ........................... 25
Outside temperature display ........... 257
Overhead control panel ...................... 39
Override feature
Rear side windows ........................... 67
P
Paint code number ............................ 426
Paintwork (cleaning instructions) ... 361
Panic alarm .......................................... 44
Panorama roof with power tilt/
sliding panel
Important safety notes .................... 97
Opening/closing the roller sun-
blind ............................................... 100
Operating ......................................... 98
Operating the roller sunblinds for
the sliding sunroof ........................... 99
Problem (malfunction) ................... 103
Rain closing feature ......................... 99
Resetting ....................................... 102
Reversing feature ............................. 98
Parcel net hooks ............................... 329
Parking
Important safety notes .................. 189
Parking brake ................................ 190
14Index
Page 19 of 438
Refuelingprocess (PLUG-IN
HYBRID vehicles) .......................... .178
see Fuel
Remote control
Garage door opener ....................... 347
Programming (garage door
opener) .......................................... 348
Replacing bulbs
General notes ................................ 135
Reporting safety defects .................... 29
Rescue card ......................................... 29
Reserve (fuel tank)
see Fuel
Reserve fuel
Display message ............................ 296
Warning lamp ................................. 320
Residual heat (climate control) ........ 152
Restraint system
Display message ............................ 287
Introduction ..................................... 44
Warning lamp ................................. 319
Warning lamp (function) ................... 45
Reversing feature
Panorama sliding sunroof ................ 98
Roller sunblinds ............................... 99
Side windows ................................... 94
Trunk lid ........................................... 89
Reversing lamps (display mes-
sage) ................................................... 292
ROAD SURFACE SCAN ....................... 211
Roadside Assistance (breakdown) .... 26
Roller sunblind
Panorama roof with power tilt/
sliding panel ..................................... 99
Rear side windows ......................... 333
Rear window .................................. 334
Roller sunblind of the panorama
roof with power tilt/sliding panel
Operating (front roller sunblind) .... 100
Operating (rear roller sunblind) ...... 100
Roof carrier ........................................ 330
Roof lining and carpets (cleaning
guidelines) ......................................... 366
Roof load (maximum) ........................ 433S
Safety
Children in the vehicle ..................... 61
Hybrid drive system ......................... 42
see Occupant safety
see Operating safety
Safety notes
Hybrid vehicles ................................ 42
Safety system
see Driving safety systems
SD memory card
Selecting ........................................ 266
Seat
Adjusting the front-passenger
seat from the driver's seat ............. 108
Multicontour seat in the rear com-
partment ........................................ 117
Seat belt buckle extender
Display message ............................ 285
Seat belt extender
Function/notes ................................ 49
Seat belts
Adjusting the driver's and front-
passenger seat belt ......................... 50
Adjusting the height ......................... 49
Cleaning ......................................... 366
Correct usage .................................. 48
Fastening ......................................... 49
Important safety guidelines ............. 47
Introduction ..................................... 46
Releasing ......................................... 50
Seat belt extender ........................... 49
Warning lamp ................................. 313
Warning lamp (function) ................... 50
Seating
Seating comfort package ............... 117
Seating comfort package ................. 117
Seats
Active multicontour seat ................ 117
Adjusting (electrically) ................... 106
Adjusting (rear compartment) ........ 107
Adjusting the 4-way lumbar sup-
port ................................................ 118
Adjusting the head restraint .......... 114
Calling up a stored setting (mem-
ory function) .................................. 127
Chauffeur mode ............................. 111
Index17
Page 34 of 438

Cockpit
FunctionPage
:Steering wheel paddle shift-
ers174
;Combination switch131
=Horn
?Instrument cluster33
ADIRECT SELECT lever170
BOverhead control panel39
CControl panel for:
ÜLowering the rear seat
head restraints116
u Extending/retracting
the rear roller sunblind334
PASSENGER AIR BAG indica-
tor lamp46
Adjusting the brightness of
the instrument lighting and
the multimedia system dis-
play
DIgnition lock162
Start/Stop button162
FunctionPage
EClimate control systems140
FAdjusts the steering wheel120
Steering wheel heating120
GCruise control lever197
HElectric parking brake190
IDiagnostics connection28
JOpening the hood352
KLight switch130
LControl panel for:
Activating Steering Assist
and Stop&Go Pilot207
Switching on Active Lane
Keeping Assist237
Deactivating PARKTRONIC214
Switching on the 360° cam-
era224
Activating Night View Assist230
Switching on the head-up
display259
32Cockpit
At a glance
Page 41 of 438
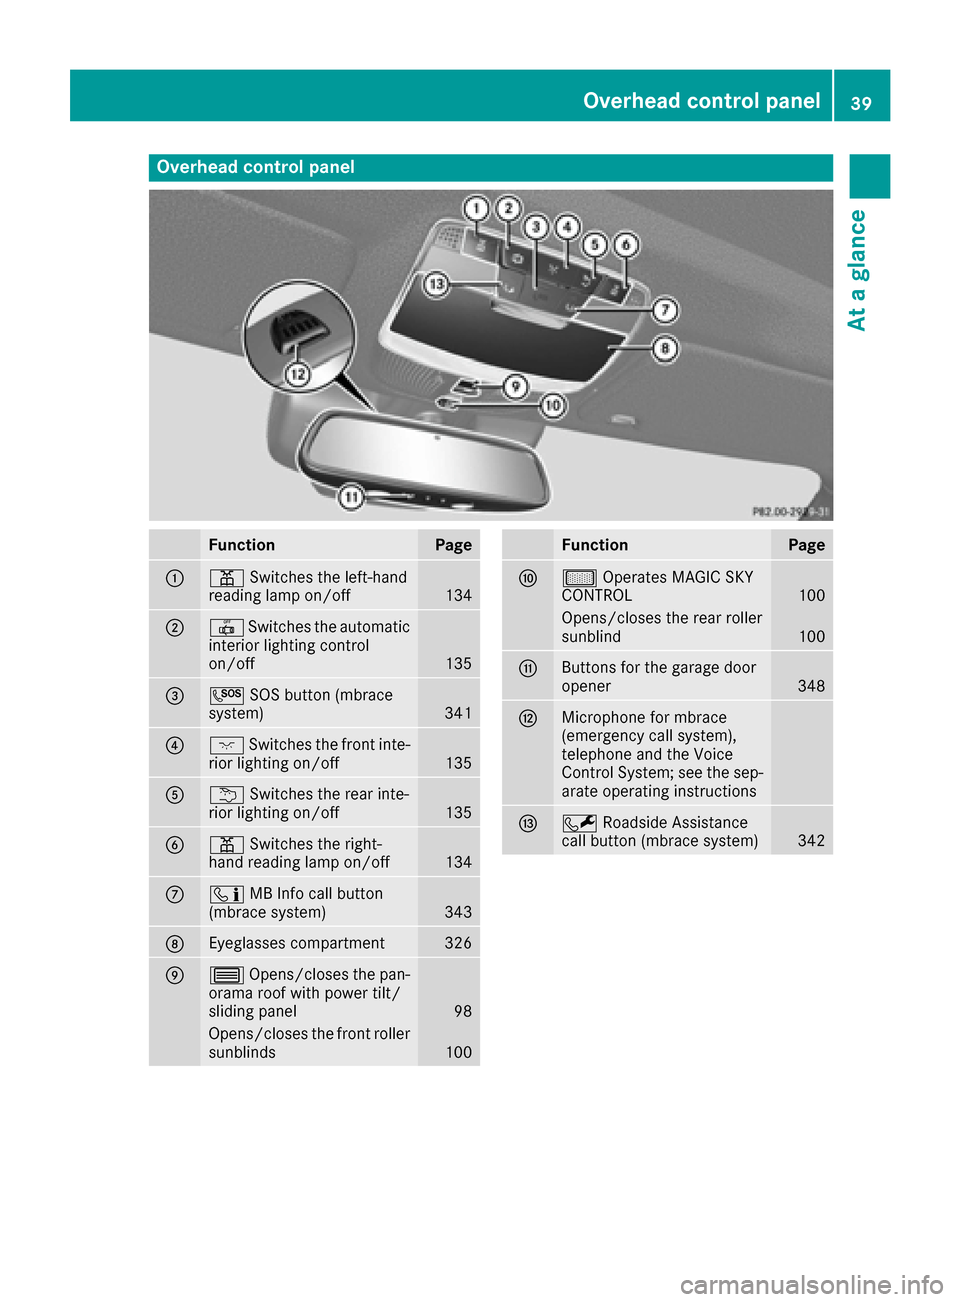
Overhead control panel
FunctionPage
:pSwitches the left-hand
reading lamp on/off134
;| Switches the automatic
interior lighting control
on/off
135
=G SOS button (mbrace
system)341
?c Switches the front inte-
rior lighting on/off135
Au Switches the rear inte-
rior lighting on/off135
Bp Switches the right-
hand reading lamp on/off134
Cï MB Info call button
(mbrace system)343
DEyeglasses compartment326
E3 Opens/closes the pan-
orama roof with power tilt/
sliding panel
98
Opens/closes the front roller
sunblinds100
FunctionPage
Fµ Operates MAGIC SKY
CONTROL100
Opens/closes the rear roller
sunblind100
GButtons for the garage door
opener348
HMicrophone for mbrace
(emergency call system),
telephone and the Voice
Control System; see the sep-
arate operating instructions
IF Roadside Assistance
call button (mbrace system)342
Overhead control panel39
At a glance
Page 69 of 438
GWARNING
If the child restraint system is subjected to
direct sunlight, parts may get very hot. Chil-
dren may burn themselves on these parts,
particularly on the metal parts of the child
restraint system. There is a risk of injury.
If you leave the vehicle, taking the child with
you, always ensure that the child restraint
system is not exposed to direct sunlight. Pro- tect it with a blanket, for example. If the child
restraint system has been exposed to direct
sunlight, let it cool down before securing the
child in it. Never leave children unattended in
the vehicle.
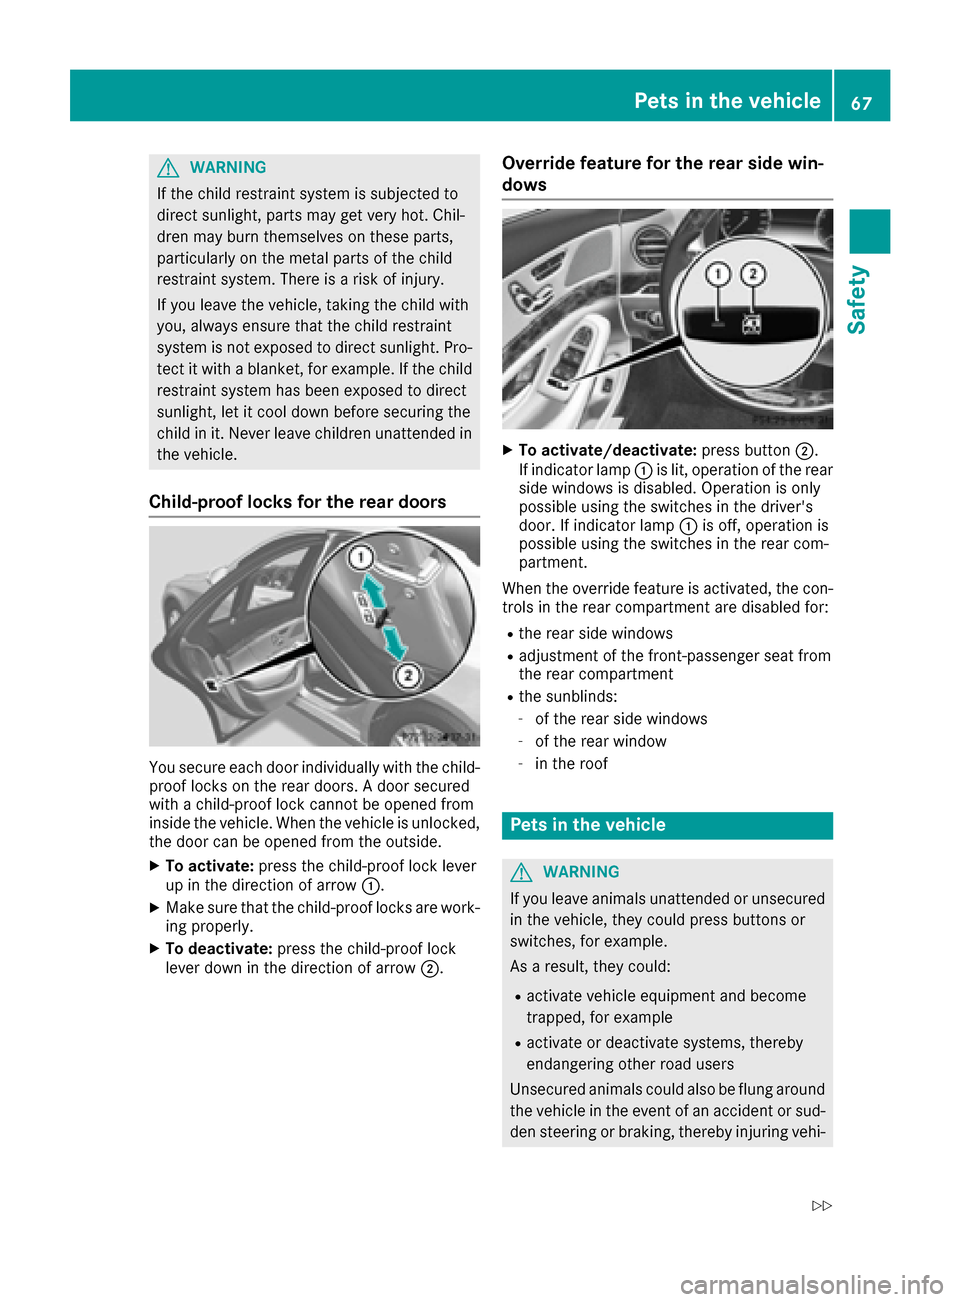
Child-proof locks for the rear doors
You secure each door individually with the child-
proof locks on the rear doors. A door secured
with a child-proof lock cannot be opened from
inside the vehicle. When the vehicle is unlocked,the door can be opened from the outside.
XTo activate: press the child-proof lock lever
up in the direction of arrow :.
XMake sure that the child-proof locks are work-
ing properly.
XTo deactivate: press the child-proof lock
lever down in the direction of arrow ;.
Override feature for the rear side win-
dows
XTo activate/deactivate:press button;.
If indicator lamp :is lit, operation of the rear
side windows is disabled. Operation is only
possible using the switches in the driver's
door. If indicator lamp :is off, operation is
possible using the switches in the rear com-
partment.
When the override feature is activated, the con-
trols in the rear compartment are disabled for:
Rthe rear side windows
Radjustment of the front-passenger seat from
the rear compartment
Rthe sunblinds:
-of the rear side windows
-of the rear window
-in the roof
Pets in the vehicle
GWARNING
If you leave animals unattended or unsecured
in the vehicle, they could press buttons or
switches, for example.
As a result, they could:
Ractivate vehicle equipment and become
trapped, for example
Ractivate or deactivate systems, thereby
endangering other road users
Unsecured animals could also be flung around
the vehicle in the event of an accident or sud-
den steering or braking, thereby injuring vehi-
Pets in the vehicle67
Safety
Z
Page 97 of 438
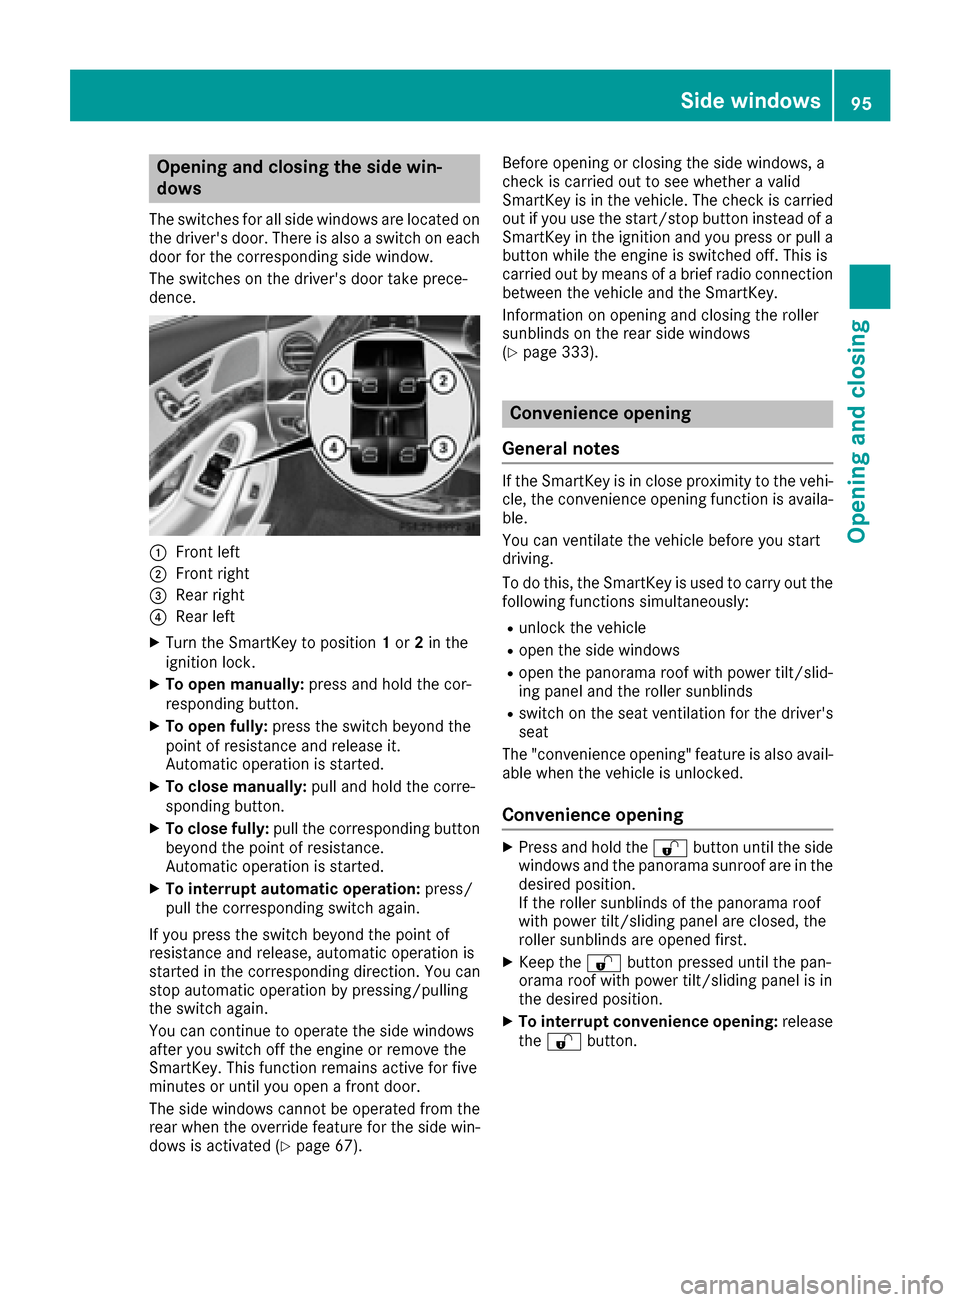
Opening and closing the side win-
dows
The switches for all side windows are located on
the driver's door. There is also a switch on each
door for the corresponding side window.
The switches on the driver's door take prece-
dence.
:Front left
;Front right
=Rear right
?Rear left
XTurn the SmartKey to position1or 2in the
ignition lock.
XTo open manually: press and hold the cor-
responding button.
XTo open fully: press the switch beyond the
point of resistance and release it.
Automatic operation is started.
XTo close manually: pull and hold the corre-
sponding button.
XTo close fully: pull the corresponding button
beyond the point of resistance.
Automatic operation is started.
XTo interrupt automatic operation: press/
pull the corresponding switch again.
If you press the switch beyond the point of
resistance and release, automatic operation is
started in the corresponding direction. You can
stop automatic operation by pressing/pulling
the switch again.
You can continue to operate the side windows
after you switch off the engine or remove the
SmartKey. This function remains active for five
minutes or until you open a front door.
The side windows cannot be operated from the
rear when the override feature for the side win-
dows is activated (
Ypage 67). Before opening or closing the side windows, a
check is carried out to see whether a valid
SmartKey is in the vehicle. The check is carried
out if you use the start/stop button instead of a
SmartKey in the ignition and you press or pull a
button while the engine is switched off. This is
carried out by means of a brief radio connection
between the vehicle and the SmartKey.
Information on opening and closing the roller
sunblinds on the rear side windows
(
Ypage 333).
Convenience opening
General notes
If the SmartKey is in close proximity to the vehi-
cle, the convenience opening function is availa-
ble.
You can ventilate the vehicle before you start
driving.
To do this, the SmartKey is used to carry out the following functions simultaneously:
Runlock the vehicle
Ropen the side windows
Ropen the panorama roof with power tilt/slid-
ing panel and the roller sunblinds
Rswitch on the seat ventilation for the driver's
seat
The "convenience opening" feature is also avail-
able when the vehicle is unlocked.
Convenience opening
XPress and hold the %button until the side
windows and the panorama sunroof are in the
desired position.
If the roller sunblinds of the panorama roof
with power tilt/sliding panel are closed, the
roller sunblinds are opened first.
XKeep the %button pressed until the pan-
orama roof with power tilt/sliding panel is in
the desired position.
XTo interrupt convenience opening: release
the % button.
Side windows95
Opening and closing
Z
Page 101 of 438
automatic operation by pressing or pulling
again.
If the sliding sunroof is raised at the rear, it low-
ers slightly automatically at higher speeds. The
noise level in the vehicle interior is reduced as a
result.
At low speeds it raises again automatically.
You can also temporarily deactivate automatic
lowering. To do so, press the3switch. The
sliding sunroof raises again automatically.
You can continue to operate the sliding sunroof
after switching off the engine or removing the
SmartKey from the ignition lock. This function
remains active for five minutes or until you open
a front door.
The sliding sunroof cannot be opened if a roof
carrier is installed. In order to allow ventilation
of the vehicle interior, you can raise the sliding
sunroof.
If contact is made with a roof carrier approved
by Mercedes-Benz, the sliding sunroof lowers
slightly but remains raised at the rear.
Before opening, raising or closing the sliding
sunroof, a check is carried out to see whether a valid SmartKey is in the vehicle, if:
Rthe 3 switch is pressed or pulled
and
Rthe Start/Stop button is used instead of the
SmartKey in the ignition lock
and
Rthe engine is not running
This is carried out by means of a brief radio con-
nection between the vehicle and the SmartKey.
Rain-closing feature
The raised sliding sunroof automatically lowers
at the rear when driving if it starts to rain. The
sliding sunroof is lowered depending on:
Rthe road speed and
Rthe intensity of the rain
You can manually cancel the automatic closing
procedure. Press or pull the 3switch in any
direction.
To raise the sliding sunroof again, press the
3 switch in direction :. The rain-closing
feature remains activated.
Operating the roller sunblinds for the
sliding sunroof
Important safety notes
GWARNING
Parts of the body could become trapped
between the roller sunblind and frame or slid-
ing sunroof during automatic opening or clos-
ing. There is a risk of injury.
When opening or closing, make sure that no
body parts are in the sweep of the roller sun-
blind.
If somebody becomes trapped:
Rrelease the switch immediately, or
Rduring automatic operation, push the
switch briefly in any direction
The opening or closing procedure will be stop- ped.
The roller sunblinds shield the vehicle interior
from sunlight. The front roller sunblind can only be opened and closed when the sliding sunroof
is closed.
Roller sunblind reversing feature
The roller sunblinds are equipped with an auto-
matic reversing feature. If a solid object blocks
or restricts a roller sunblind during the closing
process, the roller sunblind opens again auto-
matically. The automatic reversing feature is
only an aid and is not a substitute for your atten-
tion when closing the roller sunblinds.
GWARNING
The reversing feature does not react in par-
ticular to soft, light and thin objects, e.g. small
fingers. This means that the reversing feature
cannot prevent someone being trapped in
these situations. There is a risk of injury.
When closing the roller sunblind, make sure
that no body parts are in the sweep area.
If somebody becomes trapped:
Rrelease the switch immediately, or
Rpress the switch in any direction during the
automatic closing process
The closing process is stopped.
Panorama roof with power tilt/sliding panel99
Opening and closing
Z
Page 102 of 438
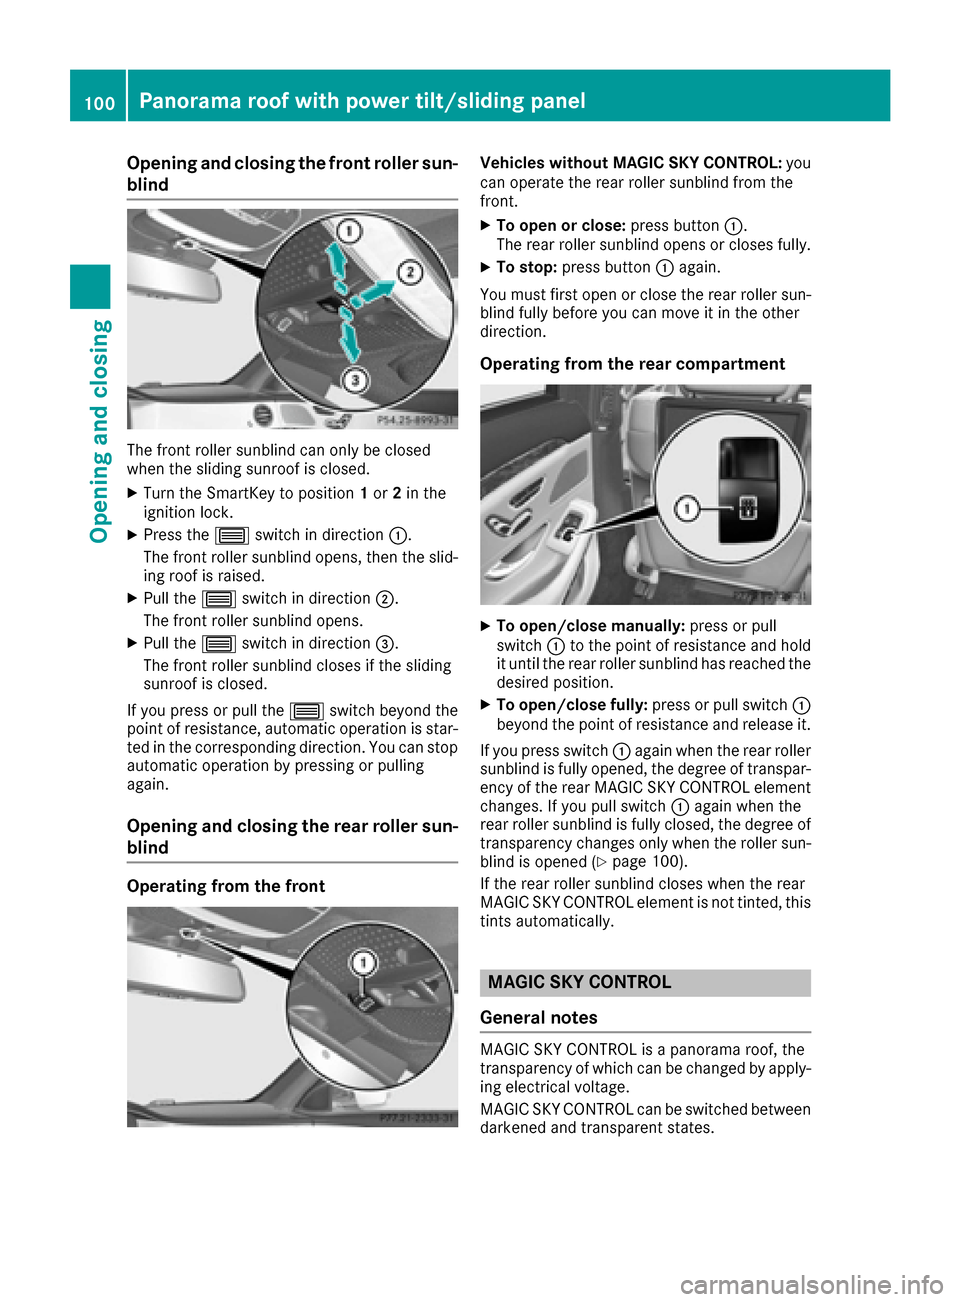
Opening and closing the front roller sun-
blind
The front roller sunblind can only be closed
when the sliding sunroof is closed.
XTurn the SmartKey to position1or 2in the
ignition lock.
XPress the 3switch in direction :.
The front roller sunblind opens, then the slid-
ing roof is raised.
XPull the 3switch in direction ;.
The front roller sunblind opens.
XPull the 3switch in direction =.
The front roller sunblind closes if the sliding
sunroof is closed.
If you press or pull the 3switch beyond the
point of resistance, automatic operation is star-
ted in the corresponding direction. You can stop
automatic operation by pressing or pulling
again.
Opening and closing the rear roller sun-
blind
Operating from the front
Vehicles without MAGIC SKY CONTROL: you
can operate the rear roller sunblind from the
front.
XTo open or close: press button:.
The rear roller sunblind opens or closes fully.
XTo stop: press button :again.
You must first open or close the rear roller sun-
blind fully before you can move it in the other
direction.
Operating from the rear compartment
XTo open/close manually: press or pull
switch :to the point of resistance and hold
it until the rear roller sunblind has reached the
desired position.
XTo open/close fully: press or pull switch:
beyond the point of resistance and release it.
If you press switch :again when the rear roller
sunblind is fully opened, the degree of transpar-
ency of the rear MAGIC SKY CONTROL element
changes. If you pull switch :again when the
rear roller sunblind is fully closed, the degree of transparency changes only when the roller sun-
blind is opened (
Ypage 100).
If the rear roller sunblind closes when the rear
MAGIC SKY CONTROL element is not tinted, this
tints automatically.
MAGIC SKY CONTROL
General notes
MAGIC SKY CONTROL is a panorama roof, the
transparency of which can be changed by apply- ing electrical voltage.
MAGIC SKY CONTROL can be switched between
darkened and transparent states.
100Panorama roof with power tilt/sliding panel
Opening and closing