2016 MERCEDES-BENZ S-Class SEDAN fold seats
[x] Cancel search: fold seatsPage 42 of 438
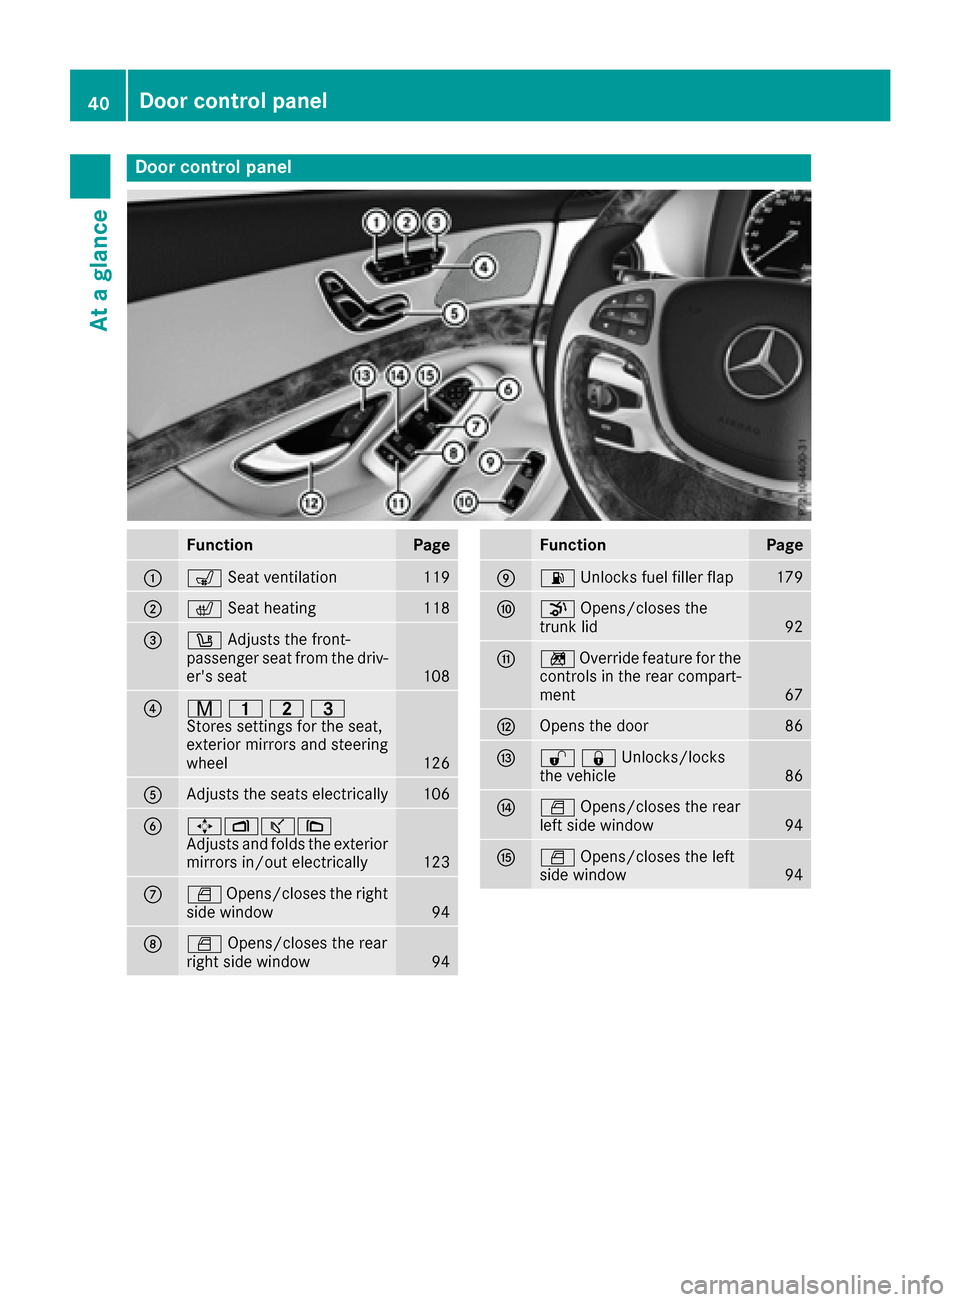
Door controlpanel
FunctionPage
:s Seat ventilation119
;c Seat heatin g118
=w Adjust sth efront-
passenger seat from th edriv-
er' sseat
10 8
?r 45=
Stores settings for the seat,
exterior mirrors and steering
wheel
126
AAdjusts the seats electrically106
B7Zª\
Adjusts and folds the exterior
mirrors in/out electrically
123
CW Opens/closes the right
side window94
DW Opens/closes the rear
right side window94
FunctionPage
E6 Unlocks fuel filler flap179
FpOpens/closes the
trunk lid92
Gn Override feature for the
controls in the rear compart-
ment
67
HOpens the door86
I%&Unlocks/locks
the vehicle86
JW Opens/closes the rear
left side window94
KW Opens/closes the left
side window94
40Door control panel
At a glance
Page 66 of 438
!When installing the child restraint system,
make sure that the seat belt for the middle
seat does not get trapped. The seat belt could
otherwise be damaged.
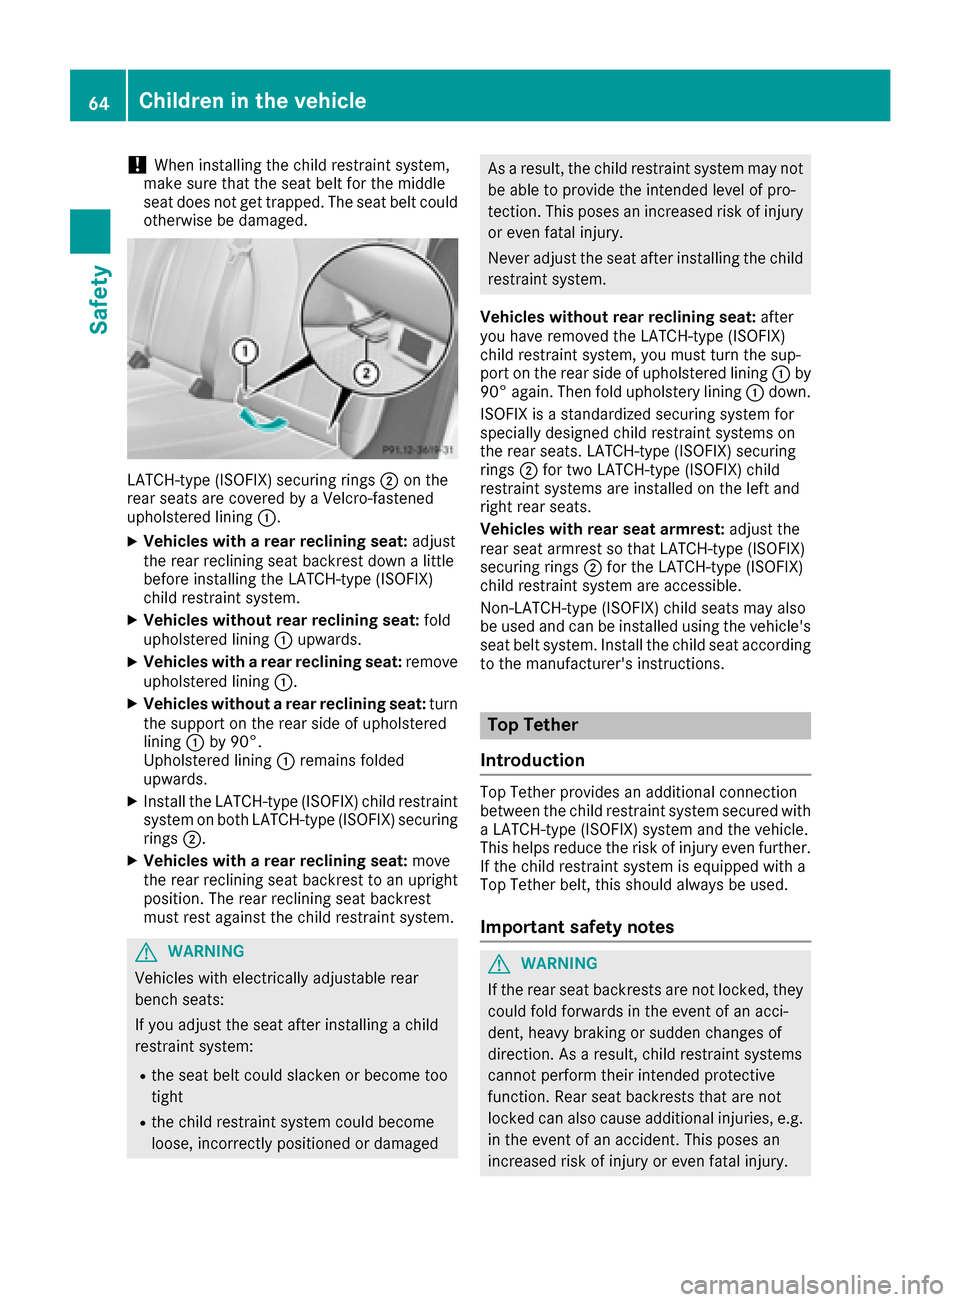
LATCH-type (ISOFIX) securing rings ;on the
rear seats are covered by a Velcro-fastened
upholstered lining :.
XVehicles with a rear reclining seat: adjust
the rear reclining seat backrest down a little
before installing the LATCH-type (ISOFIX)
child restraint system.
XVehicles without rear reclining seat: fold
upholstered lining :upwards.
XVehicles with a rear reclining seat: remove
upholstered lining :.
XVehicles without a rear reclining seat: turn
the support on the rear side of upholstered
lining :by 90°.
Upholstered lining :remains folded
upwards.
XInstall the LATCH-type (ISOFIX) child restraint
system on both LATCH-type (ISOFIX) securing
rings ;.
XVehicles with a rear reclining seat: move
the rear reclining seat backrest to an upright
position. The rear reclining seat backrest
must rest against the child restraint system.
GWARNING
Vehicles with electrically adjustable rear
bench seats:
If you adjust the seat after installing a child
restraint system:
Rthe seat belt could slacken or become too
tight
Rthe child restraint system could become
loose, incorrectly positioned or damaged
As a result, the child restraint system may not be able to provide the intended level of pro-
tection. This poses an increased risk of injury
or even fatal injury.
Never adjust the seat after installing the child
restraint system.
Vehicles without rear reclining seat: after
you have removed the LATCH-type (ISOFIX)
child restraint system, you must turn the sup-
port on the rear side of upholstered lining :by
90° again. Then fold upholstery lining :down.
ISOFIX is a standardized securing system for
specially designed child restraint systems on
the rear seats. LATCH-type (ISOFIX) securing
rings ;for two LATCH-type (ISOFIX) child
restraint systems are installed on the left and
right rear seats.
Vehicles with rear seat armrest: adjust the
rear seat armrest so that LATCH-type (ISOFIX)
securing rings ;for the LATCH-type (ISOFIX)
child restraint system are accessible.
Non-LATCH-type (ISOFIX) child seats may also
be used and can be installed using the vehicle's
seat belt system. Install the child seat according
to the manufacturer's instructions.
Top Tether
Introduction
Top Tether provides an additional connection
between the child restraint system secured with
a LATCH-type (ISOFIX) system and the vehicle.
This helps reduce the risk of injury even further.
If the child restraint system is equipped with a
Top Tether belt, this should always be used.
Important safety notes
GWARNING
If the rear seat backrests are not locked, they
could fold forwards in the event of an acci-
dent, heavy braking or sudden changes of
direction. As a result, child restraint systems
cannot perform their intended protective
function. Rear seat backrests that are not
locked can also cause additional injuries, e.g.
in the event of an accident. This poses an
increased risk of injury or even fatal injury.
64Children in the vehicle
Safety
Page 67 of 438
Always lock rear seat backrests after instal-
ling a Top Tether belt. Observe the lock veri-
fication indicator. Adjust the rear seat backr-
ests so that they are in an upright position.
GWARNING
Vehicles with electrically adjustable rear
bench seats:
If you adjust the seat after installing a child
restraint system:
Rthe seat belt could slacken or become too
tight
Rthe child restraint system could become
loose, incorrectly positioned or damaged
As a result, the child restraint system may not
be able to provide the intended level of pro-
tection. This poses an increased risk of injury
or even fatal injury.
Never adjust the seat after installing the child
restraint system.
If the rear seat backrest is not engaged and
locked, this will be shown in the multifunction
display in the instrument cluster. A warning tone
also sounds.
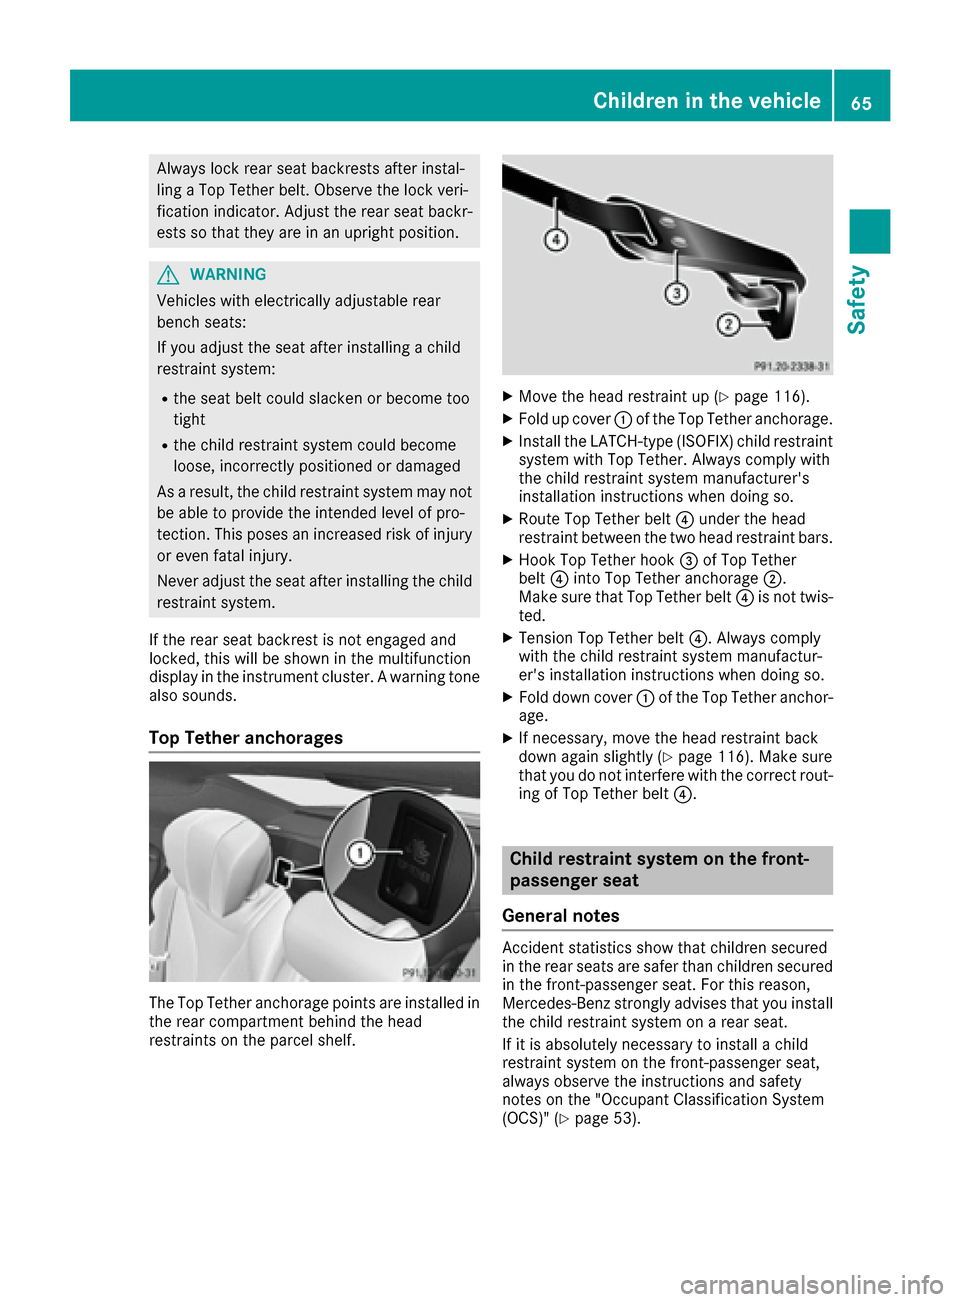
Top Tether anchorages
The Top Tether anchorage points are installed in
the rear compartment behind the head
restraints on the parcel shelf.
XMove the head restraint up (Ypage 116).
XFold up cover :of the Top Tether anchorage.
XInstall the LATCH-type (ISOFIX) child restraint
system with Top Tether. Always comply with
the child restraint system manufacturer's
installation instructions when doing so.
XRoute Top Tether belt ?under the head
restraint between the two head restraint bars.
XHook Top Tether hook =of Top Tether
belt ?into Top Tether anchorage ;.
Make sure that Top Tether belt ?is not twis-
ted.
XTension Top Tether belt ?. Always comply
with the child restraint system manufactur-
er's installation instructions when doing so.
XFold down cover :of the Top Tether anchor-
age.
XIf necessary, move the head restraint back
down again slightly (Ypage 116). Make sure
that you do not interfere with the correct rout-
ing of Top Tether belt ?.
Child restraint system on the front-
passenger seat
General notes
Accident statistics show that children secured
in the rear seats are safer than children secured
in the front-passenger seat. For this reason,
Mercedes-Benz strongly advises that you install
the child restraint system on a rear seat.
If it is absolutely necessary to install a child
restraint system on the front-passenger seat,
always observe the instructions and safety
notes on the "Occupant Classification System
(OCS)" (
Ypage 53).
Children in the vehicle65
Safety
Z
Page 109 of 438
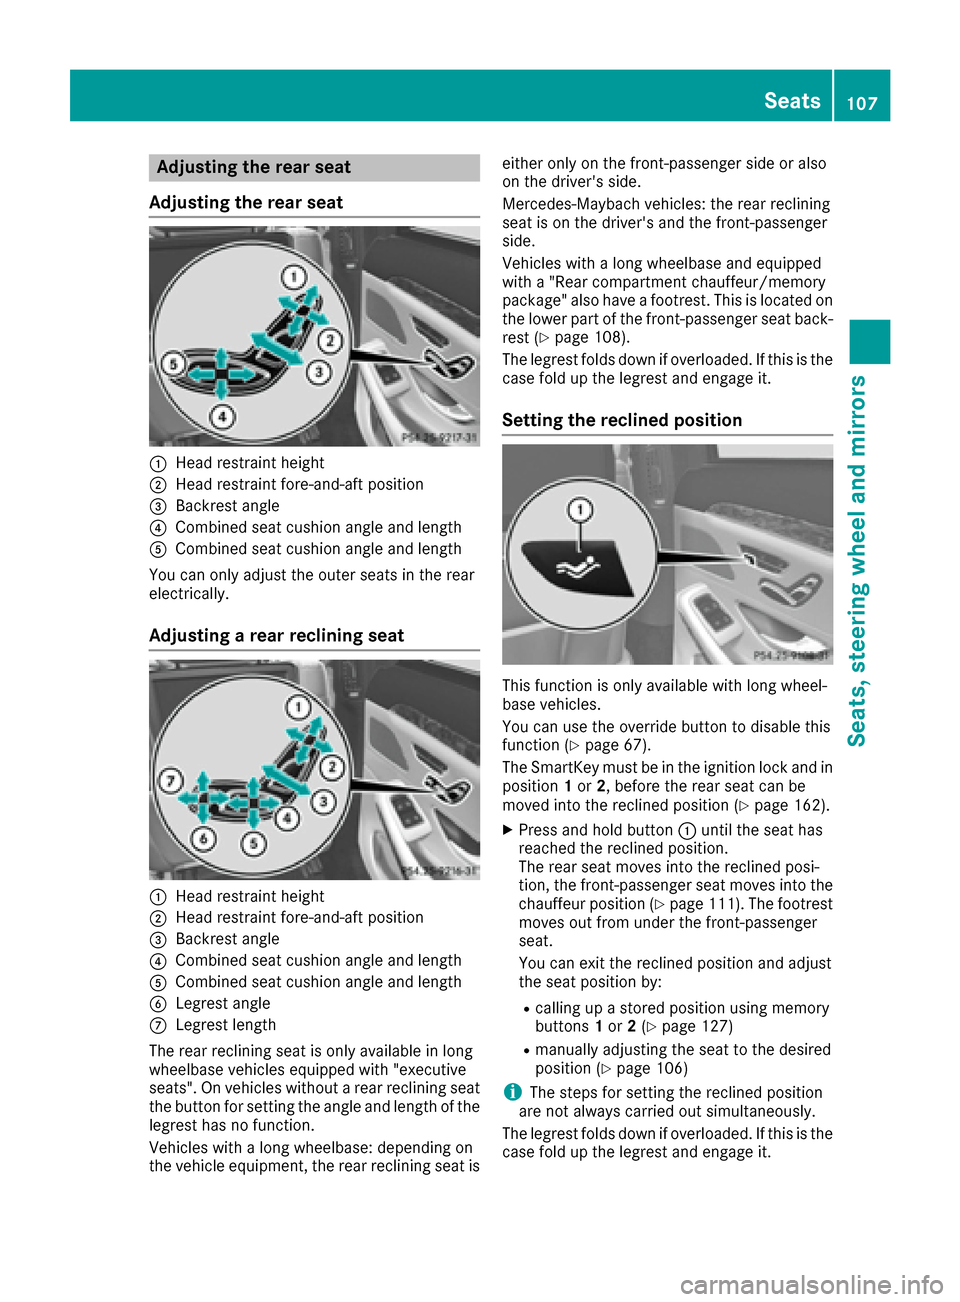
Adjusting the rear seat
Adjusting the rear seat
:Hea drestrain theight
;Hea drestrain tfore-and-af tposition
=Backrest angle
?Combine dseat cushion angle and lengt h
ACombinedseat cushion angle and lengt h
You can only adjust th eouter seat sin th erear
electrically.
Adjusting a rear reclining seat
:Hea drestrain theight
;Hea drestrain tfore-and-af tposition
=Backrest angle
?Combine dseat cushion angle and lengt h
ACombinedseat cushion angle and lengt h
BLegrestangle
CLegres tlengt h
The rear reclining seat is only available in lon g
wheelbase vehicles equipped wit h"executive
seats". On vehicles without arear reclining seat
th ebutto nfor setting th eangle and lengt hof th e
legrest has no function .
Vehicles wit h alongwheelbase :depending on
th evehicl eequipment, th erear reclining seat is either only on th
efront-passenger side or also
on th edriver's side .
Mercedes-Maybac hvehicles: th erear reclining
seat is on th edriver's and th efront-passenger
side .
Vehicles wit h alongwheelbase and equipped
wit h a "Rear compartmen tchauffeur/memory
package" also hav e afootrest .This is locate don
th elower part of th efront-passenger seat back-
res t (
Ypage 108).
The legrest folds down if overloaded. If this is th e
cas efol dup th elegrest and engage it .
Setting the reclined position
This function is only available wit hlon gwheel-
base vehicles.
You can use th eoverride butto nto disable this
function (
Ypage 67) .
The SmartKey mus tbe in th eignition loc kand in
position 1or 2,before th erear seat can be
moved int oth ereclined position (
Ypage 162).
XPress and hold butto n: until th eseat has
reached th ereclined position .
The rear seat moves int oth ereclined posi-
tion ,th efront-passenger seat moves int oth e
chauffeur position (
Ypage 111). The footrest
moves out from under th efront-passenger
seat .
You can exit th ereclined position and adjust
th eseat position by:
Rcalling up astore dposition usin gmemory
buttons 1or 2(Ypage 127)
Rmanually adjusting th eseat to th edesired
position (Ypage 106)
iThe steps for setting th ereclined position
are no talways carrie dout simultaneously.
The legrest folds down if overloaded. If this is th e
cas efol dup th elegrest and engage it .
Seats107
Seats, steering wheel and mirrors
Z
Page 113 of 438
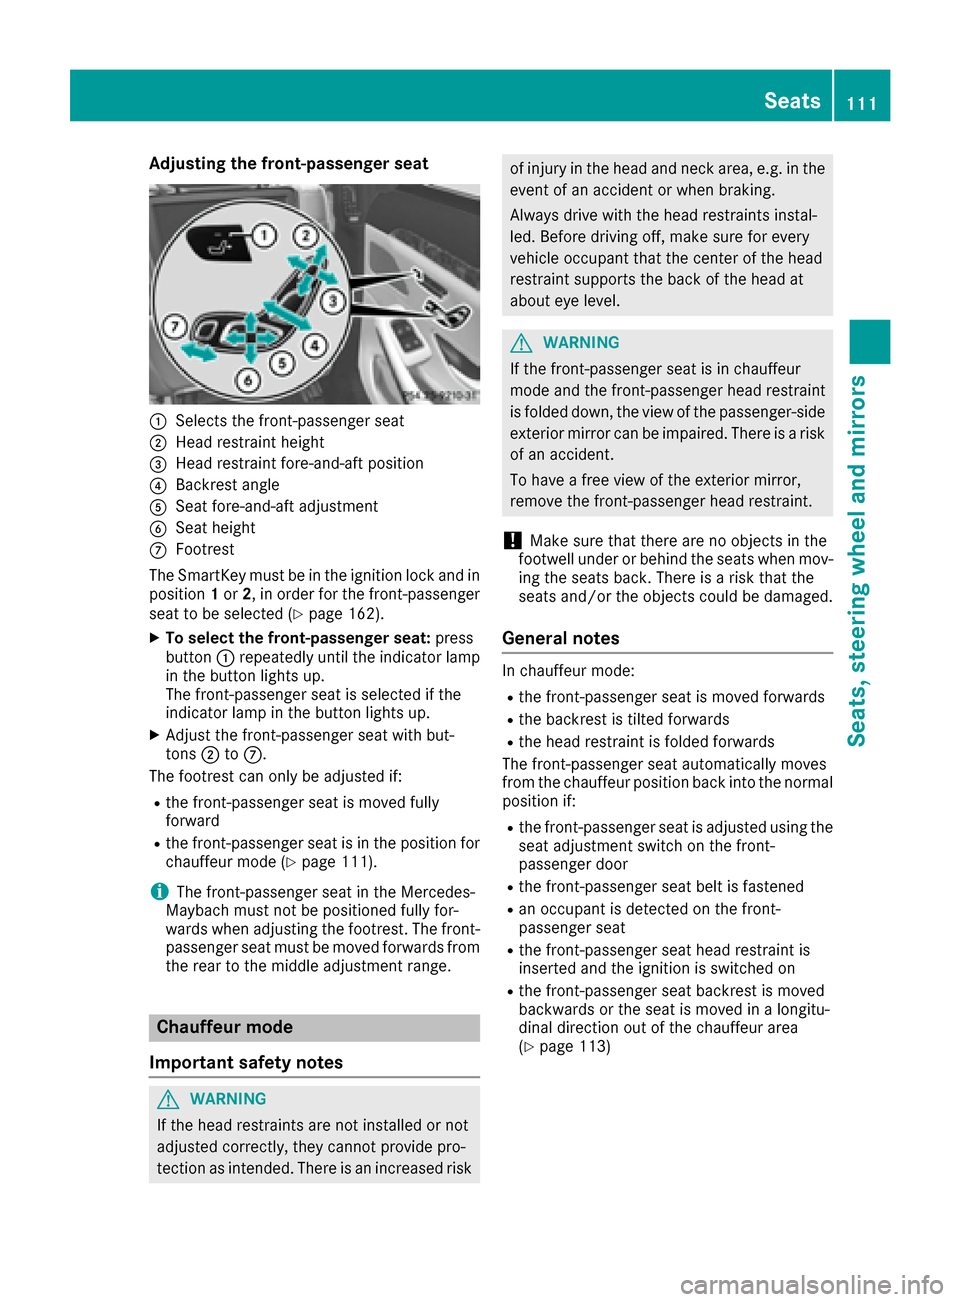
Adjusting the front-passenger seat
:Selects thefront-passenger seat
;Head restraint height
=Head restraint fore-and-af tpositio n
?Backrest angle
ASeat fore-and-af tadjustmen t
BSeat height
CFootrest
The SmartKey must be in th eignition loc kand in
positio n1 or 2,in order for th efront-passenger
seat to be selected (
Ypage 162).
XTo select the front-passenger seat :press
butto n: repeatedly until th eindicator lamp
in th ebutto nlights up.
The front-passenger seat is selected if th e
indicator lamp in th ebutto nlights up.
XAdjus tth efront-passenger seat wit hbut -
tons ;toC.
The footrest can only be adjusted if:
Rth efront-passenger seat is moved fully
forward
Rth efront-passenger seat is in th epositio nfor
chauffeur mod e (Ypage 111).
iThe front-passenger seat in th eMercedes-
Maybac hmust no tbe positione dfully for -
wards when adjusting th efootrest .The front-
passenger seat must be moved forwards from
th erear to th emiddle adjustmen trange.
Chauffeur mode
Important safety notes
GWARNIN G
If th ehead restraint sare no tinstalled or no t
adjusted correctly, they canno tprovide pro -
tection as intended. Ther eis an increased ris k
of injury in thehead and neck area, e.g. in th e
event of an acciden tor when braking .
Always driv ewit hth ehead restraint sinstal -
led. Before driving off ,mak esure for every
vehicl eoccupant that th ecente rof th ehead
restraint support sth ebac kof th ehead at
about eye level.
GWARNIN G
If th efront-passenger seat is in chauffeur
mod eand th efront-passenger head restraint
is folded down ,th eview of th epassenger-side
exterio rmirror can be impaired .Ther eis aris k
of an accident.
To have afree view of th eexterio rmirror ,
remove th efront-passenger head restraint .
!Makesure that there are no object sin th e
footwell under or behind th eseat swhen mov -
ing th eseat sback. Ther eis aris kthat th e
seat sand/o rth eobject scould be damaged.
General notes
In chauffeur mode:
Rth efront-passenger seat is moved forwards
Rth ebackrest is tilte dforwards
Rth ehead restraint is folded forwards
The front-passenger seat automatically moves
from th echauffeur positio nbac kint oth enormal
positio nif:
Rth efront-passenger seat is adjusted usin gth e
seat adjustmen tswitch on th efront-
passenger door
Rth efront-passenger seat belt is fastene d
Ran occupant is detected on thefront-
passenger seat
Rth efront-passenger seat head restraint is
inserted and th eignition is switched on
Rth efront-passenger seat backrest is moved
backwards or th eseat is moved in alongitu-
dinal direction out of th echauffeur area
(
Ypage 113)
Seats111
Seats, steering wheel and mirrors
Z
Page 114 of 438
Positioning the front-passenger seat for
chauffeur mode
General notes
Pay attention to the important safety notes
(Ypage 111). Adjust the seat for chauffeur
mode before the journey (Ypage 112). Do not
remove the front-passenger seat head restraint
during the journey.
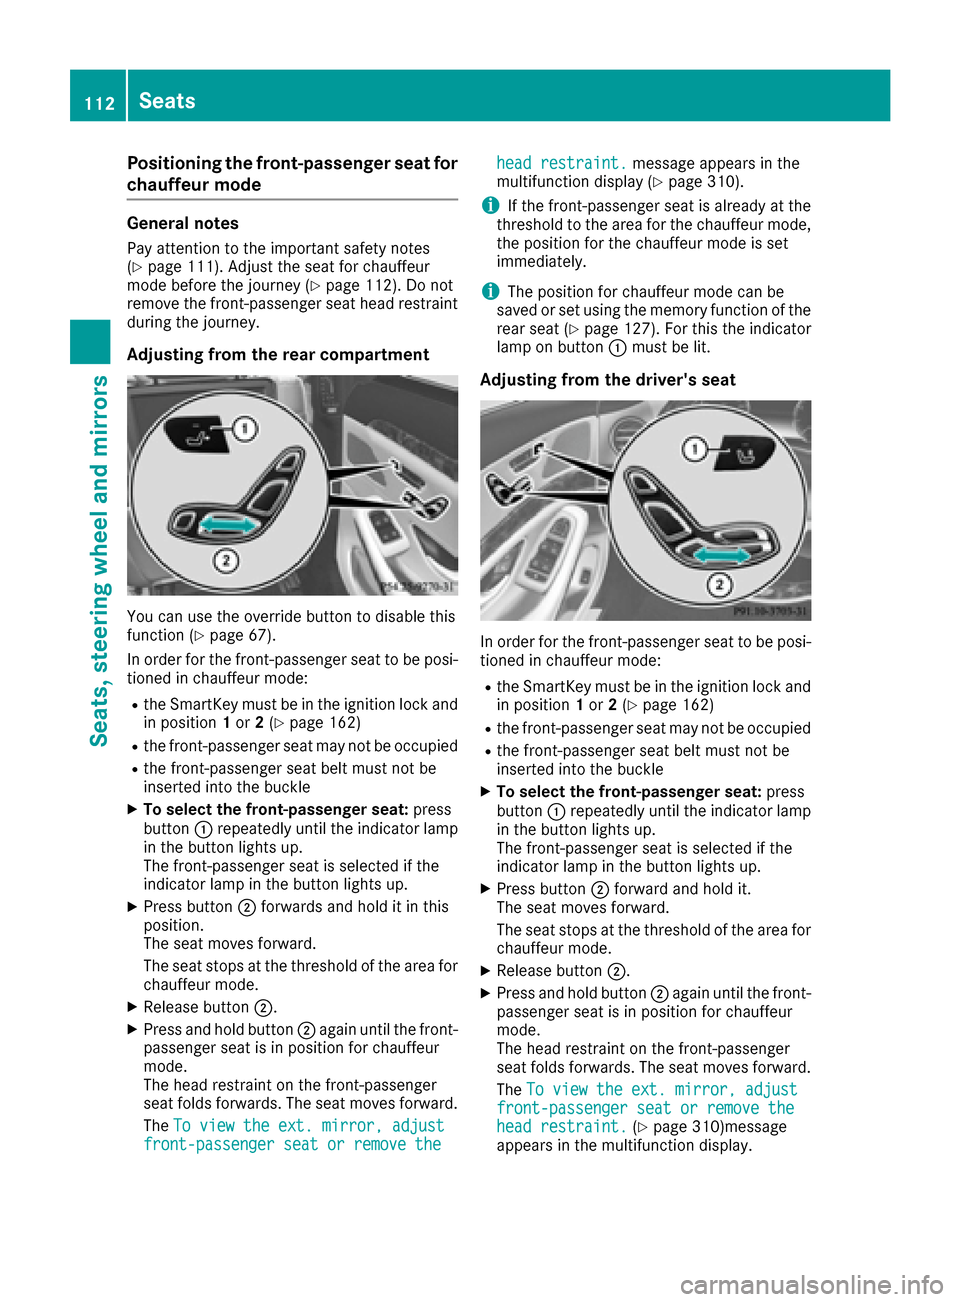
Adjusting from the rear compartment
You can use the override button to disable this
function (Ypage 67).
In order for the front-passenger seat to be posi-
tioned in chauffeur mode:
Rthe SmartKey must be in the ignition lock and in position 1or 2(Ypage 162)
Rthe front-passenger seat may not be occupied
Rthe front-passenger seat belt must not be
inserted into the buckle
XTo select the front-passenger seat: press
button :repeatedly until the indicator lamp
in the button lights up.
The front-passenger seat is selected if the
indicator lamp in the button lights up.
XPress button ;forwards and hold it in this
position.
The seat moves forward.
The seat stops at the threshold of the area for
chauffeur mode.
XRelease button ;.
XPress and hold button ;again until the front-
passenger seat is in position for chauffeur
mode.
The head restraint on the front-passenger
seat folds forwards. The seat moves forward.
The To view the ext. mirror, adjust
front-passenger seat or remove the
head restraint.message appears in the
multifunction display (Ypage 310).
iIf the front-passenger seat is already at the
threshold to the area for the chauffeur mode,
the position for the chauffeur mode is set
immediately.
iThe position for chauffeur mode can be
saved or set using the memory function of the
rear seat (
Ypage 127). For this the indicator
lamp on button :must be lit.
Adjusting from the driver's seat
In order for the front-passenger seat to be posi-
tioned in chauffeur mode:
Rthe SmartKey must be in the ignition lock and
in position 1or 2(Ypage 162)
Rthe front-passenger seat may not be occupied
Rthe front-passenger seat belt must not be
inserted into the buckle
XTo select the front-passenger seat: press
button :repeatedly until the indicator lamp
in the button lights up.
The front-passenger seat is selected if the
indicator lamp in the button lights up.
XPress button ;forward and hold it.
The seat moves forward.
The seat stops at the threshold of the area for
chauffeur mode.
XRelease button ;.
XPress and hold button ;again until the front-
passenger seat is in position for chauffeur
mode.
The head restraint on the front-passenger
seat folds forwards. The seat moves forward.
The To view the ext. mirror, adjust
front-passenger seat or remove thehead restraint.(Ypage 310)message
appears in the multifunction display.
112Seats
Seats, steering wheel and mirrors
Page 115 of 438
iIf the front-passenger seat is already at the
threshold to the area for the chauffeur mode,
the position for the chauffeur mode is set
immediately.
iThe position for chauffeur mode cannot be
stored or set with the driver's seat memory
function.
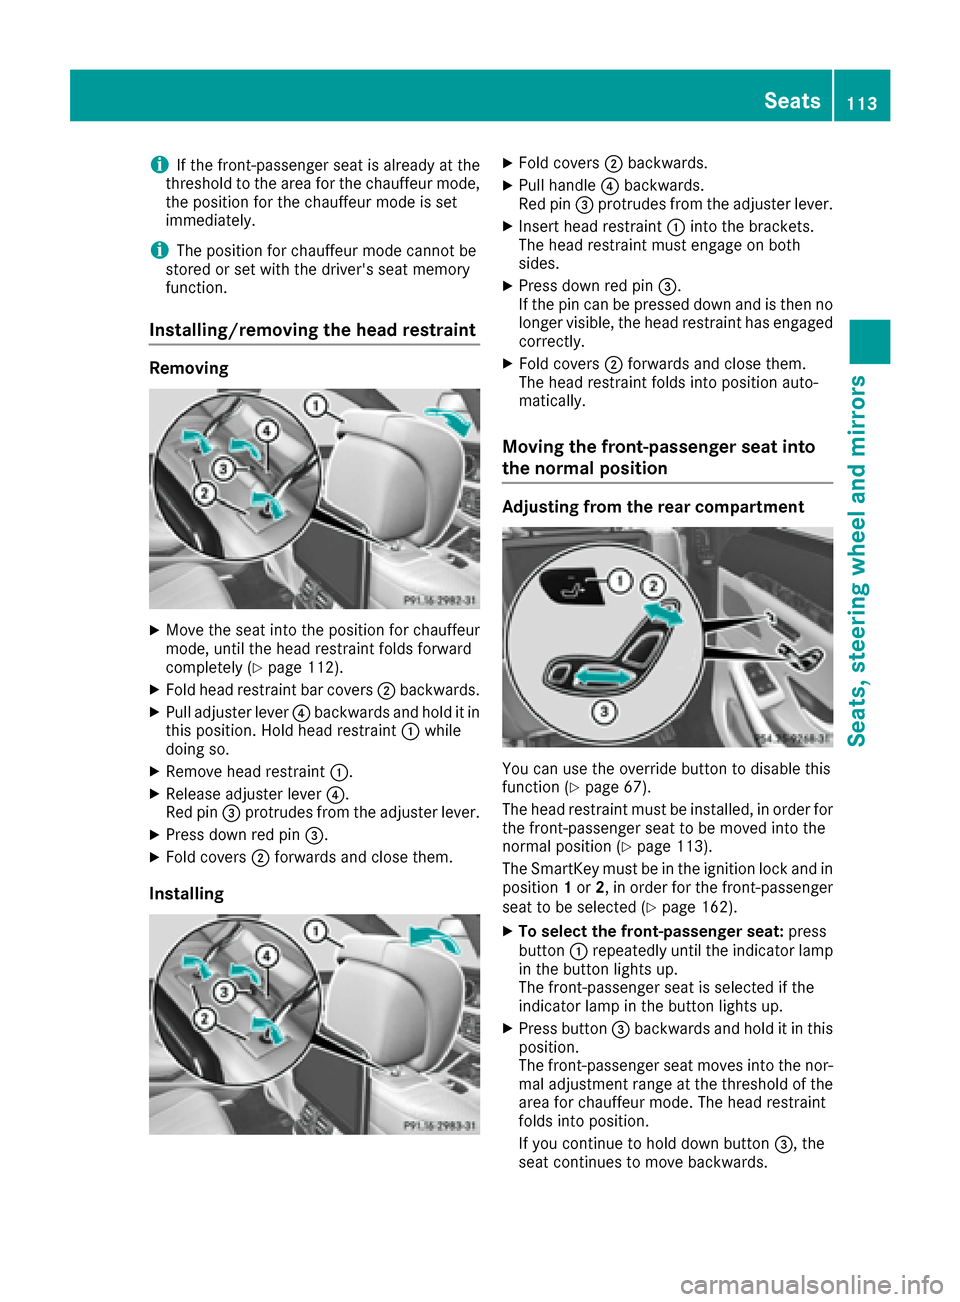
Installing/removing the head restraint
Removing
XMove the seat into the position for chauffeur
mode, until the head restraint folds forward
completely (
Ypage 112).
XFold head restraint bar covers ;backwards.
XPull adjuster lever ?backwards and hold it in
this position. Hold head restraint :while
doing so.
XRemove head restraint :.
XRelease adjuster lever?.
Red pin =protrudes from the adjuster lever.
XPress down red pin =.
XFold covers;forwards and close them.
Installing
XFold covers ;backwards.
XPull handle ?backwards.
Red pin =protrudes from the adjuster lever.
XInsert head restraint :into the brackets.
The head restraint must engage on both
sides.
XPress down red pin =.
If the pin can be pressed down and is then no longer visible, the head restraint has engaged
correctly.
XFold covers ;forwards and close them.
The head restraint folds into position auto-
matically.
Moving the front-passenger seat into
the normal position
Adjusting from the rear compartment
You can use the override button to disable this
function (Ypage 67).
The head restraint must be installed, in order for
the front-passenger seat to be moved into the
normal position (
Ypage 113).
The SmartKey must be in the ignition lock and in
position 1or 2, in order for the front-passenger
seat to be selected (
Ypage 162).
XTo select the front-passenger seat: press
button :repeatedly until the indicator lamp
in the button lights up.
The front-passenger seat is selected if the
indicator lamp in the button lights up.
XPress button =backwards and hold it in this
position.
The front-passenger seat moves into the nor-
mal adjustment range at the threshold of the
area for chauffeur mode. The head restraint
folds into position.
If you continue to hold down button =, the
seat continues to move backwards.
Seats113
Seats, steering wheel and mirrors
Z
Page 116 of 438
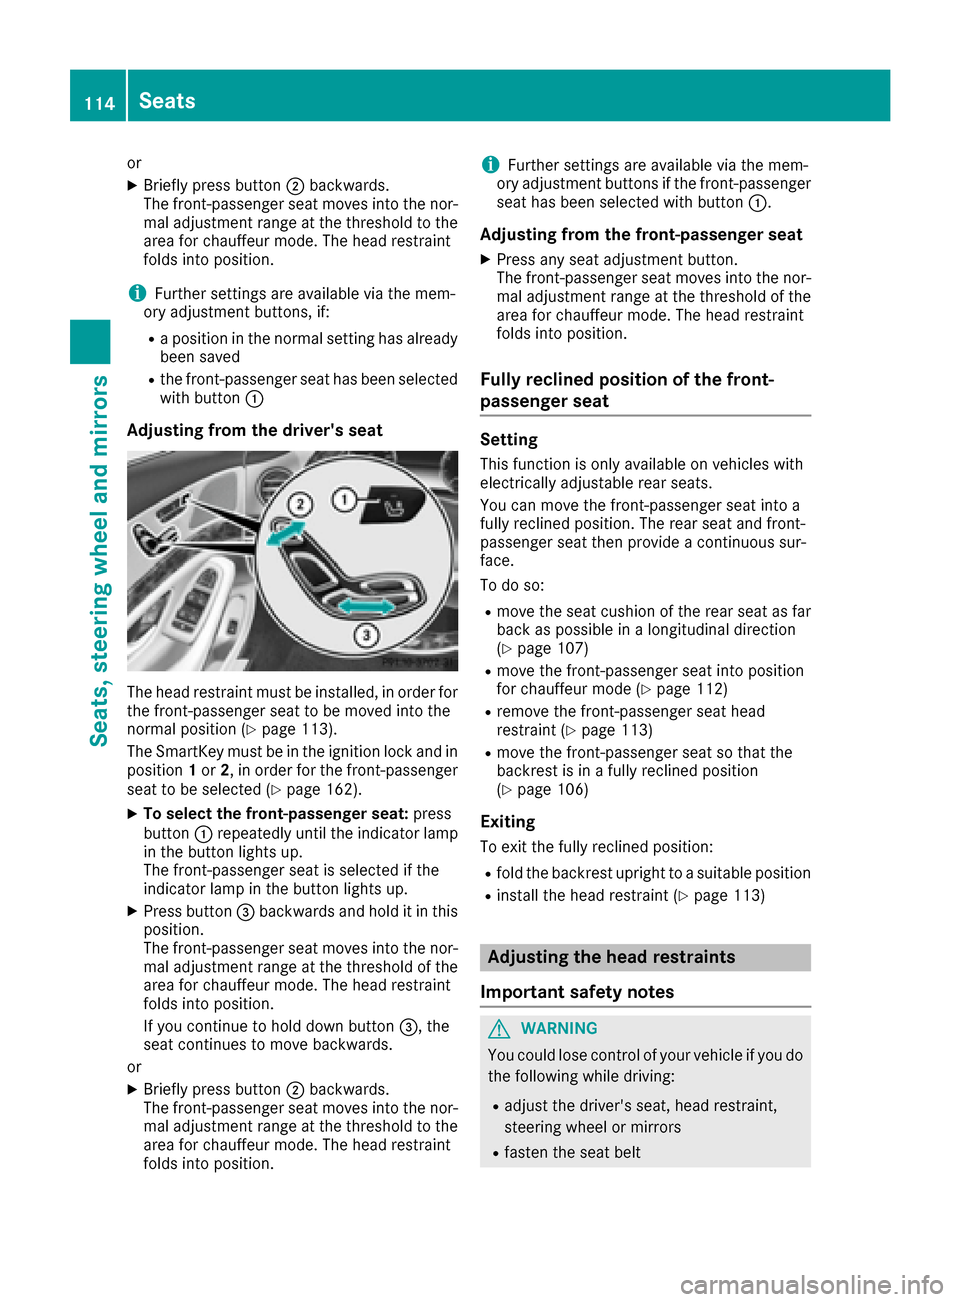
or
XBriefly press button;backwards.
The front-passenger seat moves into the nor-
mal adjustment range at the threshold to the
area for chauffeur mode. The head restraint
folds into position.
iFurther settings are available via the mem-
ory adjustment buttons, if:
Ra position in the normal setting has already been saved
Rthe front-passenger seat has been selected
with button :
Adjusting from the driver's seat
The head restraint must be installed, in order for
the front-passenger seat to be moved into the
normal position (
Ypage 113).
The SmartKey must be in the ignition lock and in
position 1or 2, in order for the front-passenger
seat to be selected (
Ypage 162).
XTo select the front-passenger seat: press
button :repeatedly until the indicator lamp
in the button lights up.
The front-passenger seat is selected if the
indicator lamp in the button lights up.
XPress button =backwards and hold it in this
position.
The front-passenger seat moves into the nor-
mal adjustment range at the threshold of the
area for chauffeur mode. The head restraint
folds into position.
If you continue to hold down button =, the
seat continues to move backwards.
or
XBriefly press button ;backwards.
The front-passenger seat moves into the nor-
mal adjustment range at the threshold to the
area for chauffeur mode. The head restraint
folds into position.
iFurther settings are available via the mem-
ory adjustment buttons if the front-passenger
seat has been selected with button :.
Adjusting from the front-passenger seat
XPress any seat adjustment button.
The front-passenger seat moves into the nor-
mal adjustment range at the threshold of the
area for chauffeur mode. The head restraint
folds into position.
Fully reclined position of the front-
passenger seat
Setting
This function is only available on vehicles with
electrically adjustable rear seats.
You can move the front-passenger seat into a
fully reclined position. The rear seat and front-
passenger seat then provide a continuous sur-
face.
To do so:
Rmove the seat cushion of the rear seat as far
back as possible in a longitudinal direction
(
Ypage 107)
Rmove the front-passenger seat into position
for chauffeur mode (Ypage 112)
Rremove the front-passenger seat head
restraint (Ypage 113)
Rmove the front-passenger seat so that the
backrest is in a fully reclined position
(
Ypage 106)
Exiting
To exit the fully reclined position:
Rfold the backrest upright to a suitable position
Rinstall the head restraint (Ypage 113)
Adjusting the head restraints
Important safety notes
GWARNING
You could lose control of your vehicle if you do the following while driving:
Radjust the driver's seat, head restraint,
steering wheel or mirrors
Rfasten the seat belt
114Seats
Seats, steering wheel and mirrors