2016 MERCEDES-BENZ S-Class SEDAN display
[x] Cancel search: displayPage 77 of 438
Important safety notes
GWARNING
If road and weather conditions are poor,
trailer stabiliz ationwillnotbe able to prevent
the veh icle/trailer co mbination from swerv-
ing. Trailers with a high center of gravity can
tip over before ESP
®can detect this. There is
a risk of an acc ident.
Always adapt your driving style to the prevail-
ing road and weather conditions.
If your veh icle with trailer (veh icle/trailer com-
bin ation) begins to lurch, you can only stabilize
the veh icle/trailer co mbination by depr essing
the brake firmly.
ESP
®trailer stabiliz ationisactive above speeds
of about 65 km/h.
ESP
®trailer stabiliz ation does not work ifESP®
is deactivated or disabled because of a malfunc-
tion.
Crosswind Assist (vehicles without
MAGIC BODY CONTROL)
General information
Vehicle swit h MAGIC BODY CONTROL: informa-
tion on stabiliz ing the vehicle inthe event of
crosswin d (
Ypage 210).
St rong crosswinds can cause your veh icleto
deviate from a straight course. The crosswin d
driv ing assistance function integrated inESP
®
noticeably reduces these impairments.
ESP®intervenes automatical lyaccording to the
dire ction and intensity of the crosswinds affect-
ing your veh icle.
ESP intervenes with stabiliz ing braking to assist
you inkeepin g the veh icle inthe lane.
Cros swind Assist isactive at veh iclespeeds
above 50 mph (80 km/h) when driving straight
ahead or cornering gently.
Important safety notes
Cros swind Assist does not work ifESP®is
swit ched off or deactivated because of a mal-
function.
EBD (electronic brake force distribu-
tion)
General information
EBD monitors and controls the brake pressure
on the rear wheels to improve driving stability
while braking.
Important safety notes
iObserve the "Important safety notes" sec-
tion (Ypage 68).
GWARNING
If EBD ismalfunctioning, the rear wheels can
lock, e.g. under full braking. This increases the
risk of skidding and an accident.
You should therefore adapt your driving style
to the different handlin g characteristics. Have
the brake system checked at a qualified spe-
cialist workshop.
Observe information regarding indicator and
warning lamps (
Ypage 316) as wellas display
messages (Ypage 280).
ADAPTIVE BRAKE
ADAPTIVE BRAKE enhances braking safety and
offers increased braking comfort. In addition to
the braking function, ADAPTIVE BRAKE also has
the HOLD function (
Ypage 208) and hillstart
assist (Ypage 165).
PRE-SAFE®Brake
General information
PRE-SAFE®Brake can help you to minimize the
risk of a collision with a vehicle ahead or a
pedestrian, and reduce the effects of such a
collision. If PRE-SAFE
®Brake has detected a risk
of collision, you willbe warned visually and
acoustically as wellas by automatic braking.
iPay attention to the important safety notes
in the "Driving safety systems" section
(
Ypage 68).
PRE‑ SAFE
®Brake isonly availab le invehicles
wit h the Driving Assistance Plus package.
Driving safety systems75
Safety
Z
Page 106 of 438
Useful information
i
This Operator's Manual describes all models
and all standard and optional equipment of
your vehicle available at the time of publica-
tion of the Operator's Manual. Country-spe-
cific differences are possible. Please note
that your vehicle may not be equipped with all
features described. This also applies to
safety-related systems and functions.
iRead the information on qualified specialist
workshops (Ypage 28).
Correct driver's seat position
GWARNING
You could lose control of your vehicle if you do the following while driving:
Radjust the driver's seat, head restraint,
steering wheel or mirrors
Rfasten the seat belt
There is a risk of an accident.
Adjust the driver's seat, head restraint, steer-
ing wheel and mirror and fasten your seat belt before starting the engine.
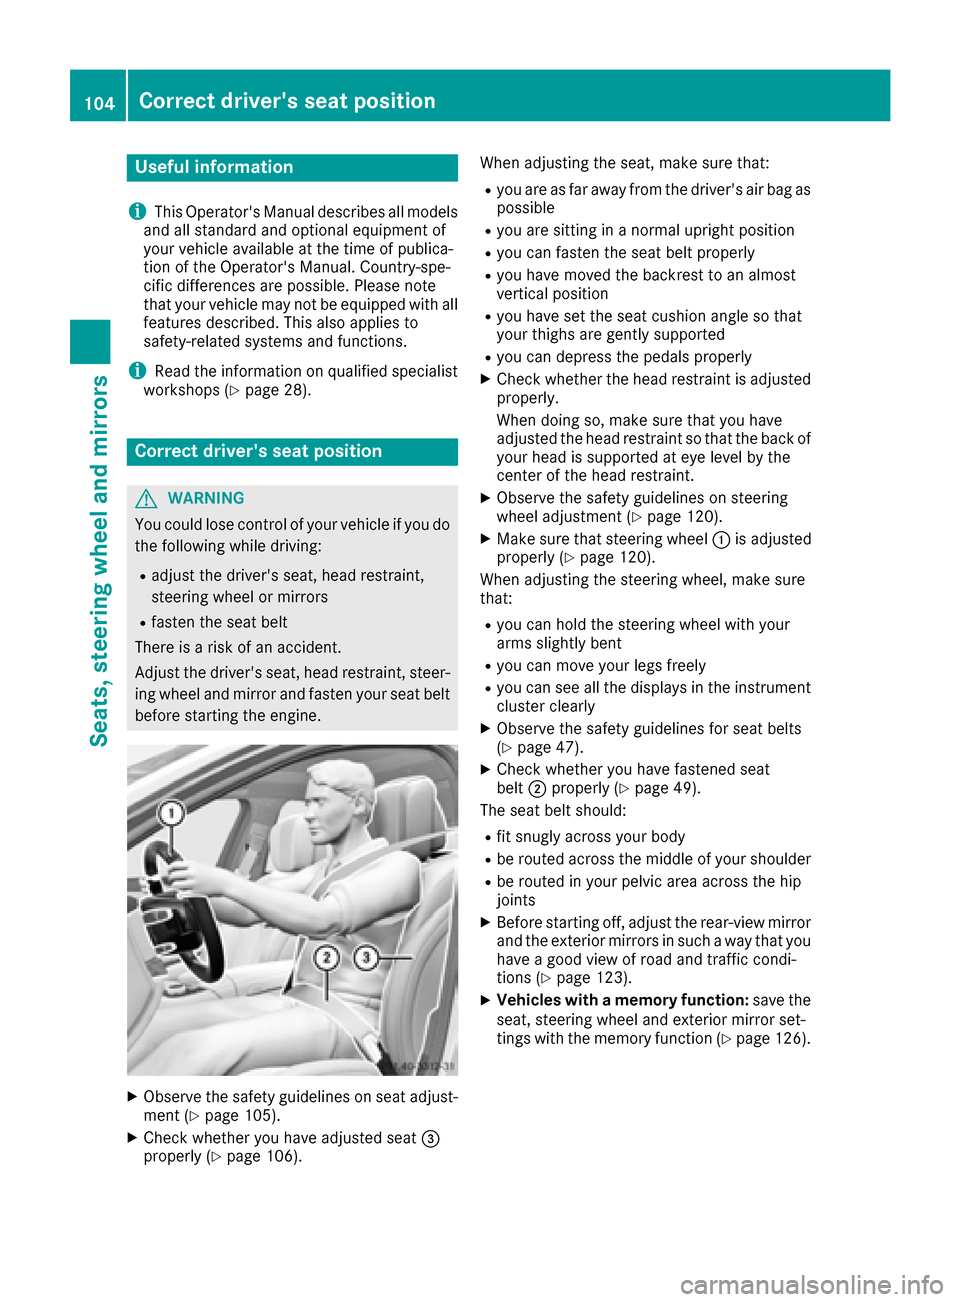
XObserve the safety guidelines on seat adjust-
ment (Ypage 105).
XCheck whether you have adjusted seat =
properly (Ypage 106). When adjusting the seat, make sure that:
Ryou are as far away from the driver's air bag as
possible
Ryou are sitting in a normal upright position
Ryou can fasten the seat belt properly
Ryou have moved the backrest to an almost
vertical position
Ryou have set the seat cushion angle so that
your thighs are gently supported
Ryou can depress the pedals properly
XCheck whether the head restraint is adjusted
properly.
When doing so, make sure that you have
adjusted the head restraint so that the back of
your head is supported at eye level by the
center of the head restraint.
XObserve the safety guidelines on steering
wheel adjustment (Ypage 120).
XMake sure that steering wheel
:is adjusted
properly (Ypage 120).
When adjusting the steering wheel, make sure
that:
Ryou can hold the steering wheel with your
arms slightly bent
Ryou can move your legs freely
Ryou can see all the displays in the instrument cluster clearly
XObserve the safety guidelines for seat belts
(Ypage 47).
XCheck whether you have fastened seat
belt ;properly (Ypage 49).
The seat belt should:
Rfit snugly across your body
Rbe routed across the middle of your shoulder
Rbe routed in your pelvic area across the hip
joints
XBefore starting off, adjust the rear-view mirror
and the exterior mirrors in such a way that you
have a good view of road and traffic condi-
tions (
Ypage 123).
XVehicles with a memory function: save the
seat, steering wheel and exterior mirror set-
tings with the memory function (
Ypage 126).
104Correct driver's seat position
Seats, steering wheel and mirrors
Page 114 of 438
Positioning the front-passenger seat for
chauffeur mode
General notes
Pay attention to the important safety notes
(Ypage 111). Adjust the seat for chauffeur
mode before the journey (Ypage 112). Do not
remove the front-passenger seat head restraint
during the journey.
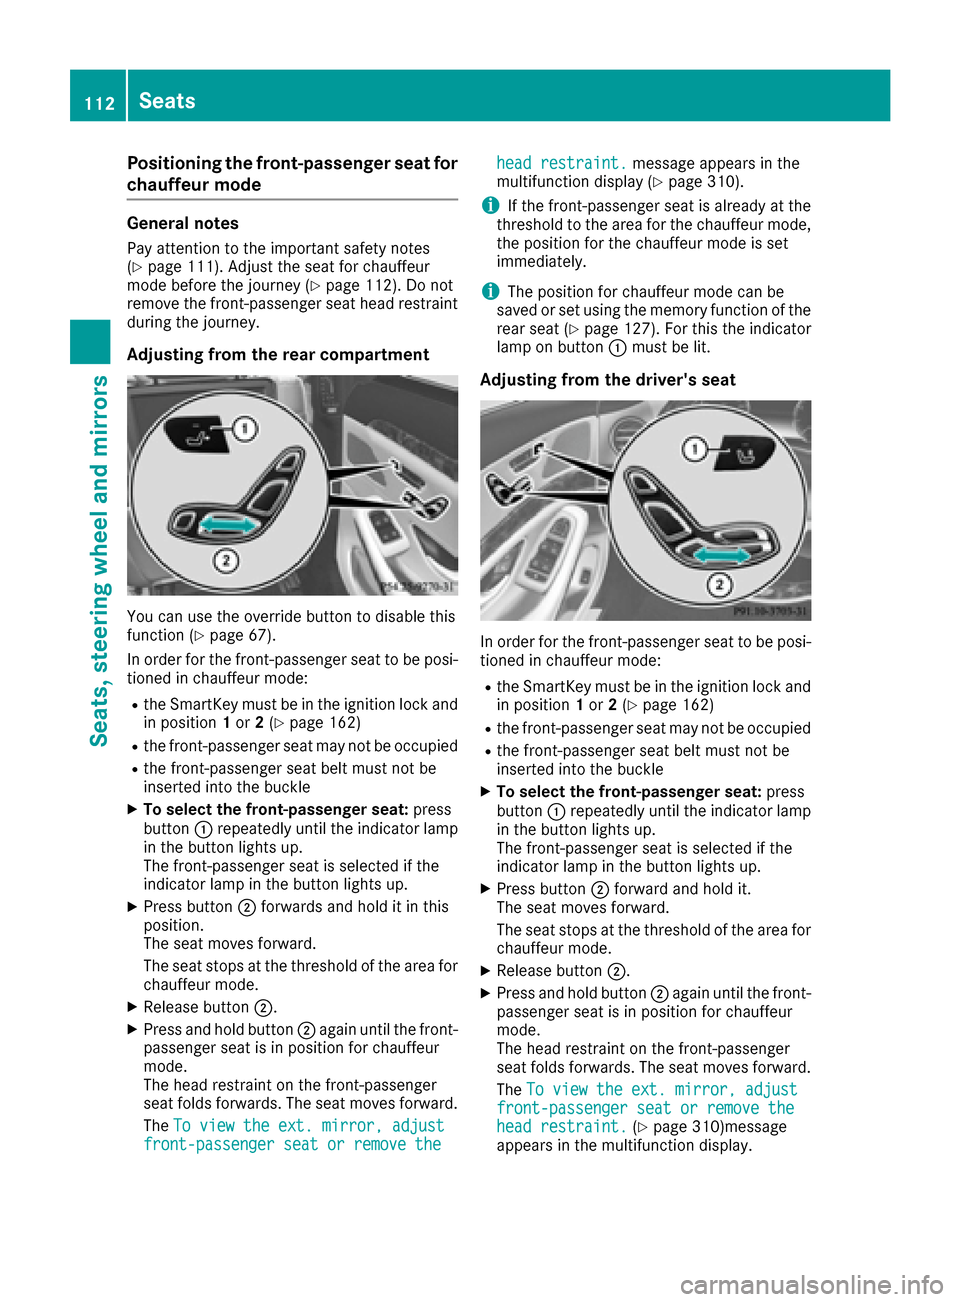
Adjusting from the rear compartment
You can use the override button to disable this
function (Ypage 67).
In order for the front-passenger seat to be posi-
tioned in chauffeur mode:
Rthe SmartKey must be in the ignition lock and in position 1or 2(Ypage 162)
Rthe front-passenger seat may not be occupied
Rthe front-passenger seat belt must not be
inserted into the buckle
XTo select the front-passenger seat: press
button :repeatedly until the indicator lamp
in the button lights up.
The front-passenger seat is selected if the
indicator lamp in the button lights up.
XPress button ;forwards and hold it in this
position.
The seat moves forward.
The seat stops at the threshold of the area for
chauffeur mode.
XRelease button ;.
XPress and hold button ;again until the front-
passenger seat is in position for chauffeur
mode.
The head restraint on the front-passenger
seat folds forwards. The seat moves forward.
The To view the ext. mirror, adjust
front-passenger seat or remove the
head restraint.message appears in the
multifunction display (Ypage 310).
iIf the front-passenger seat is already at the
threshold to the area for the chauffeur mode,
the position for the chauffeur mode is set
immediately.
iThe position for chauffeur mode can be
saved or set using the memory function of the
rear seat (
Ypage 127). For this the indicator
lamp on button :must be lit.
Adjusting from the driver's seat
In order for the front-passenger seat to be posi-
tioned in chauffeur mode:
Rthe SmartKey must be in the ignition lock and
in position 1or 2(Ypage 162)
Rthe front-passenger seat may not be occupied
Rthe front-passenger seat belt must not be
inserted into the buckle
XTo select the front-passenger seat: press
button :repeatedly until the indicator lamp
in the button lights up.
The front-passenger seat is selected if the
indicator lamp in the button lights up.
XPress button ;forward and hold it.
The seat moves forward.
The seat stops at the threshold of the area for
chauffeur mode.
XRelease button ;.
XPress and hold button ;again until the front-
passenger seat is in position for chauffeur
mode.
The head restraint on the front-passenger
seat folds forwards. The seat moves forward.
The To view the ext. mirror, adjust
front-passenger seat or remove thehead restraint.(Ypage 310)message
appears in the multifunction display.
112Seats
Seats, steering wheel and mirrors
Page 136 of 438
=High-beam flasher
?Turn signal, left
XTo switch on:turn the light switch to Ã.
XPress the combination switch beyond the
pressure point in the direction of arrow :.
The _ indicator lamp in the multifunction
display lights up if it is dark and the light sen-
sor activates the low-beam headlamps.
At speeds above approx. 16 mph
(25 km/h): the headlamp range is set auto-
matically depending on the distance between
the vehicle and other road users.
At speeds above approx. 19 mph
(30 km/h):
RIf no other road users are detected, the
high-beam headlamps are automatically
switched on.
RIf other road users are detected, the partial
high-beam headlamps are automatically
switched on.
The K indicator lamp in the instrument
cluster also lights up.
At speeds below approx. 16 mph
(25 km/h) or when there is sufficient
street lighting:
RThe partial high-beam headlamps are
switched off automatically.
RThe high-beam headlamps are switched off
automatically.
The K indicator lamp in the instrument
cluster goes out. The _indicator lamp in
the multifunction display remains lit.
XTo switch off: move the combination switch
back to its normal position or move the light
switch to another position.
The _ indicator lamp in the multifunction
display goes out.
Headlamps fogged up on the inside
Certain climatic and physical conditions may
cause moisture to form in the headlamp. This
moisture does not affect the functionality of the
headlamp.
Interior lighting
Overview of interior lighting
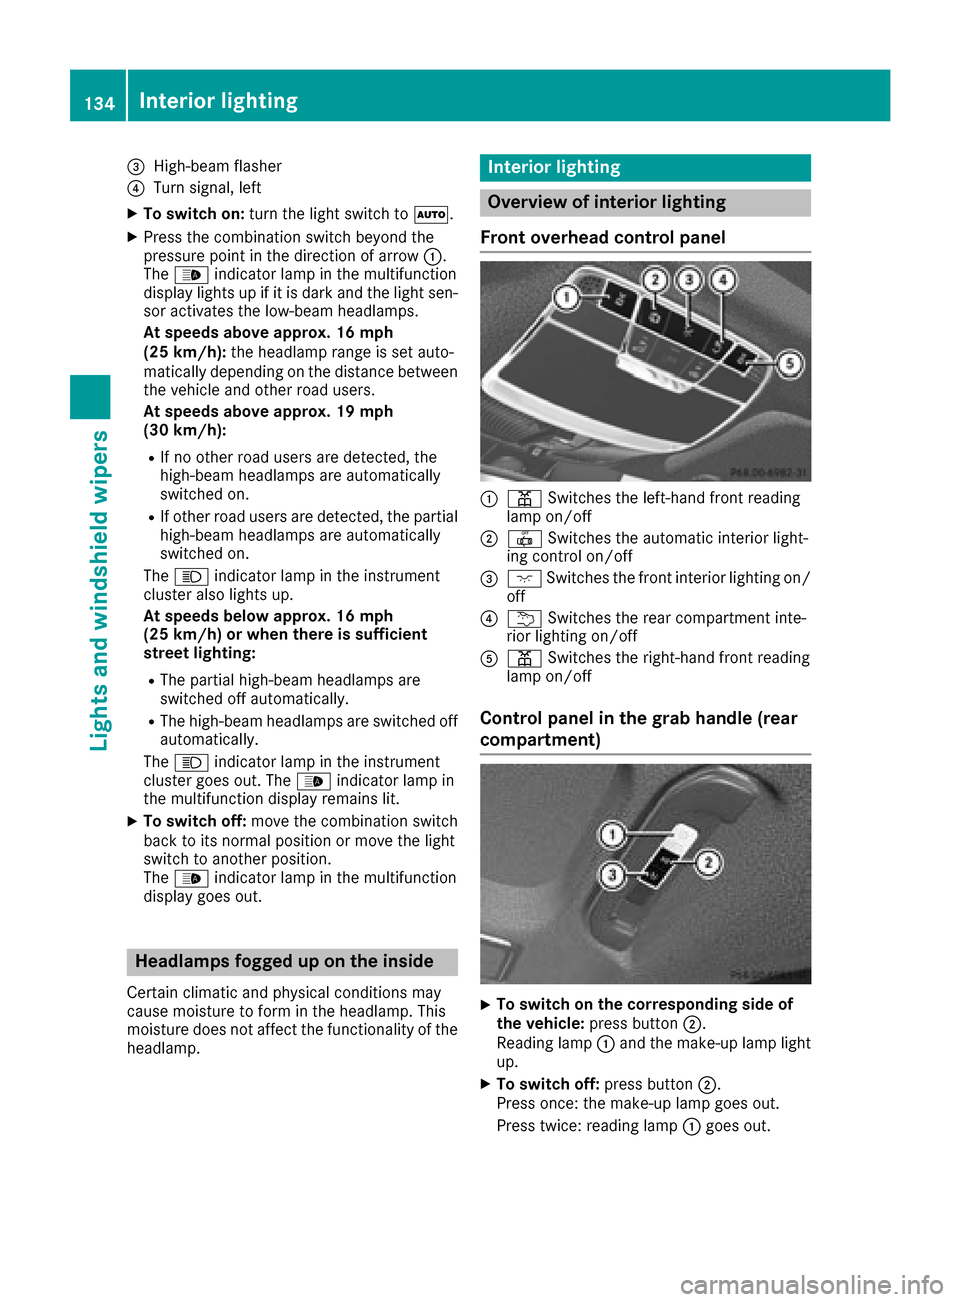
Front overhead control panel
:p Switches the left-hand front reading
lamp on/off
;| Switches the automatic interior light-
ing control on/off
=c Switches the front interior lighting on/
off
?u Switches the rear compartment inte-
rior lighting on/off
Ap Switches the right-hand front reading
lamp on/off
Control panel in the grab handle (rear
compartment)
XTo switch on the corresponding side of
the vehicle: press button ;.
Reading lamp :and the make-up lamp light
up.
XTo switch off: press button;.
Press once: the make-up lamp goes out.
Press twice: reading lamp :goes out.
134Interior lighting
Lights and windshield wipers
Page 137 of 438

XTo switch on both sides of the vehicle:
press button=.
Reading lamp :and the make-up lamp light
up.
XTo switch off: press button=.
Reading lamp :and the make-up lamp go
out.
Interior lighting control
General notes
In order to prevent the vehicle's battery from
discharging, the interior lighting functions are
automatically deactivated after some time
except when the SmartKey is in position 2in the
ignition lock.
The color, brightness, zone and display lighting
for the ambient lighting are set using the multi-
media system (see the separate operating
instructions).
The interior lighting control can be operated
using the front overhead control panel.
Automatic interior lighting control
XTo switch on or off: press the|button.
When the automatic interior lighting control is
activated, the button is flush with the over-
head control panel.
The interior lighting automatically switches on if
you:
Runlock the vehicle
Ropen a door
Rremove the SmartKey from the ignition lock
The interior light is activated for a short while
when the SmartKey is removed from the ignition
lock. This delayed switch-off can be adjusted via the multimedia system (see the separate oper-
ating instructions).
Manual interior lighting control
XTo switch the front interior lighting on/
off: press the cbutton.
XTo switch the rear compartment interior
lighting on/off: press theubutton.
XTo switch the reading lamp on/off: press
the p button.
Crash-responsive emergency lighting
The interior lighting is activated automatically if
the vehicle is involved in an accident.
XTo switch off the crash-responsive emer-
gency lighting: press the hazard warning
lamp button.
or
XLock and then unlock the vehicle using the
SmartKey.
Replacing bulbs
The front and rear light clusters of your vehicle
are equipped with LED light bulbs. Do not
replace the bulbs yourself. Contact a qualified
specialist workshop which has the necessary
specialist knowledge and tools to carry out the
work required.
Lamps are an important aspect of vehicle safety.
You must therefore make sure that these func-
tion correctly at all times. Have the headlamp
setting checked regularly.
Windshield wipers
Switching the windshield wipers
on/off
!
Do not operate the windshield wipers when
the windshield is dry, as this could damage
the wiper blades. Moreover, dust that has col-
lected on the windshield can scratch the glass
if wiping takes place when the windshield is
dry.
If it is necessary to switch on the windshield
wipers in dry weather conditions, always use
washer fluid when operating the windshield
wipers.
!If the windshield wipers leave smears on the
windshield after the vehicle has been washed
in an automatic car wash, wax or other resi-
dues may be the reason for this. Clean the
windshield using washer fluid after washing
the vehicle in an automatic car wash.
!Vehicles with a rain sensor: if the windshield
becomes dirty in dry weather conditions, the
windshield wipers may be activated inadver-
tently. This could then damage the windshield wiper blades or scratch the windshield.
Windshield wipers135
Lights and windshield wiper s
Z
Page 147 of 438
Notes on using automatic climate
control
Climate control system
Below, you can find a number of notes and rec-
ommendations to help you use climate control
optimally.
RActivate climate control using the Ã
rocker switch. The indicator lamp in the Ã
rocker switch lights up.
RSet the temperature to 72 ‡ (22 †).
ROnly use the "Windshield defrosting" function
briefly until the windshield is clear again.
ROnly use air-recirculation mode briefly, e.g. if
there are unpleasant outside odors or when in
a tunnel. The windows could otherwise fog up, since no fresh air is drawn into the vehicle in
air-recirculation mode.
RUse the residual heat function if you want to
heat or ventilate the vehicle interior when the
ignition is switched off. The residual heat
function can only be activated or deactivated
with the ignition switched off. The residual
heat function is switched off when the ignition
is switched on.
If you are controlling the rear-compartment cli-
mate control using the front control panel, note
the following:
RIf you set rear-compartment climate control
using the front control panel, the Ysym-
bol appears in the rear-compartment control
panel display.
RIf the rear-compartment climate control is set
using the front control panel, it cannot be set
at the same time using the rear control panel. After completing the settings for the rear-
compartment climate control using the front
control panel, wait five seconds. You will then
be able to control the rear climate control
using the rear control panel.
RAfter selecting the rear compartment set-
tings, the front climate control can be con-
trolled automatically again via the multimedia
system after five seconds.
Alternatively, you can select "Cancel rear
compartment" in the multimedia system air-
conditioning function bar.
ECO start/stop function
During automatic engine switch-off, the climate
control system only operates at a reduced capa-
city. If you require the full climate control output,
you can switch off the ECO start/stop function
by pressing the ECO button (
Ypage 167).
Operating the climate control sys-
tems
Activating/deactivating climate con-
trol
General notes
When the climate control is switched off, the air
supply and air circulation are also switched off.
The windows could fog up. Therefore, switch off
climate control only briefly
Switch on climate control primarily using the
à rocker switch (
Ypage 147).
Activating/deactivating front climate
control using the front control panel
XTurn the SmartKey to position 2in the ignition
lock (Ypage 162).
XTo activate: press thetor! rocker
switch up or down.
The climate control menu opens.
XActivate climate control via the air-condition-
ing setting bar in the multimedia system (see
the separate operating instructions).
XTo deactivate: press thetor!
rocker switch up or down.
The climate control menu opens.
XActivate climate control via the air-condition-
ing setting bar in the multimedia system (see
the separate operating instructions).
Activating/deactivating rear-compart-
ment climate control using the front
control panel
Observe the notes on controlling the rear-com-
partment climate control using the front control
panel (
Ypage 145).
Operating the climate control systems145
Climate control
Page 148 of 438
XTurn the SmartKey to position2in the ignition
lock (Ypage 162).
XTo activate: press thetor! rocker
switch up or down.
The climate control menu opens.
XSelect "Rear adjustment" in the air-condition-
ing setting bar (see the separate operating
instructions).
You can control the rear-compartment cli-
mate control using the front control panel or
via the multimedia system.
XActivate rear-compartment climate control
via the air-conditioning setting bar.
XTo deactivate: press thetor!
rocker switch up or down.
The climate control menu opens.
XSelect "Rear adjustment" in the air-condition- ing setting bar (see the separate operating
instructions).
XDeactivate rear-compartment climate control
via the air-conditioning setting bar.
Activating/deactivating rear-compart-
ment climate control using the rear con-
trol panel
XTurn the SmartKey to position 2in the ignition
lock (Ypage 162).
XTo activate: press rocker switch Lup or
down (Ypage 141).
The indicator lamp in rocker switch Lgoes
out. All settings are displayed in full in the
rear-compartment display.
XTo deactivate: press rocker switch Lup or
down (Ypage 141).
The indicator lamp in rocker switch Llights
up. OFF is displayed in the rear-compartment
display.
Switching cooling with air dehumidi-
fication on/off
General notes
If you deactivate the "Cooling with air-dehumid-
ification" function, the air inside the vehicle will
not be cooled. The air inside the vehicle will also
not be dehumidified. The windows can fog up
more quickly. Therefore, deactivate the cooling
with air-dehumidification function only briefly. For vehicles with a combustion engine, the
"Cooling with air dehumidification" function is
available when the engine is running. For hybrid
vehicles, the "Cooling with air dehumidification"
function is also available via the electric refrig-
erant compressor when the engine is not run-
ning. The air inside the vehicle is cooled and
dehumidified according to the temperature
selected.
Condensation may drip from the underside of
the vehicle when it is in cooling mode. This is
normal and not a sign that there is a malfunc-
tion.
Switching on/off
XTo activate: press theÁrocker switch up
or down.
The indicator lamp above the rocker switch
lights up.
or
XActivate the "Cooling with air dehumidifica-
tion" function via the multimedia system (see
the separate operating instructions).
XTo deactivate: press theÁrocker switch
up or down.
The indicator lamp above the rocker switch
goes out.
or
XDeactivate the "Cooling with air dehumidifi-
cation" function via the multimedia system
(see the separate operating instructions).
146Operating the climate control systems
Climate control
Page 150 of 438
XTo switch on:press theÃrocker switch
on the front control unit up or down.
or
XActivate automatic mode via the air-condi-
tioning setting bar in the multimedia system
(see the separate operating instructions).
The indicator lamp in the Ãrocker switch
lights up.
iSelect the temperature and automatic
mode immediately thereafter. Otherwise, you
will have to select "Rear adjustment" again
from the air-conditioning setting bar before
activating automatic mode.
XTo switch to manual operation: press the
tor !rocker switch up or down.
The climate control menu opens.
XSelect "Rear adjustment" in the air-condition-
ing setting bar (see the separate operating
instructions).
XUse the air-conditioning setting bar to deac-
tivate automatic mode.
or
XSet the air distribution using rocker switch I
or M on the rear control panel (Ypage 141).
or
XSet the airflow using rocker switch Kon the
rear control panel (Ypage 141).
The AUTO indicator on the rear display goes
out.
If you adjust the rear airflow or air distribution
manually using the multimedia system when in
automatic mode, the AUTOindicator on the rear
display goes out. The function which has not
been changed manually, however, continues to
be controll ed a
utomatically. When the manually
set function switches back to automatic mode,
the AUTO display reappears in the rear-com-
partment display.
Controlling rear climate control auto-
matically using the rear control panel
XTurn the SmartKey to position 2in the ignition
lock (Ypage 162).
XSet the desired temperature using rocker
switches Hand N(Ypage 141).
XTo activate: press rocker switch Jup or
down (Ypage 141).
The indicator lamp in rocker switch Jlights
up.
XTo deactivate: press rocker switch Jup or
down (Ypage 141).
The indicator lamp in rocker switch Jgoes
out.
If you adjust the airflow or air distribution man-
ually when in automatic mode, the AUTOdisplay
in the rear-compartment display goes out. The
function which has not been changed manually,
however, continues to be controlled automati-
cally. When the manually set function switches
back to automatic mode, the AUTOdisplay
reappears in the rear-compartment display.
Adjusting the climate mode settings
In automatic mode you can select the following
airflow settings for the driver's and front-
passenger areas:
FOCUS high airflow, slightly cooler setting
MEDIU Mmedium airflow, standard setting
DIFFUSEl ow airflow, slightly warmer and draft-
free setting
XTo set: set the climate mode using the mul-
timedia system (see the separate operating
instructions).
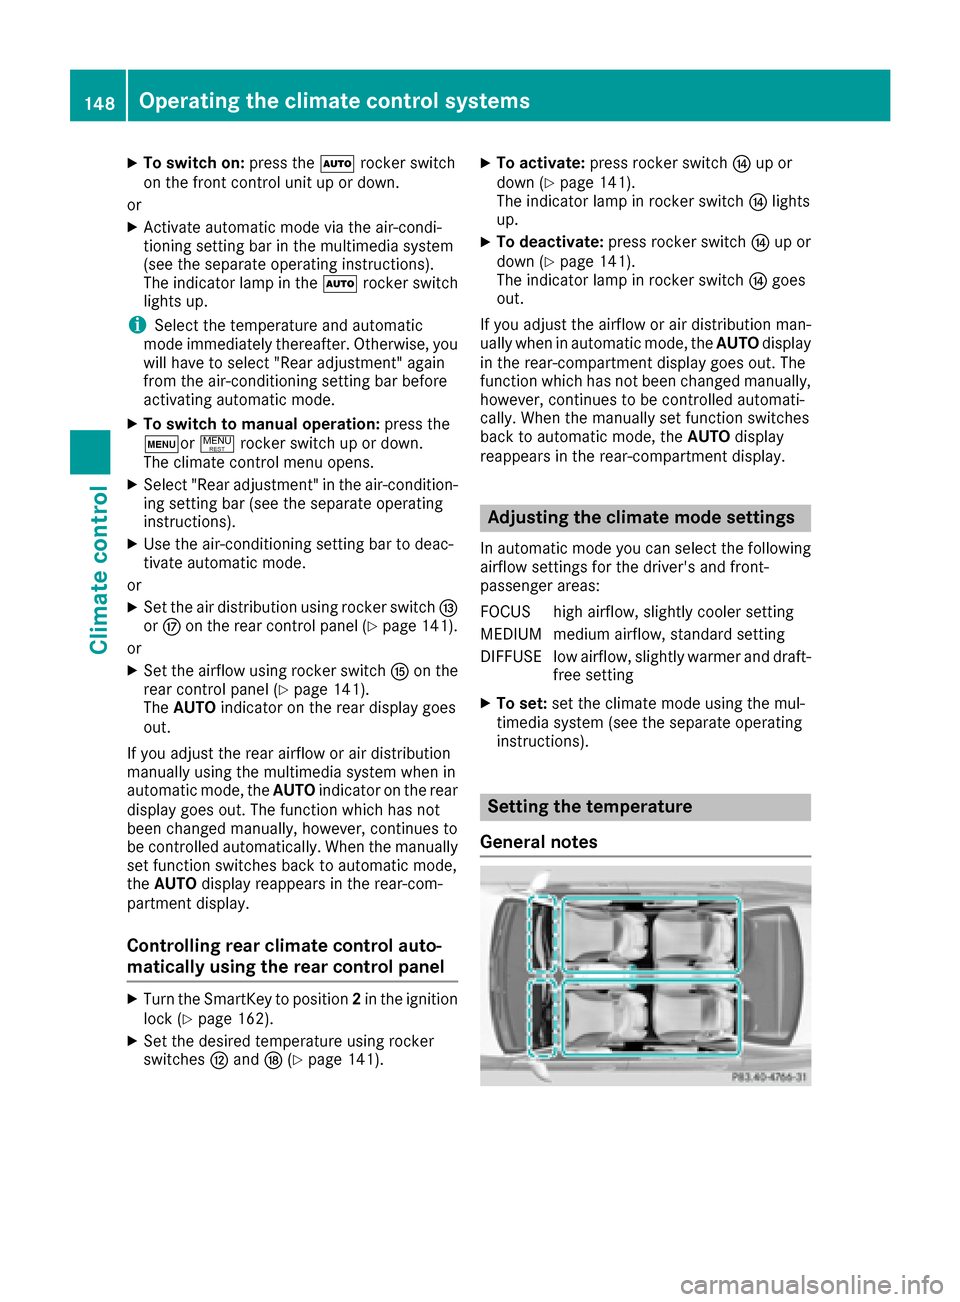
Setting the temperature
General notes
148Operating the climate control systems
Climate control