2016 MERCEDES-BENZ GLS SUV service interval
[x] Cancel search: service intervalPage 8 of 397

Setting the side air vents ............... 145
Air-conditioning system
see Climate control
Airbag
Automatic front-passenger front
airbag deactivation .......................... 50
Introduction ..................................... 47
PASSENGER AIR BAG indicator
lamps ............................................... 43
Airbags
Display message ............................ 268
Front airbag (driver, front
passenger) ....................................... 48
Important safety guidelines ............. 47
Kneebag ........................................... 49
Sidebag ............................................ 49
Triggering ......................................... 54
Windowbag ...................................... 49
AIRMATIC package
ADS (Adaptive Damping System) ... 197
Function/note s............................. 196
Alarm
ATA (Anti-Theft Alarm system) ......... 78
Switching off (ATA) .......................... 78
Switching the function on/off
(ATA) ................................................ 78
Alarm system
see ATA (Anti-Theft Alarm system)
AMG
RIDE CONTROL sports suspen-
sion ................................................ 200
AMG menu (on-board computer) ..... 255
Anti-glare film .................................... 331
Anti-lock braking system
see ABS (Anti-lock Braking System)
Anti-Theft Alarm system
see ATA (Anti-Theft Alarm system)
Approach/departure angle .............. 179
Aquaplaning ....................................... 175
Ashtray ............................................... 323
Assistance display (on-board com-
puter) .................................................. 249
Assistance menu (on-board com-
puter) .................................................. 249
ASSYST PLUS
Displaying a service message ........ 337
Hiding a service message .............. 336 Resetting the service interval dis-
play ................................................ 337
Service message ............................ 336
Special service requirements ......... 337
ATA (Anti-Theft Alarm system)
Activating/deactivating ................... 78
Function ........................................... 78
Switching off the alarm .................... 78
ATTENTION ASSIST
Activating/deactivating ................. 250
Display message ............................ 275
Function/note s............................. 216
Audio 20
Switching on/of f........................... 303
Audio menu (on-board computer) .... 247
Authorised workshop
see Qualified specialist workshop
AUTO lights
Display message ............................ 270
see Lights
Automatic engine start (ECO start/
stop function) .................................... 152
Automatic engine switch-off (ECO
start/stop function) .......................... 152
Automatic front-passenger front
airbag deactivation
Display message ............................ 268
Automatic front-passenger front
airbag deactivation system
Operation ......................................... 50
Problems ......................................... 54
System self-test ............................... 53
Automatic headlamp mode .............. 121
Automatic transmission
Accelerator pedal position ............. 159
Changing gear ............................... 159
DIRECT SELECT lever ..................... 156
Display message ............................ 285
Drive program display .................... 158
Drive programs .............................. 159
Driving tips .................................... 159
DYNAMIC SELECT controlle r......... 155
Emergency running mode .............. 163
Engaging drive position .................. 158
Engaging neutral ............................ 157
Engaging park position automati-
cally ............................................... 157
Engaging reverse gear ................... 157 Index
5
Page 29 of 397

Environmental protection
General notes
H
Environmental note
Daimler's declared policy is one of compre-
hensive environmental protection.
Our objectives are to use the natural resour-
ces which form the basis of our existence on
this planet sparingly and in a manner which
takes the requirements of both nature and
humanity into consideration.
You too can help to protect the environment
by operating your vehicle in an environmen-
tally-responsible manner.
Fuel consumption and the rate of engine,
transmission, brake and tyre wear depend on
the following factors:
R operating conditions of your vehicle
R your personal driving style
You can influence both factors. Therefore,
please bear the following in mind:
Operating conditions:
R avoid short trips, as these increase fuel
consumption.
R observe the correct tyre pressure.
R do not carry any unnecessary weight in the
vehicle.
R remove the roof rack once you no longer
need it.
R a regularly serviced vehicle will contribute
to environmental protection. You should
therefore adhere to the service intervals.
R all maintenance work should be carried out
at a qualified specialist workshop.
Personal driving style:
R do not depress the accelerator pedal when
starting the engine.
R do not warm up the engine when the vehicle
is stationary.
R drive carefully and maintain a safe distance
from the vehicle in front.
R avoid frequent, sudden acceleration and
braking. R
change gear in good time and use each gear
only up to Ôof its maximum engine speed.
R switch off the engine in stationary traffic.
R monitor the vehicle's fuel consumption. Returning an end-of-life vehicle
EU countries only:
Mercedes-Benz will take back your end-of-life
vehicle for environmentally-friendly disposal in
accordance with the European Union (EU) End-
Of-Life Vehicles Directive.
A network of vehicle take-back points and dis-
mantlers has been established for you to return
your vehicle. You can leave it at any of these
points free of charge. This makes an important
contribution to closing the recycling circle and
conserving resources.
For further information about the recycling and
disposal of end-of-life vehicles, and the take-
back conditions, please visit the national
Mercedes-Benz website for your country. Genuine Mercedes-Benz parts
H
Environmental note
Daimler AG also supplies reconditioned
assemblies and parts which are of the same
quality as new parts. For these, the same war-
ranty applies as for new parts.
! Airbags and seat belt tensioners, as well as
control units and sensors for these restraint
systems, may be installed in the following
areas of your vehicle:
R doors
R door pillars
R door sills
R seats
R dashboard
R instrument cluster
R centre console
Do not install accessories such as audio sys-
tems in these areas. Do not carry out repairs
or welding. You could impair the operating
efficiency of the restraint systems. 26
Introduction
Page 134 of 397
Overview of climate control systems
General notes
Observe the settings recommended on the fol-
lowing pages. Otherwise, the windows could
mist up.
To prevent the windows from misting up:
R switch off climate control only briefly
R activate air-recirculation mode only briefly
R switch on "Cooling with air dehumidification"
R activate the "Windscreen demisting" function
briefly, if required
Climate control regulates the temperature and
the humidity in the vehicle interior and filters
undesirable substances out of the air.
the "Residual heat" function can be switched on
or off only with the ignition switched off
(Y page 140).
i Ventilate the vehicle for a brief period during
warm weather, e.g. using the convenience
opening feature (Y page 95).
This will speed up the cooling process and the desired interior temperature will be reached
more quickly. i
The integrated filter filters out most parti-
cles of dust and soot and completely filters
out pollen. It also reduces gaseous pollutants
and odours. A clogged filter reduces the
amount of air supplied to the vehicle interior.
For this reason, you should always observe
the interval for replacing the filter, which is
specified in the Service Booklet. As this
depends on environmental conditions, e.g.
heavy air pollution, the interval may be
shorter than stated in the Service Booklet.
i Vehicles with AIR-BALANCE package:
in
addition to ionisation, the vehicle has an air
filter with anti-allergenic properties that con-
tribute to improved air filtration.
i Under certain environmental conditions, the
residual heat function may be activated auto-
matically an hour after the key has been
removed in order to dry the automatic climate control. The vehicle is then ventilated for 30
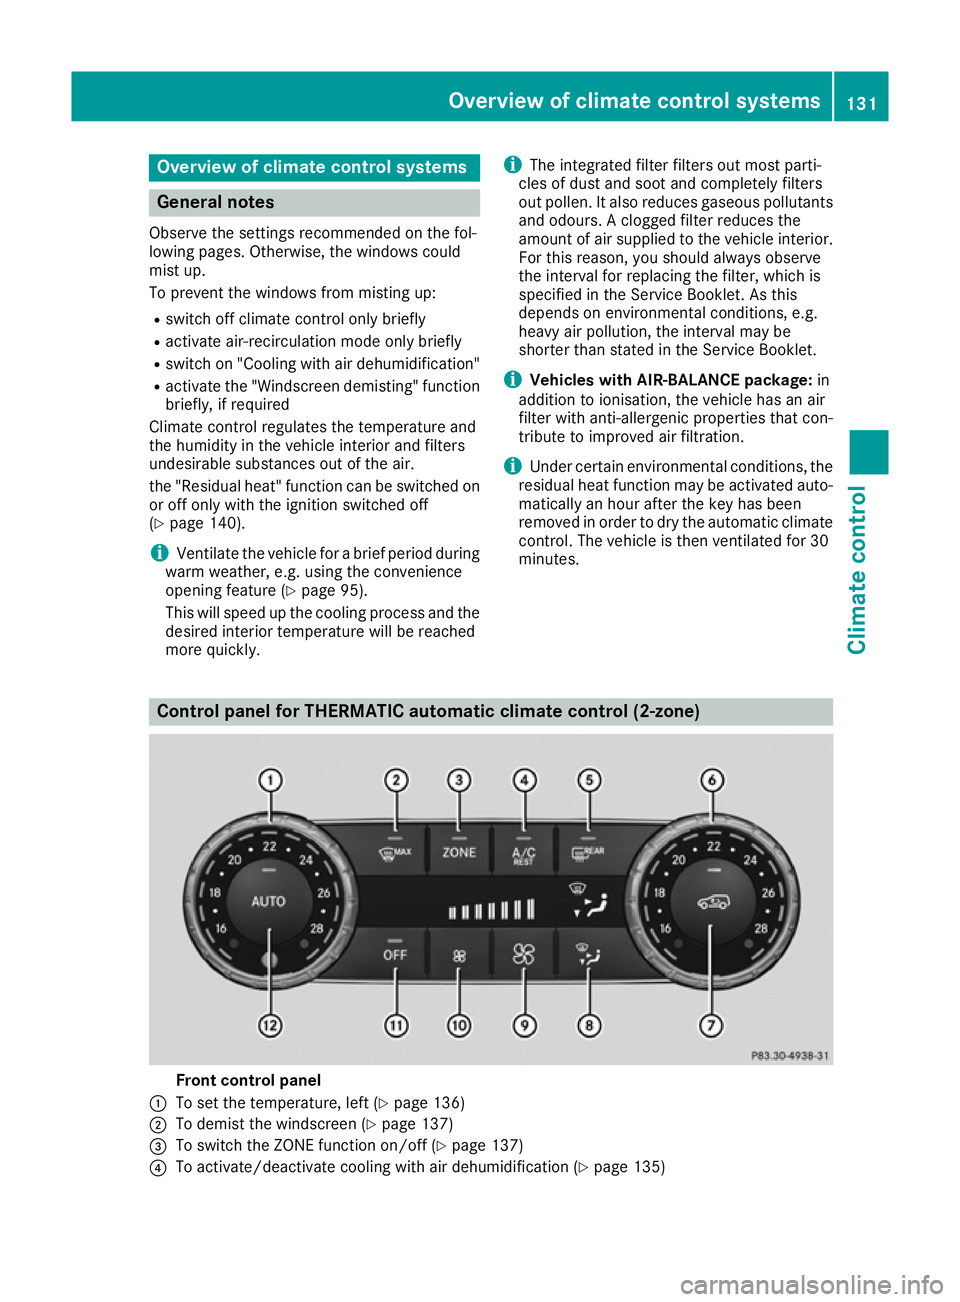
minutes. Control panel for THERMATIC automatic climate control (2-zone)
Front control panel
: To set the temperature, left (Y page 136)
; To demist the windscreen (Y page 137)
= To switch the ZONE function on/off (Y page 137)
? To activate/deactivate cooling with air dehumidification (Y page 135) Overview of climate control systems
131Climate control
Page 175 of 397
Driving tips
General notes
Important safety notes G
WARNING
If you switch off the ignition while driving,
safety-relevant functions are only available
with limitations, or not at all. This could affect, for example, the power steering and the brake
boosting effect. You will require considerably
more effort to steer and brake. There is a risk of an accident.
Do not switch off the ignition while driving.
Drive sensibly – save fuel Observe the following tips to save fuel:
X The tyres should always be inflated to the rec-
ommended tyre pressure.
X Remove unnecessary loads.
X Remove roof carriers when they are not nee-
ded.
X Warm up the engine at low engine speeds.
X Avoid frequent acceleration or braking.
X Have all maintenance work carried out as
indicated by the service intervals in the Ser-
vice Booklet or by the service interval display.
Fuel consumption also increases when driving in
cold weather, in stop-start traffic, on short jour- neys and in hilly terrain. ECO display
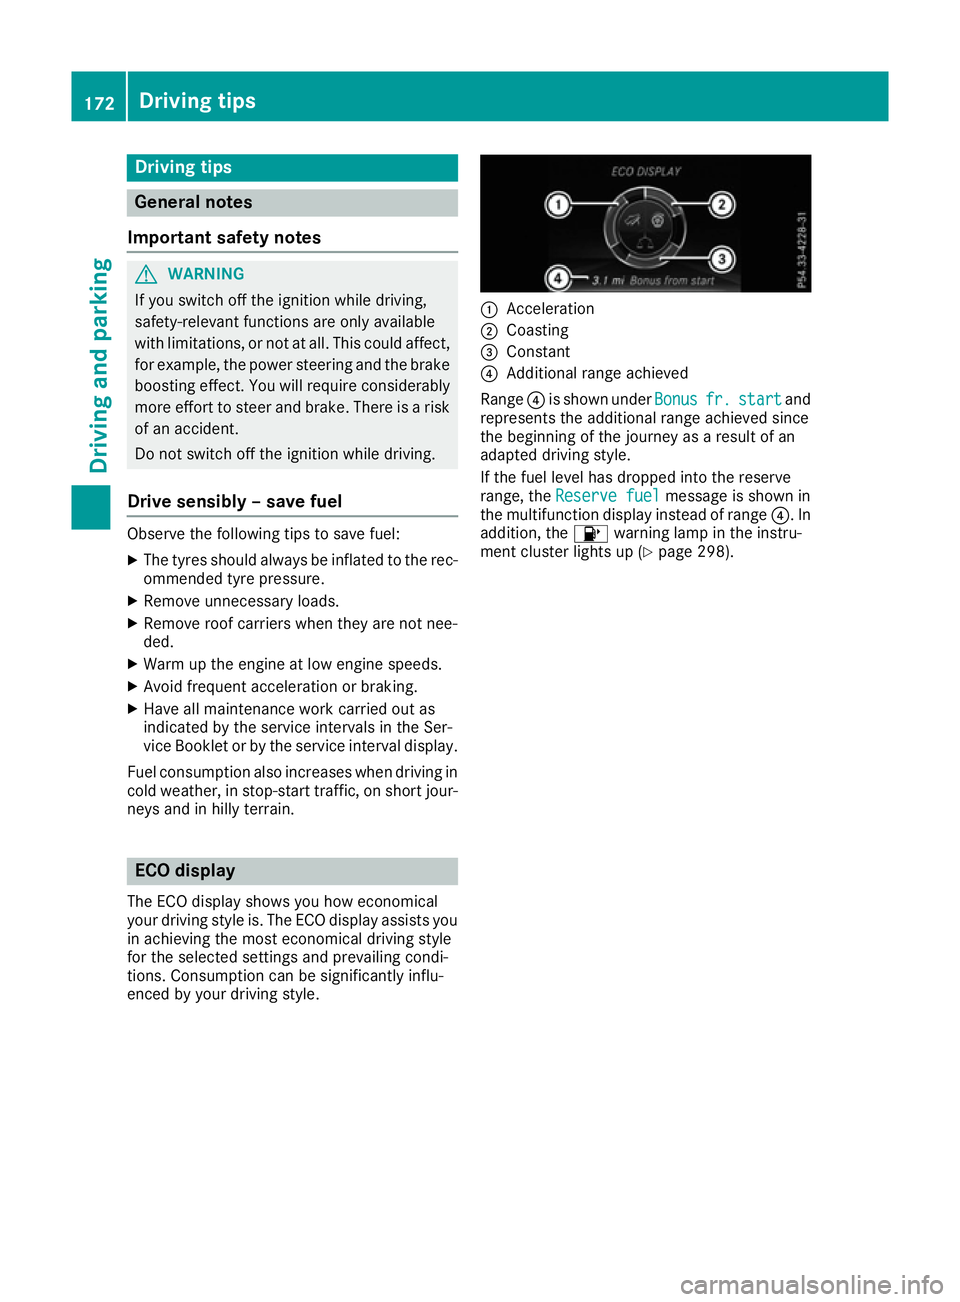
The ECO display shows you how economical
your driving style is. The ECO display assists you in achieving the most economical driving style
for the selected settings and prevailing condi-
tions. Consumption can be significantly influ-
enced by your driving style. :
Acceleration
; Coasting
= Constant
? Additional range achieved
Range ?is shown under Bonus Bonusfr.
fr.start
start and
represents the additional range achieved since
the beginning of the journey as a result of an
adapted driving style.
If the fuel level has dropped into the reserve
range, the Reserve fuel Reserve fuel message is shown in
the multifunction display instead of range ?. In
addition, the 8warning lamp in the instru-
ment cluster lights up (Y page 298).172
Driving tipsDriving and pa
rking
Page 254 of 397
Activating/deactivating Lane Keeping
Assist X
Press the =or; button on the steering
wheel to select the Assist.
Assist. menu.
X Press the 9or: button to select
Lane Keeping Assist
Lane Keeping Assist .
X Press ato confirm.
The current selection appears.
X Press ato confirm.
X Press the :or9 button to set Off
Off ,
Standard
Standard orAdaptive
Adaptive.
When Lane Keeping Assist or Active Lane
Keeping Assist is activated, the multifunction display shows the lane markings as bright
lines in the assistance graphic.
X Press the abutton to save the setting.
Further information about Lane Keeping Assist
(Y page 221).
Further information about Active Lane Keeping
Assist (Y page 224). Service menu
Depending on the equipment fitted in the vehi-
cle, you have the following options in the Ser‐
Ser‐
vice
vice menu:
R Calling up display messages in the message
memory (Y page 258)
R Restarting the tyre pressure loss warning sys-
tem (Y page 366) or checking the tyre pres-
sure electronically (Y page 367)
R Calling up the service due date
(Y page 337) Settings menu
Introduction Depending on the equipment fitted in the vehi-
cle, In the Settings
Settings menu you have the follow-
ing options:
R Changing the instrument cluster settings
(Y page 251)
R Changing the light settings (Y page 252)
R Changing the vehicle settings (Y page 252)
R Changing the heating settings (Y page 253)R
Changing the convenience settings
(Y page 254)
R Restoring the factory settings (Y page 255)
Instrument cluster submenu Selecting the unit of measurement for dis-
tance
The Display unit Speed-/odometer: Display unit Speed-/odometer: func-
tion allows you to choose whether certain dis-
plays appear in kilometres or miles in the mul-
tifunction display.
X Press the =or; button on the steering
wheel to select the Settings Settingsmenu.
X Press the :or9 button to select the
Instrument cluster
Instrument cluster submenu.
X Press ato confirm.
X Press the :or9 button to select the
Display unit Speed-/odometer
Display unit Speed-/odometer function.
You will see the selected setting: km
kmormiles
miles.
X Press the abutton to save the setting.
The selected unit of measurement for distance
applies to the following:
R Digital speedometer in the Trip
Trip menu
R Total distance recorder and the trip meter
R Trip computer
R Current consumption and the range
R Navigation instructions in the Navi
Navi menu
R Cruise control
R Speed limiter
R Distance Pilot DISTRONIC
R ASSYST PLUS service interval display
Selecting permanent display
United Kingdom: this function is unavailable.
The Permanent display:
Permanent display: function allows you
to choose whether the multifunction display
always shows the outside temperature or the
speed.
The speed display is inverse to your speedome- ter.
X Press the =or; button on the steering
wheel to select the Settings Settingsmenu.
X Press the :or9 button to select the
Instrument cluster Instrument cluster submenu.
X Confirm by pressing aon the steering
wheel. Menus and sub
menus
251On-board computer and displays Z
Page 338 of 397
The following cause engine failure or damage
to the exhaust system:
R Use of engine oils and oil filters that have
not been expressly approved for the service
system
R Replacement of engine oil and oil filter after
the replacement interval specified by the
service system has expired
R Use of engine oil additives
! Do not add too much oil. Topping up with too
much engine oil can result in damage to the
engine or to the catalytic converter. Have
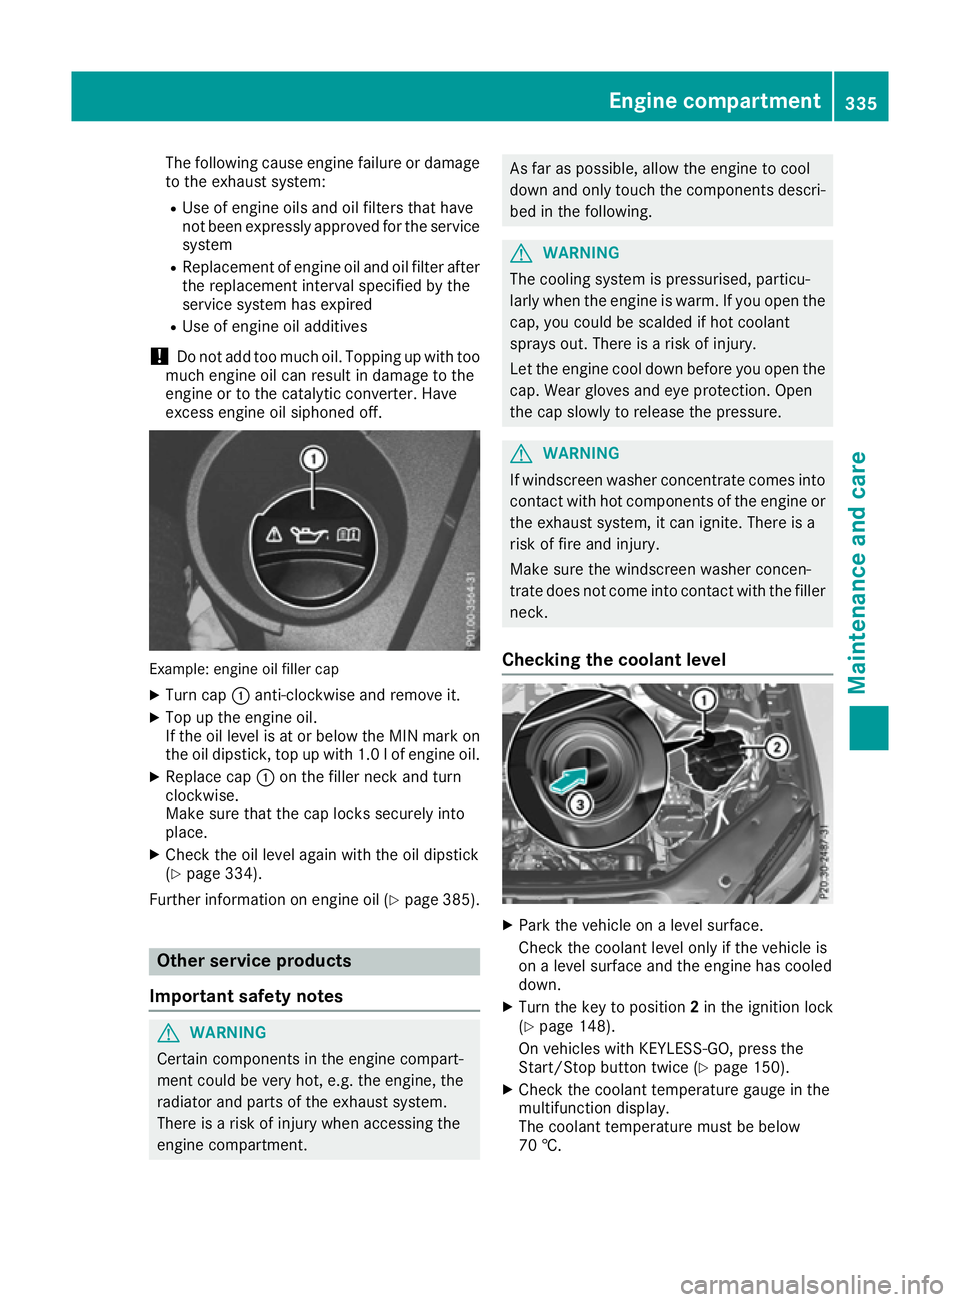
excess engine oil siphoned off. Example: engine oil filler cap
X Turn cap :anti-clockwise and remove it.
X Top up the engine oil.
If the oil level is at or below the MIN mark on
the oil dipstick, top up with 1.0 lof engine oil.
X Replace cap :on the filler neck and turn
clockwise.
Make sure that the cap locks securely into
place.
X Check the oil level again with the oil dipstick
(Y page 334).
Further information on engine oil (Y page 385).Other service products
Important safety notes G
WARNING
Certain components in the engine compart-
ment could be very hot, e.g. the engine, the
radiator and parts of the exhaust system.
There is a risk of injury when accessing the
engine compartment. As far as possible, allow the engine to cool
down and only touch the components descri-
bed in the following. G
WARNING
The cooling system is pressurised, particu-
larly when the engine is warm. If you open the cap, you could be scalded if hot coolant
sprays out. There is a risk of injury.
Let the engine cool down before you open the
cap. Wear gloves and eye protection. Open
the cap slowly to release the pressure. G
WARNING
If windscreen washer concentrate comes into contact with hot components of the engine or
the exhaust system, it can ignite. There is a
risk of fire and injury.
Make sure the windscreen washer concen-
trate does not come into contact with the filler neck.
Checking the coolant level X
Park the vehicle on a level surface.
Check the coolant level only if the vehicle is
on a level surface and the engine has cooled
down.
X Turn the key to position 2in the ignition lock
(Y page 148).
On vehicles with KEYLESS-GO, press the
Start/Stop button twice (Y page 150).
X Check the coolant temperature gauge in the
multifunction display.
The coolant temperature must be below
70 †. Engine compartment
335Maintenance and care Z
Page 339 of 397
X
Turn the key to position 0in the ignition lock
(Y page 148).
X On vehicles with KEYLESS-GO, press the
Start/Stop button (Y page 150).
X Press the Start/Stop button (Y page 150).
X Slowly turn cap :half a turn anti-clockwise
and allow excess pressure to escape.
X Turn cap :further anti-clockwise and
remove it.
If the coolant is at the level of marker bar =
in the filler neck when cold, there is enough
coolant in coolant expansion tank ;.
If the coolant level is approximately 1.5 cm
above marker bar =in the filler neck when
warm, there is enough coolant in coolant
expansion tank ;.
X If necessary, top up with coolant that has
been tested and approved by Mercedes-Benz.
X Replace cap :and turn it clockwise as far as
it will go.
Further information on coolant (Y page 386).
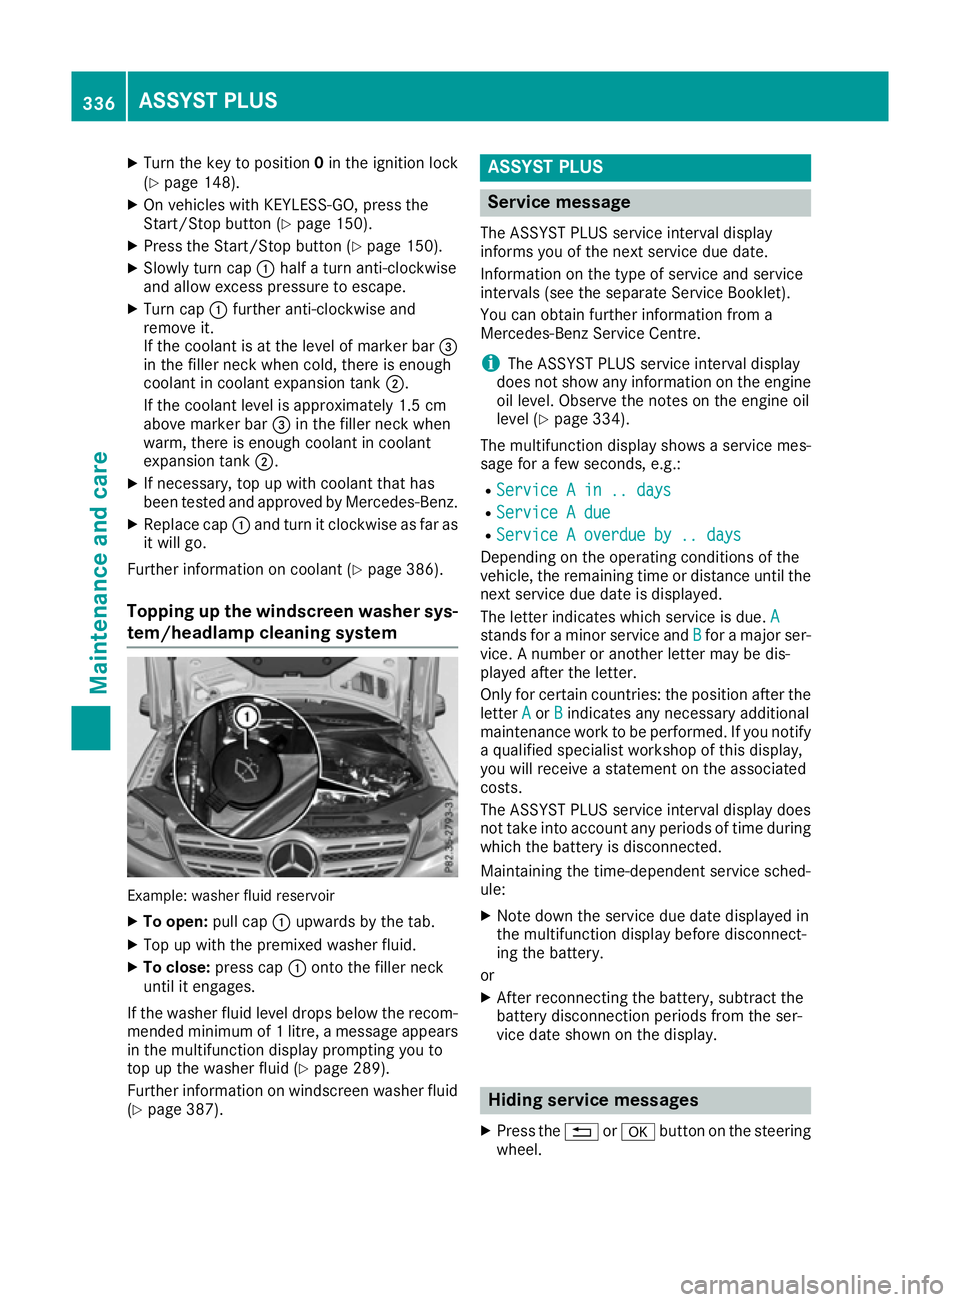
Topping up the windscreen washer sys- tem/headlamp cleaning system Example: washer fluid reservoir
X To open: pull cap:upwards by the tab.
X Top up with the premixed washer fluid.
X To close: press cap :onto the filler neck
until it engages.
If the washer fluid level drops below the recom- mended minimum of 1 litre, a message appears in the multifunction display prompting you to
top up the washer fluid (Y page 289).
Further information on windscreen washer fluid
(Y page 387). ASSYST PLUS
Service message
The ASSYST PLUS service interval display
informs you of the next service due date.
Information on the type of service and service
intervals (see the separate Service Booklet).
You can obtain further information from a
Mercedes-Benz Service Centre.
i The ASSYST PLUS service interval display
does not show any information on the engine oil level. Observe the notes on the engine oil
level (Y page 334).
The multifunction display shows a service mes-
sage for a few seconds, e.g.:
R Service A in .. days Service A in .. days
R Service A due
Service A due
R Service A overdue by .. days
Service A overdue by .. days
Depending on the operating conditions of the
vehicle, the remaining time or distance until the
next service due date is displayed.
The letter indicates which service is due. A A
stands for a minor service and B
Bfor a major ser-
vice. A number or another letter may be dis-
played after the letter.
Only for certain countries: the position after the letter A
A or B
Bindicates any necessary additional
maintenance work to be performed. If you notify
a qualified specialist workshop of this display,
you will receive a statement on the associated
costs.
The ASSYST PLUS service interval display does
not take into account any periods of time during which the battery is disconnected.
Maintaining the time-dependent service sched-
ule:
X Note down the service due date displayed in
the multifunction display before disconnect-
ing the battery.
or
X After reconnecting the battery, subtract the
battery disconnection periods from the ser-
vice date shown on the display. Hiding service messages
X Press the %ora button on the steering
wheel. 336
ASSYST PLUSMaintenance and care
Page 340 of 397
Displaying service messages
X Switch the ignition on.
X Press the =or; button on the steering
wheel to select the Serv.
Serv.menu.
X Press the 9or: button to select the
ASSYST
ASSYST PLUS
PLUSsubmenu and confirm by press-
ing the abutton.
The service due date appears in the multi-
function display. Information about service
Resetting the ASSYST PLUS service
interval display !
If the ASSYST PLUS service interval display
has been inadvertently reset, this setting can
be corrected at a qualified specialist work-
shop.
Have service work carried out as described in the Service Booklet. This may otherwise lead
to increased wear and damage to the major
assemblies or the vehicle.
A qualified specialist workshop, e.g. a
Mercedes-Benz Service Centre, will reset the
ASSYST PLUS service interval display after the
service work has been carried out. You can also
obtain further information on maintenance
work, for example.
Special service requirements The prescribed service interval is based on nor-
mal operation of the vehicle. Service work will
need to be performed more often if the vehicle is
operated under arduous conditions or increased loads, for example:
R regular city driving with frequent intermediate
stops
R if the vehicle is primarily used to travel short
distances
R for frequent operation in mountainous terrain
or on poor road surfaces
R if the engine is often left idling for long periods
In these or similar operating conditions, have,
for example, the air filter, engine oil and oil filter changed more frequently. The tyres must be
checked more frequently if the vehicle is oper-
ated under increased loads. Further informationcan be obtained at a qualified specialist work-
shop, e.g. a Mercedes-Benz Service Centre. Driving abroad An extensive Mercedes-Benz Service network is
also available in other countries. You can obtain further information from any Mercedes-Benz
Service Centre. Care
General notes
H
Environmental note
Dispose of empty packaging and cleaning
cloths in an environmentally responsible man-
ner.
! For cleaning your vehicle, do not use any of
the following:
R dry, rough or hard cloths
R abrasive cleaning agents
R solvents
R cleaning agents containing solvents
Do not scrub.
Do not touch the surfaces or protective films
with hard objects, e.g. a ring or ice scraper.
You could otherwise scratch or damage the
surfaces and protective film.
! Do not park up your vehicle for a long period
of time immediately after cleaning, particu-
larly after cleaning the wheel rim with wheel
cleaner. Wheel cleaner may lead to increased corrosion of the brake discs and pads. You
should therefore drive for a few minutes after
cleaning. By heating up the brakes, the brake
discs and pads dry. The vehicle can then be
parked up for a long period of time.
Regular care of your vehicle is a condition for
retaining quality in the long term.
Use care products and cleaning agents recom-
mended and approved by Mercedes-Benz. Care
337Maintenance and care Z