2016 MERCEDES-BENZ GLS SUV window
[x] Cancel search: windowPage 143 of 397
Switching the residual heat on/off
General notes It is possible to make use of the residual heat of
the engine to continue heating the stationary
vehicle for up to 30 minutesafter the engine has
been switched off. The heating time depends on
the set interior temperature.
Switching on/off X
To switch on: press theÌorÁ button.
The indicator lamp in the ÌorÁ button
lights up.
i The blower will run at a low speed regardless
of the airflow setting.
i If you activate the residual heat function at
high temperatures, only the ventilation will be
activated. The blower runs at medium speed.
X To switch off: press theÌorÁ but-
ton.
The indicator lamp in the ÌorÁ button
goes out.
Residual heat is deactivated automatically:
R after approximately 30 minutes
R when the ignition is switched on
R if the battery voltage drops
R when the auxiliary heating is switched on Ionisation
Ionisation is used to purify and freshen the air in
the vehicle interior, which is conducive to a
pleasant climate.
The ionisation of the interior air is odourless and cannot, directly, be perceived in the vehicle inte-
rior.
You can switch ionisation on and off via the mul- timedia system (see the separate operating
instructions).
Ionisation can only be operated when the auto-
matic climate control is switched on. The side air vent on the driver's side must be open. Auxiliary heating
Important safety notes G
DANGER
If the exhaust pipe is blocked or sufficient
ventilation is not possible, toxic exhaust
fumes can enter the vehicle, especially car-
bon monoxide. This is the case, e.g. in
enclosed spaces, or if the vehicle is stuck in
snow. There is a risk of fatal injuries.
You should switch off the auxiliary heating in
enclosed spaces which do not have an extrac- tion system, e.g. a garage. If the vehicle is
stuck in snow and you must leave the auxiliary
heating running, keep the exhaust pipe and
the area around the vehicle clear of snow. To guarantee a sufficient supply of fresh air, open
a window on the side of the vehicle away from the wind. G
WARNING
When the auxiliary heating is switched on,
parts of the vehicle can become very hot.
Flammable materials such as leaves, grass or twigs may ignite if they come into contact
with:
R hot parts of the exhaust system
R the exhaust gas itself
There is a risk of fire.
When the auxiliary heating is switched on,
make sure that:
R no flammable materials come into contact
with hot vehicle components
R the exhaust gas can escape from the
exhaust pipe unhindered
R the exhaust gas does not come into contact
with flammable materials.
The auxiliary heating is fitted under the front
wing on the left-hand side of the vehicle. The
emissions outlet is found behind the left front
wheel. ! Operating the auxiliary heating/ventilation
draws on the vehicle battery. After you have
heated or ventilated the vehicle a maximum of two times, drive for a longer distance. 140
Operating the climate control systemClimate control
Page 148 of 397
X
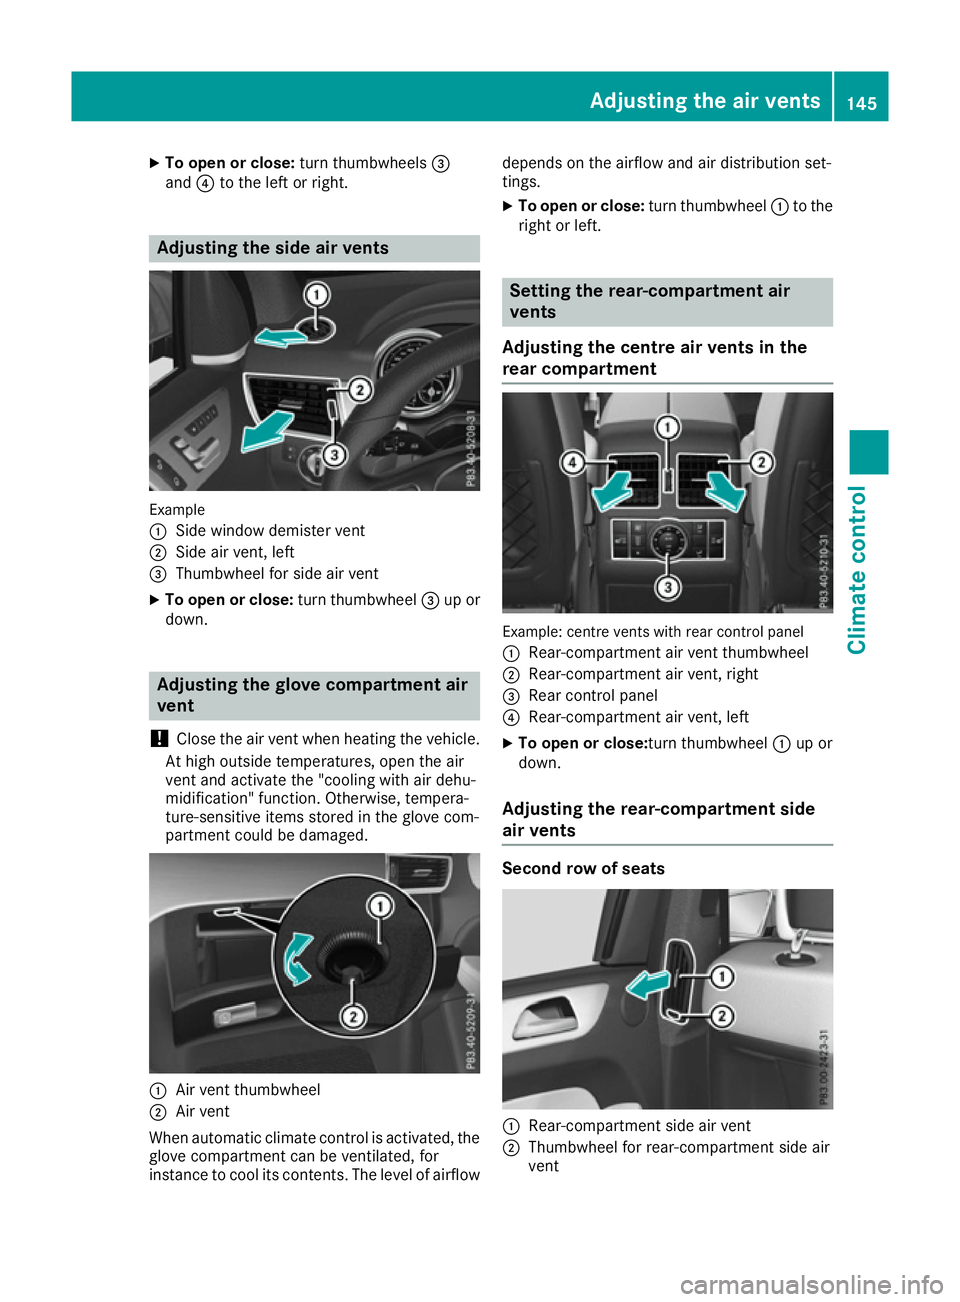
To open or close: turn thumbwheels=
and ?to the left or right. Adjusting the side air vents
Example
:
Side window demister vent
; Side air vent, left
= Thumbwheel for side air vent
X To open or close: turn thumbwheel=up or
down. Adjusting the glove compartment air
vent
! Close the air vent when heating the vehicle.
At high outside temperatures, open the air
vent and activate the "cooling with air dehu-
midification" function. Otherwise, tempera-
ture-sensitive items stored in the glove com-
partment could be damaged. :
Air vent thumbwheel
; Air vent
When automatic climate control is activated, the
glove compartment can be ventilated, for
instance to cool its contents. The level of airflow depends on the airflow and air distribution set-
tings.
X To open or close: turn thumbwheel:to the
right or left. Setting the rear-compartment air
vents
Adjusting the centre air vents in the
rear compartment Example: centre vents with rear control panel
: Rear-compartment air vent thumbwheel
; Rear-compartment air vent, right
= Rear control panel
? Rear-compartment air vent, left
X To open or close: turn thumbwheel:up or
down.
Adjusting the rear-compartment side
air vents Second row of seats
:
Rear-compartment side air vent
; Thumbwheel for rear-compartment side air
vent Adjusting the air vents
145Climate control Z
Page 179 of 397
such as carbon monoxide (CO) may enter the
vehicle. This is the case, e.g. if the vehicle
becomes trapped in snow. There is a risk of
fatal injury.
If you leave the engine or the auxiliary heating
running, make sure the exhaust pipe and area
around the vehicle are clear of snow. To
ensure an adequate supply of fresh air, open a window on the side of the vehicle that is not
facing into the wind.
! Take care not to damage the sealing strip
and the moulding on the side of the rear win- dow when scraping ice off the rear window.
Have your vehicle winterproofed at a qualified
specialist workshop at the onset of winter.
You should drive particularly carefully on slip-
pery road surfaces. Avoid sudden acceleration,
steering and braking manoeuvres. Do not use
cruise control or Distance Pilot DISTRONIC.
If the vehicle threatens to skid or cannot be
stopped when moving at low speed:
X Shift the transmission to position N.
X Try to bring the vehicle under control by using
corrective steering.
When driving in snow with or without snow
chains, select driving program Slippery
(Y page 155).
The outside temperature indicator is not
designed to serve as an ice-warning device and
is therefore unsuitable for that purpose.
Changes in the outside temperature are dis-
played after a short delay.
Indicated temperatures just above the freezing
point do not guarantee that the road surface is
free of ice. The road may still be icy, especially in wooded areas or on bridges. You should pay
special attention to road conditions when tem-
peratures are around freezing point.
Further information on driving with snow chains
(Y page 364).
Further information on driving with summer
tyres (Y page 363).
Observe the notes in the "Changing a wheel"
section (Y page 369). Off-road driving
Important safety notes G
WARNING
If you drive on a steep incline at an angle or
turn on a steep incline, the vehicle could slip
sideways, tip and overturn. There is a risk of
an accident.
When driving on an incline, drive into the line of fall (upwards or downwards in a straight
line) and do not turn. G
WARNING
Flammable material such as leaves, grass or
twigs may ignite if they come into contact with hot parts of the exhaust system. There is a risk of fire.
When driving off road or on unpaved roads,
check the vehicle's underside regularly. In
particular, remove parts of plants or other
flammable materials which have become
trapped. In the case of damage, contact a
qualified specialist workshop. G
WARNING
If the vehicle level is high, the vehicle centre of gravity is raised. This could cause the vehicleto tip over more easily on uphill or downhill
gradients. There is a risk of an accident.
Select the lowest possible vehicle level.
! There is a risk of damage to the vehicle if:
R the vehicle becomes stuck, e.g. on a high
kerb or an unpaved road
R you drive too fast over an obstacle, e.g. a
kerb, a speed bump or a pothole in the road
R a heavy object strikes the underbody or
parts of the chassis
In situations like this, the body, the under-
body, chassis parts, wheels or tyres could be damaged without the damage being visible.
Components damaged in this way can unex-
pectedly fail or, in the case of an accident, no
longer withstand the strain they are designed
to.
If the underbody panelling is damaged, com-
bustible materials such as leaves, grass or 176
Driving tipsDriving and parking
Page 252 of 397
X
Press the 9or: button to select the
desired name.
or X To start rapid scrolling: press and hold9
or : for longer than one second.
Rapid scrolling stops when you release the
button or reach the end of the list.
X If only one telephone number is stored for
a name: press the 6ora button to
start dialling.
or X If there is more than one number for a
particular name:press the 6ora
button to display the numbers.
X Press the 9or: button to select the
number you want to dial.
X Press the 6ora button to start dial-
ling.
or
X To exit the telephone book: press the~
or % button.
Redialling The on-board computer saves the last names or
numbers dialled in the redial memory.
X Press the =or; button on the steering
wheel to select the Tel
Tel menu.
X Press the 6button to switch to the redial
memory.
X Press the 9or: button to select the
desired name or number.
X Press the 6ora button to start dial-
ling.
or X To exit the redial memory: press the~
or % button. Assistance menu
Introduction Depending on the equipment fitted in the vehi-
cle, you have the following options in the
Assist.
Assist. menu:
R Showing the assistance graphic
(Y page 249)
R Activating/deactivating the Traffic Sign
Assist display (Y page 250) R
Activating or deactivating Steering Pilot
(Y page 250)
R Activating/deactivating Active Brake Assist
(Y page 250)
R Activating/deactivating Active Brake Assist
with cross-traffic function (Y page 250)
R Activating/deactivating ATTENTION ASSIST
(Y page 250)
R Activating/deactivating Blind Spot Assist or
Active Blind Spot Assist (Y page 250)
R Activating/deactivating Lane Keeping Assist
or Active Lane Keeping Assist (Y page 251)
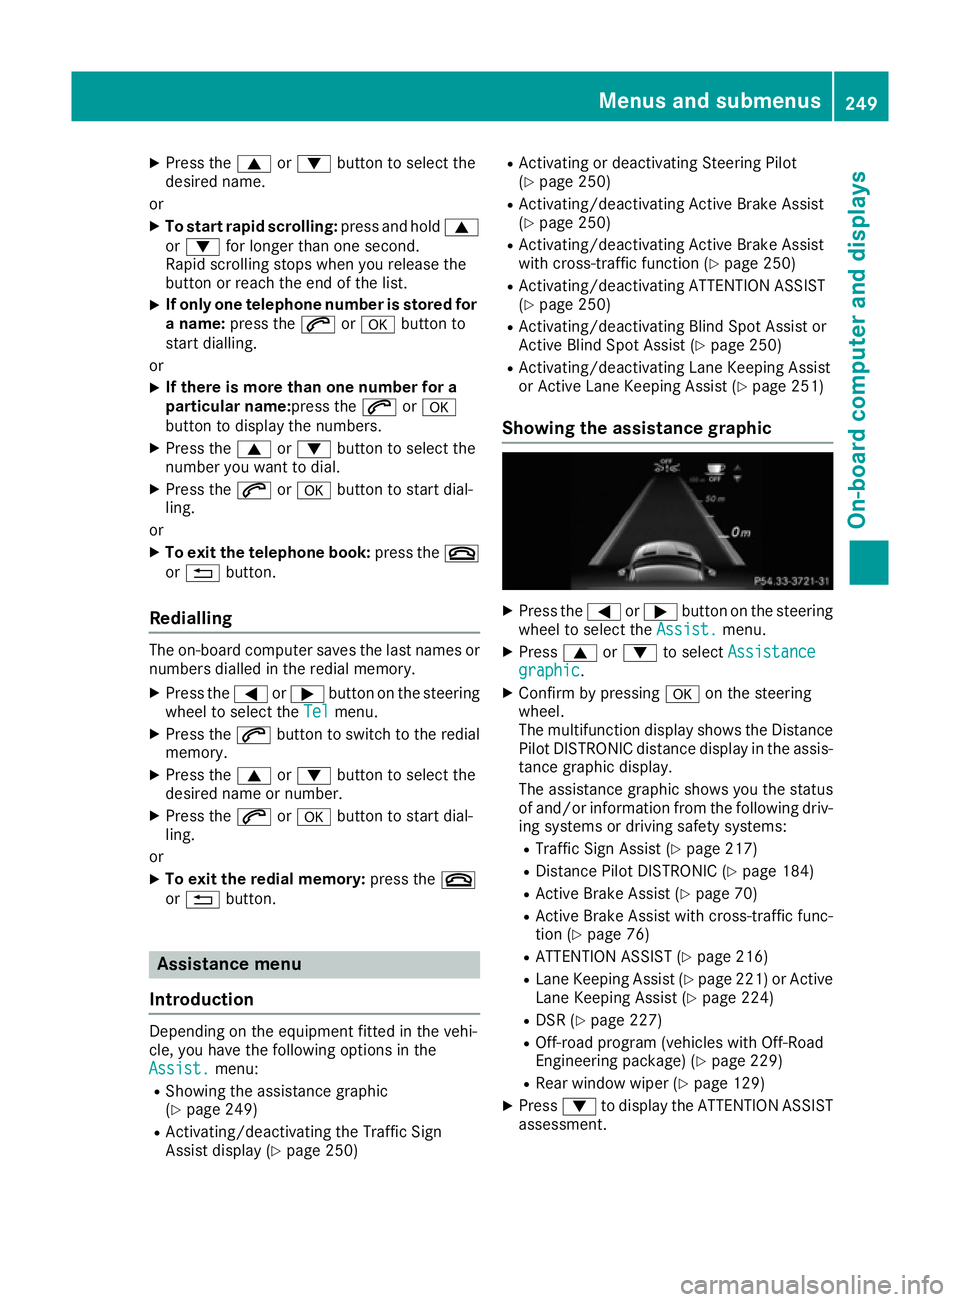
Showing the assistance graphic X
Press the =or; button on the steering
wheel to select the Assist. Assist.menu.
X Press 9or: to select Assistance
Assistance
graphic
graphic.
X Confirm by pressing aon the steering
wheel.
The multifunction display shows the Distance
Pilot DISTRONIC distance display in the assis-
tance graphic display.
The assistance graphic shows you the status
of and/or information from the following driv-
ing systems or driving safety systems:
R Traffic Sign Assist (Y page 217)
R Distance Pilot DISTRONIC (Y page 184)
R Active Brake Assist (Y page 70)
R Active Brake Assist with cross-traffic func-
tion (Y page 76)
R ATTENTION ASSIST (Y page 216)
R Lane Keeping Assist (Y page 221) or Active
Lane Keeping Assist (Y page 224)
R DSR (Y page 227)
R Off-road program (vehicles with Off-Road
Engineering package) (Y page 229)
R Rear window wiper (Y page 129)
X Press :to display the ATTENTION ASSIST
assessment. Menus and submenus
249On-board computer and displays Z
Page 256 of 397
X
Press :or9 to select the Limit Limit
speed (winter tyres): speed (winter tyres): function.
You will see the current setting.
X Press ato confirm.
X Press the :or9 button to adjust the
permanent speed limiter in increments of ten
(160 km/h 160 km/h to240 km/h
240 km/h). The Off
Off setting
switches the permanent speed limiter off.
X Press the abutton to store the entry.
Further information on the permanent speed
limiter (Y page 184).
Activating/deactivating the automatic
locking feature
If you activate the Automatic door locks
Automatic door locks
function, the vehicle is centrally locked above a speed of approximately 15 km/h.
X Press the =or; button on the steering
wheel to select the Settings
Settings menu.
X Press the :or9 button to select the
Vehicle
Vehicle submenu.
X Press ato confirm.
X Press the :or9 button to select the
Automatic door locks Automatic door locks function.
When the Automatic
Automatic door
doorlocks
locks function is
activated, the vehicle doors are displayed in
orange in the multifunction display.
X Press the abutton to save the setting.
For further information on the automatic locking
feature; see (Y page 88).
Activating/deactivating the acoustic
locking confirmation
If you switch on the Acoustic
Acoustic Lock Lockfunction, an
acoustic signal sounds when you lock the vehi-
cle.
X Press the =or; button on the steering
wheel to select the Settings Settingsmenu.
X Press the :or9 button to select the
Vehicle
Vehicle submenu.
X Press ato confirm.
X Press the :or9 button to select the
Acoustic Lock
Acoustic Lock function.
If the Acoustic Lock
Acoustic Lock function is activated,
the & symbol in the multifunction display
lights up orange.
X Press the abutton to save the setting. Heating submenu Auxiliary heating departure time
G
DANGER
If the exhaust pipe is blocked or sufficient
ventilation is not possible, toxic exhaust
fumes can enter the vehicle, especially car-
bon monoxide. This is the case, e.g. in
enclosed spaces, or if the vehicle is stuck in
snow. There is a risk of fatal injuries.
You should switch off the auxiliary heating in
enclosed spaces which do not have an extrac- tion system, e.g. a garage. If the vehicle is
stuck in snow and you must leave the auxiliary
heating running, keep the exhaust pipe and
the area around the vehicle clear of snow. To guarantee a sufficient supply of fresh air, open
a window on the side of the vehicle away from the wind. G
WARNING
When the auxiliary heating is switched on,
parts of the vehicle can become very hot.
Flammable materials such as leaves, grass or twigs may ignite if they come into contact
with:
R hot parts of the exhaust system
R the exhaust gas itself
There is a risk of fire.
When the auxiliary heating is switched on,
make sure that:
R no flammable materials come into contact
with hot vehicle components
R the exhaust gas can escape from the
exhaust pipe unhindered
R the exhaust gas does not come into contact
with flammable materials.
! Operating the auxiliary heating/ventilation
draws on the vehicle battery. After you have
heated or ventilated the vehicle a maximum of two times, drive for a longer distance.
Only vehicles with auxiliary heating have this
function. Menus and submenus
253On-board computer and displays Z
Page 270 of 397
Display messages
Possible causes/consequences and
M
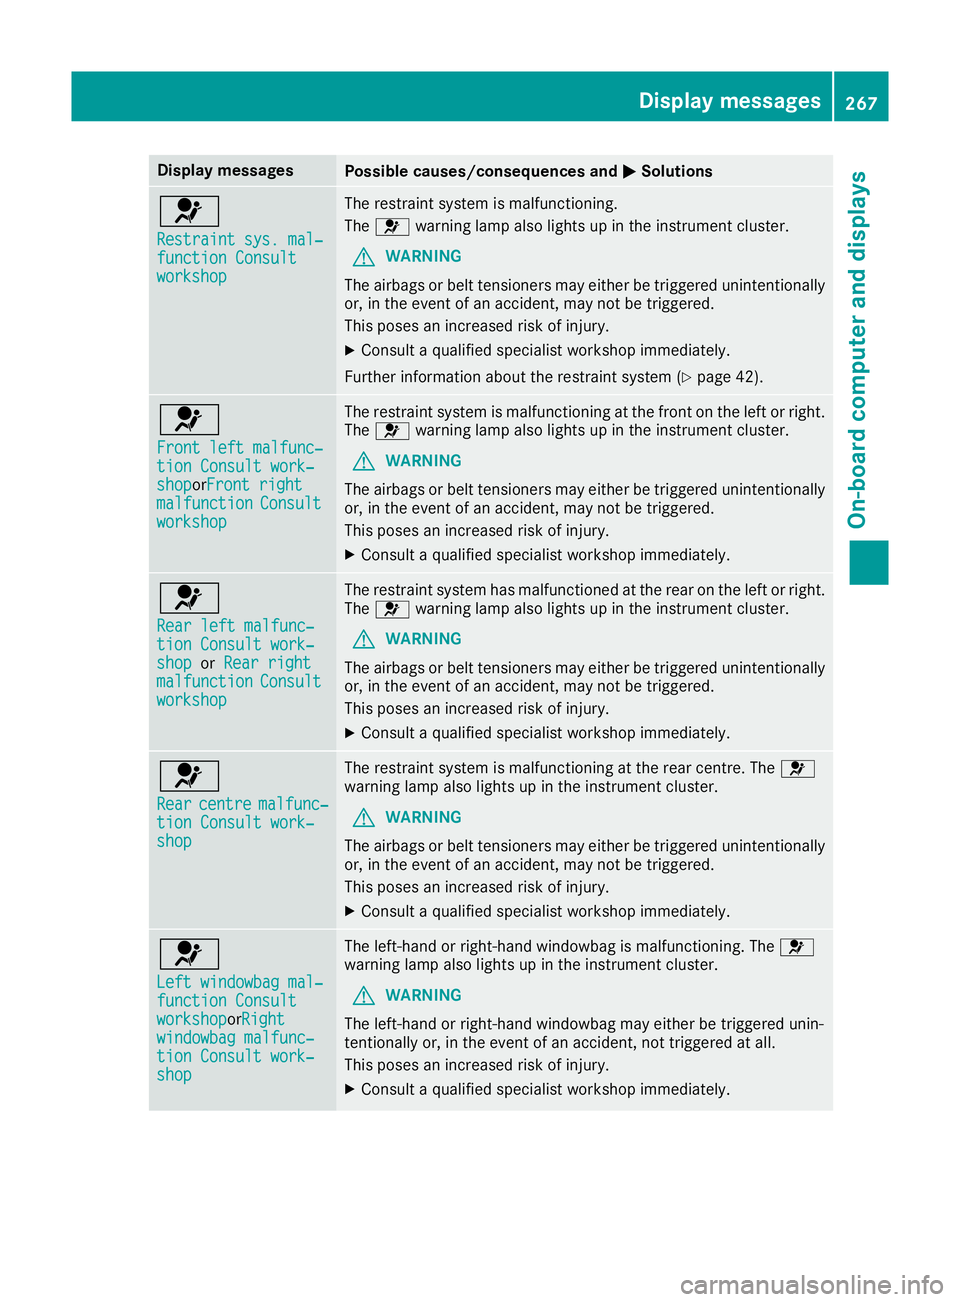
MSolutions 6
Restraint sys. mal‐ Restraint sys. mal‐
function Consult function Consult
workshop workshop The restraint system is malfunctioning.
The
6 warning lamp also lights up in the instrument cluster.
G WARNING
The airbags or belt tensioners may either be triggered unintentionally or, in the event of an accident, may not be triggered.
This poses an increased risk of injury.
X Consult a qualified specialist workshop immediately.
Further information about the restraint system (Y page 42).6
Front left malfunc‐ Front left malfunc‐
tion Consult work‐ tion Consult work‐
shop shopor
Front right
Front right
malfunction
malfunction Consult
Consult
workshop
workshop The restraint system is malfunctioning at the front on the left or right.
The 6 warning lamp also lights up in the instrument cluster.
G WARNING
The airbags or belt tensioners may either be triggered unintentionally or, in the event of an accident, may not be triggered.
This poses an increased risk of injury.
X Consult a qualified specialist workshop immediately. 6
Rear left malfunc‐ Rear left malfunc‐
tion Consult work‐ tion Consult work‐
shop shop
orRear right
Rear right
malfunction
malfunction Consult
Consult
workshop
workshop The restraint system has malfunctioned at the rear on the left or right.
The 6 warning lamp also lights up in the instrument cluster.
G WARNING
The airbags or belt tensioners may either be triggered unintentionally or, in the event of an accident, may not be triggered.
This poses an increased risk of injury.
X Consult a qualified specialist workshop immediately. 6
Rear Rear
centre
centre malfunc‐
malfunc‐
tion Consult work‐
tion Consult work‐
shop shop The restraint system is malfunctioning at the rear centre. The
6
warning lamp also lights up in the instrument cluster.
G WARNING
The airbags or belt tensioners may either be triggered unintentionally or, in the event of an accident, may not be triggered.
This poses an increased risk of injury.
X Consult a qualified specialist workshop immediately. 6
Left windowbag mal‐ Left windowbag mal‐
function Consult function Consult
workshop workshoporRight
Right
windowbag malfunc‐
windowbag malfunc‐
tion Consult work‐ tion Consult work‐
shop shop The left-hand or right-hand windowbag is malfunctioning. The
6
warning lamp also lights up in the instrument cluster.
G WARNING
The left-hand or right-hand windowbag may either be triggered unin-
tentionally or, in the event of an accident, not triggered at all.
This poses an increased risk of injury.
X Consult a qualified specialist workshop immediately. Display
messages
267On-board computer and displays Z
Page 320 of 397
load could slip, tip over or be flung around and
thereby collide with vehicle occupants. There
is a risk of injury.
Only use the lashing eyelets when securing a
load.
Observe the following notes on securing loads: R Secure the load using the lashing eyelets.
R Distribute the load on the lashing eyelets
evenly.
R Do not use elastic straps or nets to secure a
load. These are only intended as an anti-slip
protection for light loads.
R Do not route lashing materials across sharp
edges or corners.
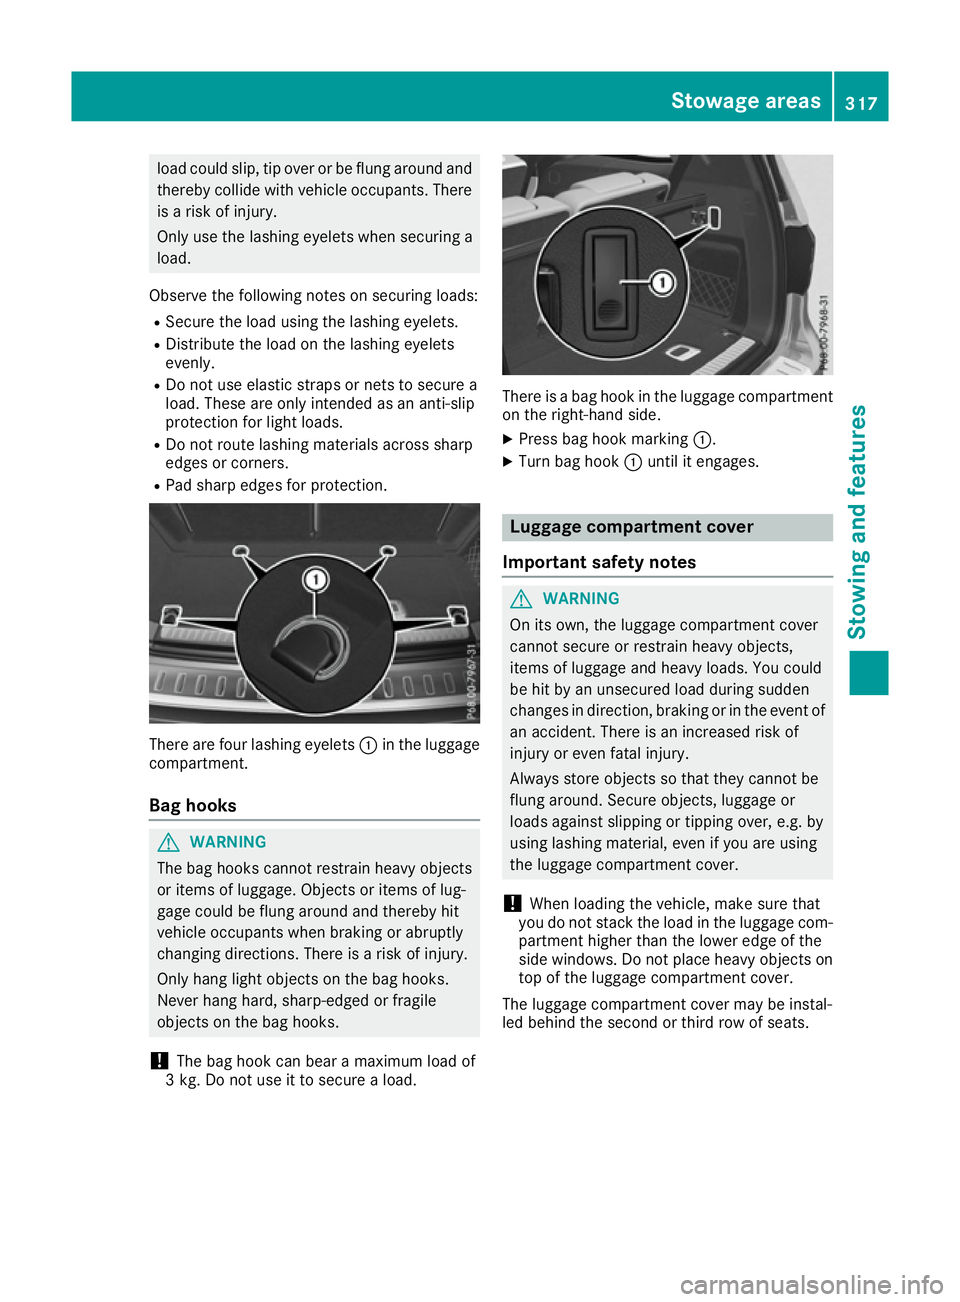
R Pad sharp edges for protection. There are four lashing eyelets
:in the luggage
compartment.
Bag hooks G
WARNING
The bag hooks cannot restrain heavy objects
or items of luggage. Objects or items of lug-
gage could be flung around and thereby hit
vehicle occupants when braking or abruptly
changing directions. There is a risk of injury.
Only hang light objects on the bag hooks.
Never hang hard, sharp-edged or fragile
objects on the bag hooks.
! The bag hook can bear a maximum load of
3 kg. Do not use it to secure a load. There is a bag hook in the luggage compartment
on the right-hand side.
X Press bag hook marking :.
X Turn bag hook :until it engages. Luggage compartment cover
Important safety notes G
WARNING
On its own, the luggage compartment cover
cannot secure or restrain heavy objects,
items of luggage and heavy loads. You could
be hit by an unsecured load during sudden
changes in direction, braking or in the event of an accident. There is an increased risk of
injury or even fatal injury.
Always store objects so that they cannot be
flung around. Secure objects, luggage or
loads against slipping or tipping over, e.g. by
using lashing material, even if you are using
the luggage compartment cover.
! When loading the vehicle, make sure that
you do not stack the load in the luggage com- partment higher than the lower edge of the
side windows. Do not place heavy objects ontop of the luggage compartment cover.
The luggage compartment cover may be instal-
led behind the second or third row of seats. Stowage areas
317Stowing and features Z
Page 325 of 397
Sun visors
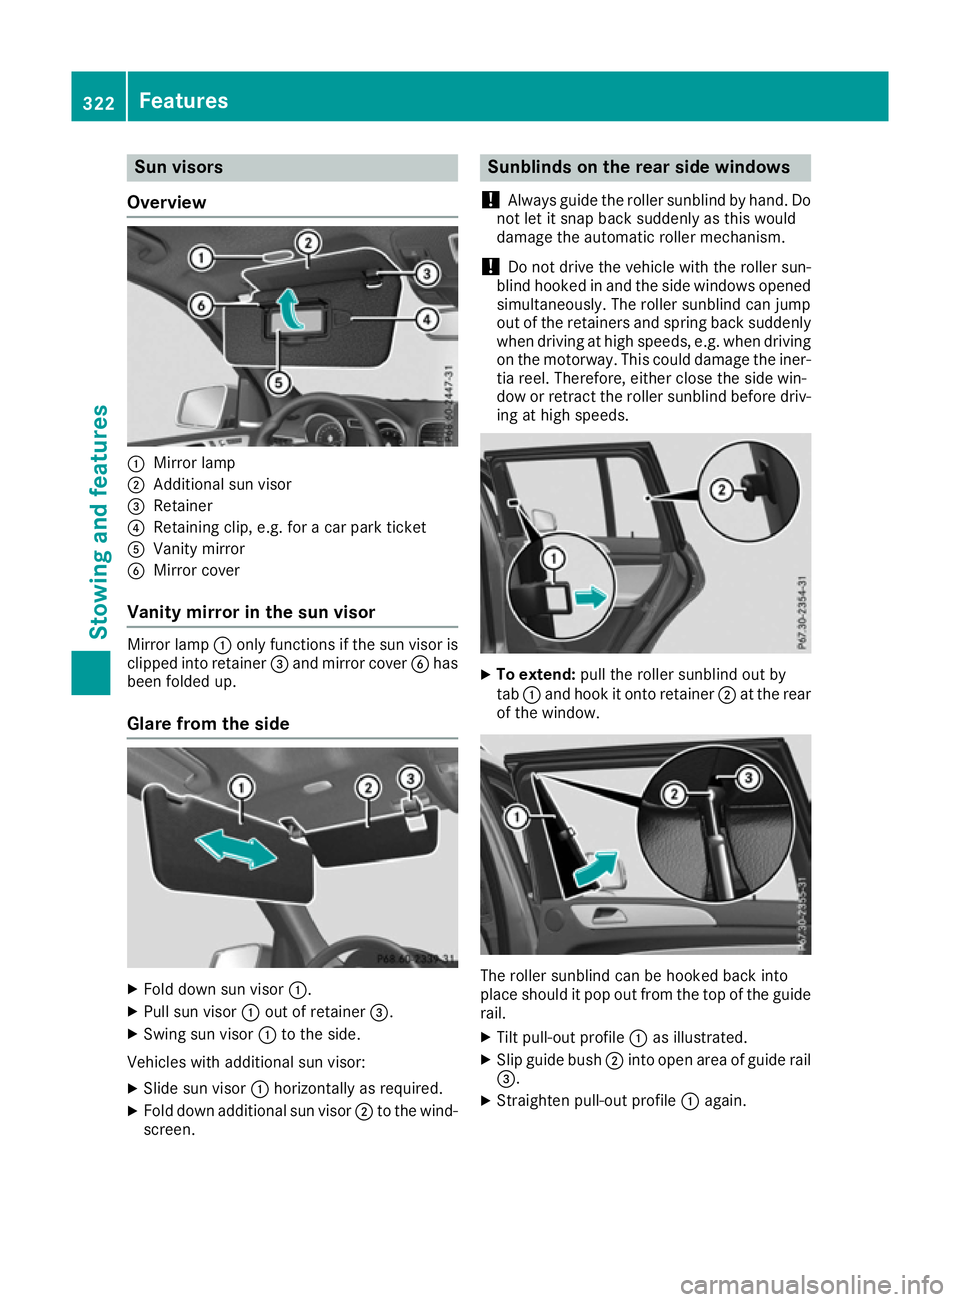
Overview :
Mirror lamp
; Additional sun visor
= Retainer
? Retaining clip, e.g. for a car park ticket
A Vanity mirror
B Mirror cover
Vanity mirror in the sun visor Mirror lamp
:only functions if the sun visor is
clipped into retainer =and mirror cover Bhas
been folded up.
Glare from the side X
Fold down sun visor :.
X Pull sun visor :out of retainer =.
X Swing sun visor :to the side.
Vehicles with additional sun visor:
X Slide sun visor :horizontally as required.
X Fold down additional sun visor ;to the wind-
screen. Sunblinds on the rear side windows
! Always guide the roller sunblind by hand. Do
not let it snap back suddenly as this would
damage the automatic roller mechanism.
! Do not drive the vehicle with the roller sun-
blind hooked in and the side windows opened simultaneously. The roller sunblind can jump
out of the retainers and spring back suddenly
when driving at high speeds, e.g. when driving on the motorway. This could damage the iner-
tia reel. Therefore, either close the side win-
dow or retract the roller sunblind before driv- ing at high speeds. X
To extend: pull the roller sunblind out by
tab :and hook it onto retainer ;at the rear
of the window. The roller sunblind can be hooked back into
place should it pop out from the top of the guide
rail.
X Tilt pull-out profile :as illustrated.
X Slip guide bush ;into open area of guide rail
=.
X Straighten pull-out profile :again. 322
FeaturesStowing and features