2016 MERCEDES-BENZ GLS SUV battery
[x] Cancel search: batteryPage 276 of 397
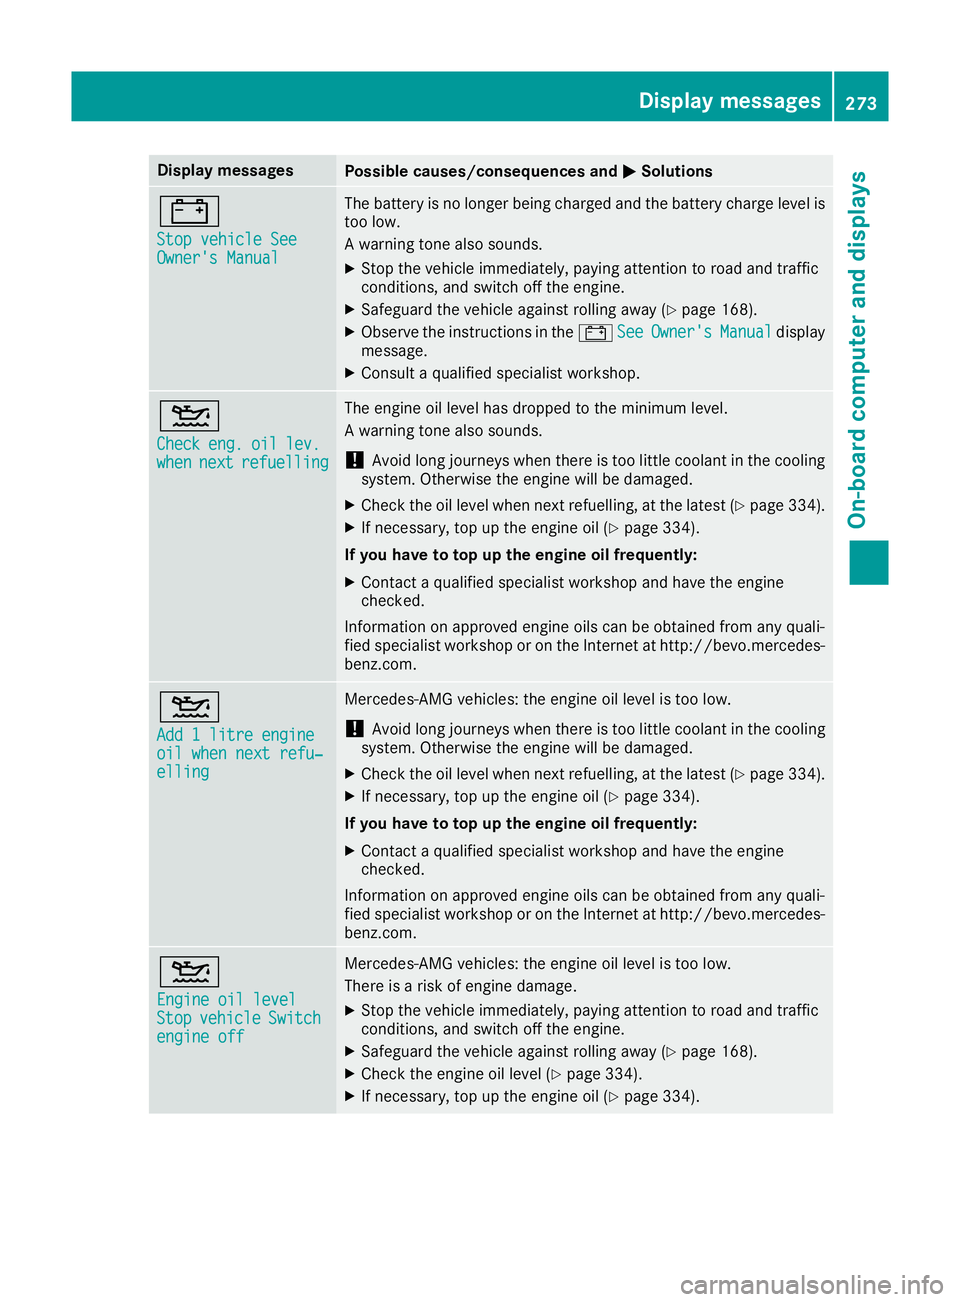
Display messages
Possible causes/consequences and
M
MSolutions #
Stop vehicle See Stop vehicle See
Owner's Manual Owner's Manual The battery is no longer being charged and the battery charge level is
too low.
A warning tone also sounds.
X Stop the vehicle immediately, paying attention to road and traffic
conditions, and switch off the engine.
X Safeguard the vehicle against rolling away (Y page 168).
X Observe the instructions in the #See SeeOwner's
Owner's Manual
Manualdisplay
message.
X Consult a qualified specialist workshop. 4
Check Check
eng.
eng.oil
oillev.
lev.
when
when next
nextrefuelling
refuelling The engine oil level has dropped to the minimum level.
A warning tone also sounds.
! Avoid long journeys when there is too little coolant in the cooling
system. Otherwise the engine will be damaged.
X Check the oil level when next refuelling, at the latest (Y page 334).
X If necessary, top up the engine oil (Y page 334).
If you have to top up the engine oil frequently:
X Contact a qualified specialist workshop and have the engine
checked.
Information on approved engine oils can be obtained from any quali-
fied specialist workshop or on the Internet at http://bevo.mercedes-
benz.co m. 4
Add 1 litre engine Add 1 litre engine
oil when next refu‐ oil when next refu‐
elling elling Mercedes-AMG vehicles: the engine oil level is too low.
! Avoid long journeys when there is too little coolant in the cooling
system. Otherwise the engine will be damaged.
X Check the oil level when next refuelling, at the latest (Y page 334).
X If necessary, top up the engine oil (Y page 334).
If you have to top up the engine oil frequently:
X Contact a qualified specialist workshop and have the engine
checked.
Information on approved engine oils can be obtained from any quali-
fied specialist workshop or on the Internet at http://bevo.mercedes-
benz.com. 4
Engine oil level Engine oil level
Stop Stop
vehicle
vehicle Switch
Switch
engine off
engine off Mercedes-AMG vehicles: the engine oil level is too low.
There is a risk of engine damage.
X Stop the vehicle immediately, paying attention to road and traffic
conditions, and switch off the engine.
X Safeguard the vehicle against rolling away (Y page 168).
X Check the engine oil level (Y page 334).
X If necessary, top up the engine oil (Y page 334). Display messages
273On-board computer and displays Z
Page 289 of 397
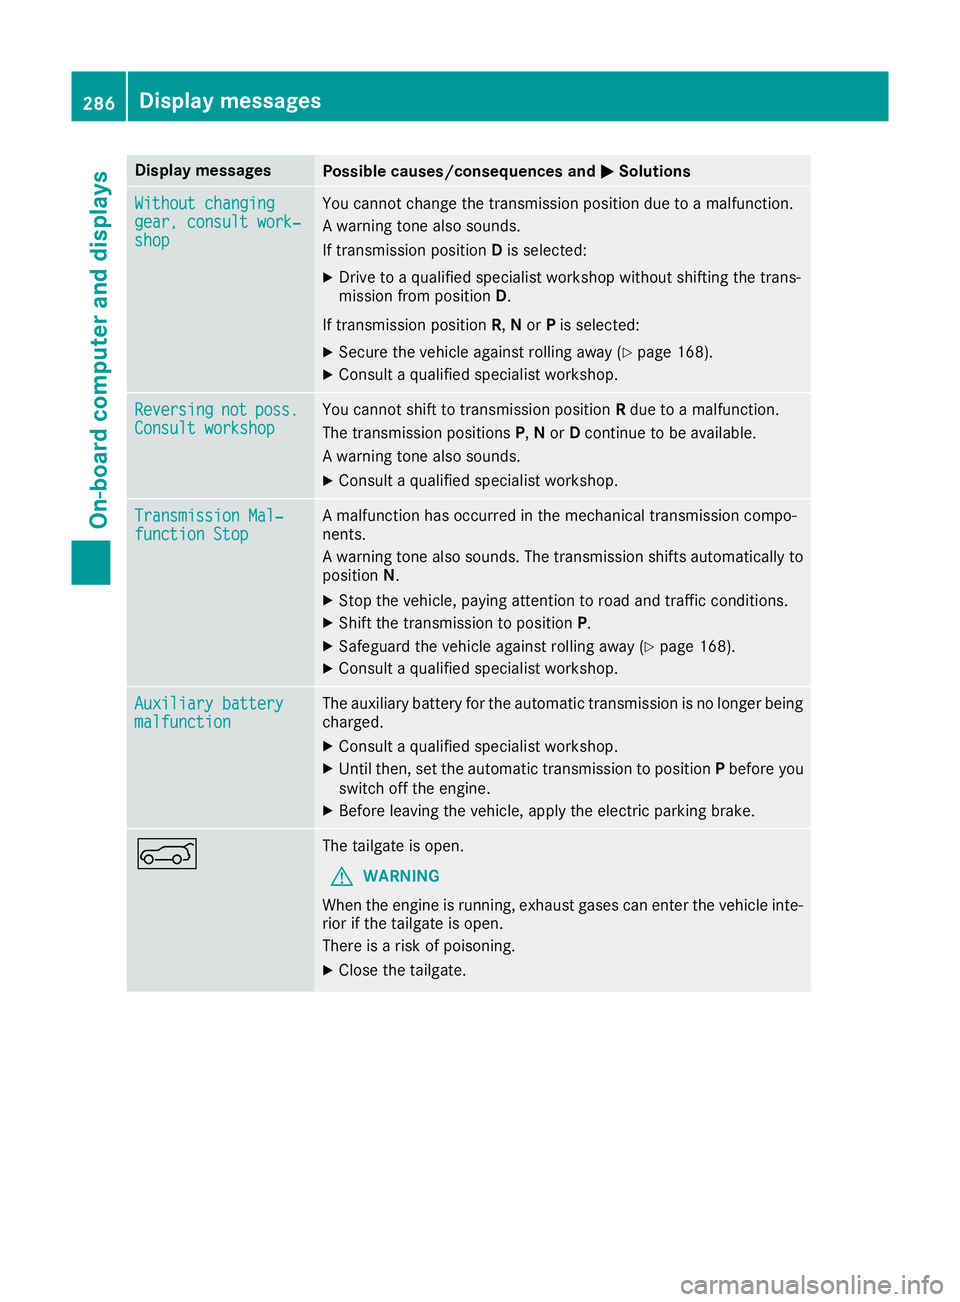
Display messages
Possible causes/consequences and
M
MSolutions Without changing
Without changing
gear, consult work‐ gear, consult work‐
shop shop You cannot change the transmission position due to a malfunction.
A warning tone also sounds.
If transmission position
Dis selected:
X Drive to a qualified specialist workshop without shifting the trans-
mission from position D.
If transmission position R,Nor Pis selected:
X Secure the vehicle against rolling away (Y page 168).
X Consult a qualified specialist workshop. Reversing Reversing
not
not poss.
poss.
Consult workshop
Consult workshop You cannot shift to transmission position
Rdue to a malfunction.
The transmission positions P,Nor Dcontinue to be available.
A warning tone also sounds.
X Consult a qualified specialist workshop. Transmission Mal‐
Transmission Mal‐
function Stop function Stop A malfunction has occurred in the mechanical transmission compo-
nents.
A warning tone also sounds. The transmission shifts automatically to position N.
X Stop the vehicle, paying attention to road and traffic conditions.
X Shift the transmission to position P.
X Safeguard the vehicle against rolling away (Y page 168).
X Consult a qualified specialist workshop. Auxiliary battery Auxiliary battery
malfunction malfunction The auxiliary battery for the automatic transmission is no longer being
charged.
X Consult a qualified specialist workshop.
X Until then, set the automatic transmission to position Pbefore you
switch off the engine.
X Before leaving the vehicle, apply the electric parking brake. A The tailgate is open.
G WARNING
When the engine is running, exhaust gases can enter the vehicle inte- rior if the tailgate is open.
There is a risk of poisoning.
X Close the tailgate. 286
Display
messagesOn-board computer and displays
Page 291 of 397
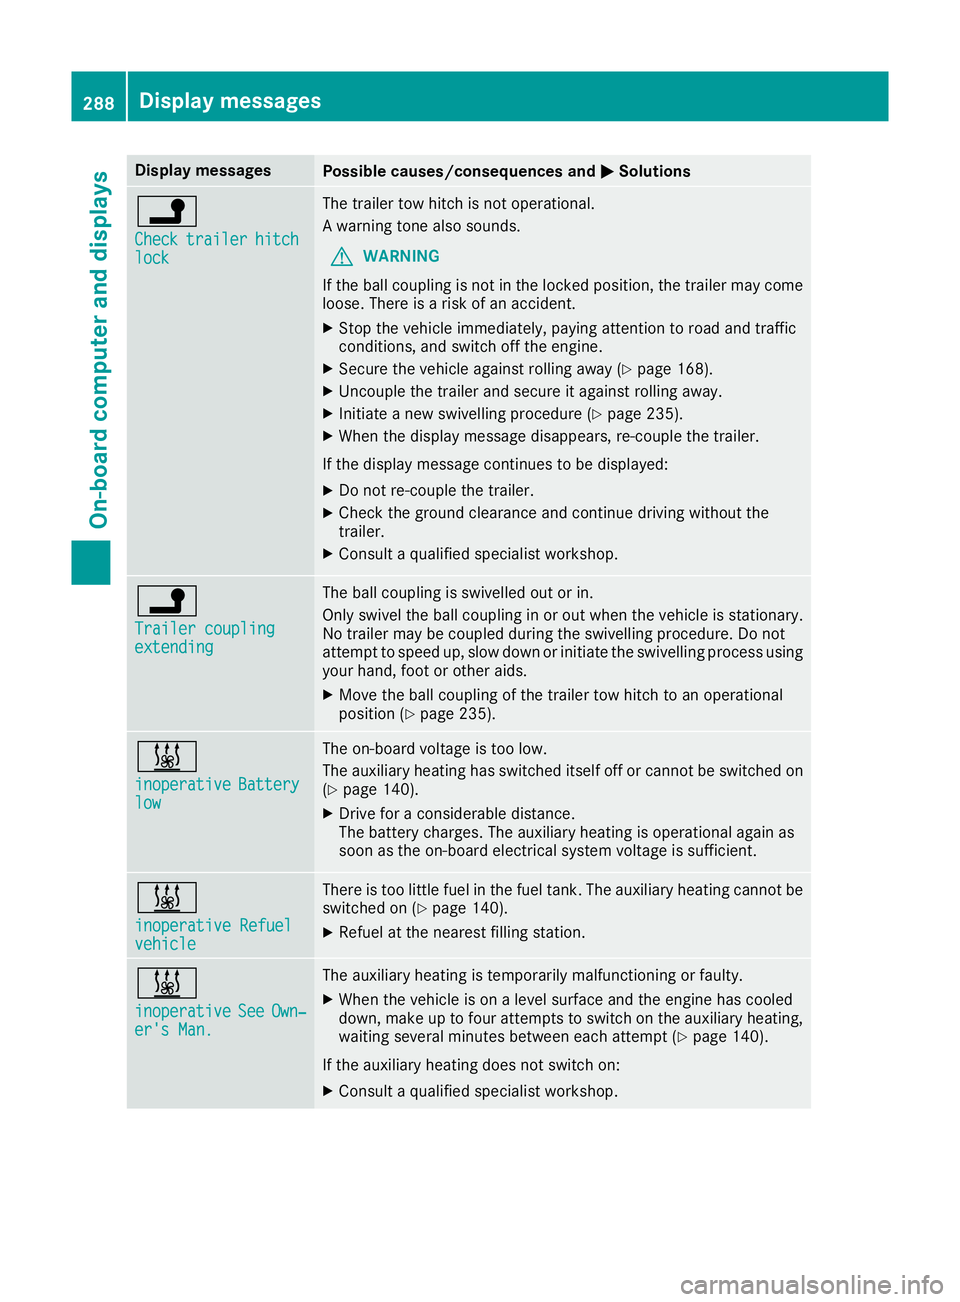
Display messages
Possible causes/consequences and
M
MSolutions j
Check Check
trailer
trailer hitch
hitch
lock
lock The trailer tow hitch is not operational.
A warning tone also sounds.
G WARNING
If the ball coupling is not in the locked position, the trailer may come
loose. There is a risk of an accident.
X Stop the vehicle immediately, paying attention to road and traffic
conditions, and switch off the engine.
X Secure the vehicle against rolling away (Y page 168).
X Uncouple the trailer and secure it against rolling away.
X Initiate a new swivelling procedure (Y page 235).
X When the display message disappears, re-couple the trailer.
If the display message continues to be displayed: X Do not re-couple the trailer.
X Check the ground clearance and continue driving without the
trailer.
X Consult a qualified specialist workshop. j
Trailer coupling Trailer coupling
extending extending The ball coupling is swivelled out or in.
Only swivel the ball coupling in or out when the vehicle is stationary.
No trailer may be coupled during the swivelling procedure. Do not
attempt to speed up, slow down or initiate the swivelling process using your hand, foot or other aids.
X Move the ball coupling of the trailer tow hitch to an operational
position (Y page 235). &
inoperative inoperative
Battery
Battery
low
low The on-board voltage is too low.
The auxiliary heating has switched itself off or cannot be switched on
(Y page 140).
X Drive for a considerable distance.
The battery charges. The auxiliary heating is operational again as
soon as the on-board electrical system voltage is sufficient. &
inoperative Refuel inoperative Refuel
vehicle vehicle There is too little fuel in the fuel tank. The auxiliary heating cannot be
switched on (Y page 140).
X Refuel at the nearest filling station. &
inoperative inoperative
See
SeeOwn‐
Own‐
er's Man.
er's Man. The auxiliary heating is temporarily malfunctioning or faulty.
X When the vehicle is on a level surface and the engine has cooled
down, make up to four attempts to switch on the auxiliary heating,
waiting several minutes between each attempt (Y page 140).
If the auxiliary heating does not switch on: X Consult a qualified specialist workshop. 288
Display
messagesOn-board computer and displays
Page 292 of 397
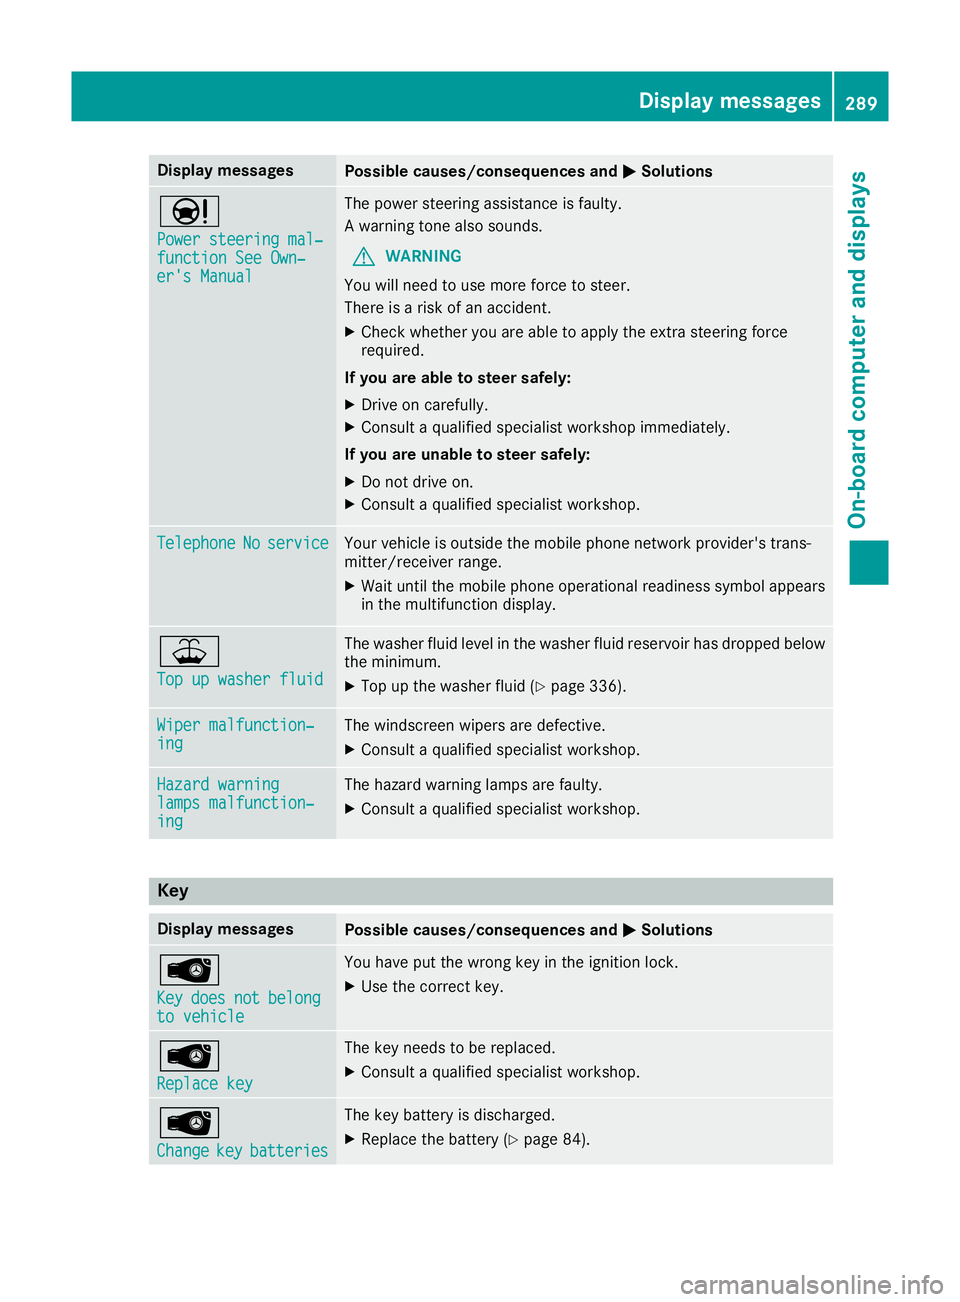
Display messages
Possible causes/consequences and
M
MSolutions Ð
Power steering mal‐ Power steering mal‐
function See Own‐ function See Own‐
er's Manual er's Manual The power steering assistance is faulty.
A warning tone also sounds.
G WARNING
You will need to use more force to steer.
There is a risk of an accident.
X Check whether you are able to apply the extra steering force
required.
If you are able to steer safely:
X Drive on carefully.
X Consult a qualified specialist workshop immediately.
If you are unable to steer safely:
X Do not drive on.
X Consult a qualified specialist workshop. Telephone Telephone
No
Noservice
service Your vehicle is outside the mobile phone network provider's trans-
mitter/receiver range.
X Wait until the mobile phone operational readiness symbol appears
in the multifunction display. ¥
Top up washer fluid Top up washer fluid The washer fluid level in the washer fluid reservoir has dropped below
the minimum.
X Top up the washer fluid (Y page 336).Wiper malfunction‐
Wiper malfunction‐
ing ing The windscreen wipers are defective.
X Consult a qualified specialist workshop. Hazard warning
Hazard warning
lamps malfunction‐ lamps malfunction‐
ing ing The hazard warning lamps are faulty.
X Consult a qualified specialist workshop. Key
Display messages
Possible causes/consequences and
M
MSolutions Â
Key Key
does
does not
notbelong
belong
to vehicle
to vehicle You have put the wrong key in the ignition lock.
X Use the correct key. Â
Replace key Replace key The key needs to be replaced.
X Consult a qualified specialist workshop. Â
Change Change
key
keybatteries
batteries The key battery is discharged.
X Replace the battery (Y page 84). Display
messages
289On-board computer and displays Z
Page 327 of 397

X
Turn the key to position 2in the ignition lock
(Y page 148).
X To open: slide cover :to its foremost posi-
tion.
X Press in cigarette lighter ;.
Cigarette lighter ;will pop out automatically
when the heating element is red-hot.
X To close: pull cover :back as far as it will go. 12 V sockets
General notes X
Turn the key to position 1in the ignition lock
(Y page 148).
With the exception of the socket in the front
centre console, all sockets can be used for
accessories with a maximum current draw of
240 W (20 A). The socket in the front centre
console can be used for accessories with a max-
imum current draw of 180 W (15 A). Accessories include such items as mobile phone chargers.
If you use the sockets for long periods when the engine is switched off, the battery may dis-
charge.
i An emergency cut-off ensures that the on-
board voltage does not drop too low. If the on-
board voltage is too low, the power to the
sockets is automatically cut. This ensures
that there is sufficient power to start the
engine.
Socket in the front centre console !
The socket is not intended for operating the
tyre inflation compressor.
X To open: slide the cover to its foremost posi-
tion.
X Lift up the cover of the socket.
X To close: pull the cover back as far as it will
go.
Socket in the rear-compartment centre
console On vehicles with the Rear Seat Entertainment
System, there are two sockets in the rear-com-
partment centre console.
X Lift up the cover of the socket. Socket in the luggage compartment
X
Lift up the cover of socket :. Mercedes-Benz emergency call sys-
tem
Information on these requirements can be found in the separate multimedia system operating
instructions. X
To open: press and hold cover :for at least
one second.
X To make an emergency call: press SOS but-
ton ;briefly.
The indicator lamp in SOS button ;flashes
until the emergency call is concluded.
X Wait for a voice connection to the Mercedes-
Benz emergency call centre.
X After the emergency call, close cover :.
You will see a message if:
R a connection to the Mercedes-Benz emer-
gency call centre cannot be made
R a call has not been automatically forwarded
to the public emergency call centre
In this case, dial the 112emergency number
on your mobile phone. 324
FeaturesStowing and features
Page 339 of 397
X
Turn the key to position 0in the ignition lock
(Y page 148).
X On vehicles with KEYLESS-GO, press the
Start/Stop button (Y page 150).
X Press the Start/Stop button (Y page 150).
X Slowly turn cap :half a turn anti-clockwise
and allow excess pressure to escape.
X Turn cap :further anti-clockwise and
remove it.
If the coolant is at the level of marker bar =
in the filler neck when cold, there is enough
coolant in coolant expansion tank ;.
If the coolant level is approximately 1.5 cm
above marker bar =in the filler neck when
warm, there is enough coolant in coolant
expansion tank ;.
X If necessary, top up with coolant that has
been tested and approved by Mercedes-Benz.
X Replace cap :and turn it clockwise as far as
it will go.
Further information on coolant (Y page 386).
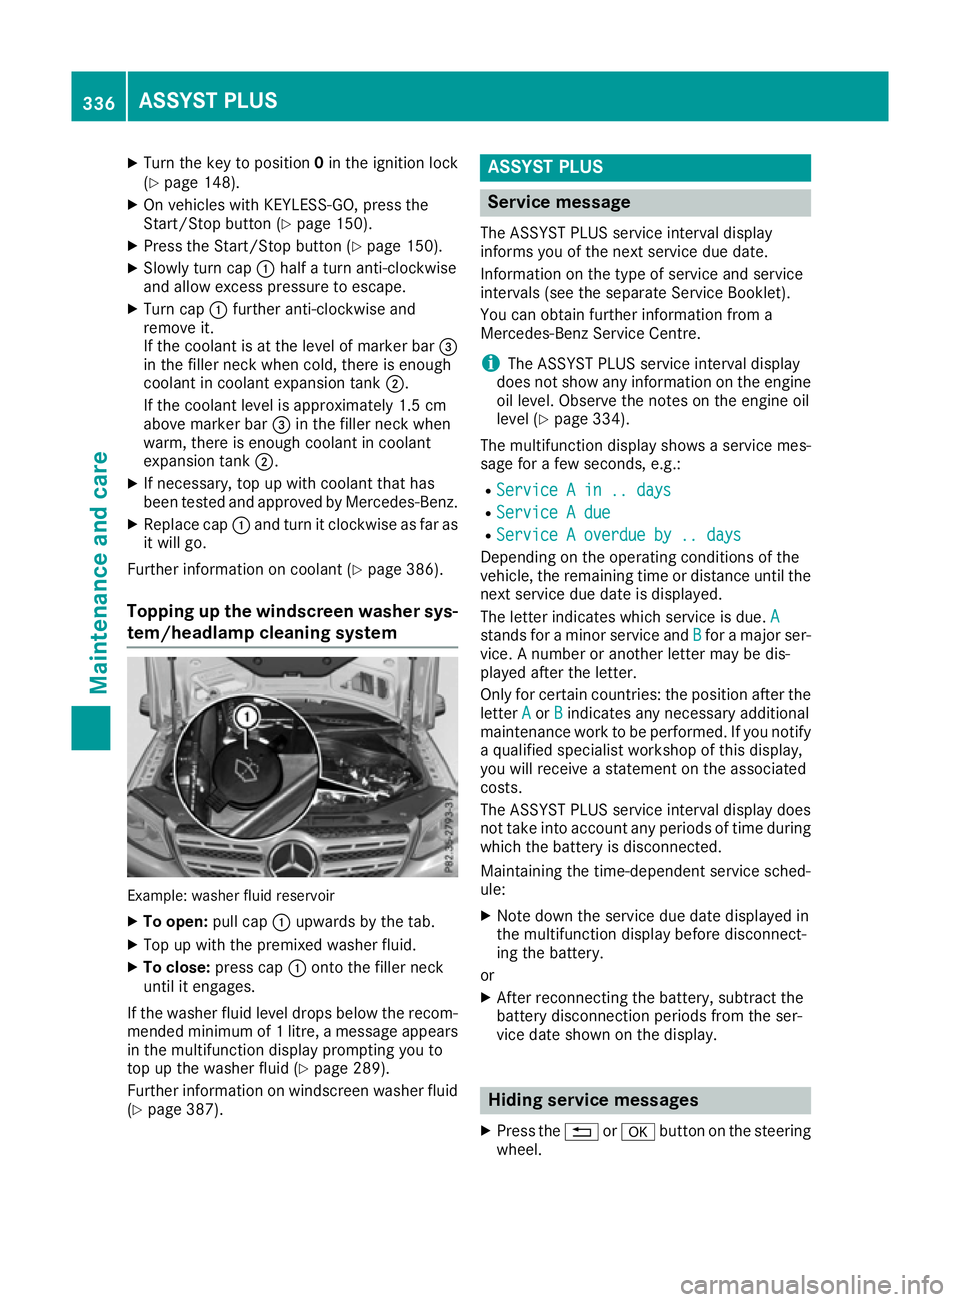
Topping up the windscreen washer sys- tem/headlamp cleaning system Example: washer fluid reservoir
X To open: pull cap:upwards by the tab.
X Top up with the premixed washer fluid.
X To close: press cap :onto the filler neck
until it engages.
If the washer fluid level drops below the recom- mended minimum of 1 litre, a message appears in the multifunction display prompting you to
top up the washer fluid (Y page 289).
Further information on windscreen washer fluid
(Y page 387). ASSYST PLUS
Service message
The ASSYST PLUS service interval display
informs you of the next service due date.
Information on the type of service and service
intervals (see the separate Service Booklet).
You can obtain further information from a
Mercedes-Benz Service Centre.
i The ASSYST PLUS service interval display
does not show any information on the engine oil level. Observe the notes on the engine oil
level (Y page 334).
The multifunction display shows a service mes-
sage for a few seconds, e.g.:
R Service A in .. days Service A in .. days
R Service A due
Service A due
R Service A overdue by .. days
Service A overdue by .. days
Depending on the operating conditions of the
vehicle, the remaining time or distance until the
next service due date is displayed.
The letter indicates which service is due. A A
stands for a minor service and B
Bfor a major ser-
vice. A number or another letter may be dis-
played after the letter.
Only for certain countries: the position after the letter A
A or B
Bindicates any necessary additional
maintenance work to be performed. If you notify
a qualified specialist workshop of this display,
you will receive a statement on the associated
costs.
The ASSYST PLUS service interval display does
not take into account any periods of time during which the battery is disconnected.
Maintaining the time-dependent service sched-
ule:
X Note down the service due date displayed in
the multifunction display before disconnect-
ing the battery.
or
X After reconnecting the battery, subtract the
battery disconnection periods from the ser-
vice date shown on the display. Hiding service messages
X Press the %ora button on the steering
wheel. 336
ASSYST PLUSMaintenance and care
Page 342 of 397
X
Use a mild cleaning agent, such as a car
shampoo approved by Mercedes-Benz.
X Thoroughly hose down the vehicle with a gen-
tle jet of water.
X Do not point the water jet directly towards the
air inlets.
X Use plenty of water and rinse out the sponge
frequently.
X Rinse the vehicle with clean water and dry
thoroughly with a chamois.
X Do not let the cleaning agent dry on the paint-
work.
When using the vehicle in winter, remove all
traces of road salt deposits carefully and as
soon as possible.
High-pressure cleaning equipment G
WARNING
The water jet of circular-jet nozzles (dirt grind- ers) can cause damage not visible from the
outside to tyres or chassis components. Com-
ponents damaged in this way can unexpect-
edly fail. There is a risk of an accident.
Do not use high-pressure cleaners with circu-
lar-jet nozzles to clean the vehicle. Have dam- aged tyres or chassis components replaced
immediately.
! Always maintain a distance of at least 30 cm
between the vehicle and the high-pressure
cleaner nozzle. Information about the correct
distance is available from the equipment
manufacturer.
Move the high-pressure cleaner nozzle
around when cleaning your vehicle.
Do not aim directly at any of the following:
R tyres
R door gaps, roof gaps, joints etc.
R electrical components
R battery
R plug connectors
R lamps
R seals
R trim elements
R ventilation slots
Damage to seals or electrical components
can lead to leaks or failures. Cleaning the paintwork !
Do not affix:
R stickers
R films
R magnetic plates or similar items
to painted surfaces. You could otherwise
damage the paintwork.
Scratches, corrosive deposits, areas affected by
corrosion and damage caused by inadequate
care cannot always be completely repaired. In
such cases, visit a qualified specialist workshop.
X Remove impurities immediately, where pos-
sible, whilst avoiding rubbing too hard.
X Soak insect remains with insect remover and
rinse off the treated areas afterwards.
X Soak bird droppings with water and rinse off
the treated areas afterwards.
X Remove coolant, brake fluid, tree resin, oils,
fuels and greases by rubbing gently with a
cloth soaked in petroleum ether or lighter
fluid.
X Use tar remover to remove tar stains.
X Use silicone remover to remove wax.
Care and treatment of matt paintwork !
Never polish the vehicle or the light alloy
wheels. Polishing makes the paintwork shiny.
! The following may cause the paint to
become shiny and thus reduce the matt
effect:
R vigorous rubbing with unsuitable materials
R frequent use of car washes
R washing the vehicle in direct sunlight
! Never use paint cleaner, buffing or polishing
products, or gloss preserver, e.g. wax, for the purpose of paintwork care. These products
are only suitable for high-gloss surfaces. Their
use on vehicles with matt paintwork leads to
considerable surface damage or, more spe-
cifically, to shiny, spotted areas.
Always have paintwork repairs carried out at a
qualified specialist workshop.
! Do not use wash programs with a hot wax
treatment under any circumstances.
Observe these notes if your vehicle has a clear
matt finish. This will help you to avoid damage to the paintwork due to incorrect treatment. Care
339Maintenance and care Z
Page 354 of 397
X
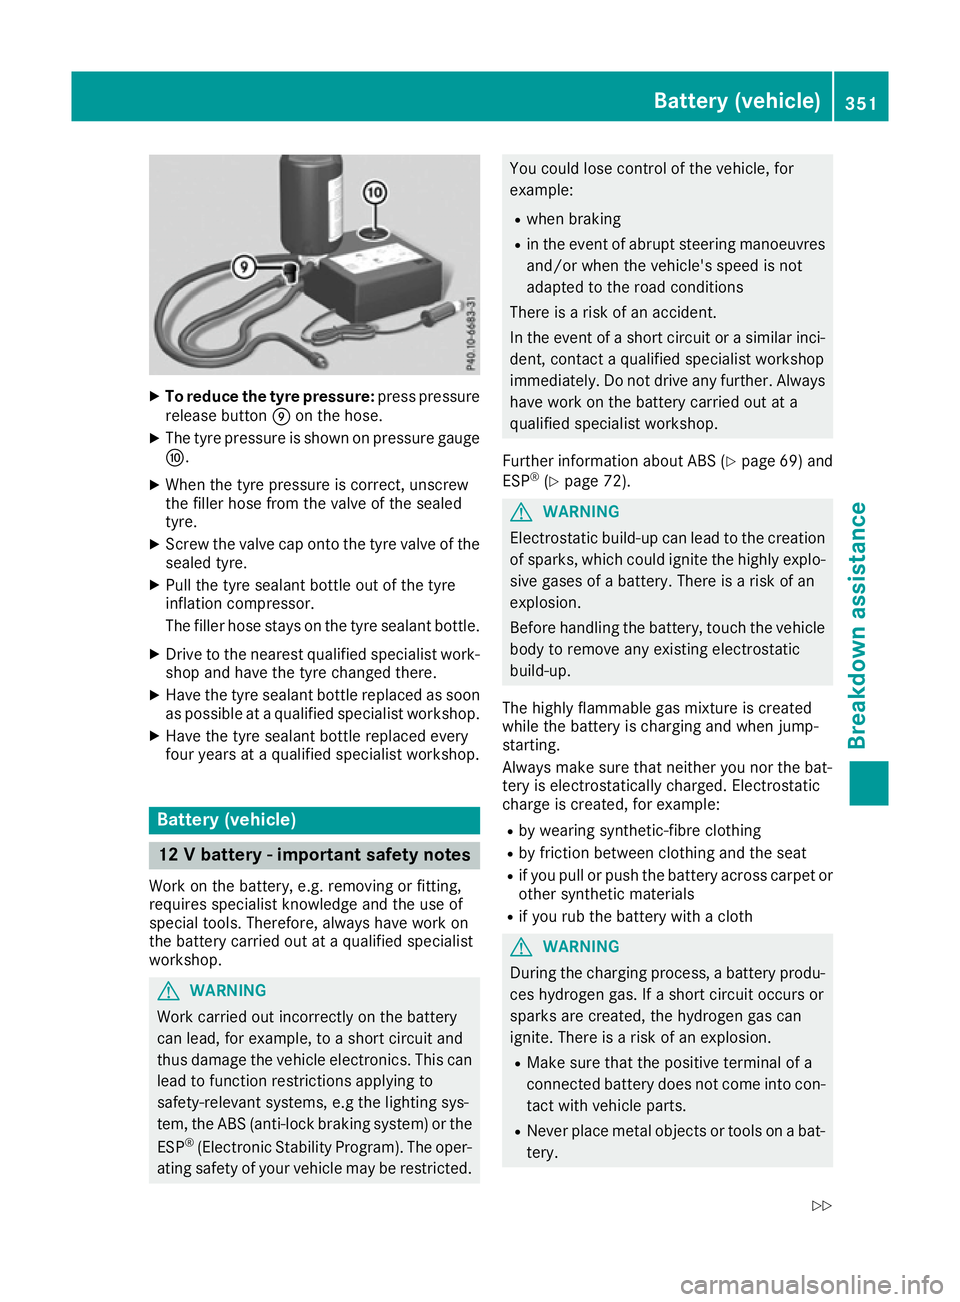
To reduce the tyre pressure: press pressure
release button Eon the hose.
X The tyre pressure is shown on pressure gauge
F.
X When the tyre pressure is correct, unscrew
the filler hose from the valve of the sealed
tyre.
X Screw the valve cap onto the tyre valve of the
sealed tyre.
X Pull the tyre sealant bottle out of the tyre
inflation compressor.
The filler hose stays on the tyre sealant bottle.
X Drive to the nearest qualified specialist work-
shop and have the tyre changed there.
X Have the tyre sealant bottle replaced as soon
as possible at a qualified specialist workshop.
X Have the tyre sealant bottle replaced every
four years at a qualified specialist workshop. Battery (vehicle)
12 V battery - important safety notes
Work on the battery, e.g. removing or fitting,
requires specialist knowledge and the use of
special tools. Therefore, always have work on
the battery carried out at a qualified specialist
workshop. G
WARNING
Work carried out incorrectly on the battery
can lead, for example, to a short circuit and
thus damage the vehicle electronics. This can lead to function restrictions applying to
safety-relevant systems, e.g the lighting sys-
tem, the ABS (anti-lock braking system) or the
ESP ®
(Electronic Stability Program). The oper-
ating safety of your vehicle may be restricted. You could lose control of the vehicle, for
example:
R when braking
R in the event of abrupt steering manoeuvres
and/or when the vehicle's speed is not
adapted to the road conditions
There is a risk of an accident.
In the event of a short circuit or a similar inci-
dent, contact a qualified specialist workshop
immediately. Do not drive any further. Always have work on the battery carried out at a
qualified specialist workshop.
Further information about ABS (Y page 69)and
ESP ®
(Y page 72). G
WARNING
Electrostatic build-up can lead to the creation of sparks, which could ignite the highly explo-
sive gases of a battery. There is a risk of an
explosion.
Before handling the battery, touch the vehicle body to remove any existing electrostatic
build-up.
The highly flammable gas mixture is created
while the battery is charging and when jump-
starting.
Always make sure that neither you nor the bat-
tery is electrostatically charged. Electrostatic
charge is created, for example: R by wearing synthetic-fibre clothing
R by friction between clothing and the seat
R if you pull or push the battery across carpet or
other synthetic materials
R if you rub the battery with a cloth G
WARNING
During the charging process, a battery produ- ces hydrogen gas. If a short circuit occurs or
sparks are created, the hydrogen gas can
ignite. There is a risk of an explosion.
R Make sure that the positive terminal of a
connected battery does not come into con-
tact with vehicle parts.
R Never place metal objects or tools on a bat-
tery. Battery (vehicle)
351Breakdown assis tance
Z