2016 MERCEDES-BENZ GLS SUV battery
[x] Cancel search: batteryPage 174 of 397
In addition, at least one of the following condi-
tions must be fulfilled:
R The engine is switched off
R The driver is not wearing a seat belt and the
driver's door is opened
R The system is malfunctioning
R The power supply is insufficient
R The vehicle is stationary for a lengthy period
The red !indicator lamp in the instrument
cluster lights up.
The electric parking brake is not automatically
applied if the engine is switched off by the ECO
start/stop function.
Releasing automatically The electric parking brake is released automat-
ically when all of the following conditions are
fulfilled:
R the engine is running.
R the transmission is in position Dor R
R the seat belt is fastened
R you depress the accelerator pedal
If the transmission is in position R, the boot lid
must be closed.
If your seat belt is not fastened, the following
conditions must be fulfilled for the electric park-
ing brake to be released automatically:
R the driver's door is closed
R you have shifted out of transmission position
P or you have previously driven faster than
3 km/h
i Ensure that you do not depress the accel-
erator pedal unintentionally. Otherwise, the
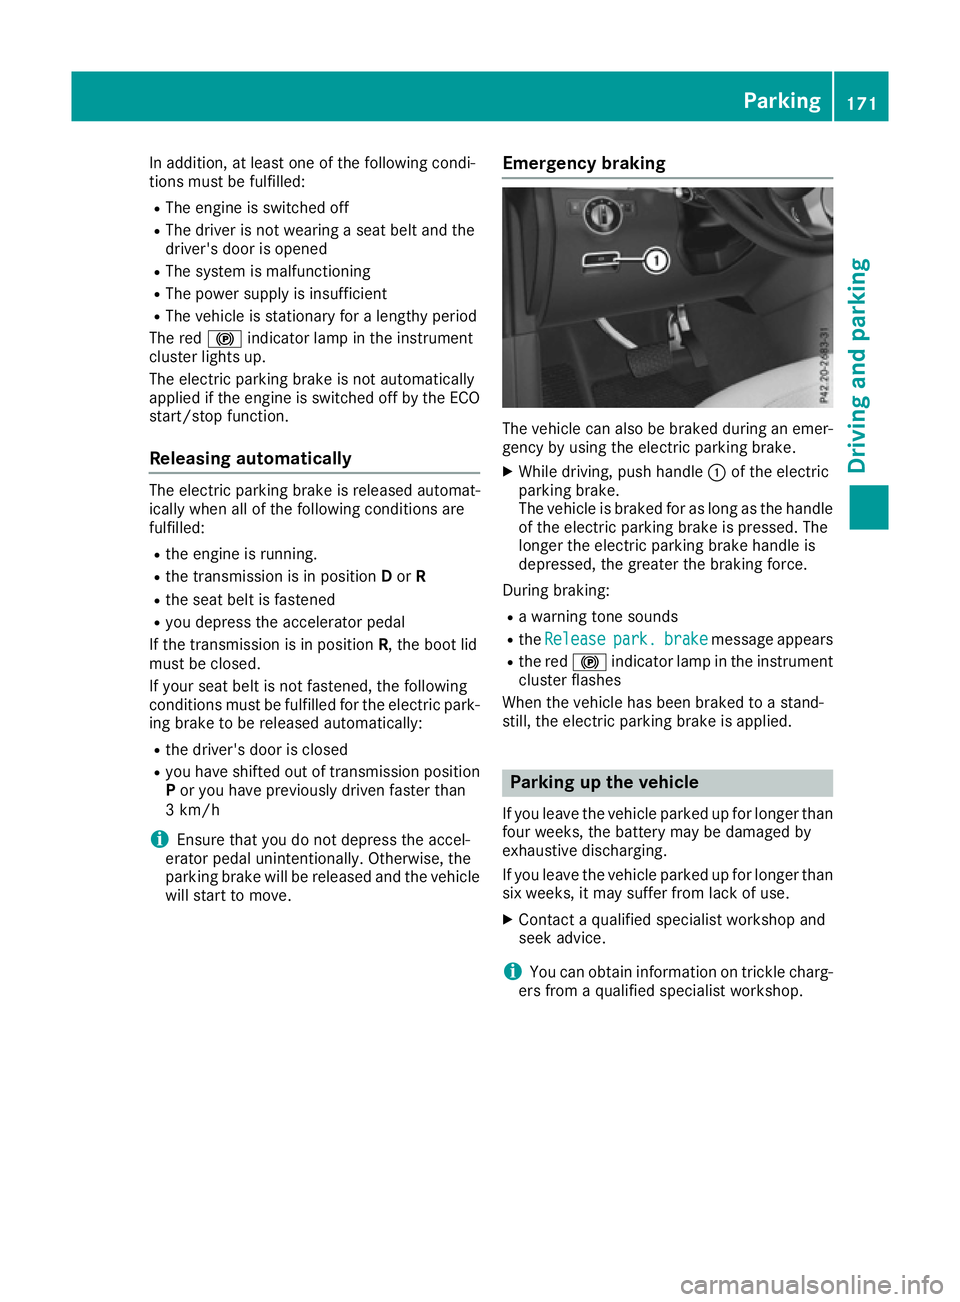
parking brake will be released and the vehicle will start to move. Emergency braking The vehicle can also be braked during an emer-
gency by using the electric parking brake.
X While driving, push handle :of the electric
parking brake.
The vehicle is braked for as long as the handle of the electric parking brake is pressed. The
longer the electric parking brake handle is
depressed, the greater the braking force.
During braking:
R a warning tone sounds
R the Release Release park.
park.brake
brakemessage appears
R the red !indicator lamp in the instrument
cluster flashes
When the vehicle has been braked to a stand-
still, the electric parking brake is applied. Parking up the vehicle
If you leave the vehicle parked up for longer than
four weeks, the battery may be damaged by
exhaustive discharging.
If you leave the vehicle parked up for longer than
six weeks, it may suffer from lack of use.
X Contact a qualified specialist workshop and
seek advice.
i You can obtain information on trickle charg-
ers from a qualified specialist workshop. Parking
171Driving and parking Z
Page 191 of 397
Stopping
G
WARNING
When leaving the vehicle, even if it is braked
only by DISTRONIC PLUS, it could roll away if:
R there is a malfunction in the system or in
the voltage supply.
R DISTRONIC PLUS has been deactivated
with the cruise control lever, e.g. by a vehi-
cle occupant or from outside the vehicle.
R the electrical system in the engine com-
partment, the battery or the fuses have
been tampered with.
R the battery is disconnected.
R the accelerator pedal has been depressed,
e.g. by a vehicle occupant.
There is a risk of an accident.
If you wish to exit the vehicle, always turn off
DISTRONIC PLUS and secure the vehicle
against rolling away.
If Distance Pilot DISTRONIC detects that the
vehicle in front is stopping, it brakes your vehicle to a stop.
Once your vehicle is stationary, it remains sta-
tionary and you do not need to depress the
brake.
After a short period, the vehicle is secured by
the electric parking brake, thus relieving the
service brake.
Depending on the specified minimum distance,
your vehicle will come to a standstill at a suffi-
cient distance behind the vehicle in front. The
specified minimum distance is set using the
control on the cruise control lever.
The transmission is shifted automatically to
position P if, with Distance Pilot DISTRONIC
activated and the vehicle stationary:
R the driver's door is open and the driver's seat
belt is unfastened
R the engine is switched off, unless it is auto-
matically switched off by the ECO start/stop
function
The electric parking brake secures the vehicle
automatically if, with Distance Pilot DISTRONIC activated and the vehicle stationary:
R a system fault occurs.
R the power supply is insufficient. On steep uphill or downhill inclines or if there is
a malfunction, the transmission may also be
automatically shifted into position P.
Setting a speed Bear in mind that it may take a brief moment
until the vehicle has accelerated or braked to
the set speed.
X Press the cruise control lever up :for a
higher speed or down Afor a lower speed
X Keep the cruise control lever pressed until the
desired speed is reached.
X Release the cruise control lever.
The new speed is stored. Distance Pilot
DISTRONIC is activated and adjusts the vehi-
cle's speed to the new speed stored.
X To adjust the set speed in1 km/hincre-
ments:
briefly press the cruise control lever
up : or down Ato the pressure point.
The last stored speed increases or decreases
in 1 km/h increments.
X To adjust the set speed in10 km/hincre-
ments: briefly press the cruise control lever
up : or down Abeyond the pressure point.
The last stored speed increases or decreases
in 10 km/h increments.
i If you accelerate to overtake, Distance Pilot
DISTRONIC adjusts the vehicle's speed to the last speed stored after you have finished over-
taking.
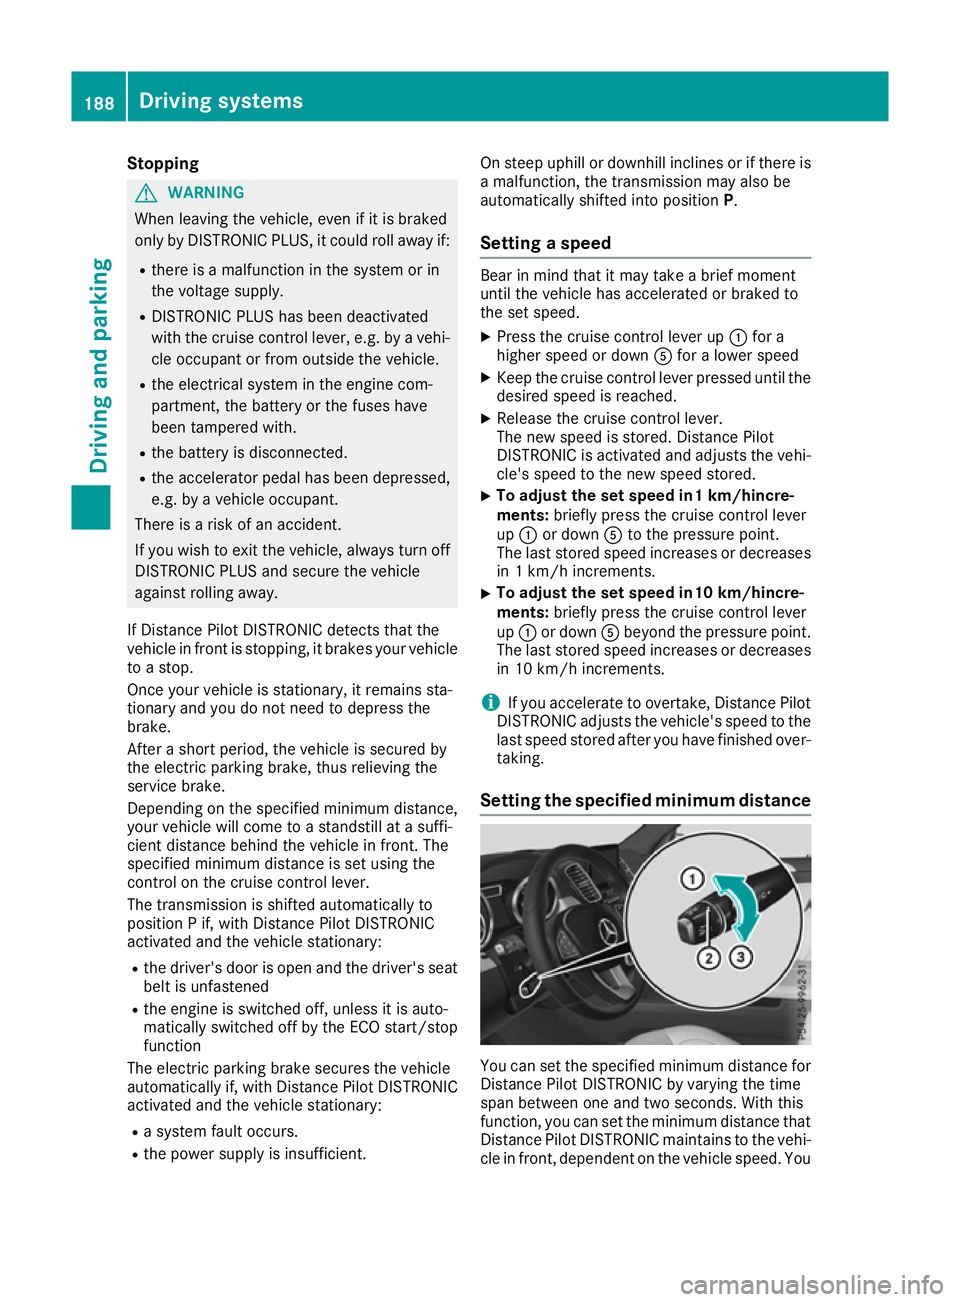
Setting the specified minimum distance You can set the specified minimum distance for
Distance Pilot DISTRONIC by varying the time
span between one and two seconds. With this
function, you can set the minimum distance that
Distance Pilot DISTRONIC maintains to the vehi- cle in front, dependent on the vehicle speed. You 188
Driving systemsDriving and parking
Page 198 of 397
If you press the
%ora button on the
multifunction steering wheel, the message will
disappear.
i Up to offroad level 2, you can hide the mes-
sages using the %ora button on the
multifunction steering wheel.
While the adjustment from offroad level 2 to off-
road level 3 is taking place, you will see a mes-
sage such as the following in the multifunction
display: Vehicle rising Max. speed
Vehicle rising Max. speed
20 km/h 20 km/h.
The Max. Max. speed
speed 20
20km/h
km/h message draws your
attention to the maximum speed permitted for
offroad level 3.
If you drive above 20 km/h at offroad level 3,
you will see the following message shown in red
in the multifunction display: Lowering Max. Lowering Max.
speed 20 km/h
speed 20 km/h.
i You cannot clear these messages.
You also hear a warning tone. The vehicle is low-
ered and offroad level 3 is cancelled.
If you continue to increase your speed, the red
message continues to be shown in the multi-
function display. The newly set level is not dis-
played until the vehicle has been set to a level
suitable for the current speed.
Lowering the vehicle If you drive faster than 20 km/h while the vehi-
cle is being lowered, you will see the following
message shown in white in the multifunction
display: Lowering Max. speed 20 km/h Lowering Max. speed 20 km/h.
The vehicle is lowered to offroad level 2.
You will see a message in the multifunction dis- play, for example: Lowering
Lowering.
Off-road level 2 is cancelled and the vehicle is
lowered to offroad level 1 if you:
R drive at speeds above 80 km/h or
R drive at speeds between 65 km/h and
80 km/h for longer than 20 seconds
Off-road level 1 is cancelled. Depending on the
vehicle's speed and the selected drive program,
the vehicle is automatically lowered to normal
level or low level if you:
R drive at speeds above 115 km/h or
R drive at speeds between 100 km/h and
115 km/h for longer than 20 seconds HOLD function
General notes The HOLD function can assist you if required in
the following situations:
R
when pulling away, especially on steep
slopes.
R when manoeuvring on steep slopes.
R when waiting in traffic.
The vehicle is kept stationary without the driver having to depress the brake pedal.
The braking effect is cancelled and the HOLD
function is deactivated when you depress the
accelerator pedal to pull away.
i Do not use the HOLD function when driving
off-road, on steep uphill or downhill gradients or on slippery or loose surfaces. The HOLD
function cannot hold the vehicle on such sur- faces.
Important safety notes G
WARNING
When leaving the vehicle, it can still roll away despite being braked by the HOLD function if:
R there is a malfunction in the system or in
the voltage supply
R the HOLD function is deactivated by the
accelerator pedal being depressed, e.g. by
a vehicle occupant
R the electrical system in the engine com-
partment, the battery or the fuses are tam-
pered with
R the battery is disconnected
There is a risk of an accident.
Before leaving the vehicle, always deactivate
the HOLD function and secure the vehicle
from rolling away.
! When DISTRONIC PLUS or the HOLD func-
tion is activated, the vehicle brakes automat- ically in certain situations.
To avoid damage to the vehicle, deactivate
DISTRONIC PLUS and the HOLD function in
the following or similar situations:
R when towing away
R in a car wash Driving systems
195Driving and parking Z
Page 208 of 397
Parking Pilot does not assist you parking in
spaces at a right angle to the direction of travel
if:
R two parking spaces are located directly next
to one another
R the parking space is directly next to a low
obstacle such as a low kerb
R you forward-park
Parking Pilot does not assist you parking in
spaces parallel with or at a right angle to the
direction of travel if:
R the parking space is on a kerb
R the system reads the parking space as being
blocked, such as by foliage or grass paving
blocks
R the area is too small for the vehicle to
manoeuvre into
R the parking space is bordered by an obstacle,
e.g. a tree, a post or a trailer :
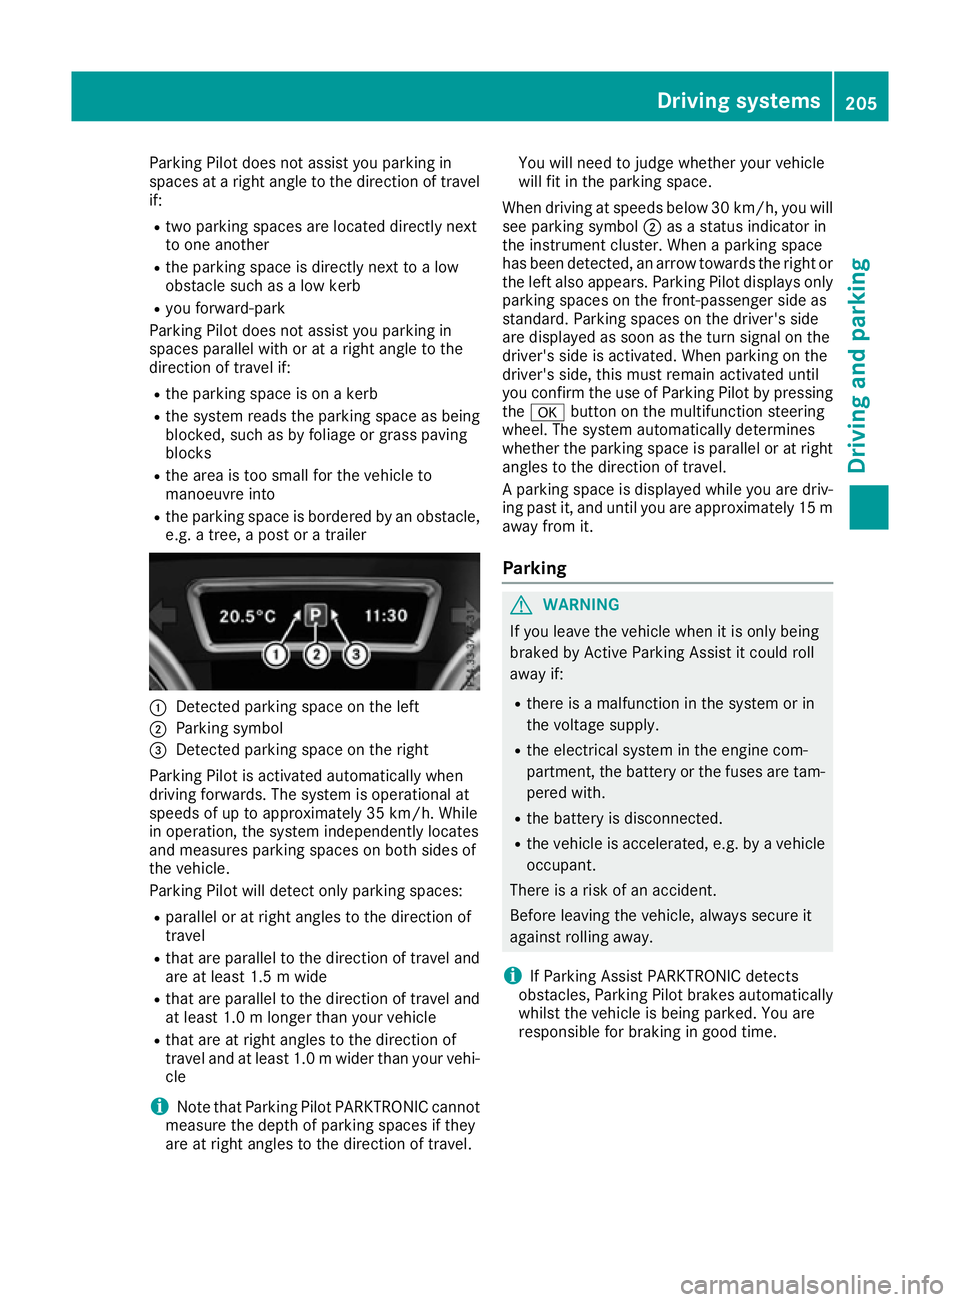
Detected parking space on the left
; Parking symbol
= Detected parking space on the right
Parking Pilot is activated automatically when
driving forwards. The system is operational at
speeds of up to approximately 35 km/h. While
in operation, the system independently locates
and measures parking spaces on both sides of
the vehicle.
Parking Pilot will detect only parking spaces:
R parallel or at right angles to the direction of
travel
R that are parallel to the direction of travel and
are at least 1.5 m wide
R that are parallel to the direction of travel and
at least 1.0 m longer than your vehicle
R that are at right angles to the direction of
travel and at least 1.0 mwider than your vehi-
cle
i Note that Parking Pilot PARKTRONIC cannot
measure the depth of parking spaces if they
are at right angles to the direction of travel. You will need to judge whether your vehicle
will fit in the parking space.
When driving at speeds below 30 km/h, you will
see parking symbol ;as a status indicator in
the instrument cluster. When a parking space
has been detected, an arrow towards the right or the left also appears. Parking Pilot displays only
parking spaces on the front-passenger side as
standard. Parking spaces on the driver's side
are displayed as soon as the turn signal on the
driver's side is activated. When parking on the
driver's side, this must remain activated until
you confirm the use of Parking Pilot by pressing the a button on the multifunction steering
wheel. The system automatically determines
whether the parking space is parallel or at right
angles to the direction of travel.
A parking space is displayed while you are driv- ing past it, and until you are approximately 15 m
away from it.
Parking G
WARNING
If you leave the vehicle when it is only being
braked by Active Parking Assist it could roll
away if:
R there is a malfunction in the system or in
the voltage supply.
R the electrical system in the engine com-
partment, the battery or the fuses are tam-
pered with.
R the battery is disconnected.
R the vehicle is accelerated, e.g. by a vehicle
occupant.
There is a risk of an accident.
Before leaving the vehicle, always secure it
against rolling away.
i If Parking Assist PARKTRONIC detects
obstacles, Parking Pilot brakes automatically whilst the vehicle is being parked. You are
responsible for braking in good time. Driving systems
205Driving and parking Z
Page 241 of 397
X
Start the engine.
X Close the doors and tailgate.
X Secure the trailer against rolling away.
X Remove the trailer cable and decouple the
trailer.
X Switch off the engine. Trailer power supply
! You can connect accessories with a power
rating of up to 180 W to the permanent power
supply and with a power rating of up to 180 W to the power supply that is switched on via the ignition lock.
The trailer battery may not be charged from
the power supply.
When it leaves the factory, your vehicle's trailer
socket is equipped with a permanent power
supply and a power supply that is switched on
via the ignition lock.
The permanent power supply is supplied via
trailer socket pin 9.
The power supply that is switched on via the
ignition lock is supplied via trailer socket pin 10.
The trailer's permanent power supply is
switched off in the event of low vehicle supply
voltage and after six hours at the latest.
You can find more information about fitting the
trailer electrics at a qualified specialist work-
shop.
X To switch the connected power supply on
or off: turn the key to position 2or0respec-
tively (Y page 148). Failure check for LEDs
If LED lamps are fitted in the trailer, a malfunc-
tion message may appear in the multifunction
display even if there is no fault. The reason for
the error message may be that the current has
fallen below the minimum of 50 mA. To ensure reliable indication of the failure, each
LED chain in the trailer lighting must be guaran-
teed a minimum current of 50 mA. Trailer with 7-pin connector
General notes Trailer with 7-pin connector:
you can connect
to the 13-pin socket on the ball coupling using
an adapter or, if necessary, an adapter cable.
Both can be obtained at a qualified specialist
workshop.
Fitting the adapter !
Make sure that there is sufficient cable play
so that the cable cannot become detached
when cornering.
! Remove the adapter cable before folding in
the ball coupling. You could otherwise dam-
age the rear bumper and the adapter cable. X
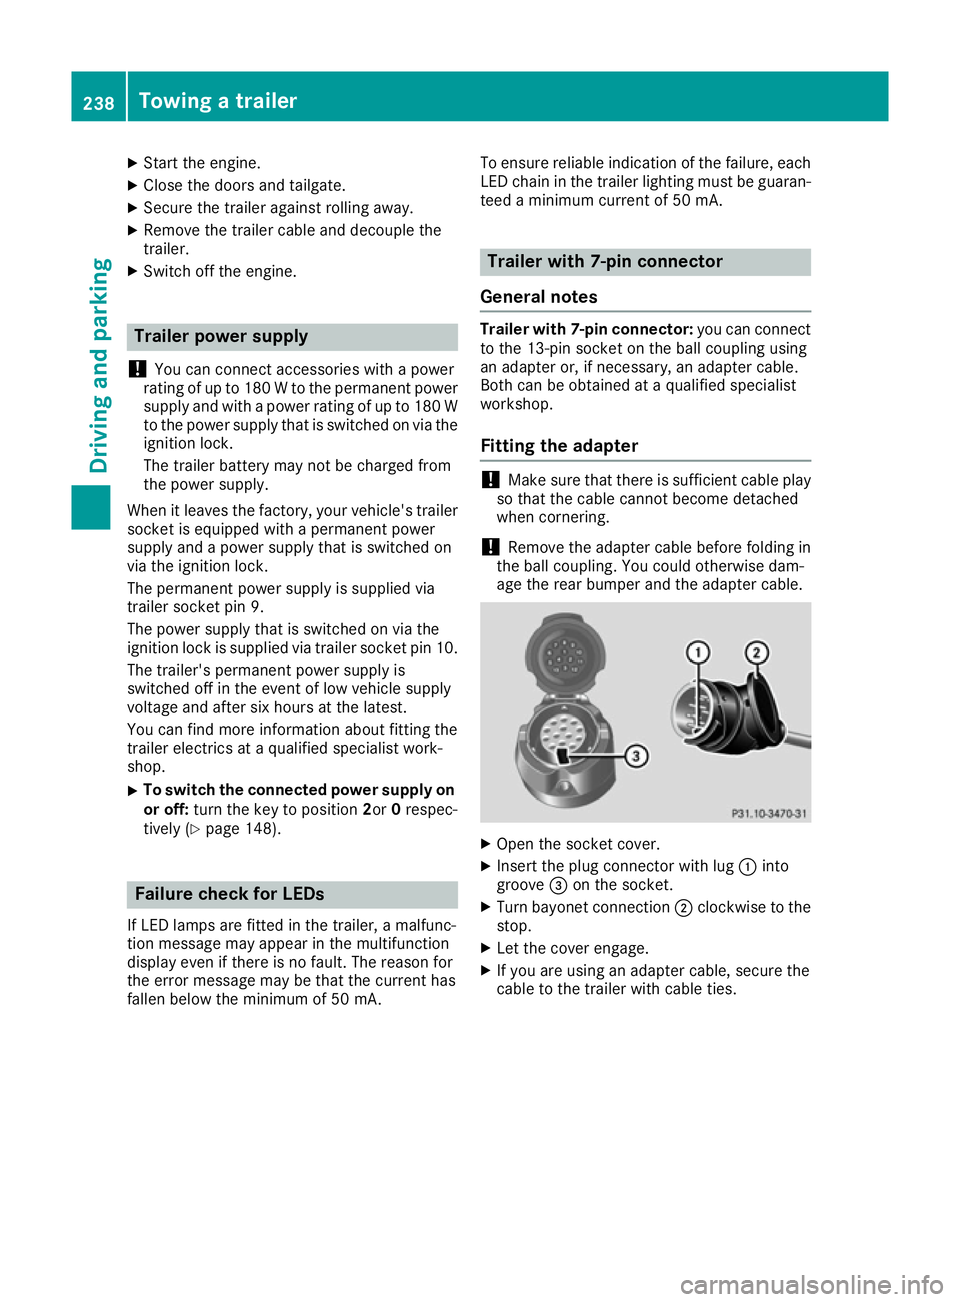
Open the socket cover.
X Insert the plug connector with lug :into
groove =on the socket.
X Turn bayonet connection ;clockwise to the
stop.
X Let the cover engage.
X If you are using an adapter cable, secure the
cable to the trailer with cable ties. 238
Towing a trailerDriving and parking
Page 256 of 397
X
Press :or9 to select the Limit Limit
speed (winter tyres): speed (winter tyres): function.
You will see the current setting.
X Press ato confirm.
X Press the :or9 button to adjust the
permanent speed limiter in increments of ten
(160 km/h 160 km/h to240 km/h
240 km/h). The Off
Off setting
switches the permanent speed limiter off.
X Press the abutton to store the entry.
Further information on the permanent speed
limiter (Y page 184).
Activating/deactivating the automatic
locking feature
If you activate the Automatic door locks
Automatic door locks
function, the vehicle is centrally locked above a speed of approximately 15 km/h.
X Press the =or; button on the steering
wheel to select the Settings
Settings menu.
X Press the :or9 button to select the
Vehicle
Vehicle submenu.
X Press ato confirm.
X Press the :or9 button to select the
Automatic door locks Automatic door locks function.
When the Automatic
Automatic door
doorlocks
locks function is
activated, the vehicle doors are displayed in
orange in the multifunction display.
X Press the abutton to save the setting.
For further information on the automatic locking
feature; see (Y page 88).
Activating/deactivating the acoustic
locking confirmation
If you switch on the Acoustic
Acoustic Lock Lockfunction, an
acoustic signal sounds when you lock the vehi-
cle.
X Press the =or; button on the steering
wheel to select the Settings Settingsmenu.
X Press the :or9 button to select the
Vehicle
Vehicle submenu.
X Press ato confirm.
X Press the :or9 button to select the
Acoustic Lock
Acoustic Lock function.
If the Acoustic Lock
Acoustic Lock function is activated,
the & symbol in the multifunction display
lights up orange.
X Press the abutton to save the setting. Heating submenu Auxiliary heating departure time
G
DANGER
If the exhaust pipe is blocked or sufficient
ventilation is not possible, toxic exhaust
fumes can enter the vehicle, especially car-
bon monoxide. This is the case, e.g. in
enclosed spaces, or if the vehicle is stuck in
snow. There is a risk of fatal injuries.
You should switch off the auxiliary heating in
enclosed spaces which do not have an extrac- tion system, e.g. a garage. If the vehicle is
stuck in snow and you must leave the auxiliary
heating running, keep the exhaust pipe and
the area around the vehicle clear of snow. To guarantee a sufficient supply of fresh air, open
a window on the side of the vehicle away from the wind. G
WARNING
When the auxiliary heating is switched on,
parts of the vehicle can become very hot.
Flammable materials such as leaves, grass or twigs may ignite if they come into contact
with:
R hot parts of the exhaust system
R the exhaust gas itself
There is a risk of fire.
When the auxiliary heating is switched on,
make sure that:
R no flammable materials come into contact
with hot vehicle components
R the exhaust gas can escape from the
exhaust pipe unhindered
R the exhaust gas does not come into contact
with flammable materials.
! Operating the auxiliary heating/ventilation
draws on the vehicle battery. After you have
heated or ventilated the vehicle a maximum of two times, drive for a longer distance.
Only vehicles with auxiliary heating have this
function. Menus and submenus
253On-board computer and displays Z
Page 266 of 397
Display messages
Possible causes/consequences and
M
MSolutions The yellow
!warning lamp lights up. If you manually apply or
release the electric parking brake, the red !indicator lamp
flashes.
The electric parking brake is malfunctioning. The electric parking
brake cannot be applied manually.
X Shift the transmission to position P.
X Consult a qualified specialist workshop. !
Parking brake inop‐ Parking brake inop‐
erative erative The yellow
!warning lamp lights up. The red !indicator lamp
flashes for about ten seconds after the electric parking brake has been applied or released. It then goes out or remains lit.
The electric parking brake is malfunctioning, e.g. because of over-
voltage or undervoltage.
X Rectify the cause of the overvoltage or undervoltage, e.g. by charg-
ing the battery or restarting the engine.
X Apply or release the electric parking brake.
If the electric parking brake still cannot be applied or released: X Turn the ignition off and then back on.
X Apply or release the electric parking brake.
If the electric parking brake still cannot be released:
X Consult a qualified specialist workshop.
If the electric parking brake still cannot be applied:
X Consult a qualified specialist workshop. The yellow
!warning lamp lights up and the red !indicator
lamp flashes.
The electric parking brake cannot be applied manually.
X Shift the transmission to position P.
X Consult a qualified specialist workshop. J
Check brake fluid Check brake fluid
level level There is insufficient brake fluid in the brake fluid reservoir. In addition,
the J warning lamp in the instrument cluster lights up and a warn-
ing tone sounds.
G WARNING
Braking efficiency may be impaired.
There is a risk of an accident.
X Stop the vehicle immediately, paying attention to road and traffic
conditions. Do not continue driving.
X Secure the vehicle against rolling away (Y page 168).
X Consult a qualified specialist workshop.
X Do not top up the brake fluid. This does not correct the fault. #
Check Check
brake
brakepad
padwear
wear The brake pads/linings have reached their wear limit.
X Consult a qualified specialist workshop. Display
messages
263On-board computer and displays Z
Page 275 of 397
Display messages
Possible causes/consequences and
M
MSolutions ?
Coolant Stop vehi‐ Coolant Stop vehi‐
cle Switch engine cle Switch engine
off off The coolant is too hot.
A warning tone also sounds.
G WARNING
Never drive with an overheated engine. Driving when your engine is
overheated can cause any fluids that may have leaked into the engine
compartment to catch fire.
In addition, steam from an overheated engine can cause serious
burns, which can occur just by opening the bonnet.
There is a risk of injury.
X Stop the vehicle immediately, paying attention to road and traffic
conditions, and switch off the engine.
X Safeguard the vehicle against rolling away (Y page 168).
X Wait until the engine has cooled down.
X Make sure that the air supply to the engine radiator is not blocked,
e.g. by frozen slush.
X Do not start the engine again until the display message goes out and
the coolant temperature is below 120 †. The engine may otherwisebe damaged.
X Pay attention to the coolant temperature gauge.
If the temperature increases again:
X Consult a qualified specialist workshop immediately.
Under normal operating conditions and with the specified coolant
level, the coolant temperature may rise to 120 †. #
See Owner's Manual See Owner's Manual The battery is no longer being charged.
A warning tone also sounds.
Possible causes:
R faulty alternator
R torn poly-V-belt
R a malfunction in the electronics
! Do not continue driving. The engine could otherwise overheat.
X Stop the vehicle immediately, paying attention to road and traffic
conditions, and switch off the engine.
X Safeguard the vehicle against rolling away (Y page 168).
X Consult a qualified specialist workshop. 272
Display
messagesOn-board computer and displays