2016 MERCEDES-BENZ GLS SUV change wheel
[x] Cancel search: change wheelPage 202 of 397
If this vehicle is not driven in a safe manner, it
can lead to an accident, to the vehicle over-
turning as well as serious or even fatal inju-
ries.
R In the event of an accident with the vehicle
overturning, passengers who are not wearing
their seat belt are considerably more likely to die than passengers wearing their seat belt.
You and all vehicle occupants should always
wear your seat belts.
General notes
Only select raised level if this is appropriate for
the road conditions. Otherwise, fuel consump-
tion may increase and handling may be affected.
Make changes to the vehicle level while the
vehicle is in motion. This enables the vehicle to
adjust to the new level as quickly as possible.
The vehicle level may change visibly if you park
the vehicle and the outside temperature
changes. If the temperature drops, the vehicle
level lowers; with an increase in temperature,
the vehicle level rises.
If you unlock the vehicle or open a door, the
vehicle begins to compensate for load discrep-
ancies while still parked. However, for signifi-
cant level changes, e.g. after the vehicle has
been stationary for a long period, the engine
must be running. For safety reasons, the vehicle is only lowered when the doors are closed. Low-
ering is interrupted if a door is opened; it con-
tinues once the door has been closed.
Vehicles with no trailer coupled: below a
speed of 60 km/h, you can choose between the
normal and raised vehicle level. Select the nor-
mal vehicle level for normal road conditions and
the raised vehicle level when using snow chains or if the road conditions are very poor. Your
selection remains stored even if you remove the
key from the ignition lock. If you try to select
raised level at a speed above 60 km/h, the
Please
Please reduce reducespeed
speedmessage appears in the
multifunction display.
Vehicles with a trailer coupled: below a speed
of 30 km/h, you can choose between the nor-
mal and raised vehicle level. Setting the raised vehicle level X
Start the engine.
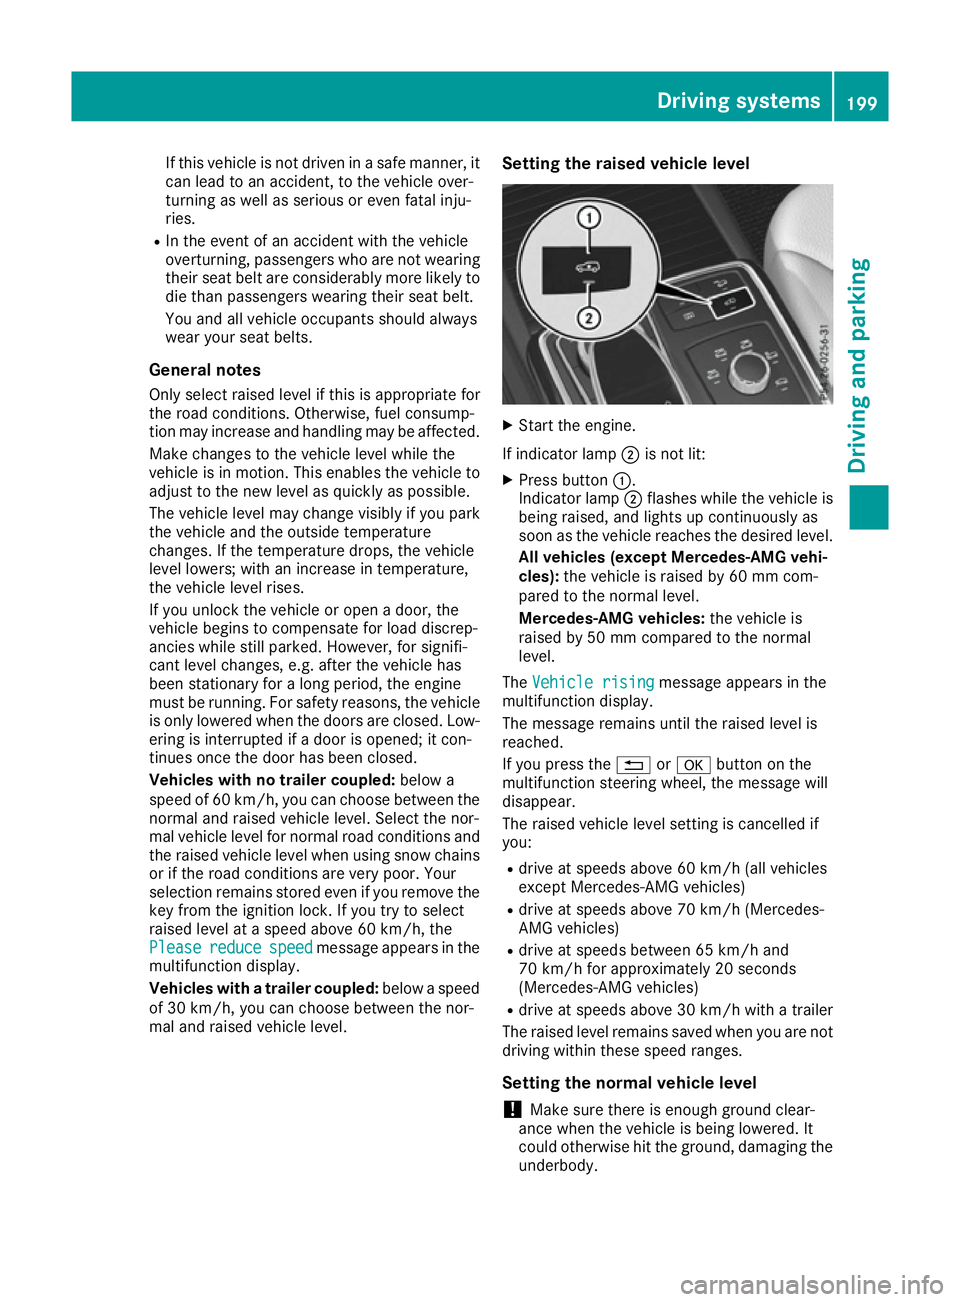
If indicator lamp ;is not lit:
X Press button :.
Indicator lamp ;flashes while the vehicle is
being raised, and lights up continuously as
soon as the vehicle reaches the desired level.
All vehicles (except Mercedes-AMG vehi-
cles): the vehicle is raised by 60 mm com-
pared to the normal level.
Mercedes-AMG vehicles: the vehicle is
raised by 50 mm compared to the normal
level.
The Vehicle rising Vehicle rising message appears in the
multifunction display.
The message remains until the raised level is
reached.
If you press the %ora button on the
multifunction steering wheel, the message will
disappear.
The raised vehicle level setting is cancelled if
you:
R drive at speeds above 60 km/h (all vehicles
except Mercedes-AMG vehicles)
R drive at speeds above 70 km/h (Mercedes-
AMG vehicles)
R drive at speeds between 65 km/h and
70 km/h for approximately 20 seconds
(Mercedes-AMG vehicles)
R drive at speeds above 30 km/h with a trailer
The raised level remains saved when you are not driving within these speed ranges.
Setting the normal vehicle level
! Make sure there is enough ground clear-
ance when the vehicle is being lowered. It
could otherwise hit the ground, damaging the
underbody. Driving systems
199Driving and parking Z
Page 203 of 397
X
Start the engine.
If indicator lamp ;is lit:
X Press button :.
Indicator lamp ;flashes while the vehicle is
being lowered, and goes out as soon as the
desired vehicle level is reached.
Vehicles with no trailer coupled: the vehi-
cle is adjusted to the height of the selected
drive program (Y page 155).
Vehicles with a trailer coupled: the vehicle
is adjusted to normal level regardless of the
drive program selected (Y page 155). The
vehicle remains at normal level, even if you
change drive programs.
During the adjustment, the Lowering
Lowering mes-
sage appears in the multifunction display.
If you press the %ora button on the
multifunction steering wheel, the message will
disappear. AMG RIDE CONTROL
General notes The electronically controlled damping system
works continuously. This improves driving
safety and ride comfort.
The damping is tuned individually to each wheel
and depends on:
R your driving style, e.g. sporty
R the road surface condition, e.g. bumps
R your individual selection of Sport, Sport + or
Comfort
The suspension setting can be adjusted using
the corresponding button in the centre console
or the DYNAMIC SELECT controller
(Y page 155).
If the ignition is switched off for less than four
hours, the previously selected drive program is
activated when the engine is next started. If the
ignition is switched off for more than four hours, Comfort mode is activated when the engine is
next started. Sport mode The firmer setting of the suspension tuning in
Sport mode ensures even better contact with
the road. Select this mode when employing a
sporty driving style, e.g. on winding country
roads.
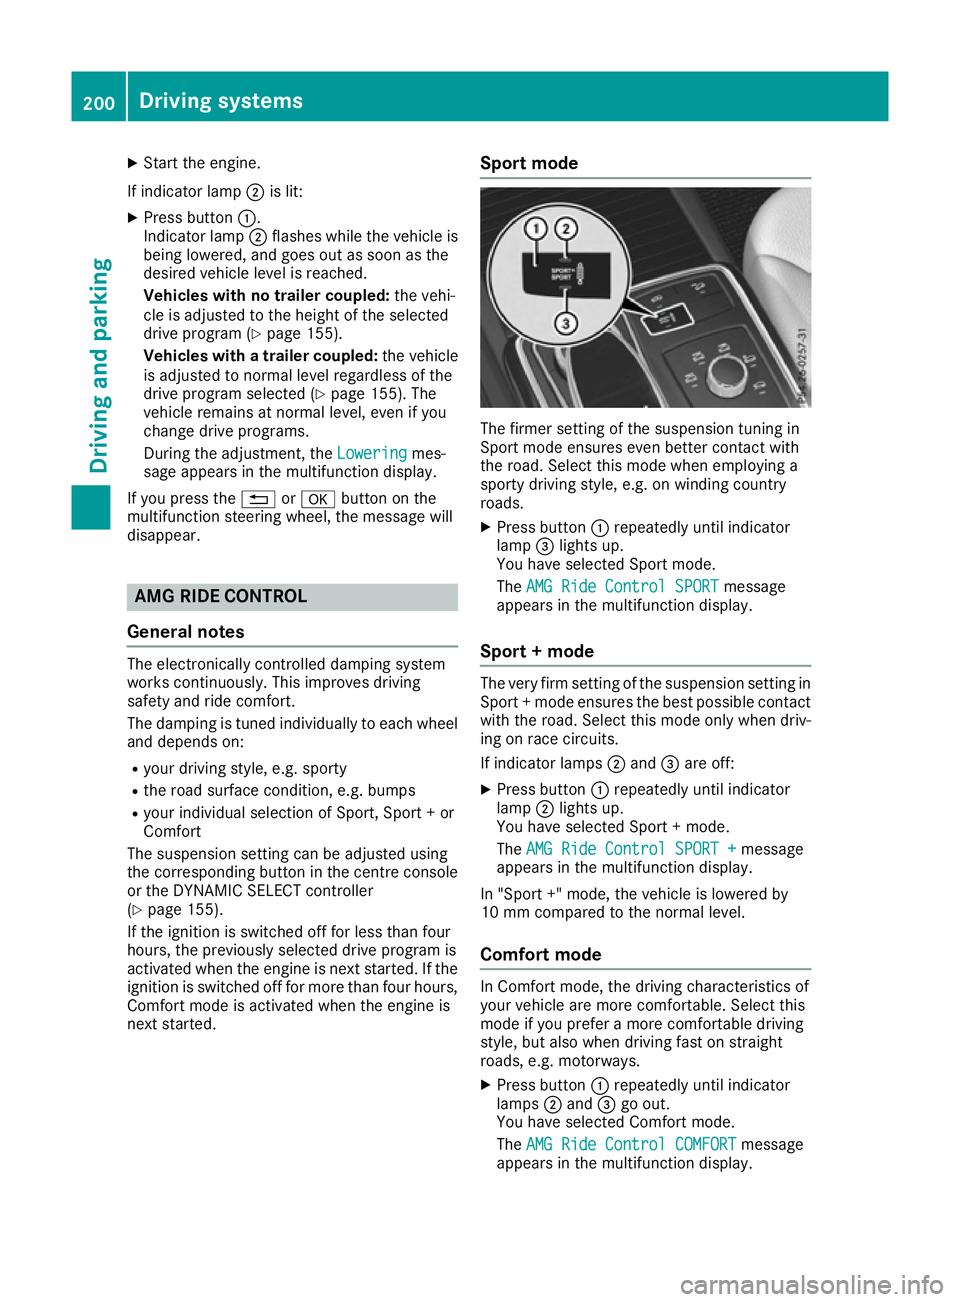
X Press button :repeatedly until indicator
lamp =lights up.
You have selected Sport mode.
The AMG Ride Control SPORT AMG Ride Control SPORT message
appears in the multifunction display.
Sport + mode The very firm setting of the suspension setting in
Sport + mode ensures the best possible contact
with the road. Select this mode only when driv-
ing on race circuits.
If indicator lamps ;and =are off:
X Press button :repeatedly until indicator
lamp ;lights up.
You have selected Sport + mode.
The AMG Ride Control SPORT + AMG Ride Control SPORT + message
appears in the multifunction display.
In "Sport +" mode, the vehicle is lowered by
10 mm compared to the normal level.
Comfort mode In Comfort mode, the driving characteristics of
your vehicle are more comfortable. Select this
mode if you prefer a more comfortable driving
style, but also when driving fast on straight
roads, e.g. motorways.
X Press button :repeatedly until indicator
lamps ;and =go out.
You have selected Comfort mode.
The AMG Ride Control COMFORT AMG Ride Control COMFORT message
appears in the multifunction display. 200
Driving systemsDriving and parking
Page 209 of 397
X
Stop the vehicle when the parking symbol
shows the desired parking space in the instru-
ment cluster.
X Shift the transmission to position R.
The Start Parking Pilot? Yes: OK No:
Start Parking Pilot? Yes: OK No:
% message appears in the multifunction
display.
X To cancel the procedure:press the %
button on the multifunction steering wheel or pull away.
or
X To park using Parking Pilot: press thea
button on the multifunction steering wheel.
The Parking Pilot active Accelerate
Parking Pilot active Accelerate
and brake Observe surroundings and brake Observe surroundings mes-
sage appears in the multifunction display.
X Release the multifunction steering wheel.
X Reverse the vehicle, being ready to brake at
all times. When reversing, drive at a speed
below 10 km/h. Otherwise, Parking Pilot will
be cancelled.
Parking Pilot brakes the vehicle to a standstill when the vehicle approaches the rear border
of the parking space.
Manoeuvring may be required in tight parking
spaces.
The Parking Pilot active Select D
Parking Pilot active Select D
Observe surroundings Observe surroundings message appears in
the multifunction display.
X Shift the transmission to position Dwhile the
vehicle is stationary.
Parking Pilot immediately steers in the other
direction.
The Parking Pilot active Accelerate
Parking Pilot active Accelerate
and brake Observe surroundings
and brake Observe surroundings mes-
sage appears in the multifunction display.
i You will achieve the best results by waiting
for the steering procedure to complete before
pulling away.
X Drive forwards and be ready to brake at all
times.
Parking Pilot brakes the vehicle to a standstill.
The Parking Pilot active Select R
Parking Pilot active Select R
Observe surroundings Observe surroundings message appears in
the multifunction display.
As soon as the parking procedure is complete,
the Parking Pilot ended Parking Pilot ended message appears
and a warning tone sounds. The vehicle is now
parked. The vehicle is kept stationary without
the driver having to depress the brake pedal. The braking effect is cancelled when you
depress the accelerator pedal.
Parking Pilot no longer supports you with steer-
ing interventions and brake applications. When
Parking Pilot is finished, you must steer and
brake again yourself. Parking Assist
PARKTRONIC is still available.
Parking tips:
R The way your vehicle is positioned in the park-
ing space after parking is dependent on vari-
ous factors. These include the position and
shape of the vehicles parked in front of and
behind it and the conditions of the location. It
may be the case that Parking Pilot guides you
too far into a parking space, or not far enough
into it. In some cases, it may also lead you
across or onto the kerb. If necessary, you
should cancel the parking procedure with
Parking Pilot.
R You can also preselect transmission position
D. The vehicle redirects and does not drive as
far into the parking space. Should the trans-
mission change take place too early, the park-
ing procedure will be cancelled. A sensible
parking position can no longer be achieved
from this position.
Exiting a parking space In order for Parking Pilot to assist you:
R the border of the parking space must be high
enough at the front and the rear. A kerb, for
example, is too small.
R the border of the parking space must not be
too wide, as the position of the vehicle must
not exceed an angle of 45° to the starting
position as it is manoeuvred into the parking
space.
R a manoeuvring distance of at least 1.0 mmust
be available.
Parking Pilot can assist you with exiting a park-
ing space only if you have parked the vehicle
parallel to the direction of travel.
i If Parking Assist PARKTRONIC detects
obstacles, Parking Pilot brakes automatically
whilst the vehicle is exiting the parking space. You are responsible for braking in good time.
X Start the engine.
X Release the electric parking brake.
X Switch on the turn signal in the direction you
will drive out of the parking space. 206
Driving systemsDriving and pa
rking
Page 215 of 397
only to objects that are at the same level as
the ball coupling.
X Reverse carefully, making sure that trailer
drawbar locating aid ;points approximately
in the direction of trailer drawbar =.
X Reverse carefully until trailer drawbar =rea-
ches the red guide line.
The distance between the trailer drawbar and
the red guide line is now approximately
0.30 m.
X Couple up the trailer (Y page 234).
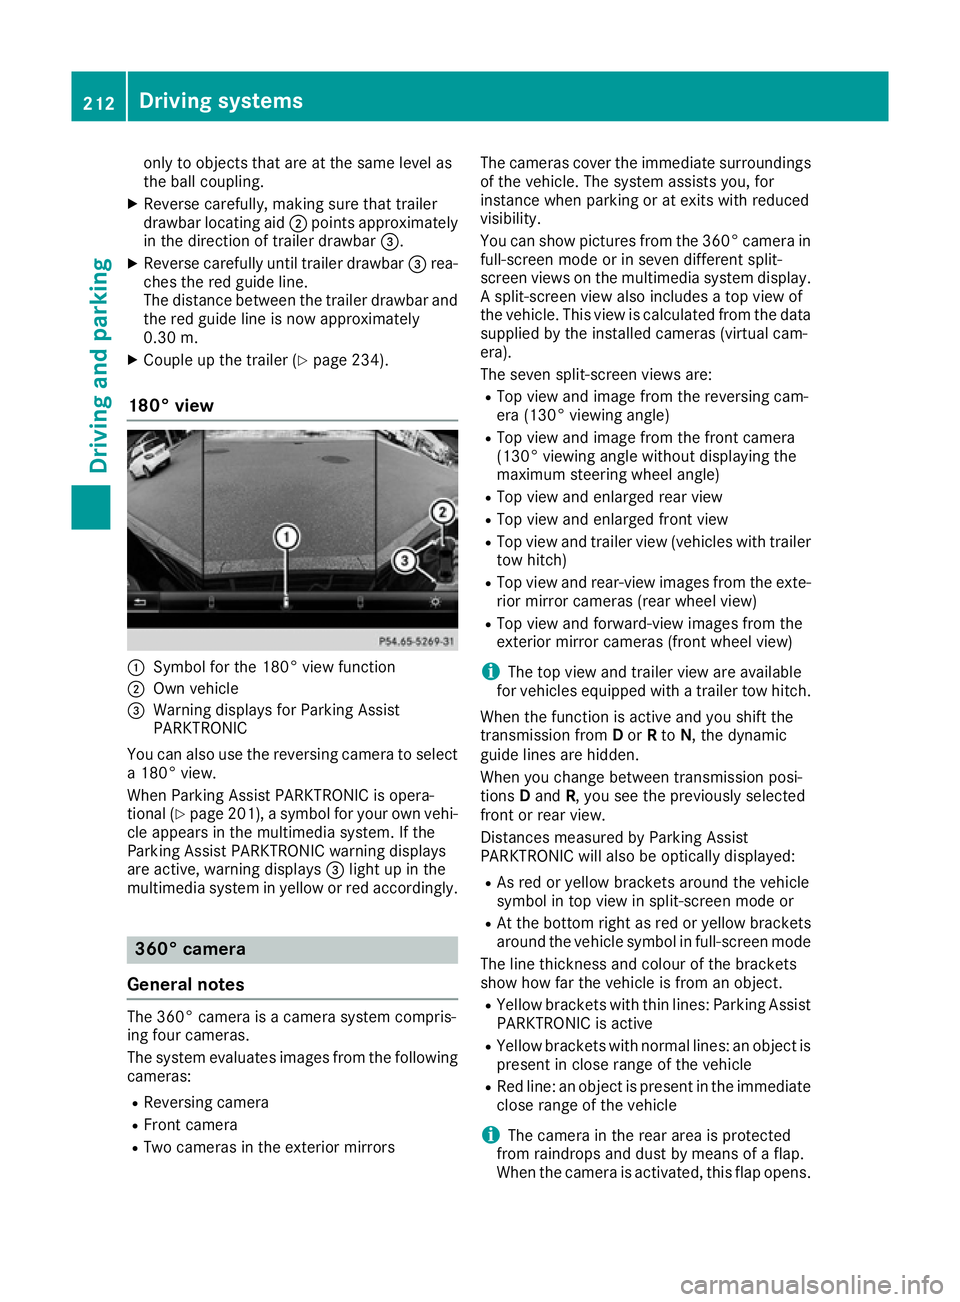
180° view :
Symbol for the 180° view function
; Own vehicle
= Warning displays for Parking Assist
PARKTRONIC
You can also use the reversing camera to select
a 180° view.
When Parking Assist PARKTRONIC is opera-
tional (Y page 201), a symbol for your own vehi-
cle appears in the multimedia system. If the
Parking Assist PARKTRONIC warning displays
are active, warning displays =light up in the
multimedia system in yellow or red accordingly. 360° camera
General notes The 360° camera is a camera system compris-
ing four cameras.
The system evaluates images from the following
cameras:
R Reversing camera
R Front camera
R Two cameras in the exterior mirrors The cameras cover the immediate surroundings
of the vehicle. The system assists you, for
instance when parking or at exits with reduced
visibility.
You can show pictures from the 360° camera in full-screen mode or in seven different split-
screen views on the multimedia system display. A split-screen view also includes a top view of
the vehicle. This view is calculated from the data
supplied by the installed cameras (virtual cam-
era).
The seven split-screen views are:
R Top view and image from the reversing cam-
era (130° viewing angle)
R Top view and image from the front camera
(130° viewing angle without displaying the
maximum steering wheel angle)
R Top view and enlarged rear view
R Top view and enlarged front view
R Top view and trailer view (vehicles with trailer
tow hitch)
R Top view and rear-view images from the exte-
rior mirror cameras (rear wheel view)
R Top view and forward-view images from the
exterior mirror cameras (front wheel view)
i The top view and trailer view are available
for vehicles equipped with a trailer tow hitch.
When the function is active and you shift the
transmission from Dor Rto N, the dynamic
guide lines are hidden.
When you change between transmission posi-
tions Dand R, you see the previously selected
front or rear view.
Distances measured by Parking Assist
PARKTRONIC will also be optically displayed:
R As red or yellow brackets around the vehicle
symbol in top view in split-screen mode or
R At the bottom right as red or yellow brackets
around the vehicle symbol in full-screen mode
The line thickness and colour of the brackets
show how far the vehicle is from an object.
R Yellow brackets with thin lines: Parking Assist
PARKTRONIC is active
R Yellow brackets with normal lines: an object is
present in close range of the vehicle
R Red line: an object is present in the immediate
close range of the vehicle
i The camera in the rear area is protected
from raindrops and dust by means of a flap.
When the camera is activated, this flap opens. 212
Driving systemsDriving and parking
Page 220 of 397

X
Select the assistance graphic display for
ATTENTION ASSIST using the on-board com-
puter (Y page 249).
The following information is displayed:
R The length of the journey since the last break
R The attention level determined by ATTENTION
ASSIST, displayed in a bar display in five levelsfrom high to low
R If ATTENTION ASSIST is unable to calculate
the attention level and cannot output a warn-
ing, the System suspended
System suspended message
appears. The bar display then changes the
display, e.g. if you are driving at a speed below
60 km/h or above 200 km/h.
Activating ATTENTION ASSIST X
Activate ATTENTION ASSIST using the on-
board computer (Y page 250).
The system determines the attention level of
the driver depending on the setting selected:
Standard selected: the sensitivity with which
the system determines the attention level is set
to normal.
Sensitive selected: the sensitivity is set higher.
The attention level detected by ATTENTION
ASSIST is adapted accordingly and the driver is
warned earlier.
When ATTENTION ASSIST is deactivated, the
À symbol and OFF appear in the multifunc-
tion display in the assistance graphics display
when the engine is running.
When ATTENTION ASSIST has been deactivated, it is automatically reactivated after the engine
has been switched off. The sensitivity selected
corresponds to the last selection activated
(standard/sensitive).
Warning in the multifunction display If fatigue or increasing lapses in concentration
are detected, a warning appears in the multi-
function display: Attention
Attention Assist: Assist:Take
Takea
a
break!
break!
In addition to the message shown in the multi-
function display, you will then hear a warning
tone.
X If necessary, take a break.
X Confirm the message by pressing the a
button on the steering wheel.
On long journeys, take regular breaks in good
time to allow yourself to rest. If you do not take a break, you will be warned again after
15 minutes at the earliest. This will happen only
if ATTENTION ASSIST still detects typical indi-
cators of fatigue or increasing lapses in concen- tration.
Vehicles with COMAND Online: if a warning is
output in the multifunction display, a service
station search is performed in COMAND Online. You can select a service station and you will then
be navigated to this service station. This func-
tion can be activated and deactivated in
COMAND Online. Traffic Sign Assist
General notes Traffic Sign Assist displays the maximum speed
permitted and overtaking restrictions to the
driver in the instrument cluster. Driving onto a
section of road in the wrong direction triggers a
warning. Traffic Sign Assist detects traffic signs with camera system :attached behind the top
of the windscreen. The data and general traffic
regulations stored in the navigation system are
also used to determine the current speed limit.
If a traffic sign that is relevant to your vehicle is passed, the display of the speed limits and over-
taking restrictions is updated.
The display can also be updated without a visible traffic sign in the following situations:
R The vehicle changes roads (e.g. motorway
exit or slip road)
R A village or town boundary that is stored in the
digital map is passed
R The last traffic sign detected by the camera
has not been repeated
If a sign indicating the end of a restriction (speed
limit or overtaking restriction) is passed, the
sign is displayed for five seconds. The currently Driving systems
217Driving and parking Z
Page 224 of 397
Lane Keeping Assist
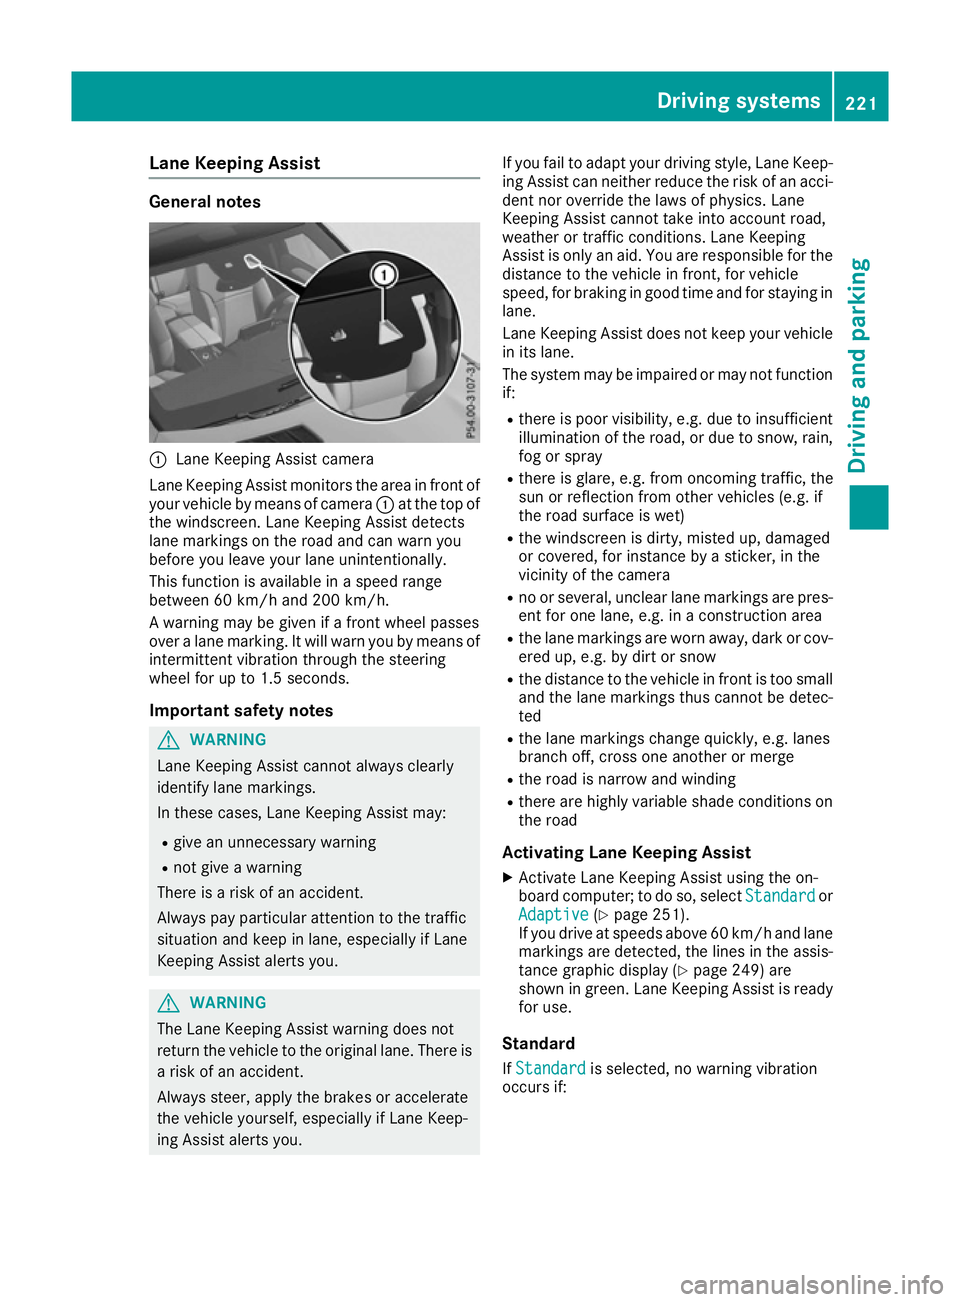
General notes
:
Lane Keeping Assist camera
Lane Keeping Assist monitors the area in front of
your vehicle by means of camera :at the top of
the windscreen. Lane Keeping Assist detects
lane markings on the road and can warn you
before you leave your lane unintentionally.
This function is available in a speed range
between 60 km/h and 200 km/h.
A warning may be given if a front wheel passes
over a lane marking. It will warn you by means of
intermittent vibration through the steering
wheel for up to 1.5 seconds.
Important safety notes G
WARNING
Lane Keeping Assist cannot always clearly
identify lane markings.
In these cases, Lane Keeping Assist may:
R give an unnecessary warning
R not give a warning
There is a risk of an accident.
Always pay particular attention to the traffic
situation and keep in lane, especially if Lane
Keeping Assist alerts you. G
WARNING
The Lane Keeping Assist warning does not
return the vehicle to the original lane. There is a risk of an accident.
Always steer, apply the brakes or accelerate
the vehicle yourself, especially if Lane Keep-
ing Assist alerts you. If you fail to adapt your driving style, Lane Keep-
ing Assist can neither reduce the risk of an acci-
dent nor override the laws of physics. Lane
Keeping Assist cannot take into account road,
weather or traffic conditions. Lane Keeping
Assist is only an aid. You are responsible for the distance to the vehicle in front, for vehicle
speed, for braking in good time and for staying in
lane.
Lane Keeping Assist does not keep your vehicle
in its lane.
The system may be impaired or may not function if:
R there is poor visibility, e.g. due to insufficient
illumination of the road, or due to snow, rain,fog or spray
R there is glare, e.g. from oncoming traffic, the
sun or reflection from other vehicles (e.g. if
the road surface is wet)
R the windscreen is dirty, misted up, damaged
or covered, for instance by a sticker, in the
vicinity of the camera
R no or several, unclear lane markings are pres-
ent for one lane, e.g. in a construction area
R the lane markings are worn away, dark or cov-
ered up, e.g. by dirt or snow
R the distance to the vehicle in front is too small
and the lane markings thus cannot be detec-
ted
R the lane markings change quickly, e.g. lanes
branch off, cross one another or merge
R the road is narrow and winding
R there are highly variable shade conditions on
the road
Activating Lane Keeping Assist
X Activate Lane Keeping Assist using the on-
board computer; to do so, select Standard Standardor
Adaptive
Adaptive (Ypage 251).
If you drive at speeds above 60 km/h and lane
markings are detected, the lines in the assis- tance graphic display (Y page 249) are
shown in green. Lane Keeping Assist is ready
for use.
Standard If Standard Standard is selected, no warning vibration
occurs if: Driving systems
221Driving and parking Z
Page 228 of 397
Important safety notes
If you fail to adapt your driving style, Active Lane
Keeping Assist can neither reduce the risk of an accident nor override the laws of physics. ActiveLane Keeping Assist cannot take into account
road, weather or traffic conditions. Active Lane
Keeping Assist is only an aid. You are responsi-
ble for the distance to the vehicle in front, for
vehicle speed, for braking in good time and for
staying in lane.
Active Lane Keeping Assist cannot continuously
keep your vehicle in its lane. G
WARNING
Active Lane Keeping Assist cannot always
clearly detect lane markings.
In such cases, Active Lane Keeping Assist
can:
R give an unnecessary warning and then
make a course-correcting brake application
to the vehicle
R neither give a warning nor intervene
There is a risk of an accident.
Always pay particular attention to the traffic
situation and keep within the lane, especially
if Active Lane Keeping Assist alerts you. Ter-
minate the intervention in a non-critical driv-
ing situation.
The system may be impaired or may not function if:
R there is poor visibility, e.g. due to insufficient
illumination of the road, or due to snow, rain,fog or spray
R there is glare, e.g. from oncoming traffic, the
sun or reflection from other vehicles (e.g. if
the road surface is wet)
R the windscreen is dirty, misted up, damaged
or covered, for instance by a sticker, in the
vicinity of the camera
R no or several, unclear lane markings are pres-
ent for one lane, e.g. in a construction area
R the lane markings are worn away, dark or cov-
ered up, e.g. by dirt or snow
R the distance to the vehicle in front is too small
and the lane markings thus cannot be detec-
ted
R the lane markings change quickly, e.g. lanes
branch off, cross one another or merge R
the road is narrow and winding
R there are highly variable shade conditions on
the roadway
R no vehicle is detected in the adjacent lane and
there are broken lane markings
Warning vibration through the steering
wheel A warning may be given if a front wheel passes
over a lane marking. It will warn you by means of intermittent vibration in the steering wheel for
up to 1.5 seconds.
In order that you are warned only when neces-
sary and in good time if you cross the lane mark-
ing, the system detects certain conditions and
warns you accordingly.
The warning vibration occurs earlier if:
R you approach the outer lane marking on a
bend
R the road has very wide lanes, e.g. a motorway
R the system detects solid lane markings
The warning vibration occurs later if:
R the road has narrow lanes
R you cut the corner on a bend
Lane-correcting brake application G
WARNING
A lane-correcting brake application cannot
always bring the vehicle back into the original lane. There is a risk of an accident.
Always steer, brake or accelerate yourself,
especially if Active Lane Keeping Assist warns
you or makes a lane-correcting brake appli-
cation. G
WARNING
Active Lane Keeping Assist does not detect
traffic conditions or road users. In very rare
cases, the system may make an inappropriate brake application, e.g. after intentionally driv-
ing over a solid lane marking. There is a risk of an accident.
An inappropriate brake application may be
interrupted at any time if you steer slightly in
the opposite direction. Always make sure that
there is sufficient distance to the side for
other traffic or obstacles. Driving systems
225Driving and parking Z
Page 230 of 397
R
you brake hard.
R you steer actively, e.g. swerve to avoid an
obstacle or change lane quickly.
R you cut the corner on a sharp bend.
Towing a trailer
If you couple up a trailer, make sure that you
have correctly established the electrical con-
nection. This can be accomplished by checking
the trailer lighting. Lane-correcting brake appli-
cation does not take place when towing a trailer.
Active Lane Keeping Assist is not activated and the lines in the assistance graphic are grey. Off-road driving systems
4MATIC (permanent all-wheel drive) 4MATIC ensures that all four wheels are perma-
nently driven. Together with ESP ®
and 4ETS, it
improves the traction of your vehicle whenever
a drive wheel spins due to insufficient grip.
If you fail to adapt your driving style, 4MATIC can
neither reduce the risk of an accident nor over-
ride the laws of physics. 4MATIC cannot take
account of road, weather and traffic conditions.
4MATIC is only an aid. You are responsible for
the distance to the vehicle in front, for vehicle
speed, for braking in good time and for staying in
lane.
! Never tow the vehicle with one axle raised.
This may damage the transfer case. Damage
of this sort is not covered by the Mercedes-
Benz implied warranty. All wheels must
remain either on the ground or be fully raised. Observe the instructions for towing the vehi-
cle with all wheels in full contact with the
ground.
! A function or performance test should only
be carried out on a twin-axle dynamometer.
Before you operate the vehicle on such a
dynamometer, please consult a qualified
workshop. You could otherwise damage the
drive train or the brake system.
i In wintry driving conditions, the maximum
effect of 4MATIC can only be achieved if you
use winter tyres (M+S tyres), with snow
chains if necessary.
Further information about "Driving off-road"
(Y page 176). DSR (Downhill Speed Regulation) General notes
DSR is an aid to assist you when driving down-
hill. It keeps the speed of travel at the speed
selected on the on-board computer. The steeper
the downhill gradient, the greater the DSR brak- ing effect on the vehicle. When driving on flat
stretches of road or on an uphill gradient, the
DSR braking effect is minimal or non-existent.
DSR controls the vehicle’s speed when it is acti-
vated and the transmission is in position D,Ror
N. By accelerating or braking, you can always
drive at a higher or a lower speed than that set
on the on-board computer.
Important safety notes G
WARNING
If the speed driven and the set speed deviate and you activate DSR on a slippery road sur-
face, the wheels may lose traction. This
increases the risk of skidding and having an
accident.
Before switching DSR on, please take into
consideration the road surface and the differ-
ence between driving speed and the set
speed.
If you fail to adapt your driving style, DSR can
neither reduce the risk of accident nor override the laws of physics. DSR cannot take account ofroad, weather and traffic conditions. DSR is only
an aid. You are responsible for the distance to
the vehicle in front, for vehicle speed, for brak-
ing in good time and for staying in lane.
You are always responsible for keeping control
of the vehicle and for assessing whether the
downhill gradient can be managed. DSR may not
always be able to keep to the set speed, depend-
ing on road surface and tyre conditions. Select a set speed suitable for the prevailing conditions
and when necessary, apply the brakes manually. Driving systems
227Driving and parking Z