2016 MERCEDES-BENZ GLS SUV change wheel
[x] Cancel search: change wheelPage 113 of 397
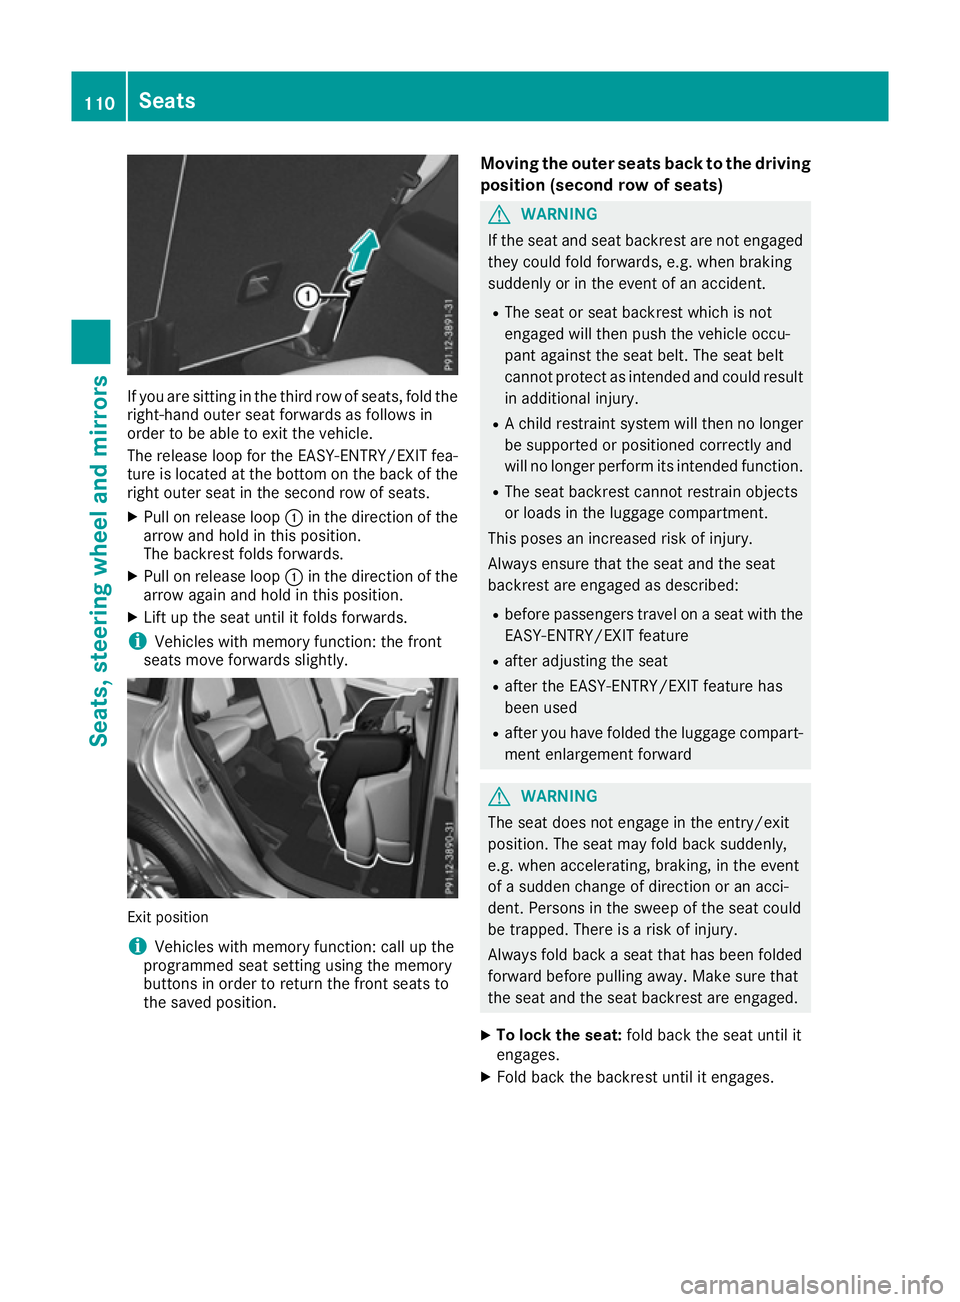
If you are sitting in the third row of seats, fold the
right-hand outer seat forwards as follows in
order to be able to exit the vehicle.
The release loop for the EASY-ENTRY/EXIT fea-
ture is located at the bottom on the back of the right outer seat in the second row of seats.
X Pull on release loop :in the direction of the
arrow and hold in this position.
The backrest folds forwards.
X Pull on release loop :in the direction of the
arrow again and hold in this position.
X Lift up the seat until it folds forwards.
i Vehicles with memory function: the front
seats move forwards slightly. Exit position
i
Vehicles with memory function: call up the
programmed seat setting using the memory
buttons in order to return the front seats to
the saved position. Moving the outer seats back to the driving
position (second row of seats) G
WARNING
If the seat and seat backrest are not engaged they could fold forwards, e.g. when braking
suddenly or in the event of an accident.
R The seat or seat backrest which is not
engaged will then push the vehicle occu-
pant against the seat belt. The seat belt
cannot protect as intended and could result
in additional injury.
R A child restraint system will then no longer
be supported or positioned correctly and
will no longer perform its intended function.
R The seat backrest cannot restrain objects
or loads in the luggage compartment.
This poses an increased risk of injury.
Always ensure that the seat and the seat
backrest are engaged as described:
R before passengers travel on a seat with the
EASY-ENTRY/EXIT feature
R after adjusting the seat
R after the EASY-ENTRY/EXIT feature has
been used
R after you have folded the luggage compart-
ment enlargement forward G
WARNING
The seat does not engage in the entry/exit
position. The seat may fold back suddenly,
e.g. when accelerating, braking, in the event
of a sudden change of direction or an acci-
dent. Persons in the sweep of the seat could
be trapped. There is a risk of injury.
Always fold back a seat that has been folded
forward before pulling away. Make sure that
the seat and the seat backrest are engaged.
X To lock the seat: fold back the seat until it
engages.
X Fold back the backrest until it engages. 110
SeatsSeats, steering wheel and mirrors
Page 114 of 397
Folding down the seats in the second
row electrically Important safety notes
G
WARNING
If the seat and seat backrest are not engaged they could fold forwards, e.g. when braking
suddenly or in the event of an accident.
R The seat or seat backrest which is not
engaged will then push the vehicle occu-
pant against the seat belt. The seat belt
cannot protect as intended and could result
in additional injury.
R A child restraint system will then no longer
be supported or positioned correctly and
will no longer perform its intended function.
R The seat backrest cannot restrain objects
or loads in the luggage compartment.
This poses an increased risk of injury.
Always ensure that the seat and the seat
backrest are engaged as described:
R before passengers travel on a seat with the
EASY-ENTRY/EXIT feature
R after adjusting the seat
R after the EASY-ENTRY/EXIT feature has
been used
R after you have folded the luggage compart-
ment enlargement forward G
WARNING
The seat does not engage in the entry/exit
position. The seat may fold back suddenly,
e.g. when accelerating, braking, in the event
of a sudden change of direction or an acci-
dent. Persons in the sweep of the seat could
be trapped. There is a risk of injury.
Always fold back a seat that has been folded
forward before pulling away. Make sure that
the seat and the seat backrest are engaged.
General notes Getting in or out from third row of seats: you canfold forward the outer seats on the left and right
of the second row of seats electronically. If one of the two outer rear seats in the second
row of seats is in the entry/exit position: the
display message:
2nd
2nd seat seat row,
row,right
right Not
Not
locked
locked appears in the multifunction display, for
example.
When you fold the seat back until it engages, the display message disappears.
To ensure that the seat backrest is fully
engaged, pull firmly on the seat backrest.
i Further related subjects:
R Luggage compartment enlargement (fold-
ing down the second row of seats)
(Y page 315)
R Folding the seats in the third row of seats
down/up (Y page 107)
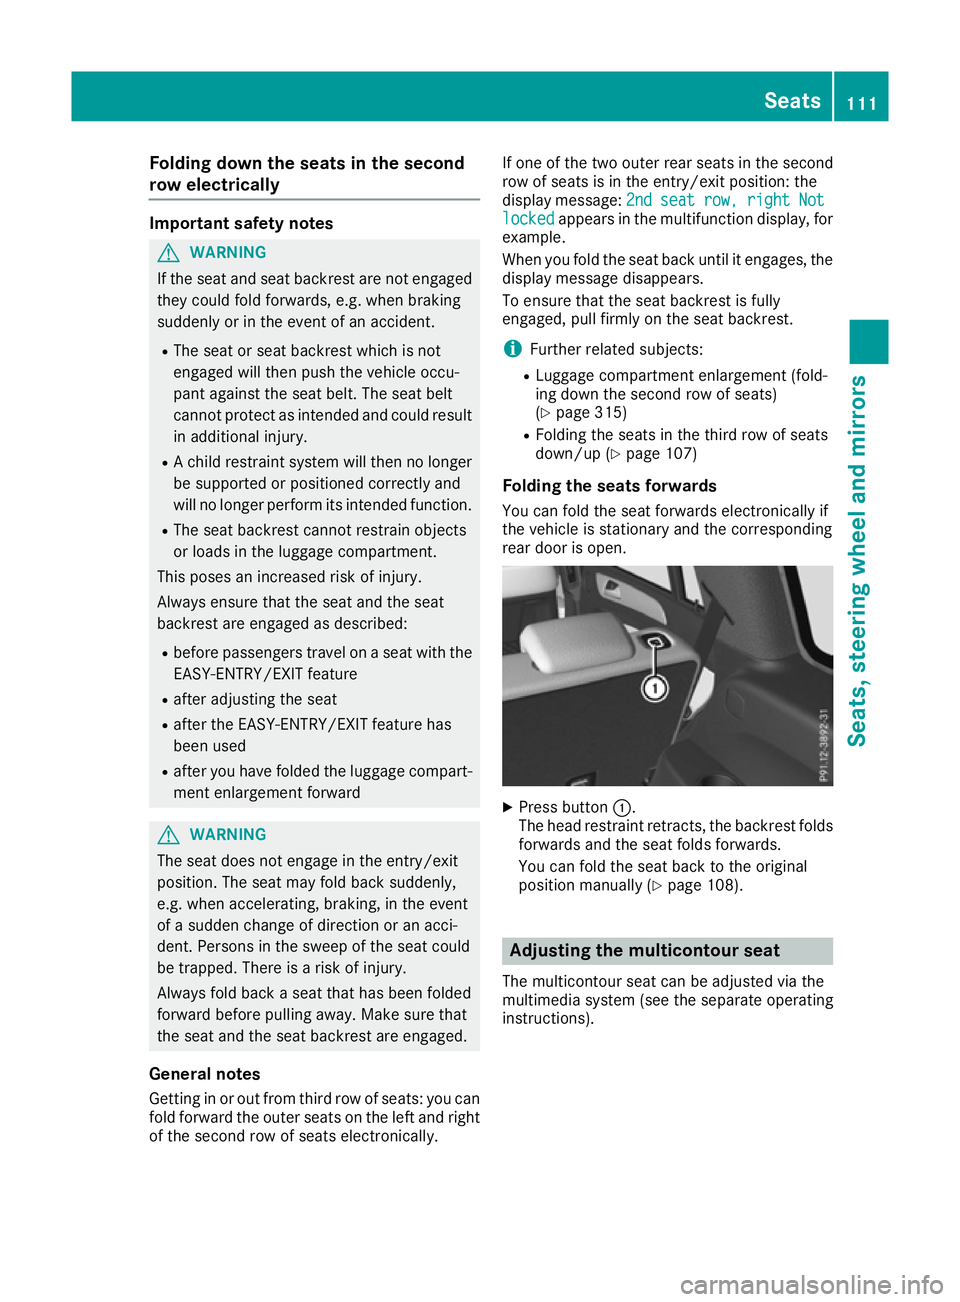
Folding the seats forwards
You can fold the seat forwards electronically if
the vehicle is stationary and the corresponding
rear door is open. X
Press button :.
The head restraint retracts, the backrest folds
forwards and the seat folds forwards.
You can fold the seat back to the original
position manually (Y page 108). Adjusting the multicontour seat
The multicontour seat can be adjusted via the
multimedia system (see the separate operating
instructions). Seats
111Seats, steering wheel and mirrors Z
Page 120 of 397
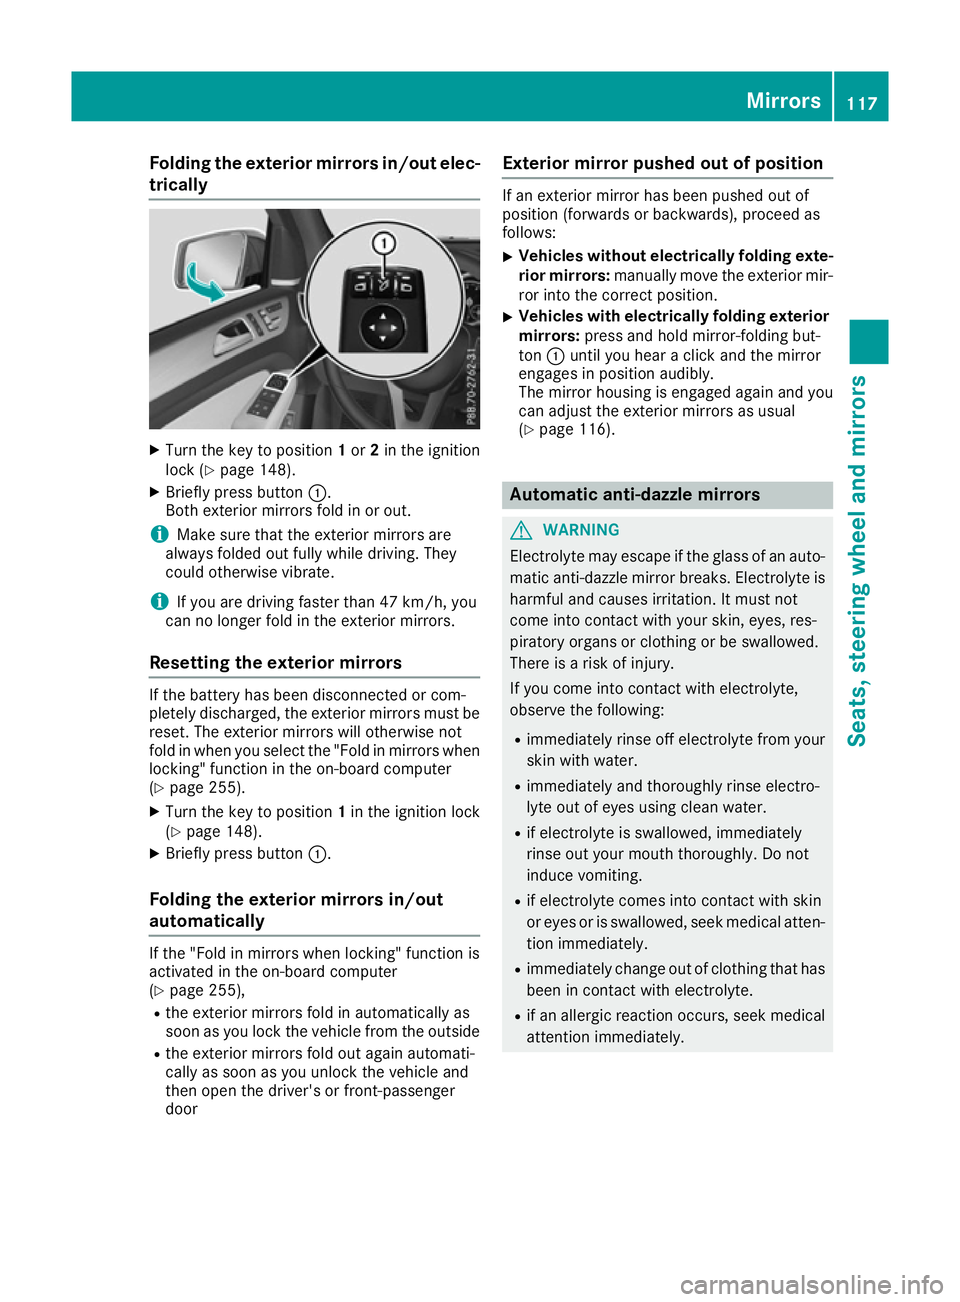
Folding the exterior mirrors in/out elec-
trically X
Turn the key to position 1or 2in the ignition
lock (Y page 148).
X Briefly press button :.
Both exterior mirrors fold in or out.
i Make sure that the exterior mirrors are
always folded out fully while driving. They
could otherwise vibrate.
i If you are driving faster than 47 km/h, you
can no longer fold in the exterior mirrors.
Resetting the exterior mirrors If the battery has been disconnected or com-
pletely discharged, the exterior mirrors must be
reset. The exterior mirrors will otherwise not
fold in when you select the "Fold in mirrors whenlocking" function in the on-board computer
(Y page 255).
X Turn the key to position 1in the ignition lock
(Y page 148).
X Briefly press button :.
Folding the exterior mirrors in/out
automatically If the "Fold in mirrors when locking" function is
activated in the on-board computer
(Y page 255),
R the exterior mirrors fold in automatically as
soon as you lock the vehicle from the outside
R the exterior mirrors fold out again automati-
cally as soon as you unlock the vehicle and
then open the driver's or front-passenger
door Exterior mirror pushed out of position If an exterior mirror has been pushed out of
position (forwards or backwards), proceed as
follows:
X Vehicles without electrically folding exte-
rior mirrors: manually move the exterior mir-
ror into the correct position.
X Vehicles with electrically folding exterior
mirrors: press and hold mirror-folding but-
ton :until you hear a click and the mirror
engages in position audibly.
The mirror housing is engaged again and you
can adjust the exterior mirrors as usual
(Y page 116). Automatic anti-dazzle mirrors
G
WARNING
Electrolyte may escape if the glass of an auto- matic anti-dazzle mirror breaks. Electrolyte is
harmful and causes irritation. It must not
come into contact with your skin, eyes, res-
piratory organs or clothing or be swallowed.
There is a risk of injury.
If you come into contact with electrolyte,
observe the following:
R immediately rinse off electrolyte from your
skin with water.
R immediately and thoroughly rinse electro-
lyte out of eyes using clean water.
R if electrolyte is swallowed, immediately
rinse out your mouth thoroughly. Do not
induce vomiting.
R if electrolyte comes into contact with skin
or eyes or is swallowed, seek medical atten-
tion immediately.
R immediately change out of clothing that has
been in contact with electrolyte.
R if an allergic reaction occurs, seek medical
attention immediately. Mirrors
117Seats, steering wheel and mirrors Z
Page 130 of 397
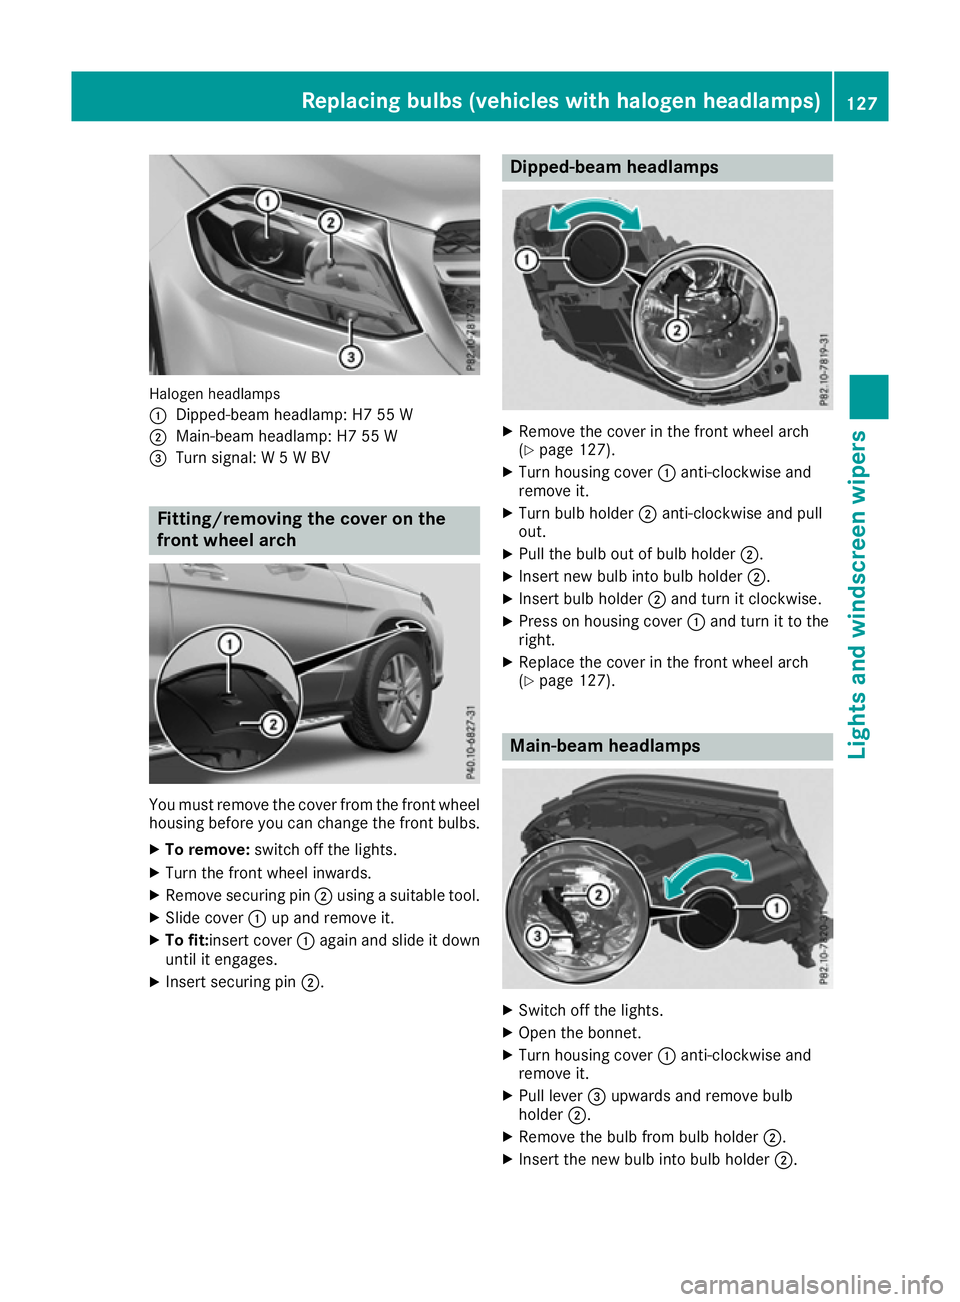
Halogen headlamps
:
Dipped-beam headlamp: H7 55 W
; Main-beam headlamp: H7 55 W
= Turn signal: W 5 W BV Fitting/removing the cover on the
front wheel arch You must remove the cover from the front wheel
housing before you can change the front bulbs.
X To remove: switch off the lights.
X Turn the front wheel inwards.
X Remove securing pin ;using a suitable tool.
X Slide cover :up and remove it.
X To fit: insert cover :again and slide it down
until it engages.
X Insert securing pin ;. Dipped-beam headlamps
X
Remove the cover in the front wheel arch
(Y page 127).
X Turn housing cover :anti-clockwise and
remove it.
X Turn bulb holder ;anti-clockwise and pull
out.
X Pull the bulb out of bulb holder ;.
X Insert new bulb into bulb holder ;.
X Insert bulb holder ;and turn it clockwise.
X Press on housing cover :and turn it to the
right.
X Replace the cover in the front wheel arch
(Y page 127). Main-beam headlamps
X
Switch off the lights.
X Open the bonnet.
X Turn housing cover :anti-clockwise and
remove it.
X Pull lever =upwards and remove bulb
holder ;.
X Remove the bulb from bulb holder ;.
X Insert the new bulb into bulb holder ;. Replacing bulbs (vehicles with halogen headlamps)
127Lights and windscreen wipers Z
Page 147 of 397
X
Insert new battery =with the lettering facing
upwards.
X Slide battery cover ;in the opposite direc-
tion to the arrow on the remote control until it engages.
Problems with the auxiliary heating/ventilation Problem
Possible causes/consequences and
M
MSolutions FAIL¨ The signal transmission between the transmitter and the vehicle is
faulty.
X
Change your position in relation to the vehicle, moving closer if
necessary. FAIL The auxiliary heating/ventilation cannot be switched on or has
switched itself off.
The starter battery is not sufficiently charged.
X Charge the starter battery. The fuel tank content is below the reserve fuel level.
X Refuel at the nearest filling station. The auxiliary heating/ventilation is malfunctioning.
X Have the auxiliary heating/ventilation checked at a qualified spe-
cialist workshop. Adjusting the air vents
Important safety notes
G
WARNING
Very hot or very cold air can flow from the air vents. This could result in burns or frostbite in the immediate vicinity of the air vents. There
is a risk of injury.
Make sure that all vehicle occupants always
maintain a sufficient distance to the air out-
lets. If necessary, redirect the airflow to
another area of the vehicle interior.
In order to ensure the direct flow of fresh air
through the air vents into the vehicle interior,
please observe the following notes:
R keep the air inlet grille on the bonnet and in
the engine compartment on the front-
passenger side free of blockages, such as ice,
snow or leaves.
R never cover the vents or ventilation grilles in
the vehicle interior i
For virtually draught-free ventilation, adjust
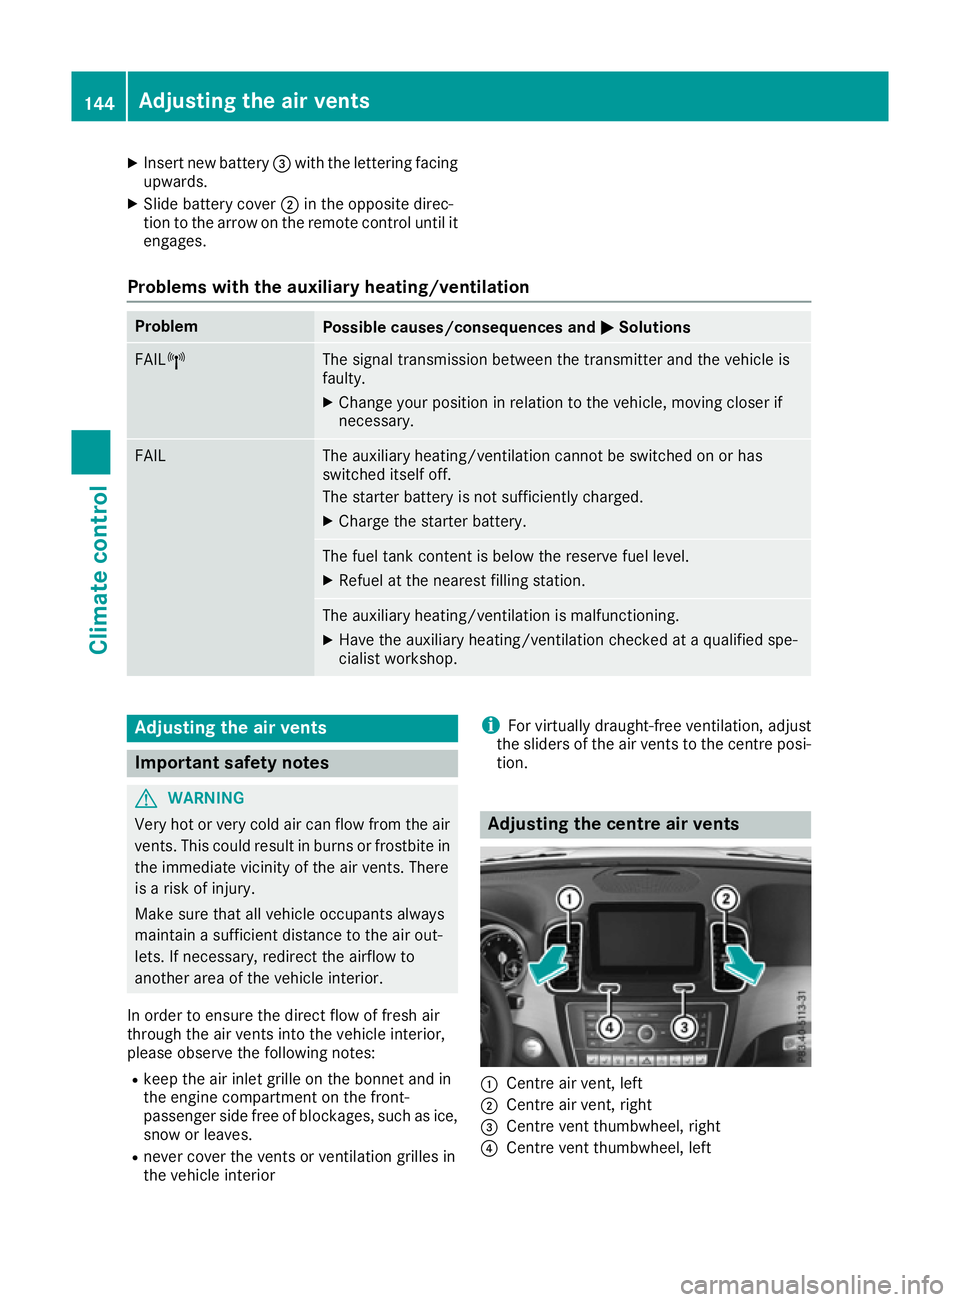
the sliders of the air vents to the centre posi- tion. Adjusting the centre air vents
:
Centre air vent, left
; Centre air vent, right
= Centre vent thumbwheel, right
? Centre vent thumbwheel, left 144
Adjusting the air ventsClimate control
Page 161 of 397
X
Release the electric parking brake.
X Switch off the ignition and leave the key in the
ignition lock.
Engaging drive position D X
If the transmission is in position Ror N: push
the DIRECT SELECT lever down past the first
point of resistance.
X If the transmission is in position P: depress
the brake pedal and push the DIRECT SELECT lever down past the first point of resistance. Transmission position and drive pro-
gram display
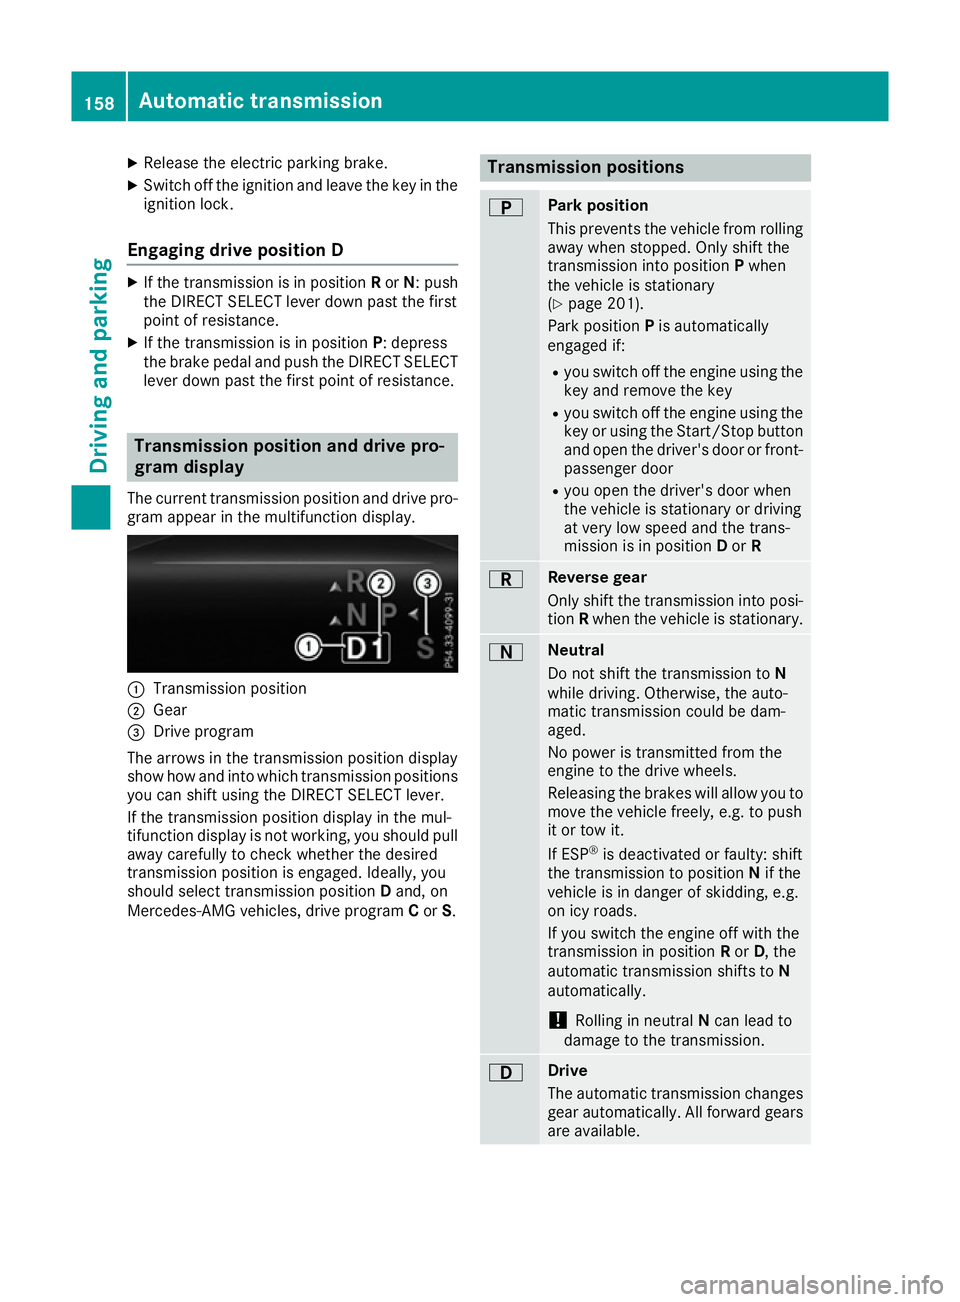
The current transmission position and drive pro-
gram appear in the multifunction display. :
Transmission position
; Gear
= Drive program
The arrows in the transmission position display
show how and into which transmission positions
you can shift using the DIRECT SELECT lever.
If the transmission position display in the mul-
tifunction display is not working, you should pull away carefully to check whether the desired
transmission position is engaged. Ideally, you
should select transmission position Dand, on
Mercedes-AMG vehicles, drive program Cor S. Transmission positions
B Park position
This prevents the vehicle from rolling
away when stopped. Only shift the
transmission into position Pwhen
the vehicle is stationary
(Y page 201).
Park position Pis automatically
engaged if:
R you switch off the engine using the
key and remove the key
R you switch off the engine using the
key or using the Start/Stop button
and open the driver's door or front- passenger door
R you open the driver's door when
the vehicle is stationary or driving
at very low speed and the trans-
mission is in position Dor R C Reverse gear
Only shift the transmission into posi-
tion Rwhen the vehicle is stationary. A Neutral
Do not shift the transmission to
N
while driving. Otherwise, the auto-
matic transmission could be dam-
aged.
No power is transmitted from the
engine to the drive wheels.
Releasing the brakes will allow you to
move the vehicle freely, e.g. to push
it or tow it.
If ESP ®
is deactivated or faulty: shift
the transmission to position Nif the
vehicle is in danger of skidding, e.g.
on icy roads.
If you switch the engine off with the
transmission in position Ror D, the
automatic transmission shifts to N
automatically.
! Rolling in neutral
Ncan lead to
damage to the transmission. 7 Drive
The automatic transmission changes
gear automatically. All forward gears
are available. 158
Automatic transmissionDriving and pa
rking
Page 162 of 397
Driving tips
Changing gear The automatic transmission shifts to the indi-
vidual gears automatically when it is in trans-
mission position
D. Gearshifting is determined
by:
R the selected drive program
R the position of the accelerator pedal
R the road speed
Accelerator pedal position Your driving style influences how the automatic
transmission shifts gear:
R little throttle: early upshifts
R more throttle: late upshifts
Kickdown Use kickdown for maximum acceleration:
X Depress the accelerator pedal beyond the
pressure point.
The automatic transmission shifts to a lower
gear depending on the engine speed.
X Ease off the accelerator pedal once the
desired speed is reached.
The automatic transmission shifts back up.
Gliding mode (diesel engines only) Gliding mode is characterised by the following:
R the combustion engine is disconnected from
the drive train
R the engine speed is equal to the engine idling
speed
R the gear indicated after the transmission
position Ddisappears in the multifunction
display (Y page 158)
Gliding mode can be activated and transmission
position Dshown in green under the following
conditions:
R you select the "ECO" setting for the drive sys-
tem within the Individualdrive program. You
can find information about this in the Digital
Owner's Manual
R the speed is within a suitable range
R the type of road is suitable, e.g. no steep uphill
or downhill gradients R
the distance to the vehicle in front is sufficient
R you are no longer depressing the accelerator
pedal
Gliding mode is deactivated under the following
conditions:
R you depress the accelerator pedal
R you depress the brake pedal
R you use the DIRECT SELECT lever to switch
the transmission position (Y page 156)
R you use the DYNAMIC SELECT controller to
change the drive program (Y page 155)
R you activate manual gearshifting
(Y page 160)
R the distance to the vehicle in front is too short
R you leave the suitable speed range
Towing a trailer X
Drive in the middle of the engine speed range
on uphill gradients.
X Depending on the uphill or downhill gradient,
use the left-hand steering wheel gearshift
paddle (Y page 160) to select a lower gear,
even if cruise control, Distance Pilot
DISTRONIC or the speed limiter are activated. Drive programs
Slippery drive program The
Slippery drive program has the following
characteristics:
R reduced engine and transmission settings for
optimum propulsion on slippery or snow-cov-
ered roads.
R optimised ESP ®
stability control on slippery
or snow-covered roads.
R the vehicle has improved driving stability on
slippery or snow-covered roads, for example.
Comfort drive program The
Comfort drive program has the following
characteristics:
R comfort-orientated engine and transmission
settings.
R optimal fuel consumption resulting from the
automatic transmission shifting up sooner. Automatic transmission
159Driving and parking Z
Page 164 of 397
X
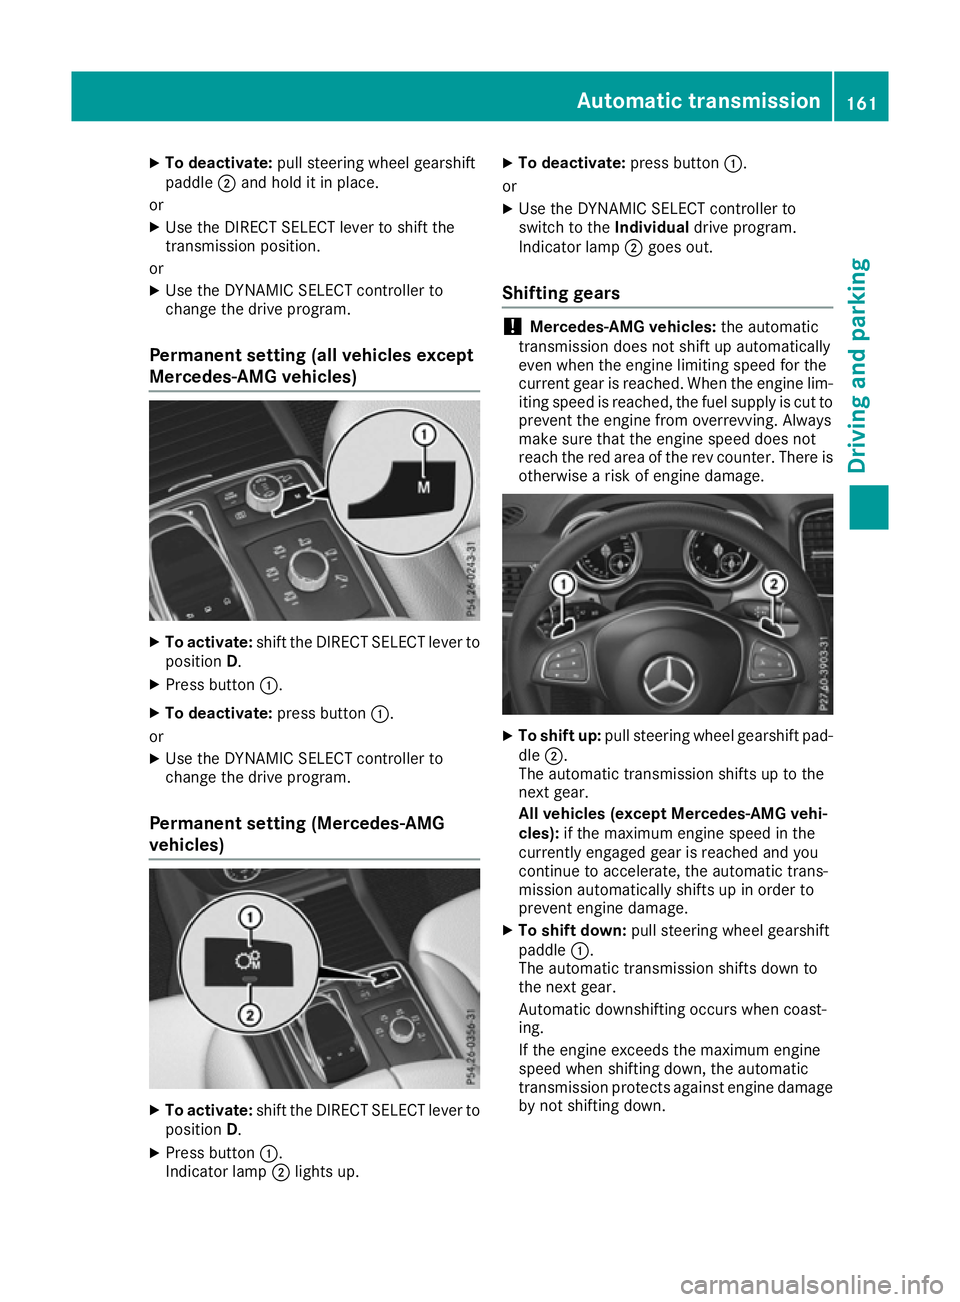
To deactivate: pull steering wheel gearshift
paddle ;and hold it in place.
or X Use the DIRECT SELECT lever to shift the
transmission position.
or X Use the DYNAMIC SELECT controller to
change the drive program.
Permanent setting (all vehicles except
Mercedes-AMG vehicles) X
To activate: shift the DIRECT SELECT lever to
position D.
X Press button :.
X To deactivate: press button:.
or X Use the DYNAMIC SELECT controller to
change the drive program.
Permanent setting (Mercedes-AMG
vehicles) X
To activate: shift the DIRECT SELECT lever to
position D.
X Press button :.
Indicator lamp ;lights up. X
To deactivate: press button:.
or
X Use the DYNAMIC SELECT controller to
switch to the Individualdrive program.
Indicator lamp ;goes out.
Shifting gears !
Mercedes-AMG vehicles:
the automatic
transmission does not shift up automatically
even when the engine limiting speed for the
current gear is reached. When the engine lim- iting speed is reached, the fuel supply is cut to
prevent the engine from overrevving. Always
make sure that the engine speed does not
reach the red area of the rev counter. There is
otherwise a risk of engine damage. X
To shift up: pull steering wheel gearshift pad-
dle ;.
The automatic transmission shifts up to the
next gear.
All vehicles (except Mercedes-AMG vehi-
cles): if the maximum engine speed in the
currently engaged gear is reached and you
continue to accelerate, the automatic trans-
mission automatically shifts up in order to
prevent engine damage.
X To shift down: pull steering wheel gearshift
paddle :.
The automatic transmission shifts down to
the next gear.
Automatic downshifting occurs when coast-
ing.
If the engine exceeds the maximum engine
speed when shifting down, the automatic
transmission protects against engine damage
by not shifting down. Automatic transmission
161Driving and parking Z