2016 MERCEDES-BENZ GLS SUV headlamp
[x] Cancel search: headlampPage 127 of 397
Adaptive Highbeam Assist Plus
General notes With Adaptive Highbeam Assist Plus, you can
automatically switch between dipped-beam,
partial main-beam and main-beam headlamps.
Partial main-beam illumination is a form of illu-
mination whereby the main beam is directed
past other road users. Other road users are kept
out of the main beam. This prevents glare. If
there is a vehicle in front, for example, the main- beam headlamps illuminate the areas to its right
and left, and the vehicle in front is illuminated by
the dipped-beam headlamps.
The system automatically adapts the dipped-
beam headlamp range depending on the dis-
tance to the other vehicle. Once the system no
longer detects any other vehicles, it switches on the main-beam headlamps again.
If the main-beam or partial main-beam head-
lamps are causing too much reflection from traf-fic signs, the lights are automatically dimmed
and glare for the driver caused by the reflections
is thus avoided.
The system's optical sensor is located behind
the windscreen near the overhead control
panel.
Vehicles with drive program S+(Sport Plus): the
speed at which Adaptive Highbeam Assist Plus
switches between full beam and dipped beam is
increased when the drive program is switched
on.
Important safety notes G
WARNING
Adaptive Highbeam Assist Plus does not rec-
ognise road users:
R who have no lights, e.g. pedestrians
R who have poor lighting, e.g. cyclists
R whose lighting is blocked, e.g. by a barrier
In very rare cases, Adaptive Highbeam Assist
Plus may not recognise road users who do
have lights, or may recognise them too late. In this, or in similar situations, the automatic
main-beam headlamps will not be deactivated
or will be activated despite the presence of
other road users. There is a risk of an acci-
dent. Always carefully observe the traffic conditions
and switch off the main-beam headlamps in
good time.
Adaptive Highbeam Assist Plus cannot take into
account road, weather or traffic conditions.
Adaptive Highbeam Assist Plus is only an aid.
You are responsible for adjusting the vehicle's
lighting to the prevailing light, visibility and traf-
fic conditions.
In particular, the detection of obstacles can be
restricted if there is:
R poor visibility, e.g. due to fog, heavy rain or
snow
R dirt on the sensors or if the sensors are
obscured
Switching Adaptive Highbeam Assist
Plus on/off X
To switch on: turn the light switch to Ã.
X Press the combination switch beyond the
pressure point in the direction of arrow :.
The _ indicator lamp in the multifunction
display lights up when it is dark and the light
sensor switches on the dipped-beam head-
lamps.
At speeds above approx.25 km/h: the
headlamp range is automatically controlled
according to the distance to other road users.
At speeds above approx.30 km/h:
R if no other road users are detected, the
main-beam headlamps are automatically
switched on
R if other road users are detected, the partial
main-beam headlamps are automatically
switched on
The K indicator lamp in the instrument
cluster also lights up.
At speeds below approx.25 km/hor when
there is sufficient street lighting:
R the partial main-beam headlamps are
switched off automatically
R the main-beam headlamps are switched off
automatically 124
Exterior lightingLights and windscreen wipers
Page 128 of 397
The
K indicator lamp in the instrument
cluster goes out. The _indicator lamp in
the multifunction display remains lit.
X To switch off: move the combination switch
back to its normal position or move the light
switch to another position.
The _ indicator lamp in the multifunction
display goes out. Headlamps misted up on the inside
Under certain climatic and physical conditions,
moisture may form in the headlamp. This mois-
ture will not impair the function of the headlamp. Interior lighting
Overview of interior lighting
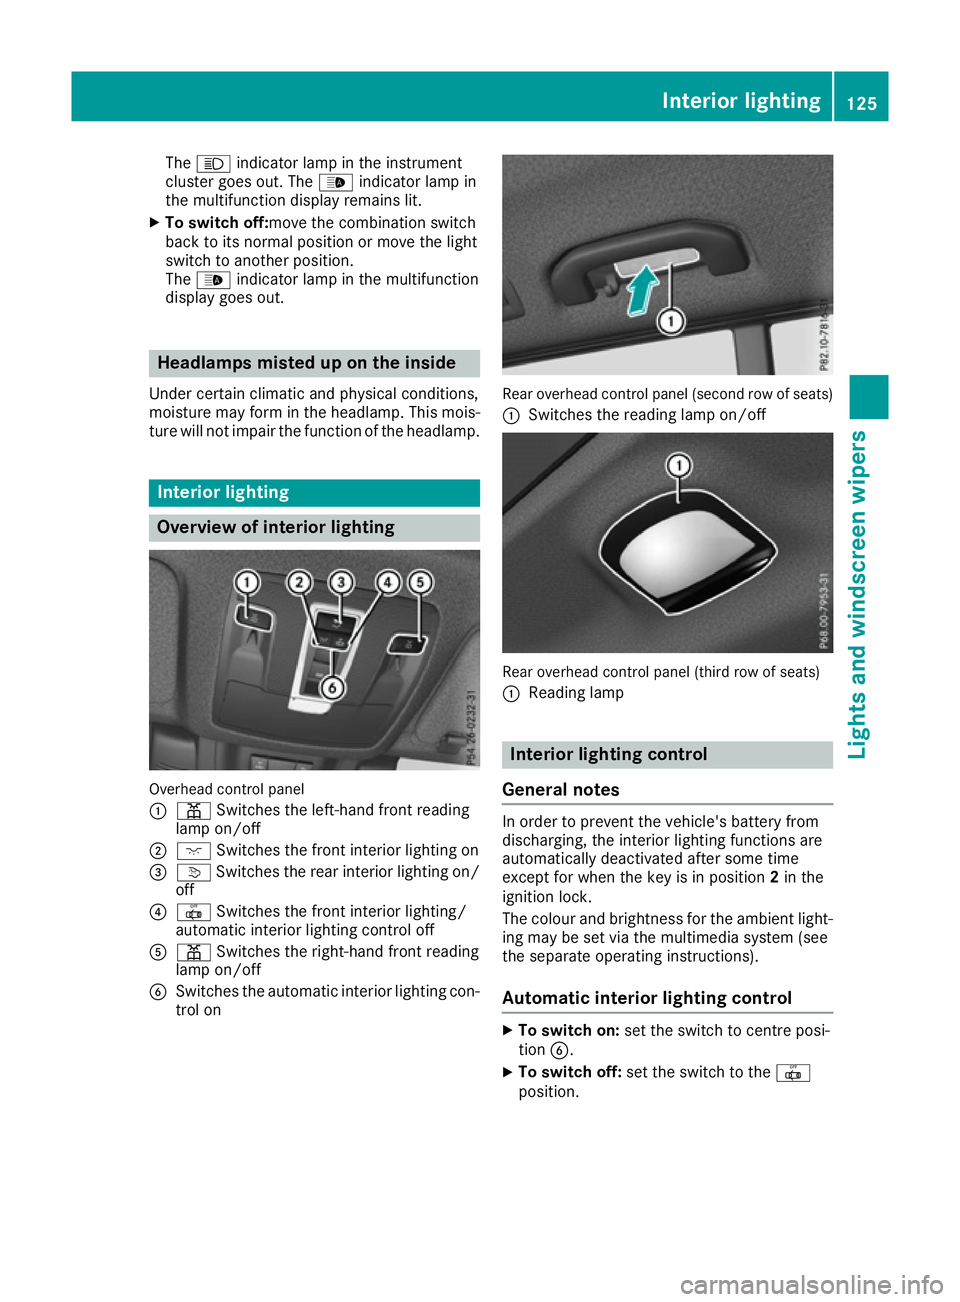
Overhead control panel
:
p Switches the left-hand front reading
lamp on/off
; c Switches the front interior lighting on
= v Switches the rear interior lighting on/
off
? | Switches the front interior lighting/
automatic interior lighting control off
A p Switches the right-hand front reading
lamp on/off
B Switches the automatic interior lighting con-
trol on Rear overhead control panel (second row of seats)
: Switches the reading lamp on/off Rear overhead control panel (third row of seats)
:
Reading lamp Interior lighting control
General notes In order to prevent the vehicle's battery from
discharging, the interior lighting functions are
automatically deactivated after some time
except for when the key is in position
2in the
ignition lock.
The colour and brightness for the ambient light-
ing may be set via the multimedia system (see
the separate operating instructions).
Automatic interior lighting control X
To switch on: set the switch to centre posi-
tion B.
X To switch off: set the switch to the |
position. Interior lighting
125Lights and windscreen wipers Z
Page 129 of 397
The interior lighting automatically switches on if
you:
R unlock the vehicle
R open a door
R remove the key from the ignition lock
The interior lighting is activated for a short time
when the key is removed from the ignition lock.
This delayed switch-off can be adjusted via the
multimedia system (see separate Owner's Man- ual). Crash-responsive emergency lighting
The interior lighting is activated automatically if
the vehicle is involved in an accident.
X To switch off the crash-responsive emer-
gency lighting: press the hazard warning
lamp button.
or X Lock and then unlock the vehicle using the
key. Replacing bulbs (vehicles with LED
headlamps)
The front and rear light clusters of your vehicle
are equipped with LED bulbs. Do not replace the
vehicle's bulbs yourself. Contact a qualified spe- cialist workshop with the necessary specialist
knowledge and tools to carry out the work
required.
Lamps are an important aspect of vehicle safety.
You must therefore make sure that these func-
tion correctly at all times. Have the headlamp
setting checked regularly. Replacing bulbs (vehicles with halo-
gen headlamps) Important safety notes
G
WARNING
Bulbs, lamps and plug connectors can
become very hot during use. When replacing a bulb, you could burn yourself on these com-
ponents. There is a risk of injury. Allow these components to cool down before
replacing the bulb.
Do not use a bulb if it has been dropped or if its
glass tube has been scratched.
The bulb may explode if:
R you touch it
R it is hot
R you drop it
R you scratch it
Use bulbs only in closed lamps that have been
designed for this purpose. Fit only spare bulbs of the same type and the specified voltage.
Marks on the glass tube reduce the service life
of the bulb. Do not touch the glass tube with
your bare hands. If necessary, clean the glass
tube when cold with alcohol or spirit and rub it
off with a lint-free cloth.
Protect bulbs from moisture during operation.
Do not allow bulbs to come into contact with
liquids.
Replace only the bulbs listed (Y page 126).
Have the bulbs that you cannot replace yourself
replaced at a qualified specialist workshop.
If you require assistance replacing bulbs, con-
sult a qualified specialist workshop.
If the new bulb does not light up either, consult
a qualified specialist workshop.
Headlamps and lamps are an important aspect
of vehicle safety. You must therefore make sure
that these function correctly at all times. Have
the headlamp setting checked regularly. Overview of bulb replacement - bulb
types
You can replace the following bulbs. The details for the bulb types can be found in the legend. 126
Replacing bulbs (vehicles with halogen headlamps)Lights and windscreen wipers
Page 130 of 397
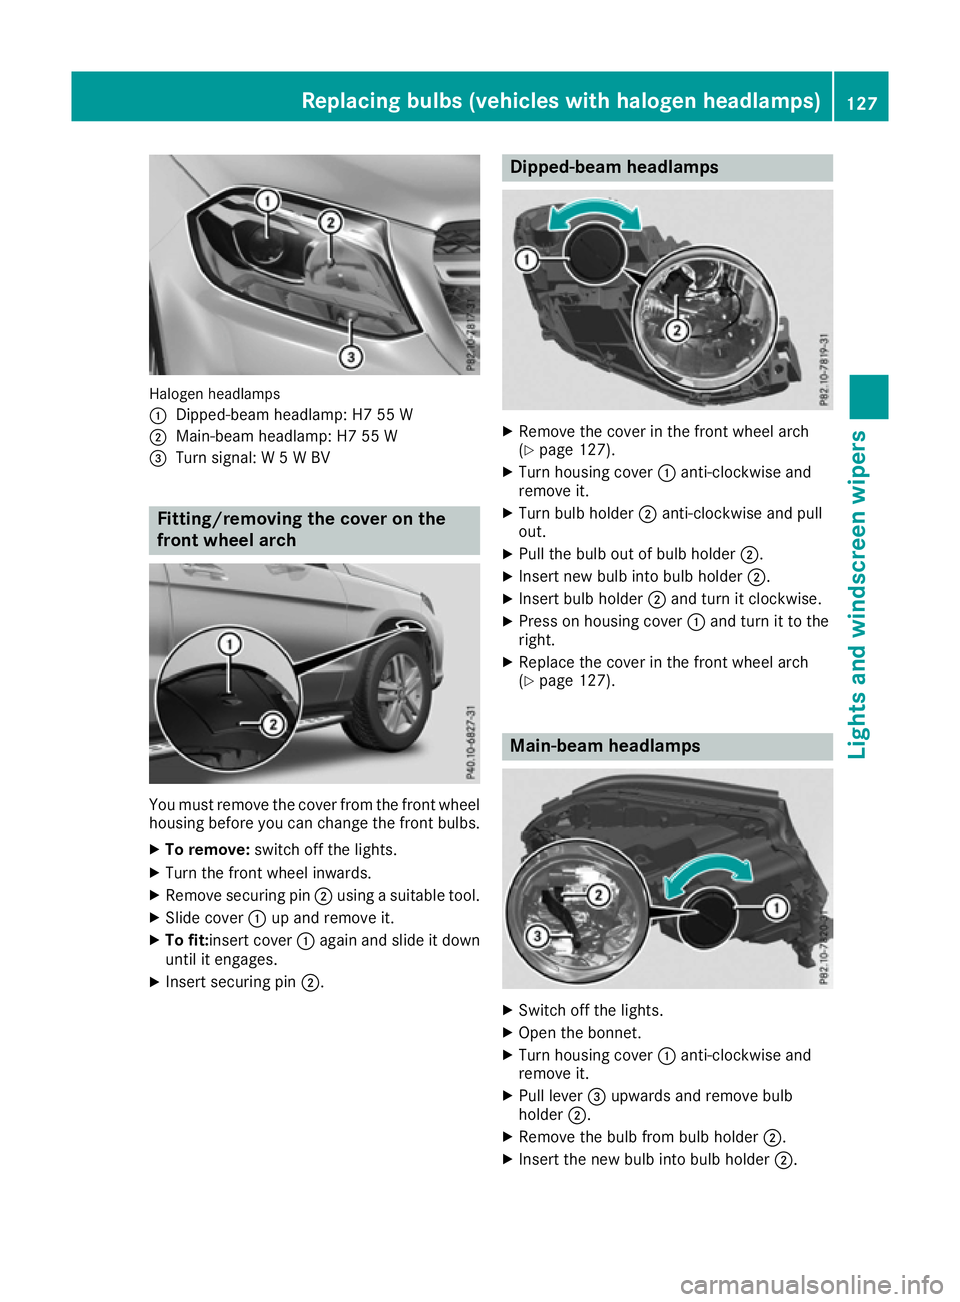
Halogen headlamps
:
Dipped-beam headlamp: H7 55 W
; Main-beam headlamp: H7 55 W
= Turn signal: W 5 W BV Fitting/removing the cover on the
front wheel arch You must remove the cover from the front wheel
housing before you can change the front bulbs.
X To remove: switch off the lights.
X Turn the front wheel inwards.
X Remove securing pin ;using a suitable tool.
X Slide cover :up and remove it.
X To fit: insert cover :again and slide it down
until it engages.
X Insert securing pin ;. Dipped-beam headlamps
X
Remove the cover in the front wheel arch
(Y page 127).
X Turn housing cover :anti-clockwise and
remove it.
X Turn bulb holder ;anti-clockwise and pull
out.
X Pull the bulb out of bulb holder ;.
X Insert new bulb into bulb holder ;.
X Insert bulb holder ;and turn it clockwise.
X Press on housing cover :and turn it to the
right.
X Replace the cover in the front wheel arch
(Y page 127). Main-beam headlamps
X
Switch off the lights.
X Open the bonnet.
X Turn housing cover :anti-clockwise and
remove it.
X Pull lever =upwards and remove bulb
holder ;.
X Remove the bulb from bulb holder ;.
X Insert the new bulb into bulb holder ;. Replacing bulbs (vehicles with halogen headlamps)
127Lights and windscreen wipers Z
Page 181 of 397
R
Do not stray from marked routes or paths.
R Observe the notes on off-road fording
(Y page 175).
i Information about retrofitting special all-ter-
rain tyres is available from any qualified spe-
cialist workshop.
i Do not use the HOLD function when driving
off-road, on steep uphill or downhill gradients or on slippery or loose surfaces. The HOLD
function cannot hold the vehicle on such sur- faces.
Checklist before off-road driving X
Engine oil level: check the engine oil and top
it up if necessary.
When driving on steep gradients, the oil level must be sufficiently high to ensure a correct
oil supply in the vehicle.
X AdBlue ®
tank (BlueTEC vehicles): check the
level and top up if necessary (Y page 166).
X Tyre-change tool kit: check that the jack is
working and make sure that the wheel
wrench, a robust tow cable and a folding
spade are in the vehicle.
X Wheels and tyres: check the tyre tread
depth and tyre pressure.
X Check for damage and remove any foreign
objects, e.g. small stones, from the wheels/
tyres.
X Replace any missing valve caps.
X Replace dented or damaged wheels.
X Wheels: dented or bent wheels can lead to a
loss of tyre pressure and damage to the tyre
bead. Before driving off-road, check the
wheels and replace them if necessary.
Checklist after off-road driving !
If you detect damage to the vehicle after
driving off-road, have the vehicle checked
immediately at a qualified specialist work-
shop.
Driving over rough terrain places greater
demands on your vehicle than driving on normal
roads. After driving off-road, check the vehicle.
This allows you to detect damage promptly and reduce the risk of an accident to yourself and
other road users.
X If the Off-road orOff-road Plus drive pro-
gram is selected: select the Individual,Sport,
Comfort orSlippery drive program
(Y page 155).
X Deactivate the LOW RANGE offroad gear
(Y page 230).
X Deactivate DSR (Y page 227).
X Lower the vehicle level again to a level suita-
ble to the road conditions, e.g. to the normal
level.
X Clean the headlamps and rear lights and
check for damage.
X Clean the front and rear licence plates.
X Clean the wheels and tyres with a water jet
and remove any foreign objects.
X Clean the wheels, wheel arches and the vehi-
cle underside with a water jet; check for any
foreign objects and damage.
X Check whether twigs or other parts of plants
have become trapped. These increase the risk
of fire and can damage fuel pipes, brake
hoses or the rubber bellows of the axle joints
and propeller shafts.
X After the trip, examine without fail the entire
undercarriage, wheels, tyres, brakes, body-
work structure, steering, chassis and exhaust
system for damage.
X After driving for extended periods across
sand, mud, gravel, water or in similarly dirty
conditions, have the brake discs, wheels,
brake pads/linings and axle joints checked
and cleaned.
X If you detect strong vibrations after driving
off-road, check for foreign objects in the
wheels and drive train and remove them if
necessary. Foreign objects can disturb the
balance and cause vibrations.
Driving on sand Observe the following rules when driving on
sand:
R Select the Offroaddrive program (vehicles
without Off-Road Engineering package)
(Y page 228).
R Select the Offroaddrive program (vehicles
with Off-Road Engineering package)
(Y page 229).
R Select a higher vehicle level.
R Avoid high engine speeds.
R Use the left-hand steering wheel gearshift
paddle to shift to a lower gear appropriate to
the terrain. 178
Driving
tipsDriving an d parking
Page 255 of 397
![MERCEDES-BENZ GLS SUV 2016 Owners Manual X
Press the :or9 button to select the
Permanent display:
Permanent display: function.
The current setting, outside temperature
outside temperature
or Dig. speedo [mph]:
Dig. speedo [mph]:, appears.
X MERCEDES-BENZ GLS SUV 2016 Owners Manual X
Press the :or9 button to select the
Permanent display:
Permanent display: function.
The current setting, outside temperature
outside temperature
or Dig. speedo [mph]:
Dig. speedo [mph]:, appears.
X](/manual-img/4/55577/w960_55577-254.png)
X
Press the :or9 button to select the
Permanent display:
Permanent display: function.
The current setting, outside temperature
outside temperature
or Dig. speedo [mph]:
Dig. speedo [mph]:, appears.
X To change the setting: pressaagain.
Light submenu Setting the daytime driving lights
The Daytime driving lights
Daytime driving lights function can
only be switched on with the engine turned off.
X Press the =or; button on the steering
wheel to select the Settings
Settings menu.
X Press the :or9 button to select the
Lights
Lights submenu.
X Press ato confirm.
X Press the :or9 button to select the
Daytime driving lights
Daytime driving lights function.
If the Daytime
Daytime driving
drivinglights
lightsfunction has
been switched on, the cone of light and the
W symbol in the multifunction display are
shown in orange.
X Press the abutton to save the setting.
Further information on daytime driving lights
(Y page 121).
Switching the Intelligent Light System
on/off
X Press the =or; button on the steering
wheel to select the Settings
Settings menu.
X Press the :or9 button to select the
Lights Lights submenu.
X Press ato confirm.
X Press the :or9 button to select the
Intell. Light System
Intell. Light System function.
If the Intell. Light System
Intell. Light System function has
been switched on, the cone of light and the
L symbol in the multifunction display are
shown in orange.
X Press the abutton to save the setting.
When you switch the Intell. Light System Intell. Light System
function on, you activate the following func-
tions:
R Motorway mode
R Active light function
R Cornering light function
R Extended range foglamps
R Off-road lights
If you set the dipped-beam headlamps for driv-
ing on the right/left, the multifunction display shows the
Intell. Light System: System
Intell. Light System: System
inoperative Inactive for left-side inoperative Inactive for left-side
traffic traffic orIntell.
Intell. Light
LightSystem:
System: System
System
inoperative Inactive for right-side
inoperative Inactive for right-side
traffic
traffic display message instead of the
Intell. Light Sys.
Intell. Light Sys. function in theLights
Lights
submenu (Y page 252). This display message
will only appear if the setting for driving on the
left/right is set opposite to your vehicle's coun-
try version.
Further information on the Intelligent Light Sys-
tem (Y page 123).
Setting the dipped-beam headlamps for
driving on the left/right
This function is only available in vehicles with
the Intelligent Light System.
You can use this function to switch between
symmetrical and asymmetrical dipped beam
(Y page 120).
X Press the =or; button on the steering
wheel to select the Settings
Settings menu.
X Press the :or9 button to select the
Lights Lights submenu.
X Press ato confirm.
X Press the :or9 button to select the
Dipped beams Setting for:
Dipped beams Setting for: function.
You will see the selected setting: Right-
Right-
side traffic
side traffic orLeft-side traffic
Left-side traffic.
X Press the abutton to save the setting.
If you change the setting, conversion does not take place until the next time the vehicle is
stationary.
If you set the dipped-beam headlamps for driv-
ing on the right/left, then motorway mode and
the extended range foglamps are unavailable.
These are only deactivated if the setting for driv-
ing on the left/right is set opposite to your vehi- cle's country version.
A qualified specialist workshop can set the
dipped-beam headlamps for driving on the left/
right.
Vehicle submenu Setting the permanent speed limiter
X Press the =or; button on the steering
wheel to select the Settings
Settings menu.
X Press the :or9 button to select the
Vehicle Vehicle submenu.
X Press ato confirm. 252
Menus and submenusOn-board computer and displays
Page 274 of 397
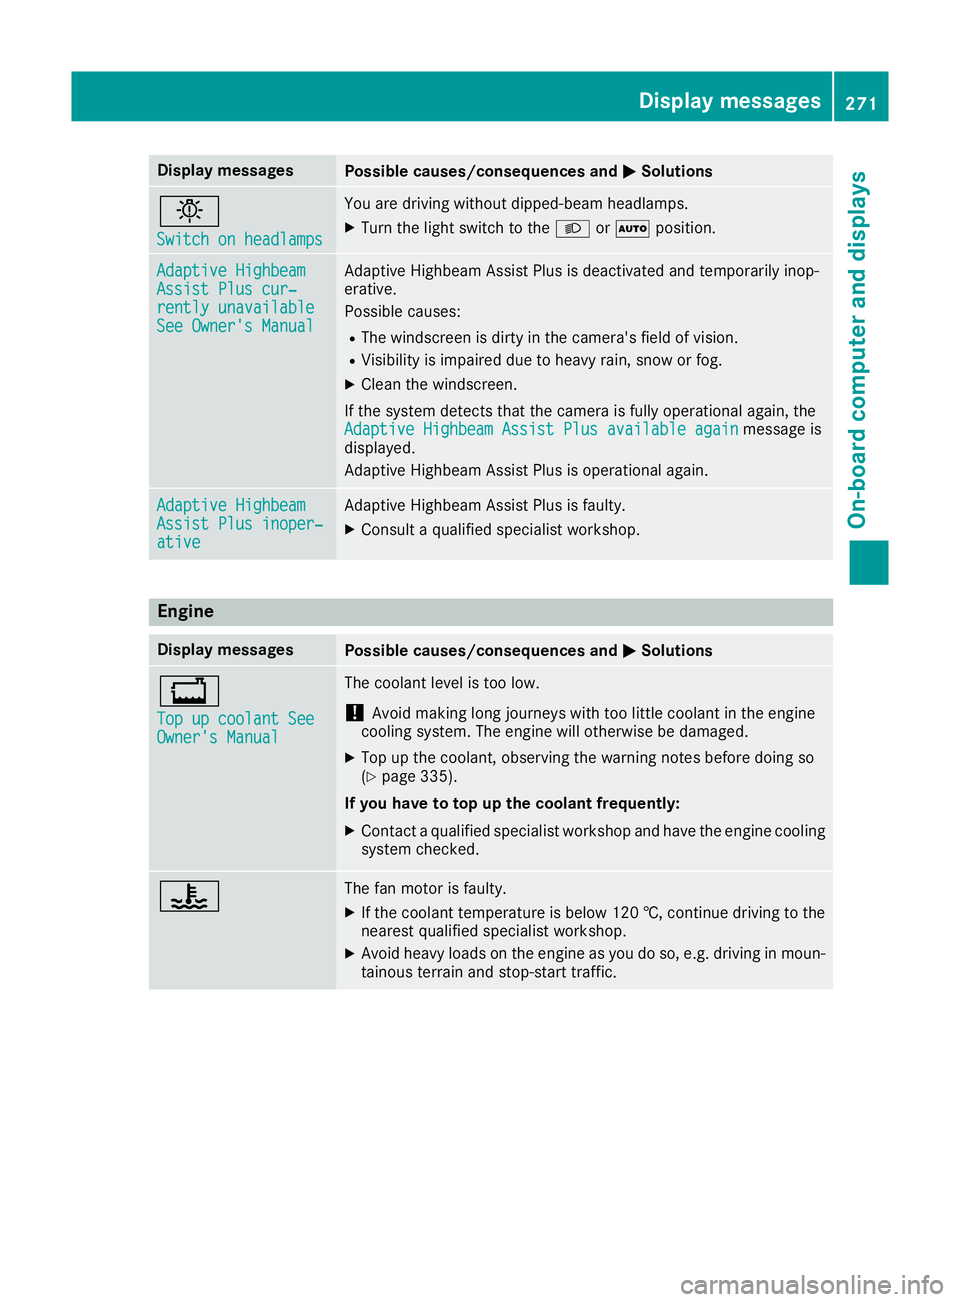
Display messages
Possible causes/consequences and
M
MSolutions b
Switch on headlamps Switch on headlamps You are driving without dipped-beam headlamps.
X
Turn the light switch to the Lorà position. Adaptive Highbeam Adaptive Highbeam
Assist Plus cur‐ Assist Plus cur‐
rently unavailable rently unavailable
See Owner's Manual See Owner's Manual Adaptive Highbeam Assist Plus is deactivated and temporarily inop-
erative.
Possible causes:
R The windscreen is dirty in the camera's field of vision.
R Visibility is impaired due to heavy rain, snow or fog.
X Clean the windscreen.
If the system detects that the camera is fully operational again, the Adaptive Highbeam Assist Plus available again Adaptive Highbeam Assist Plus available again message is
displayed.
Adaptive Highbeam Assist Plus is operational again. Adaptive Highbeam Adaptive Highbeam
Assist Plus inoper‐ Assist Plus inoper‐
ative ative Adaptive Highbeam Assist Plus is faulty.
X Consult a qualified specialist workshop. Engine
Display messages
Possible causes/consequences and
M
MSolutions +
Top up coolant See Top up coolant See
Owner's Manual Owner's Manual The coolant level is too low.
! Avoid making long journeys with too little coolant in the engine
cooling system. The engine will otherwise be damaged.
X Top up the coolant, observing the warning notes before doing so
(Y page 335).
If you have to top up the coolant frequently: X Contact a qualified specialist workshop and have the engine cooling
system checked. ? The fan motor is faulty.
X If the coolant temperature is below 120 †, continue driving to the
nearest qualified specialist workshop.
X Avoid heavy loads on the engine as you do so, e.g. driving in moun-
tainous terrain and stop-start traffic. Display
messages
271On-board computer and displays Z
Page 339 of 397
X
Turn the key to position 0in the ignition lock
(Y page 148).
X On vehicles with KEYLESS-GO, press the
Start/Stop button (Y page 150).
X Press the Start/Stop button (Y page 150).
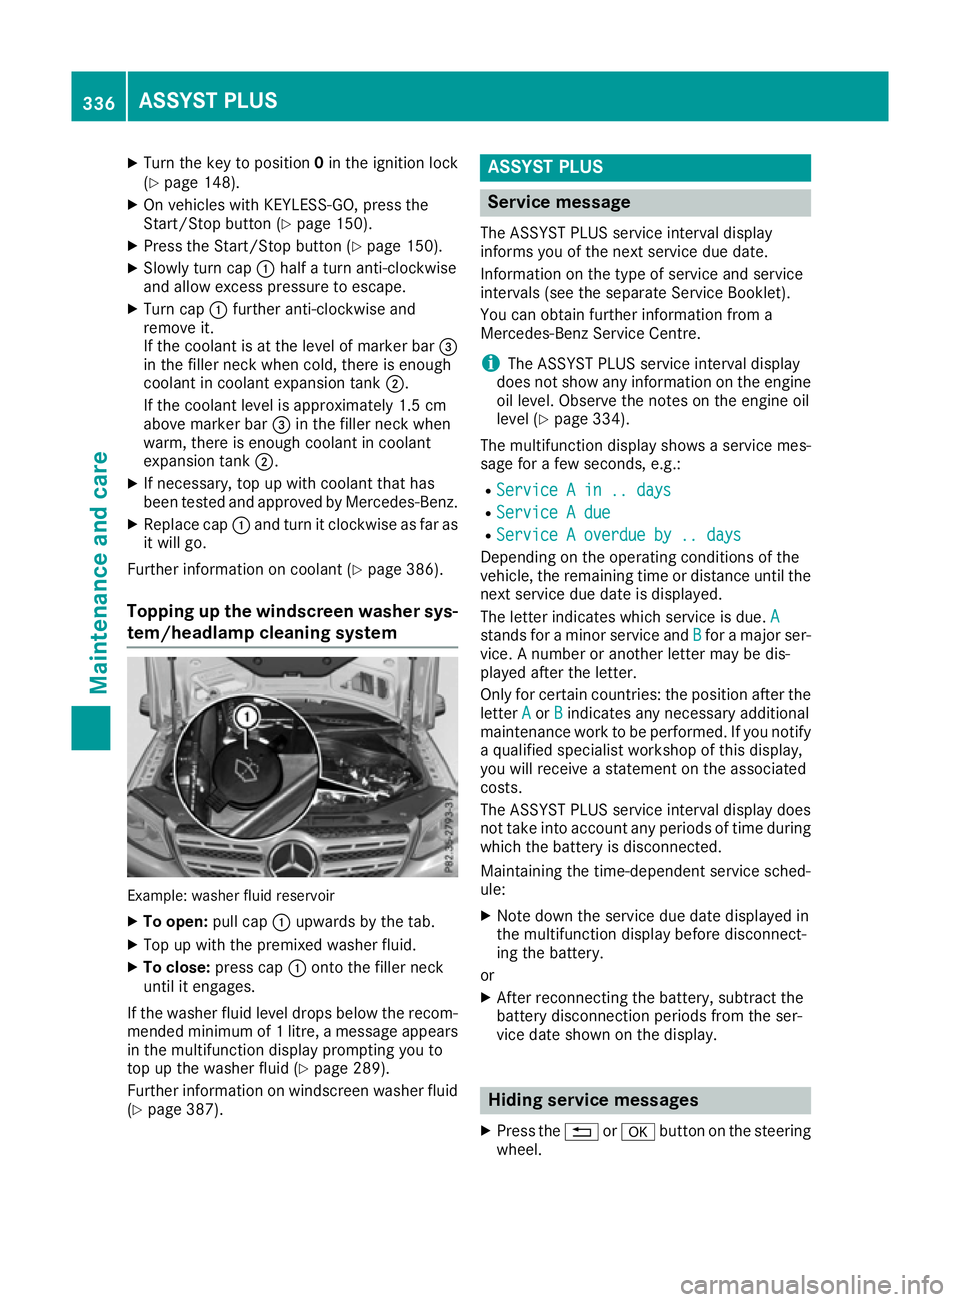
X Slowly turn cap :half a turn anti-clockwise
and allow excess pressure to escape.
X Turn cap :further anti-clockwise and
remove it.
If the coolant is at the level of marker bar =
in the filler neck when cold, there is enough
coolant in coolant expansion tank ;.
If the coolant level is approximately 1.5 cm
above marker bar =in the filler neck when
warm, there is enough coolant in coolant
expansion tank ;.
X If necessary, top up with coolant that has
been tested and approved by Mercedes-Benz.
X Replace cap :and turn it clockwise as far as
it will go.
Further information on coolant (Y page 386).
Topping up the windscreen washer sys- tem/headlamp cleaning system Example: washer fluid reservoir
X To open: pull cap:upwards by the tab.
X Top up with the premixed washer fluid.
X To close: press cap :onto the filler neck
until it engages.
If the washer fluid level drops below the recom- mended minimum of 1 litre, a message appears in the multifunction display prompting you to
top up the washer fluid (Y page 289).
Further information on windscreen washer fluid
(Y page 387). ASSYST PLUS
Service message
The ASSYST PLUS service interval display
informs you of the next service due date.
Information on the type of service and service
intervals (see the separate Service Booklet).
You can obtain further information from a
Mercedes-Benz Service Centre.
i The ASSYST PLUS service interval display
does not show any information on the engine oil level. Observe the notes on the engine oil
level (Y page 334).
The multifunction display shows a service mes-
sage for a few seconds, e.g.:
R Service A in .. days Service A in .. days
R Service A due
Service A due
R Service A overdue by .. days
Service A overdue by .. days
Depending on the operating conditions of the
vehicle, the remaining time or distance until the
next service due date is displayed.
The letter indicates which service is due. A A
stands for a minor service and B
Bfor a major ser-
vice. A number or another letter may be dis-
played after the letter.
Only for certain countries: the position after the letter A
A or B
Bindicates any necessary additional
maintenance work to be performed. If you notify
a qualified specialist workshop of this display,
you will receive a statement on the associated
costs.
The ASSYST PLUS service interval display does
not take into account any periods of time during which the battery is disconnected.
Maintaining the time-dependent service sched-
ule:
X Note down the service due date displayed in
the multifunction display before disconnect-
ing the battery.
or
X After reconnecting the battery, subtract the
battery disconnection periods from the ser-
vice date shown on the display. Hiding service messages
X Press the %ora button on the steering
wheel. 336
ASSYST PLUSMaintenance and care