2016 MERCEDES-BENZ GLS SUV headlamp
[x] Cancel search: headlampPage 21 of 397
Plastic trim (cleaning instruc-
tions)
.................................................. 343
Power closing ...................................... 88
Power windows
see Side windows
PRE-SAFE ®
(anticipatory occupant
protection)
Operation ......................................... 56
PRE-SAFE ®
(preventive occupant
safety system)
Display message ............................2 64
PRE-SAFE ®
PLUS (anticipatory
occupant protection PLUS)
Display message ............................ 265
Operation ......................................... 56
Protection against theft
ATA (Anti-Theft Alarm system) ......... 78
Immobiliser ...................................... 78
Interior motion sensor ..................... 80
Tow-away protection ........................ 79
Protection of the environment
General notes .................................. 26
Pulling away
Automatic transmission ................. 150
General notes ................................ 150
Hill start assist ............................... 151
Trailer ............................................ 151 Q
QR code Mercedes-Benz Guide App ................. 1
Rescue card ..................................... 31
Qualified specialist workshop ........... 30R
RACETIMER (on-board computer) .... 256
Radiator cover ................................... 333
Radio
Selecting a station ......................... 247
see separate operating instructions
Radio mode
See also Digital Owner's Manual ... 303
Radio-based vehicle components
Declaration of conformity ................ 28
Rain closing feature
Sliding sunroof ................................. 98 Rain closing feature (panorama
sliding sunroof)
................................... 99
Reading lamp ..................................... 125
Rear bench seat
Folding the bench seat forwards/back ............................................... 316
Rear compartment
Exit/entry position (3rd row of
seats) ............................................. 108
Setting the air vents ..................... .145
Setting the temperature ................ 136
Rear foglamp
Display message ............................ 270
Switching on/off ........................... 121
Rear seat
Adjusting ....................................... 107
Display message ............................ 287
Rear Seat Entertainment System
AUX jacks ...................................... 311
AUX jacks CD/DVD drive .............. 311
Rear window heating
Problem (fault) ............................... 138
Switching on/off ........................... 138
Rear window wiper
Replacing the wiper blade .............. 130
Switching on/off ........................... 129
Rear-compartment seat belt sta-
tus indicator ........................................ 47
Rear-view mirror
Anti-dazzle mode (automatic) ....... .117
Dipping (manual )........................... 116
Refuelling
Fuel gaug e....................................... 35
Important safety notes .................. 163
Notes for Mercedes‑AMG vehi-
cles ................................................ 383
Refuelling process ......................... 164
see Fuel
Remote control
Auxiliary heating/ventilation .......... 141
Changing the batteries (auxiliary
heating) ......................................... 143
Garage door opener ....................... 326
Programming (garage door
opener) .......................................... 326
Replacing bulbs
Dipped-beam headlamp s............... 127 18
Index
Page 22 of 397
Fitting/removing the cover (front
wheel arch) .................................... 127
General notes ................................ 126
Important safety notes .................. 126
Main-beam headlamp s................... 127
Overview of bulb types .................. 126
Turn signals (front) ......................... 128
Replacing the battery (auxiliary
heating remote control) .................... 143
Rescue card ......................................... 31
Reserve (fuel tank)
see Fuel
Reserve fuel
Display message ............................ 274
Warning lamp ................................. 298
Residual heat (climate control) ........ 140
Restraint system
Display message ............................ 267
Introduction ..................................... 42
Warning lamp ................................. 298
Warning lamp (function) ................... 43
Rev counter ........................................ 241
Reversing camera
Cleaning instructions ..................... 341
Display in the multimedia system .. 208
Function/note s............................. 207
Switching on/of f........................... 208
Reversing feature
Panorama sliding sunroo f................ 97
Roller sunblind s............................... 99
Side windows ................................... 93
Sliding sunroof ................................. 97
Tailgate ............................................ 90
Reversing lamp (display message) .. 270
Roller sunblind
Panorama sliding sunroo f................ 99
Roof carrier ........................................ 319
Roof lining and carpets (cleaning
instructions) ...................................... 344
Roof load (maximum) ........................ 387
Route (navigation)
see Route guidance (navigation)
Route guidance
See also Digital Owner's Manua l... 303
Route guidance (navigation) ............ 245 S
Safety Children in the vehicle ..................... 57
see Occupant safety
see Operating safety
Safety system
see Driving safety systems
SD card
Inserting ........................................ 311
Inserting/removing ........................ 311
Removing ....................................... 311
SD memory card
See also Digital Owner's Manua l... 303
Selecting ........................................ 247
Seat belt
Correct usage .................................. 45
Switching belt adjustment on/off
(on-board computer) ...................... 254
Seat belts
Adjusting the driver's and front-
passenger seat belt ......................... 46
Adjusting the height ......................... 46
Cleaning ......................................... 344
Display message ............................ 266
Fastening ......................................... 46
Important safety guidelines ............. 44
Introduction ..................................... 44
Rear seat belt status indicator ......... 47
Releasing ......................................... 46
Warning lamp ................................. 291
Warning lamp (function) ................... 46
Seats
Adjusting (electrically) ................... 104
Adjusting the 4-way lumbar sup-
port ................................................ 112
Adjusting the head restraint .......... 104
Calling up a stored setting (mem-
ory function) .................................. 119
Cleaning the cover ......................... 343
Correct driver's seat position ........ 102
Entry position (3rd row of seats) .... 109
Exit position (3rd row of seats) ...... 109
Folding down/up (3rd row of
seats) ............................................. 107
Folding the 2nd row of seats
forward electrically ........................ 111 Index
19
Page 38 of 397
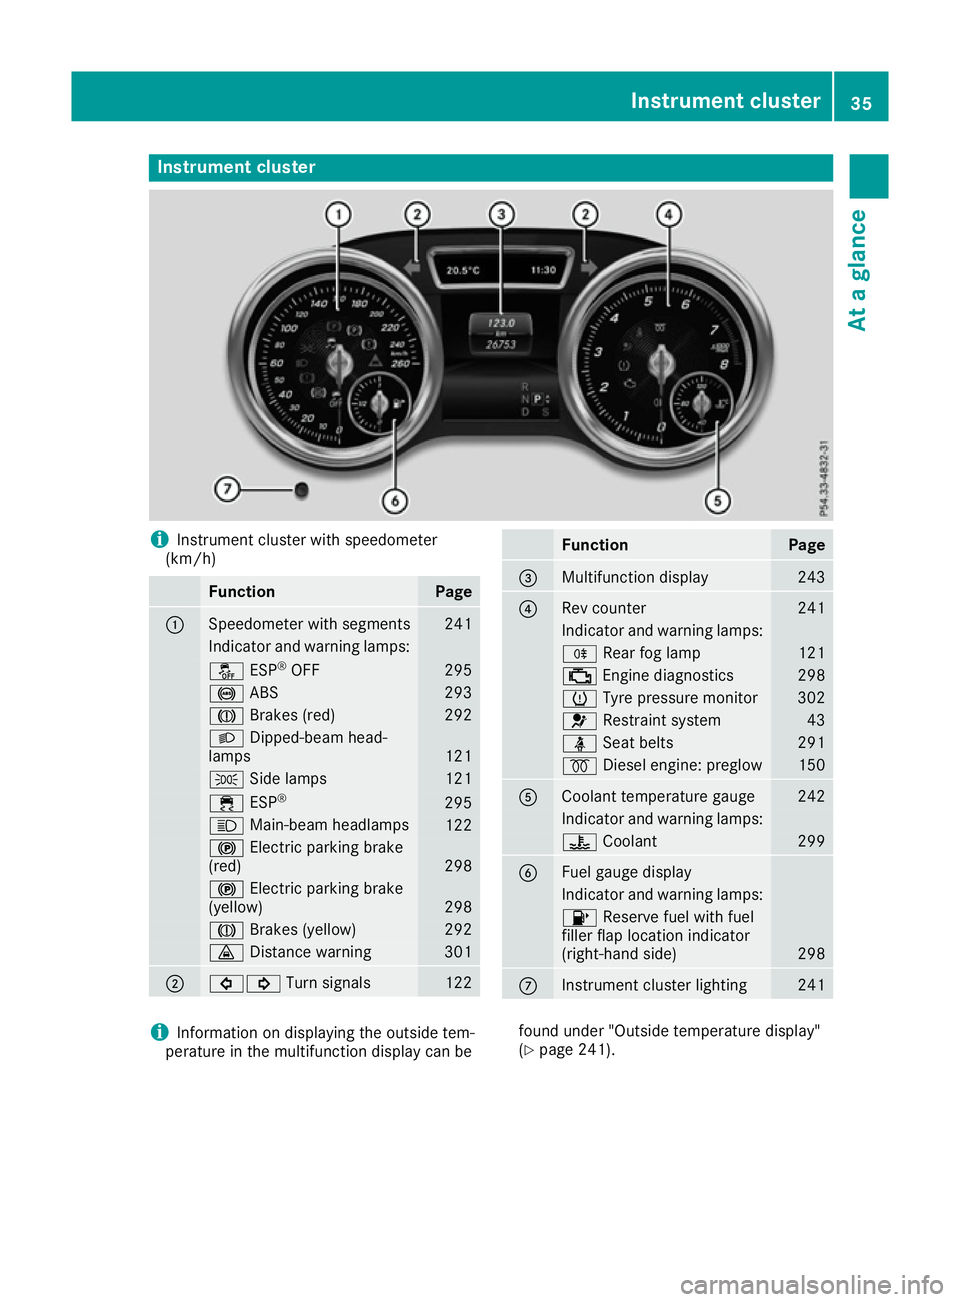
Instrument cluster
i
Instrument cluster with speedometer
(km/h) Function Page
:
Speedometer with segments 241
Indicator and warning lamps:
å
ESP®
OFF 295
!
ABS 293
J
Brakes (red) 292
L
Dipped-beam head-
lamps 121
T
Side lamps 121
÷
ESP® 295
K
Main-beam headlamps 122
!
Electric parking brake
(red) 298
!
Electric parking brake
(yellow) 298
J
Brakes (yellow) 292
·
Distance warning 301
;
#!
Turn signals 122 Function Page
=
Multifunction display 243
?
Rev counter 241
Indicator and warning lamps:
R
Rear fog lamp 121
;
Engine diagnostics 298
h
Tyre pressure monitor 302
6
Restraint system 43
ü
Seat belts 291
%
Diesel engine: preglow 150
A
Coolant temperature gauge 242
Indicator and warning lamps:
?
Coolant 299
B
Fuel gauge display
Indicator and warning lamps:
8
Reserve fuel with fuel
filler flap location indicator
(right-hand side) 298
C
Instrument cluster lighting 241
i
Information on displaying the outside tem-
perature in the multifunction display can be found under "Outside temperature display"
(Y
page 241). Instrument cluster
35At a glance
Page 121 of 397
The rear-view mirror and the exterior mirror on
the driver's side automatically go into anti-daz-
zle mode if the following conditions are met
simultaneously:
R the ignition is switched on and
R incident light from headlamps strikes the sen-
sor in the rear-view mirror
The mirrors do not dip if reverse gear is engaged or if the interior lighting is switched on. Parking position of the exterior mirror
on the front-passenger side
Setting and storing the parking position You can set the front-passenger side exterior
mirror so that you can see the rear wheel on that side as soon as you engage reverse gear. You
can store this position.
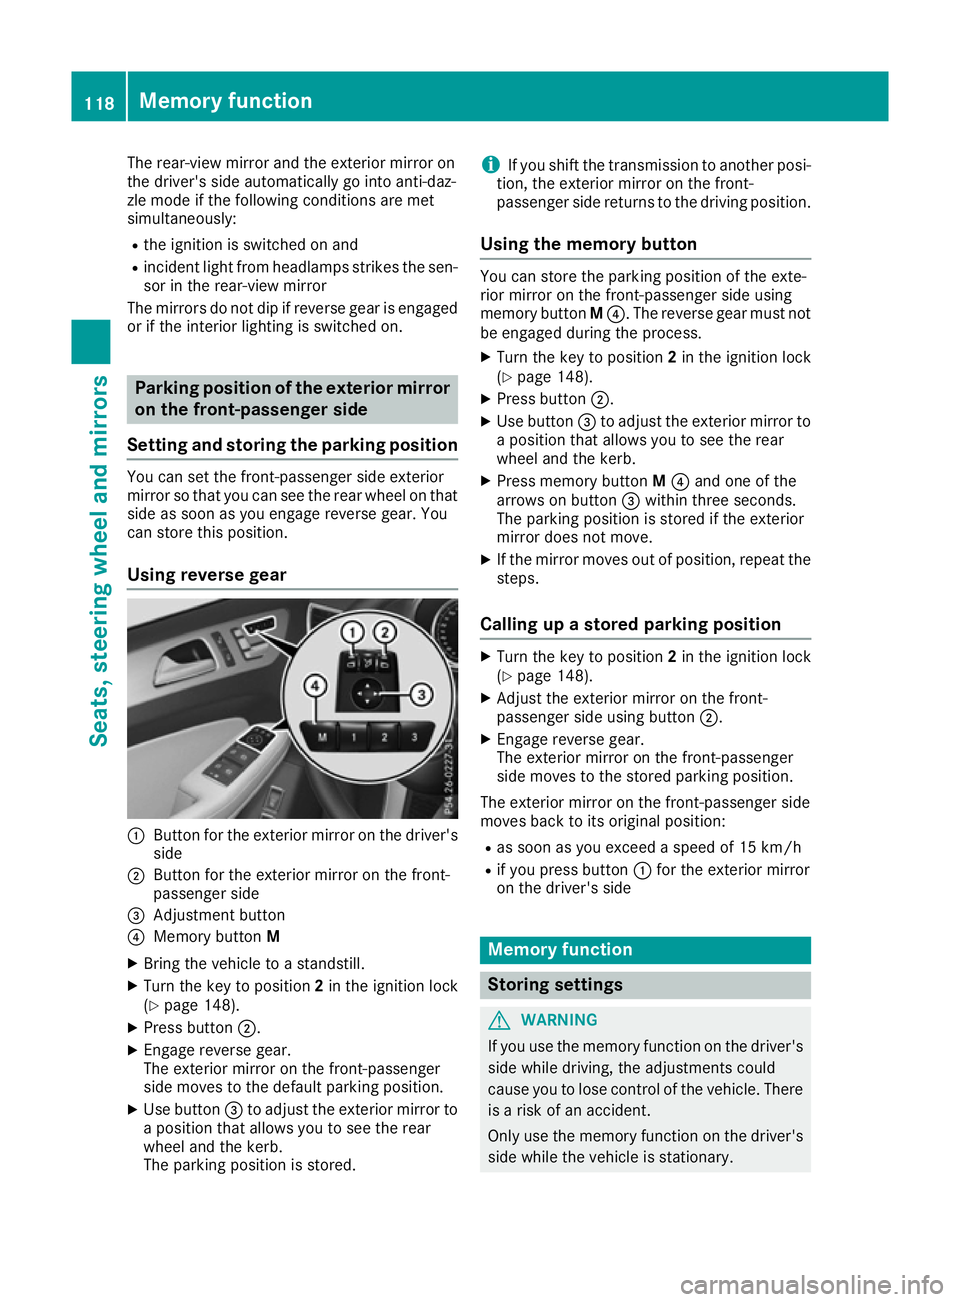
Using reverse gear :
Button for the exterior mirror on the driver's
side
; Button for the exterior mirror on the front-
passenger side
= Adjustment button
? Memory button M
X Bring the vehicle to a standstill.
X Turn the key to position 2in the ignition lock
(Y page 148).
X Press button ;.
X Engage reverse gear.
The exterior mirror on the front-passenger
side moves to the default parking position.
X Use button =to adjust the exterior mirror to
a position that allows you to see the rear
wheel and the kerb.
The parking position is stored. i
If you shift the transmission to another posi-
tion, the exterior mirror on the front-
passenger side returns to the driving position.
Using the memory button You can store the parking position of the exte-
rior mirror on the front-passenger side using
memory button
M?. The reverse gear must not
be engaged during the process.
X Turn the key to position 2in the ignition lock
(Y page 148).
X Press button ;.
X Use button =to adjust the exterior mirror to
a position that allows you to see the rear
wheel and the kerb.
X Press memory button M? and one of the
arrows on button =within three seconds.
The parking position is stored if the exterior
mirror does not move.
X If the mirror moves out of position, repeat the
steps.
Calling up a stored parking position X
Turn the key to position 2in the ignition lock
(Y page 148).
X Adjust the exterior mirror on the front-
passenger side using button ;.
X Engage reverse gear.
The exterior mirror on the front-passenger
side moves to the stored parking position.
The exterior mirror on the front-passenger side
moves back to its original position: R as soon as you exceed a speed of 15 km/h
R if you press button :for the exterior mirror
on the driver's side Memory function
Storing settings
G
WARNING
If you use the memory function on the driver's side while driving, the adjustments could
cause you to lose control of the vehicle. There
is a risk of an accident.
Only use the memory function on the driver's
side while the vehicle is stationary. 118
Memory functionSeats, steering wheel and mirrors
Page 123 of 397

Exterior lighting
General notes
For reasons of safety, Mercedes-Benz recom-
mends that you drive with the lights switched on even during the daytime. In some countries,
operation of the headlamps varies due to legal
requirements and self-imposed obligations. Driving abroad
General notes If your journey takes you to countries where
vehicles are driven on the opposite side of the
road to the country in which the vehicle is reg-
istered, your headlamps must be switched to
symmetrical dipped beam as soon as possible
after crossing the border. This prevents oncom-
ing traffic from being dazzled. Symmetrical
lights do not illuminate as large an area of the
edge of the carriageway.
Vehicles with halogen headlamps X
Turn cap :anti-clockwise and remove it.
X Push switchover lever ;down.
X Replace cap :and turn it clockwise.
Convert the headlamps back to asymmetrical
dipped beam as soon as possible after returning across the border.
Vehicles with Intelligent Light System X
Before crossing the border, set the head-
lamps to symmetrical dipped beam and after
returning back to asymmetrical dipped beam via the "Dipped-beam headlamps for driving
on the right/left" function in the on-board
computer (Y page 252). If the headlamps are converted to symmetrical
dipped beam, the "motorway mode" and "exten-
ded range foglamps" functions are not available. Setting the exterior lighting
Setting options Exterior lighting can be set using:
R the light switch
R headlamp range control (vehicles with halo-
gen headlamps only) (Y page 122)
R the combination switch (Y page 122)
R the on-board computer (Y page 252)
Light switch Operation
1
W
Left-hand parking lamps
2 X
Right-hand parking lamps
3 T
Side lamps, licence plate and instru-
ment cluster lighting
4 c
Automatic headlamps, controlled by
the light sensor
5 L
Dipped-beam/main-beam headlamps
B R
Rear foglamp
If you hear a warning tone when you leave the
vehicle, the lights may still be switched on.
X Turn the light switch to c.
The exterior lighting (except the side lamps/
parking lamps) switches off automatically if you: R remove the key from the ignition lock
R open the driver's door with the key in posi-
tion 0in the ignition lock 120
Exterior lightingLights and windscreen wipers
Page 124 of 397
Automatic headlamps
c is the preferred light switch position. The
light setting is automatically selected according to the brightness of the ambient light (excep-
tion: poor visibility due to weather conditions
such as fog, snow or spray):
R key in position 1in the ignition lock: the side
lamps are switched on or off automatically
depending on the brightness of the ambient
light
R with the engine running: depending on the
ambient light conditions, the daytime driving
lights or the side lamps and dipped-beam
headlamps are switched on or off automati-
cally
X To switch on automatic headlamp mode:
turn the light switch to c. G
WARNING
When the light switch is set to Ã, the
dipped-beam headlamps may not be switched on automatically if there is fog, snow or othercauses of poor visibility due to the weather
conditions such as spray. There is a risk of an
accident.
In such situations, turn the light switch to
L.
The automatic headlamp feature is only an aid.
You are responsible for the vehicle lighting at all times.
The daytime driving lights improve the visibility
of your vehicle during the day.
When the side lamps and dipped-beam head-
lamps are switched on, the green T(side
lamps) and L(dipped-beam headlamps)
indicator lamps in the instrument cluster light
up.
Dipped-beam headlamps
When the ignition is switched on and the light
switch is in the Lposition, the side lamps
and dipped-beam headlamps are switched on
even if the light sensor does not sense dark
ambient light conditions. This is particularly
advantageous when there is fog or rain. X
To switch on the dipped-beam headlamps:
turn the key in the ignition lock to position 2
or start the engine.
X Turn the light switch to L.
The green Lindicator lamp on the instru-
ment cluster lights up.
Rear foglamp
The rear foglamp improves the visibility of your
vehicle in heavy fog for the following traffic.
Please observe the country-specific laws on the
use of rear foglamps.
X To switch on the rear foglamp: turn the key
in the ignition lock to position 2or start the
engine.
X Turn the light switch to Lorc .
X Press the Rbutton.
The yellow Rindicator lamp in the instru-
ment cluster lights up.
X To switch off the rear foglamp: press the
R button.
The yellow Rindicator lamp in the instru-
ment cluster goes out.
Side lamps ! When the battery is discharged heavily, the
side lamps or parking lamps are automatically
switched off to facilitate an engine start.
Always park your vehicle safely and in a well lit area, in accordance with the relevant legal
stipulations. Avoid using the Tside lamps
for periods lasting several hours. Where pos-
sible, switch on the right Xor left W
parking lamp.
X To switch on: turn the light switch to T.
The green Tindicator lamp in the instru-
ment cluster lights up.
Parking lamps Switching on the parking lamps ensures that the
corresponding side of the vehicle is illuminated.
X To switch on the parking lamps: the key
should not be in the ignition lock or it should
be in position 0.
X Turn the light switch to W(left-hand side of
the vehicle) or X(right-hand side of the
vehicle). Exterior lighting
121Lights and windscreen wipers Z
Page 125 of 397
Adjusting the headlamp range (halogen
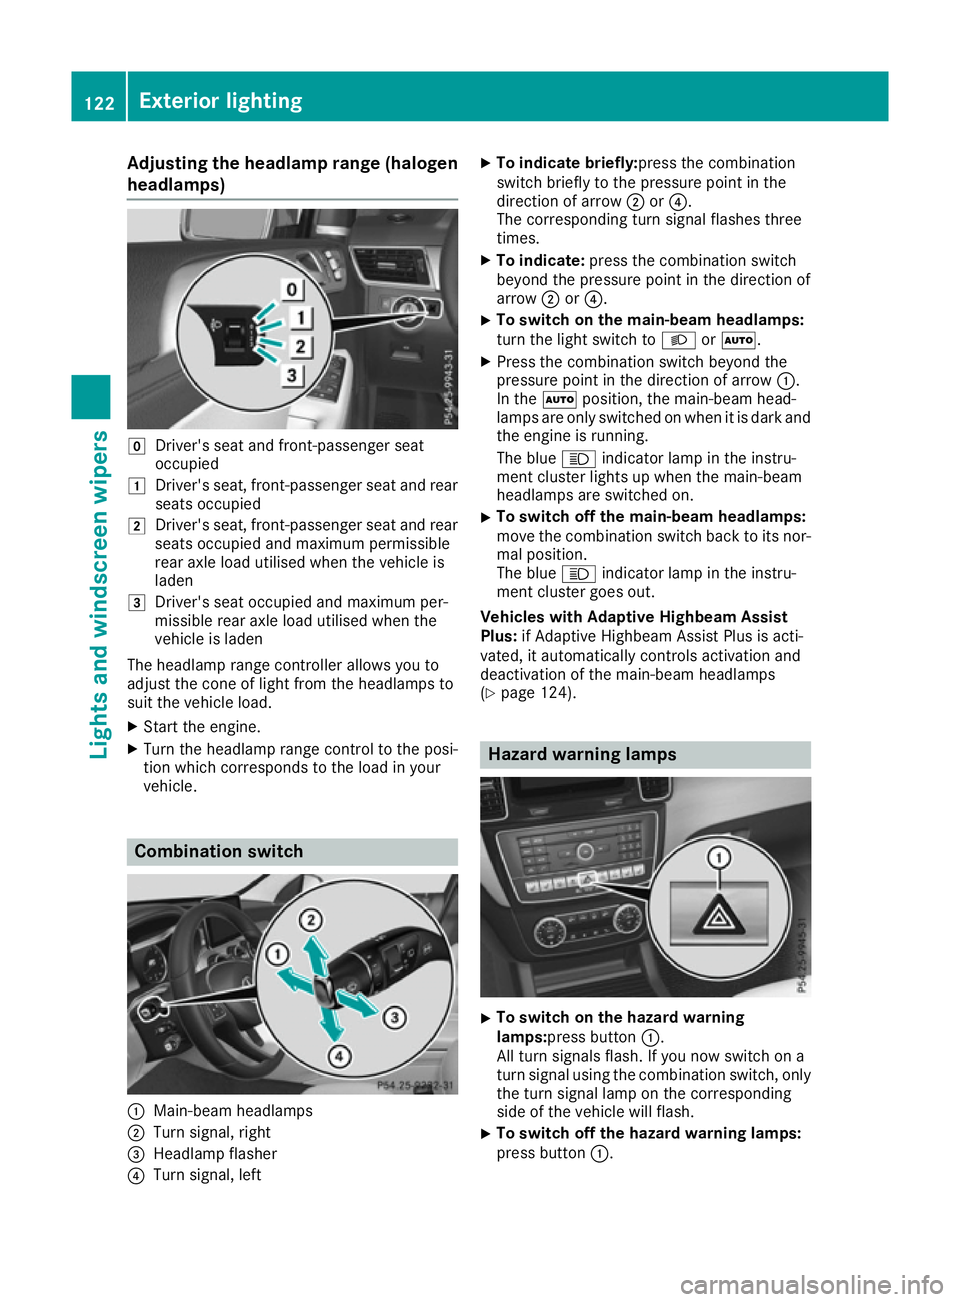
headlamps) g
Driver's seat and front-passenger seat
occupied
1 Driver's seat, front-passenger seat and rear
seats occupied
2 Driver's seat, front-passenger seat and rear
seats occupied and maximum permissible
rear axle load utilised when the vehicle is
laden
3 Driver's seat occupied and maximum per-
missible rear axle load utilised when the
vehicle is laden
The headlamp range controller allows you to
adjust the cone of light from the headlamps to
suit the vehicle load.
X Start the engine.
X Turn the headlamp range control to the posi-
tion which corresponds to the load in your
vehicle. Combination switch
:
Main-beam headlamps
; Turn signal, right
= Headlamp flasher
? Turn signal, left X
To indicate briefly: press the combination
switch briefly to the pressure point in the
direction of arrow ;or?.
The corresponding turn signal flashes three
times.
X To indicate: press the combination switch
beyond the pressure point in the direction of
arrow ;or?.
X To switch on the main-beam headlamps:
turn the light switch to LorÃ.
X Press the combination switch beyond the
pressure point in the direction of arrow :.
In the Ãposition, the main-beam head-
lamps are only switched on when it is dark and the engine is running.
The blue Kindicator lamp in the instru-
ment cluster lights up when the main-beam
headlamps are switched on.
X To switch off the main-beam headlamps:
move the combination switch back to its nor-
mal position.
The blue Kindicator lamp in the instru-
ment cluster goes out.
Vehicles with Adaptive Highbeam Assist
Plus: if Adaptive Highbeam Assist Plus is acti-
vated, it automatically controls activation and
deactivation of the main-beam headlamps
(Y page 124). Hazard warning lamps
X
To switch on the hazard warning
lamps:press button
:.
All turn signals flash. If you now switch on a
turn signal using the combination switch, only the turn signal lamp on the corresponding
side of the vehicle will flash.
X To switch off the hazard warning lamps:
press button
:.122
Exterior lightingLights and windscreen wipers
Page 126 of 397
The hazard warning lamps switch on automati-
cally if:
R an airbag is deployed or
R the vehicle decelerates rapidly from a speed
of above 70 km/h and comes to a standstill
The hazard warning lamps switch off automati-
cally if the vehicle reaches a speed of above
10 km/h again after a full brake application.
i The hazard warning lamps continue to oper-
ate even if the ignition is switched off. Intelligent Light System
General notes The Intelligent Light System is a system that
adjusts the headlamps automatically to suit the
prevailing driving and weather conditions. It
offers advanced functions for improved illumi-
nation of the road surface, e.g. depending on the vehicle speed or weather conditions. The sys-
tem includes the active light function, corneringlight function, motorway mode and extended
range foglamps. The system is only active when it is dark.
You can activate or deactivate the "Intelligent
Light System" function using the on-board com-
puter (Y page 252).
Active light function The active light function is a system that moves
the headlamps according to the steering move-
ments of the front wheels. In this way, relevant
areas remain illuminated while you are driving.
This allows you to recognise pedestrians,
cyclists and animals.
Active: when the lights are switched on.
Cornering light function The cornering light function improves the illu-
mination of the road over a wide angle in the
direction you are turning, enabling better visi-
bility in tight bends, for example. It can be acti-
vated only when the dipped-beam headlamps
are switched on. Active:
R if you are driving at speeds below 40 km/h
and switch on the turn signal or turn the steer-
ing wheel
R if you are driving at speeds between 40 km/h
and 70 km/h and turn the steering wheel
The cornering light function may remain lit for a
short time, but is automatically switched off
after no more than three minutes.
Motorway mode Motorway mode increases the range of the
beam.
Active:if you are driving at a speed above
110 km/h and do not make any large steering
movements for at least 1,000 m or if you are
driving at a speed above 130 km/h.
Not active: if you are driving at speeds below
80 km/h following activation.
Extended range fog lamps The extended-range foglamps reduce the glare
experienced by the driver and improve the illu-
mination of the edge of the carriageway.
Active: if you are driving at speeds below
70 km/h and you switch on the rear foglamp.
Not active: if, following activation, you are driv-
ing at speeds above 100 km/h or if you switch
off the rear foglamp.
Off-road lights The off-road lights facilitate the early recogni-
tion of objects/obstacles when driving off-road
thanks to a symmetrical, wider and brighter dis-
tribution of light from the dipped-beam head-
lamps.
Active: when driving at speeds no faster than
50 km/h and the off-road program selector
wheel is in position 1 or 2.
Not active: when driving at speeds above
50 km/h.
When the off-road lights are switched on, the
cornering light function is permanently activa-
ted, the active light function is deactivated and
the headlamp range control is set to static
mode. Exterior lighting
123Lights and windscreen wipers Z