2016 MERCEDES-BENZ GLS SUV key battery
[x] Cancel search: key batteryPage 115 of 397
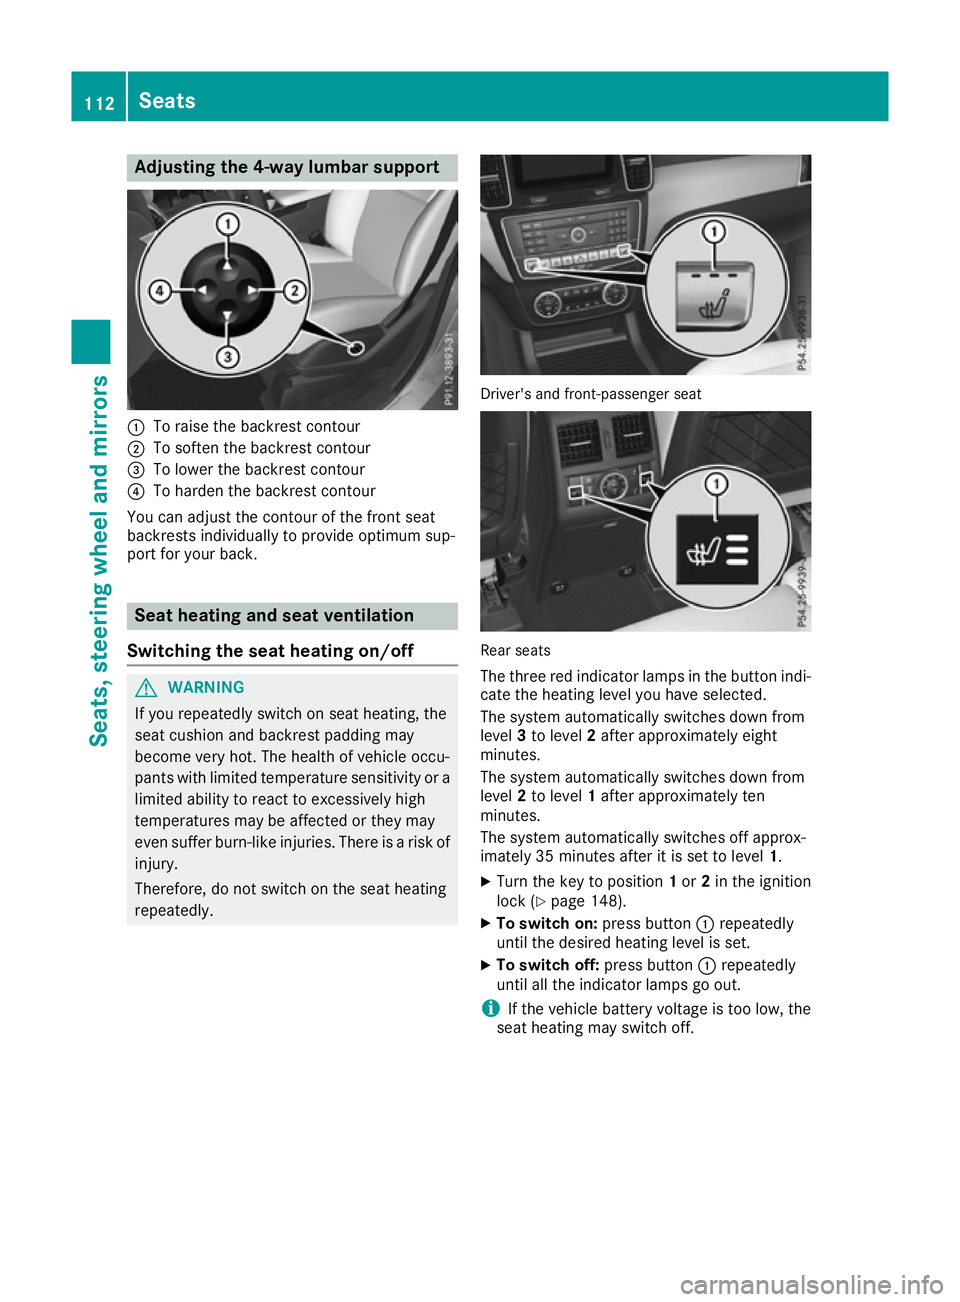
Adjusting the 4-way lumbar support
:
To raise the backrest contour
; To soften the backrest contour
= To lower the backrest contour
? To harden the backrest contour
You can adjust the contour of the front seat
backrests individually to provide optimum sup-
port for your back. Seat heating and seat ventilation
Switching the seat heating on/off G
WARNING
If you repeatedly switch on seat heating, the
seat cushion and backrest padding may
become very hot. The health of vehicle occu-
pants with limited temperature sensitivity or a limited ability to react to excessively high
temperatures may be affected or they may
even suffer burn-like injuries. There is a risk of
injury.
Therefore, do not switch on the seat heating
repeatedly. Driver's and front-passenger seat
Rear seats
The three red indicator lamps in the button indi- cate the heating level you have selected.
The system automatically switches down from
level 3to level 2after approximately eight
minutes.
The system automatically switches down from
level 2to level 1after approximately ten
minutes.
The system automatically switches off approx-
imately 35 minutes after it is set to level 1.
X Turn the key to position 1or 2in the ignition
lock (Y page 148).
X To switch on: press button:repeatedly
until the desired heating level is set.
X To switch off: press button:repeatedly
until all the indicator lamps go out.
i If the vehicle battery voltage is too low, the
seat heating may switch off. 112
SeatsSeats
, steering wheel and mirrors
Page 116 of 397
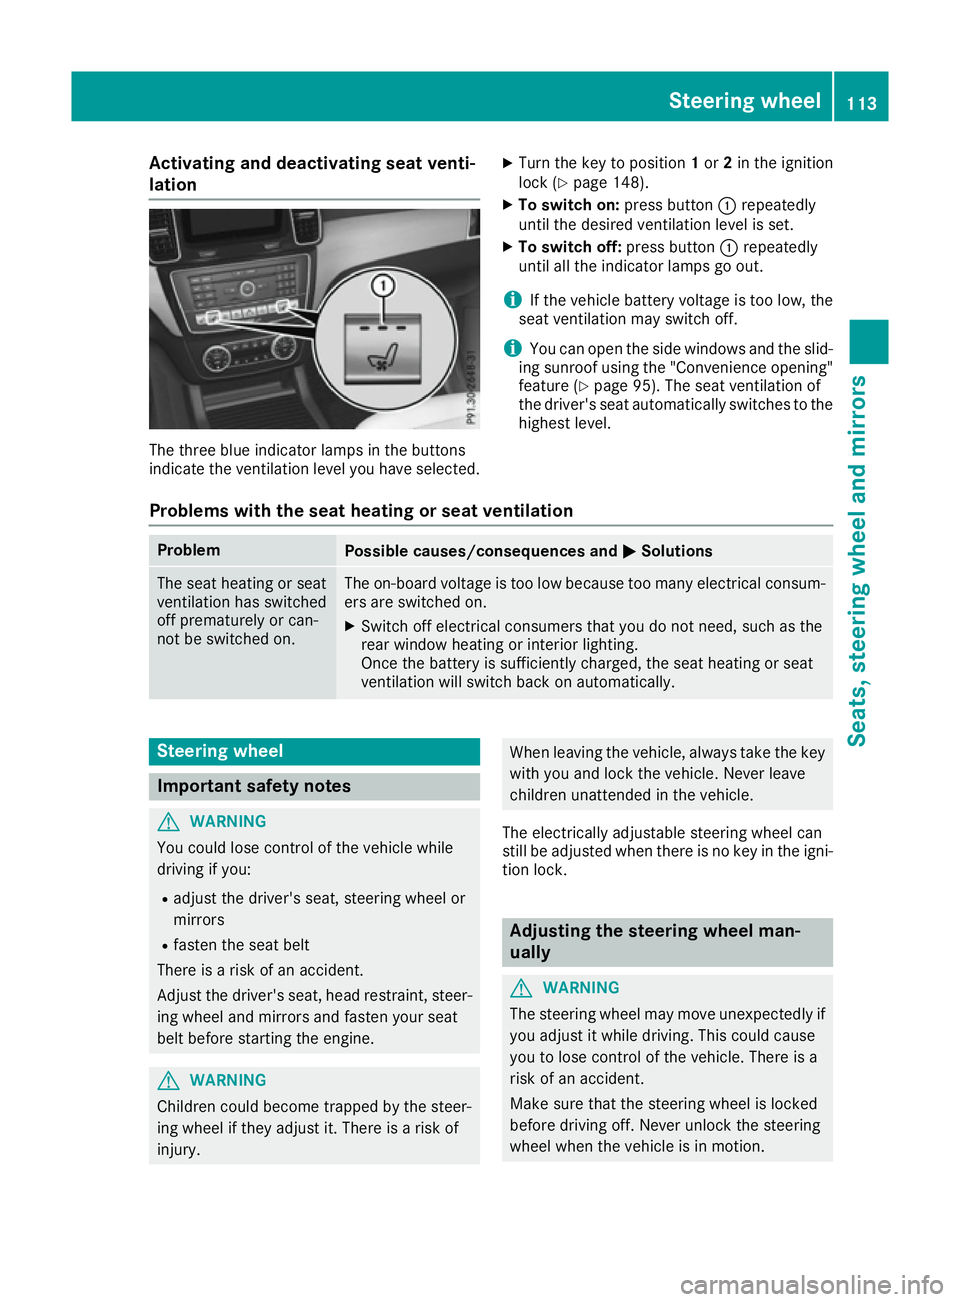
Activating and deactivating seat venti-
lation The three blue indicator lamps in the buttons
indicate the ventilation level you have selected. X
Turn the key to position 1or 2in the ignition
lock (Y page 148).
X To switch on: press button:repeatedly
until the desired ventilation level is set.
X To switch off: press button:repeatedly
until all the indicator lamps go out.
i If the vehicle battery voltage is too low, the
seat ventilation may switch off.
i You can open the side windows and the slid-
ing sunroof using the "Convenience opening" feature (Y page 95). The seat ventilation of
the driver's seat automatically switches to the
highest level.
Problems with the seat heating or seat ventilation Problem
Possible causes/consequences and
M
MSolutions The seat heating or seat
ventilation has switched
off prematurely or can-
not be switched on. The on-board voltage is too low because too many electrical consum-
ers are switched on.
X Switch off electrical consumers that you do not need, such as the
rear window heating or interior lighting.
Once the battery is sufficiently charged, the seat heating or seat
ventilation will switch back on automatically. Steering wheel
Important safety notes
G
WARNING
You could lose control of the vehicle while
driving if you:
R adjust the driver's seat, steering wheel or
mirrors
R fasten the seat belt
There is a risk of an accident.
Adjust the driver's seat, head restraint, steer-
ing wheel and mirrors and fasten your seat
belt before starting the engine. G
WARNING
Children could become trapped by the steer-
ing wheel if they adjust it. There is a risk of
injury. When leaving the vehicle, always take the key
with you and lock the vehicle. Never leave
children unattended in the vehicle.
The electrically adjustable steering wheel can
still be adjusted when there is no key in the igni-
tion lock. Adjusting the steering wheel man-
ually
G
WARNING
The steering wheel may move unexpectedly if you adjust it while driving. This could cause
you to lose control of the vehicle. There is a
risk of an accident.
Make sure that the steering wheel is locked
before driving off. Never unlock the steering
wheel when the vehicle is in motion. Steering wheel
113Seats, steering wheel and mirrors Z
Page 120 of 397
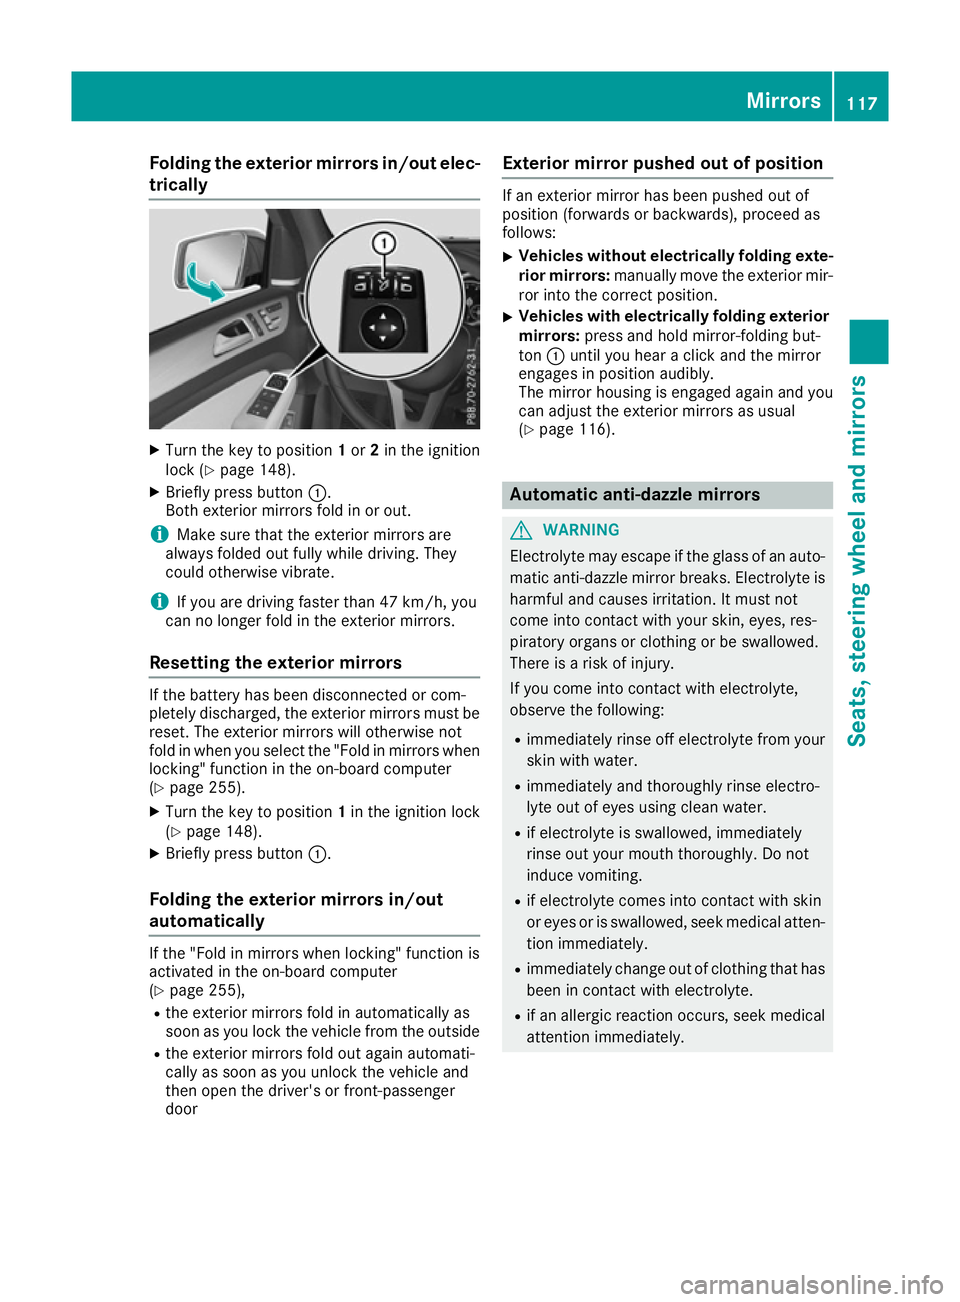
Folding the exterior mirrors in/out elec-
trically X
Turn the key to position 1or 2in the ignition
lock (Y page 148).
X Briefly press button :.
Both exterior mirrors fold in or out.
i Make sure that the exterior mirrors are
always folded out fully while driving. They
could otherwise vibrate.
i If you are driving faster than 47 km/h, you
can no longer fold in the exterior mirrors.
Resetting the exterior mirrors If the battery has been disconnected or com-
pletely discharged, the exterior mirrors must be
reset. The exterior mirrors will otherwise not
fold in when you select the "Fold in mirrors whenlocking" function in the on-board computer
(Y page 255).
X Turn the key to position 1in the ignition lock
(Y page 148).
X Briefly press button :.
Folding the exterior mirrors in/out
automatically If the "Fold in mirrors when locking" function is
activated in the on-board computer
(Y page 255),
R the exterior mirrors fold in automatically as
soon as you lock the vehicle from the outside
R the exterior mirrors fold out again automati-
cally as soon as you unlock the vehicle and
then open the driver's or front-passenger
door Exterior mirror pushed out of position If an exterior mirror has been pushed out of
position (forwards or backwards), proceed as
follows:
X Vehicles without electrically folding exte-
rior mirrors: manually move the exterior mir-
ror into the correct position.
X Vehicles with electrically folding exterior
mirrors: press and hold mirror-folding but-
ton :until you hear a click and the mirror
engages in position audibly.
The mirror housing is engaged again and you
can adjust the exterior mirrors as usual
(Y page 116). Automatic anti-dazzle mirrors
G
WARNING
Electrolyte may escape if the glass of an auto- matic anti-dazzle mirror breaks. Electrolyte is
harmful and causes irritation. It must not
come into contact with your skin, eyes, res-
piratory organs or clothing or be swallowed.
There is a risk of injury.
If you come into contact with electrolyte,
observe the following:
R immediately rinse off electrolyte from your
skin with water.
R immediately and thoroughly rinse electro-
lyte out of eyes using clean water.
R if electrolyte is swallowed, immediately
rinse out your mouth thoroughly. Do not
induce vomiting.
R if electrolyte comes into contact with skin
or eyes or is swallowed, seek medical atten-
tion immediately.
R immediately change out of clothing that has
been in contact with electrolyte.
R if an allergic reaction occurs, seek medical
attention immediately. Mirrors
117Seats, steering wheel and mirrors Z
Page 124 of 397
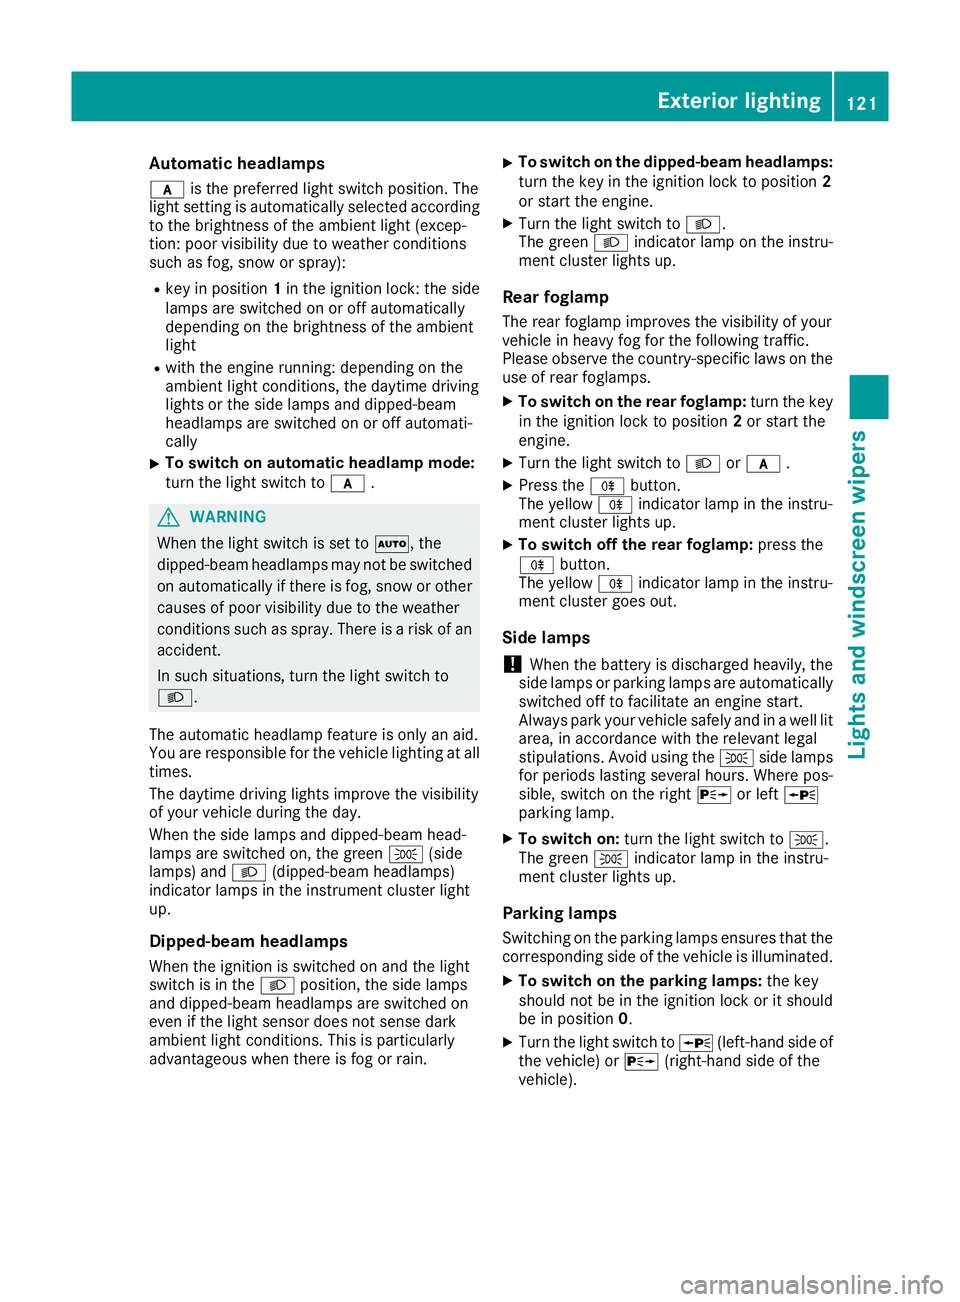
Automatic headlamps
c is the preferred light switch position. The
light setting is automatically selected according to the brightness of the ambient light (excep-
tion: poor visibility due to weather conditions
such as fog, snow or spray):
R key in position 1in the ignition lock: the side
lamps are switched on or off automatically
depending on the brightness of the ambient
light
R with the engine running: depending on the
ambient light conditions, the daytime driving
lights or the side lamps and dipped-beam
headlamps are switched on or off automati-
cally
X To switch on automatic headlamp mode:
turn the light switch to c. G
WARNING
When the light switch is set to Ã, the
dipped-beam headlamps may not be switched on automatically if there is fog, snow or othercauses of poor visibility due to the weather
conditions such as spray. There is a risk of an
accident.
In such situations, turn the light switch to
L.
The automatic headlamp feature is only an aid.
You are responsible for the vehicle lighting at all times.
The daytime driving lights improve the visibility
of your vehicle during the day.
When the side lamps and dipped-beam head-
lamps are switched on, the green T(side
lamps) and L(dipped-beam headlamps)
indicator lamps in the instrument cluster light
up.
Dipped-beam headlamps
When the ignition is switched on and the light
switch is in the Lposition, the side lamps
and dipped-beam headlamps are switched on
even if the light sensor does not sense dark
ambient light conditions. This is particularly
advantageous when there is fog or rain. X
To switch on the dipped-beam headlamps:
turn the key in the ignition lock to position 2
or start the engine.
X Turn the light switch to L.
The green Lindicator lamp on the instru-
ment cluster lights up.
Rear foglamp
The rear foglamp improves the visibility of your
vehicle in heavy fog for the following traffic.
Please observe the country-specific laws on the
use of rear foglamps.
X To switch on the rear foglamp: turn the key
in the ignition lock to position 2or start the
engine.
X Turn the light switch to Lorc .
X Press the Rbutton.
The yellow Rindicator lamp in the instru-
ment cluster lights up.
X To switch off the rear foglamp: press the
R button.
The yellow Rindicator lamp in the instru-
ment cluster goes out.
Side lamps ! When the battery is discharged heavily, the
side lamps or parking lamps are automatically
switched off to facilitate an engine start.
Always park your vehicle safely and in a well lit area, in accordance with the relevant legal
stipulations. Avoid using the Tside lamps
for periods lasting several hours. Where pos-
sible, switch on the right Xor left W
parking lamp.
X To switch on: turn the light switch to T.
The green Tindicator lamp in the instru-
ment cluster lights up.
Parking lamps Switching on the parking lamps ensures that the
corresponding side of the vehicle is illuminated.
X To switch on the parking lamps: the key
should not be in the ignition lock or it should
be in position 0.
X Turn the light switch to W(left-hand side of
the vehicle) or X(right-hand side of the
vehicle). Exterior lighting
121Lights and windscreen wipers Z
Page 128 of 397
The
K indicator lamp in the instrument
cluster goes out. The _indicator lamp in
the multifunction display remains lit.
X To switch off: move the combination switch
back to its normal position or move the light
switch to another position.
The _ indicator lamp in the multifunction
display goes out. Headlamps misted up on the inside
Under certain climatic and physical conditions,
moisture may form in the headlamp. This mois-
ture will not impair the function of the headlamp. Interior lighting
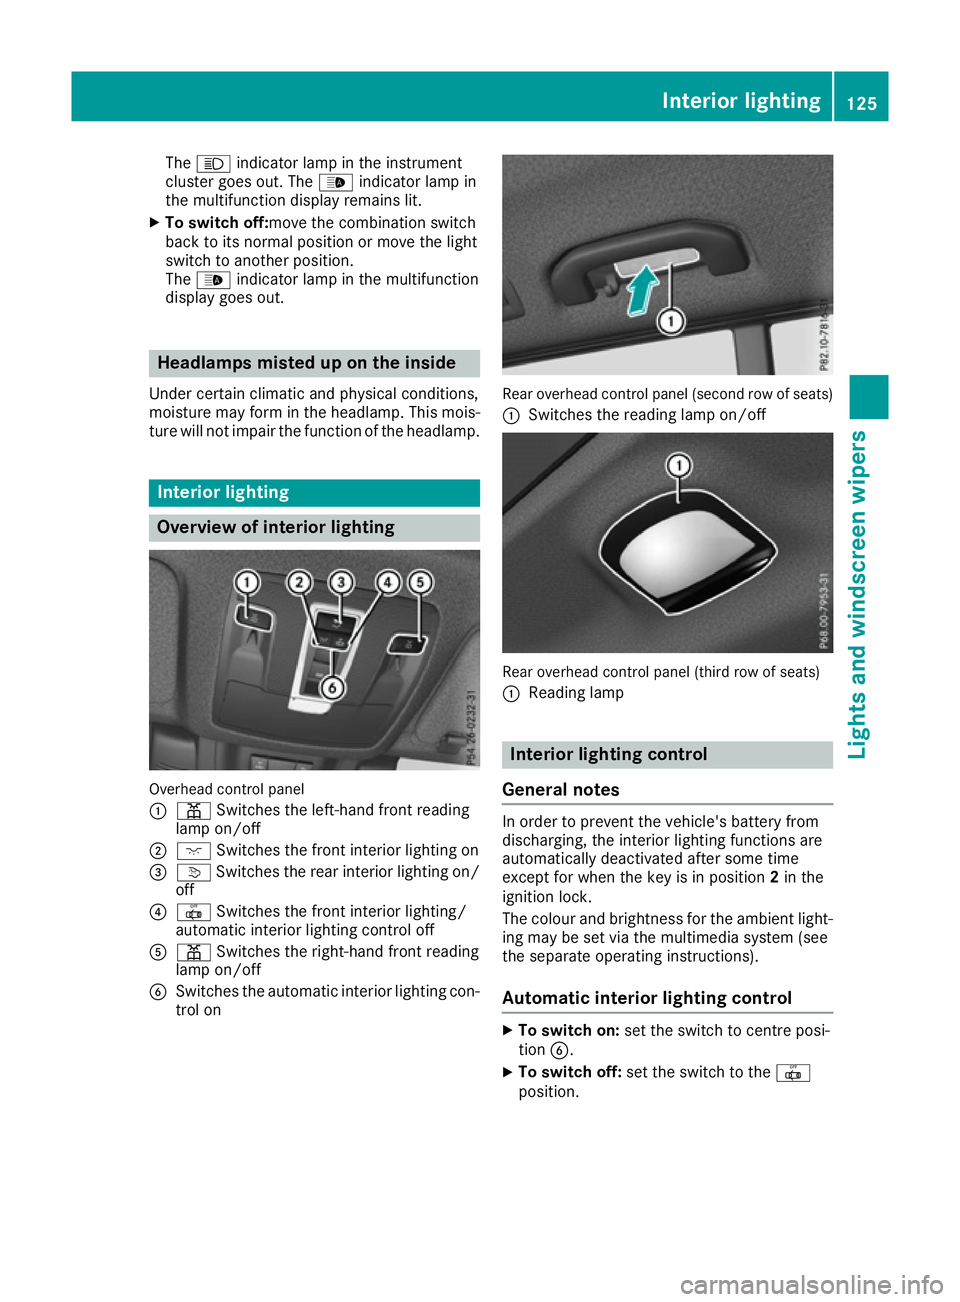
Overview of interior lighting
Overhead control panel
:
p Switches the left-hand front reading
lamp on/off
; c Switches the front interior lighting on
= v Switches the rear interior lighting on/
off
? | Switches the front interior lighting/
automatic interior lighting control off
A p Switches the right-hand front reading
lamp on/off
B Switches the automatic interior lighting con-
trol on Rear overhead control panel (second row of seats)
: Switches the reading lamp on/off Rear overhead control panel (third row of seats)
:
Reading lamp Interior lighting control
General notes In order to prevent the vehicle's battery from
discharging, the interior lighting functions are
automatically deactivated after some time
except for when the key is in position
2in the
ignition lock.
The colour and brightness for the ambient light-
ing may be set via the multimedia system (see
the separate operating instructions).
Automatic interior lighting control X
To switch on: set the switch to centre posi-
tion B.
X To switch off: set the switch to the |
position. Interior lighting
125Lights and windscreen wipers Z
Page 141 of 397
Demisting the windows
Windows misted up on the inside X
Activate the ¿orÁ cooling with air
dehumidification function.
X Activate automatic mode Ã.
X If the windows continue to mist up, activate
the "Windscreen demisting" function
(Y page 137).
i You should only select this setting until the
windscreen is clear again.
Windows misted up on the outside X
Switch on the windscreen wipers.
X Press the _button repeatedly until the
P orO symbol appears in the display.
i You should only select this setting until the
windscreen is clear again.
i If you clean the windows regularly, they do
not mist up so quickly. Rear window heating
General notes The rear window heating has a high current
draw. You should therefore switch it off as soon
as the window is clear. It otherwise switches off automatically after several minutes.
If the battery voltage is too low, the rear window
heating may switch off.
Switching on/off X
Turn the key to position 2in the ignition lock
(Y page 148).
X Press the ¤button.
The indicator lamp in the ¤button lights
up or goes out.
Problems with the rear window heating Problem
Possible causes/consequences and
M MSolutions The rear window heating
has switched off prema-
turely or cannot be
switched on. The battery has not been sufficiently charged.
X Switch off any consumers that are not required, e.g. reading lamps,
interior lighting or the seat heating.
When the battery is sufficiently charged, the rear window heating
can be switched on again. Activating/deactivating air-recircula-
tion mode
General notes You can deactivate the flow of fresh air tempo-
rarily if unpleasant odours are entering the vehi-
cle from outside. The air already inside the vehi- cle will then be recirculated.
If you switch on air-recirculation mode, the win-
dows can mist up more quickly, in particular at
low temperatures. Only use air-recirculation
mode briefly to prevent the windows from mist- ing up. Switching on/off X
Turn the key to position 2in the ignition lock
(Y page 148).
X To activate: press thedbutton.
The indicator lamp in the dbutton lights
up.
i In the event of high pollution levels
(THERMOTRONIC automatic climate control
only) or at high outside temperatures, air-
recirculation mode is automatically activated.
When air-recirculation mode is activated
automatically, the indicator lamp in the d
button is not lit. 138
Operating the climate cont
rol systemClimate control
Page 157 of 397
Problems with the engine
Problem
Possible causes/consequences and
M
MSolutions The engine does not
start. The starter motor
can be heard. R
There is a malfunction in the engine electronics.
R There is a malfunction in the fuel supply.
Before attempting to start the engine again:
X Turn the key back to position 0in the ignition lock.
or X Press the Start/Stop button repeatedly until all indicator lamps in
the instrument cluster go out.
X Try to start the engine again (Y page 149). Avoid excessively long
and frequent attempts to start the engine, as this will drain the
battery.
If the engine does not start after several attempts:
X Consult a qualified specialist workshop. The engine does not
start. The starter motor
can be heard. The
reserve fuel warning
lamp is lit and the fuel
gauge display shows
0. The fuel tank is empty.
X Refuel the vehicle. The engine does not
start. You cannot hear
the starter motor. The on-board voltage is too low because the battery is too weak or
discharged.
X Jump-start the vehicle (Y page 354).
If the engine does not start despite attempts to jump-start it:
X Consult a qualified specialist workshop. The starter motor was exposed to a thermal load that was too high.
X Allow the starter motor to cool down for approximately two minutes.
X Try to start the engine again.
If the engine still does not start: X Consult a qualified specialist workshop. Vehicles with a petrol
engine:
The engine is not running
smoothly and is misfir-
ing. There is a malfunction in the engine electronics or in a mechanical
component of the engine management system.
X Only depress the accelerator pedal slightly.
Otherwise, non-combusted fuel may get into the catalytic converter
and damage it.
X Have the cause rectified immediately at a qualified specialist work-
shop. 154
DrivingDriving and parking
Page 169 of 397
Problem
Possible causes/consequences and
M
MSolutions The fuel filler flap cannot
be opened. The fuel filler flap is not unlocked.
X Unlock the vehicle (Y page 81). The key battery is weak or discharged.
X Unlock the vehicle using the emergency key element (Y page 83).The fuel filler flap is unlocked, but the opening mechanism is jammed.
X Consult a qualified specialist workshop. AdBlue
®
(BlueTEC vehicles only)
General notes To function properly, BlueTEC exhaust gas after-
treatment must be operated with the reducing
agent AdBlue ®
. Topping up AdBlue ®
is part of
the maintenance work. Under normal operating
conditions, a full tank of AdBlue ®
should last
until the next service due date.
When the supply of AdBlue ®
is down to approx-
imately 3.8 l, the Refill AdBlue See Own‐ Refill AdBlue See Own‐
er's Manual er's Manual message is shown in the multi-
function display.
X Add at least 3.8 lof AdBlue ®
.
X Switch on the ignition for at least 60 seconds.
X Start the engine.
i You can also have the AdBlue ®
tank refilled
at a qualified specialist workshop.
Before driving your vehicle outside Europe, have
the AdBlue ®
supply checked at a qualified spe-
cialist workshop.
Further information about BlueTEC exhaust gas
aftertreatment and about AdBlue ®
can
be obtained from any Mercedes-Benz Service
Centre.
Important safety notes AdBlue
®
is a water-soluble fluid for the exhaust
gas aftertreatment of diesel engines. It is:
R non-toxic
R colourless and odourless
R non-flammable
If you open the AdBlue ®
tank, small amounts of
ammonia vapour may be released. Ammonia vapours have a pungent odour and are
particularly irritating to the skin, mucous mem-
branes and eyes. You may experience a burning sensation in your eyes, nose and throat. You
may also experience coughing and watery eyes.
Do not inhale any ammonia vapours that may be
released. Only fill the AdBlue ®
tank in well-ven-
tilated areas.
Do not swallow AdBlue ®
or let it come into con-
tact with skin, eyes or clothing. Keep AdBlue ®
away from children.
If you or others come into contact with AdBlue ®
,
observe the following:
R immediately rinse AdBlue ®
off your skin with
soap and water.
R if AdBlue ®
comes into contact with your eyes,
immediately rinse them thoroughly with clean water. Seek medical attention immediately.
R if AdBlue ®
is swallowed, immediately rinse
your mouth out thoroughly. Drink plenty of
water. Seek medical attention immediately.
R change immediately out of clothing that has
come into contact with AdBlue ®
.
! Only use AdBlue ®
in accordance with
ISO 22241. Do not mix any additives with
AdBlue ®
, and do not dilute AdBlue ®
with
water. This may destroy the BlueTEC exhaust
gas aftertreatment system.
! In order to fill the AdBlue ®
tank, the vehicle
must be parked on a level surface. The
AdBlue ®
tank can only be filled as intended
with the vehicle parked on a level surface.
Fluctuations in capacity will thus be avoided.
Filling a vehicle standing on an uneven sur-
face is not permitted. There is a danger of
overfilling, which can cause damage to Blue-
TEC exhaust gas aftertreatment components. 166
RefuellingDriving and parking