2016 MERCEDES-BENZ GLS SUV light
[x] Cancel search: lightPage 229 of 397
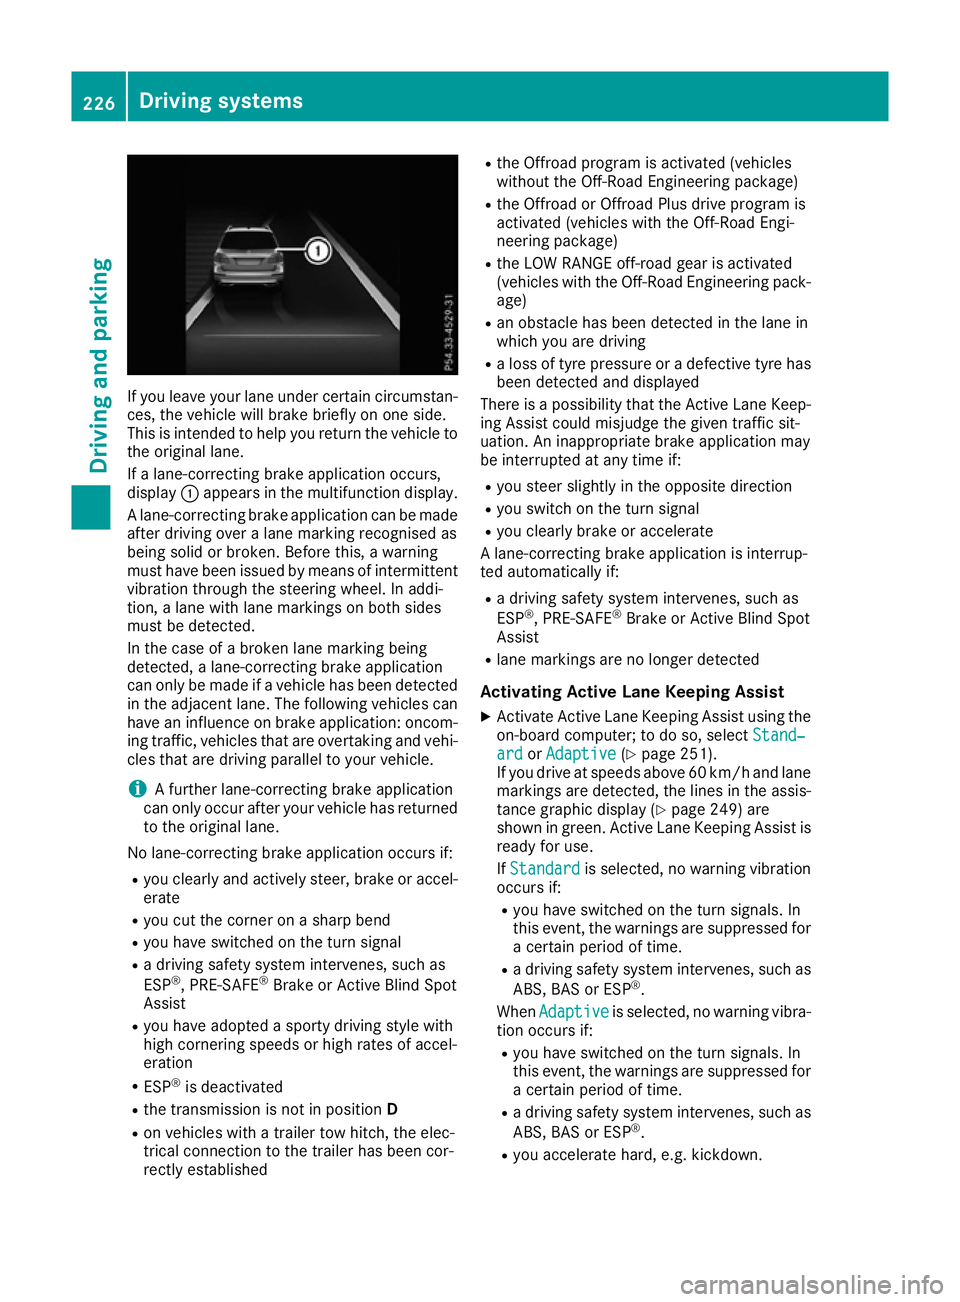
If you leave your lane under certain circumstan-
ces, the vehicle will brake briefly on one side.
This is intended to help you return the vehicle to
the original lane.
If a lane-correcting brake application occurs,
display :appears in the multifunction display.
A lane-correcting brake application can be made
after driving over a lane marking recognised as
being solid or broken. Before this, a warning
must have been issued by means of intermittent
vibration through the steering wheel. In addi-
tion, a lane with lane markings on both sides
must be detected.
In the case of a broken lane marking being
detected, a lane-correcting brake application
can only be made if a vehicle has been detected
in the adjacent lane. The following vehicles can have an influence on brake application: oncom- ing traffic, vehicles that are overtaking and vehi-
cles that are driving parallel to your vehicle.
i A further lane-correcting brake application
can only occur after your vehicle has returned
to the original lane.
No lane-correcting brake application occurs if: R you clearly and actively steer, brake or accel-
erate
R you cut the corner on a sharp bend
R you have switched on the turn signal
R a driving safety system intervenes, such as
ESP ®
, PRE-SAFE ®
Brake or Active Blind Spot
Assist
R you have adopted a sporty driving style with
high cornering speeds or high rates of accel-
eration
R ESP ®
is deactivated
R the transmission is not in position D
R on vehicles with a trailer tow hitch, the elec-
trical connection to the trailer has been cor-
rectly established R
the Offroad program is activated (vehicles
without the Off-Road Engineering package)
R the Offroad or Offroad Plus drive program is
activated (vehicles with the Off-Road Engi-
neering package)
R the LOW RANGE off-road gear is activated
(vehicles with the Off-Road Engineering pack-
age)
R an obstacle has been detected in the lane in
which you are driving
R a loss of tyre pressure or a defective tyre has
been detected and displayed
There is a possibility that the Active Lane Keep-
ing Assist could misjudge the given traffic sit-
uation. An inappropriate brake application may
be interrupted at any time if:
R you steer slightly in the opposite direction
R you switch on the turn signal
R you clearly brake or accelerate
A lane-correcting brake application is interrup-
ted automatically if:
R a driving safety system intervenes, such as
ESP ®
, PRE-SAFE ®
Brake or Active Blind Spot
Assist
R lane markings are no longer detected
Activating Active Lane Keeping Assist
X Activate Active Lane Keeping Assist using the
on-board computer; to do so, select Stand‐
Stand‐
ard ard orAdaptive
Adaptive (Ypage 251).
If you drive at speeds above 60 km/h and lane
markings are detected, the lines in the assis-
tance graphic display (Y page 249) are
shown in green. Active Lane Keeping Assist is
ready for use.
If Standard Standard is selected, no warning vibration
occurs if:
R you have switched on the turn signals. In
this event, the warnings are suppressed for
a certain period of time.
R a driving safety system intervenes, such as
ABS, BAS or ESP ®
.
When Adaptive Adaptive is selected, no warning vibra-
tion occurs if:
R you have switched on the turn signals. In
this event, the warnings are suppressed for
a certain period of time.
R a driving safety system intervenes, such as
ABS, BAS or ESP ®
.
R you accelerate hard, e.g. kickdown. 226
Driving systemsDriving and parking
Page 230 of 397
R
you brake hard.
R you steer actively, e.g. swerve to avoid an
obstacle or change lane quickly.
R you cut the corner on a sharp bend.
Towing a trailer
If you couple up a trailer, make sure that you
have correctly established the electrical con-
nection. This can be accomplished by checking
the trailer lighting. Lane-correcting brake appli-
cation does not take place when towing a trailer.
Active Lane Keeping Assist is not activated and the lines in the assistance graphic are grey. Off-road driving systems
4MATIC (permanent all-wheel drive) 4MATIC ensures that all four wheels are perma-
nently driven. Together with ESP ®
and 4ETS, it
improves the traction of your vehicle whenever
a drive wheel spins due to insufficient grip.
If you fail to adapt your driving style, 4MATIC can
neither reduce the risk of an accident nor over-
ride the laws of physics. 4MATIC cannot take
account of road, weather and traffic conditions.
4MATIC is only an aid. You are responsible for
the distance to the vehicle in front, for vehicle
speed, for braking in good time and for staying in
lane.
! Never tow the vehicle with one axle raised.
This may damage the transfer case. Damage
of this sort is not covered by the Mercedes-
Benz implied warranty. All wheels must
remain either on the ground or be fully raised. Observe the instructions for towing the vehi-
cle with all wheels in full contact with the
ground.
! A function or performance test should only
be carried out on a twin-axle dynamometer.
Before you operate the vehicle on such a
dynamometer, please consult a qualified
workshop. You could otherwise damage the
drive train or the brake system.
i In wintry driving conditions, the maximum
effect of 4MATIC can only be achieved if you
use winter tyres (M+S tyres), with snow
chains if necessary.
Further information about "Driving off-road"
(Y page 176). DSR (Downhill Speed Regulation) General notes
DSR is an aid to assist you when driving down-
hill. It keeps the speed of travel at the speed
selected on the on-board computer. The steeper
the downhill gradient, the greater the DSR brak- ing effect on the vehicle. When driving on flat
stretches of road or on an uphill gradient, the
DSR braking effect is minimal or non-existent.
DSR controls the vehicle’s speed when it is acti-
vated and the transmission is in position D,Ror
N. By accelerating or braking, you can always
drive at a higher or a lower speed than that set
on the on-board computer.
Important safety notes G
WARNING
If the speed driven and the set speed deviate and you activate DSR on a slippery road sur-
face, the wheels may lose traction. This
increases the risk of skidding and having an
accident.
Before switching DSR on, please take into
consideration the road surface and the differ-
ence between driving speed and the set
speed.
If you fail to adapt your driving style, DSR can
neither reduce the risk of accident nor override the laws of physics. DSR cannot take account ofroad, weather and traffic conditions. DSR is only
an aid. You are responsible for the distance to
the vehicle in front, for vehicle speed, for brak-
ing in good time and for staying in lane.
You are always responsible for keeping control
of the vehicle and for assessing whether the
downhill gradient can be managed. DSR may not
always be able to keep to the set speed, depend-
ing on road surface and tyre conditions. Select a set speed suitable for the prevailing conditions
and when necessary, apply the brakes manually. Driving systems
227Driving and parking Z
Page 231 of 397
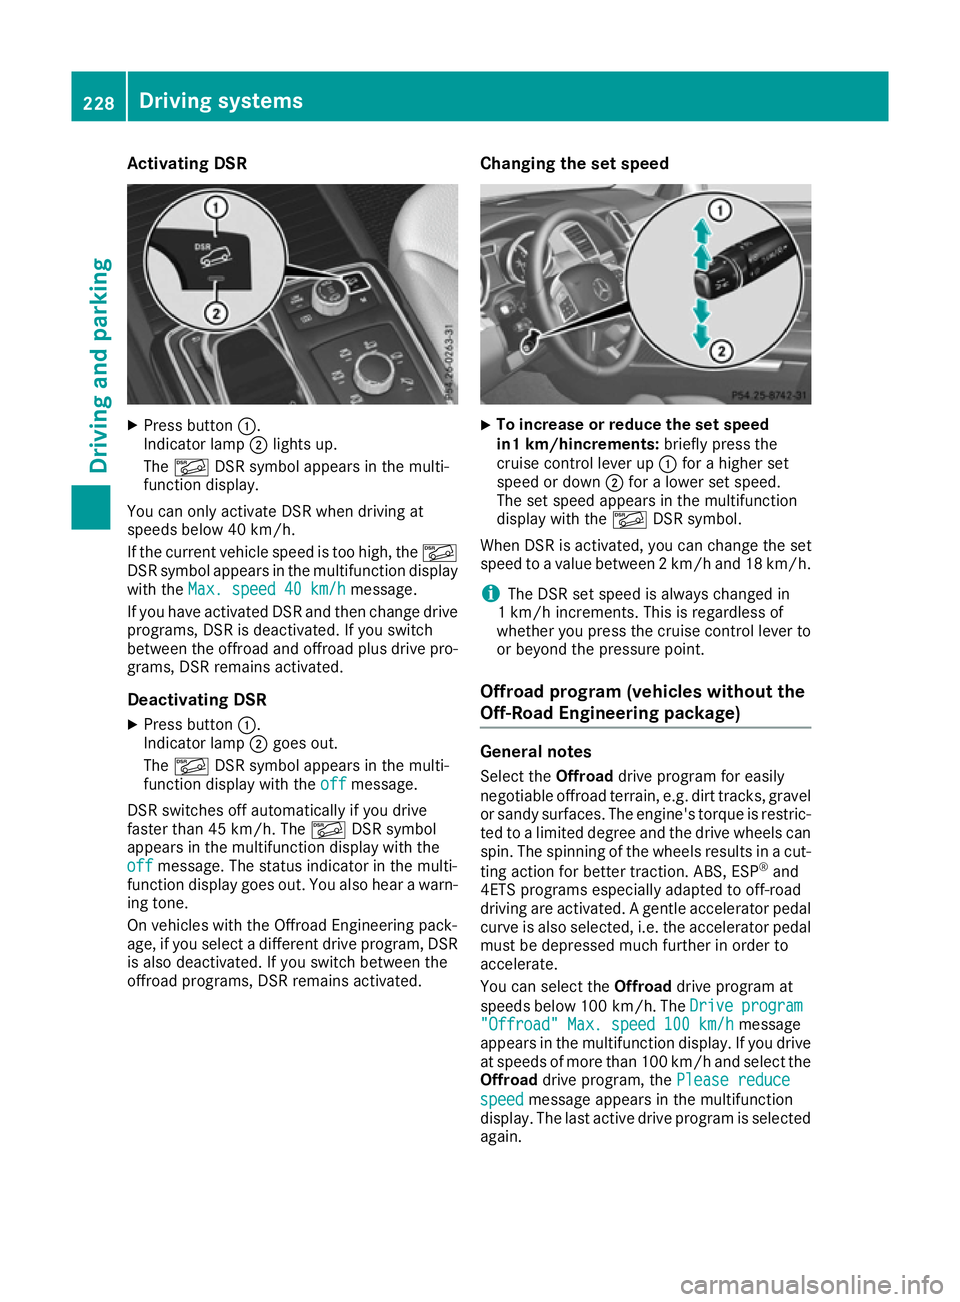
Activating DSR
X
Press button :.
Indicator lamp ;lights up.
The à DSR symbol appears in the multi-
function display.
You can only activate DSR when driving at
speeds below 40 km/h.
If the current vehicle speed is too high, the Ã
DSR symbol appears in the multifunction display
with the Max. speed 40 km/h
Max. speed 40 km/h message.
If you have activated DSR and then change drive programs, DSR is deactivated. If you switch
between the offroad and offroad plus drive pro- grams, DSR remains activated.
Deactivating DSR
X Press button :.
Indicator lamp ;goes out.
The à DSR symbol appears in the multi-
function display with the off offmessage.
DSR switches off automatically if you drive
faster than 45 km/h. The ÃDSR symbol
appears in the multifunction display with the
off
off message. The status indicator in the multi-
function display goes out. You also hear a warn-
ing tone.
On vehicles with the Offroad Engineering pack-
age, if you select a different drive program, DSR is also deactivated. If you switch between the
offroad programs, DSR remains activated. Changing the set speed X
To increase or reduce the set speed
in1 km/hincrements:
briefly press the
cruise control lever up :for a higher set
speed or down ;for a lower set speed.
The set speed appears in the multifunction
display with the ÃDSR symbol.
When DSR is activated, you can change the set
speed to a value between 2 km/h and 18 km/h.
i The DSR set speed is always changed in
1 km/h increments. This is regardless of
whether you press the cruise control lever to or beyond the pressure point.
Offroad program (vehicles without the
Off-Road Engineering package) General notes
Select the Offroaddrive program for easily
negotiable offroad terrain, e.g. dirt tracks, gravel
or sandy surfaces. The engine's torque is restric-
ted to a limited degree and the drive wheels can
spin. The spinning of the wheels results in a cut-
ting action for better traction. ABS, ESP ®
and
4ETS programs especially adapted to off-road
driving are activated. A gentle accelerator pedal
curve is also selected, i.e. the accelerator pedal
must be depressed much further in order to
accelerate.
You can select the Offroaddrive program at
speeds below 100 km/h. The Drive Driveprogram
program
"Offroad" Max. speed 100 km/h
"Offroad" Max. speed 100 km/h message
appears in the multifunction display. If you drive
at speeds of more than 100 km/h and select the
Offroad drive program, the Please reduce
Please reduce
speed speed message appears in the multifunction
display. The last active drive program is selected
again. 228
Driving systemsDriving and pa
rking
Page 232 of 397
Do not use the
Offroaddrive program on roads
that are snow-covered or icy, or if you have fitted
your vehicle with snow chains.
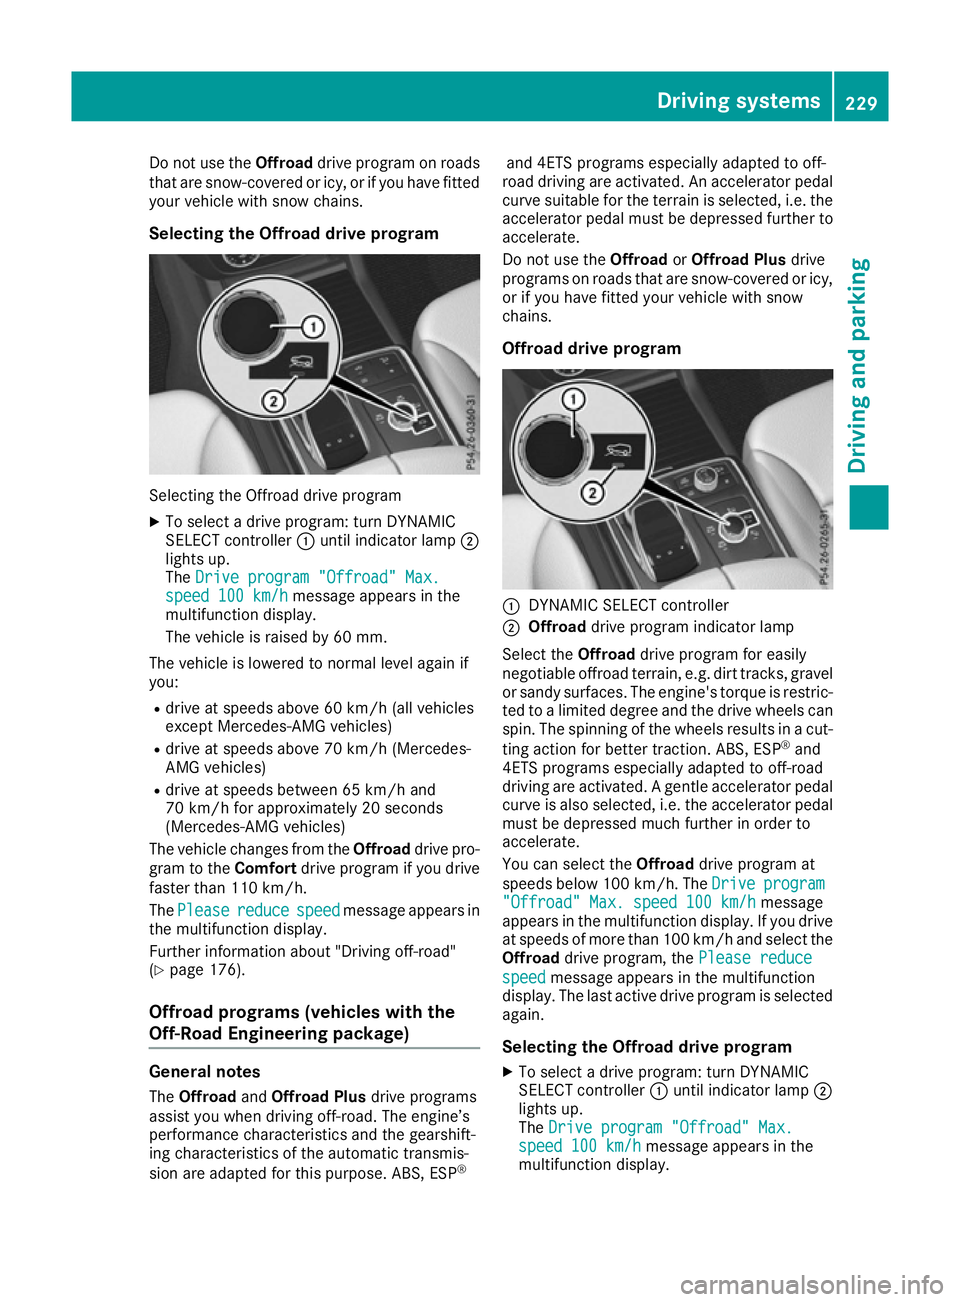
Selecting the Offroad drive program Selecting the Offroad drive program
X To select a drive program: turn DYNAMIC
SELECT controller :until indicator lamp ;
lights up.
The Drive program "Offroad" Max.
Drive program "Offroad" Max.
speed 100 km/h speed 100 km/h message appears in the
multifunction display.
The vehicle is raised by 60 mm.
The vehicle is lowered to normal level again if
you: R drive at speeds above 60 km/h (all vehicles
except Mercedes-AMG vehicles)
R drive at speeds above 70 km/h (Mercedes-
AMG vehicles)
R drive at speeds between 65 km/h and
70 km/h for approximately 20 seconds
(Mercedes-AMG vehicles)
The vehicle changes from the Offroaddrive pro-
gram to the Comfortdrive program if you drive
faster than 110 km/h.
The Please
Please reduce reducespeed
speedmessage appears in
the multifunction display.
Further information about "Driving off-road"
(Y page 176).
Offroad programs (vehicles with the
Off-Road Engineering package) General notes
The Offroad andOffroad Plus drive programs
assist you when driving off-road. The engine’s
performance characteristics and the gearshift-
ing characteristics of the automatic transmis-
sion are adapted for this purpose. ABS, ESP ®and 4ETS programs especially adapted to off-
road driving are activated. An accelerator pedal
curve suitable for the terrain is selected, i.e. the accelerator pedal must be depressed further to accelerate.
Do not use the OffroadorOffroad Plus drive
programs on roads that are snow-covered or icy,
or if you have fitted your vehicle with snow
chains.
Offroad drive program :
DYNAMIC SELECT controller
; Offroad drive program indicator lamp
Select the Offroaddrive program for easily
negotiable offroad terrain, e.g. dirt tracks, gravel
or sandy surfaces. The engine's torque is restric-
ted to a limited degree and the drive wheels can
spin. The spinning of the wheels results in a cut-
ting action for better traction. ABS, ESP ®
and
4ETS programs especially adapted to off-road
driving are activated. A gentle accelerator pedal curve is also selected, i.e. the accelerator pedal
must be depressed much further in order to
accelerate.
You can select the Offroaddrive program at
speeds below 100 km/h. The Drive
Drive program program
"Offroad" Max. speed 100 km/h
"Offroad" Max. speed 100 km/h message
appears in the multifunction display. If you drive
at speeds of more than 100 km/h and select the
Offroad drive program, the Please reduce
Please reduce
speed
speed message appears in the multifunction
display. The last active drive program is selected
again.
Selecting the Offroad drive program X To select a drive program: turn DYNAMIC
SELECT controller :until indicator lamp ;
lights up.
The Drive program "Offroad" Max. Drive program "Offroad" Max.
speed 100 km/h
speed 100 km/h message appears in the
multifunction display. Driving systems
229Driving and parking Z
Page 233 of 397
The vehicle is raised by 30 mm.
The vehicle changes from the Offroaddrive pro-
gram to the Comfortdrive program if you drive
faster than 110 km/h.
The Please Please reduce
reducespeed
speedmessage appears in
the multifunction display.
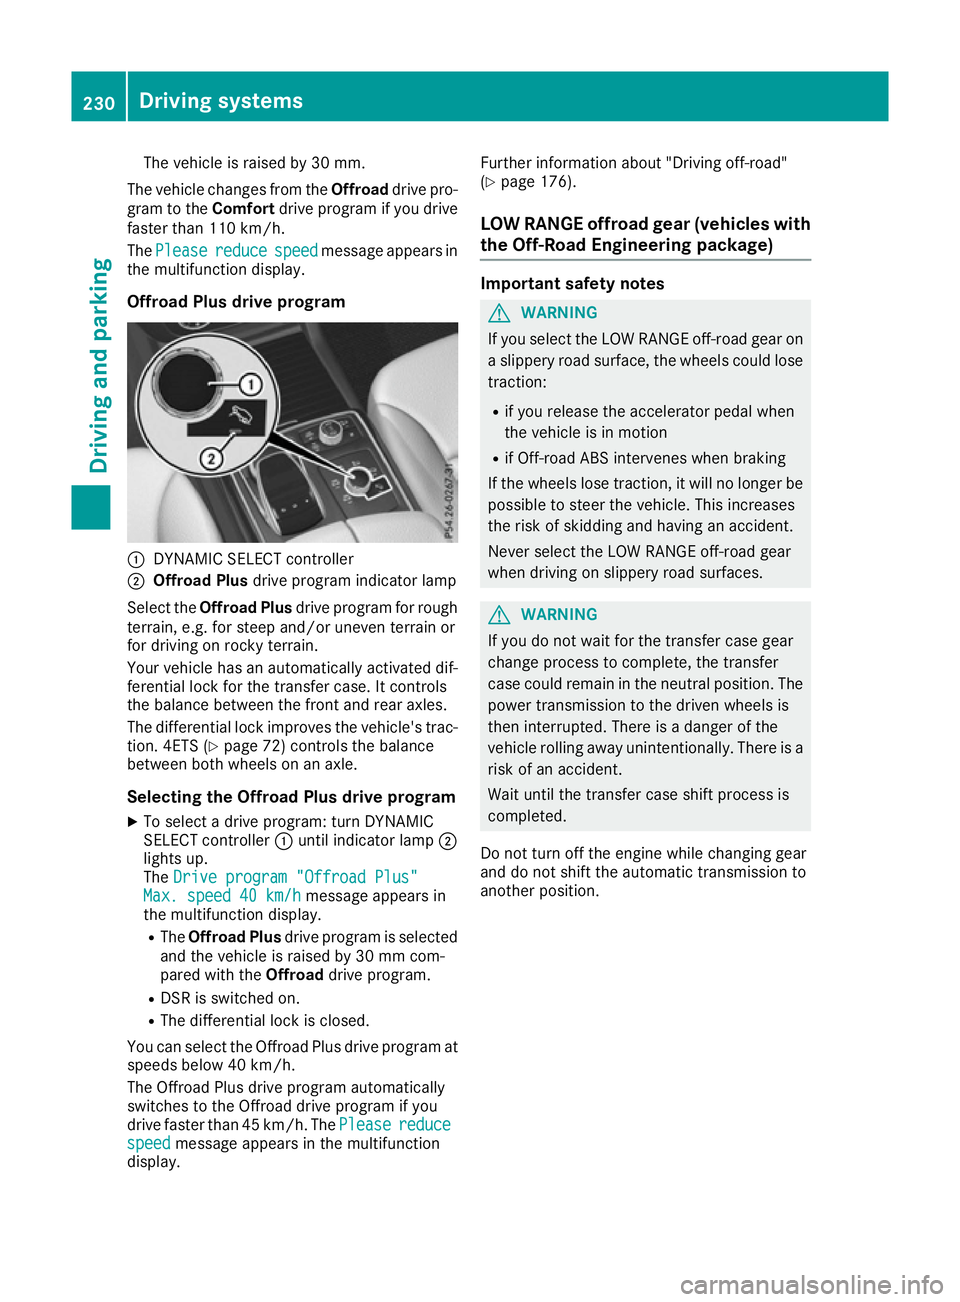
Offroad Plus drive program :
DYNAMIC SELECT controller
; Offroad Plus drive program indicator lamp
Select the Offroad Plus drive program for rough
terrain, e.g. for steep and/or uneven terrain or
for driving on rocky terrain.
Your vehicle has an automatically activated dif-
ferential lock for the transfer case. It controls
the balance between the front and rear axles.
The differential lock improves the vehicle's trac-
tion. 4ETS (Y page 72) controls the balance
between both wheels on an axle.
Selecting the Offroad Plus drive program X To select a drive program: turn DYNAMIC
SELECT controller :until indicator lamp ;
lights up.
The Drive program "Offroad Plus"
Drive program "Offroad Plus"
Max. speed 40 km/h
Max. speed 40 km/h message appears in
the multifunction display.
R The Offroad Plus drive program is selected
and the vehicle is raised by 30 mm com-
pared with the Offroaddrive program.
R DSR is switched on.
R The differential lock is closed.
You can select the Offroad Plus drive program at speeds below 40 km/h.
The Offroad Plus drive program automatically
switches to the Offroad drive program if you
drive faster than 45 km/h. ThePlease
Please reduce reduce
speed
speed message appears in the multifunction
display. Further information about "Driving off-road"
(Y
page 176).
LOW RANGE offroad gear (vehicles with
the Off-Road Engineering package) Important safety notes
G
WARNING
If you select the LOW RANGE off-road gear on a slippery road surface, the wheels could lose traction:
R if you release the accelerator pedal when
the vehicle is in motion
R if Off-road ABS intervenes when braking
If the wheels lose traction, it will no longer be
possible to steer the vehicle. This increases
the risk of skidding and having an accident.
Never select the LOW RANGE off-road gear
when driving on slippery road surfaces. G
WARNING
If you do not wait for the transfer case gear
change process to complete, the transfer
case could remain in the neutral position. The power transmission to the driven wheels is
then interrupted. There is a danger of the
vehicle rolling away unintentionally. There is a
risk of an accident.
Wait until the transfer case shift process is
completed.
Do not turn off the engine while changing gear
and do not shift the automatic transmission to
another position. 230
Driving systemsDriving and parking
Page 234 of 397
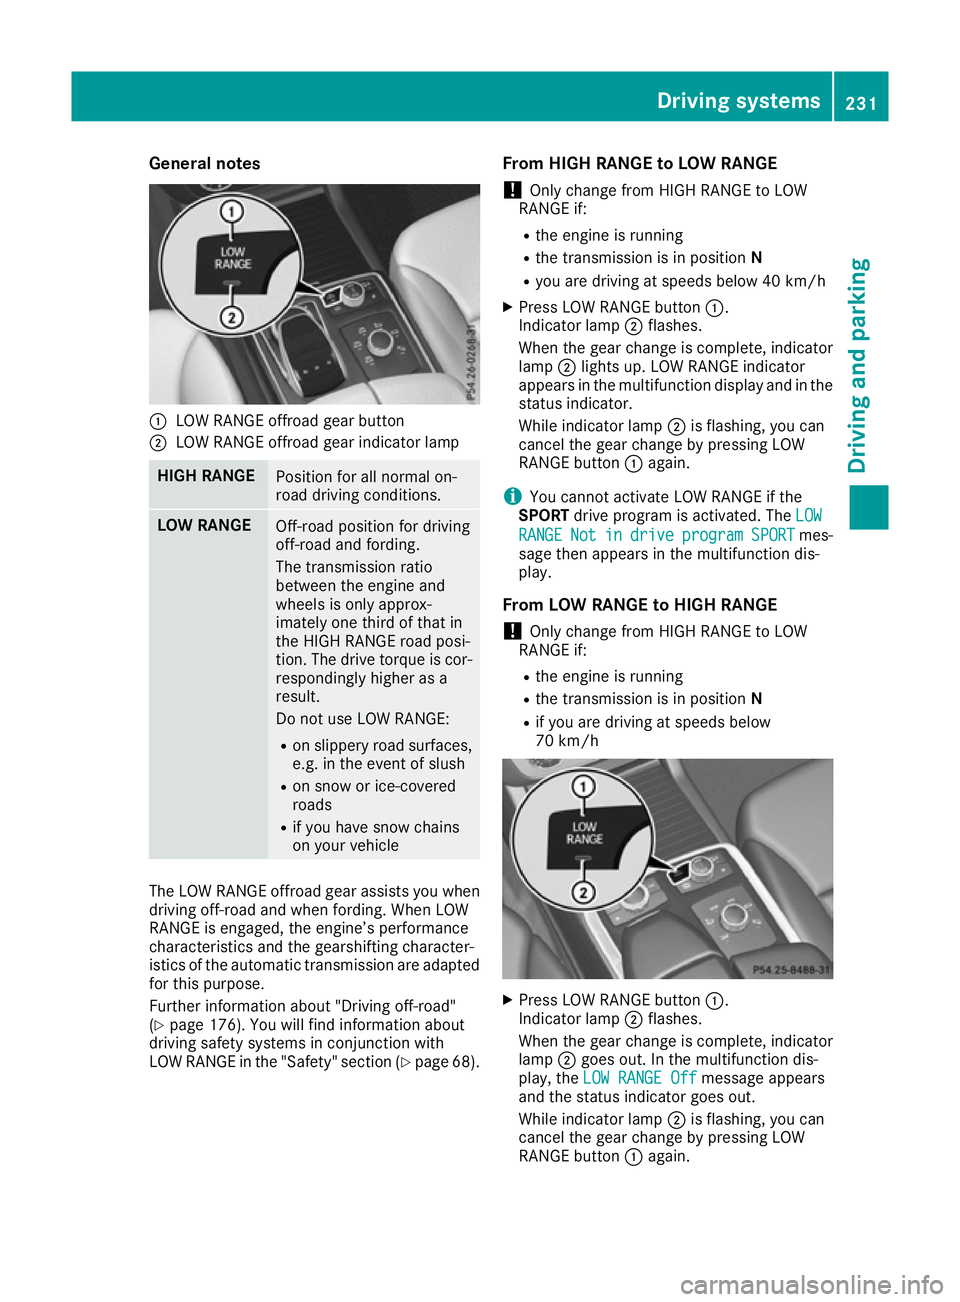
General notes
:
LOW RANGE offroad gear button
; LOW RANGE offroad gear indicator lamp HIGH RANGE
Position for all normal on-
road driving conditions.
LOW RANGE
Off-road position for driving
off-road and fording.
The transmission ratio
between the engine and
wheels is only approx-
imately one third of that in
the HIGH RANGE road posi-
tion. The drive torque is cor-
respondingly higher as a
result.
Do not use LOW RANGE:
R on slippery road surfaces,
e.g. in the event of slush
R on snow or ice-covered
roads
R if you have snow chains
on your vehicle The LOW RANGE offroad gear assists you when
driving off-road and when fording. When LOW
RANGE is engaged, the engine’s performance
characteristics and the gearshifting character-
istics of the automatic transmission are adapted
for this purpose.
Further information about "Driving off-road"
(Y page 176). You will find information about
driving safety systems in conjunction with
LOW RANGE in the "Safety" section (Y page 68).From HIGH RANGE to LOW RANGE
! Only change from HIGH RANGE to LOW
RANGE if:
R the engine is running
R the transmission is in position N
R you are driving at speeds below 40 km/h
X Press LOW RANGE button :.
Indicator lamp ;flashes.
When the gear change is complete, indicator
lamp ;lights up. LOW RANGE indicator
appears in the multifunction display and in the
status indicator.
While indicator lamp ;is flashing, you can
cancel the gear change by pressing LOW
RANGE button :again.
i You cannot activate LOW RANGE if the
SPORT drive program is activated. The LOW LOW
RANGE RANGE Not Notin
indrive
drive program
program SPORT
SPORTmes-
sage then appears in the multifunction dis-
play.
From LOW RANGE to HIGH RANGE ! Only change from HIGH RANGE to LOW
RANGE if:
R the engine is running
R the transmission is in position N
R if you are driving at speeds below
70 km/h X
Press LOW RANGE button :.
Indicator lamp ;flashes.
When the gear change is complete, indicator
lamp ;goes out. In the multifunction dis-
play, the LOW RANGE Off
LOW RANGE Off message appears
and the status indicator goes out.
While indicator lamp ;is flashing, you can
cancel the gear change by pressing LOW
RANGE button :again. Driving systems
231Driving and parking Z
Page 240 of 397
Vehicles with the AIRMATIC package
!
Before beginning the journey, make sure
that the trailer support wheel is completely
raised. Otherwise, the trailer or the vehicle
could be damaged by the lowered trailer sup- port wheel during the journey.
X Shift the transmission to position P.
X Apply the electric parking brake.
X Start the engine.
X Vehicles with the Off-Road Engineering
package:
set the vehicle level to normal level
(Y page 192).
X Vehicles without the Off-Road Engineer-
ing package: select theComfortdrive pro-
gram using the DYNAMIC SELECT controller
(Y page 197).
X Switch off the engine.
X Close the doors and tailgate.
X Position the trailer horizontally behind the
vehicle.
X Couple up the trailer.
X Establish the electrical connection between
the vehicle and the trailer.
X Check that the trailer lighting system is work-
ing.
X Push the combination switch upwards and
downwards and check whether the corre-
sponding turn signal indicator on the trailer is
flashing.
A connected trailer is only detected when the
electrical connection is established correctly
and when the lighting system is working prop-
erly. The function of other systems also depends on this, for example:
R ESP ®
R Parking Assist PARKTRONIC
R Parking Pilot
R Active Blind Spot Assist
R Active Lane Keeping Assist
i Vehicles with the AIRMATIC package:
if
you couple up a trailer, the vehicle initially
remains at the selected level of the drive pro- gram set. Observe the following when cou-
pling up a trailer:
R If the normal level was not selected previ-
ously, the vehicle automatically adopts the normal level starting from a speed of 30 km/h. Even at higher speeds, it does not
drop below the normal level.
R Vehicle levels below the normal level are
not available.
R The raised level is available up to a speed of
30 km/h.
R This also applies when using accessories
that are plugged into the socket of the
trailer tow hitch (e.g. a bicycle rack).
R Before driving with a trailer, please observe
the information on the trailer support
wheel. Uncoupling a trailer
Important safety notes G
WARNING
If you uncouple a trailer with an engaged over- run brake, you could trap your hand between
the vehicle and the trailer drawbar. This poses a risk of injury.
Do not uncouple a trailer with an engaged
overrun brake. G
WARNING
Vehicles with level control:
If you disconnect the trailer cable, the vehicle is lowered. This can cause you or others to
become trapped between the vehicle body
and tyres, or underneath the vehicle. This
poses a risk of injury.
Make sure that no-one is in the immediate
vicinity of the wheel arch or underneath the
vehicle when disconnecting the trailer cable.
! Do not disconnect a trailer with an engaged
overrun brake. Otherwise, your vehicle could
be damaged by the rebounding of the overrun
brake.
! Remove the adapter cable before folding in
the ball coupling. You could otherwise dam-
age the rear bumper and the adapter cable.
Vehicles with the AIRMATIC package X
Shift the transmission to position P.
X Apply the electric parking brake. Towing a trailer
237Driving and parking Z
Page 241 of 397
X
Start the engine.
X Close the doors and tailgate.
X Secure the trailer against rolling away.
X Remove the trailer cable and decouple the
trailer.
X Switch off the engine. Trailer power supply
! You can connect accessories with a power
rating of up to 180 W to the permanent power
supply and with a power rating of up to 180 W to the power supply that is switched on via the ignition lock.
The trailer battery may not be charged from
the power supply.
When it leaves the factory, your vehicle's trailer
socket is equipped with a permanent power
supply and a power supply that is switched on
via the ignition lock.
The permanent power supply is supplied via
trailer socket pin 9.
The power supply that is switched on via the
ignition lock is supplied via trailer socket pin 10.
The trailer's permanent power supply is
switched off in the event of low vehicle supply
voltage and after six hours at the latest.
You can find more information about fitting the
trailer electrics at a qualified specialist work-
shop.
X To switch the connected power supply on
or off: turn the key to position 2or0respec-
tively (Y page 148). Failure check for LEDs
If LED lamps are fitted in the trailer, a malfunc-
tion message may appear in the multifunction
display even if there is no fault. The reason for
the error message may be that the current has
fallen below the minimum of 50 mA. To ensure reliable indication of the failure, each
LED chain in the trailer lighting must be guaran-
teed a minimum current of 50 mA. Trailer with 7-pin connector
General notes Trailer with 7-pin connector:
you can connect
to the 13-pin socket on the ball coupling using
an adapter or, if necessary, an adapter cable.
Both can be obtained at a qualified specialist
workshop.
Fitting the adapter !
Make sure that there is sufficient cable play
so that the cable cannot become detached
when cornering.
! Remove the adapter cable before folding in
the ball coupling. You could otherwise dam-
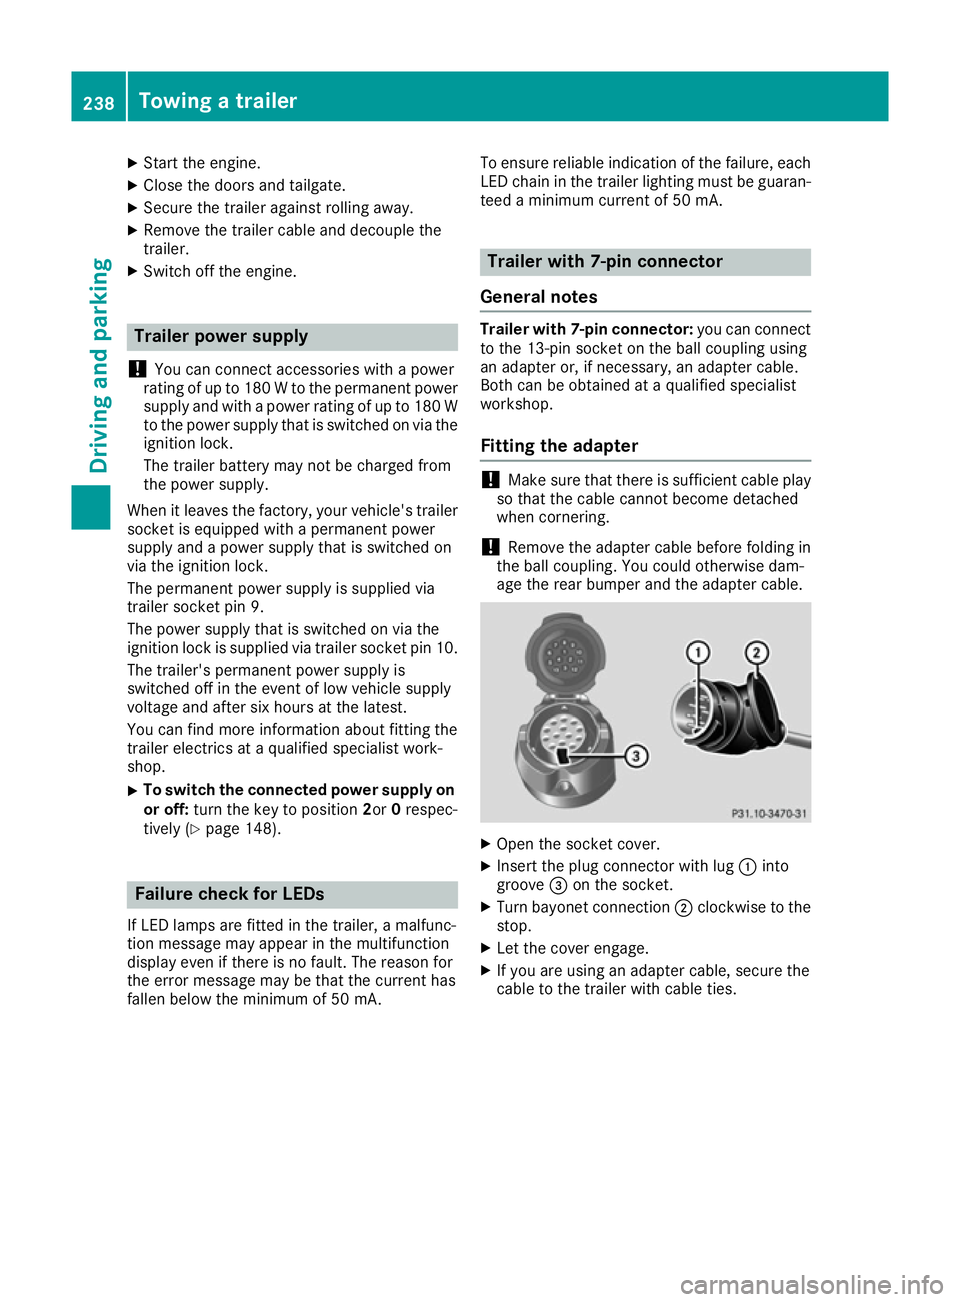
age the rear bumper and the adapter cable. X
Open the socket cover.
X Insert the plug connector with lug :into
groove =on the socket.
X Turn bayonet connection ;clockwise to the
stop.
X Let the cover engage.
X If you are using an adapter cable, secure the
cable to the trailer with cable ties. 238
Towing a trailerDriving and parking