2016 MERCEDES-BENZ GLC COUPE towing capacity
[x] Cancel search: towing capacityPage 7 of 389

1, 2, 3 ...
4ETS (Electronic Traction System) see ETS/4ETS (Electronic Trac-
tion System)
4MATIC (permanent four-wheel
drive) .................................................. 190
4MATIC off-road system ...................190
12 V socket
see Socket (12 V)
230 V power socket .......................... 319
360° camera
Cleaning ......................................... 335
Display in the multimedia system .. 204
Function/notes ............................ .202 A
ABS (Anti-lock Braking System) Display message ............................ 250
Function/notes ................................ 68
Warning lamp ................................. 283
Accident
Automatic measures after an acci-
dent ................................................. 56
Activating media mode
General notes ................................ 303
Activating/deactivating air-recir-
culation mode ................................... .134
Activating/deactivating cooling
with air dehumidification ................. 130
Active Blind Spot Assist
Activating/deactivating (on-
board computer) ............................ 241
Display message ............................ 268
Function/notes ............................ .213
Active Lane Keeping Assist
Activating/deactivating (on-
board computer) ............................ 242
Display message ............................ 268
Function/notes ............................ .216
Active light function ......................... 118
Active Light System
Display message ............................ 261
Active Parking Assist
Cancelling ...................................... 197
Detecting parking spaces .............. 194
Display message ............................ 269 Exiting a parking space .................. 197
Function/notes ............................
.194
Important safety notes .................. 194
Parking .......................................... 196
Towing a trailer .............................. 194
ADAPTIVE BRAKE ................................. 77
Adaptive Brake Assist
Function/notes ................................ 72
Adaptive brake lights .......................... 73
Adaptive Damping System
Function/notes ............................ .190
Adaptive Damping System (ADS) ..... 188
Adaptive Highbeam Assist
Display message ............................ 262
Function/notes ............................ .119
Switching on/off ........................... 119
Adaptive Highbeam Assist Plus
Display message ............................ 262
Function/notes ............................ .119
Switching on/off ........................... 120
AdBlue ®
Additive ......................................... 376
Display message ............................ 265
Displaying level and range ............. 240
Filling capacity ............................... 376
Important safety notes .................. 376
Low outside temperatures ............. 376
Purity ............................................. 376
Topping up ..................................... 164
Additional speedometer ................... 244
Additives (engine oil) ........................ 377
Address book
See also Digital Owner's Manual ... 292
Adjusting the headlamp range ......... 117
Adjusting the volume
Multimedia system ........................ 293
AIR BODY CONTROL
Display message ............................ 266
Function/notes ............................ .187
Lowering the rear of the vehicle .... 189
Raising the rear of the vehicle ....... 189
Air conditioning
General notes ................................ 127
Air filter (white display message) .... 265
Air vents
Important safety notes .................. 141
Rear ............................................... 141 4
Index
Page 310 of 389

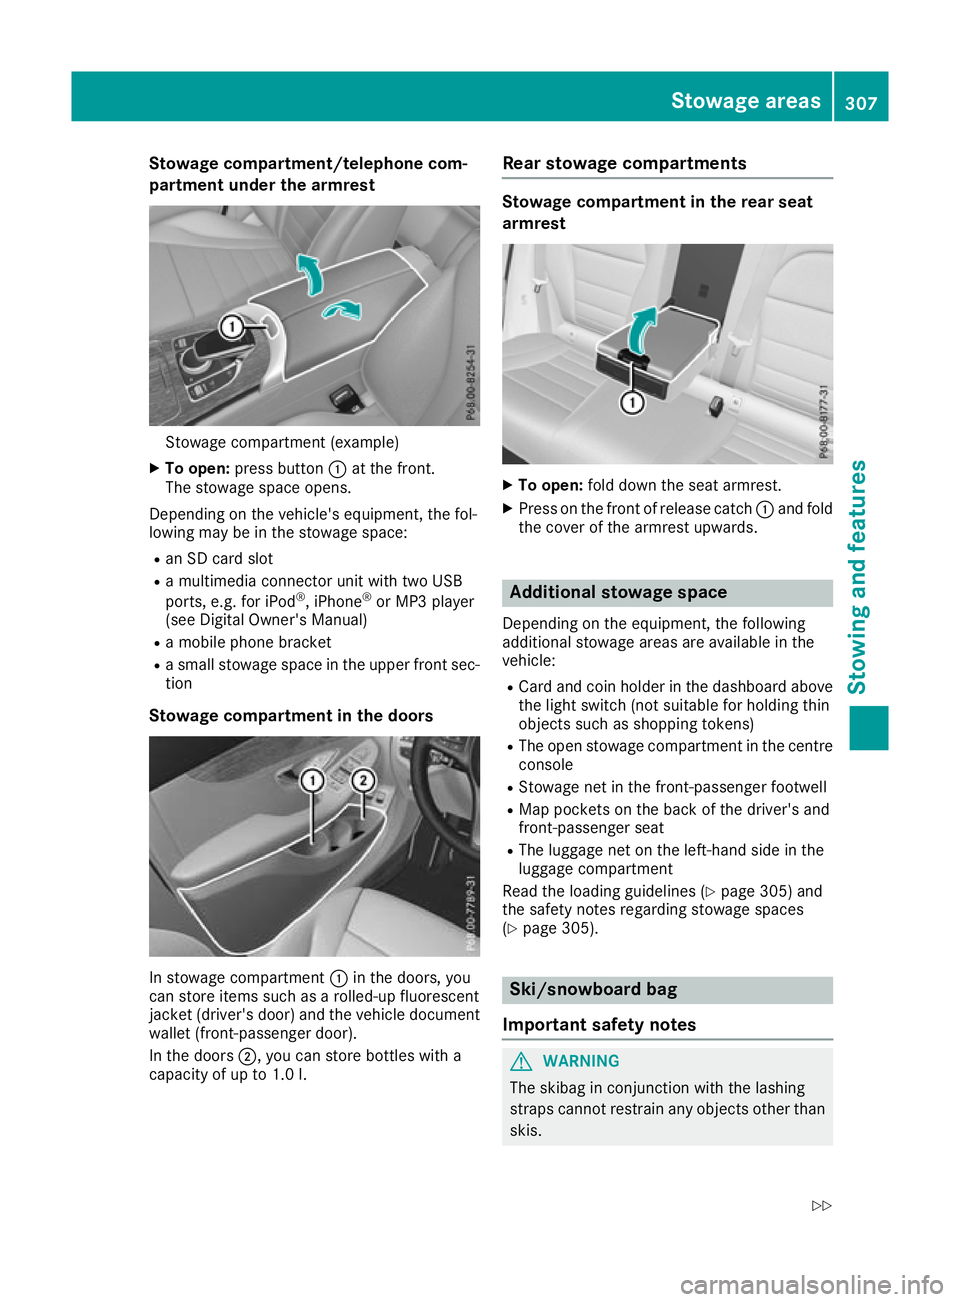
Stowage compartment/telephone com-
partment under the armrest Stowage compartment (example)
X To open: press button :at the front.
The stowage space opens.
Depending on the vehicle's equipment, the fol-
lowing may be in the stowage space:
R an SD card slot
R a multimedia connector unit with two USB
ports, e.g. for iPod ®
, iPhone ®
or MP3 player
(see Digital Owner's Manual)
R a mobile phone bracket
R a small stowage space in the upper front sec-
tion
Stowage compartment in the doors In stowage compartment
:in the doors, you
can store items such as a rolled-up fluorescent
jacket (driver's door) and the vehicle document wallet (front-passenger door).
In the doors ;, you can store bottles with a
capacity of up to 1.0 l. Rear stowage compartments Stowage compartment in the rear seat
armrest
X
To open: fold down the seat armrest.
X Press on the front of release catch :and fold
the cover of the armrest upwards. Additional stowage space
Depending on the equipment, the following
additional stowage areas are available in the
vehicle:
R Card and coin holder in the dashboard above
the light switch (not suitable for holding thin
objects such as shopping tokens)
R The open stowage compartment in the centre
console
R Stowage net in the front-passenger footwell
R Map pockets on the back of the driver's and
front-passenger seat
R The luggage net on the left-hand side in the
luggage compartment
Read the loading guidelines (Y page 305) and
the safety notes regarding stowage spaces
(Y page 305). Ski/snowboard bag
Important safety notes G
WARNING
The skibag in conjunction with the lashing
straps cannot restrain any objects other than skis. Stowage areas
307Stowing and features
Z
Page 311 of 389

Vehicle occupants could be struck in the
event of sudden braking or an accident, for
instance, if you:
R transport other heavy or sharp-edged
objects in the skibag
R do not secure the skibag with the lashing
straps
There is a risk of accident and injury.
Store only skis in the skibag. Always secure
the skibag with the lashing straps so that it
cannot move around.
A maximum of four pairs of skis or two snow-
boards can be transported in the ski/snow-
board bag.
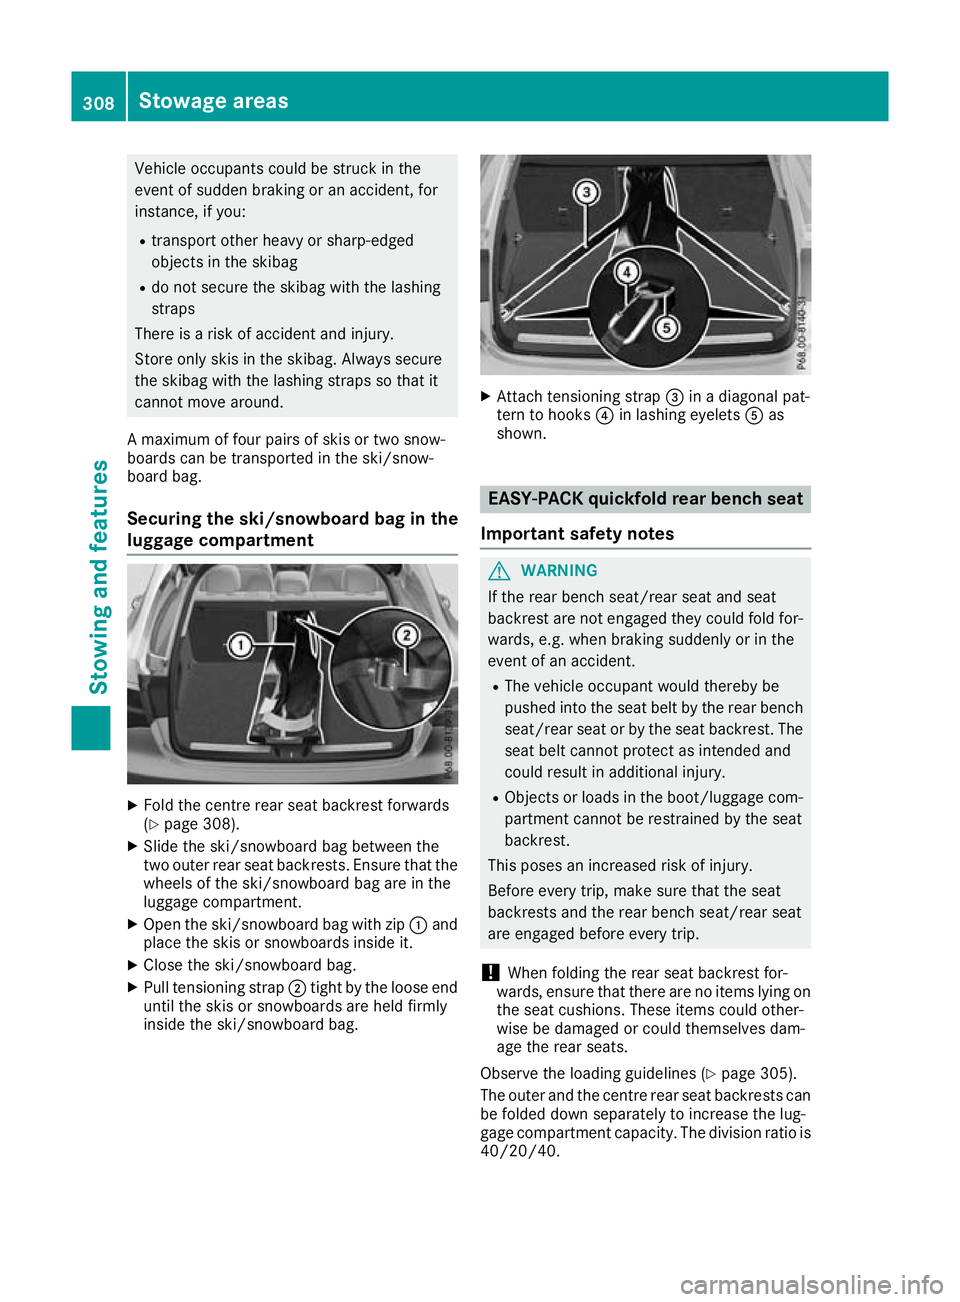
Securing the ski/snowboard bag in the
luggage compartment X
Fold the centre rear seat backrest forwards
(Y page 308).
X Slide the ski/snowboard bag between the
two outer rear seat backrests. Ensure that the
wheels of the ski/snowboard bag are in the
luggage compartment.
X Open the ski/snowboard bag with zip :and
place the skis or snowboards inside it.
X Close the ski/snowboard bag.
X Pull tensioning strap ;tight by the loose end
until the skis or snowboards are held firmly
inside the ski/snowboard bag. X
Attach tensioning strap =in a diagonal pat-
tern to hooks ?in lashing eyelets Aas
shown. EASY-PACK quickfold rear bench seat
Important safety notes G
WARNING
If the rear bench seat/rear seat and seat
backrest are not engaged they could fold for- wards, e.g. when braking suddenly or in the
event of an accident.
R The vehicle occupant would thereby be
pushed into the seat belt by the rear bench
seat/rear seat or by the seat backrest. The
seat belt cannot protect as intended and
could result in additional injury.
R Objects or loads in the boot/luggage com-
partment cannot be restrained by the seat
backrest.
This poses an increased risk of injury.
Before every trip, make sure that the seat
backrests and the rear bench seat/rear seat
are engaged before every trip.
! When folding the rear seat backrest for-
wards, ensure that there are no items lying on the seat cushions. These items could other-
wise be damaged or could themselves dam-
age the rear seats.
Observe the loading guidelines (Y page 305).
The outer and the centre rear seat backrests can be folded down separately to increase the lug-
gage compartment capacity. The division ratio is
40/20/40. 308
Stowage areasStowing and features
Page 343 of 389

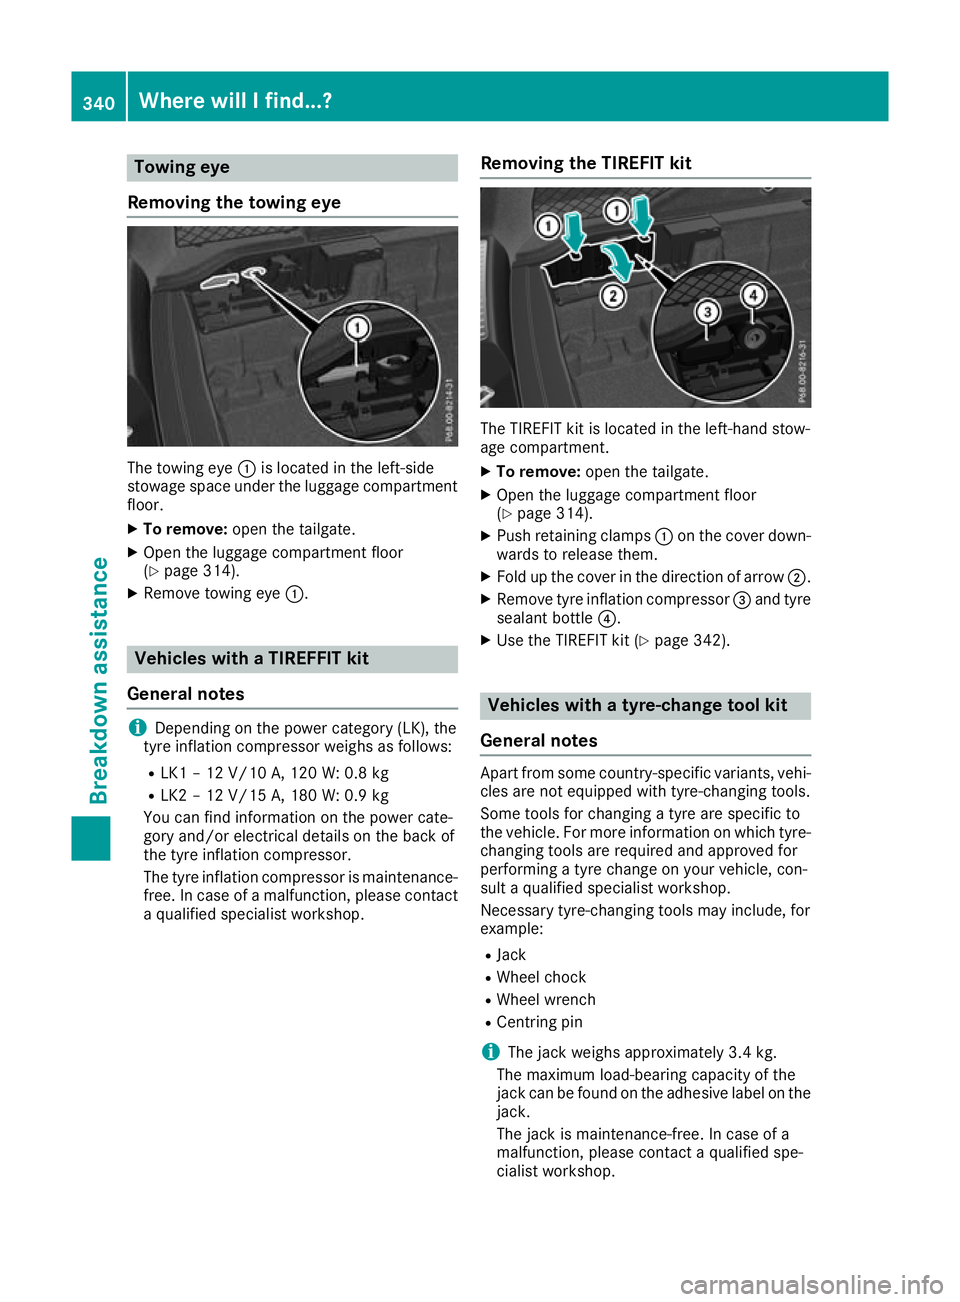
Towing eye
Removing the towing eye The towing eye
:is located in the left-side
stowage space under the luggage compartment
floor.
X To remove: open the tailgate.
X Open the luggage compartment floor
(Y page 314).
X Remove towing eye :.Vehicles with a TIREFFIT kit
General notes i
Depending on the power category (LK), the
tyre inflation compressor weighs as follows:
R LK1 – 12 V/10 A, 120 W: 0.8 kg
R LK2 – 12 V/15 A, 180 W:0.9 kg
You can find information on the power cate-
gory and/or electrical details on the back of
the tyre inflation compressor.
The tyre inflation compressor is maintenance-
free. In case of a malfunction, please contact
a qualified specialist workshop. Removing the TIREFIT kit The TIREFIT kit is located in the left-hand stow-
age compartment.
X To remove: open the tailgate.
X Open the luggage compartment floor
(Y page 314).
X Push retaining clamps :on the cover down-
wards to release them.
X Fold up the cover in the direction of arrow ;.
X Remove tyre inflation compressor =and tyre
sealant bottle ?.
X Use the TIREFIT kit (Y page 342). Vehicles with a tyre-change tool kit
General notes Apart from some country-specific variants, vehi-
cles are not equipped with tyre-changing tools.
Some tools for changing a tyre are specific to
the vehicle. For more information on which tyre- changing tools are required and approved for
performing a tyre change on your vehicle, con-
sult a qualified specialist workshop.
Necessary tyre-changing tools may include, for
example:
R Jack
R Wheel chock
R Wheel wrench
R Centring pin
i The jack weighs approximately 3.4 kg.
The maximum load-bearing capacity of the
jack can be found on the adhesive label on the jack.
The jack is maintenance-free. In case of a
malfunction, please contact a qualified spe-
cialist workshop. 340
Where will I find...?Breakdown assistance