2016 MERCEDES-BENZ GLC COUPE air filter
[x] Cancel search: air filterPage 7 of 389

1, 2, 3 ...
4ETS (Electronic Traction System) see ETS/4ETS (Electronic Trac-
tion System)
4MATIC (permanent four-wheel
drive) .................................................. 190
4MATIC off-road system ...................190
12 V socket
see Socket (12 V)
230 V power socket .......................... 319
360° camera
Cleaning ......................................... 335
Display in the multimedia system .. 204
Function/notes ............................ .202 A
ABS (Anti-lock Braking System) Display message ............................ 250
Function/notes ................................ 68
Warning lamp ................................. 283
Accident
Automatic measures after an acci-
dent ................................................. 56
Activating media mode
General notes ................................ 303
Activating/deactivating air-recir-
culation mode ................................... .134
Activating/deactivating cooling
with air dehumidification ................. 130
Active Blind Spot Assist
Activating/deactivating (on-
board computer) ............................ 241
Display message ............................ 268
Function/notes ............................ .213
Active Lane Keeping Assist
Activating/deactivating (on-
board computer) ............................ 242
Display message ............................ 268
Function/notes ............................ .216
Active light function ......................... 118
Active Light System
Display message ............................ 261
Active Parking Assist
Cancelling ...................................... 197
Detecting parking spaces .............. 194
Display message ............................ 269 Exiting a parking space .................. 197
Function/notes ............................
.194
Important safety notes .................. 194
Parking .......................................... 196
Towing a trailer .............................. 194
ADAPTIVE BRAKE ................................. 77
Adaptive Brake Assist
Function/notes ................................ 72
Adaptive brake lights .......................... 73
Adaptive Damping System
Function/notes ............................ .190
Adaptive Damping System (ADS) ..... 188
Adaptive Highbeam Assist
Display message ............................ 262
Function/notes ............................ .119
Switching on/off ........................... 119
Adaptive Highbeam Assist Plus
Display message ............................ 262
Function/notes ............................ .119
Switching on/off ........................... 120
AdBlue ®
Additive ......................................... 376
Display message ............................ 265
Displaying level and range ............. 240
Filling capacity ............................... 376
Important safety notes .................. 376
Low outside temperatures ............. 376
Purity ............................................. 376
Topping up ..................................... 164
Additional speedometer ................... 244
Additives (engine oil) ........................ 377
Address book
See also Digital Owner's Manual ... 292
Adjusting the headlamp range ......... 117
Adjusting the volume
Multimedia system ........................ 293
AIR BODY CONTROL
Display message ............................ 266
Function/notes ............................ .187
Lowering the rear of the vehicle .... 189
Raising the rear of the vehicle ....... 189
Air conditioning
General notes ................................ 127
Air filter (white display message) .... 265
Air vents
Important safety notes .................. 141
Rear ............................................... 141 4
Index
Page 15 of 389
Exterior lighting
Cleaning ........................................ .334
Settings options ............................ .115
see Lights
Exterior mirrors
Adjusting ....................................... 111
Anti-dazzle mode (automatic) ....... .112
Folding in/out (automatically) ....... 112
Folding in/out (electrically) ........... 111
Out of position (troubleshooting) ... 112
Parking position ............................. 112
Resetting ....................................... 111
Storing settings (memory func-
tion) ............................................... 113 F
Fault message see Display messages
Favourites
Overview ........................................ 295
Features ............................................. 315
Filler cap
see Fuel filler flap
Fire extinguisher ............................... 339
First-aid kit ......................................... 339
Fitting a wheel
Fitting a wheel ............................... 367
Lowering the vehicle ...................... 368
Preparing the vehicle ..................... 365
Raising the vehicl e......................... 366
Removing a whee l.......................... 367
Securing the vehicle against roll-
ing away ........................................ 365
Fitting/removing
front wheel arch cover ................... 123
Flat tyre
Changing a wheel/fitting the
spare whee l................................... 364
MOExtended tyre s......................... 341
Preparing the vehicle ..................... 341
TIREFIT kit ...................................... 342
see Emergency spare wheel
Floormat ............................................. 324
Foglamps (extended range) .............. 118
Frequencies
Mobile phone ................................. 371
Two-way radio ................................ 371 Front-passenger front airbag deac-
tivation
Display message ............................ 259
Front-passenger front airbag deac-
tivation system
Operation ......................................... 49
Problems ......................................... 53
System self-test ............................... 52
Fuel
Additives ........................................ 375
Consumption statistics .................. 233
Displaying the current consump-
tion ................................................ 233
Displaying the rang e...................... 233
Driving tips .................................... 170
E10 ................................................ 374
Fuel gaug e....................................... 34
Grade (petrol) ................................ 374
Important safety notes .................. 374
Low outside temperature s............. 376
Notes for GLC 300 4MATIC
Coupé, Mercedes-AMG GLC 43
4MATIC Coup é............................... 375
Problem (malfunction) ................... 164
Quality (diesel )............................... 375
Refuelling ....................................... 161
Tank content/reserve fue l............. 374
Fuel filler flap
Closing ........................................... 163
Opening ......................................... 162
Fuel filter (white display message) .. 265
Fuel level
Calling up the range (on-board
computer) ...................................... 233
Gaug e.............................................. 34
Fuel tank
Capacity ........................................ 374
Problem (malfunction) ................... 164
Fuses
Allocation chart ............................. 355
Before changing ............................. 354
Dashboard fuse box ....................... 354
Fuse box in the engine compart-
ment .............................................. 355
Fuse box in the front-passenger
footwell .......................................... 354
Fuse box in the luggage compart-
ment .............................................. 355 12
Index
Page 130 of 389
Overview of climate control systems
General notes
Observe the settings recommended on the fol-
lowing pages. Otherwise, the windows could
mist up.
To prevent the windows from misting up:
R switch off climate control only briefly
R activate air-recirculation mode only briefly
R switch on "Cooling with air dehumidification"
R activate the "Windscreen demisting" function
briefly, if required
Climate control regulates the temperature and
air humidity in the vehicle interior. The interior
filter cleans the air, thus improving the interior
climate.
The "Cooling with dehumidification" function is
available only when the engine is running. Opti-
mum climate control is achieved only with the
side windows and roof closed.
The residual heat function can be activated or
deactivated only with the ignition switched off
(Y page 135). The integrated filter filters out most particles of
dust and soot and completely filters out pollen.
It also reduces gaseous pollutants and odours. A
clogged filter reduces the amount of air supplied to the vehicle interior. For this reason, you
should always observe the interval for replacing
the filter, which is specified in the Service Book-
let. As this depends on environmental condi-
tions, e.g. heavy air pollution, the interval may
be shorter than stated in the Service Booklet.
i Ventilate the vehicle for a brief period during
warm weather, e.g. using the convenience
opening feature (Y page 96). This will speed
up the cooling process and the desired inte-
rior temperature will be reached more
quickly.
i It is possible that the blower may be activa-
ted automatically 60 minutes after the key
has been removed depending on various fac-
tors, e.g. the outside temperature. The vehi-
cle is then ventilated for 30 minutes to dry the
automatic climate control.
i Hybrid vehicles:
observe the notes on cli-
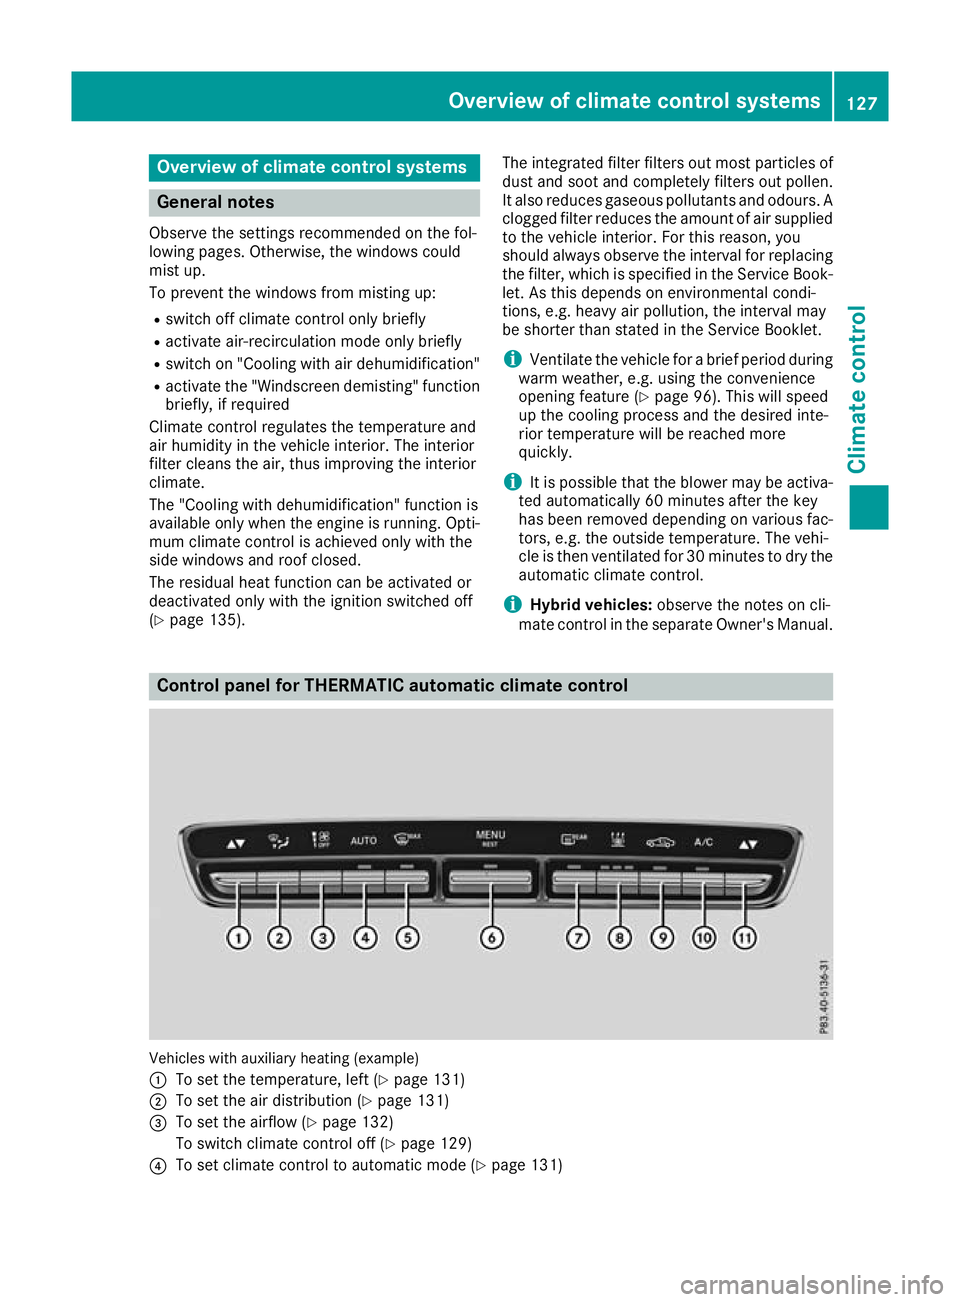
mate control in the separate Owner's Manual. Control panel for THERMATIC automatic climate control
Vehicles with auxiliary heating (example)
:
To set the temperature, left (Y page 131)
; To set the air distribution (Y page 131)
= To set the airflow (Y page 132)
To switch climate control off (Y page 129)
? To set climate control to automatic mode (Y page 131) Overview of climate control systems
127Climate control
Page 165 of 389
If you or others come into contact with fuel,
observe the following:
R Wash the fuel off any affected areas of skin
with water and soap immediately.
R If you get fuel in your eyes, rinse them thor-
oughly with clean water immediately. Seek
immediate medical attention.
R If fuel is swallowed, seek immediate medi-
cal attention. Do not induce vomiting.
R Change any clothing that has come into
contact with fuel immediately. G
WARNING
Electrostatic charge can cause sparks and
thereby ignite fuel vapours. There is a risk of
fire and explosion.
Always touch the vehicle body before opening the fuel filler flap or touching the fuel pump
nozzle. This discharges any electrostatic
charge that may have built up.
Do not get back into the vehicle during the refu-
elling process, otherwise electrostatic charge
could build up again. G
WARNING
Vehicles with a diesel engine:
If you mix diesel fuel with petrol, the flash
point of this fuel mixture is lower than that of pure diesel fuel. When the engine is running,
components in the exhaust system may over-
heat unnoticed. There is a risk of fire.
Never refuel with petrol. Never add petrol to
diesel fuel.
! Do not use diesel to refuel vehicles with a
petrol engine. Do not switch on the ignition if you accidentally refuel with the wrong fuel.
Otherwise, the fuel will enter the fuel system.
Even small amounts of the wrong fuel can
result in damage to the fuel system and the
engine. Notify a qualified specialist workshop
and have the fuel tank and fuel lines drained
completely.
! Do not use petrol to refuel vehicles with a
diesel engine. Do not switch on the ignition if you accidentally refuel with the wrong fuel.
Otherwise, fuel can enter the fuel system. Even small amounts of the wrong fuel could
result in damage to the fuel system and the
engine. The repair costs are high. Notify a
qualified specialist workshop and have the
fuel tank and fuel lines drained completely.
! Overfilling the fuel tank could damage the
fuel system.
! Take care not to spill any fuel on painted
surfaces. You could otherwise damage the
paintwork.
! Use a filter when adding fuel from a fuel can.
The fuel lines and/or the fuel injection system could otherwise be blocked by particles fromthe fuel can.
If you overfill the fuel tank, some fuel may spray
out when you remove the fuel pump nozzle.
Further information on fuel and fuel quality
(Y page 373). Refuelling
General information Pay attention to the important safety notes
(Y
page 161).
If you unlock/lock the vehicle from the outside, the fuel filler flap also unlocks/locks.
The position of the 8fuel filler cap is dis-
played on the instrument cluster. The arrow next
to the filling pump indicates the side of the vehi-
cle.
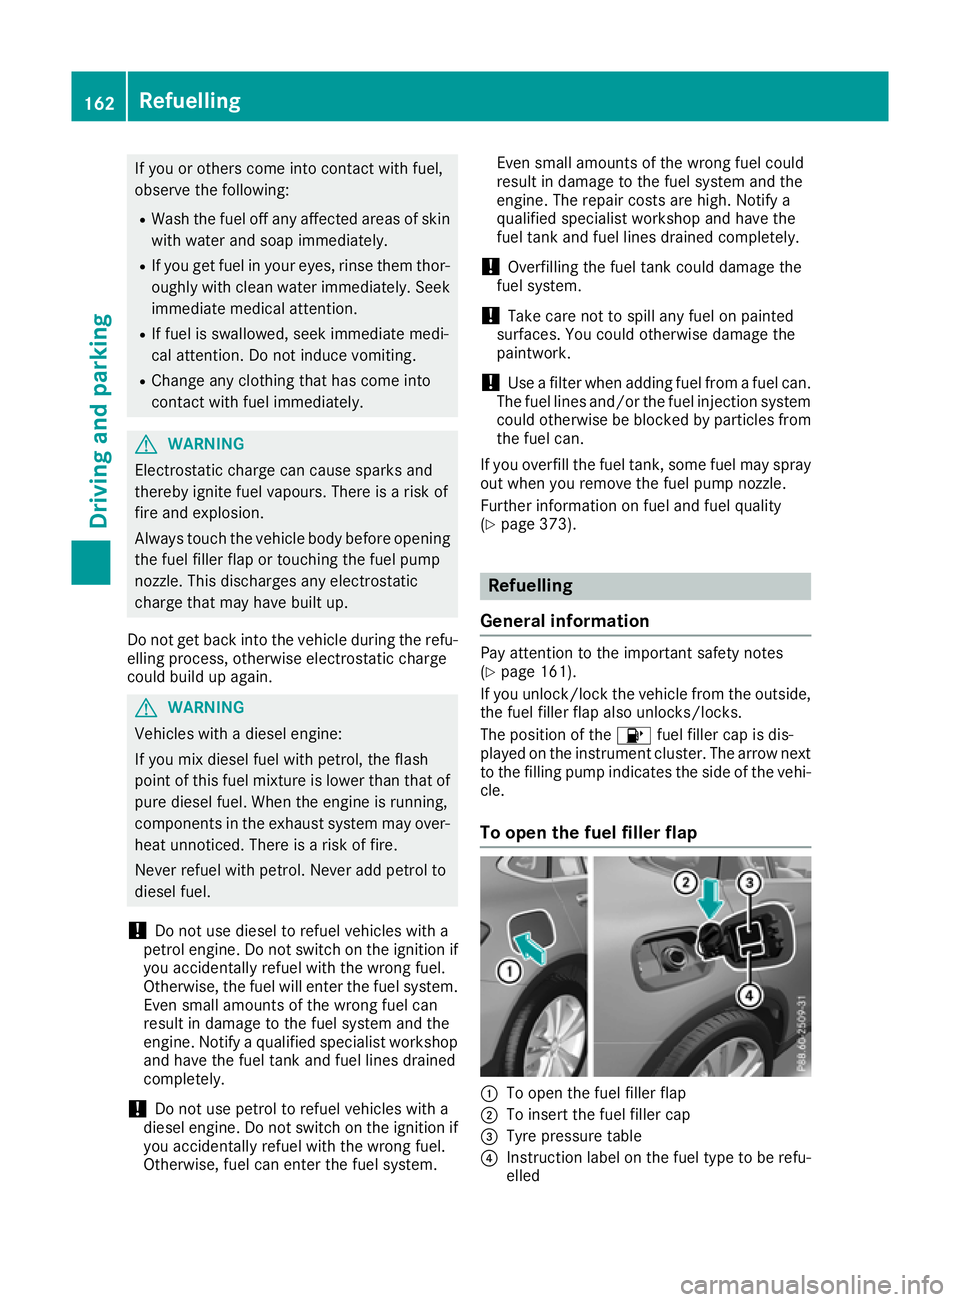
To open the fuel filler flap :
To open the fuel filler flap
; To insert the fuel filler cap
= Tyre pressure table
? Instruction label on the fuel type to be refu-
elled 162
RefuellingDriving and parking
Page 182 of 389
In particular, the detection of obstacles can be
impaired in the case of:
R dirt on the sensors or obscured sensors
R snow or heavy rain
R interference by other radar sources
R strong radar reflections, e.g. in multi-storey
car parks
If DISTRONIC PLUS no longer detects a vehicle
in front, it may unexpectedly accelerate to the
speed stored.
This speed can:
R be too high for a filter lane or a slip road
R be so high in the right lane that you pass vehi-
cles driving on the left (in countries where
they drive on the right)
R be so high in the left lane that you pass vehi-
cles driving on the right (in countries where
they drive on the left)
If there is a change of drivers, advise the new
driver of the speed stored.
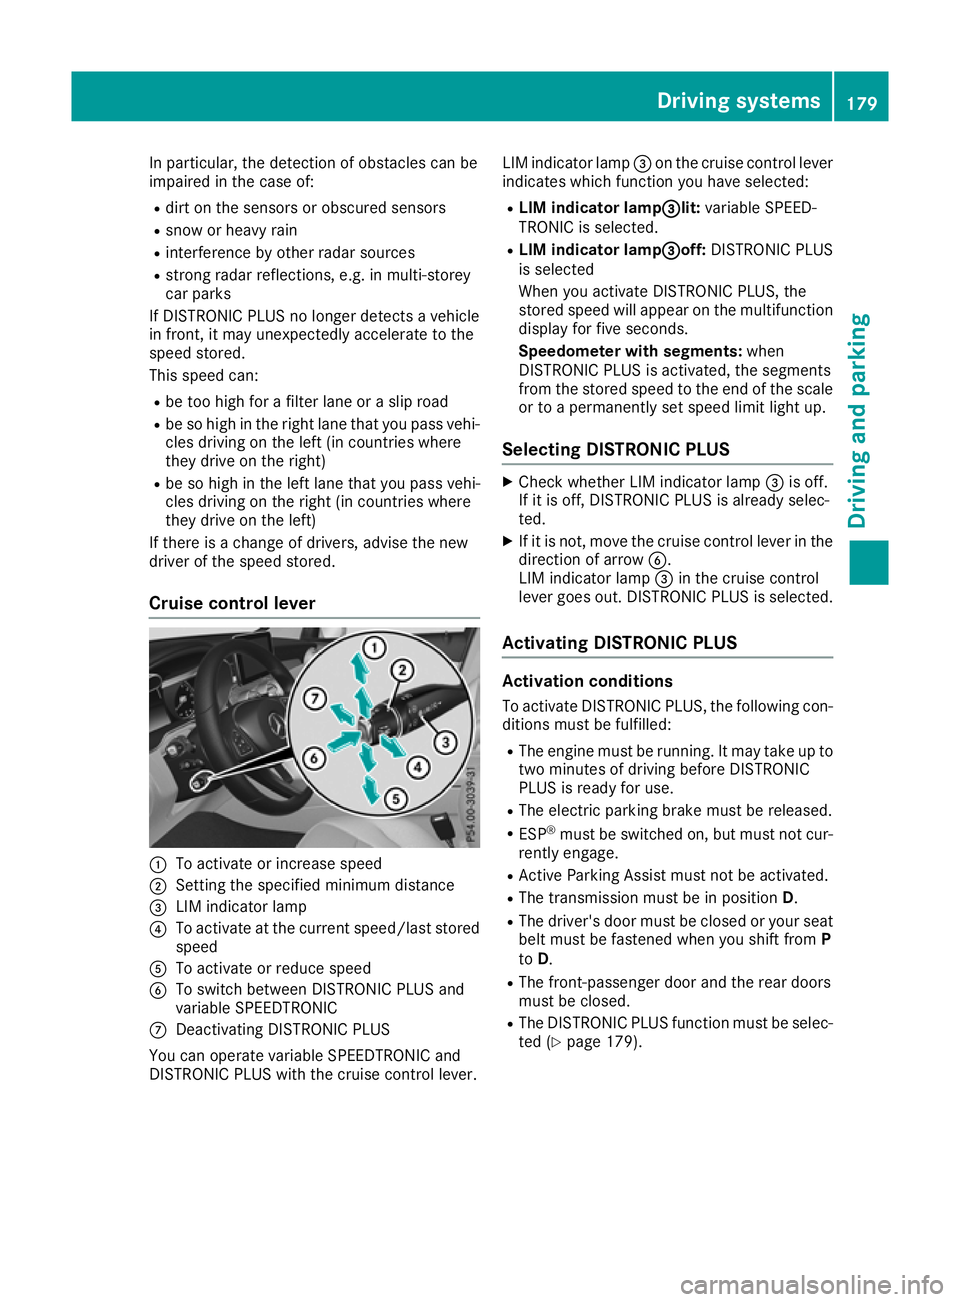
Cruise control lever :
To activate or increase speed
; Setting the specified minimum distance
= LIM indicator lamp
? To activate at the current speed/last stored
speed
A To activate or reduce speed
B To switch between DISTRONIC PLUS and
variable SPEEDTRONIC
C Deactivating DISTRONIC PLUS
You can operate variable SPEEDTRONIC and
DISTRONIC PLUS with the cruise control lever. LIM indicator lamp
=on the cruise control lever
indicates which function you have selected:
R LIM indicator lamp= =lit:variable SPEED-
TRONIC is selected.
R LIM indicator lamp = =off:DISTRONIC PLUS
is selected
When you activate DISTRONIC PLUS, the
stored speed will appear on the multifunction display for five seconds.
Speedometer with segments: when
DISTRONIC PLUS is activated, the segments
from the stored speed to the end of the scale or to a permanently set speed limit light up.
Selecting DISTRONIC PLUS X
Check whether LIM indicator lamp =is off.
If it is off, DISTRONIC PLUS is already selec-
ted.
X If it is not, move the cruise control lever in the
direction of arrow B.
LIM indicator lamp =in the cruise control
lever goes out. DISTRONIC PLUS is selected.
Activating DISTRONIC PLUS Activation conditions
To activate DISTRONIC PLUS, the following con-
ditions must be fulfilled:
R The engine must be running. It may take up to
two minutes of driving before DISTRONIC
PLUS is ready for use.
R The electric parking brake must be released.
R ESP ®
must be switched on, but must not cur-
rently engage.
R Active Parking Assist must not be activated.
R The transmission must be in position D.
R The driver's door must be closed or your seat
belt must be fastened when you shift from P
to D.
R The front-passenger door and the rear doors
must be closed.
R The DISTRONIC PLUS function must be selec-
ted (Y page 179). Driving systems
179Driving and parking Z
Page 234 of 389
R
È SPEEDTRONIC (Y page 176)
R ¯ Cruise control (Y page 174)
R a DISTRONIC PLUS Steering Assist and
Stop&Go Pilot (Y page 184)
R _ Adaptive Highbeam Assist
(Y page 119)
R _ Adaptive Highbeam Assist Plus
(Y page 119)
R è ECO start/stop function (Y page 148)
R ë HOLD function (Y page 186)
R ð Maximum permissible speed exceeded
(for certain countries only) Head-up display
General notes The Head-up Display projects information from
the navigation system and the driver assistance
systems above the dashboard into the driver's
field of vision. This way, the Head-up Display
enables drivers to see information without hav-
ing to take their eyes off the road.
A requirement for the display of the content is
that the following functions are available in the
vehicle and are switched on:
R Cruise control
R SPEEDTRONIC
R DISTRONIC PLUS
R Traffic Sign Assist
R Navigation
Important safety notes The head-up display is only an aid and is not a
substitute for attentive driving.
Speed limits and overtaking restrictions are not
always correctly displayed. Traffic signs always
have priority over the Traffic Sign Assist display.
The visibility of the head-up display is influenced by the following conditions:
R the driver's seat position
R the positioning of the display image
R the general light conditions
R sunglasses with polarisation filters
R wet road surfaces
R blocking of sunlight by objects on the display
cover In the event of extreme sunlight, sections of the
display may fade. This can be reversed by
switching the head-up display off and on again.
i Vehicles with the head-up display are equip-
ped with a special windscreen. Should repairs
be necessary, have the windscreen replaced
at a qualified specialist workshop.
Displays and operation Switching the head-up display on/off
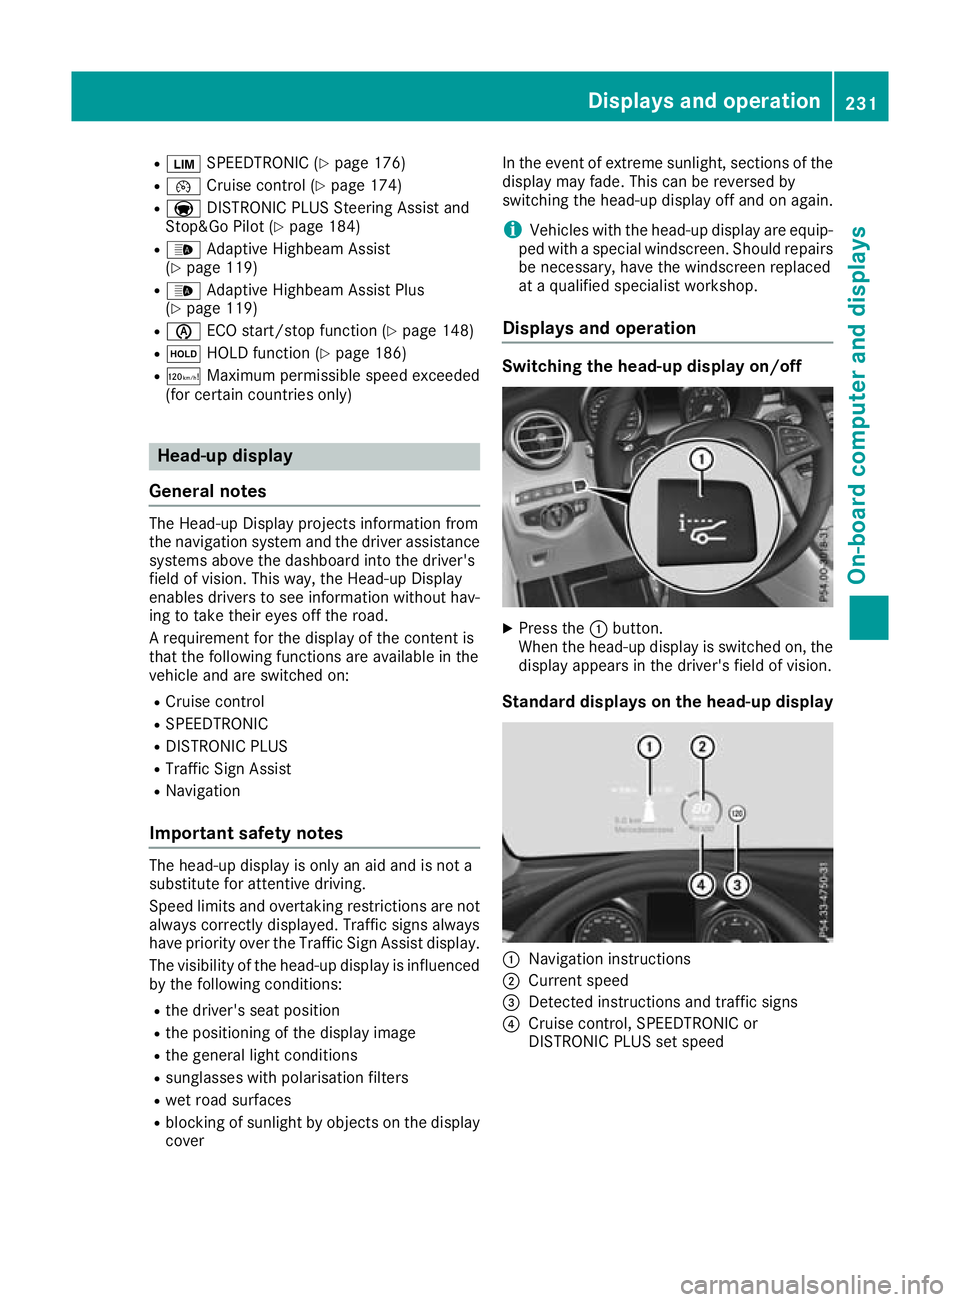
X
Press the :button.
When the head-up display is switched on, the display appears in the driver's field of vision.
Standard displays on the head-up display :
Navigation instructions
; Current speed
= Detected instructions and traffic signs
? Cruise control, SPEEDTRONIC or
DISTRONIC PLUS set speed Displays and operation
231On-board computer and displays Z
Page 268 of 389
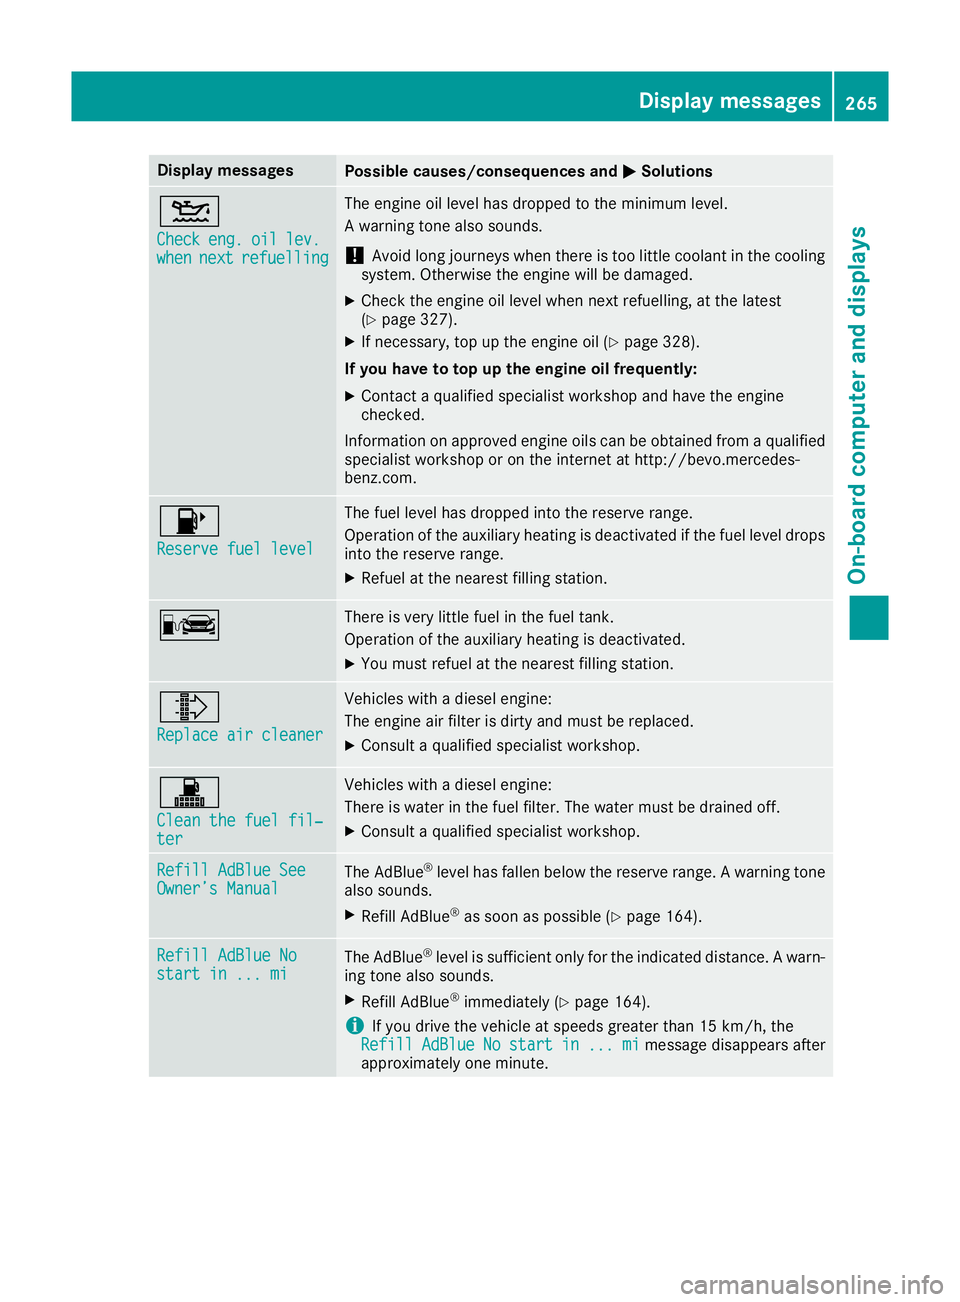
Display messages
Possible causes/consequences and
M
MSolutions 4
Check Check
eng.
eng.oil
oillev.
lev.
when
when next
nextrefuelling
refuelling The engine oil level has dropped to the minimum level.
A warning tone also sounds.
! Avoid long journeys when there is too little coolant in the cooling
system. Otherwise the engine will be damaged.
X Check the engine oil level when next refuelling, at the latest
(Y page 327).
X If necessary, top up the engine oil (Y page 328).
If you have to top up the engine oil frequently:
X Contact a qualified specialist workshop and have the engine
checked.
Information on approved engine oils can be obtained from a qualified specialist workshop or on the internet at http://bevo.mercedes-
benz.com. 8
Reserve fuel level Reserve fuel level The fuel level has dropped into the reserve range.
Operation of the auxiliary heating is deactivated if the fuel level drops
into the reserve range.
X Refuel at the nearest filling station. C There is very little fuel in the fuel tank.
Operation of the auxiliary heating is deactivated.
X You must refuel at the nearest filling station. ¸
Replace air cleaner Replace air cleaner Vehicles with a diesel engine:
The engine air filter is dirty and must be replaced.
X Consult a qualified specialist workshop. !
Clean the fuel fil‐ Clean the fuel fil‐
ter ter Vehicles with a diesel engine:
There is water in the fuel filter. The water must be drained off.
X Consult a qualified specialist workshop. Refill AdBlue See Refill AdBlue See
Owner’s Manual Owner’s Manual
The AdBlue
®
level has fallen below the reserve range. A warning tone
also sounds.
X Refill AdBlue ®
as soon as possible (Y page 164).Refill AdBlue No Refill AdBlue No
start in ... mi start in ... mi
The AdBlue
®
level is sufficient only for the indicated distance. A warn-
ing tone also sounds.
X Refill AdBlue ®
immediately (Y page 164).
i If you drive the vehicle at speeds greater than 15 km/h, the
Refill
Refill AdBlue
AdBlueNo
Nostart
start in
in...
... mi
mimessage disappears after
approximately one minute. Display
messages
265On-board computer and displays Z
Page 331 of 389
X
Slowly slide oil dipstick :into the guide tube
to the stop and take it out again after approx- imately three seconds.
If the level is between MIN mark =and MAX
mark ;, the oil level is correct.
X If the oil level has dropped to MIN mark =or
below, top up with 1.0 lof engine oil.
Topping up engine oil H
Environmental note
When topping up the oil, take care not to spill any. If oil enters the soil or waterways, it is
harmful to the environment.
! Use only engine oils and oil filters that are
approved for vehicles with a service system. A list of the engine oils and oil filters that have
been tested and approved in accordance with
Mercedes-Benz Specifications for Service
Products is available at any Mercedes-Benz
Service Centre.
The following cause engine failure or damage
to the exhaust system:
R Use of engine oils and oil filters that have
not been expressly approved for the service system
R Replacement of engine oil and oil filter after
the replacement interval specified by the
service system has expired
R Use of engine oil additives
! Do not add too much oil. Topping up with too
much engine oil can result in damage to the
engine or to the catalytic converter. Have
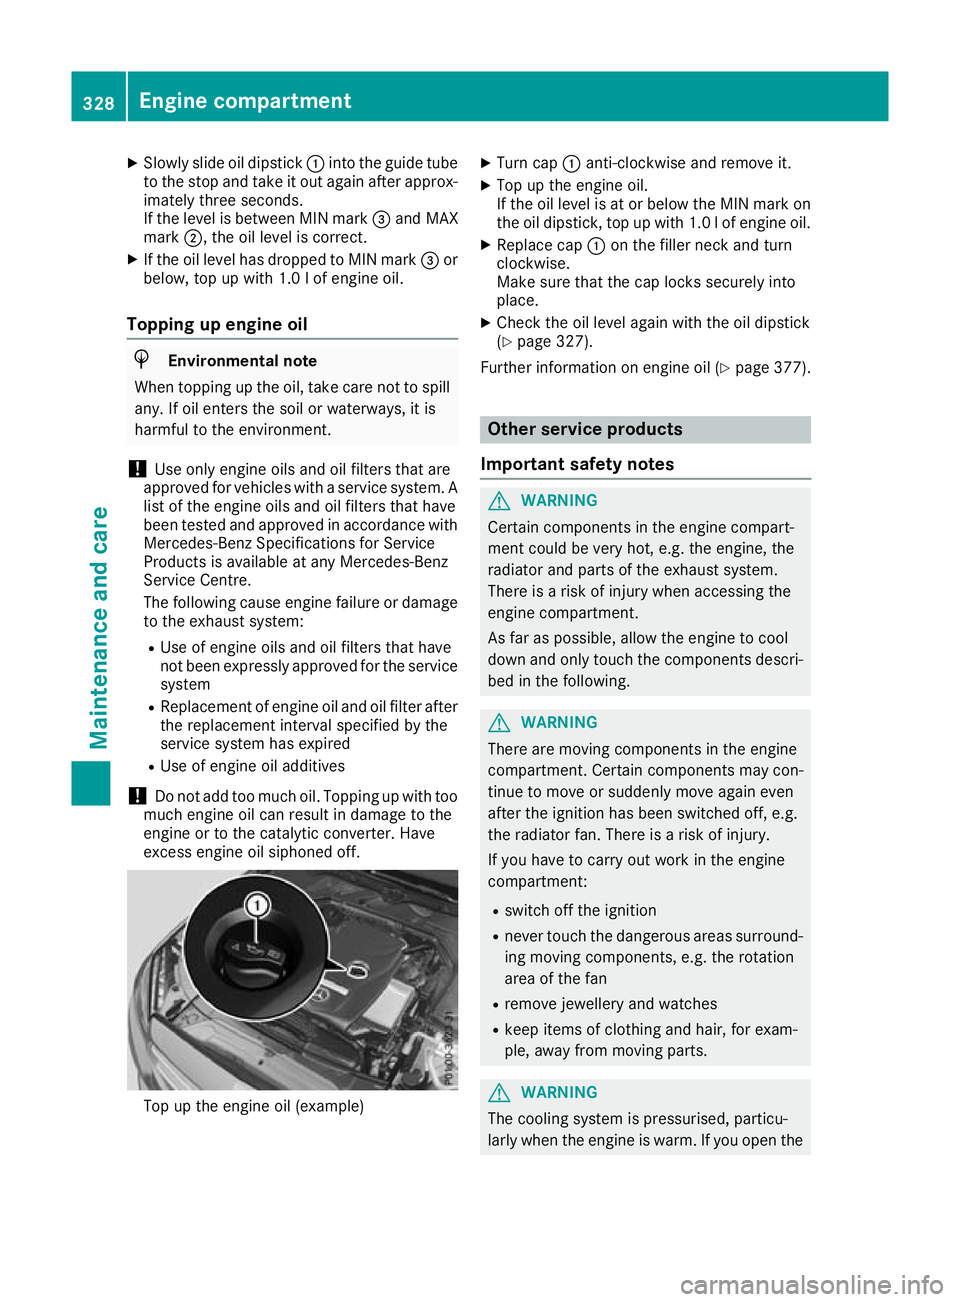
excess engine oil siphoned off. Top up the engine oil (example) X
Turn cap :anti-clockwise and remove it.
X Top up the engine oil.
If the oil level is at or below the MIN mark on
the oil dipstick, top up with 1.0 l of engine oil.
X Replace cap :on the filler neck and turn
clockwise.
Make sure that the cap locks securely into
place.
X Check the oil level again with the oil dipstick
(Y page 327).
Further information on engine oil (Y page 377). Other service products
Important safety notes G
WARNING
Certain components in the engine compart-
ment could be very hot, e.g. the engine, the
radiator and parts of the exhaust system.
There is a risk of injury when accessing the
engine compartment.
As far as possible, allow the engine to cool
down and only touch the components descri- bed in the following. G
WARNING
There are moving components in the engine
compartment. Certain components may con-
tinue to move or suddenly move again even
after the ignition has been switched off, e.g.
the radiator fan. There is a risk of injury.
If you have to carry out work in the engine
compartment:
R switch off the ignition
R never touch the dangerous areas surround-
ing moving components, e.g. the rotation
area of the fan
R remove jewellery and watches
R keep items of clothing and hair, for exam-
ple, away from moving parts. G
WARNING
The cooling system is pressurised, particu-
larly when the engine is warm. If you open the 328
Engine compartmentMaintenance and care