2016 MERCEDES-BENZ GLC COUPE key battery
[x] Cancel search: key batteryPage 9 of 389
Gliding mod
e................................. 157
Kickdown ....................................... 157
Manual shifting .............................. 158
Oil temperature (on-board com-
puter, Mercedes-AMG vehicles) ..... 245
Overview ........................................ 153
Problem (fault) ............................... 161
Pulling away ................................... 146
Starting the engine ........................ 146
Steering wheel gearshift paddle s... 158
Trailer towing ................................. 157
Transmission position display
(DIRECT SELECT lever) ................... 155
Transmission positions .................. 156
Automatic transmission emer-
gency running mode ......................... 161
Auxiliary heating/ventilation
Display message ............................ 278
Important safety notes .................. 137
Problem (display message) ............ 141
Remote control .............................. 139
Setting the departure time ............. 140
Switching on/off (on the centre
console) ......................................... 138
Axle load, permissible (trailer tow-
ing) ...................................................... 381 B
Back button ....................................... 293
Bag hook ............................................ 311
Ball coupling
Swinging out .................................. 220
BAS (Brake Assist System) ................. 69
BAS PLUS with Cross-Traffic Assist (Brake Assist PLUS with Cross-
Traffic Assist)
Function/note s................................ 69
Important safety notes .................... 69
Battery (key)
Checking .......................................... 85
Important safety notes .................... 85
Replacing ......................................... 85
Battery (vehicle)
Charging ........................................ 347
Display message ............................ 264
Important safety notes .................. 345
Jump starting ................................. 348 Belt tensioner
Activation ......................................... 53
Blind Spot Assist
Activating/deactivating (on-
board computer) ............................ 241
Display message ............................ 268
Notes/function .............................. 210
see Active Blind Spot Assist
BlueTEC
see AdBlue ®
Bluetooth ®
Connecting a different mobile
phone ............................................ 300
Searching for a mobile phone ........ 299
See also Digital Owner's Manua l... 292
Telephony ...................................... 299
Bonnet
Active bonnet (pedestrian protec-tion) ............................................... 325
Closing ........................................... 326
Display message ............................ 277
Important safety notes .................. 325
Opening ......................................... 326
Boot load (maximum) ........................ 379
Brake
EBD .................................................. 77
Brake Assist
see BAS (Brake Assist System)
Brake fluid
Display message ............................ 254
Notes ............................................. 377
Brake force distribution
see EBD (electronic brake force
distribution)
Brake lamps
Adaptive ........................................... 73
Brakes
ABS .................................................. 68
Adaptive Brake Assist ...................... 72
BAS .................................................. 69
BAS PLUS with Cross-Traffic
Assist ............................................... 69
Brake fluid (notes) ......................... 377
Display message ............................ 250
Driving tips .................................... 171
Hill start assist ............................... 147
HOLD function ............................... 186 6
Index
Page 17 of 389

Reading lamp ................................
.121
Interior motion sensor
Deactivating ..................................... 81
Function .......................................... .81
iPod ®
See also Digital Owner's Manual .. .292
ISOFIX child seat securing system .... 58J
Jack Declaration of conformity ................ 28
Storage location ............................ 340
Using ............................................. 366
Jump starting (engine) ......................348 K
Key Changing the battery ....................... 85
Checking the battery ....................... 85
Convenience closing feature ............ 97
Convenience opening feature .......... 96
Display message ............................ 279
Door central locking/unlocking ....... 83
Emergency key element ................... 84
Important safety notes .................... 82
KEYLESS-GO start function .............. 84
Loss ................................................. 86
Modifying the programming ............. 84
Overview .......................................... 82
Positions (ignition lock) ................. 144
Problem (malfunction) ..................... 86
Starting the engine ........................ 146
Key positions
Key ................................................ 144
Start/Stop button .......................... 144
KEYLESS-GO
Activating ......................................... 83
Convenience closing ........................ 97
Deactivation ..................................... 83
Locking ............................................ 83
Removing the Start/Stop button ... 145
Start function ................................... 84
Unlocking ......................................... 83
Kickdown
Driving tips ................................... .157
Manual gearshifting ....................... 160 Kneebag
............................................... 48 L
Lamps see Warning and indicator lamps
Lane Keeping Assist
Activating/deactivating ................. 212
Activating/deactivating (on-
board computer) ............................ 242
Display message ............................ 268
Function/informatio n.................... 211
see Active Lane Keeping Assist
Lane package ..................................... 210
Lap time (RACETIMER) ...................... 247
Lashing eyelets ................................. 310
Level control (display message) ...... 267
Licence plate lamp (display mes-
sage) ................................................... 261
Light sensor (display message) ....... 261
Light switch
operation ....................................... 115
Lighting
see Lights
Lights
Activating/deactivating the Intel-
ligent Light System ........................ 243
Active light function ....................... 118
Adaptive Highbeam Assist ............. 119
Adaptive Highbeam Assist PLUS .... 119
Automatic headlamp mod e............ 115
Cornering light function ................. 118
Dipped-beam headlamp s............... 116
Driving abroad ............................... 115
Foglamps (extended range) ........... 118
General notes ................................ 115
Hazard warning lamps ................... 117
Headlamp flashe r........................... 117
Headlamp rang e............................ 117
Intelligent Light System (func-
tion) ............................................... 118
Light switch ................................... 115
Main-beam headlamp s................... 117
Misted up headlamp s.................... 120
Motorway mod e............................. 118
Parking lamps ................................ 116
Rear foglamp ................................. 116
Setting exterior lighting ................. 115 14
Index
Page 87 of 389
X
To unlock the vehicle: touch the inner sur-
face of the door handle.
X To lock the vehicle: touch sensor surface :
or ;.
Make sure that you do not touch the inner
surface of the door handle.
X Convenience closing feature: touch
recessed sensor surface ;for an extended
period.
Further information on the convenience clos-
ing feature (Y page 97).
X To unlock the tailgate: push the top of the
star on the tailgate inwards.
Deactivating and activating If you do not intend to use a key for an extended
period of time, you can deactivate the KEYLESS-
GO function of the key. The key will then use very
little power, thereby conserving battery power.
For the purposes of activation or deactivation,
the vehicle does not have to be nearby.
X To deactivate: press the&button on the
key twice in rapid succession.
The battery indicator lamp (Y page 85) of
the key flashes twice briefly and lights up
once, then KEYLESS-GO is deactivated.
X To activate: press any button on the key.
or X Insert the key into the ignition lock.
KEYLESS-GO and all its associated features
are available again. KEYLESS-GO start function
General notes Bear in mind that the engine can be started by
any of the vehicle occupants if there is a key in
the vehicle (Y page 146). Changing the settings of the locking
system
You can change the settings of the locking sys-
tem. This means that only the driver's door and
the fuel filler flap are unlocked when the vehicle is unlocked. This is useful if you frequently travel
alone. X
To change the setting: simultaneously press
the % and& buttons for approximately
six seconds until the battery check lamp
(Y page 85) flashes twice.
If the setting of the locking system is changed
within the signal range of the vehicle, pressing
the & or% button:
R locks or
R unlocks the vehicle
The key now functions as follows:
X To unlock: press the%button once.
X To unlock centrally: press the%button
twice.
X To lock: press the &button.
The KEYLESS-GO functions can be changed as
follows: X To unlock the driver's door: touch the inner
surface of the door handle on the driver's
door.
X To unlock centrally: touch the inner surface
of the door handle on the front-passenger
door or the rear door.
X To lock centrally: touch the outer sensor
surface on one of the door handles.
X To restore the factory settings: press and
hold the %and& buttons simultane-
ously for approximately six seconds until the
battery check lamp (Y page 85) flashes
twice. Emergency key element
General notes If the vehicle can no longer be unlocked with the
key or KEYLESS-GO, use the emergency key ele-
ment.
If you use the emergency key element to unlock
and open the driver's door, the anti-theft alarm
system will be triggered. Switch off the alarm
(Y page 79).
If you unlock the vehicle using the emergency
key element, the fuel filler flap will not be
unlocked automatically.
X To unlock the fuel filler flap: insert the key
into the ignition lock. 84
KeyOpening and closing
Page 88 of 389
Removing the emergency key element
X
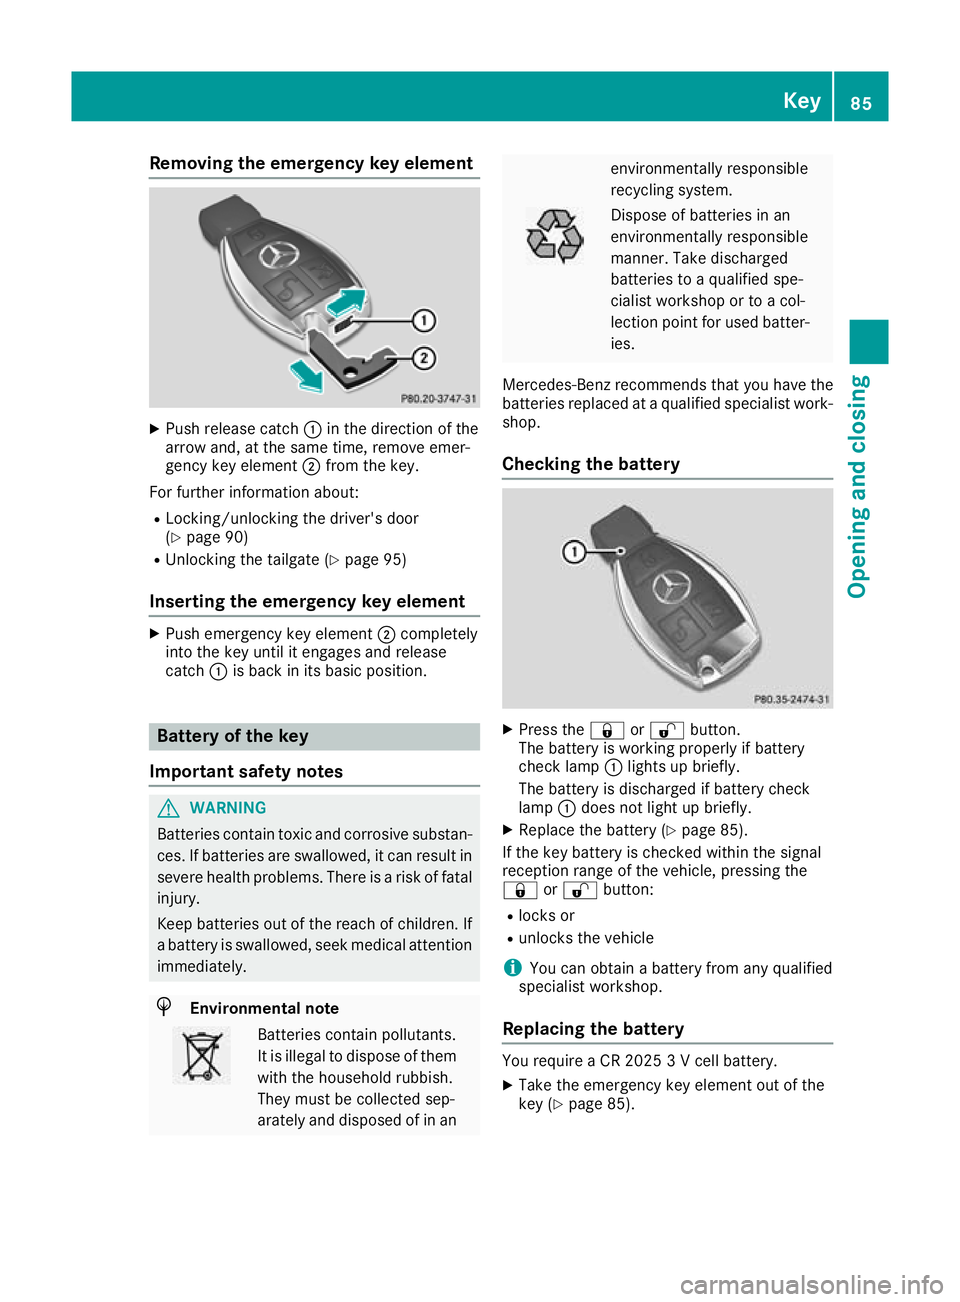
Push release catch :in the direction of the
arrow and, at the same time, remove emer-
gency key element ;from the key.
For further information about:
R Locking/unlocking the driver's door
(Y page 90)
R Unlocking the tailgate (Y page 95)
Inserting the emergency key element X
Push emergency key element ;completely
into the key until it engages and release
catch :is back in its basic position. Battery of the key
Important safety notes G
WARNING
Batteries contain toxic and corrosive substan- ces. If batteries are swallowed, it can result in
severe health problems. There is a risk of fatal injury.
Keep batteries out of the reach of children. If
a battery is swallowed, seek medical attention immediately. H
Environmental note Batteries contain pollutants.
It is illegal to dispose of them with the household rubbish.
They must be collected sep-
arately and disposed of in an environmentally responsible
recycling system.
Dispose of batteries in an
environmentally responsible
manner. Take discharged
batteries to a qualified spe-
cialist workshop or to a col-
lection point for used batter-
ies.
Mercedes-Benz recommends that you have the
batteries replaced at a qualified specialist work- shop.
Checking the battery X
Press the &or% button.
The battery is working properly if battery
check lamp :lights up briefly.
The battery is discharged if battery check
lamp :does not light up briefly.
X Replace the battery (Y page 85).
If the key battery is checked within the signal
reception range of the vehicle, pressing the
& or% button:
R locks or
R unlocks the vehicle
i You can obtain a battery from any qualified
specialist workshop.
Replacing the battery You require a CR 2025 3 V cell battery.
X Take the emergency key element out of the
key (Y page 85). Key
85Opening and closing Z
Page 89 of 389
X
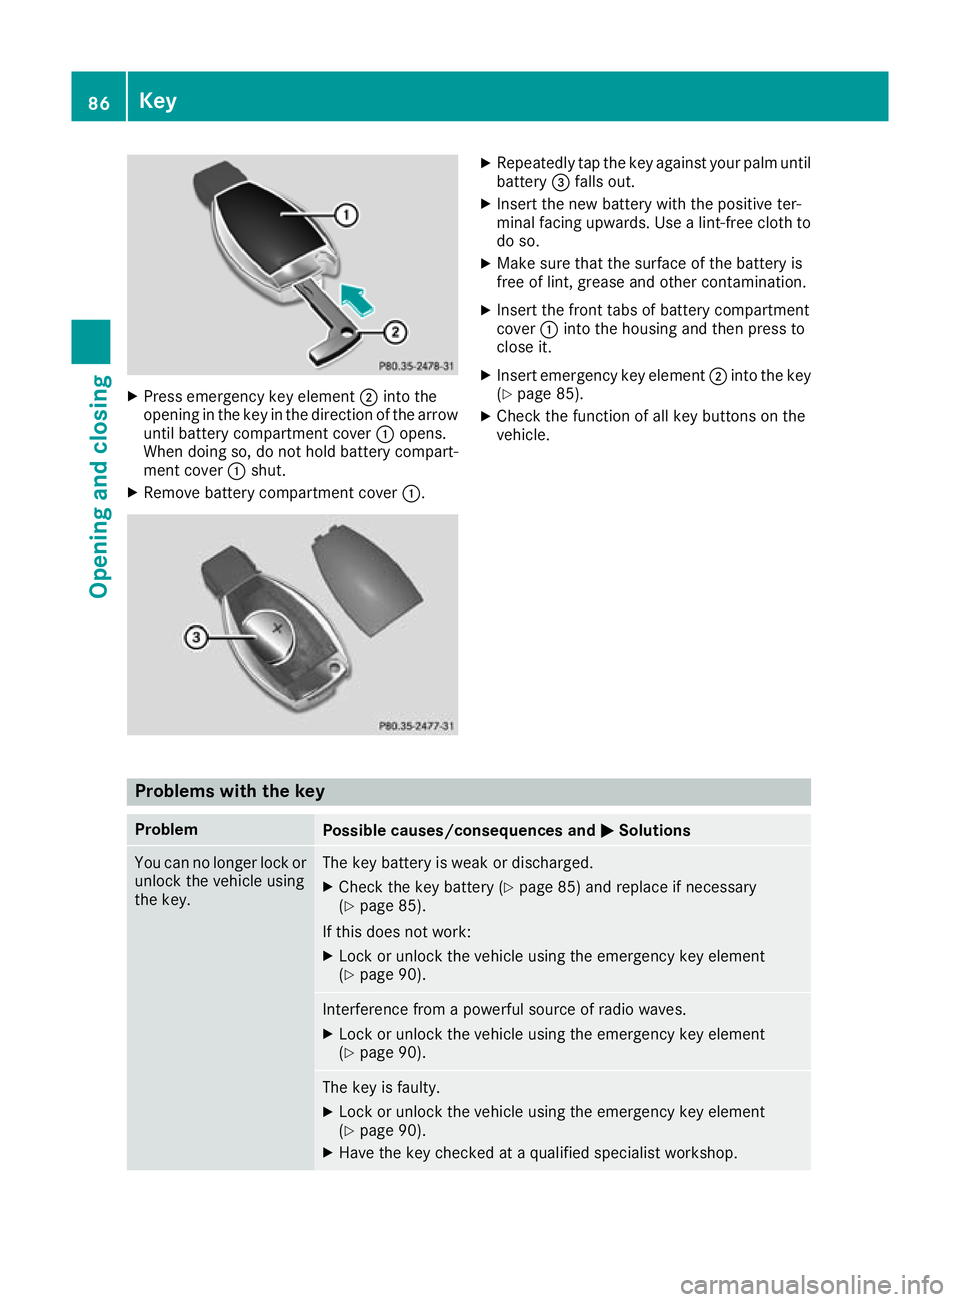
Press emergency key element ;into the
opening in the key in the direction of the arrow
until battery compartment cover :opens.
When doing so, do not hold battery compart-
ment cover :shut.
X Remove battery compartment cover :. X
Repeatedly tap the key against your palm until
battery =falls out.
X Insert the new battery with the positive ter-
minal facing upwards. Use a lint-free cloth to
do so.
X Make sure that the surface of the battery is
free of lint, grease and other contamination.
X Insert the front tabs of battery compartment
cover :into the housing and then press to
close it.
X Insert emergency key element ;into the key
(Y page 85).
X Check the function of all key buttons on the
vehicle. Problems with the key
Problem
Possible causes/consequences and
M MSolutions You can no longer lock or
unlock the vehicle using
the key. The key battery is weak or discharged.
X Check the key battery (Y page 85) and replace if necessary
(Y page 85).
If this does not work: X Lock or unlock the vehicle using the emergency key element
(Y page 90). Interference from a powerful source of radio waves.
X Lock or unlock the vehicle using the emergency key element
(Y page 90). The key is faulty.
X Lock or unlock the vehicle using the emergency key element
(Y page 90).
X Have the key checked at a qualified specialist workshop. 86
KeyOpening and closing
Page 90 of 389
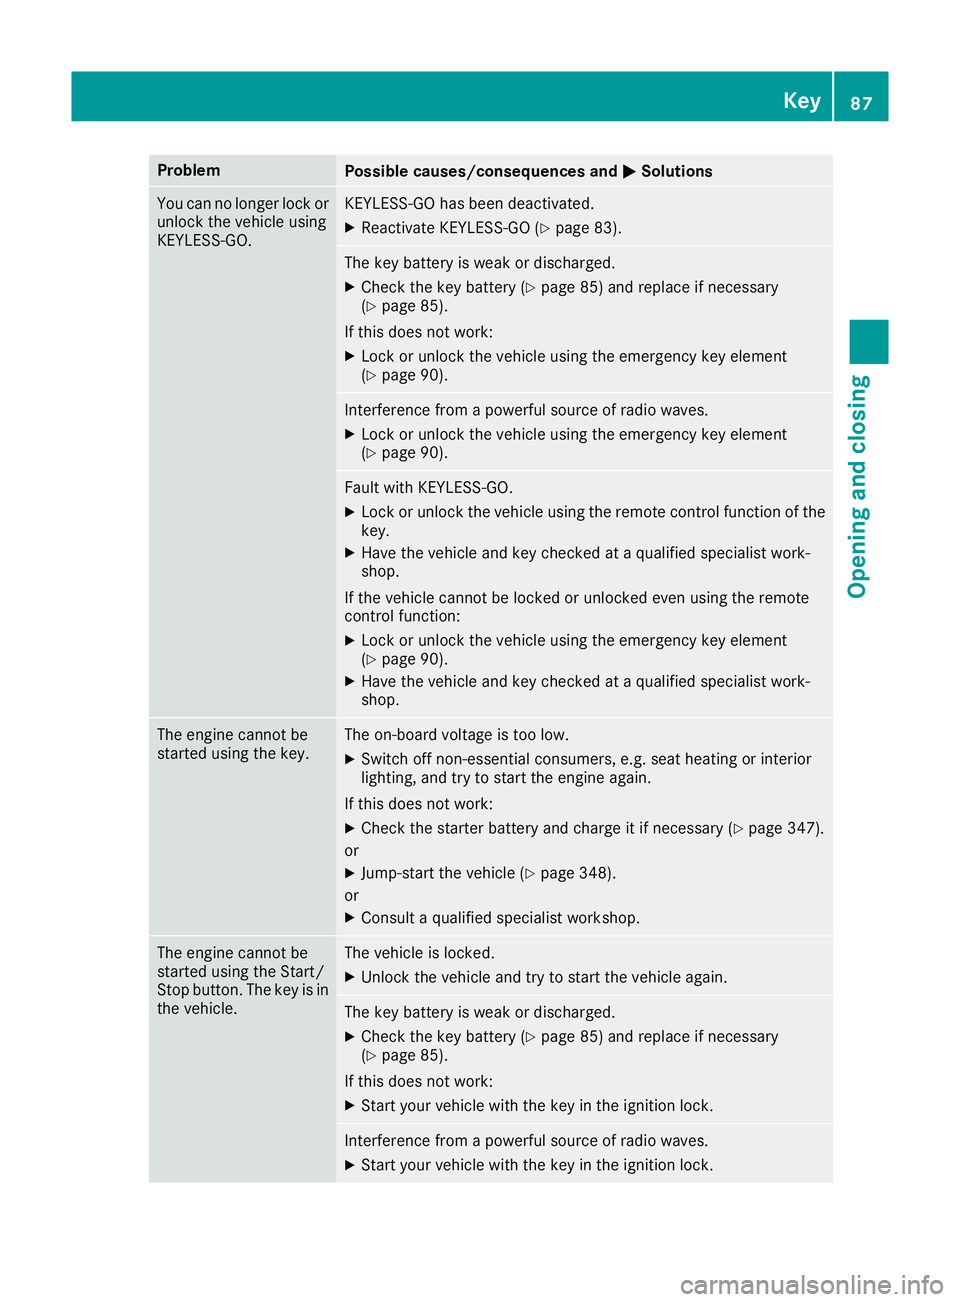
Problem
Possible causes/consequences and
M
MSolutions You can no longer lock or
unlock the vehicle using
KEYLESS-GO. KEYLESS-GO has been deactivated.
X Reactivate KEYLESS-GO (Y page 83). The key battery is weak or discharged.
X Check the key battery (Y page 85) and replace if necessary
(Y page 85).
If this does not work: X Lock or unlock the vehicle using the emergency key element
(Y page 90). Interference from a powerful source of radio waves.
X Lock or unlock the vehicle using the emergency key element
(Y page 90). Fault with KEYLESS-GO.
X Lock or unlock the vehicle using the remote control function of the
key.
X Have the vehicle and key checked at a qualified specialist work-
shop.
If the vehicle cannot be locked or unlocked even using the remote
control function:
X Lock or unlock the vehicle using the emergency key element
(Y page 90).
X Have the vehicle and key checked at a qualified specialist work-
shop. The engine cannot be
started using the key. The on-board voltage is too low.
X Switch off non-essential consumers, e.g. seat heating or interior
lighting, and try to start the engine again.
If this does not work:
X Check the starter battery and charge it if necessary (Y page 347).
or X Jump-start the vehicle (Y page 348).
or X Consult a qualified specialist workshop. The engine cannot be
started using the Start/
Stop button. The key is in
the vehicle. The vehicle is locked.
X Unlock the vehicle and try to start the vehicle again. The key battery is weak or discharged.
X Check the key battery (Y page 85) and replace if necessary
(Y page 85).
If this does not work: X Start your vehicle with the key in the ignition lock. Interference from a powerful source of radio waves.
X Start your vehicle with the key in the ignition lock. Key
87Opening and closing Z
Page 110 of 389
The three red indicator lamps in the button indi-
cate the heating level you have selected.
The system automatically switches down from
level 3to level 2after approximately eight
minutes.
The system automatically switches down from
level 2to level 1after approximately ten
minutes.
The system automatically switches off approx-
imately 20 minutes after it is set to level 1.
X Turn the key to position 1or 2in the ignition
lock (Y page 144).
X To switch on: press button:repeatedly
until the desired heating level is set.
X To switch off: press button:repeatedly
until all the indicator lamps go out.
i If the vehicle battery voltage is too low, the
seat heating may switch off.
i If drive program
E(Y page 157) is selected,
the power of the seat heating is reduced. Switching the seat ventilation on/off
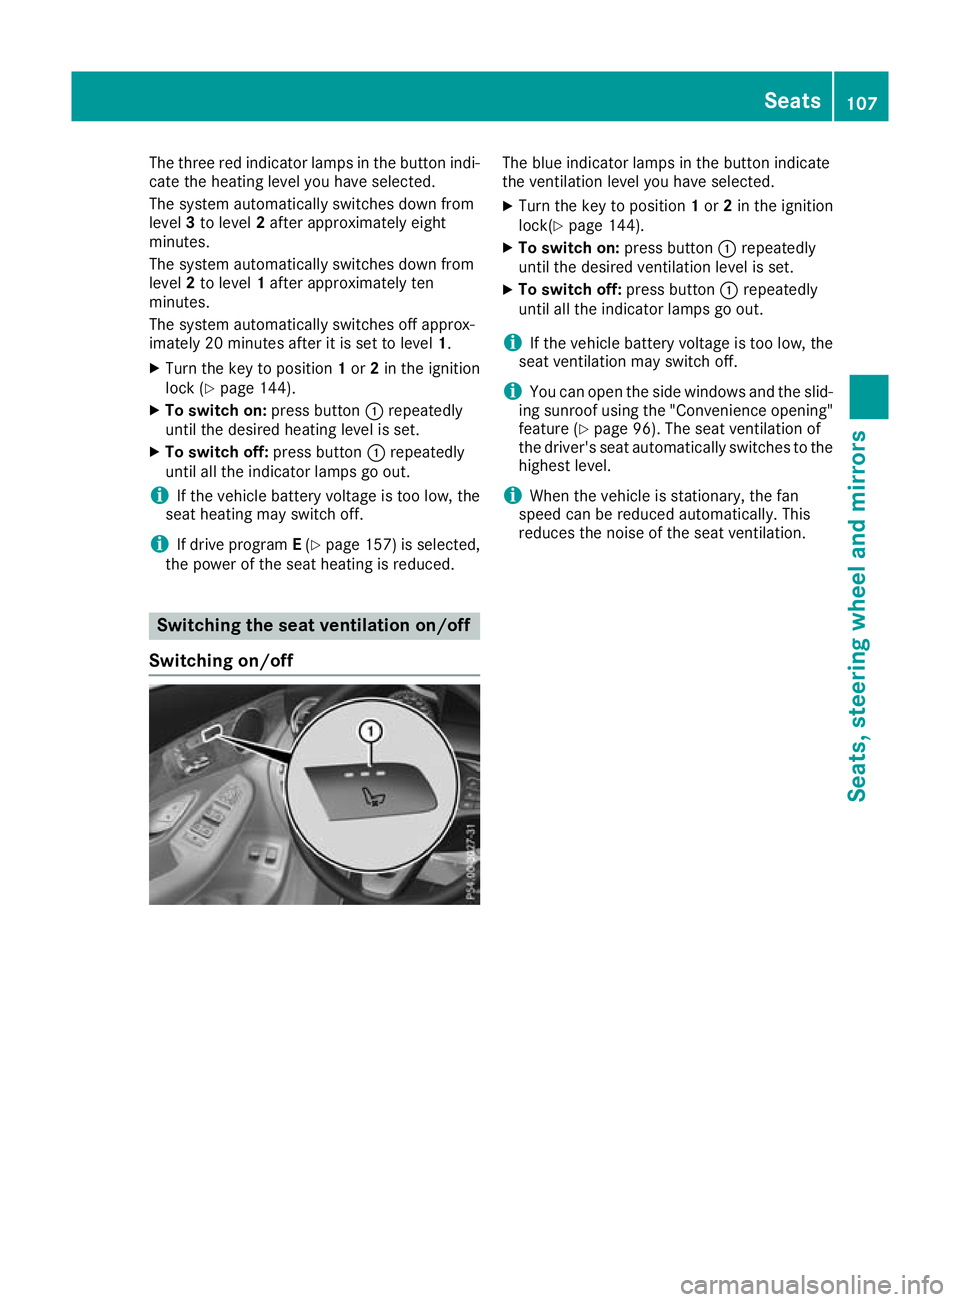
Switching on/off The blue indicator lamps in the button indicate
the ventilation level you have selected.
X Turn the key to position 1or 2in the ignition
lock(Y page 144).
X To switch on: press button:repeatedly
until the desired ventilation level is set.
X To switch off: press button:repeatedly
until all the indicator lamps go out.
i If the vehicle battery voltage is too low, the
seat ventilation may switch off.
i You can open the side windows and the slid-
ing sunroof using the "Convenience opening" feature (Y page 96). The seat ventilation of
the driver's seat automatically switches to the
highest level.
i When the vehicle is stationary, the fan
speed can be reduced automatically. This
reduces the noise of the seat ventilation. Seats
107Seats, steering wheel and mirrors Z
Page 111 of 389
Problems with the seat heating / seat ventilation
Problem
Possible causes/consequences and
M
MSolutions The seat heating or seat
ventilation has switched
off prematurely or can-
not be switched on. The on-board voltage is too low because too many electrical consum-
ers are switched on.
X Switch off electrical consumers that you do not need, such as the
rear window heating or interior lighting.
Once the battery is sufficiently charged, the seat heating or seat
ventilation can be switched back on manually. Steering wheel
Important safety notes
G
WARNING
You could lose control of the vehicle while
driving if you:
R adjust the driver's seat, steering wheel or
mirrors
R fasten the seat belt
There is a risk of an accident.
Adjust the driver's seat, head restraint, steer-
ing wheel and mirrors and fasten your seat
belt before starting the engine. G
WARNING
Children could become trapped by the steer-
ing wheel if they adjust it. There is a risk of
injury.
When leaving the vehicle, always take the key with you and lock the vehicle. Never leave
children unattended in the vehicle.
The electrically adjustable steering wheel can
still be adjusted when there is no key in the igni-
tion lock. Adjusting the steering wheel man-
ually
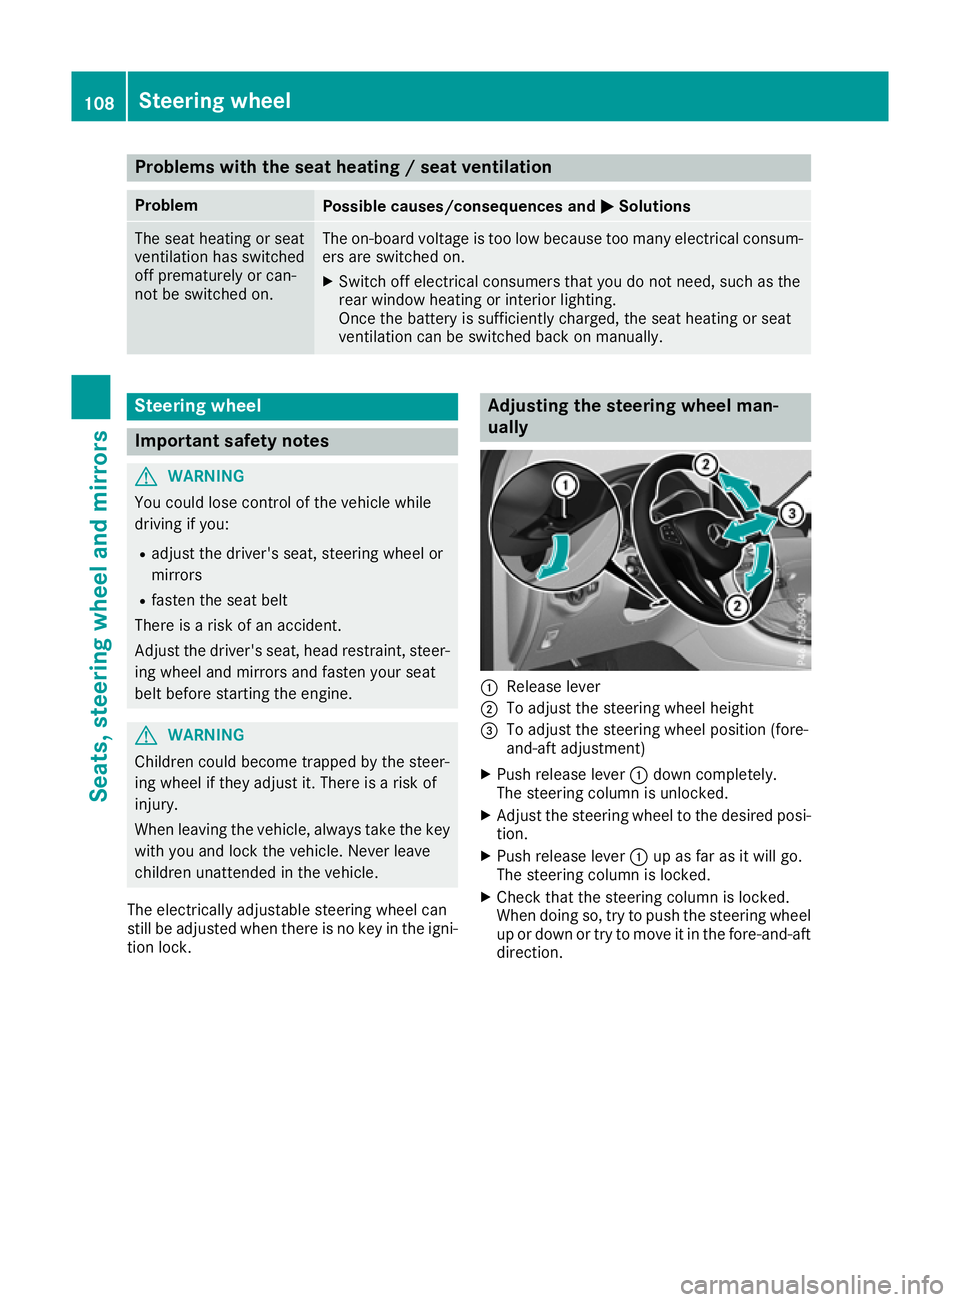
:
Release lever
; To adjust the steering wheel height
= To adjust the steering wheel position (fore-
and-aft adjustment)
X Push release lever :down completely.
The steering column is unlocked.
X Adjust the steering wheel to the desired posi-
tion.
X Push release lever :up as far as it will go.
The steering column is locked.
X Check that the steering column is locked.
When doing so, try to push the steering wheel
up or down or try to move it in the fore-and-aft
direction. 108
Steering wheelSeats, steering wheel and mirrors