2016 MERCEDES-BENZ GLC COUPE oil level
[x] Cancel search: oil levelPage 7 of 389

1, 2, 3 ...
4ETS (Electronic Traction System) see ETS/4ETS (Electronic Trac-
tion System)
4MATIC (permanent four-wheel
drive) .................................................. 190
4MATIC off-road system ...................190
12 V socket
see Socket (12 V)
230 V power socket .......................... 319
360° camera
Cleaning ......................................... 335
Display in the multimedia system .. 204
Function/notes ............................ .202 A
ABS (Anti-lock Braking System) Display message ............................ 250
Function/notes ................................ 68
Warning lamp ................................. 283
Accident
Automatic measures after an acci-
dent ................................................. 56
Activating media mode
General notes ................................ 303
Activating/deactivating air-recir-
culation mode ................................... .134
Activating/deactivating cooling
with air dehumidification ................. 130
Active Blind Spot Assist
Activating/deactivating (on-
board computer) ............................ 241
Display message ............................ 268
Function/notes ............................ .213
Active Lane Keeping Assist
Activating/deactivating (on-
board computer) ............................ 242
Display message ............................ 268
Function/notes ............................ .216
Active light function ......................... 118
Active Light System
Display message ............................ 261
Active Parking Assist
Cancelling ...................................... 197
Detecting parking spaces .............. 194
Display message ............................ 269 Exiting a parking space .................. 197
Function/notes ............................
.194
Important safety notes .................. 194
Parking .......................................... 196
Towing a trailer .............................. 194
ADAPTIVE BRAKE ................................. 77
Adaptive Brake Assist
Function/notes ................................ 72
Adaptive brake lights .......................... 73
Adaptive Damping System
Function/notes ............................ .190
Adaptive Damping System (ADS) ..... 188
Adaptive Highbeam Assist
Display message ............................ 262
Function/notes ............................ .119
Switching on/off ........................... 119
Adaptive Highbeam Assist Plus
Display message ............................ 262
Function/notes ............................ .119
Switching on/off ........................... 120
AdBlue ®
Additive ......................................... 376
Display message ............................ 265
Displaying level and range ............. 240
Filling capacity ............................... 376
Important safety notes .................. 376
Low outside temperatures ............. 376
Purity ............................................. 376
Topping up ..................................... 164
Additional speedometer ................... 244
Additives (engine oil) ........................ 377
Address book
See also Digital Owner's Manual ... 292
Adjusting the headlamp range ......... 117
Adjusting the volume
Multimedia system ........................ 293
AIR BODY CONTROL
Display message ............................ 266
Function/notes ............................ .187
Lowering the rear of the vehicle .... 189
Raising the rear of the vehicle ....... 189
Air conditioning
General notes ................................ 127
Air filter (white display message) .... 265
Air vents
Important safety notes .................. 141
Rear ............................................... 141 4
Index
Page 14 of 389
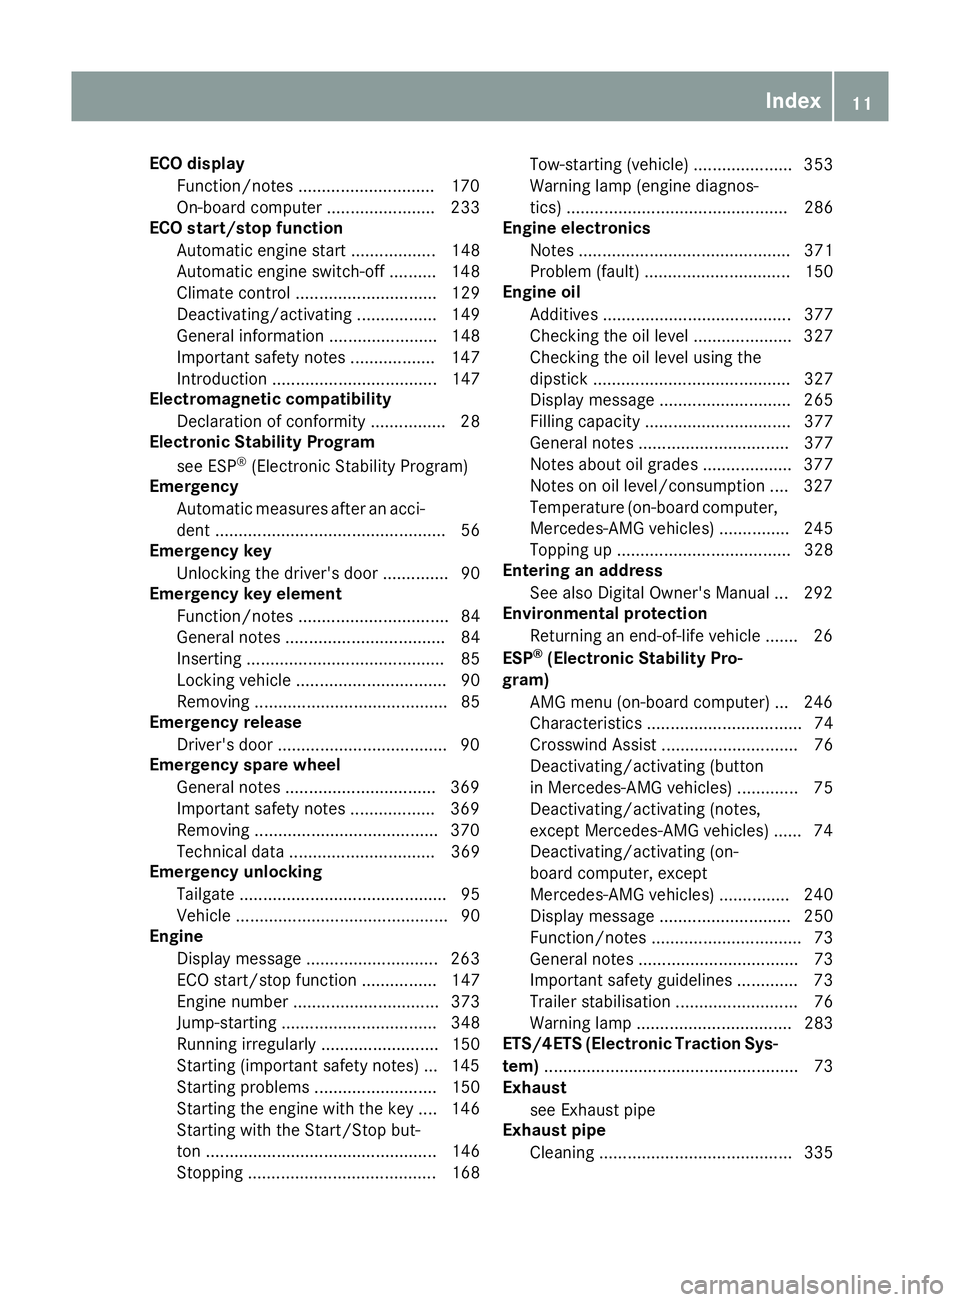
ECO display
Function/notes ............................ .170
On-board computer ....................... 233
ECO start/stop function
Automatic engine start .................. 148
Automatic engine switch-off .......... 148
Climate control .............................. 129
Deactivating/activating ................. 149
General information ....................... 148
Important safety notes .................. 147
Introduction ................................... 147
Electromagnetic compatibility
Declaration of conformity ................ 28
Electronic Stability Program
see ESP ®
(Electronic Stability Program)
Emergency
Automatic measures after an acci-
dent ................................................. 56
Emergency key
Unlocking the driver's door .............. 90
Emergency key element
Function/notes ................................ 84
General notes .................................. 84
Inserting .......................................... 85
Locking vehicle ................................ 90
Removing ......................................... 85
Emergency release
Driver's door ................................... .90
Emergency spare wheel
General notes ................................ 369
Important safety notes .................. 369
Removing ...................................... .370
Technical data ............................... 369
Emergency unlocking
Tailgate ............................................ 95
Vehicle ............................................. 90
Engine
Display message ............................ 263
ECO start/stop function ................ 147
Engine number ............................... 373
Jump-starting ................................. 348
Running irregularl y......................... 150
Starting (important safety notes )... 145
Starting problems .......................... 150
Starting the engine with the key .... 146
Starting with the Start/Stop but-
ton ................................................. 146
Stopping ........................................ 168 Tow-starting (vehicle) ..................... 353
Warning lamp (engine diagnos-
tics) ............................................... 286
Engine electronics
Notes ............................................. 371
Problem (fault) ............................... 150
Engine oil
Additives ........................................ 377
Checking the oil level ..................... 327
Checking the oil level using the
dipstick .......................................... 327
Display message ............................ 265
Filling capacity ............................... 377
General notes ................................ 377
Notes about oil grade s................... 377
Notes on oil level/consumption .... 327
Temperature (on-board computer, Mercedes-AMG vehicles) ............... 245
Topping up ..................................... 328
Entering an address
See also Digital Owner's Manua l... 292
Environmental protection
Returning an end-of-life vehicle ....... 26
ESP ®
(Electronic Stability Pro-
gram)
AMG menu (on-board computer) ... 246
Characteristics ................................. 74
Crosswind Assist ............................. 76
Deactivating/activating (button
in Mercedes-AMG vehicles) ............. 75
Deactivating/activating (notes,
except Mercedes-AMG vehicles) ...... 74
Deactivating/activating (on-
board computer, except
Mercedes-AMG vehicles) ............... 240
Display message ............................ 250
Function/note s................................ 73
General notes .................................. 73
Important safety guidelines ............. 73
Trailer stabilisation .......................... 76
Warning lamp ................................. 283
ETS/4ETS (Electronic Traction Sys-
tem) ...................................................... 73
Exhaust
see Exhaust pipe
Exhaust pipe
Cleaning ......................................... 335 Index
11
Page 168 of 389
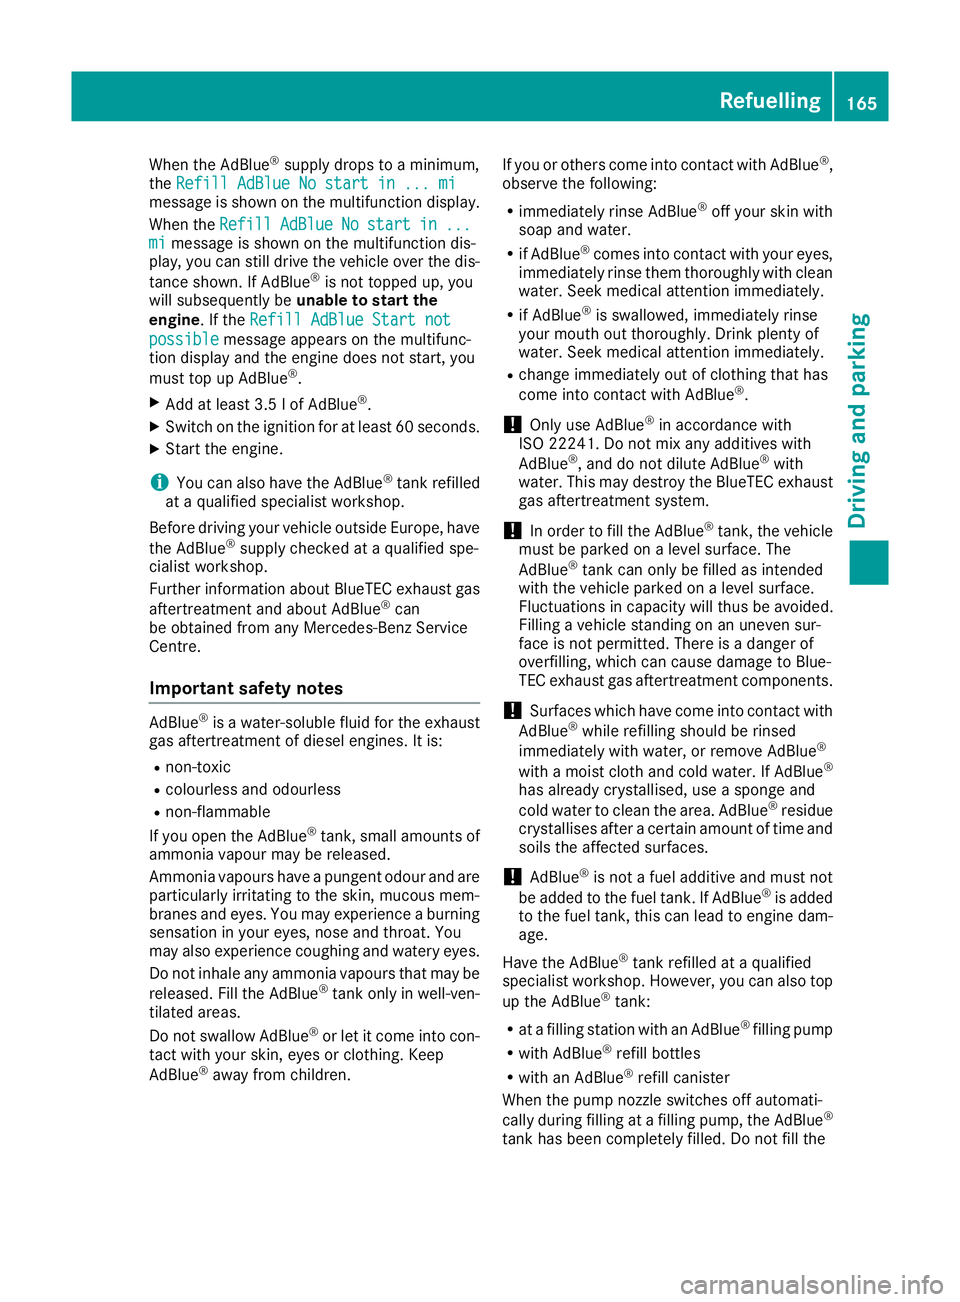
When the AdBlue
®
supply drops to a minimum,
the Refill AdBlue No start in ... mi
Refill AdBlue No start in ... mi
message is shown on the multifunction display.
When the Refill
Refill AdBlue
AdBlueNo
Nostart
start in
in...
...
mi
mi message is shown on the multifunction dis-
play, you can still drive the vehicle over the dis-
tance shown. If AdBlue ®
is not topped up, you
will subsequently be unable to start the
engine. If the Refill AdBlue Start not
Refill AdBlue Start not
possible
possible message appears on the multifunc-
tion display and the engine does not start, you
must top up AdBlue ®
.
X Add at least 3.5 l of AdBlue ®
.
X Switch on the ignition for at least 60 seconds.
X Start the engine.
i You can also have the AdBlue ®
tank refilled
at a qualified specialist workshop.
Before driving your vehicle outside Europe, have
the AdBlue ®
supply checked at a qualified spe-
cialist workshop.
Further information about BlueTEC exhaust gas
aftertreatment and about AdBlue ®
can
be obtained from any Mercedes-Benz Service
Centre.
Important safety notes AdBlue
®
is a water-soluble fluid for the exhaust
gas aftertreatment of diesel engines. It is:
R non-toxic
R colourless and odourless
R non-flammable
If you open the AdBlue ®
tank, small amounts of
ammonia vapour may be released.
Ammonia vapours have a pungent odour and are
particularly irritating to the skin, mucous mem-
branes and eyes. You may experience a burning sensation in your eyes, nose and throat. You
may also experience coughing and watery eyes.
Do not inhale any ammonia vapours that may be
released. Fill the AdBlue ®
tank only in well-ven-
tilated areas.
Do not swallow AdBlue ®
or let it come into con-
tact with your skin, eyes or clothing. Keep
AdBlue ®
away from children. If you or others come into contact with AdBlue
®
,
observe the following:
R immediately rinse AdBlue ®
off your skin with
soap and water.
R if AdBlue ®
comes into contact with your eyes,
immediately rinse them thoroughly with clean water. Seek medical attention immediately.
R if AdBlue ®
is swallowed, immediately rinse
your mouth out thoroughly. Drink plenty of
water. Seek medical attention immediately.
R change immediately out of clothing that has
come into contact with AdBlue ®
.
! Only use AdBlue ®
in accordance with
ISO 22241. Do not mix any additives with
AdBlue ®
, and do not dilute AdBlue ®
with
water. This may destroy the BlueTEC exhaust
gas aftertreatment system.
! In order to fill the AdBlue ®
tank, the vehicle
must be parked on a level surface. The
AdBlue ®
tank can only be filled as intended
with the vehicle parked on a level surface.
Fluctuations in capacity will thus be avoided.
Filling a vehicle standing on an uneven sur-
face is not permitted. There is a danger of
overfilling, which can cause damage to Blue-
TEC exhaust gas aftertreatment components.
! Surfaces which have come into contact with
AdBlue ®
while refilling should be rinsed
immediately with water, or remove AdBlue ®
with a moist cloth and cold water. If AdBlue ®
has already crystallised, use a sponge and
cold water to clean the area. AdBlue ®
residue
crystallises after a certain amount of time and
soils the affected surfaces.
! AdBlue ®
is not a fuel additive and must not
be added to the fuel tank. If AdBlue ®
is added
to the fuel tank, this can lead to engine dam- age.
Have the AdBlue ®
tank refilled at a qualified
specialist workshop. However, you can also top
up the AdBlue ®
tank:
R at a filling station with an AdBlue ®
filling pump
R with AdBlue ®
refill bottles
R with an AdBlue ®
refill canister
When the pump nozzle switches off automati-
cally during filling at a filling pump, the AdBlue ®
tank has been completely filled. Do not fill the Refuelling
165Driving and parking Z
Page 268 of 389
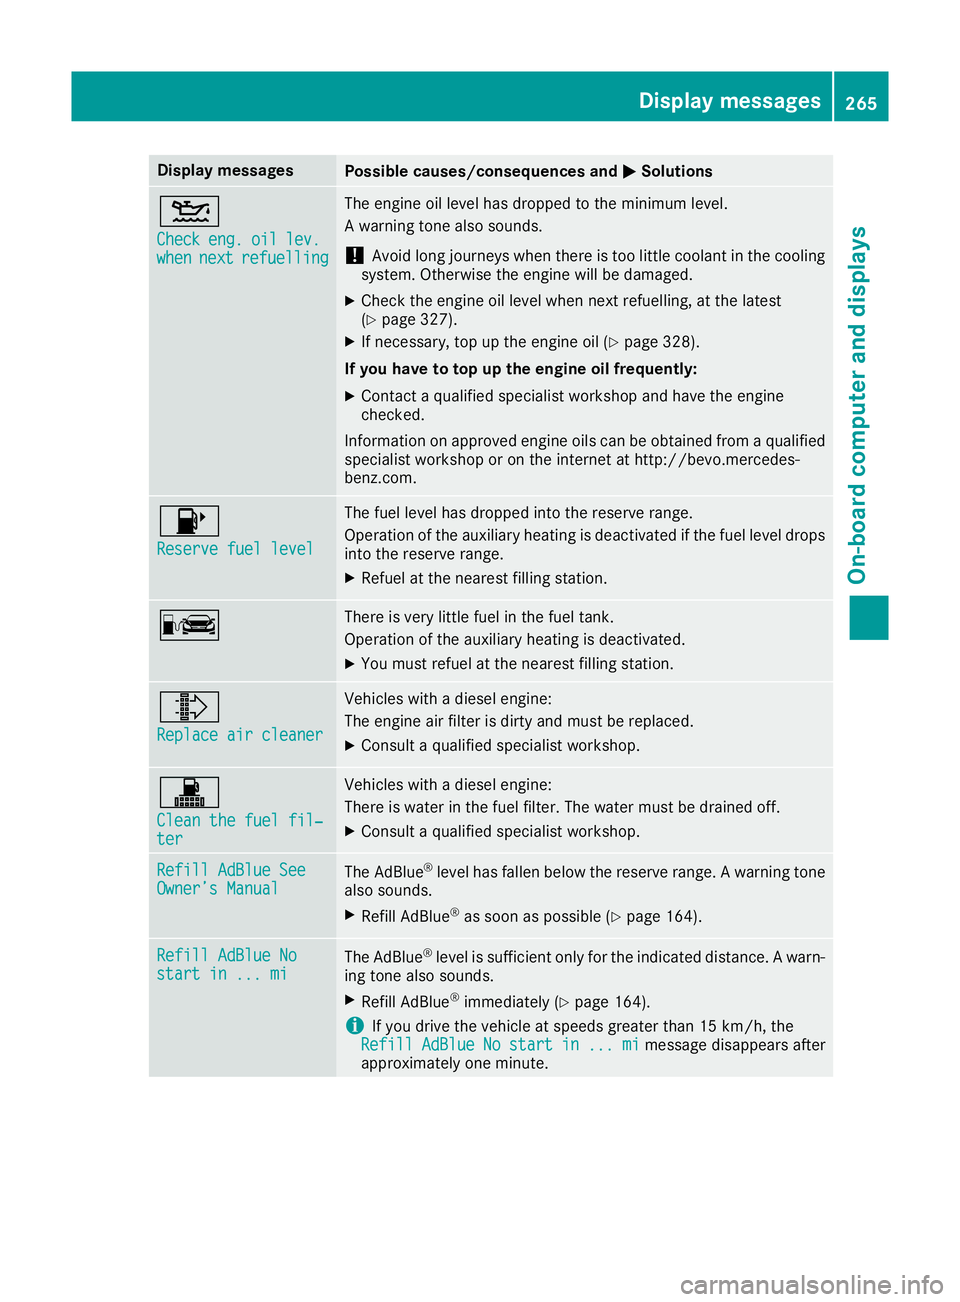
Display messages
Possible causes/consequences and
M
MSolutions 4
Check Check
eng.
eng.oil
oillev.
lev.
when
when next
nextrefuelling
refuelling The engine oil level has dropped to the minimum level.
A warning tone also sounds.
! Avoid long journeys when there is too little coolant in the cooling
system. Otherwise the engine will be damaged.
X Check the engine oil level when next refuelling, at the latest
(Y page 327).
X If necessary, top up the engine oil (Y page 328).
If you have to top up the engine oil frequently:
X Contact a qualified specialist workshop and have the engine
checked.
Information on approved engine oils can be obtained from a qualified specialist workshop or on the internet at http://bevo.mercedes-
benz.com. 8
Reserve fuel level Reserve fuel level The fuel level has dropped into the reserve range.
Operation of the auxiliary heating is deactivated if the fuel level drops
into the reserve range.
X Refuel at the nearest filling station. C There is very little fuel in the fuel tank.
Operation of the auxiliary heating is deactivated.
X You must refuel at the nearest filling station. ¸
Replace air cleaner Replace air cleaner Vehicles with a diesel engine:
The engine air filter is dirty and must be replaced.
X Consult a qualified specialist workshop. !
Clean the fuel fil‐ Clean the fuel fil‐
ter ter Vehicles with a diesel engine:
There is water in the fuel filter. The water must be drained off.
X Consult a qualified specialist workshop. Refill AdBlue See Refill AdBlue See
Owner’s Manual Owner’s Manual
The AdBlue
®
level has fallen below the reserve range. A warning tone
also sounds.
X Refill AdBlue ®
as soon as possible (Y page 164).Refill AdBlue No Refill AdBlue No
start in ... mi start in ... mi
The AdBlue
®
level is sufficient only for the indicated distance. A warn-
ing tone also sounds.
X Refill AdBlue ®
immediately (Y page 164).
i If you drive the vehicle at speeds greater than 15 km/h, the
Refill
Refill AdBlue
AdBlueNo
Nostart
start in
in...
... mi
mimessage disappears after
approximately one minute. Display
messages
265On-board computer and displays Z
Page 330 of 389
Engine oil
Important safety notes G
WARNING
Certain components in the engine compart-
ment could be very hot, e.g. the engine, the
radiator and parts of the exhaust system.
There is a risk of injury when accessing the
engine compartment.
As far as possible, allow the engine to cool
down and only touch the components descri- bed in the following. G
WARNING
There are moving components in the engine
compartment. Certain components may con-
tinue to move or suddenly move again even
after the ignition has been switched off, e.g.
the radiator fan. There is a risk of injury.
If you have to carry out work in the engine
compartment:
R switch off the ignition
R never touch the dangerous areas surround-
ing moving components, e.g. the rotation
area of the fan
R remove jewellery and watches
R keep items of clothing and hair, for exam-
ple, away from moving parts. G
WARNING
If engine oil comes into contact with hot com- ponents in the engine compartment, it may
ignite. There is a risk of fire and injury.
Make sure that engine oil does not spill out
over the filler neck. Allow the engine to cool
down and thoroughly clean the components
that have come into contact with engine oil
before you start the engine. G
WARNING
If you open the bonnet while the engine is
overheating or while there is a fire in the
engine compartment, you could come into
contact with hot gases or other leaking ser-
vice products. There is a danger of injury. Allow an overheating engine to cool down
before opening the bonnet. If there is a fire in
the engine compartment, leave the bonnet
closed and notify the fire brigade.
Hybrid vehicles: make sure that you read the
separate Owner's Manual. You could otherwise
fail to recognise dangers, e.g. due to high volt-
age.
General notes Depending on your driving style, the vehicle
consumes up to 0.8 l of oil per 1000 km. The oil
consumption may be higher than this when the
vehicle is new or if you frequently drive at high
engine speeds.
Depending on the engine, the oil dipstick may be installed at different locations.
To check the oil level:
R park the vehicle on a level surface
R The engine should be switched off for approx-
imately five minutes if the engine is at normal
operating temperature
R If the engine is not at normal operating tem-
perature, e.g. if the engine was only started
briefly, wait approximately 30 minute sbefore
carrying out the measurement
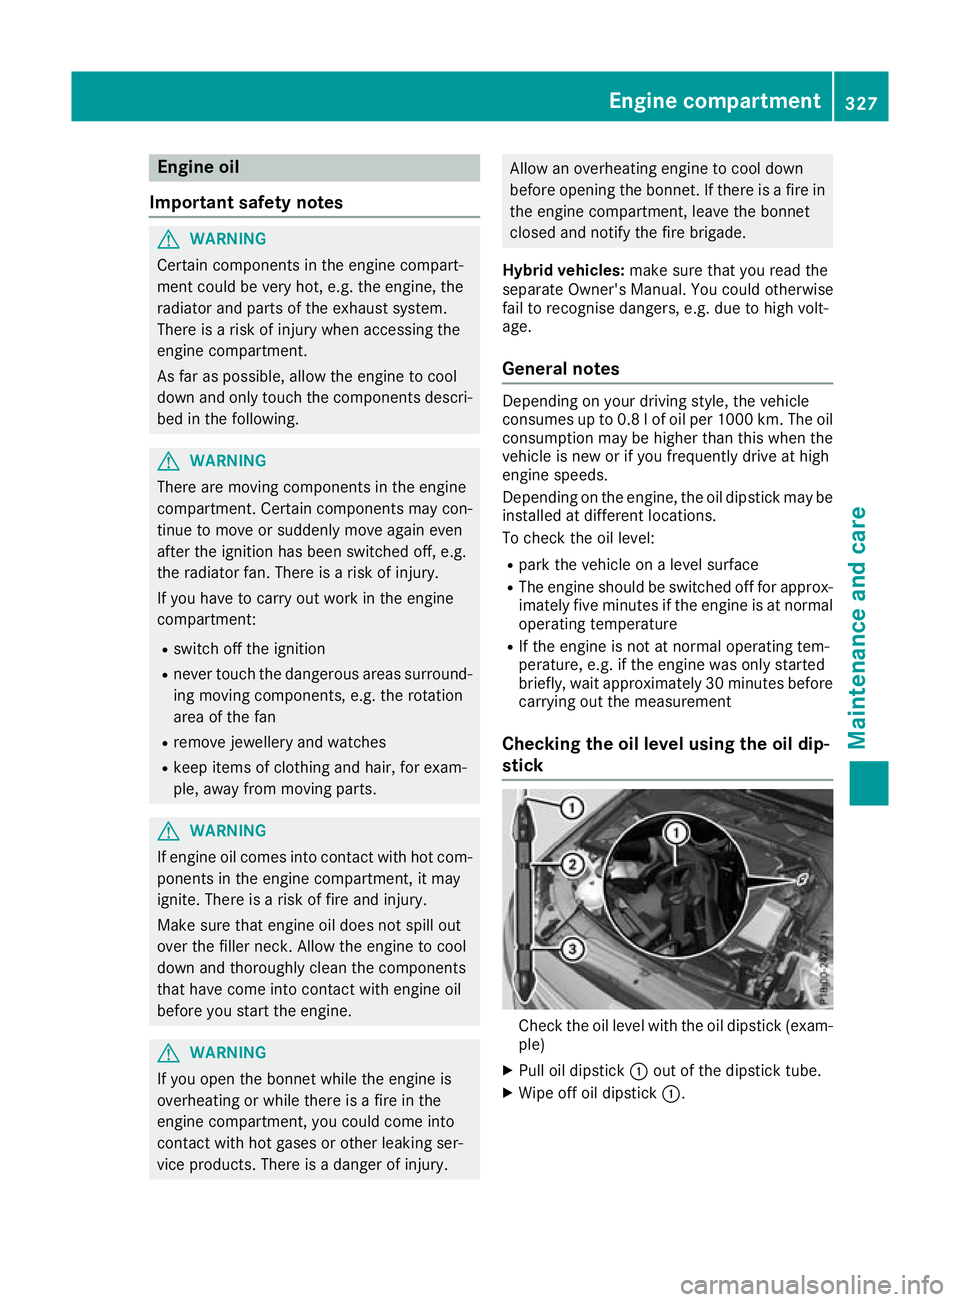
Checking the oil level using the oil dip-
stick Check the oil level with the oil dipstick (exam-
ple)
X Pull oil dipstick :out of the dipstick tube.
X Wipe off oil dipstick :. Engine compartment
327Maintenance and care Z
Page 331 of 389
X
Slowly slide oil dipstick :into the guide tube
to the stop and take it out again after approx- imately three seconds.
If the level is between MIN mark =and MAX
mark ;, the oil level is correct.
X If the oil level has dropped to MIN mark =or
below, top up with 1.0 lof engine oil.
Topping up engine oil H
Environmental note
When topping up the oil, take care not to spill any. If oil enters the soil or waterways, it is
harmful to the environment.
! Use only engine oils and oil filters that are
approved for vehicles with a service system. A list of the engine oils and oil filters that have
been tested and approved in accordance with
Mercedes-Benz Specifications for Service
Products is available at any Mercedes-Benz
Service Centre.
The following cause engine failure or damage
to the exhaust system:
R Use of engine oils and oil filters that have
not been expressly approved for the service system
R Replacement of engine oil and oil filter after
the replacement interval specified by the
service system has expired
R Use of engine oil additives
! Do not add too much oil. Topping up with too
much engine oil can result in damage to the
engine or to the catalytic converter. Have
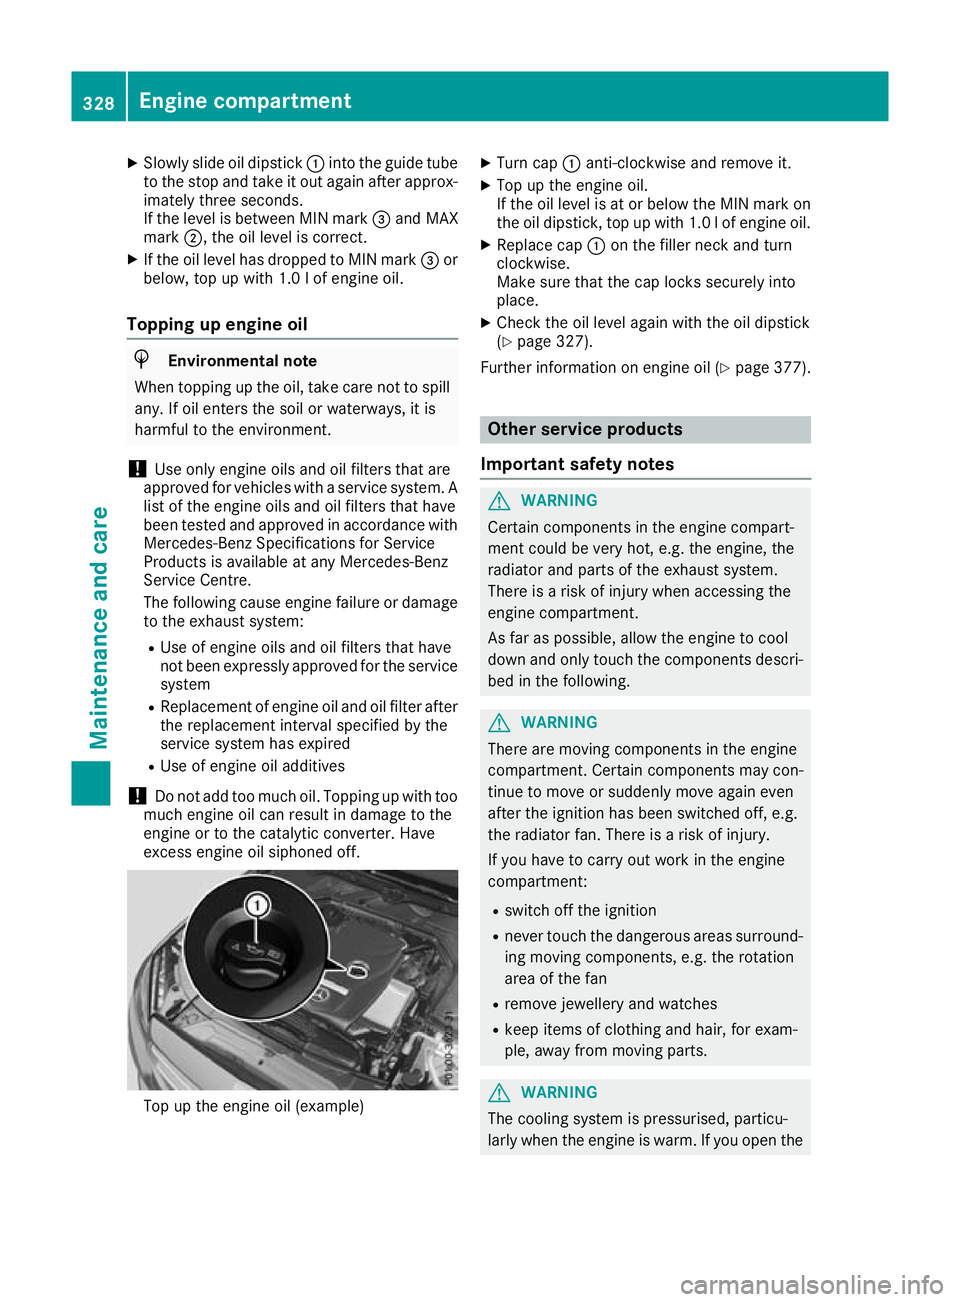
excess engine oil siphoned off. Top up the engine oil (example) X
Turn cap :anti-clockwise and remove it.
X Top up the engine oil.
If the oil level is at or below the MIN mark on
the oil dipstick, top up with 1.0 l of engine oil.
X Replace cap :on the filler neck and turn
clockwise.
Make sure that the cap locks securely into
place.
X Check the oil level again with the oil dipstick
(Y page 327).
Further information on engine oil (Y page 377). Other service products
Important safety notes G
WARNING
Certain components in the engine compart-
ment could be very hot, e.g. the engine, the
radiator and parts of the exhaust system.
There is a risk of injury when accessing the
engine compartment.
As far as possible, allow the engine to cool
down and only touch the components descri- bed in the following. G
WARNING
There are moving components in the engine
compartment. Certain components may con-
tinue to move or suddenly move again even
after the ignition has been switched off, e.g.
the radiator fan. There is a risk of injury.
If you have to carry out work in the engine
compartment:
R switch off the ignition
R never touch the dangerous areas surround-
ing moving components, e.g. the rotation
area of the fan
R remove jewellery and watches
R keep items of clothing and hair, for exam-
ple, away from moving parts. G
WARNING
The cooling system is pressurised, particu-
larly when the engine is warm. If you open the 328
Engine compartmentMaintenance and care
Page 333 of 389
X
To open: pull cap:upwards by the tab and
open.
X Top up with the premixed washer fluid.
X To close: press cap :onto the filler neck
until it engages.
If the washer fluid level drops below the recom- mended minimum of 1.0 l, a message appears
on the multifunction display prompting you to
top up the washer fluid (Y page 279).
Further information on washer fluid
(Y page 378). ASSYST PLUS
Service message
The ASSYST PLUS service interval display
informs you of the next service due date.
Information on the type of service and service
intervals (see the separate Service Booklet).
Further information can be obtained at a quali-
fied specialist workshop, e.g. a Mercedes-Benz
Service Centre.
i The ASSYST PLUS service interval display
does not show any information on the engine oil level. Observe the notes on the engine oil
level (Y page 327).
The multifunction display shows a service mes-
sage for a few seconds, e.g.:
R Service A in XX days
Service A in XX days
R Service A due Service A due
R Service A overdue by XX days
Service A overdue by XX days
Depending on the operating conditions of the
vehicle, the remaining time or distance until the next service due date is displayed.
The letter indicates which service is due. A
A
stands for a minor service and B Bfor a major ser-
vice. A number or another letter may be dis-
played after the letter.
For certain countries only: the position after the
letter A Aor B
Bindicates any necessary additional
maintenance work. If you notify a qualified spe-
cialist workshop of this display, you will receive a statement on the associated costs.
The ASSYST PLUS service interval display does
not take into account any periods of time during
which the battery is disconnected. Maintaining the time-dependent service sched-
ule:
X Note down the service due date displayed in
the multifunction display before disconnect-
ing the battery.
or X After reconnecting the battery, subtract the
battery disconnection periods from the ser-
vice date shown on the display. Hiding service messages
X Press the aor% button on the steering
wheel. Displaying service messages
X Switch the ignition on.
X Use ò on the steering wheel to call up the
list of menus.
X Press 9or: on the steering wheel to
select the Service Servicemenu and confirm with
a.
X Press 9or: on the steering wheel to
select the ASSYST PLUS
ASSYST PLUS submenu and con-
firm with a.
The service due date appears in the multi-
function display. Information about service
Resetting the ASSYST PLUS service
interval display !
If the ASSYST PLUS service interval display
has been inadvertently reset, this setting can
be corrected at a qualified specialist work-
shop.
Have service work carried out as described in the Service Booklet. This may otherwise lead
to increased wear and damage to the major
assemblies or the vehicle.
A qualified specialist workshop, e.g. a
Mercedes-Benz Service Centre, will reset the
ASSYST PLUS service interval display after the
service work has been carried out. You can also
obtain further information on maintenance
work, for example. 330
ASSYST PLUSMaintenance and care
Page 368 of 389
The wear patterns on the front and rear tyres
differ depending on the operating conditions.
Interchange the wheels before a clear wear pat-
tern has formed on the tyres. Front tyres typi-
cally wear more on the shoulders, while rear
tyres wear more in the centre.
On vehicles that have front and rear wheels of
the same size, you can interchange the wheels
every 5,000 to 10,000 km depending on the
degree of tyre wear. Ensure the direction of
rotation is maintained.
Clean the contact surfaces of the wheel and the
brake disc thoroughly every time a wheel is
interchanged. Check the tyre pressure and, if
necessary, restart the tyre pressure loss warn-
ing system (Y page 361) or the tyre pressure
monitor (Y page 363). Direction of rotation
Tyres with a specified direction of rotation have additional benefits, e.g. if there is a risk of aqua- planing. These advantages can only be gained if
the tyres are fitted corresponding to the direc-
tion of rotation.
An arrow on the sidewall of the tyre indicates its correct direction of rotation. Storing wheels
Store wheels in a cool, dry and preferably dark
place if they are not being used. Protect the
tyres against oil, grease, petrol and diesel. Fitting a wheel
Preparing the vehicle X
Stop the vehicle on solid, non-slippery and
level ground.
X Apply the electric parking brake manually.
X Move the front wheels to the straight-ahead
position.
X Shift the transmission to position P.
X Make sure that the vehicle level is set to "Nor-
mal" on vehicles with AIR BODY CONTROL
(Y page 188).
X Switch off the engine.
X Vehicles without KEYLESS-GO: remove the
key from the ignition lock. X
Vehicles with KEYLESS-GO start-function
or KEYLESS-GO: open the driver's door.
The vehicle electronics now have status 0.
This is the same as the key having been
removed.
X Vehicles with KEYLESS-GO start function
or KEYLESS-GO: remove the Start/Stop but-
ton from the ignition lock (Y page 144).
X If included in the vehicle equipment, remove
the tyre-change tool kit from the vehicle.
X Safeguard the vehicle against rolling away.
i Apart from some country-specific variants,
vehicles are not equipped with tyre-changing
tools. Some tools for changing a tyre are spe- cific to the vehicle. For more information on
which tools are required to perform a wheel
change on your vehicle, consult a qualified
specialist workshop.
Necessary tyre-changing tools may include,
for example:
R Jack
R wheel chock
R Wheel wrench
R Centring pin
Securing the vehicle against rolling
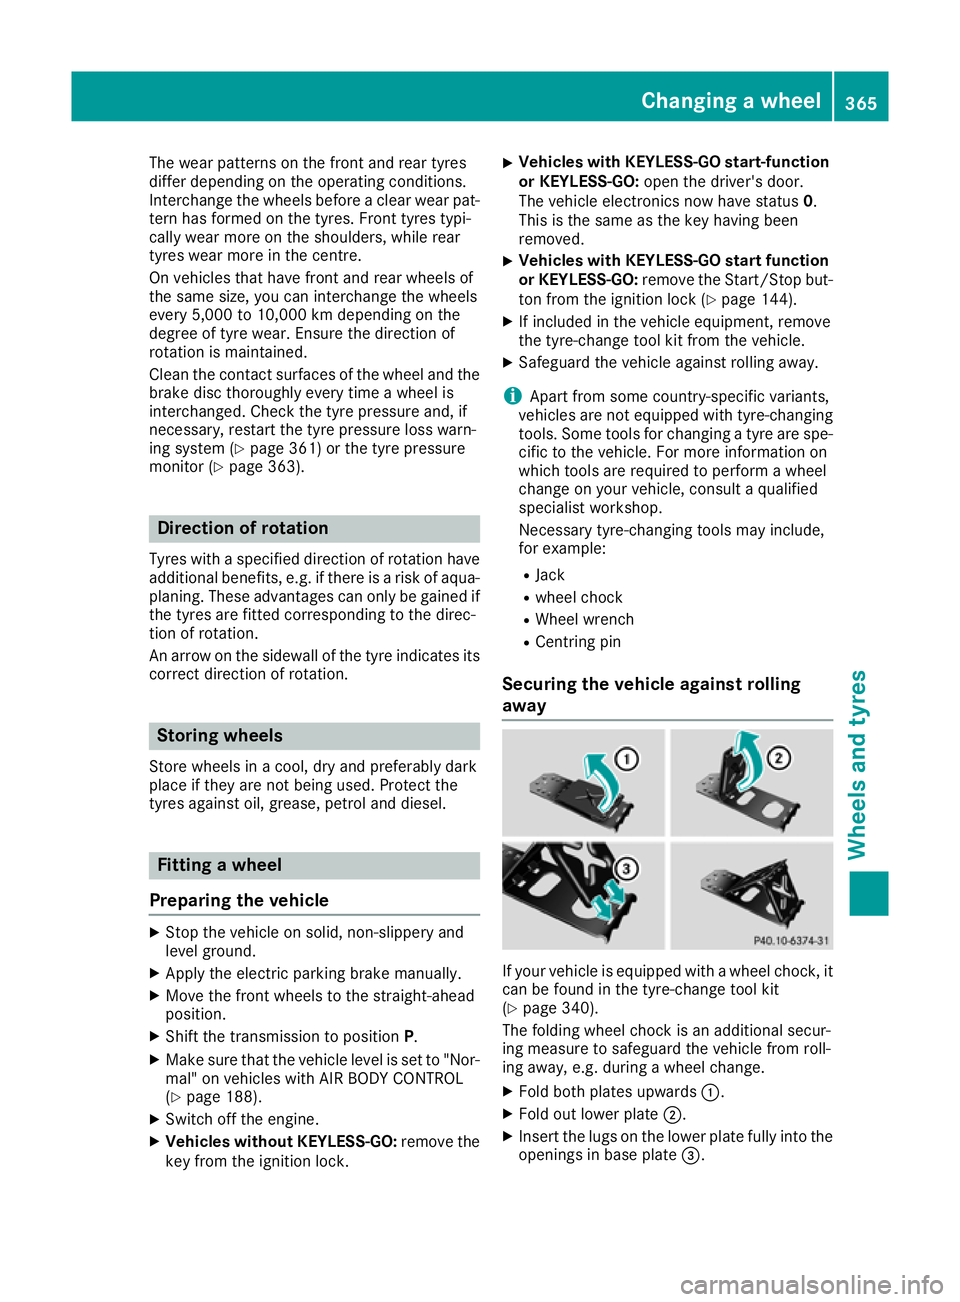
away If your vehicle is equipped with a wheel chock, it
can be found in the tyre-change tool kit
(Y page 340).
The folding wheel chock is an additional secur-
ing measure to safeguard the vehicle from roll-
ing away, e.g. during a wheel change.
X Fold both plates upwards :.
X Fold out lower plate ;.
X Insert the lugs on the lower plate fully into the
openings in base plate =. Changing a wheel
365Wheels and tyres Z