2016 MERCEDES-BENZ GLC COUPE remote start
[x] Cancel search: remote startPage 9 of 389
Gliding mod
e................................. 157
Kickdown ....................................... 157
Manual shifting .............................. 158
Oil temperature (on-board com-
puter, Mercedes-AMG vehicles) ..... 245
Overview ........................................ 153
Problem (fault) ............................... 161
Pulling away ................................... 146
Starting the engine ........................ 146
Steering wheel gearshift paddle s... 158
Trailer towing ................................. 157
Transmission position display
(DIRECT SELECT lever) ................... 155
Transmission positions .................. 156
Automatic transmission emer-
gency running mode ......................... 161
Auxiliary heating/ventilation
Display message ............................ 278
Important safety notes .................. 137
Problem (display message) ............ 141
Remote control .............................. 139
Setting the departure time ............. 140
Switching on/off (on the centre
console) ......................................... 138
Axle load, permissible (trailer tow-
ing) ...................................................... 381 B
Back button ....................................... 293
Bag hook ............................................ 311
Ball coupling
Swinging out .................................. 220
BAS (Brake Assist System) ................. 69
BAS PLUS with Cross-Traffic Assist (Brake Assist PLUS with Cross-
Traffic Assist)
Function/note s................................ 69
Important safety notes .................... 69
Battery (key)
Checking .......................................... 85
Important safety notes .................... 85
Replacing ......................................... 85
Battery (vehicle)
Charging ........................................ 347
Display message ............................ 264
Important safety notes .................. 345
Jump starting ................................. 348 Belt tensioner
Activation ......................................... 53
Blind Spot Assist
Activating/deactivating (on-
board computer) ............................ 241
Display message ............................ 268
Notes/function .............................. 210
see Active Blind Spot Assist
BlueTEC
see AdBlue ®
Bluetooth ®
Connecting a different mobile
phone ............................................ 300
Searching for a mobile phone ........ 299
See also Digital Owner's Manua l... 292
Telephony ...................................... 299
Bonnet
Active bonnet (pedestrian protec-tion) ............................................... 325
Closing ........................................... 326
Display message ............................ 277
Important safety notes .................. 325
Opening ......................................... 326
Boot load (maximum) ........................ 379
Brake
EBD .................................................. 77
Brake Assist
see BAS (Brake Assist System)
Brake fluid
Display message ............................ 254
Notes ............................................. 377
Brake force distribution
see EBD (electronic brake force
distribution)
Brake lamps
Adaptive ........................................... 73
Brakes
ABS .................................................. 68
Adaptive Brake Assist ...................... 72
BAS .................................................. 69
BAS PLUS with Cross-Traffic
Assist ............................................... 69
Brake fluid (notes) ......................... 377
Display message ............................ 250
Driving tips .................................... 171
Hill start assist ............................... 147
HOLD function ............................... 186 6
Index
Page 21 of 389

Tow-away protection ........................ 80
Protection of the environment
General notes ..................................26
Pulling away
Automatic transmission ................. 146
General notes ................................ 146
Hill start assist ...............................1 47
Trailer ............................................ 147 Q
QR code Mercedes-Benz Guide App ................. 1
Rescue card ..................................... 30
Qualified specialist workshop ........... 30
Quick access for audio and tele-
phone
Changing the station/music
track .............................................. 295 R
RACETIMER (on-board computer) .... 247
Radiator cover ................................... 326
Radio
Selecting a station ......................... 236
Radio mode
See also Digital Owner's Manual ... 292
Radio-based vehicle components
Declaration of conformity ................ 28
Rain closing feature
Sliding sunroof ................................. 99
Reading lamp ..................................... 121
Rear compartment
Setting the air vents ..................... .141
Setting the airflow ......................... 132
Setting the temperature ................ 131
Rear foglamp
Display message ............................ 261
Switching on/off ........................... 116
Rear seat
Display message ............................ 277
Rear window heating
Problem (fault) ............................... 133
Switching on/off ........................... 133
Rear-compartment seat belt sta-
tus indicator ........................................ 46 Rear-view mirror
Anti-dazzle mode (automatic) ....... .112
Dipping (manual) ........................... 110
Recuperation display ........................ 233
Reflective safety vest ....................... 338
Refuelling
AdBlue ®
......................................... 164
Fuel gauge ....................................... 34
Important safety notes .................. 161
Refuelling process ......................... 162
see Fuel
Remote control
Auxiliary heating/ventilation .......... 139
Changing the batteries (auxiliary
heating) ......................................... 140
Replacing bulbs
Dipped-beam headlamps .............. .122
Fitting/removing the cover (front
wheel arch) ................................... .123
Important safety notes .................. 121
Main-beam headlamps ................... 122
Overview of bulb types .................. 122
Turn signals (front) ......................... 123
Replacing the battery (auxiliary
heating remote control) .................... 140
Rescue card ......................................... 30
Reserve (fuel tank)
see Fuel
Reserve fuel
Display message ............................ 265
Warning lamp ................................. 286
Residual heat (climate control) ........135
Restraint system
Display message ............................ 257
Introduction ..................................... 41
Warning lamp ................................. 286
Warning lamp (function) ................... 42
Rev counter ........................................ 229
Reversing camera
"Reverse parking" function ............ 200
Cleaning instructions ..................... 335
Coupling up a trailer function ....... .201
Display in the multimedia system .. 199
General notes ................................ 198
Object detection (function/
notes) ............................................ 202
Switching on/off ........................... 198 18
Index
Page 85 of 389
Key
Important safety notes
United Kingdom only: G
WARNING
When the double locks are activated, the
doors can no longer be opened from the
inside. People in the vehicle can no longer get out, e.g. in hazardous situations. There is a
risk of injury.
Therefore, do not leave any people unsuper-
vised in the vehicle, particularly children, eld-
erly people or people in need of special assis-
tance. Do not activate the double lock when
people are in the vehicle.
If the vehicle has been locked from the outside, the double lock function is activated as stand-
ard. It is then not possible to open the doors
from inside the vehicle. You can deactivate the
double lock function by deactivating the interior
motion sensor (see Digital Owner's Manual).
The doors can then be opened from the inside
after the vehicle has been locked from the out-
side. The anti-theft alarm system is triggered if
the door is opened from the inside. Switch off
the alarm (Y page 79).
All countries: G
WARNING
If children are left unsupervised in the vehicle, they can:
R open doors and endanger other persons or
road users
R climb out and be injured by the traffic
R operate vehicle equipment and, for exam-
ple, trap themselves.
Children could also set the vehicle in motion, for example by:
R releasing the parking brake
R shifting the automatic transmission out of
park position P
R starting the engine.
There is a risk of an accident and injury.
When leaving the vehicle, always take the key
with you and lock the vehicle. Never leave children unattended in the vehicle. Always
keep the key out of reach of children. G
WARNING
If you attach heavy or large objects to the key, the key could be unintentionally turned in the
ignition lock. This could cause the engine to
be switched off. There is a risk of an accident.
Do not attach any heavy or large objects to the
key. Remove any bulky keyrings before insert-
ing the key into the ignition lock.
! Keep the key away from strong magnetic
fields. Otherwise, the remote control function could be affected.
Strong magnetic fields can occur in the vicin-
ity of powerful electrical installations.
Do not keep the key: R with electronic devices, e.g. a mobile phone
or another key
R with metallic objects, e.g. coins or metal foil
R inside metallic objects, e.g. a metal case
This can impair the key's function.
Vehicles with KEYLESS-GO start function: do
not keep the key in the luggage compartment.
Otherwise, the key may not be detected, e.g.
when starting the engine using the Start/Stop
button.
A check that periodically establishes a radio
connection between the vehicle and the key
determines whether a valid key is in or in the
direct vicinity of the vehicle. This occurs, for
example:
R during engine start
R during driving
R when using HANDS-FREE ACCESS
R when the external door handles are touched
R during convenience closing 82
KeyOpening and closing
Page 90 of 389
Problem
Possible causes/consequences and
M
MSolutions You can no longer lock or
unlock the vehicle using
KEYLESS-GO. KEYLESS-GO has been deactivated.
X Reactivate KEYLESS-GO (Y page 83). The key battery is weak or discharged.
X Check the key battery (Y page 85) and replace if necessary
(Y page 85).
If this does not work: X Lock or unlock the vehicle using the emergency key element
(Y page 90). Interference from a powerful source of radio waves.
X Lock or unlock the vehicle using the emergency key element
(Y page 90). Fault with KEYLESS-GO.
X Lock or unlock the vehicle using the remote control function of the
key.
X Have the vehicle and key checked at a qualified specialist work-
shop.
If the vehicle cannot be locked or unlocked even using the remote
control function:
X Lock or unlock the vehicle using the emergency key element
(Y page 90).
X Have the vehicle and key checked at a qualified specialist work-
shop. The engine cannot be
started using the key. The on-board voltage is too low.
X Switch off non-essential consumers, e.g. seat heating or interior
lighting, and try to start the engine again.
If this does not work:
X Check the starter battery and charge it if necessary (Y page 347).
or X Jump-start the vehicle (Y page 348).
or X Consult a qualified specialist workshop. The engine cannot be
started using the Start/
Stop button. The key is in
the vehicle. The vehicle is locked.
X Unlock the vehicle and try to start the vehicle again. The key battery is weak or discharged.
X Check the key battery (Y page 85) and replace if necessary
(Y page 85).
If this does not work: X Start your vehicle with the key in the ignition lock. Interference from a powerful source of radio waves.
X Start your vehicle with the key in the ignition lock. Key
87Opening and closing Z
Page 143 of 389
If the engine has not yet reached operating tem-
perature when it is started, the auxiliary heating running time is increased. The auxiliary heating
continues to run until the engine has reached its
operating temperature. If this is the case, the
y symbol appears on the remote control dis-
play and the running time is zero minutes.
Setting the departure time Make sure that the time set in the vehicle is
correct before setting the departure time (see
the Digital Owner's Manual). Otherwise, the aux- iliary heating may activate at the wrong time and
at an unsuitable location. When setting the
departure time, also observe the important
safety notes (Y page 137).
X Briefly press the ubutton.
X Press the ,or. button repeatedly
until the time to be changed appears on the
display.
X Press the uand^ buttons simultane-
ously.
The Îsymbol on the remote control display
flashes.
X Press the ,or. button to set the
desired departure time.
i The longer you press the
,or. but-
ton, the faster the time changes.
X Press the uand^ buttons simultane-
ously.
The new departure time is stored.
Activating the set departure time
X Briefly press the ubutton.
X Press the ,or. button repeatedly
until the desired departure time appears on
the display.
X Press the ubutton.
The Ísymbol, the departure time and,
depending on the selected departure time,
the letter A, BorCappears on the display.
Deactivating the set departure time
X Briefly press the ubutton.
The status of the auxiliary heating is shown on
the display.
X Press the .button.
The first departure time stored appears on the
display.
X Press the ^button.
OFF is shown on the remote control display. Replacing the remote control battery Important safety notes
G
WARNING
Batteries contain toxic and corrosive substan- ces. If batteries are swallowed, it can result in
severe health problems. There is a risk of fatal injury.
Keep batteries out of the reach of children. If
a battery is swallowed, seek medical attention immediately. H
Environmental note Batteries contain pollutants.
It is illegal to dispose of them
with the household rubbish.
They must be collected sep-
arately and disposed of in anenvironmentally responsible
recycling system. Dispose of batteries in an
environmentally responsible
manner. Take discharged
batteries to a qualified spe-
cialist workshop or to a col-
lection point for used batter-
ies.
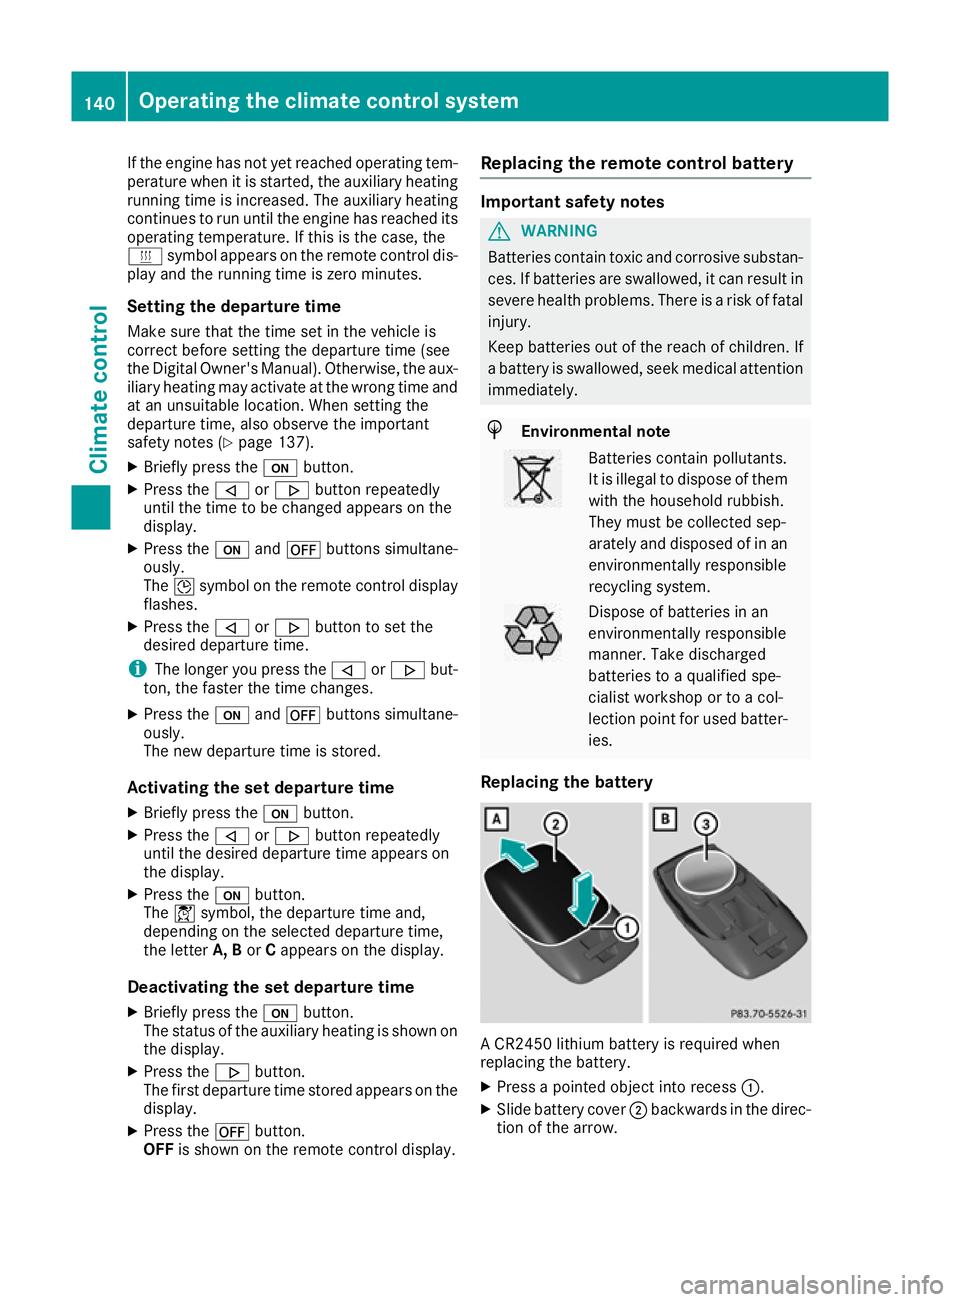
Replacing the battery A CR2450 lithium battery is required when
replacing the battery.
X Press a pointed object into recess :.
X Slide battery cover ;backwards in the direc-
tion of the arrow. 140
Operating the climate control systemClimate control
Page 144 of 389
X
Insert new battery =with the lettering facing
upwards.
X Slide battery cover ;in the opposite direc-
tion to the arrow on the remote control until it engages.
Problems with the auxiliary heating/ventilation Problem
Possible causes/consequences and
M
MSolutions FAIL
¨ The signal transmission between the transmitter and the vehicle is
faulty.
X
Change your position in relation to the vehicle, moving closer if
necessary. FAIL The auxiliary heating or auxiliary ventilation cannot be switched on or
has switched itself off.
The starter battery is not sufficiently charged.
X Charge the starter battery. The fuel level has dropped into the reserve range.
X Refuel at the nearest filling station. The auxiliary heating or auxiliary ventilation is faulty.
X Have the auxiliary heating or auxiliary ventilation checked at a
qualified specialist workshop. The battery symbol on
the left of the remote
control display is shown
as empty. The remote control battery is discharged.
X Replace the remote control battery (Y page 140).Air vents
Important safety notes
G
WARNING
Very hot or very cold air can flow from the air vents. This could result in burns or frostbite in the immediate vicinity of the air vents. There
is a risk of injury.
Make sure that all vehicle occupants always
maintain a sufficient distance to the air out-
lets. If necessary, redirect the airflow to
another area of the vehicle interior. In order to ensure the direct flow of fresh air
through the air vents into the vehicle interior,
please observe the following notes:
R keep the air inlet between the windscreen and
the bonnet free of blockages, such as ice,
snow or leaves
R never cover the vents or ventilation grilles in
the vehicle interior Adjusting the air vents
Air vents are located: R on the left and right-hand side of the dash-
board
R in the middle of the dashboard
R in the rear centre console, depending on
equipment in the vehicle Air vents
141Climate control Z
Page 147 of 389
high engine speeds and driving at full throttle
until the engine has reached its operating
temperature.
Only shift the automatic transmission to the
desired drive position when the vehicle is sta- tionary.
Where possible, avoid spinning the drive
wheels when pulling away on slippery roads.
You could otherwise damage the drive train.
HYBRID vehicles: make sure that you read the
separate Owner's Manual. Otherwise, you may
fail to recognise dangers. Key positions
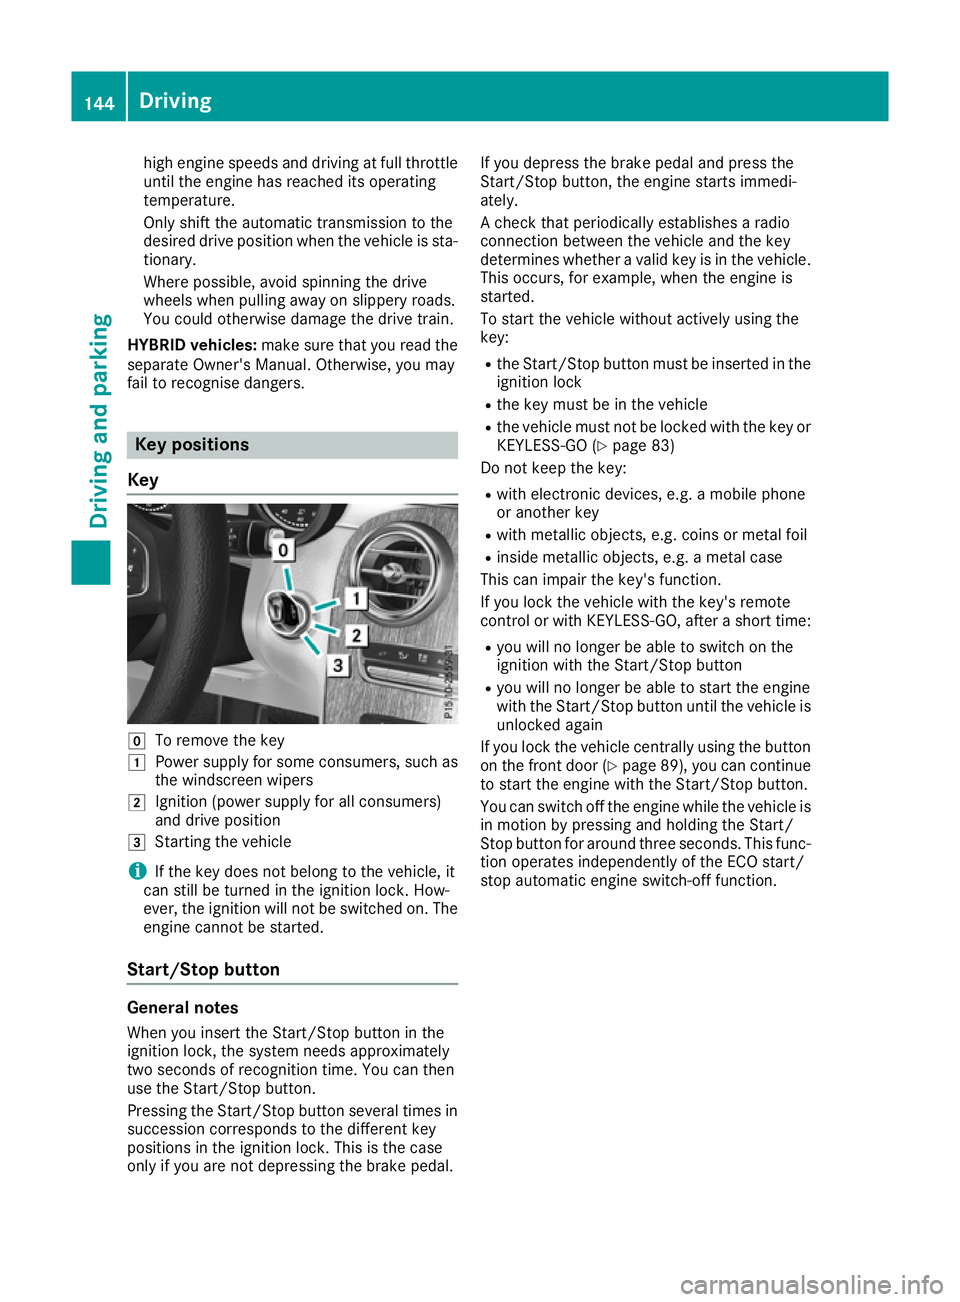
Key g
To remove the key
1 Power supply for some consumers, such as
the windscreen wipers
2 Ignition (power supply for all consumers)
and drive position
3 Starting the vehicle
i If the key does not belong to the vehicle, it
can still be turned in the ignition lock. How-
ever, the ignition will not be switched on. The
engine cannot be started.
Start/Stop button General notes
When you insert the Start/Stop button in the
ignition lock, the system needs approximately
two seconds of recognition time. You can then
use the Start/Stop button.
Pressing the Start/Stop button several times in succession corresponds to the different key
positions in the ignition lock. This is the case
only if you are not depressing the brake pedal. If you depress the brake pedal and press the
Start/Stop button, the engine starts immedi-
ately.
A check that periodically establishes a radio
connection between the vehicle and the key
determines whether a valid key is in the vehicle.
This occurs, for example, when the engine is
started.
To start the vehicle without actively using the
key:
R the Start/Stop button must be inserted in the
ignition lock
R the key must be in the vehicle
R the vehicle must not be locked with the key or
KEYLESS-GO (Y page 83)
Do not keep the key:
R with electronic devices, e.g. a mobile phone
or another key
R with metallic objects, e.g. coins or metal foil
R inside metallic objects, e.g. a metal case
This can impair the key's function.
If you lock the vehicle with the key's remote
control or with KEYLESS-GO, after a short time:
R you will no longer be able to switch on the
ignition with the Start/Stop button
R you will no longer be able to start the engine
with the Start/Stop button until the vehicle is
unlocked again
If you lock the vehicle centrally using the button
on the front door (Y page 89), you can continue
to start the engine with the Start/Stop button.
You can switch off the engine while the vehicle is
in motion by pressing and holding the Start/
Stop button for around three seconds. This func- tion operates independently of the ECO start/
stop automatic engine switch-off function. 144
DrivingDriving and parking