2016 MERCEDES-BENZ GLC COUPE reset
[x] Cancel search: resetPage 8 of 389

Setting ........................................... 141
Setting the centre air vents ........... 141
Setting the side air vents ............... 141
Air-conditioning system
see Climate control
Airbag
Automatic front-passenger front
airbag deactivation .......................... 49
Introduction ..................................... 46
PASSENGER AIR BAG indicator
lamps ............................................... 42
Airbags
Display message ............................ 259
Front airbag (driver, front
passenger) ....................................... 47
Important safety guidelines ............. 46
Kneebag ........................................... 48
Sidebag ............................................ 48
Triggering ......................................... 53
Windowbag ...................................... 48
Alarm
ATA (Anti-Theft Alarm system) ......... 79
Switching off (ATA) .......................... 79
Switching the function on/off
(ATA) ................................................ 79
Alarm system
see ATA (Anti-Theft Alarm system)
AMG
Performance Seat .......................... 106
AMG menu (on-board computer) ..... 245
AMG Performance exhaust system
can be selected ................................. 150
Anti-glare film .................................... 324
Anti-lock braking system
see ABS (Anti-lock Braking System)
Aquaplaning ....................................... 173
Armrest
Stowage compartment .................. 307
Ashtray ............................................... 317
Assistance display (on-board com-
puter) .................................................. 239
Assistance menu (on-board com-
puter) .................................................. 240
ASSYST PLUS
Displaying a service message ........ 330
Driving abroad ............................... 331
Hiding a service message .............. 330 Resetting the service interval dis-
play ................................................ 330
Service message ............................ 330
Special service requirements ......... 331
ATA (Anti-Theft Alarm system)
Activating/deactivating ................... 79
Function ........................................... 79
Switching off the alarm .................... 79
ATTENTION ASSIST
Activating/deactivating ................. 242
Display message ............................ 266
Function/note s............................. 207
Authorised workshop
see Qualified specialist workshop
AUTO lights
Display message ............................ 261
see Lights
Automatic engine start (ECO start/
stop function) .................................... 148
Automatic engine switch-off (ECO
start/stop function) .......................... 148
Automatic front-passenger front
airbag deactivation
Display message ............................ 259
Automatic front-passenger front
airbag deactivation system
Operation ......................................... 49
Problems ......................................... 53
System self-test ............................... 52
Automatic headlamp mode .............. 115
Automatic transmission
Accelerator pedal position ............. 156
Changing gear ............................... 156
DIRECT SELECT lever ..................... 154
Display message ............................ 275
Double-clutch function .................. 156
Drive program display .................... 155
Drive programs .............................. 157
Driving tip s.................................... 156
DYNAMIC SELECT switch .............. 152
Emergency running mod e.............. 161
Engaging drive position .................. 155
Engaging neutral ............................ 154
Engaging park position automati-
cally ............................................... 154
Engaging reverse gear ................... 154
Engaging the park position ............ 154
Gearshift recommendation ............ 160 Index
5
Page 15 of 389
Exterior lighting
Cleaning ........................................ .334
Settings options ............................ .115
see Lights
Exterior mirrors
Adjusting ....................................... 111
Anti-dazzle mode (automatic) ....... .112
Folding in/out (automatically) ....... 112
Folding in/out (electrically) ........... 111
Out of position (troubleshooting) ... 112
Parking position ............................. 112
Resetting ....................................... 111
Storing settings (memory func-
tion) ............................................... 113 F
Fault message see Display messages
Favourites
Overview ........................................ 295
Features ............................................. 315
Filler cap
see Fuel filler flap
Fire extinguisher ............................... 339
First-aid kit ......................................... 339
Fitting a wheel
Fitting a wheel ............................... 367
Lowering the vehicle ...................... 368
Preparing the vehicle ..................... 365
Raising the vehicl e......................... 366
Removing a whee l.......................... 367
Securing the vehicle against roll-
ing away ........................................ 365
Fitting/removing
front wheel arch cover ................... 123
Flat tyre
Changing a wheel/fitting the
spare whee l................................... 364
MOExtended tyre s......................... 341
Preparing the vehicle ..................... 341
TIREFIT kit ...................................... 342
see Emergency spare wheel
Floormat ............................................. 324
Foglamps (extended range) .............. 118
Frequencies
Mobile phone ................................. 371
Two-way radio ................................ 371 Front-passenger front airbag deac-
tivation
Display message ............................ 259
Front-passenger front airbag deac-
tivation system
Operation ......................................... 49
Problems ......................................... 53
System self-test ............................... 52
Fuel
Additives ........................................ 375
Consumption statistics .................. 233
Displaying the current consump-
tion ................................................ 233
Displaying the rang e...................... 233
Driving tips .................................... 170
E10 ................................................ 374
Fuel gaug e....................................... 34
Grade (petrol) ................................ 374
Important safety notes .................. 374
Low outside temperature s............. 376
Notes for GLC 300 4MATIC
Coupé, Mercedes-AMG GLC 43
4MATIC Coup é............................... 375
Problem (malfunction) ................... 164
Quality (diesel )............................... 375
Refuelling ....................................... 161
Tank content/reserve fue l............. 374
Fuel filler flap
Closing ........................................... 163
Opening ......................................... 162
Fuel filter (white display message) .. 265
Fuel level
Calling up the range (on-board
computer) ...................................... 233
Gaug e.............................................. 34
Fuel tank
Capacity ........................................ 374
Problem (malfunction) ................... 164
Fuses
Allocation chart ............................. 355
Before changing ............................. 354
Dashboard fuse box ....................... 354
Fuse box in the engine compart-
ment .............................................. 355
Fuse box in the front-passenger
footwell .......................................... 354
Fuse box in the luggage compart-
ment .............................................. 355 12
Index
Page 23 of 389
Side lamps
Switching on/off ........................... 116
Side windows
Convenience closing ........................ 97
Convenience opening ......................96
Important safety notes .................... 95
Opening/closing .............................. 96
Problem (malfunction) .....................98
Resetting ........................................ .97
Reversing feature ............................ .95
Sidebag ................................................ 48
SIM card
Inserting ........................................3 01
Ski/snowboard bag .......................... 307
Sliding sunroof
Important safety information ........... 98
Opening/closing .............................. 99
Problem (malfunction) ................... 100
Rain closing feature ......................... 99
Resetting ......................................... 99
SMS
See also Digital Owner's Manual ... 292
Snow chains ...................................... 359
Socket (12 V)
Centre console .............................. 319
General notes ................................ 318
Luggage compartment ................... 319
Rear compartment ......................... 319
Socket (230 V) ................................... 319
Sound
Switching on/off ........................... 293
Specialist workshop ............................ 30
Spectacles compartment ................. 306
Speedometer
Activating/deactivating the addi-
tional speedometer ........................ 244
Digital ............................................ 233
In the Instrument cluster ................. 34
Segments ...................................... 228
Selecting a display unit .................. 244
SPEEDTRONIC
Deactivating variable ..................... 177
Display message ............................ 270
Function/notes ............................ .176
General notes ................................ 176
Important safety notes .................. 176
LIM indicator lamp ......................... 176 Permanent ..................................... 177
Selecting ........................................ 176
Setting the spee
d.......................... 177
Storing the current speed .............. 177
Storing the current speed or call-
ing up the last stored speed .......... 177
Switching to passive ...................... 177
Variabl e......................................... 176
SPORT handling mode
Deactivating/activating
(Mercedes-AMG vehicles) ................ 75
Warning lamp ................................. 285
Start/Stop button
Key positions ................................. 144
Starting the engine ........................ 146
Start/stop function
see ECO start/stop function
Starting (engine) ................................ 145
STEER CONTROL .................................. 79
Steering
Display message ............................ 278
Warning lamps ............................... 291
Steering Assist and Stop&Go Pilot
(DISTRONIC PLUS)
Display message ............................ 271
Steering assistant STEER CON-
TROL
see STEER CONTROL
Steering wheel
Adjusting (electrically) ................... 109
Adjusting (manually) ...................... 108
Button overview ............................... 35
Buttons (on-board computer) ......... 229
Cleaning ......................................... 336
EASY ENTRY/EXIT feature ............. 109
Important safety notes .................. 108
Steering wheel heating .................. 109
Storing settings (memory func-
tion) ............................................... 113
Steering wheel gearshift paddles .... 158
Steering wheel heating
Problem (malfunction) ................... 109
Switching on/of f........................... 109
Stopwatch (RACETIMER) ................... 247
Stowage areas ................................... 305
Stowage compartment
Map pockets .................................. 307 20
Index
Page 25 of 389
Transmission oil (on-board com-
puter, Mercedes-AMG vehicles) ..... 245
TEMPOMAT
Function/notes ............................. 174
Text messages
Telephone module with Blue-
tooth ®
(SAP profile) ....................... 302
Timing (RACETIMER) .........................247
TIREFIT Kit
Declaration of conformity ................ 29
Important safety notes .................. 342
Storage location ............................ 340
Tyre pressure not reached ............. 344
Tyre pressure reached ................... 344
Using ............................................. 343
Top Tether ............................................ 59
Total distance recorder .................... 232
Touchpad
Changing the station/music
track .............................................. 295
Character suggestions ................... 294
Deleting characters ....................... 294
Entering a space ............................ 294
Entering characters ....................... 294
Gesture control .............................. 294
Handwriting recognition ................ 294
Operating the touchpad ................. 294
Overview ........................................ 293
Quick access for audio .................. 295
Switching ....................................... 293
Switching input line ....................... 294
Tow-away protection
Deactivating ..................................... 80
Function .......................................... .80
Priming/deactivating ....................... 80
Tow-starting
Emergency engine starting ............ 353
Important safety notes .................. 350
Towing
Important safety notes .................. 350
Notes for 4MATIC vehicles ............ 353
Transporting the vehicle ................3 53
Towing a trailer
Active Blind Spot Assist ................. 215
Active Lane Keeping Assist ............ 218
Active Parking Assist ..................... 194
Axle load, permissible .................... 381 ESP
®
(Electronic Stability Pro-
gram) ............................................... 76
Failure check for LEDs ................... 223
Pulling away with a trailer .............. 147
Swinging out the ball coupling ....... 220
Trailer tow hitch display message .. 277
Towing away
Fitting the towing eye .................... 352
Removing the towing eye ............... 352
With both axles on the ground ....... 353
Towing eye ......................................... 340
Traffic Sign Assist
Activating/deactivating the warn-ing function .................................... 241
Display message ............................ 269
Function/note s............................. 208
Important safety notes .................. 209
Instrument cluster display ............. 209
Trailer coupling
see Towing a trailer
Trailer towing
7-pin connecto r............................. 223
Blind Spot Assist ............................ 211
Cleaning the trailer tow hitch ......... 336
Coupling up a traile r...................... 222
Decoupling a trailer ....................... 222
Driving tip s.................................... 219
Important safety notes .................. 218
Lights display message .................. 261
Parktronic ...................................... 191
Power supply ................................. 222
Problem (fault) ............................... 224
Trailer load s................................... 380
Transfer case ..................................... 161
Transmission
see Automatic transmission
Transmission position display ......... 155
Transporting the vehicle .................. 353
Trim pieces (cleaning instruc-
tions) .................................................. 336
Trip computer (on-board com-
puter) .................................................. 233
Trip meter
Calling up ....................................... 232
Resetting (on-board computer) ...... 234
Turn signals
Replacing bulbs (front) ................... 123 22
Index
Page 32 of 389
documentation: director of the technical
department at Brano a.s.
4. Hradec nad Moravicí City
5. 05.05.2015 Date
Signed by
Director of Quality
TIREFIT kit Copy and translation of the original declaration of conformity:
EC declaration of conformity
In accordance with EC directive 2006/42/EC
We hereby declare that the product
Product designation: Daimler electric air pump
Model designation: 0851, DT/UW 200045
MB part no. :A 000 583 8000
complies with the following relevant regulations:
EMC 2004/108/EC (2014/30/EU)
Applied harmonised standards, in particular:
DIN EN 55014-1:2012-05
DIN EN 55014-2:2009-06
Manufacturer: Dunlop Tech GmbH
Address: Birkenhainerstrasse 77, 63450
Hanau, Germany
Authorised representative :I MS department
Date: March 2015
Signature: IMS-AM, IMS-AE-LDiagnostics connection
The diagnostics connection is used for connect- ing diagnostic equipment at a qualified special-
ist workshop. G
WARNING
If you connect equipment to a diagnostics
connection in the vehicle, it may affect the
operation of vehicle systems. As a result, the operating safety of the vehicle could be affec-
ted. There is a risk of an accident.
Only connect equipment to a diagnostics con-
nection in the vehicle, which is approved for
your vehicle by Mercedes-Benz. G
WARNING
Objects in the driver's footwell may restrict
the clearance around the pedals or block a
depressed pedal. This jeopardises the oper- ating and road safety of the vehicle. There is a
risk of an accident.
Stow all objects securely in the vehicle so that
they do not get into the driver's footwell.
Always fit the floormats securely and as pre-
scribed in order to ensure that there is always sufficient room for the pedals. Do not use
loose floormats and do not place several floor- mats on top of one another.
! If the engine is switched off and equipment
on the diagnostics connection is used, the
starter battery may discharge.
Connecting equipment to the diagnostics con-
nection can lead to emissions monitoring infor-
mation being reset, for example. This may lead
to the vehicle failing to meet the requirements of
the next emissions test during the main inspec- tion. Operating safety
29Introduction Z
Page 99 of 389
only opens again automatically after the corre-
sponding switch is released. The automatic
reversing feature is only an aid and is no substi-
tute for your attention when closing a side win-
dow. G
WARNING
The reversing function does not react:
R to soft, light and thin objects, e.g. small fin-
gers
R while resetting
This means that the reversing feature cannot
prevent someone being trapped in these sit-
uations. There is a risk of injury.
When closing, make sure that no parts of the
body are in the closing area. If someone
becomes trapped, press the switch to open
the side window again. Opening and closing the side win-
dows
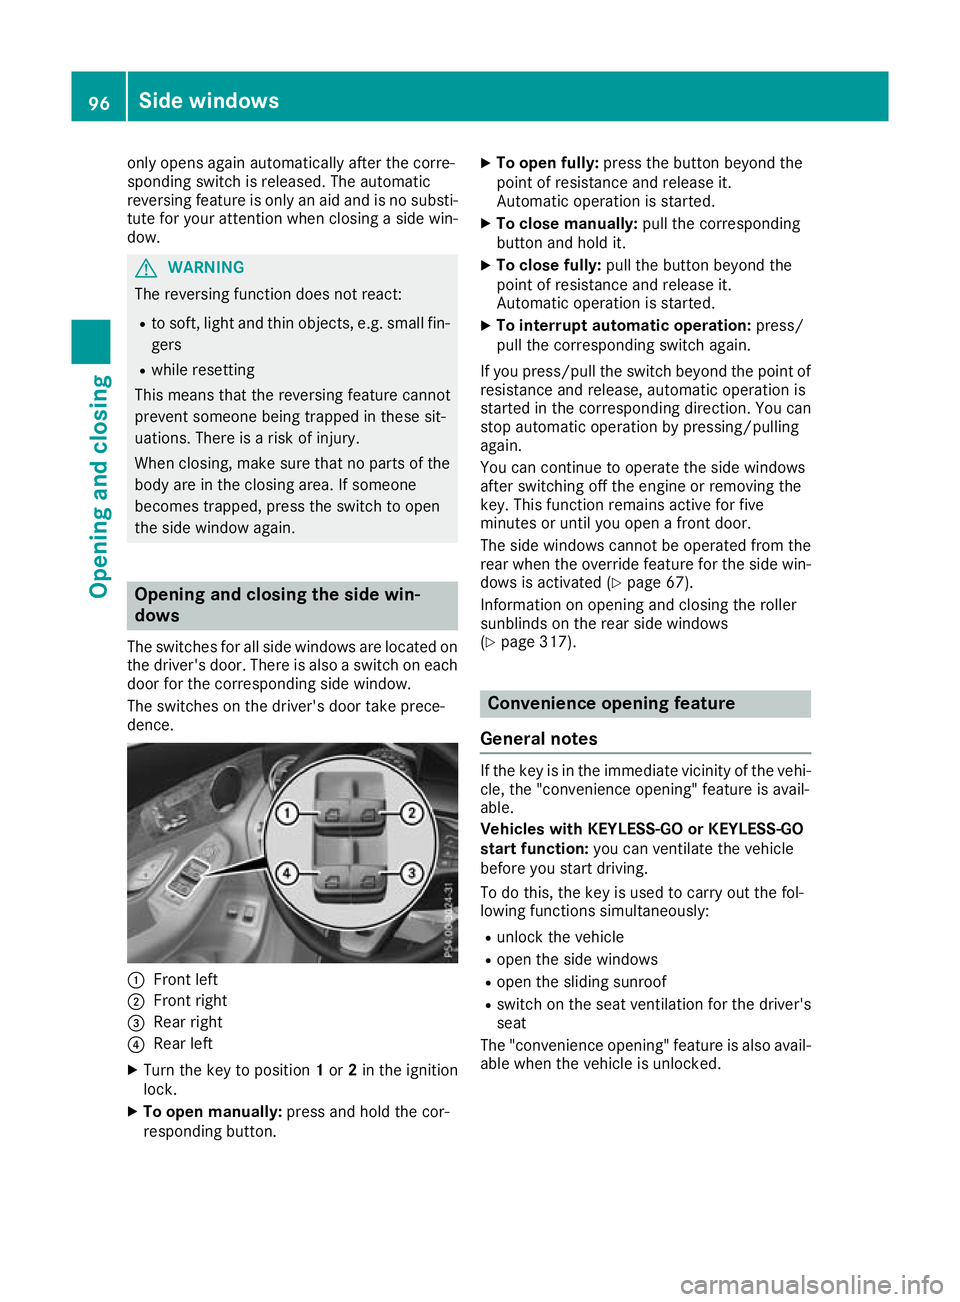
The switches for all side windows are located on
the driver's door. There is also a switch on each door for the corresponding side window.
The switches on the driver's door take prece-
dence. :
Front left
; Front right
= Rear right
? Rear left
X Turn the key to position 1or 2in the ignition
lock.
X To open manually: press and hold the cor-
responding button. X
To open fully: press the button beyond the
point of resistance and release it.
Automatic operation is started.
X To close manually: pull the corresponding
button and hold it.
X To close fully: pull the button beyond the
point of resistance and release it.
Automatic operation is started.
X To interrupt automatic operation: press/
pull the corresponding switch again.
If you press/pull the switch beyond the point of resistance and release, automatic operation is
started in the corresponding direction. You can
stop automatic operation by pressing/pulling
again.
You can continue to operate the side windows
after switching off the engine or removing the
key. This function remains active for five
minutes or until you open a front door.
The side windows cannot be operated from the
rear when the override feature for the side win-
dows is activated (Y page 67).
Information on opening and closing the roller
sunblinds on the rear side windows
(Y page 317). Convenience opening feature
General notes If the key is in the immediate vicinity of the vehi-
cle, the "convenience opening" feature is avail-
able.
Vehicles with KEYLESS-GO or KEYLESS-GO
start function: you can ventilate the vehicle
before you start driving.
To do this, the key is used to carry out the fol-
lowing functions simultaneously:
R unlock the vehicle
R open the side windows
R open the sliding sunroof
R switch on the seat ventilation for the driver's
seat
The "convenience opening" feature is also avail-
able when the vehicle is unlocked. 96
Side windowsOpening and closing
Page 100 of 389
Convenience opening feature
X
Press and hold the %button on the key
until the sliding sunroof is in the desired posi- tion.
X To interrupt convenience opening: release
the % button. Convenience closing feature
Important safety notes G
WARNING
When the convenience closing feature is oper- ating, parts of the body could become trapped
in the closing area of the side window and the
sliding sunroof. There is a risk of injury.
Observe the complete closing procedure
when the convenience closing feature is oper-
ating. When closing make sure that no parts of the body are in the closing area.
Vehicles with KEYLESS-GO or KEYLESS-GO
start function: if the key is in the immediate
vicinity of the vehicle, the "convenience closing" feature is available.
When you lock the vehicle, you can simultane-
ously:
R close the side windows
R close the sliding sunroof
Notes on the automatic reversing function for:
R the side windows (Y page 95)
R the sliding sunroof (Y page 99)
Using the key X
Press and hold the &button until the side
windows and the sliding sunroof are fully
closed.
X Make sure that all the side windows and the
sliding sunroof are closed.
X To interrupt convenience closing: release
the & button.
Using KEYLESS-GO The driver's door and the door at which the han-
dle is used must both be closed. The key must be outside the vehicle. The distance between the
key and the corresponding door handle must not
be greater than 1 m. X
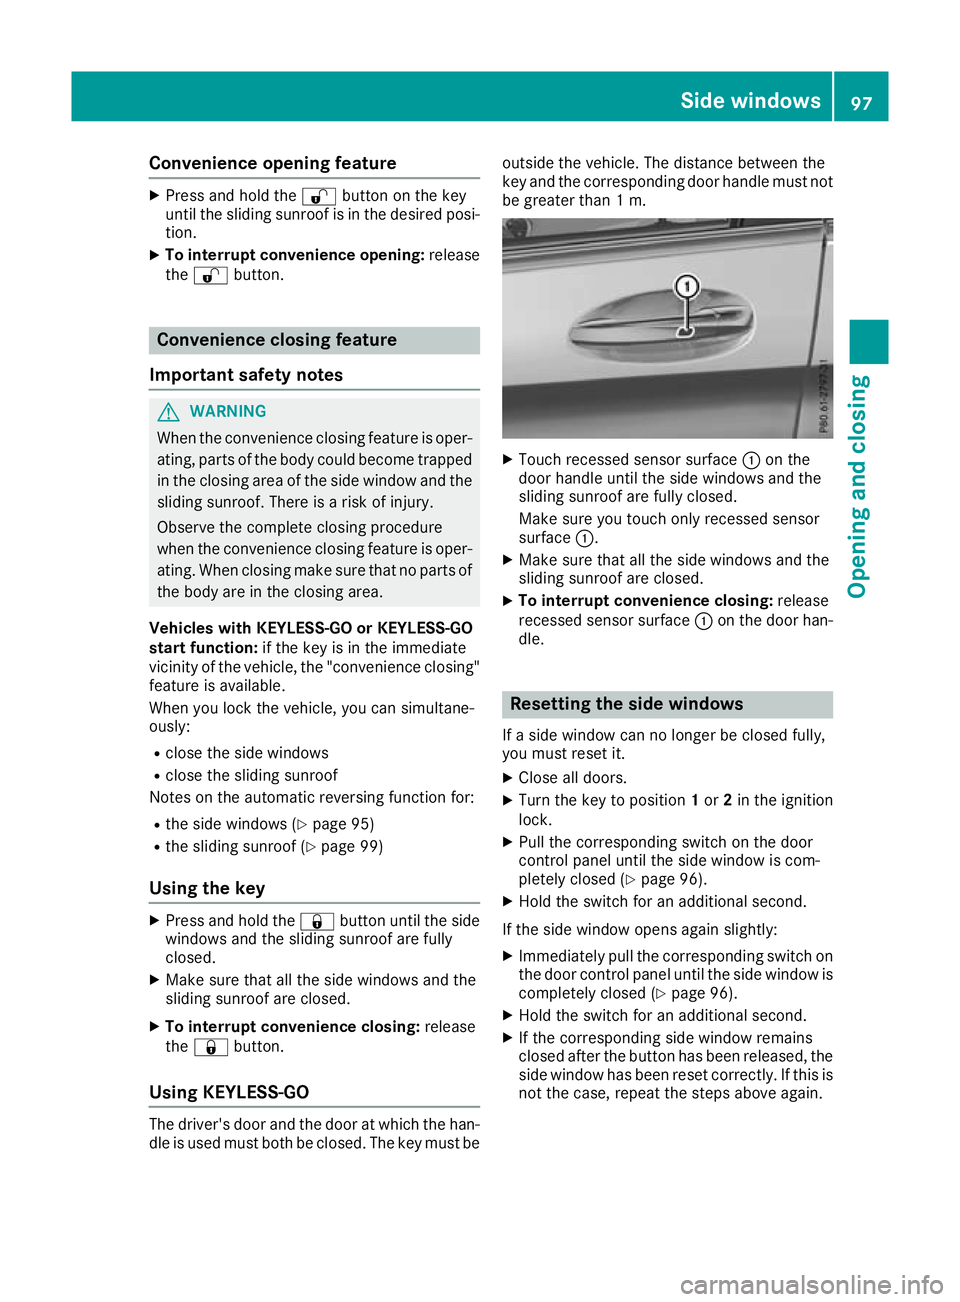
Touch recessed sensor surface :on the
door handle until the side windows and the
sliding sunroof are fully closed.
Make sure you touch only recessed sensor
surface :.
X Make sure that all the side windows and the
sliding sunroof are closed.
X To interrupt convenience closing: release
recessed sensor surface :on the door han-
dle. Resetting the side windows
If a side window can no longer be closed fully,
you must reset it.
X Close all doors.
X Turn the key to position 1or 2in the ignition
lock.
X Pull the corresponding switch on the door
control panel until the side window is com-
pletely closed (Y page 96).
X Hold the switch for an additional second.
If the side window opens again slightly: X Immediately pull the corresponding switch on
the door control panel until the side window is completely closed (Y page 96).
X Hold the switch for an additional second.
X If the corresponding side window remains
closed after the button has been released, the
side window has been reset correctly. If this is
not the case, repeat the steps above again. Side windows
97Opening and closing Z
Page 101 of 389
Problems with the side windows
G
WARNING
If you close a side window again immediately after it has been blocked or reset, the side window
closes with increased or maximum force. The reversing function is then not active. Parts of the
body could be trapped in the closing area in the process. This poses an increased risk of injury or even fatal injury.
Make sure that no parts of the body are in the closing area. To stop the closing process, releasethe switch or push the switch again to reopen the side window. Problem
Possible causes/consequences and
M MSolutions A side window cannot be
closed because it is
blocked by objects, e.g.
leaves in the window
guide. X
Remove the objects.
X Close the side window. A side window cannot be
closed and you cannot
see the cause. If a side window is obstructed during closing and reopens again
slightly:
X Immediately after the window blocks, pull the corresponding switch
again until the side window has closed.
The side window is closed with increased force.
If a side window is obstructed again during closing and reopens again slightly:
X Immediately after the window blocks, pull the corresponding switch
again until the side window has closed.
The side window is closed without the automatic reversing feature. Sliding sunroof
Important safety notes
G
WARNING
While opening and closing the sliding sunroof, body parts in close proximity could become
trapped. There is a risk of injury.
Make sure that no body parts are in close
proximity during the opening and closing pro- cedures.
If somebody becomes trapped:
R release the switch immediately, or
R during automatic operation, press the
switch briefly in any direction
The opening or closing procedure will be stop- ped. G
WARNING
If children operate the sliding sunroof they
could become trapped, particularly if they are left unsupervised. There is a risk of injury.
When leaving the vehicle, always take the key
with you and lock the vehicle. Never leave
children unattended in the vehicle.
! Only open the panorama sliding sunroof if it
is free of snow and ice. Otherwise, malfunc-
tions may occur.
Do not allow anything to protrude from the
sliding sunroof. Otherwise, the seals could be
damaged.
Resonance noises can occur in addition to the
usual airflow noises when the sliding sunroof is
open. They are caused by minor pressure fluc-
tuations in the vehicle interior. Change the posi- tion of the sliding sunroof or open a side window
slightly to reduce or eliminate these noises. 98
Sliding sunroofOpening and closing