2016 MERCEDES-BENZ GLC COUPE reset
[x] Cancel search: resetPage 241 of 389
X
Press :or9 to select the correspond-
ing DVD single drive or disc.
X Press ato confirm.
X To open the scene list: press the:or
9 button briefly.
X To select the next or previous scene in the
scene list: press the:or9 button
briefly.
X To select a scene from the scene list using
rapid scrolling: press and hold:or9
until desired scene :is reached.
X Press ato confirm your selection.
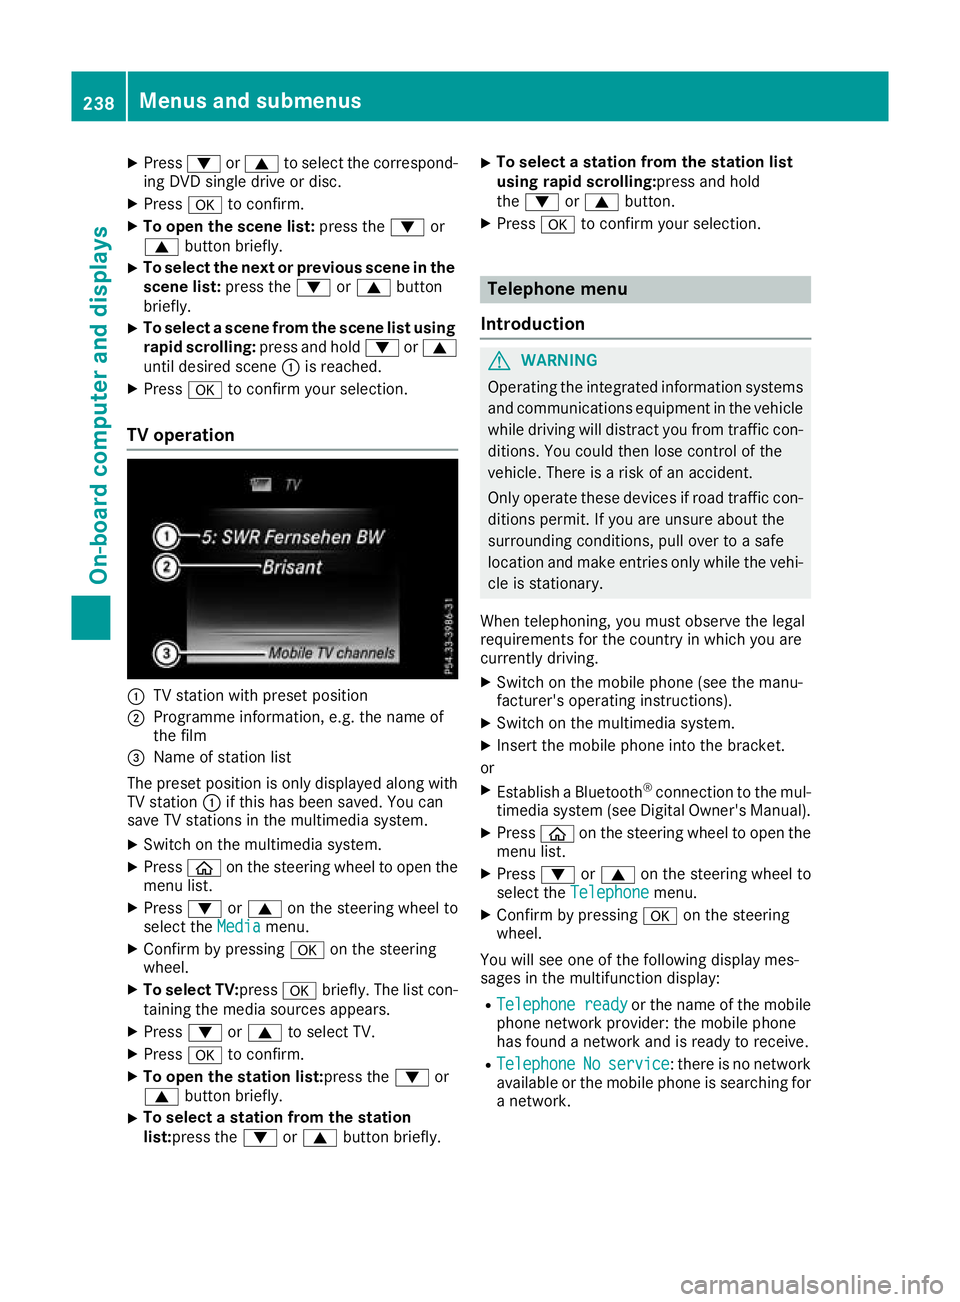
TV operation :
TV station with preset position
; Programme information, e.g. the name of
the film
= Name of station list
The preset position is only displayed along with TV station :if this has been saved. You can
save TV stations in the multimedia system.
X Switch on the multimedia system.
X Press òon the steering wheel to open the
menu list.
X Press :or9 on the steering wheel to
select the Media
Mediamenu.
X Confirm by pressing aon the steering
wheel.
X To select TV: pressabriefly. The list con-
taining the media sources appears.
X Press :or9 to select TV.
X Press ato confirm.
X To open the station list:press the :or
9 button briefly.
X To select a station from the station
list:press the
:or9 button briefly. X
To select a station from the station list
using rapid scrolling:press and hold
the
: or9 button.
X Press ato confirm your selection. Telephone menu
Introduction G
WARNING
Operating the integrated information systems and communications equipment in the vehicle
while driving will distract you from traffic con-
ditions. You could then lose control of the
vehicle. There is a risk of an accident.
Only operate these devices if road traffic con-
ditions permit. If you are unsure about the
surrounding conditions, pull over to a safe
location and make entries only while the vehi-
cle is stationary.
When telephoning, you must observe the legal
requirements for the country in which you are
currently driving. X Switch on the mobile phone (see the manu-
facturer's operating instructions).
X Switch on the multimedia system.
X Insert the mobile phone into the bracket.
or X Establish a Bluetooth ®
connection to the mul-
timedia system (see Digital Owner's Manual).
X Press òon the steering wheel to open the
menu list.
X Press :or9 on the steering wheel to
select the Telephone Telephone menu.
X Confirm by pressing aon the steering
wheel.
You will see one of the following display mes-
sages in the multifunction display:
R Telephone ready Telephone ready or the name of the mobile
phone network provider: the mobile phone
has found a network and is ready to receive.
R Telephone
Telephone No
Noservice
service: there is no network
available or the mobile phone is searching for
a network. 238
Menus and submenusOn-board computer and displays
Page 246 of 389
X
Press :or9 to select the desired dis-
play.
X Press the abutton to confirm the selec-
tion.
You can find more information on the navigation
displays in the multimedia system (see Digital
Owner's Manual).
Information on Traffic Sign Assist displays
(Y page 208).
Setting the position
You can adjust the position of the head-up dis-
play on the windscreen. You can compensate for height differences if the seat positions are
changed, for example.
X Switch on the head-up display (Y page 231).
X Press òon the steering wheel to open the
menu list.
X Press :or9 on the steering wheel to
select the Settings
Settings menu.
X Confirm by pressing aon the steering
wheel.
X Press :or9 to select the Head-up Head-up
display
display submenu.
X Press ato confirm.
X Press :or9 to select the Position
Position
function.
X Press ato change the setting.
X Press :or9 to adjust the position to a
level from Level
Level+5
+5(up) to Level
Level -5
-5(down).
X Press aor% to save the setting.
Using the Memory function, you can save and
call up the set position of the head-up display as a preset position (Y page 113).
Adjusting the brightness
The brightness of the head-up display is auto-
matically adjusted to the surrounding light con-
ditions. You can also individually adjust the
brightness of the head-up display.
X Switch on the head-up display (Y page 231).
X Press òon the steering wheel to open the
menu list.
X Press :or9 on the steering wheel to
select the Settings
Settings menu.
X Confirm by pressing aon the steering
wheel.
X Use : or9 to select the Head-up Head-up
display
display submenu.
X Press ato confirm. X
Press :or9 to select the Brightness
Brightness
function.
X Press the abutton to change the setting.
X Press :or9 to adjust the brightness
to a level from Level
Level+5
+5(bright) to Level
Level-5
-5
(dark).
X Press the aor% button to save the
setting.
Light submenu Switching the Intelligent Light System
on/off
X Press òon the steering wheel to open the
menu list.
X Press :or9 on the steering wheel to
select the Settings
Settings menu.
X Confirm by pressing aon the steering
wheel.
X Press :or9 to select the Lights
Lights
submenu.
X Press ato confirm.
X Press :or9 to select the Intelli‐ Intelli‐
gent Light System
gent Light System function.
If the Intelligent Light System
Intelligent Light System function
has been switched on, the cone of light and
the L symbol are shown in white and yel-
low respectively in the multifunction display.
X Press the abutton to change the setting.
If you switch on the Intelligent
IntelligentLight
LightSys‐
Sys‐
tem
tem function, the following functions are activa-
ted:
R Motorway mode
R Active light function
R Cornering light function
R Extended range foglamps
If you set the dipped-beam headlamps for driv-
ing on the right/left, the multifunction display
shows the Inactive Inactive for
forleft-side
left-side traffic
traffic
or Inactive for right-side traffic
Inactive for right-side traffic dis-
play message in the Lights
Lightssubmenu instead of
the Intelligent Light System
Intelligent Light System function
(Y page 244). This display message will only
appear if the setting for driving on the left/right is set opposite to your vehicle's country version.
Further information on the Intelligent Light Sys-
tem (Y page 118). Menus and submenus
243On-board computer and displays Z
Page 248 of 389
X
Confirm by pressing aon the steering
wheel.
X Press :or9 to select the Vehicle
Vehicle
submenu.
X Press ato confirm.
X Press :or9 to select the Limit
Limit
speed (winter tyres)
speed (winter tyres) function.
The current setting appears.
X Press ato confirm.
X Press :or9 to set permanent SPEED-
TRONIC in increments of ten (160 km/h 160 km/hto
240 km/h
240 km/h). The Off
Off setting switches perma-
nent SPEEDTRONIC off.
X Press the abutton to store the entry.
Further information on permanent SPEED-
TRONIC (Y page 177).
Restoring the factory settings X
Press the òbutton on the steering wheel
to open the menu list.
X Press :or9 on the steering wheel to
select the Settings Settings menu.
X Confirm by pressing aon the steering
wheel.
X Press :or9 to select the Factory
Factory
settings
settings submenu.
X Press ato confirm.
The Reset all settings?
Reset all settings? function
appears.
X Press :or9 to select No
NoorYes
Yes .
X Press the abutton to confirm the selec-
tion.
If you have selected Yes Yes, the multifunction
display shows a confirmation message.
For safety reasons, not all functions will be
reset: the Limit speed (winter tyres)
Limit speed (winter tyres) per-
manent SPEEDTRONIC function can only be set
in the Vehicle
Vehicle submenu. AMG menu (Mercedes-AMG vehicles)
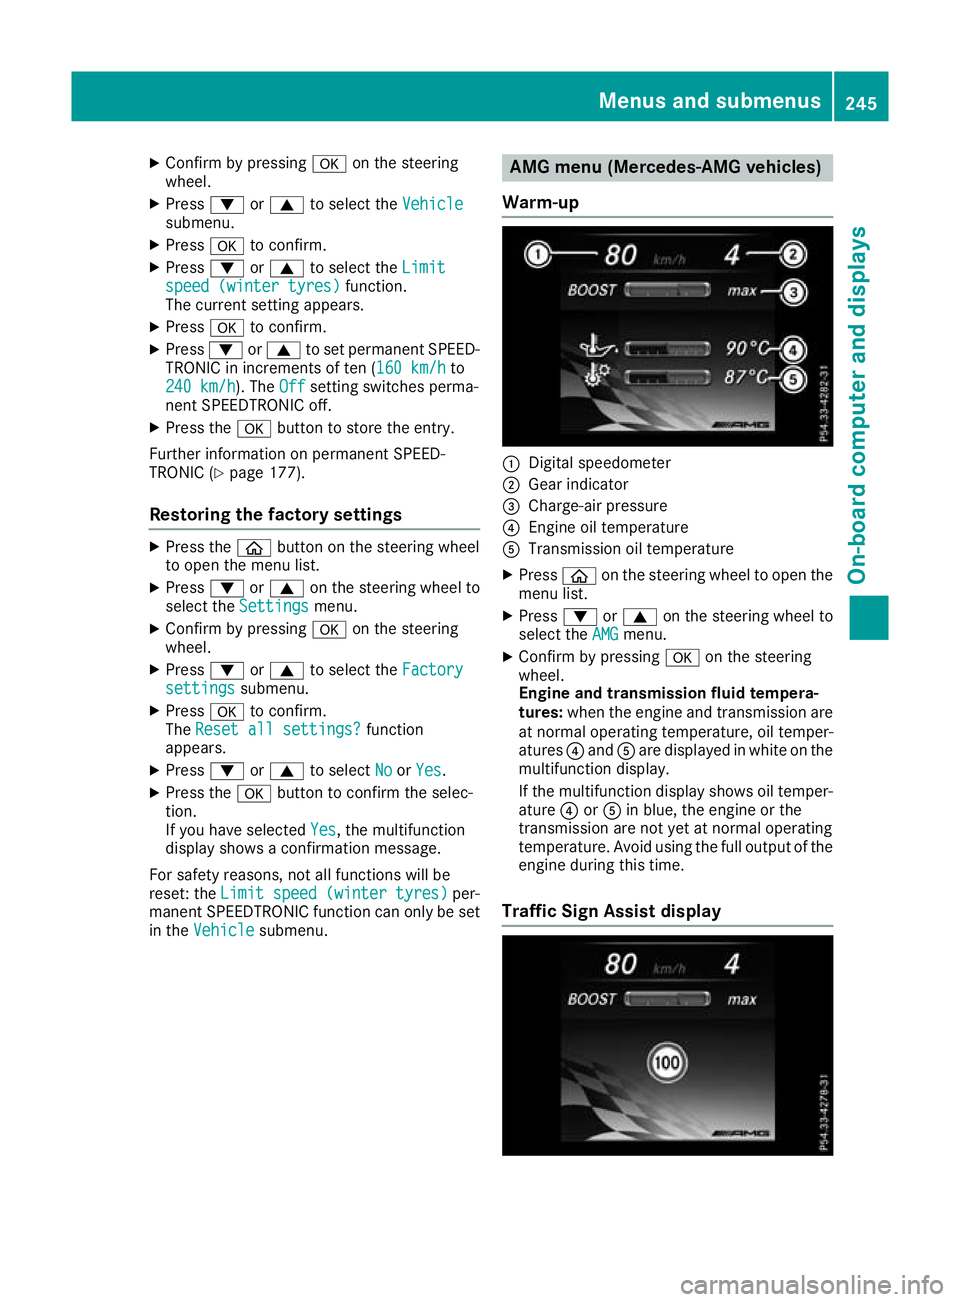
Warm-up :
Digital speedometer
; Gear indicator
= Charge-air pressure
? Engine oil temperature
A Transmission oil temperature
X Press òon the steering wheel to open the
menu list.
X Press :or9 on the steering wheel to
select the AMG
AMG menu.
X Confirm by pressing aon the steering
wheel.
Engine and transmission fluid tempera-
tures: when the engine and transmission are
at normal operating temperature, oil temper-
atures ?and Aare displayed in white on the
multifunction display.
If the multifunction display shows oil temper- ature ?orA in blue, the engine or the
transmission are not yet at normal operating
temperature. Avoid using the full output of the
engine during this time.
Traffic Sign Assist display Menus and submenus
245On-board computer and displays Z
Page 249 of 389
X
Switch on the display function for notes and
traffic signs (Y page 241).
X Press òon the steering wheel to open the
menu list.
X Press :or9 on the steering wheel to
select the AMG AMGmenu.
X Confirm by pressing aon the steering
wheel.
X Press the 9button repeatedly until the
Traffic Sign Assist display appears.
G-Meter While the vehicle is in motion, the G-Meter
shows the forces that are exerted on the driver
both laterally and in the direction of travel.
The maximum values are indicated in red in the
guideline system.
X Press òon the steering wheel to open the
menu list.
X Press :or9 on the steering wheel to
select the AMG
AMG menu.
X Confirm by pressing aon the steering
wheel.
X Press the 9button repeatedly until the G-
Meter appears.
The maximum values of the G-Meter are
saved.
X To reset the G-Meter: pressaagain.
X Using :or9 select Yes
Yes on the steer-
ing wheel.
X Press ato confirm.
The maximum values of the G-Meter are
deleted.
If the ignition remains switched off for longer
than four hours, the G-Meter will be automati-
cally reset. SETUP Overview
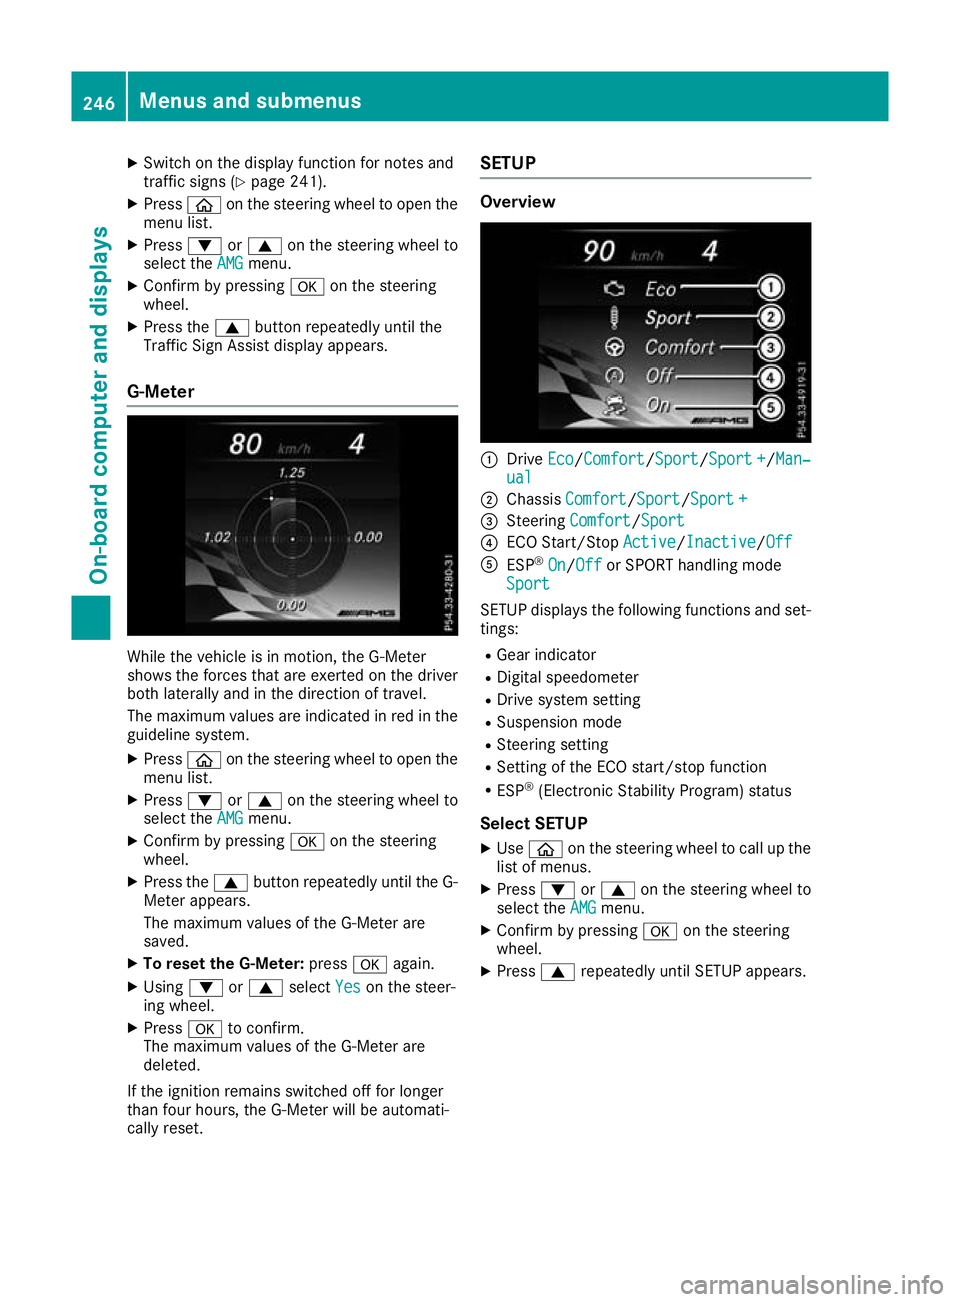
:
Drive Eco Eco/Comfort Comfort/ Sport
Sport/Sport +Sport+/Man‐
Man‐
ual
ual
; Chassis Comfort
Comfort/Sport Sport/Sport +Sport +
= Steering Comfort
Comfort/Sport Sport
? ECO Start/Stop Active
Active/InactiveInactive/Off Off
A ESP ®
On
On/Off Off or SPORT handling mode
Sport
Sport
SETUP displays the following functions and set- tings:
R Gear indicator
R Digital speedometer
R Drive system setting
R Suspension mode
R Steering setting
R Setting of the ECO start/stop function
R ESP ®
(Electronic Stability Program) status
Select SETUP X Use ò on the steering wheel to call up the
list of menus.
X Press :or9 on the steering wheel to
select the AMG
AMGmenu.
X Confirm by pressing aon the steering
wheel.
X Press 9repeatedly until SETUP appears. 246
Menus and submenusOn-board computer and displays
Page 250 of 389
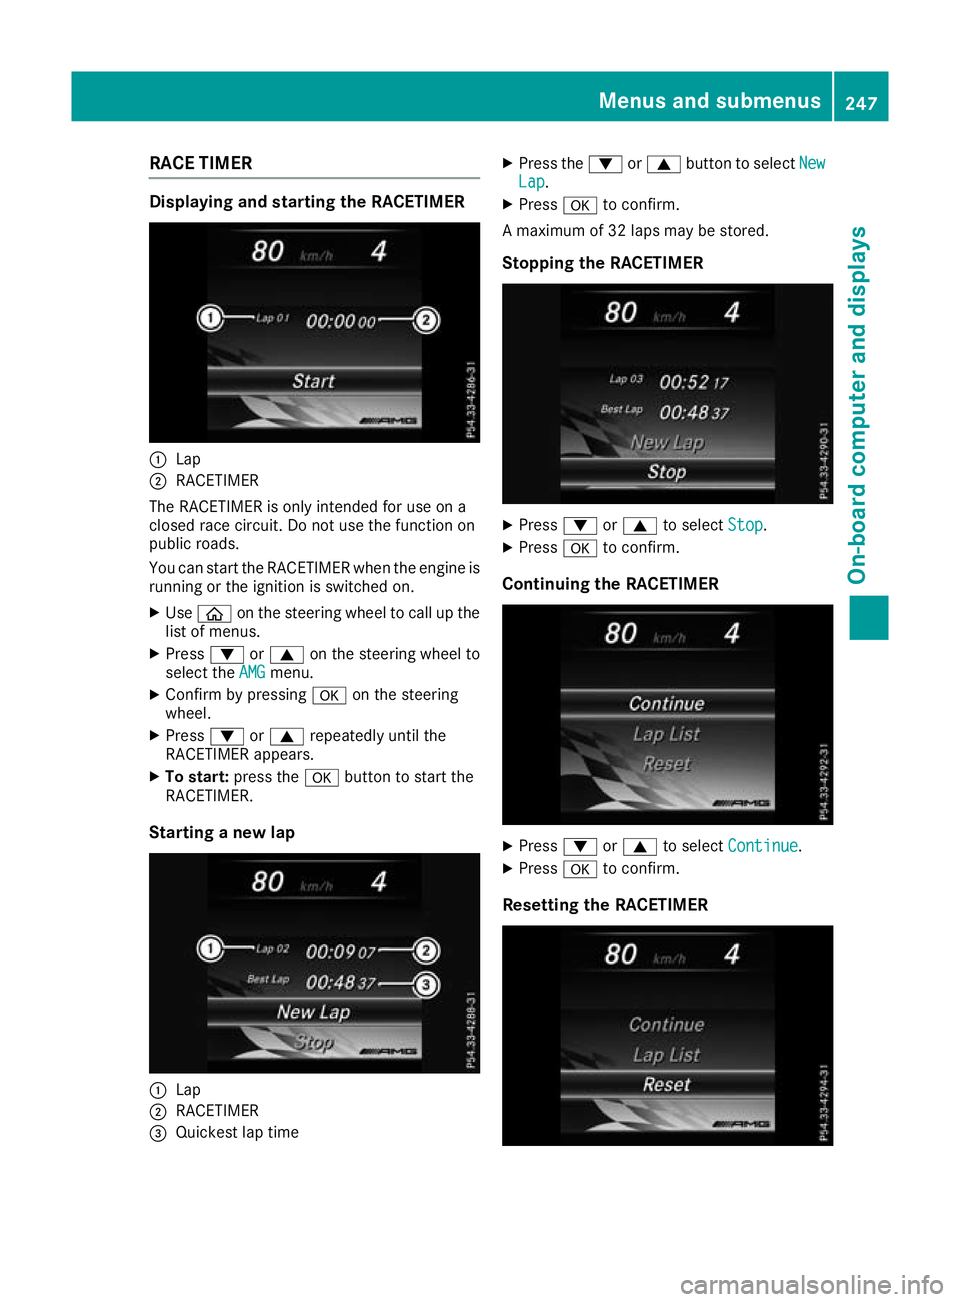
RACE TIMER
Displaying and starting the RACETIMER
:
Lap
; RACETIMER
The RACETIMER is only intended for use on a
closed race circuit. Do not use the function on
public roads.
You can start the RACETIMER when the engine is running or the ignition is switched on.
X Use ò on the steering wheel to call up the
list of menus.
X Press :or9 on the steering wheel to
select the AMG
AMG menu.
X Confirm by pressing aon the steering
wheel.
X Press :or9 repeatedly until the
RACETIMER appears.
X To start: press the abutton to start the
RACETIMER.
Starting a new lap :
Lap
; RACETIMER
= Quickest lap time X
Press the :or9 button to select New New
Lap Lap.
X Press ato confirm.
A maximum of 32 laps may be stored.
Stopping the RACETIMER X
Press :or9 to select Stop
Stop.
X Press ato confirm.
Continuing the RACETIMER X
Press :or9 to select Continue
Continue .
X Press ato confirm.
Resetting the RACETIMER Menus and submenus
247On-board computer and displays Z
Page 251 of 389
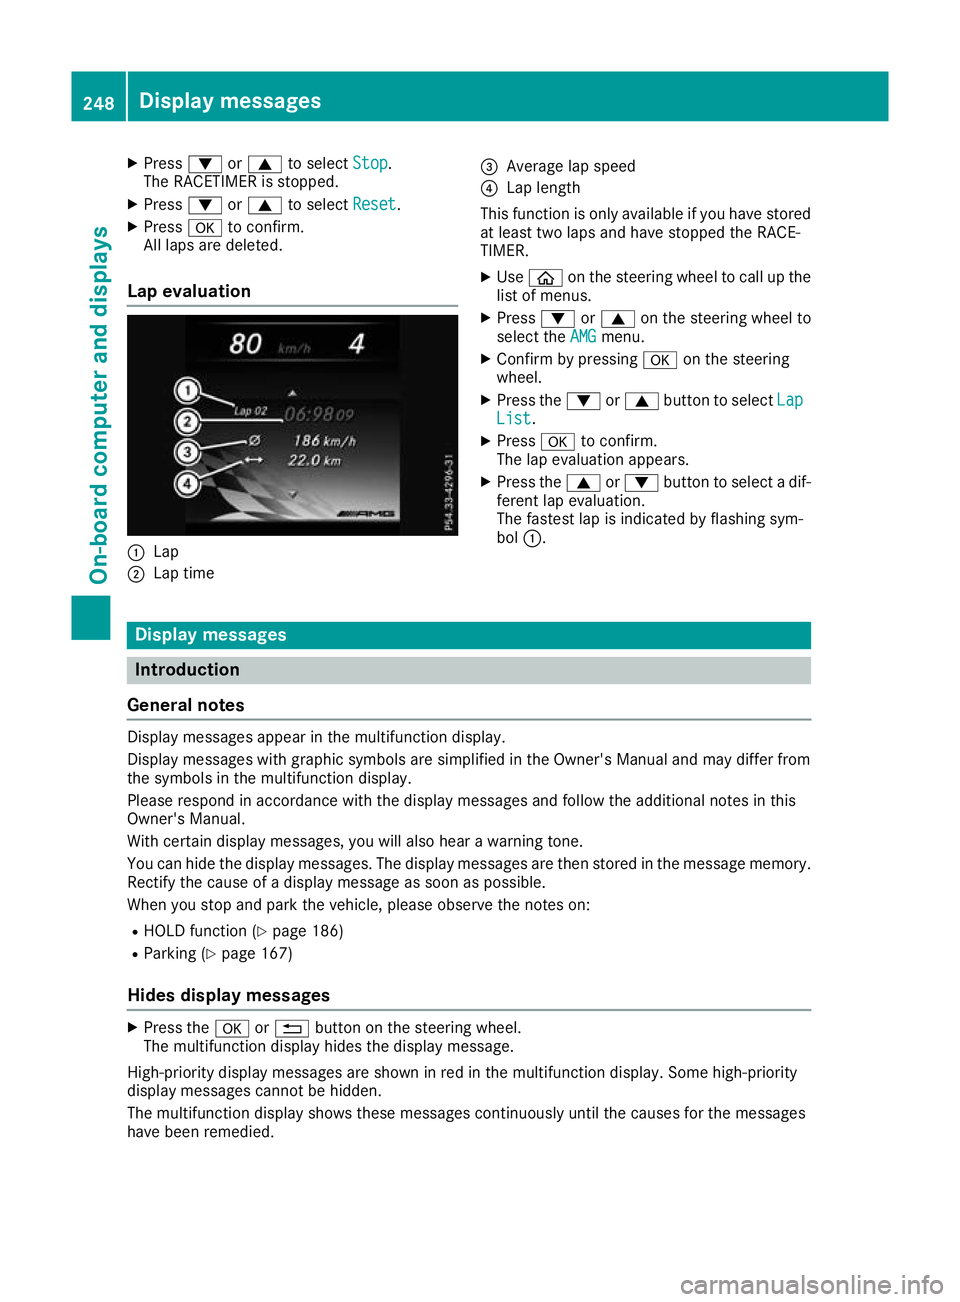
X
Press :or9 to select Stop Stop.
The RACETIMER is stopped.
X Press :or9 to select Reset Reset.
X Press ato confirm.
All laps are deleted.
Lap evaluation :
Lap
; Lap time =
Average lap speed
? Lap length
This function is only available if you have stored
at least two laps and have stopped the RACE-
TIMER.
X Use ò on the steering wheel to call up the
list of menus.
X Press :or9 on the steering wheel to
select the AMG AMGmenu.
X Confirm by pressing aon the steering
wheel.
X Press the :or9 button to select Lap
Lap
List
List.
X Press ato confirm.
The lap evaluation appears.
X Press the 9or: button to select a dif-
ferent lap evaluation.
The fastest lap is indicated by flashing sym-
bol :. Display messages
Introduction
General notes Display messages appear in the multifunction display.
Display messages with graphic symbols are simplified in the Owner's Manual and may differ from
the symbols in the multifunction display.
Please respond in accordance with the display messages and follow the additional notes in this
Owner's Manual.
With certain display messages, you will also hear a warning tone.
You can hide the display messages. The display messages are then stored in the message memory.
Rectify the cause of a display message as soon as possible.
When you stop and park the vehicle, please observe the notes on:
R HOLD function (Y page 186)
R Parking (Y page 167)
Hides display messages X
Press the aor% button on the steering wheel.
The multifunction display hides the display message.
High-priority display messages are shown in red in the multifunction display. Some high-priority
display messages cannot be hidden.
The multifunction display shows these messages continuously until the causes for the messages
have been remedied. 248
Display messagesOn-board computer and displays
Page 328 of 389
Engine compartment
Bonnet
Important safety notes G
WARNING
An unlocked bonnet may open up when the
vehicle is in motion and block your view. There is a risk of an accident.
Never unlock the bonnet when driving. Before
every trip, ensure that the bonnet is locked. G
WARNING
When being opened and closed, the bonnet
may suddenly fall into the closed position.
There is a risk of injury to persons in the range of movement of the bonnet.
Open and close the bonnet only when nobody
is in the range of movement. G
WARNING
If you open the bonnet while the engine is
overheating or while there is a fire in the
engine compartment, you could come into
contact with hot gases or other leaking ser-
vice products. There is a danger of injury.
Allow an overheating engine to cool down
before opening the bonnet. If there is a fire in the engine compartment, leave the bonnet
closed and notify the fire brigade. G
WARNING
There are moving components in the engine
compartment. Certain components may con-
tinue to move or suddenly move again even
after the ignition has been switched off, e.g.
the radiator fan. There is a risk of injury.
If you have to carry out work in the engine
compartment:
R switch off the ignition
R never touch the dangerous areas surround-
ing moving components, e.g. the rotation
area of the fan R
remove jewellery and watches
R keep items of clothing and hair, for exam-
ple, away from moving parts.
Hybrid vehicles: make sure that you read the
separate Owner's Manual. You could otherwise
fail to recognise dangers, e.g. due to high volt-
age.
Active bonnet (pedestrian protection) Operating principle
! An active bonnet that had been triggered
must be repaired at a qualified specialist
workshop. The active bonnet function will
then be available again. The additional pedes- trian protection provided by the active bonnet
will then be restored.
The active bonnet is available only in certain
countries.
The active bonnet can reduce the risk of injury to pedestrians in certain accident situations. Rais- ing the active bonnet increases the clearance tohard components, such as the engine.
If the active bonnet has been triggered, it is
raised at the rear in the area around the hinges
by approximately 80 mm. The active bonnet is
triggered by pyrotechnics.
For the drive to the workshop, reset the trig-
gered active bonnet yourself. If the active bon-
net has been triggered, pedestrian protection
may be limited.
Resetting G
WARNING
Certain components in the engine compart-
ment could be very hot, e.g. the engine, the
radiator and parts of the exhaust system.
There is a risk of injury when accessing the
engine compartment.
As far as possible, allow the engine to cool
down and only touch the components descri- bed in the following. Engine compartment
325Maintenance and care Z
Page 333 of 389
X
To open: pull cap:upwards by the tab and
open.
X Top up with the premixed washer fluid.
X To close: press cap :onto the filler neck
until it engages.
If the washer fluid level drops below the recom- mended minimum of 1.0 l, a message appears
on the multifunction display prompting you to
top up the washer fluid (Y page 279).
Further information on washer fluid
(Y page 378). ASSYST PLUS
Service message
The ASSYST PLUS service interval display
informs you of the next service due date.
Information on the type of service and service
intervals (see the separate Service Booklet).
Further information can be obtained at a quali-
fied specialist workshop, e.g. a Mercedes-Benz
Service Centre.
i The ASSYST PLUS service interval display
does not show any information on the engine oil level. Observe the notes on the engine oil
level (Y page 327).
The multifunction display shows a service mes-
sage for a few seconds, e.g.:
R Service A in XX days
Service A in XX days
R Service A due Service A due
R Service A overdue by XX days
Service A overdue by XX days
Depending on the operating conditions of the
vehicle, the remaining time or distance until the next service due date is displayed.
The letter indicates which service is due. A
A
stands for a minor service and B Bfor a major ser-
vice. A number or another letter may be dis-
played after the letter.
For certain countries only: the position after the
letter A Aor B
Bindicates any necessary additional
maintenance work. If you notify a qualified spe-
cialist workshop of this display, you will receive a statement on the associated costs.
The ASSYST PLUS service interval display does
not take into account any periods of time during
which the battery is disconnected. Maintaining the time-dependent service sched-
ule:
X Note down the service due date displayed in
the multifunction display before disconnect-
ing the battery.
or X After reconnecting the battery, subtract the
battery disconnection periods from the ser-
vice date shown on the display. Hiding service messages
X Press the aor% button on the steering
wheel. Displaying service messages
X Switch the ignition on.
X Use ò on the steering wheel to call up the
list of menus.
X Press 9or: on the steering wheel to
select the Service Servicemenu and confirm with
a.
X Press 9or: on the steering wheel to
select the ASSYST PLUS
ASSYST PLUS submenu and con-
firm with a.
The service due date appears in the multi-
function display. Information about service
Resetting the ASSYST PLUS service
interval display !
If the ASSYST PLUS service interval display
has been inadvertently reset, this setting can
be corrected at a qualified specialist work-
shop.
Have service work carried out as described in the Service Booklet. This may otherwise lead
to increased wear and damage to the major
assemblies or the vehicle.
A qualified specialist workshop, e.g. a
Mercedes-Benz Service Centre, will reset the
ASSYST PLUS service interval display after the
service work has been carried out. You can also
obtain further information on maintenance
work, for example. 330
ASSYST PLUSMaintenance and care