2016 MERCEDES-BENZ GLC COUPE lights
[x] Cancel search: lightsPage 162 of 389
Temporary setting
X
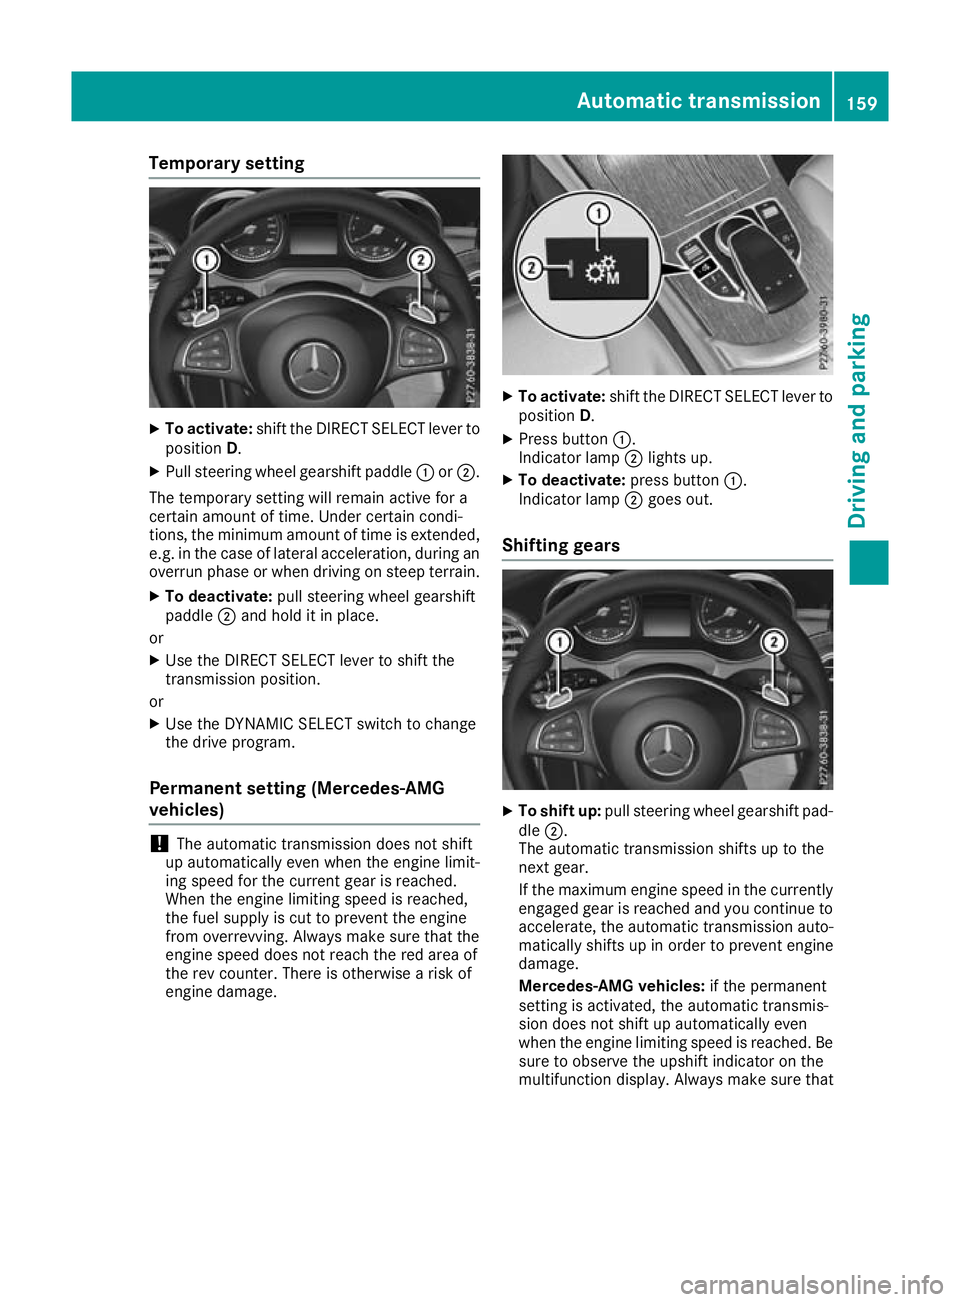
To activate: shift the DIRECT SELECT lever to
position D.
X Pull steering wheel gearshift paddle :or;.
The temporary setting will remain active for a
certain amount of time. Under certain condi-
tions, the minimum amount of time is extended,
e.g. in the case of lateral acceleration, during an overrun phase or when driving on steep terrain.
X To deactivate: pull steering wheel gearshift
paddle ;and hold it in place.
or X Use the DIRECT SELECT lever to shift the
transmission position.
or X Use the DYNAMIC SELECT switch to change
the drive program.
Permanent setting (Mercedes-AMG
vehicles) !
The automatic transmission does not shift
up automatically even when the engine limit-
ing speed for the current gear is reached.
When the engine limiting speed is reached,
the fuel supply is cut to prevent the engine
from overrevving. Always make sure that the
engine speed does not reach the red area of
the rev counter. There is otherwise a risk of
engine damage. X
To activate: shift the DIRECT SELECT lever to
position D.
X Press button :.
Indicator lamp ;lights up.
X To deactivate: press button:.
Indicator lamp ;goes out.
Shifting gears X
To shift up: pull steering wheel gearshift pad-
dle ;.
The automatic transmission shifts up to the
next gear.
If the maximum engine speed in the currently engaged gear is reached and you continue to
accelerate, the automatic transmission auto-
matically shifts up in order to prevent engine
damage.
Mercedes-AMG vehicles: if the permanent
setting is activated, the automatic transmis-
sion does not shift up automatically even
when the engine limiting speed is reached. Be
sure to observe the upshift indicator on the
multifunction display. Always make sure that Automatic transmission
159Driving and parking Z
Page 172 of 389
X
If this is the case, park the vehicle only on
level ground and secure it to prevent it from
rolling away.
X Shift the automatic transmission to position
P.
It may not be possible to release an applied
parking brake if the on-board voltage is low or if there is a malfunction in the system. Contact a
qualified specialist workshop.
The electric parking brake carries out a function
check at regular intervals when the engine is
switched off. Noises that occur are normal.
Applying or releasing manually X
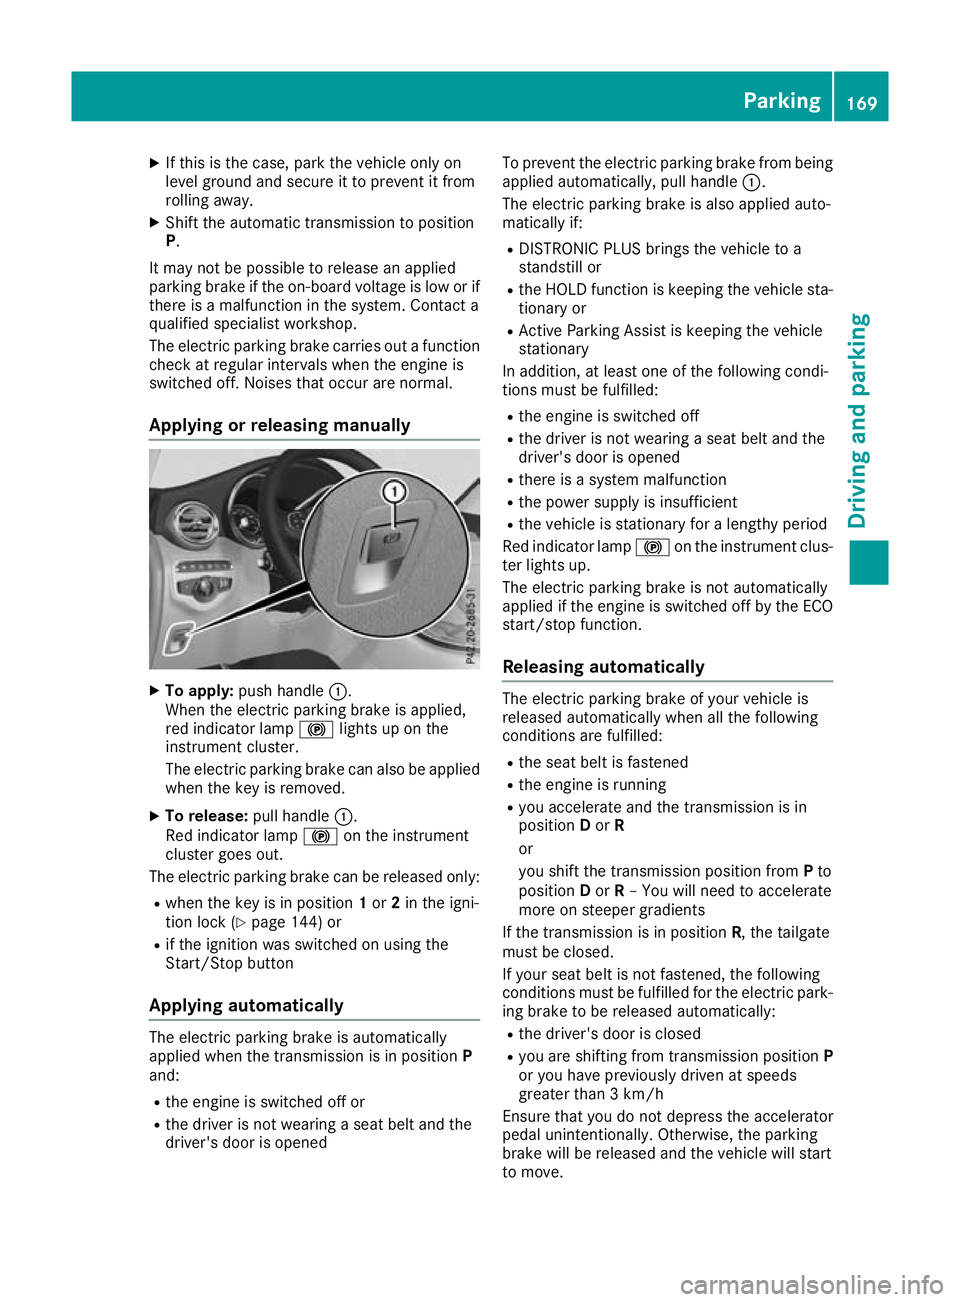
To apply: push handle :.
When the electric parking brake is applied,
red indicator lamp !lights up on the
instrument cluster.
The electric parking brake can also be applied when the key is removed.
X To release: pull handle:.
Red indicator lamp !on the instrument
cluster goes out.
The electric parking brake can be released only:
R when the key is in position 1or 2in the igni-
tion lock (Y page 144) or
R if the ignition was switched on using the
Start/Stop button
Applying automatically The electric parking brake is automatically
applied when the transmission is in position P
and:
R the engine is switched off or
R the driver is not wearing a seat belt and the
driver's door is opened To prevent the electric parking brake from being
applied automatically, pull handle :.
The electric parking brake is also applied auto-
matically if:
R DISTRONIC PLUS brings the vehicle to a
standstill or
R the HOLD function is keeping the vehicle sta-
tionary or
R Active Parking Assist is keeping the vehicle
stationary
In addition, at least one of the following condi-
tions must be fulfilled:
R the engine is switched off
R the driver is not wearing a seat belt and the
driver's door is opened
R there is a system malfunction
R the power supply is insufficient
R the vehicle is stationary for a lengthy period
Red indicator lamp !on the instrument clus-
ter lights up.
The electric parking brake is not automatically
applied if the engine is switched off by the ECO
start/stop function.
Releasing automatically The electric parking brake of your vehicle is
released automatically when all the following
conditions are fulfilled:
R the seat belt is fastened
R the engine is running
R you accelerate and the transmission is in
position Dor R
or
you shift the transmission position from Pto
position Dor R– You will need to accelerate
more on steeper gradients
If the transmission is in position R, the tailgate
must be closed.
If your seat belt is not fastened, the following
conditions must be fulfilled for the electric park- ing brake to be released automatically:
R the driver's door is closed
R you are shifting from transmission position P
or you have previously driven at speeds
greater than 3 km/h
Ensure that you do not depress the accelerator
pedal unintentionally. Otherwise, the parking
brake will be released and the vehicle will start
to move. Parking
169Driving and parking Z
Page 174 of 389
display. In addition, warning lamp
8on the
instrument cluster lights up (Y page 286).
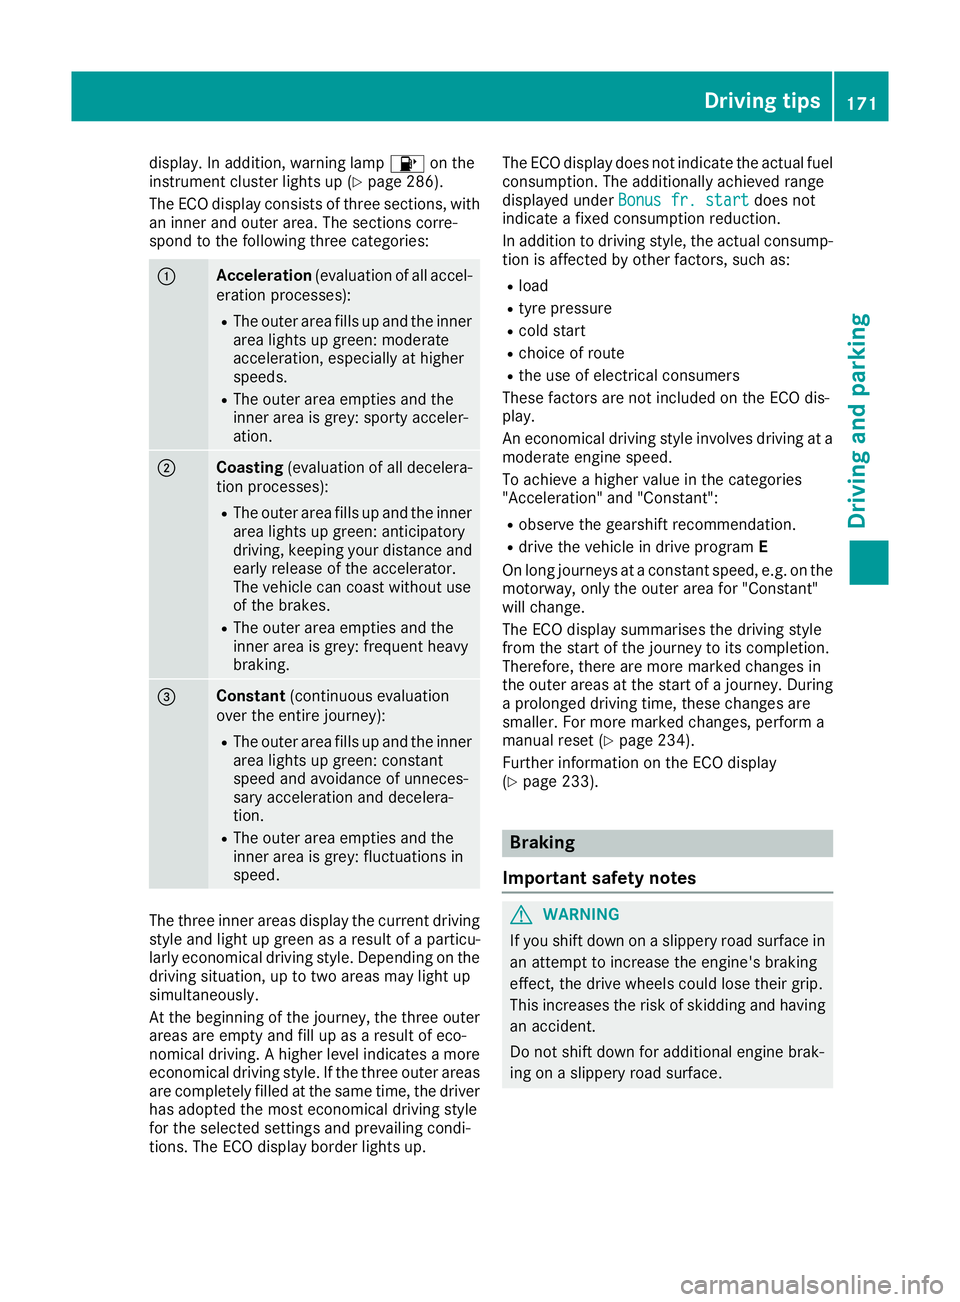
The ECO display consists of three sections, with an inner and outer area. The sections corre-
spond to the following three categories: :
Acceleration
(evaluation of all accel-
eration processes):
R The outer area fills up and the inner
area lights up green: moderate
acceleration, especially at higher
speeds.
R The outer area empties and the
inner area is grey: sporty acceler-
ation. ;
Coasting
(evaluation of all decelera-
tion processes):
R The outer area fills up and the inner
area lights up green: anticipatory
driving, keeping your distance and early release of the accelerator.
The vehicle can coast without use
of the brakes.
R The outer area empties and the
inner area is grey: frequent heavy
braking. =
Constant
(continuous evaluation
over the entire journey):
R The outer area fills up and the inner
area lights up green: constant
speed and avoidance of unneces-
sary acceleration and decelera-
tion.
R The outer area empties and the
inner area is grey: fluctuations in
speed. The three inner areas display the current driving
style and light up green as a result of a particu-
larly economical driving style. Depending on the driving situation, up to two areas may light up
simultaneously.
At the beginning of the journey, the three outer
areas are empty and fill up as a result of eco-
nomical driving. A higher level indicates a more
economical driving style. If the three outer areas
are completely filled at the same time, the driver
has adopted the most economical driving style
for the selected settings and prevailing condi-
tions. The ECO display border lights up. The ECO display does not indicate the actual fuel
consumption. The additionally achieved range
displayed under Bonus fr. start
Bonus fr. start does not
indicate a fixed consumption reduction.
In addition to driving style, the actual consump- tion is affected by other factors, such as:
R load
R tyre pressure
R cold start
R choice of route
R the use of electrical consumers
These factors are not included on the ECO dis-
play.
An economical driving style involves driving at a moderate engine speed.
To achieve a higher value in the categories
"Acceleration" and "Constant":
R observe the gearshift recommendation.
R drive the vehicle in drive program E
On long journeys at a constant speed, e.g. on the motorway, only the outer area for "Constant"
will change.
The ECO display summarises the driving style
from the start of the journey to its completion.
Therefore, there are more marked changes in
the outer areas at the start of a journey. During
a prolonged driving time, these changes are
smaller. For more marked changes, perform a
manual reset (Y page 234).
Further information on the ECO display
(Y page 233). Braking
Important safety notes G
WARNING
If you shift down on a slippery road surface in an attempt to increase the engine's braking
effect, the drive wheels could lose their grip.
This increases the risk of skidding and having
an accident.
Do not shift down for additional engine brak-
ing on a slippery road surface. Driving tips
171Driving and parking Z
Page 186 of 389
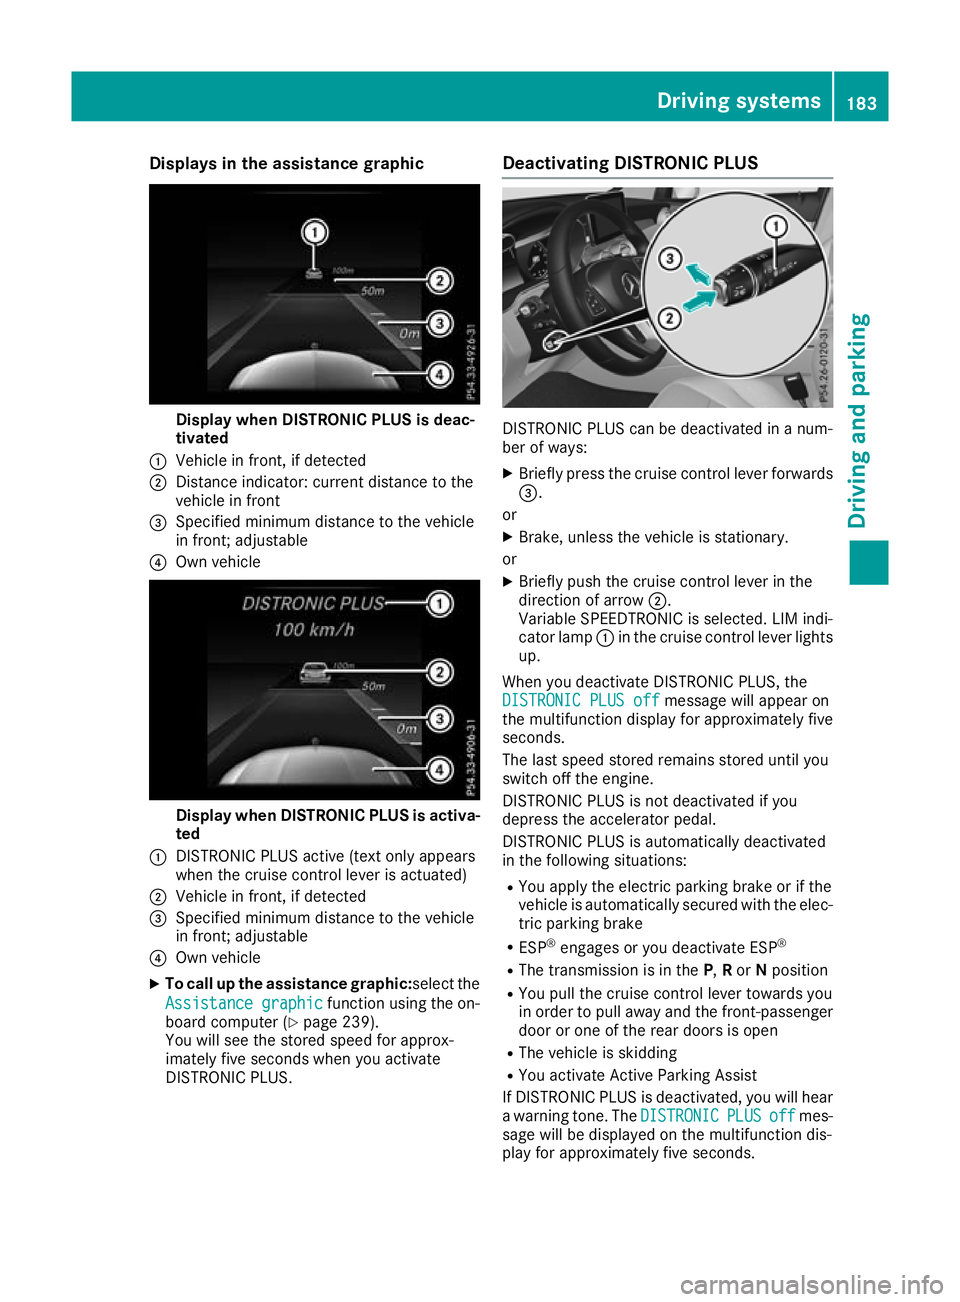
Displays in the assistance graphic
Display when DISTRONIC PLUS is deac-
tivated
: Vehicle in front, if detected
; Distance indicator: current distance to the
vehicle in front
= Specified minimum distance to the vehicle
in front; adjustable
? Own vehicle Display when DISTRONIC PLUS is activa-
ted
: DISTRONIC PLUS active (text only appears
when the cruise control lever is actuated)
; Vehicle in front, if detected
= Specified minimum distance to the vehicle
in front; adjustable
? Own vehicle
X To call up the assistance graphic:select the
Assistance graphic
Assistance graphic function using the on-
board computer (Y page 239).
You will see the stored speed for approx-
imately five seconds when you activate
DISTRONIC PLUS. Deactivating DISTRONIC PLUS
DISTRONIC PLUS can be deactivated in a num-
ber of ways:
X Briefly press the cruise control lever forwards
=.
or X Brake, unless the vehicle is stationary.
or X Briefly push the cruise control lever in the
direction of arrow ;.
Variable SPEEDTRONIC is selected. LIM indi-
cator lamp :in the cruise control lever lights
up.
When you deactivate DISTRONIC PLUS, the DISTRONIC PLUS off DISTRONIC PLUS off message will appear on
the multifunction display for approximately five
seconds.
The last speed stored remains stored until you
switch off the engine.
DISTRONIC PLUS is not deactivated if you
depress the accelerator pedal.
DISTRONIC PLUS is automatically deactivated
in the following situations:
R You apply the electric parking brake or if the
vehicle is automatically secured with the elec-
tric parking brake
R ESP ®
engages or you deactivate ESP ®
R The transmission is in the P,Ror Nposition
R You pull the cruise control lever towards you
in order to pull away and the front-passenger
door or one of the rear doors is open
R The vehicle is skidding
R You activate Active Parking Assist
If DISTRONIC PLUS is deactivated, you will hear
a warning tone. The DISTRONIC DISTRONICPLUS
PLUSoff
offmes-
sage will be displayed on the multifunction dis-
play for approximately five seconds. Driving syste
ms
183Driving an d parking Z
Page 187 of 389
Tips for driving with DISTRONIC PLUS
General notes
Pay particular attention in the following traffic
situations:
R Cornering, entering and exiting a bend: the
ability of DISTRONIC PLUS to detect vehicles
when cornering is limited. Your vehicle may
brake unexpectedly or late.
R Driving on a different line: DISTRONIC PLUS
may not detect vehicles that are not driving in the middle of their lane. The distance to the
vehicle in front will be too short.
R Other vehicles changing lane: DISTRONIC
PLUS has not detected the vehicle cutting in
yet. The distance to this vehicle will be too
short.
R Narrow vehicles: DISTRONIC PLUS has not
yet detected the vehicle in front on the edge
of the carriageway because of its narrow
width. The distance to the vehicle in front will
be too short.
R Obstacles and stationary vehicles:
DISTRONIC PLUS does not brake for obsta-
cles or stationary vehicles. If, for example, the
detected vehicle turns a corner and reveals an
obstacle or stationary vehicle, DISTRONIC
PLUS will not brake for these.
R Crossing vehicles: DISTRONIC PLUS may mis-
takenly detect vehicles that are crossing your
lane. Activating DISTRONIC PLUS at traffic
lights with crossing traffic, for example, could
cause your vehicle to pull away unintention-
ally.
In such situations, brake if necessary.
DISTRONIC PLUS is then deactivated. DISTRONIC PLUS with Steering Assist
and Stop&Go Pilot General notes
DISTRONIC PLUS with Steering Assist and
Stop&Go Pilot aids you in keeping the vehicle in
the centre of the driving lane by means of mod-
erate steering interventions in a speed range
from 0–200 km/h.
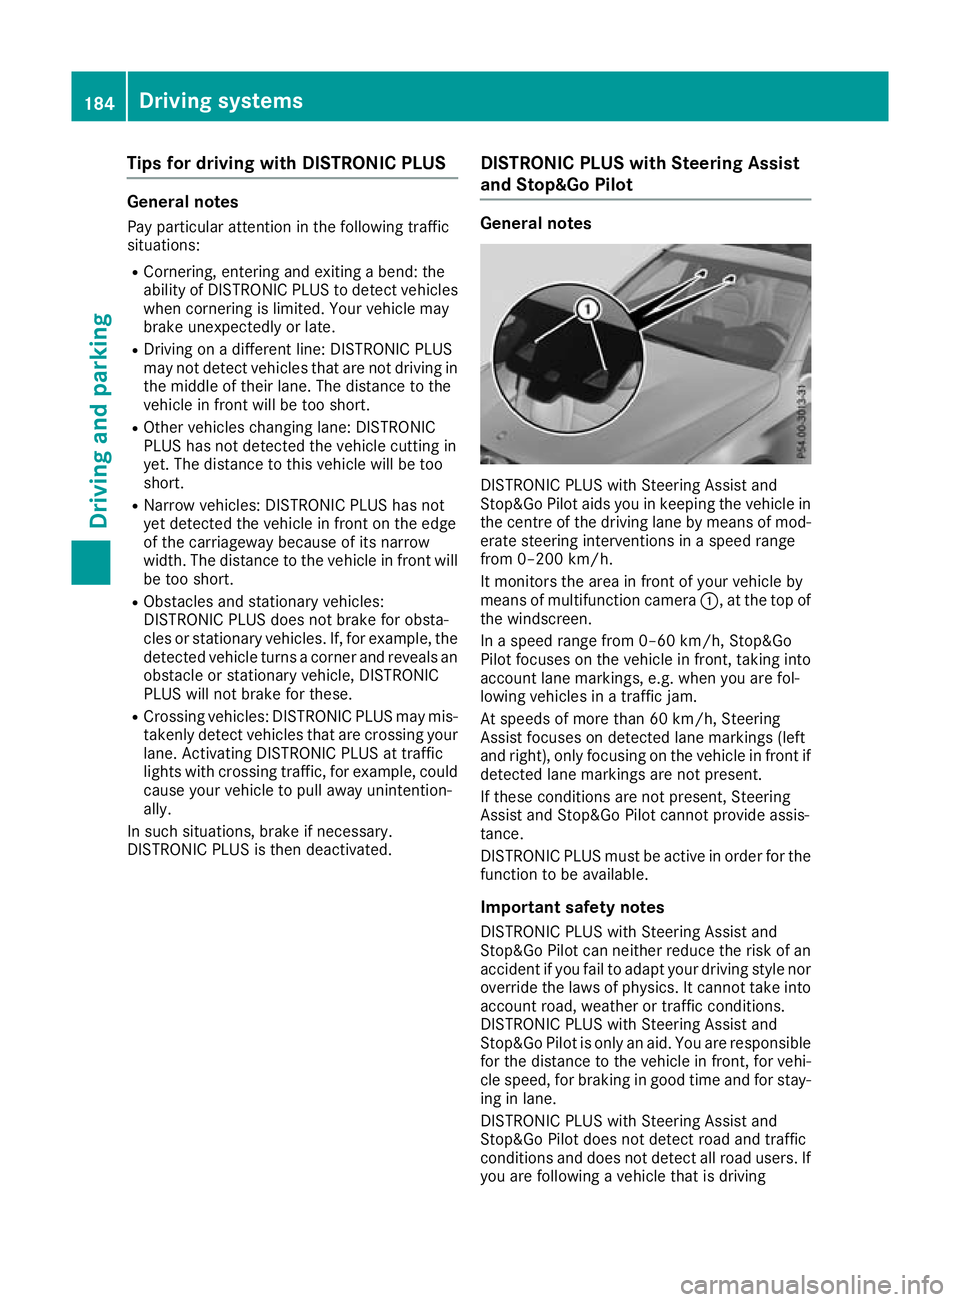
It monitors the area in front of your vehicle by
means of multifunction camera :, at the top of
the windscreen.
In a speed range from 0–60 km/h, Stop&Go
Pilot focuses on the vehicle in front, taking into
account lane markings, e.g. when you are fol-
lowing vehicles in a traffic jam.
At speeds of more than 60 km/h, Steering
Assist focuses on detected lane markings (left
and right), only focusing on the vehicle in front if detected lane markings are not present.
If these conditions are not present, Steering
Assist and Stop&Go Pilot cannot provide assis-
tance.
DISTRONIC PLUS must be active in order for the
function to be available.
Important safety notesDISTRONIC PLUS with Steering Assist and
Stop&Go Pilot can neither reduce the risk of an
accident if you fail to adapt your driving style nor
override the laws of physics. It cannot take into account road, weather or traffic conditions.
DISTRONIC PLUS with Steering Assist and
Stop&Go Pilot is only an aid. You are responsible
for the distance to the vehicle in front, for vehi-
cle speed, for braking in good time and for stay- ing in lane.
DISTRONIC PLUS with Steering Assist and
Stop&Go Pilot does not detect road and traffic
conditions and does not detect all road users. If
you are following a vehicle that is driving 184
Driving systemsDriving an
d parking
Page 188 of 389
towards the edge of the carriageway, your vehi-
cle could come into contact with the kerb or
other road boundaries. Be particularly aware of
other road users, e.g. cyclists, that are directly
next to your vehicle.
Obstacles such as traffic pylons on the lane or
projecting out into the lane are not detected.
An inappropriate steering intervention, e.g. after
you have intentionally driven over a lane mark-
ing, can be corrected at any time if you steer
slightly in the opposite direction.
DISTRONIC PLUS with Steering Assist and
Stop&Go Pilot cannot continuously keep your
vehicle in lane. In some cases, the steering
intervention is not sufficient to bring the vehicle back to the lane. In such cases, you must steer the vehicle yourself to ensure that it does not
leave the lane.
The system may be impaired or may not function
in the following situations:
R poor visibility, e.g. due to insufficient illumi-
nation of the road, or due to snow, rain, fog or
spray
R glare, e.g. from oncoming traffic, the sun or
reflection from other vehicles (e.g. if the road
surface is wet)
R the windscreen is dirty, misted up, damaged
or covered, for instance by a sticker, in the
vicinity of the camera
R no or several, unclear lane markings are pres-
ent for one lane, e.g. in a construction area
R the lane markings are worn away, dark or cov-
ered up, e.g. by dirt or snow
R the distance to the vehicle in front is so small
that the lane markings cannot be detected
R the lane markings change quickly, e.g. lanes
branch off, cross one another or merge
R the road is narrow and winding
R there are highly variable shade conditions on
the roadway
The system is switched to passive and no longer assists you by performing steering interventions
if:
R you actively change lane
R you switch on the turn signal
R you take your hands off the steering wheel or
do not steer for a prolonged period of time
After you have finished changing lanes, Steering Assist and Stop&Go Pilot are automatically
active again. Steering Assist and Stop&Go Pilot cannot pro-
vide assistance in the following situations:
R on very sharp corners
R when a loss of tyre pressure or a defective
tyre has been detected and displayed
Also observe the important safety notes for
DISTRONIC PLUS (Y page 178).
The steering interventions are carried out with a
limited steering moment. The system requires
the driver to keep his hands on the steering
wheel and to steer himself.
If you do not steer yourself or if you take your
hands off the steering wheel for a prolonged
period of time, the system will first alert you with a visual warning. A steering wheel symbol
appears on the multifunction display. If you have
still not started to steer and have not taken hold
of the steering wheel after five seconds at the
latest, a warning tone also sounds to remind you to take control of the vehicle. Steering Assist
and Stop&Go Pilot switch to passive mode.
DISTRONIC PLUS remains activated.
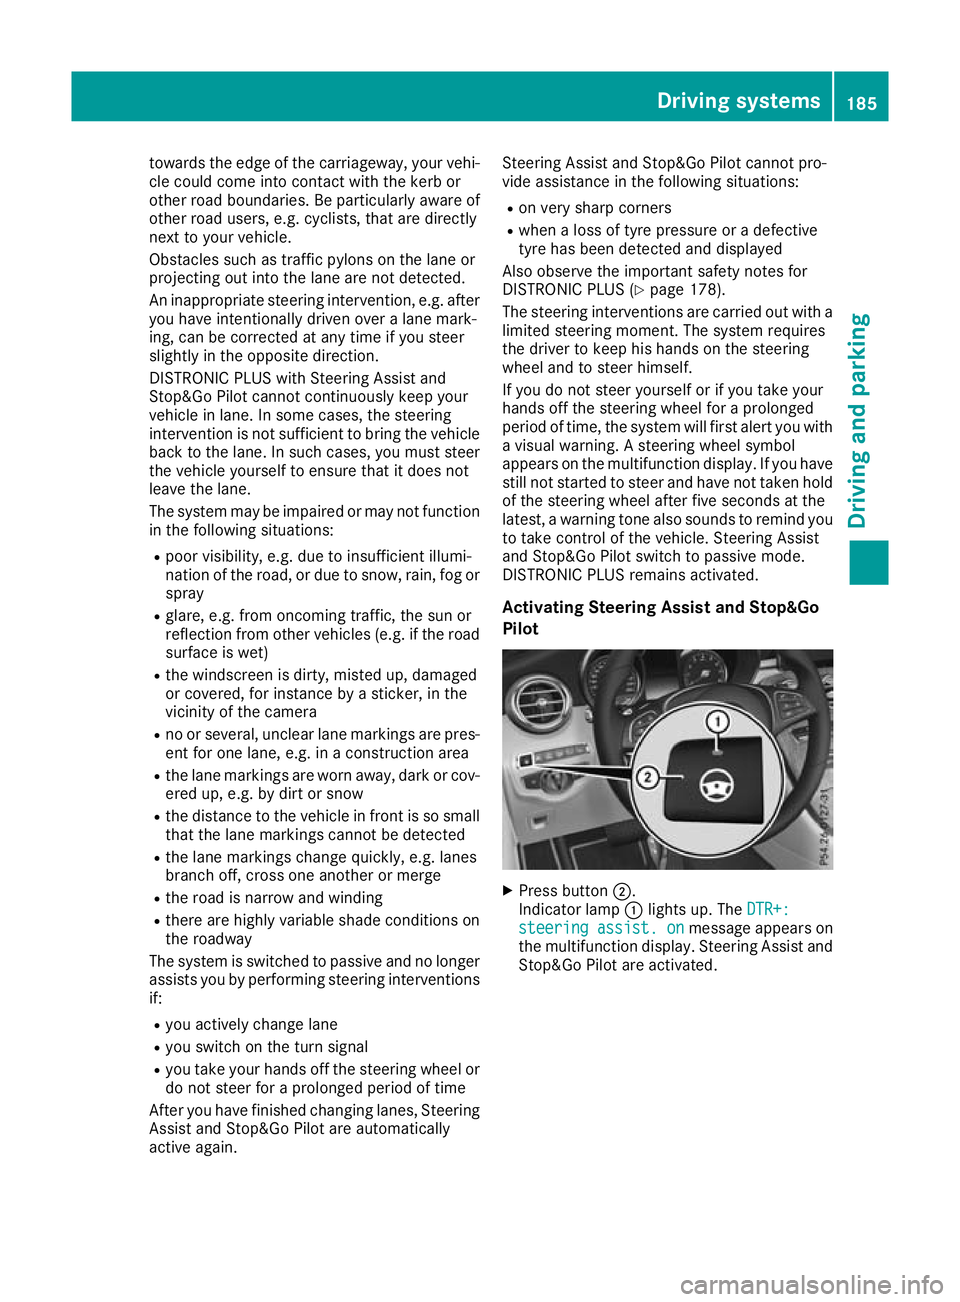
Activating Steering Assist and Stop&Go
Pilot X
Press button ;.
Indicator lamp :lights up. The DTR+: DTR+:
steering
steering assist.
assist.on
onmessage appears on
the multifunction display. Steering Assist and Stop&Go Pilot are activated. Driving systems
185Driving and parking Z
Page 191 of 389
Vehicle level
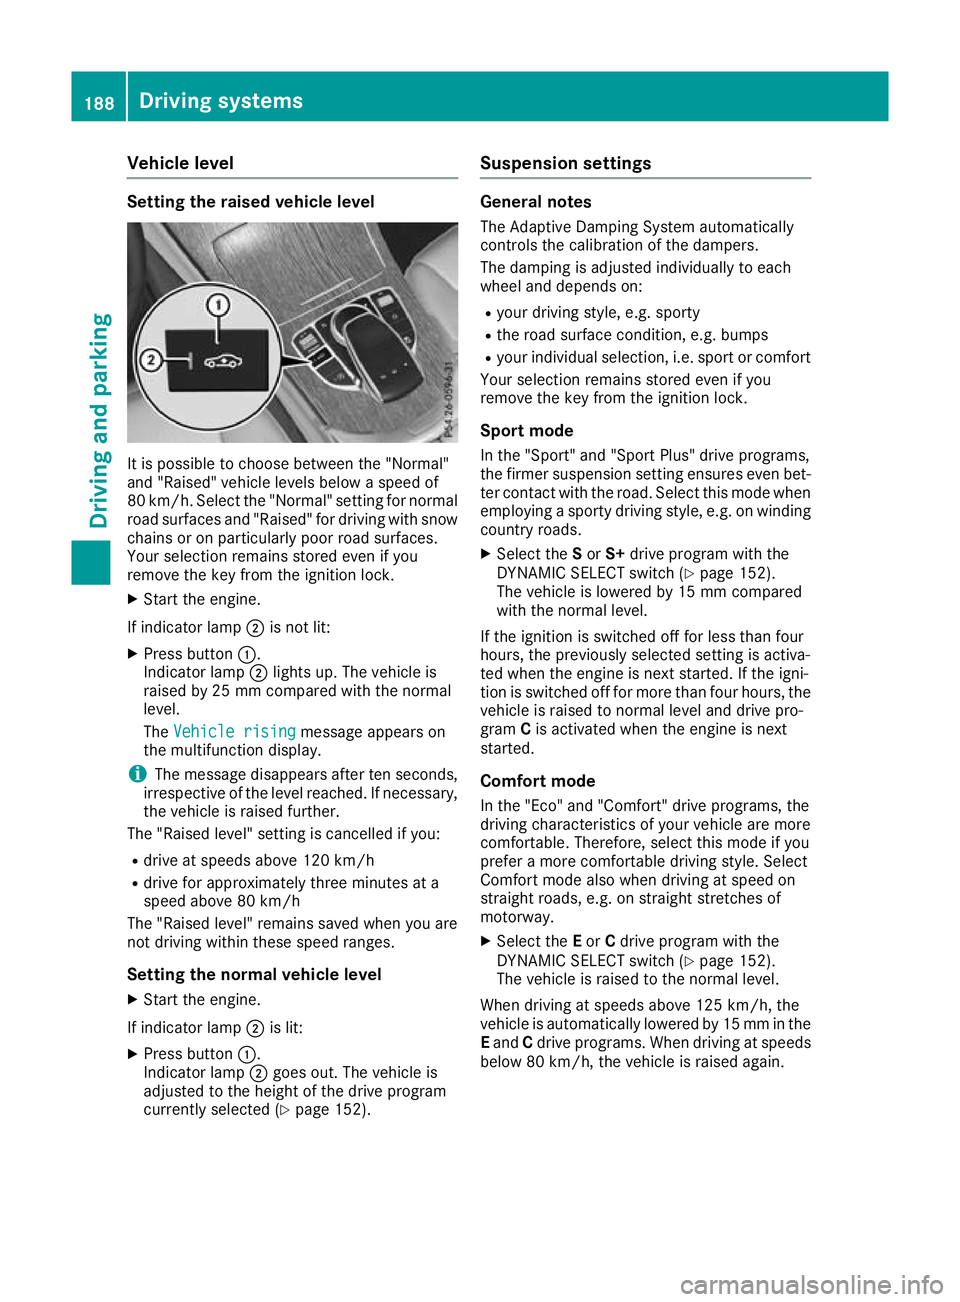
Setting the raised vehicle level
It is possible to choose between the "Normal"
and "Raised" vehicle levels below a speed of
80 km/h. Select the "Normal" setting for normal
road surfaces and "Raised" for driving with snow chains or on particularly poor road surfaces.
Your selection remains stored even if you
remove the key from the ignition lock.
X Start the engine.
If indicator lamp ;is not lit:
X Press button :.
Indicator lamp ;lights up. The vehicle is
raised by 25 mm compared with the normal
level.
The Vehicle rising
Vehicle rising message appears on
the multifunction display.
i The message disappears after ten seconds,
irrespective of the level reached. If necessary,
the vehicle is raised further.
The "Raised level" setting is cancelled if you:
R drive at speeds above 120 km/h
R drive for approximately three minutes at a
speed above 80 km/h
The "Raised level" remains saved when you are
not driving within these speed ranges.
Setting the normal vehicle levelX Start the engine.
If indicator lamp ;is lit:
X Press button :.
Indicator lamp ;goes out. The vehicle is
adjusted to the height of the drive program
currently selected (Y page 152). Suspension settings General notes
The Adaptive Damping System automatically
controls the calibration of the dampers.
The damping is adjusted individually to each
wheel and depends on:
R your driving style, e.g. sporty
R the road surface condition, e.g. bumps
R your individual selection, i.e. sport or comfort
Your selection remains stored even if you
remove the key from the ignition lock.
Sport mode In the "Sport" and "Sport Plus" drive programs,
the firmer suspension setting ensures even bet- ter contact with the road. Select this mode when
employing a sporty driving style, e.g. on winding
country roads.
X Select the Sor S+ drive program with the
DYNAMIC SELECT switch (Y page 152).
The vehicle is lowered by 15 mm compared
with the normal level.
If the ignition is switched off for less than four
hours, the previously selected setting is activa-
ted when the engine is next started. If the igni-
tion is switched off for more than four hours, the vehicle is raised to normal level and drive pro-
gram Cis activated when the engine is next
started.
Comfort mode
In the "Eco" and "Comfort" drive programs, the
driving characteristics of your vehicle are more
comfortable. Therefore, select this mode if you
prefer a more comfortable driving style. Select
Comfort mode also when driving at speed on
straight roads, e.g. on straight stretches of
motorway. X Select the Eor Cdrive program with the
DYNAMIC SELECT switch (Y page 152).
The vehicle is raised to the normal level.
When driving at speeds above 125 km/h, the
vehicle is automatically lowered by 15 mm in the
E and Cdrive programs. When driving at speeds
below 80 km/h, the vehicle is raised again. 188
Driving systemsDriving an
d parking
Page 193 of 389
AMG sports suspension based on AIR
BODY CONTROL (Mercedes-AMG
GLC 43 4MATIC Coupé)
General notes The electronically controlled damping system
works continuously. This improves driving
safety and ride comfort.
The damping is adjusted individually to each
wheel and depends on:
R your driving style, e.g. sporty
R the road surface condition, e.g. bumps
R your individual selection of Sport, Sport+ or
Comfort
The suspension setting is adjusted using the
corresponding button on the centre console.
i The mode can also be set using the
DYNAMIC SELECT switch (Y page 152).
This is possible only if the same mode is
selected for the suspension by pressing the
AMG sports suspension based on AIR BODY
CONTROL button on the centre console and
the DYNAMIC SELECT switch. This is the case,
for example, when both are set to Comfort
mode
If the ignition is switched off for less than four
hours, the previously selected drive program is
activated when the engine is next started. If the
ignition is switched off for more than four hours, Comfort mode is activated when the engine is
next started.
Sport mode The firmer setting of the suspension tuning in
Sport mode ensures even better contact with
the road. Select this mode when employing a
sporty driving style, e.g. on winding country
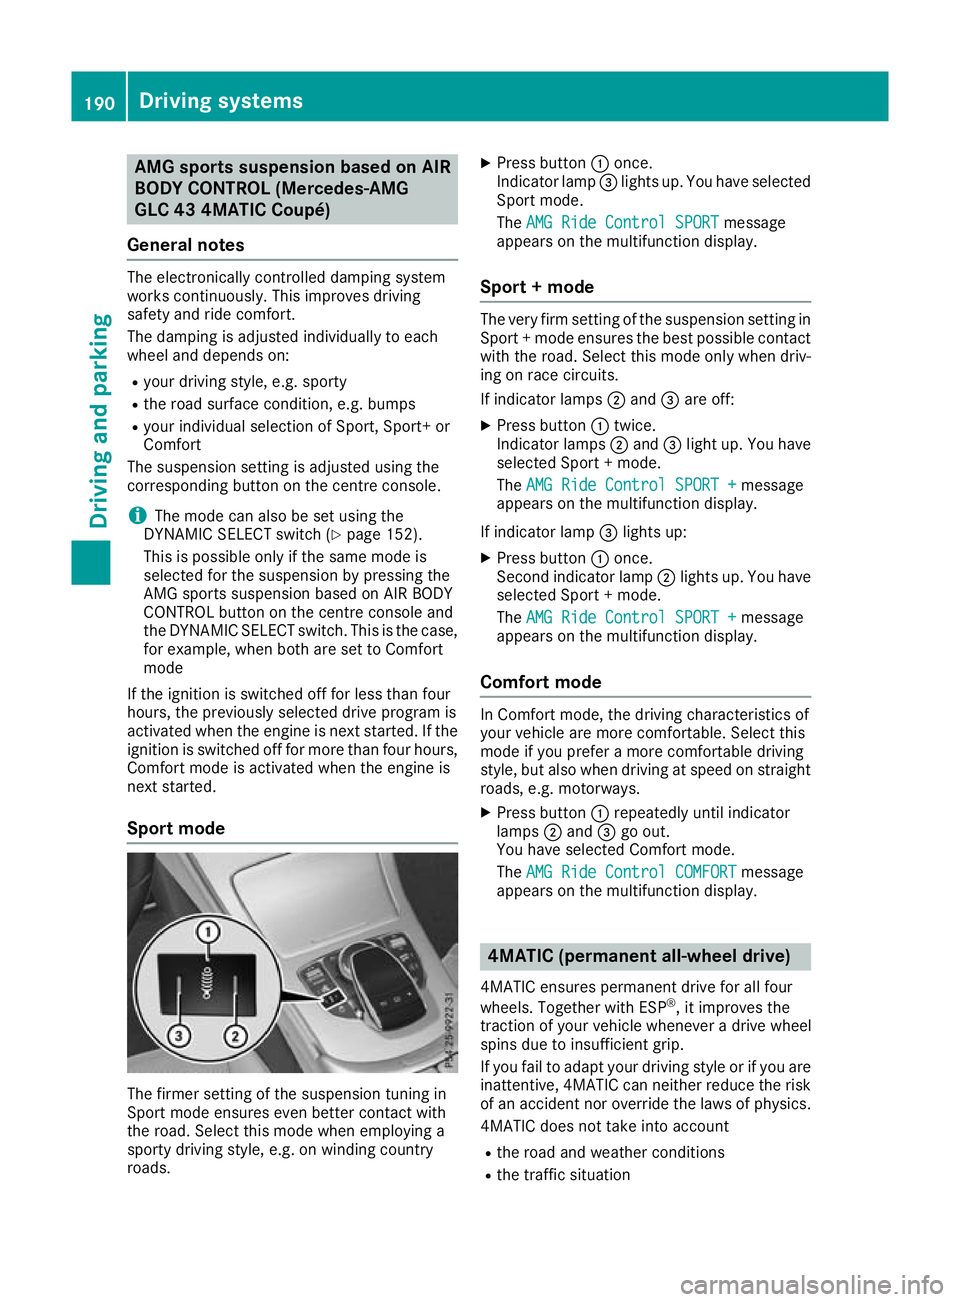
roads. X
Press button :once.
Indicator lamp =lights up. You have selected
Sport mode.
The AMG Ride Control SPORT
AMG Ride Control SPORT message
appears on the multifunction display.
Sport + mode The very firm setting of the suspension setting in
Sport + mode ensures the best possible contact
with the road. Select this mode only when driv-
ing on race circuits.
If indicator lamps ;and =are off:
X Press button :twice.
Indicator lamps ;and =light up. You have
selected Sport + mode.
The AMG Ride Control SPORT +
AMG Ride Control SPORT + message
appears on the multifunction display.
If indicator lamp =lights up:
X Press button :once.
Second indicator lamp ;lights up. You have
selected Sport + mode.
The AMG Ride Control SPORT + AMG Ride Control SPORT + message
appears on the multifunction display.
Comfort mode In Comfort mode, the driving characteristics of
your vehicle are more comfortable. Select this
mode if you prefer a more comfortable driving
style, but also when driving at speed on straight
roads, e.g. motorways.
X Press button :repeatedly until indicator
lamps ;and =go out.
You have selected Comfort mode.
The AMG Ride Control COMFORT AMG Ride Control COMFORT message
appears on the multifunction display. 4MATIC (permanent all-wheel drive)
4MATIC ensures permanent drive for all four
wheels. Together with ESP ®
, it improves the
traction of your vehicle whenever a drive wheel
spins due to insufficient grip.
If you fail to adapt your driving style or if you are inattentive, 4MATIC can neither reduce the risk
of an accident nor override the laws of physics.
4MATIC does not take into account
R the road and weather conditions
R the traffic situation 190
Driving systemsDriving and pa
rking