2016 MERCEDES-BENZ GLC COUPE charging
[x] Cancel search: chargingPage 9 of 389
Gliding mod
e................................. 157
Kickdown ....................................... 157
Manual shifting .............................. 158
Oil temperature (on-board com-
puter, Mercedes-AMG vehicles) ..... 245
Overview ........................................ 153
Problem (fault) ............................... 161
Pulling away ................................... 146
Starting the engine ........................ 146
Steering wheel gearshift paddle s... 158
Trailer towing ................................. 157
Transmission position display
(DIRECT SELECT lever) ................... 155
Transmission positions .................. 156
Automatic transmission emer-
gency running mode ......................... 161
Auxiliary heating/ventilation
Display message ............................ 278
Important safety notes .................. 137
Problem (display message) ............ 141
Remote control .............................. 139
Setting the departure time ............. 140
Switching on/off (on the centre
console) ......................................... 138
Axle load, permissible (trailer tow-
ing) ...................................................... 381 B
Back button ....................................... 293
Bag hook ............................................ 311
Ball coupling
Swinging out .................................. 220
BAS (Brake Assist System) ................. 69
BAS PLUS with Cross-Traffic Assist (Brake Assist PLUS with Cross-
Traffic Assist)
Function/note s................................ 69
Important safety notes .................... 69
Battery (key)
Checking .......................................... 85
Important safety notes .................... 85
Replacing ......................................... 85
Battery (vehicle)
Charging ........................................ 347
Display message ............................ 264
Important safety notes .................. 345
Jump starting ................................. 348 Belt tensioner
Activation ......................................... 53
Blind Spot Assist
Activating/deactivating (on-
board computer) ............................ 241
Display message ............................ 268
Notes/function .............................. 210
see Active Blind Spot Assist
BlueTEC
see AdBlue ®
Bluetooth ®
Connecting a different mobile
phone ............................................ 300
Searching for a mobile phone ........ 299
See also Digital Owner's Manua l... 292
Telephony ...................................... 299
Bonnet
Active bonnet (pedestrian protec-tion) ............................................... 325
Closing ........................................... 326
Display message ............................ 277
Important safety notes .................. 325
Opening ......................................... 326
Boot load (maximum) ........................ 379
Brake
EBD .................................................. 77
Brake Assist
see BAS (Brake Assist System)
Brake fluid
Display message ............................ 254
Notes ............................................. 377
Brake force distribution
see EBD (electronic brake force
distribution)
Brake lamps
Adaptive ........................................... 73
Brakes
ABS .................................................. 68
Adaptive Brake Assist ...................... 72
BAS .................................................. 69
BAS PLUS with Cross-Traffic
Assist ............................................... 69
Brake fluid (notes) ......................... 377
Display message ............................ 250
Driving tips .................................... 171
Hill start assist ............................... 147
HOLD function ............................... 186 6
Index
Page 24 of 389
Stowage compartments
Armrest (under) ............................. 307
Centre console .............................. 306
Cup holder .....................................3 15
Door ............................................... 307
Glove compartment ....................... 306
Important safety information ......... 305
Rear ............................................... 307
Spectacles compartment .............. .306
see Stowage areas
Stowage net ....................................... 307
Stowage space
Stowage net ................................... 307
Summer tyres
In winter ........................................ 358
Sun blind
Rear side windows ......................... 317
Sun visor ............................................ 317
Suspension settings
AIR BODY CONTROL ..................... .188
Suspension tuning
AMG sports suspension based on
AIR BODY CONTROL ..................... .190
Switching
the interior motion sensor on/off .... 81
Switching on media mode
Via the device lis t.......................... 303
Switching the auxiliary heating/
ventilation
On/off ........................................... 138 T
Tail lamps Display message ............................ 261
Tailgate
Display message ............................ 276
Emergency unlocking ....................... 95
Important safety notes .................... 90
Limiting the opening angle ............... 94
Obstruction detectio n...................... 91
Opening dimensions ...................... 379
Opening/closing .............................. 90
Opening/closing (automatically
from inside) ...................................... 94
Opening/closing (automatically
from outside) ................................... 91 Technical data
Capacities ...................................... 373
Drawbar load (maximum) ............... 380
Information .................................... 371
Trailer load s................................... 380
Vehicle data ................................... 379
Telephone
Accepting a call (multifunction
steering wheel) .............................. 239
Authorising a mobile phone (con-
necting) ......................................... 299
Connecting a Mobile phone (gen-
eral information) ............................ 299
Display message ............................ 279
Introduction ................................... 238
Menu (on-board computer) ............ 238
Number from the phone book ........ 239
Redialling ....................................... 239
Rejecting/ending a call ................. 239
See also Digital Owner's Manua l... 292
Switching between mobile
phones ........................................... 300
Telephone compartment ................ 307
see Mobile phone
Telephone module with Bluetooth ®
(SAP profile) Activating and connecting the
module ........................................... 301
Charging a mobile phone ............... 303
Connecting the mobile phone ........ 301
Connecting the module via a USB
cable .............................................. 301
Data modem mode ........................ 302
Installing the module ..................... 300
Introduction ................................... 300
Saving/deleting the PIN for the
SIM card ........................................ 302
Setting s......................................... 302
SIM card mode .............................. 301
Text messages ............................... 302
Transferring the phone book .......... 302
Temperature
Coolant (display in the instrumentcluster) .......................................... 229
Engine oil (on-board computer,
Mercedes-AMG vehicles) ............... 245
Outside temperature ...................... 229
Setting (climate control )................ 131 Index
21
Page 124 of 389
Interior lighting
Overview of interior lighting
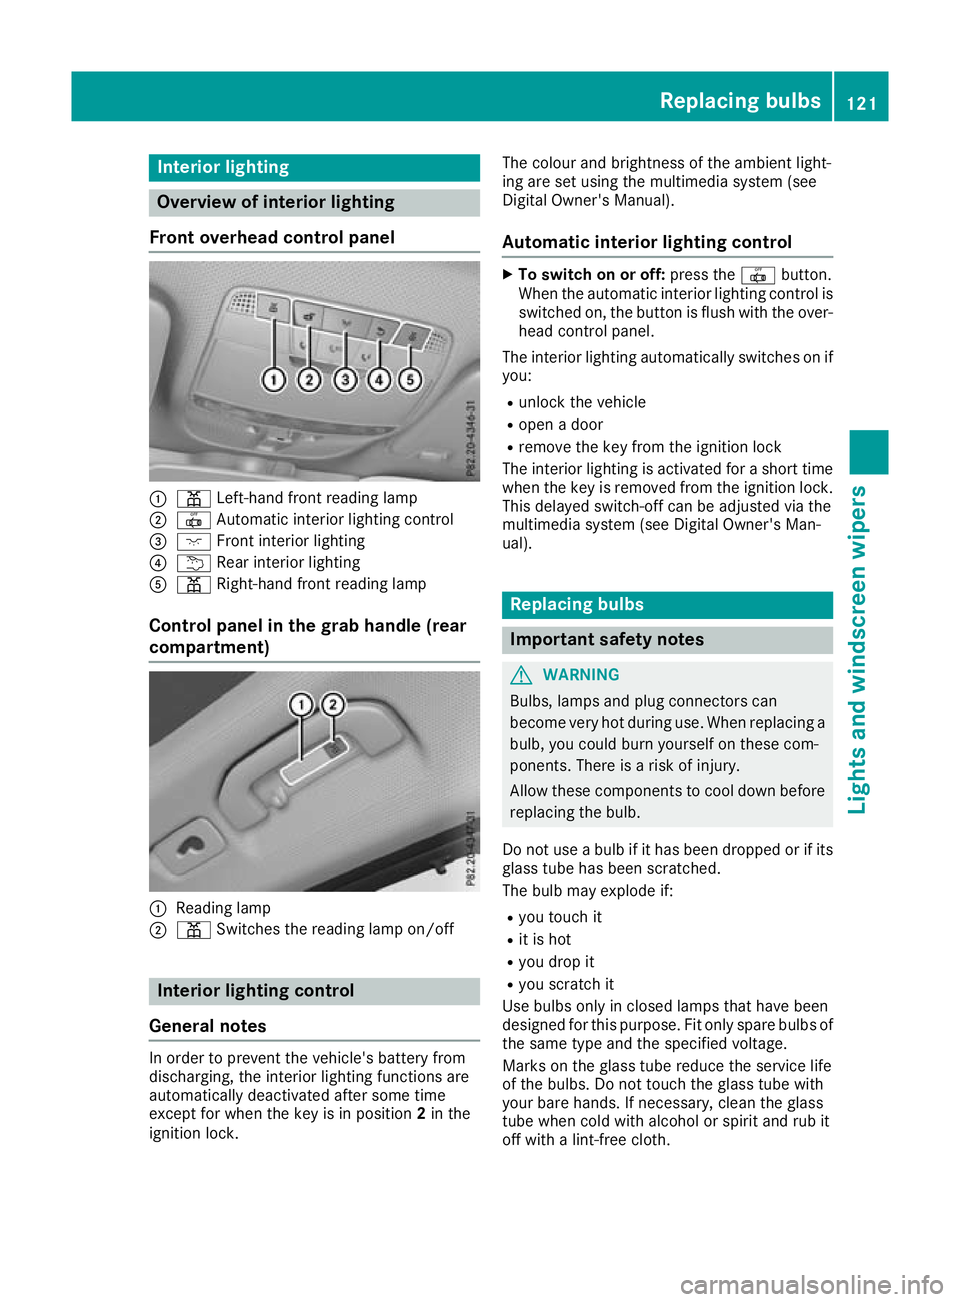
Front overhead control panel :
p Left-hand front reading lamp
; | Automatic interior lighting control
= c Front interior lighting
? u Rear interior lighting
A p Right-hand front reading lamp
Control panel in the grab handle (rear
compartment) :
Reading lamp
; p Switches the reading lamp on/off Interior lighting control
General notes In order to prevent the vehicle's battery from
discharging, the interior lighting functions are
automatically deactivated after some time
except for when the key is in position 2in the
ignition lock. The colour and brightness of the ambient light-
ing are set using the multimedia system (see
Digital Owner's Manual).
Automatic interior lighting control X
To switch on or off: press the|button.
When the automatic interior lighting control is
switched on, the button is flush with the over- head control panel.
The interior lighting automatically switches on if
you:
R unlock the vehicle
R open a door
R remove the key from the ignition lock
The interior lighting is activated for a short time
when the key is removed from the ignition lock. This delayed switch-off can be adjusted via the
multimedia system (see Digital Owner's Man-
ual). Replacing bulbs
Important safety notes
G
WARNING
Bulbs, lamps and plug connectors can
become very hot during use. When replacing a bulb, you could burn yourself on these com-
ponents. There is a risk of injury.
Allow these components to cool down beforereplacing the bulb.
Do not use a bulb if it has been dropped or if its
glass tube has been scratched.
The bulb may explode if:
R you touch it
R it is hot
R you drop it
R you scratch it
Use bulbs only in closed lamps that have been
designed for this purpose. Fit only spare bulbs of the same type and the specified voltage.
Marks on the glass tube reduce the service life
of the bulbs. Do not touch the glass tube with
your bare hands. If necessary, clean the glass
tube when cold with alcohol or spirit and rub it
off with a lint-free cloth. Replacing bulbs
121Lights and windscreen wipers Z
Page 173 of 389
Emergency braking
The vehicle can also be braked during an emer-
gency by using the electric parking brake.
X While driving, press handle :of the electric
parking brake (Y page 169).
The vehicle is braked as long as you keep
handle :of the electric parking brake
depressed. The longer electric parking brake
handle :is depressed, the greater the brak-
ing force.
During braking:
R a warning tone sounds
R the Release parking brake
Release parking brake display mes-
sage appears
R red indicator lamp !on the instrument
cluster flashes
When the vehicle has been braked to a stand-
still, the electric parking brake is applied. Parking up the vehicle
If you leave the vehicle parked up for longer than
four weeks, the battery may be damaged by
exhaustive discharging.
If you leave the vehicle parked up for longer than
six weeks, it may suffer from lack of use.
X Contact a qualified specialist workshop and
seek advice.
i You can obtain information on trickle charg-
ers from a qualified specialist workshop.
Hybrid vehicles: observe the notes on the high-
voltage battery in the separate Owner's Manual. Driving tips
General driving tips
Important safety notes G
WARNING
If you switch off the ignition while driving,
safety-relevant functions are only available
with limitations, or not at all. This could affect, for example, the power steering and the brake
boosting effect. You will require considerably
more effort to steer and brake. There is a risk of an accident. Do not switch off the ignition while driving.
Drive sensibly – save fuel Observe the following tips to save fuel:
X The tyres should always be inflated to the rec-
ommended tyre pressure.
X Remove unnecessary loads.
X Remove roof racks when they are not needed.
X Warm up the engine at low engine speeds.
X Avoid frequent acceleration or braking.
X Have all maintenance work carried out as
indicated by the service intervals in the Ser-
vice Booklet or by the service interval display.
Fuel consumption also increases when driving in
cold weather, in stop-start traffic, on short jour- neys and in hilly terrain. ECO display
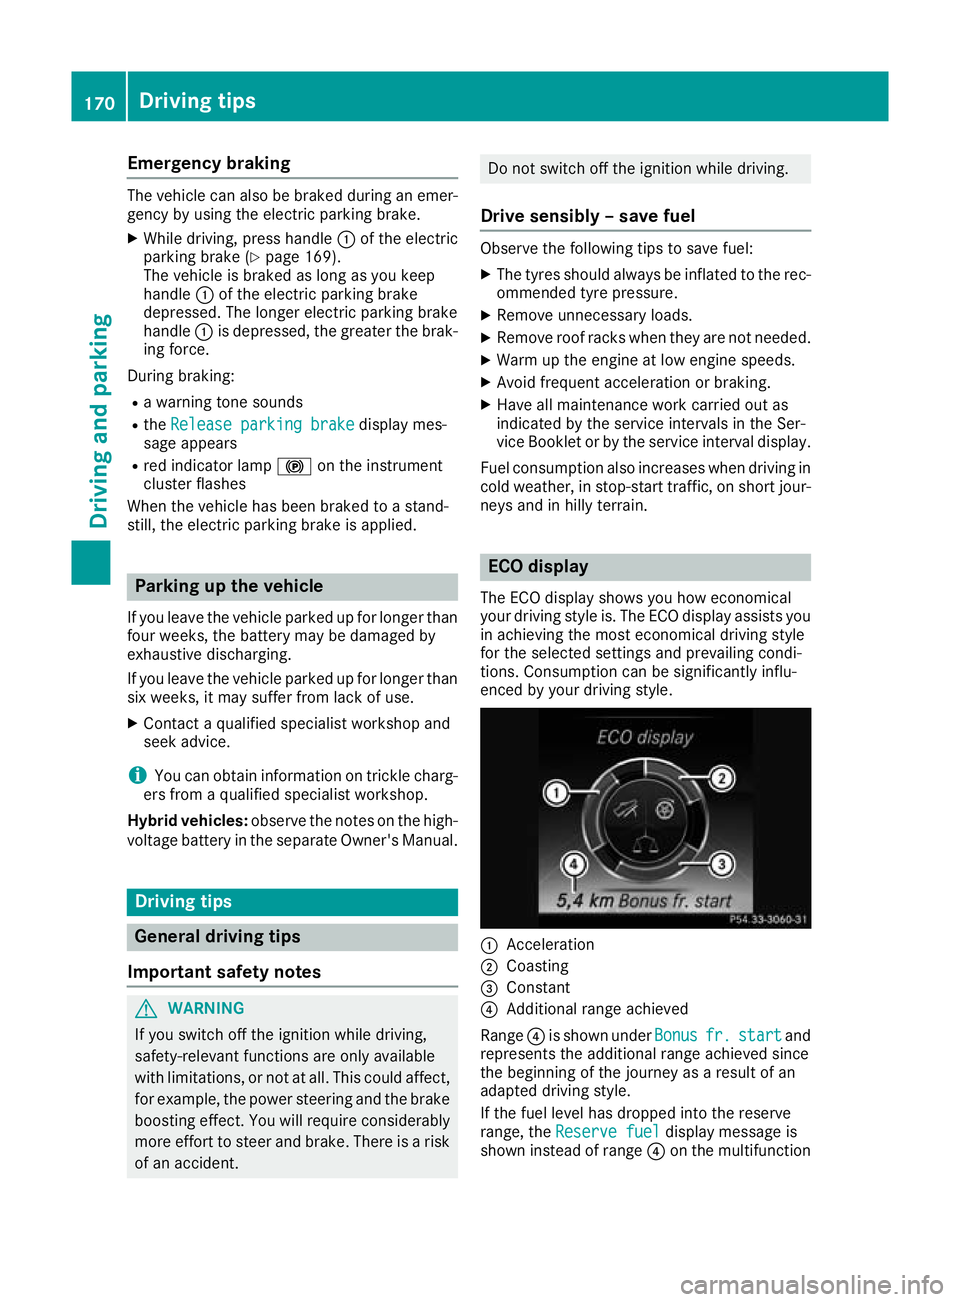
The ECO display shows you how economical
your driving style is. The ECO display assists you in achieving the most economical driving style
for the selected settings and prevailing condi-
tions. Consumption can be significantly influ-
enced by your driving style. :
Acceleration
; Coasting
= Constant
? Additional range achieved
Range ?is shown under Bonus Bonusfr. fr.start
start and
represents the additional range achieved since
the beginning of the journey as a result of an
adapted driving style.
If the fuel level has dropped into the reserve
range, the Reserve fuel Reserve fuel display message is
shown instead of range ?on the multifunction 170
Driving tipsDriving and parking
Page 303 of 389
Authorisation using Secure Simple Pairing:
X Select the mobile phone.
A code is displayed in the multimedia system
and on the mobile phone.
X If codes match: selectYes Yeson the multimedia
system.
X Confirm the code on the mobile phone.
Depending on the mobile phone used, con-
firm the connection to the multimedia system
and for the PBAP and MAP Bluetooth ®
pro-
files. The prompt to confirm may take up to
two minutes to be displayed (see the manu-
facturer's operating instructions).
X If the codes are different: selectNo
No on the
multimedia system.
The process is cancelled.
Repeat authorisation.
Authorisation by entering a passkey (passcode): X Select the Bluetooth ®
name of the mobile
phone.
The input menu for the passkey is displayed.
X Choose a one- to sixteen-digit number com-
bination as a passkey.
X Enter the passkey on the multimedia system.
X Press ¬to confirm.
X Enter and confirm the passkey on the mobile
phone. Depending on the mobile phone used,
confirm the connection to the multimedia sys-
tem and for the PBAP and MAP Bluetooth ®
profiles. The prompt to confirm may take up
to two minutes to be displayed (see the man- ufacturer's operating instructions).
i Mobile phones that are connected to the
optionally available telephone module with
Bluetooth ®
(SAP profile) are displayed sepa-
rately in the device list. These are found below
the entry MB SAP module phones
MB SAP module phones .
Switching between mobile phones If you have authorised more than one mobile
phone, you can switch between the individual
phones.
Multimedia system:
X Select Connect device Connect device .
X Select a mobile phone from the device list. Telephone module with Bluetooth
®
(SAP profile)
Introduction The module can be used as a permanently instal-
led telephone with its own SIM card
(Y page 301) or in conjunction with a mobile
phone (Y page 301).
If you wish to use the module in conjunction with
your mobile telephone, the mobile phone must
support the Bluetooth ®
SAP profile (SIM Access
Profile).
The following functions are available using the
module:
R data modem mode (Y page 302)
R sending and receiving text messages
(Y page 302)
R accessing the phone book of the mobile
phone (Y page 302)
R charging a mobile phone via the USB connec-
tion (Y page 303)
A list of compatible mobile phones can be found at:
http://www.mercedes-benz.com/connect
i The module is not available in all vehicles,
depending on the equipment.
Installing the module Mounting the module in the stowage compart-
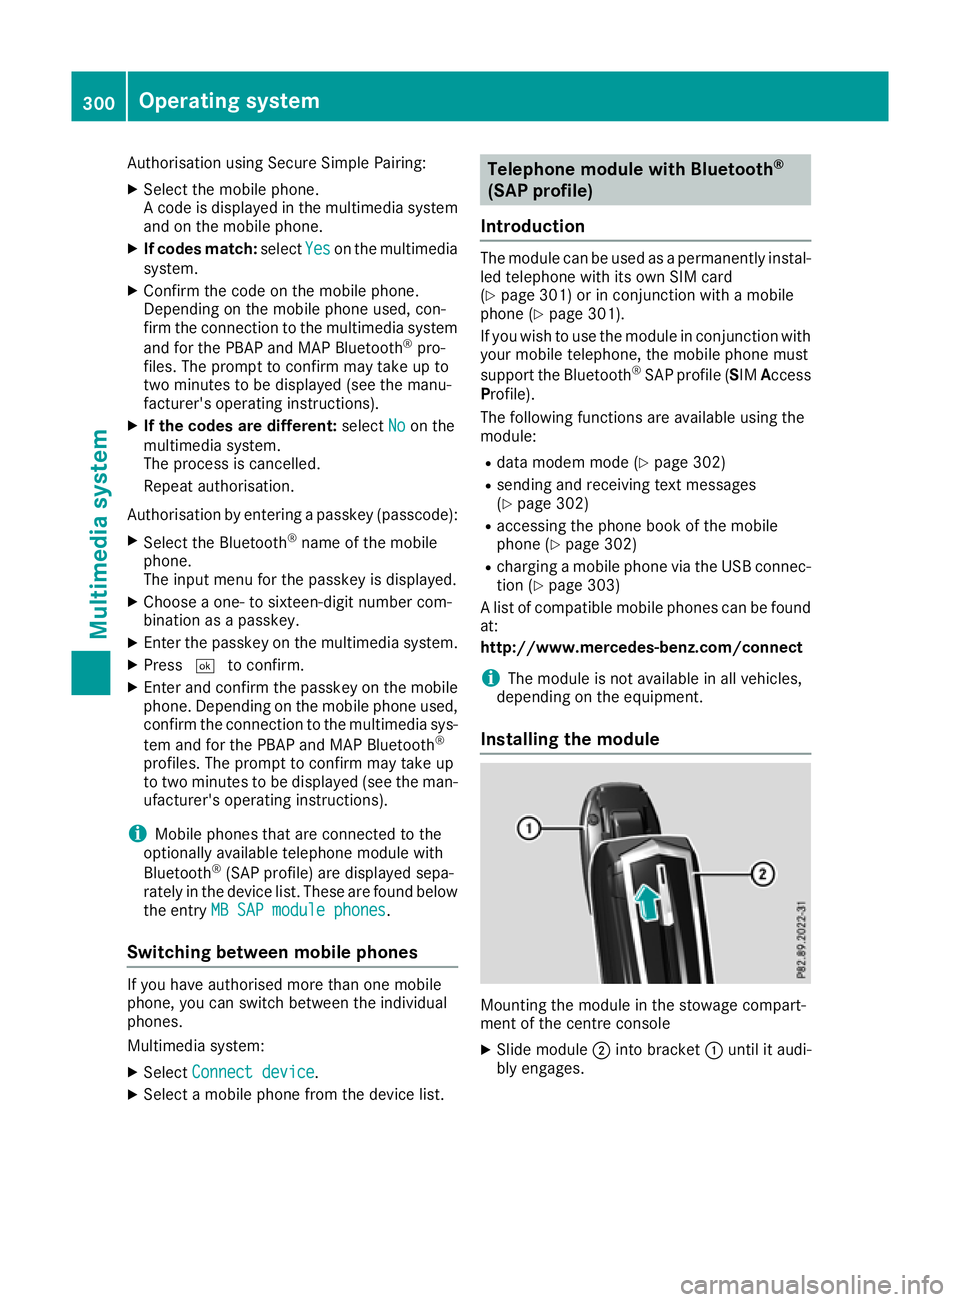
ment of the centre console
X Slide module ;into bracket :until it audi-
bly engages. 300
Operating systemMultimedia system
Page 306 of 389
Activating/deactivating text message
downloading from the mobile phone Dial number Function
00080 Text message down-
loading is deactiva-
ted.
00081 Text message down-
loading is activated.
For further information on receiving text mes-
sages when using the telephone module; see
Digital Owner's Manual.
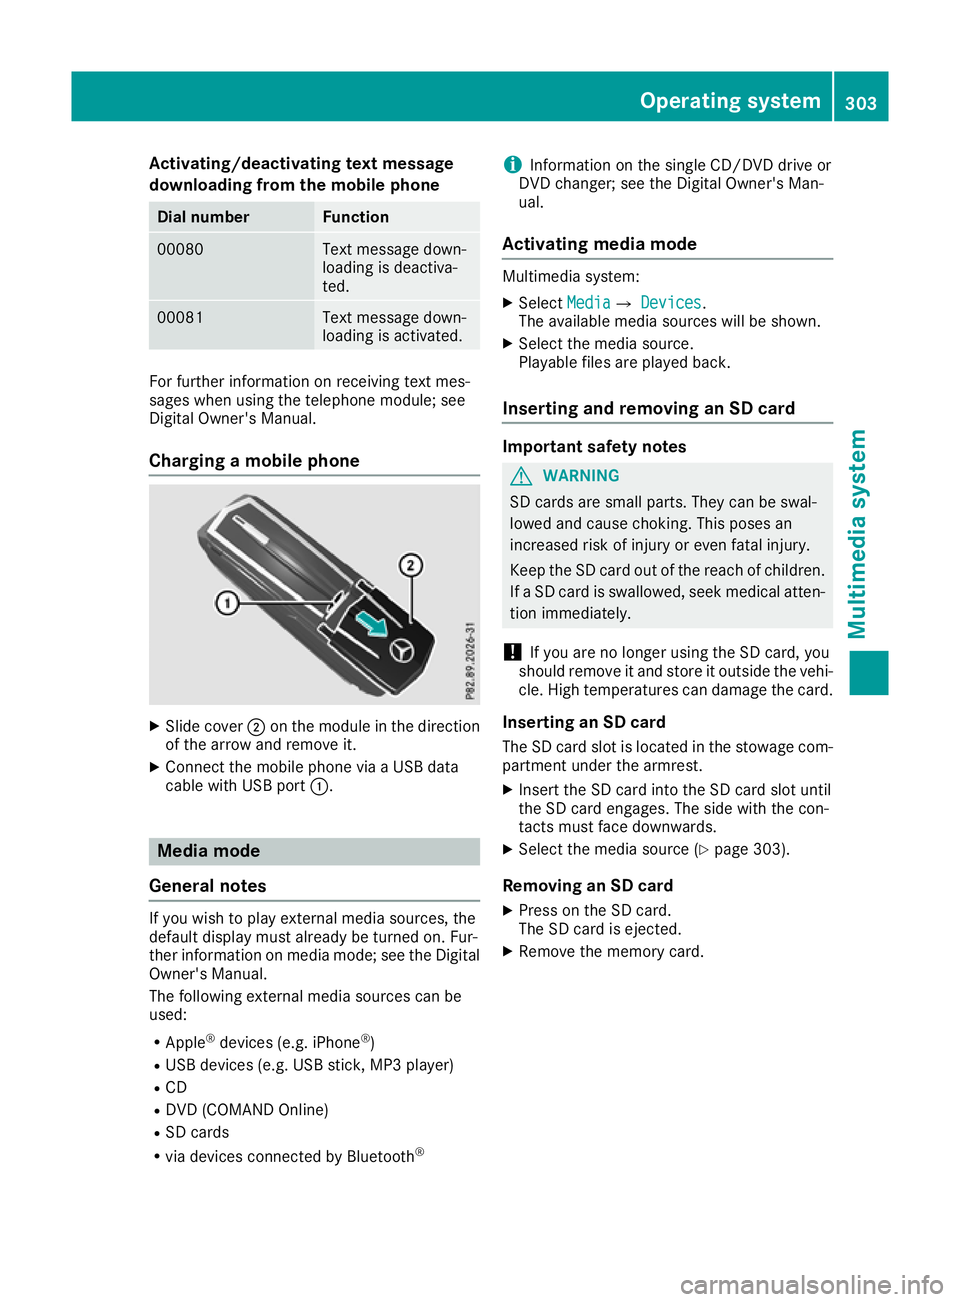
Charging a mobile phone X
Slide cover ;on the module in the direction
of the arrow and remove it.
X Connect the mobile phone via a USB data
cable with USB port :. Media mode
General notes If you wish to play external media sources, the
default display must already be turned on. Fur-
ther information on media mode; see the Digital
Owner's Manual.
The following external media sources can be
used:
R Apple ®
devices (e.g. iPhone ®
)
R USB devices (e.g. USB stick, MP3 player)
R CD
R DVD (COMAND Online)
R SD cards
R via devices connected by Bluetooth ®i
Information on the single CD/DVD drive or
DVD changer; see the Digital Owner's Man-
ual.
Activating media mode Multimedia system:
X Select Media
MediaQ Devices Devices.
The available media sources will be shown.
X Select the media source.
Playable files are played back.
Inserting and removing an SD card Important safety notes
G
WARNING
SD cards are small parts. They can be swal-
lowed and cause choking. This poses an
increased risk of injury or even fatal injury.
Keep the SD card out of the reach of children. If a SD card is swallowed, seek medical atten-
tion immediately.
! If you are no longer using the SD card, you
should remove it and store it outside the vehi-
cle. High temperatures can damage the card.
Inserting an SD card
The SD card slot is located in the stowage com- partment under the armrest.
X Insert the SD card into the SD card slot until
the SD card engages. The side with the con-
tacts must face downwards.
X Select the media source (Y page 303).
Removing an SD card X Press on the SD card.
The SD card is ejected.
X Remove the memory card. Operating system
303Multimedia system Z
Page 326 of 389
cause you to lose control of the vehicle. There
is a risk of an accident.
Use this device only when the vehicle is sta-
tionary.
You must observe the legal requirements for the country in which you are currently driving whenoperating mobile communications equipment in
the vehicle.
If it is permitted by law to operate communica-
tions equipment while the vehicle is in motion,
you may do so only if the traffic situation per-
mits. You may otherwise be distracted from the traffic conditions, cause an accident and injure
yourself and others.
Excessive levels of electromagnetic radiation
may cause damage to your health and to the
health of others. The use of an exterior aerial
takes into consideration the scientific discus-
sion surrounding the possible health risk posed
by electromagnetic fields.
Mercedes-Benz recommends the use of an
approved exterior aerial. This ensures:
R optimal mobile phone reception quality in the
vehicle
R that mutual interference between the vehicle
electronics and mobile phones is minimised
An exterior aerial has the following advantages:
R it conducts the electromagnetic fields gener-
ated by a wireless device to the exterior
R the field strength in the vehicle interior is
lower than in a vehicle that does not have an exterior aerial
Information on retrofitting two-way radios and
mobile phones (RF transmitters) (Y page 371).
General notes Depending on the vehicle equipment, there are
various mobile phone brackets that may be fit-
ted in your vehicle; in some cases, these are
country-specific.
More information on suitable mobile phones,
mobile phone brackets and on connecting Blue-
tooth ®
-capable mobile phones with the multi-
media system can be obtained:
R at a qualified specialist workshop
R on the internet at http://www.mercedes-
benz.com/connect The functions and services available when you
use the phone depend on your mobile phone
model and service provider.
Using a mobile phone To connect a mobile phone to the exterior aerial
and charge it, insert it into the mobile phone
bracket.
X Open the telephone compartment
(Y page 307).
X Place the mobile phone bracket into the pre-
installed fitting; see the separate installation
instructions for the mobile phone fitting.
X Insert the mobile phone into the mobile phone
bracket; see the separate installation instruc-
tions for the mobile phone fitting.
i The mobile phone can also be operated
without being in the bracket. However, the
charging function and aerial function are not
available.
In order to use Bluetooth ®
(SAP profile) on your
telephone module, you must first insert the tele-
phone module into the pre-installed fitting. This connects it to the exterior aerial. If you wish to
charge the mobile phone, you must connect it to
a USB port.
Further information on the telephone module
with Bluetooth ®
(SAP profile) can be found in the
Digital Owner's Manual.
Operating the mobile phone You can operate the phone using the
6and
~ buttons on the multifunction steering
wheel. You can operate other mobile phone
functions via the on-board computer
(Y page 238).
When you remove the key from the ignition lock, the mobile phone is disconnected from the vehi-cle. You can then no longer make calls using the
hands-free system.
If a call is active and you remove the key from
the ignition lock, the conversation is transferred
over to the mobile phone. It is then possible to
continue the conversation on the mobile phone. Features
323Stowing and features Z
Page 349 of 389
The highly flammable gas mixture is created
while the battery is charging and when jump-
starting.
Always make sure that neither you nor the bat-
tery is electrostatically charged. Electrostatic
charge is created, for example:
R by wearing synthetic-fibre clothing
R by friction between clothing and the seat
R if you pull or push the battery across carpet or
other synthetic materials
R if you rub the battery with a cloth G
WARNING
During the charging process, a battery produ- ces hydrogen gas. If a short circuit occurs or
sparks are created, the hydrogen gas can
ignite. There is a risk of an explosion.
R Make sure that the positive terminal of a
connected battery does not come into con- tact with vehicle parts.
R Never place metal objects or tools on a bat-
tery.
R It is important that you observe the descri-
bed order of the battery terminals when
connecting and disconnecting a battery.
R When jump-starting, make sure that the
battery poles with identical polarity are
connected.
R It is particularly important to observe the
described order when connecting and dis-
connecting the jump leads.
R Never connect or disconnect the battery
terminals while the engine is running. G
WARNING
Battery acid is caustic. There is a risk of injury. Avoid contact with the skin, eyes or clothing.
Do not breathe in any battery gases. Do not
lean over the battery. Keep the batteries out
of the reach of children. Immediately rinse off
battery acid thoroughly with plenty of clean
water and seek medical attention at once.
All vehicles: H
Environmental note Batteries contain pollutants.
It is illegal to dispose of them
with the household rubbish.
They must be collected sep-
arately and disposed of in anenvironmentally responsible
recycling system. Dispose of batteries in an
environmentally responsible
manner. Take discharged
batteries to a qualified spe-
cialist workshop or to a col-
lection point for used batter-
ies.
! Have the battery checked regularly at a
qualified specialist workshop.
Observe the service intervals in the Service
Booklet or contact a qualified specialist work- shop for more information.
! Always have work on the batteries carried
out at a qualified specialist workshop. Should
it, in exceptional circumstances, be abso-
lutely necessary to disconnect the 12-volt
battery yourself, please observe the follow-
ing:
R Secure the vehicle to prevent it from rolling
away.
R Switch off the ignition
R Disconnect the negative terminal first and
then the positive terminal
The transmission is locked in position Pafter
disconnecting the battery.
After the work is completed, securely refit the battery and the postive terminal cover.
Comply with safety notes and take protective
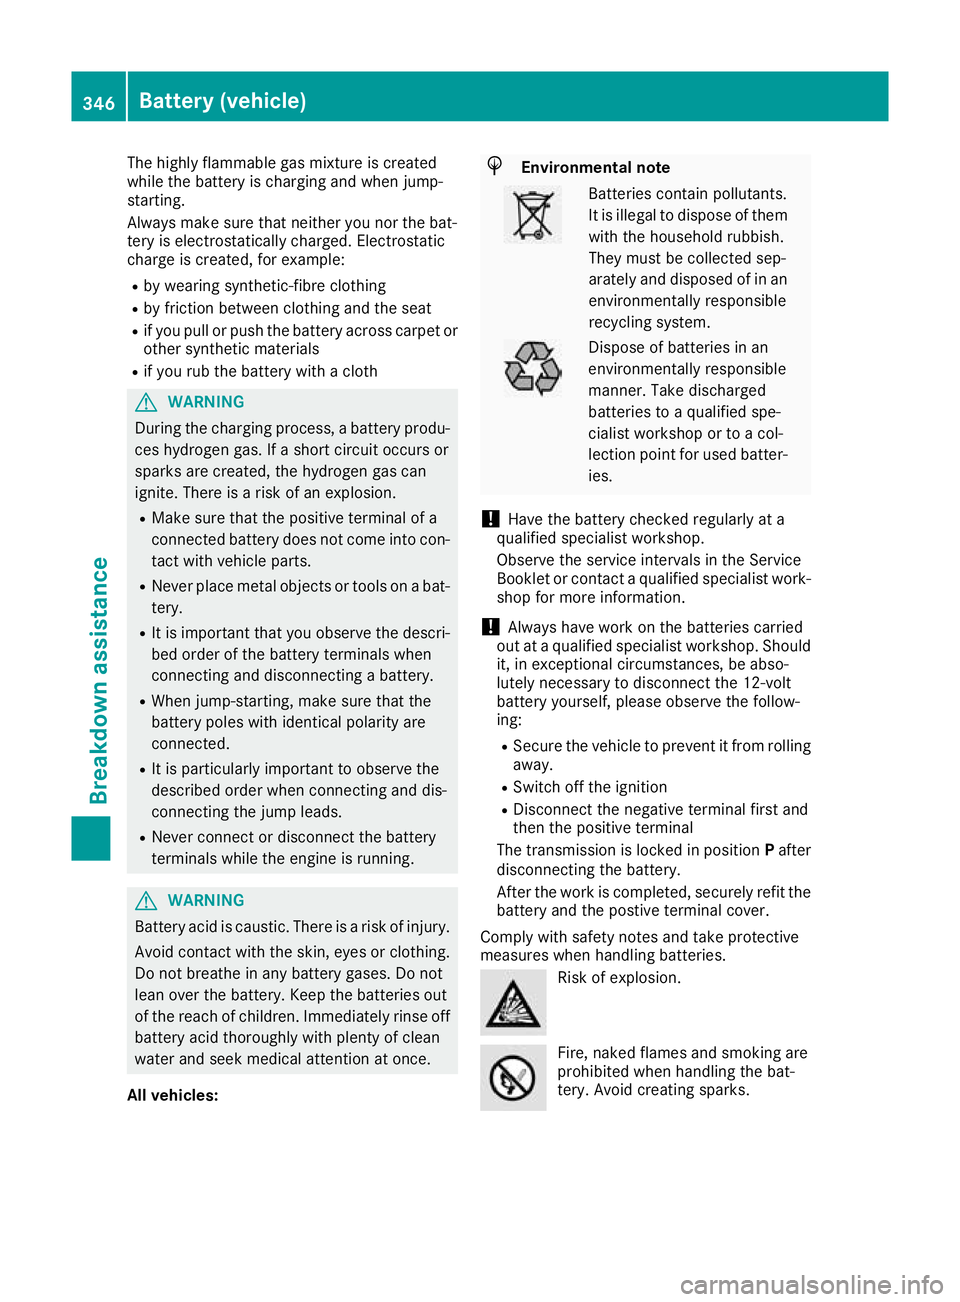
measures when handling batteries. Risk of explosion.
Fire, naked flames and smoking are
prohibited when handling the bat-
tery. Avoid creating sparks. 346
Battery (vehicle)Breakdown assistance