2016 MERCEDES-BENZ GLC COUPE fuel type
[x] Cancel search: fuel typePage 21 of 389

Tow-away protection ........................ 80
Protection of the environment
General notes ..................................26
Pulling away
Automatic transmission ................. 146
General notes ................................ 146
Hill start assist ...............................1 47
Trailer ............................................ 147 Q
QR code Mercedes-Benz Guide App ................. 1
Rescue card ..................................... 30
Qualified specialist workshop ........... 30
Quick access for audio and tele-
phone
Changing the station/music
track .............................................. 295 R
RACETIMER (on-board computer) .... 247
Radiator cover ................................... 326
Radio
Selecting a station ......................... 236
Radio mode
See also Digital Owner's Manual ... 292
Radio-based vehicle components
Declaration of conformity ................ 28
Rain closing feature
Sliding sunroof ................................. 99
Reading lamp ..................................... 121
Rear compartment
Setting the air vents ..................... .141
Setting the airflow ......................... 132
Setting the temperature ................ 131
Rear foglamp
Display message ............................ 261
Switching on/off ........................... 116
Rear seat
Display message ............................ 277
Rear window heating
Problem (fault) ............................... 133
Switching on/off ........................... 133
Rear-compartment seat belt sta-
tus indicator ........................................ 46 Rear-view mirror
Anti-dazzle mode (automatic) ....... .112
Dipping (manual) ........................... 110
Recuperation display ........................ 233
Reflective safety vest ....................... 338
Refuelling
AdBlue ®
......................................... 164
Fuel gauge ....................................... 34
Important safety notes .................. 161
Refuelling process ......................... 162
see Fuel
Remote control
Auxiliary heating/ventilation .......... 139
Changing the batteries (auxiliary
heating) ......................................... 140
Replacing bulbs
Dipped-beam headlamps .............. .122
Fitting/removing the cover (front
wheel arch) ................................... .123
Important safety notes .................. 121
Main-beam headlamps ................... 122
Overview of bulb types .................. 122
Turn signals (front) ......................... 123
Replacing the battery (auxiliary
heating remote control) .................... 140
Rescue card ......................................... 30
Reserve (fuel tank)
see Fuel
Reserve fuel
Display message ............................ 265
Warning lamp ................................. 286
Residual heat (climate control) ........135
Restraint system
Display message ............................ 257
Introduction ..................................... 41
Warning lamp ................................. 286
Warning lamp (function) ................... 42
Rev counter ........................................ 229
Reversing camera
"Reverse parking" function ............ 200
Cleaning instructions ..................... 335
Coupling up a trailer function ....... .201
Display in the multimedia system .. 199
General notes ................................ 198
Object detection (function/
notes) ............................................ 202
Switching on/off ........................... 198 18
Index
Page 27 of 389
Vehicle identification plate
.............. 372
Vehicle level
AIR BODY CONTROL ...................... 188
Display message ............................ 266
Video
Operating the DVD ......................... 237
See also Digital Owner's Manua l... 292
VIN
Seat ............................................... 373
Type plate ...................................... 372 W
Warning and indicator lamps ABS ................................................ 283
Brakes ........................................... 282
Distance warning signal ................. 289
ESP ®
.............................................. 283
ESP ®
OFF ....................................... 285
Fuel tank ........................................ 286
General notes ................................ 280
LIM (cruise control) ........................ 174
LIM (DISTRONIC PLUS) .................. 179
LIM (variable SPEEDTRONIC) ......... 176
Overview .......................................... 34
Parking brake ................................ 286
PASSENGER AIR BAG ...................... 42
Reserve fue l................................... 286
Seat belt ........................................ 280
Steering ......................................... 291
Tyre pressure monitor ................... 290
Warning triangle ................................ 339
Washer fluid
Display message ............................ 279
Weather display (COMAND Online)
See also Digital Owner's Manua l... 292
Wheel and tyre combinations
Tyres .............................................. 368
Wheel bolt tightening torque ........... 368
Wheel chock ...................................... 365
Wheels
Changing a whee l.......................... 364
Changing/replacing ....................... 364
Checking ........................................ 356
Cleaning ......................................... 334
Emergency spare whee l................. 369
Fitting a new wheel ........................ 367
Fitting a wheel ............................... 365 Important safety notes .................. 356
Information on driving .................... 356
Removing a whee l.......................... 367
Snow chains .................................. 359
Storing ........................................... 365
Tightening torque ........................... 368
Wheel size/tyre size ...................... 368
Windowbag
Display message ............................ 258
Operation ......................................... 48
Windows
Cleaning ......................................... 334
see Side windows
Windscreen
Demisting ...................................... 132
Windscreen washer fluid
see Windscreen washer system
Windscreen washer system
Important safety notes .................. 378
Topping up ..................................... 329
Windscreen wipers
Problem (malfunction) ................... 126
Replacing the wiper blades ............ 124
Switching on/of f........................... 123
Winter operation
Important safety notes .................. 358
Radiator cover ............................... 326
Slippery road surfaces ................... 173
Snow chains .................................. 359
Summer tyres ................................ 358
Winter tyres
Limiting the speed (on-board com-
puter) ............................................. 244
M+S tyres ...................................... 358
Wiper blades
Cleaning ......................................... 334
Important safety notes .................. 124
Replacing ....................................... 124
Wooden trim (cleaning instruc-
tions) .................................................. 336
Workshop
see Qualified specialist workshop 24
Index
Page 59 of 389

Using the radar sensor system, PRE-SAFE
®
PLUS is able to detect that a head-on or rear-end
collision is imminent. In certain hazardous sit-
uations, PRE-SAFE ®
PLUS takes pre-emptive
measures to protect the vehicle occupants.
Important safety notes The intervention of PRE-SAFE
®
PLUS cannot
prevent an imminent collision.
The driver is not warned before the intervention
of PRE-SAFE ®
PLUS.
PRE-SAFE ®
PLUS does not intervene:
R if the vehicle is reversing
R when the vehicle is towing a trailer and there
is a risk of a rear-end collision
When driving, or when parking or exiting a park- ing space with assistance from Active Parking
Assist, PRE-SAFE ®
PLUS will not apply the
brakes.
Function PRE-SAFE
®
PLUS intervenes in certain situa-
tions if the radar sensor system detects an
imminent head-on or rear-end collision.
PRE-SAFE ®
PLUS takes the following measures
depending on the hazardous situation detected:
R if the radar sensor system detects that a
head-on collision is imminent, the seat belts
are pre-tensioned
R if the radar sensor system detects that a rear-
end collision is imminent:
- the rear hazard warning lamps are activa-
ted and flash at a higher frequency
- the brake pressure is increased if the driver
applies the brakes when the vehicle is sta-
tionary
- the seat belts are pre-tensioned
The PRE-SAFE ®
PLUS braking application is can-
celled:
R if the accelerator pedal is depressed when a
gear is engaged
R if the risk of a collision passes or is no longer
detected
R if DISTRONIC PLUS indicates an intention to
pull away
If the hazardous situation passes without result- ing in an accident, the original settings are
restored. Automatic measures after an acci-
dent
Immediately after an accident, the following
measures are implemented, depending on the
type and severity of the impact:
R the hazard lamps are switched on
R the emergency lighting is switched on
R the vehicle doors are unlocked
R the front side windows are lowered
R vehicles with the memory function: the elec-
trically adjustable steering wheel is raised
R the engine is switched off and the fuel supply
is cut off
R vehicles with the Mercedes-Benz emergency
call system: automatic emergency call Children in the vehicle
Important safety notes
Accident statistics show that children secured
in the rear seats are safer than children secured in the front-passenger seat. For this reason,
Mercedes-Benz strongly advises that you install
a child restraint system on a rear seat. Children are generally better protected there.
If a child younger than twelve years old and
under 1.50 min height is travelling in the vehi-
cle:
R always secure the child in a child restraint
system suitable for Mercedes-Benz vehicles.
The child restraint system must be appropri-
ate to the age, weight and size of the child.
R be sure to observe the instructions and safety
notes in this section in addition to the child
restraint system manufacturer's installation
instructions.
R be sure to observe the instructions and safety
notes on the automatic front-passenger front airbag deactivation system (Y page 49).56
Children in the vehicleSafety
Page 165 of 389
If you or others come into contact with fuel,
observe the following:
R Wash the fuel off any affected areas of skin
with water and soap immediately.
R If you get fuel in your eyes, rinse them thor-
oughly with clean water immediately. Seek
immediate medical attention.
R If fuel is swallowed, seek immediate medi-
cal attention. Do not induce vomiting.
R Change any clothing that has come into
contact with fuel immediately. G
WARNING
Electrostatic charge can cause sparks and
thereby ignite fuel vapours. There is a risk of
fire and explosion.
Always touch the vehicle body before opening the fuel filler flap or touching the fuel pump
nozzle. This discharges any electrostatic
charge that may have built up.
Do not get back into the vehicle during the refu-
elling process, otherwise electrostatic charge
could build up again. G
WARNING
Vehicles with a diesel engine:
If you mix diesel fuel with petrol, the flash
point of this fuel mixture is lower than that of pure diesel fuel. When the engine is running,
components in the exhaust system may over-
heat unnoticed. There is a risk of fire.
Never refuel with petrol. Never add petrol to
diesel fuel.
! Do not use diesel to refuel vehicles with a
petrol engine. Do not switch on the ignition if you accidentally refuel with the wrong fuel.
Otherwise, the fuel will enter the fuel system.
Even small amounts of the wrong fuel can
result in damage to the fuel system and the
engine. Notify a qualified specialist workshop
and have the fuel tank and fuel lines drained
completely.
! Do not use petrol to refuel vehicles with a
diesel engine. Do not switch on the ignition if you accidentally refuel with the wrong fuel.
Otherwise, fuel can enter the fuel system. Even small amounts of the wrong fuel could
result in damage to the fuel system and the
engine. The repair costs are high. Notify a
qualified specialist workshop and have the
fuel tank and fuel lines drained completely.
! Overfilling the fuel tank could damage the
fuel system.
! Take care not to spill any fuel on painted
surfaces. You could otherwise damage the
paintwork.
! Use a filter when adding fuel from a fuel can.
The fuel lines and/or the fuel injection system could otherwise be blocked by particles fromthe fuel can.
If you overfill the fuel tank, some fuel may spray
out when you remove the fuel pump nozzle.
Further information on fuel and fuel quality
(Y page 373). Refuelling
General information Pay attention to the important safety notes
(Y
page 161).
If you unlock/lock the vehicle from the outside, the fuel filler flap also unlocks/locks.
The position of the 8fuel filler cap is dis-
played on the instrument cluster. The arrow next
to the filling pump indicates the side of the vehi-
cle.
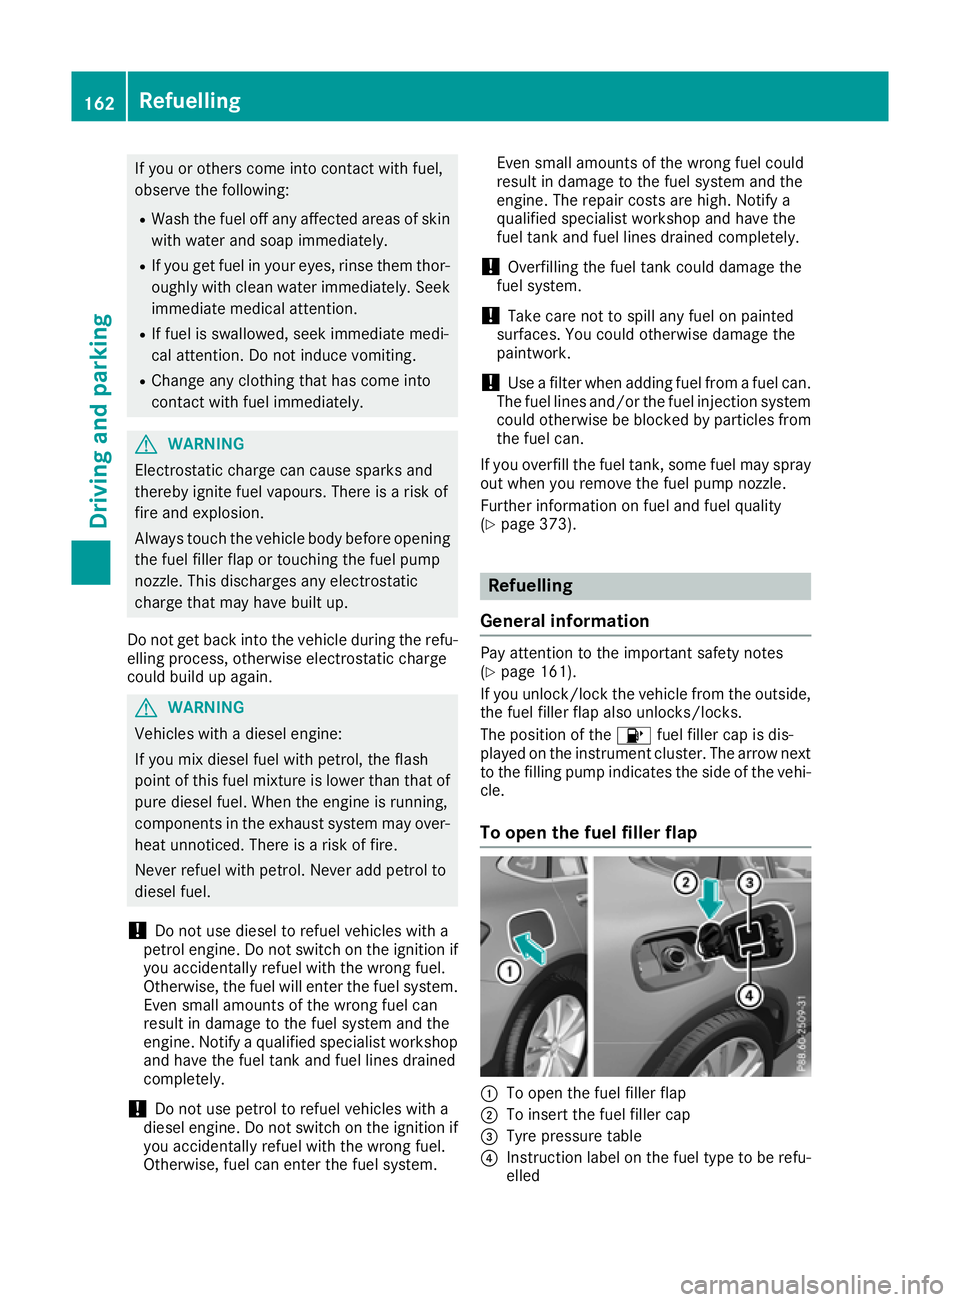
To open the fuel filler flap :
To open the fuel filler flap
; To insert the fuel filler cap
= Tyre pressure table
? Instruction label on the fuel type to be refu-
elled 162
RefuellingDriving and parking
Page 222 of 389
R
ball coupling
R trailer tow hitch
The vehicle/trailer combination could become
unstable.
The vehicle/trailer combination could also
become unstable if the noseweight used is lower
than the minimum permissible noseweight.
To avoid hazardous situations:
R make sure to check the noseweight before
each journey
R use a noseweight as close as possible to the
maximum noseweight
R do not exceed the maximum permissible
noseweight
R do not use a noseweight lower than the min-
imum noseweight
Make sure that the following values are not
exceeded:
R the permissible noseweight
R the permissible trailer load
R the permissible rear axle load of the towing
vehicle
R the maximum permissible gross vehicle
weight of both the towing vehicle and the
trailer
The applicable permissible values, which must
not be exceeded, can be found:
R in your vehicle documents
R on the type plates for the trailer
R on the vehicle identification plate
If the values differ, the lowest value applies.
You will find permissible trailer loads under
"Technical data" (Y page 380).
When reversing the towing vehicle, make sure
there is nobody between the trailer and the vehi- cle.
Couple and uncouple the trailer carefully. If you
do not couple the trailer to the towing vehicle
correctly, the trailer could become detached.
When towing a trailer, your vehicle's handling
characteristics will be different to when driving
without a trailer.
The vehicle/trailer combination:
R is heavier
R is restricted in its acceleration and gradient-
climbing capability
R has an increased braking distance
R is affected more by strong crosswinds R
demands more sensitive steering
R has a larger turning circle
This can impair the vehicle's handling charac-
teristics. Adapt your driving style accordingly.
Maintain a safe distance. Drive carefully.
When towing a trailer, always adjust your speed to the current road and weather conditions. Do
not exceed the maximum permissible speed for
your vehicle/trailer combination. Notes on towing a trailer
General notes When towing a trailer, set the tyre pressure on
the rear axle of the towing vehicle for a maxi-
mum load. Further information on the tyre pres-
sure table in the fuel filler flap (Y page 359).
You will find permissible trailer loads under
"Technical data" (Y page 380).
Driving tips Observe the information on ESP
®
trailer stabili-
sation (Y page 76).
The maximum permissible speed for vehicle/
trailer combinations depends on the type of
trailer. Before beginning the journey, check the
trailer's documents to see what the maximum
permitted speed is. Observe the maximum per-
missible speed in the relevant country.
For certain Mercedes-Benz vehicles, the maxi-
mum permissible rear axle load is increased
when towing a trailer. See the "Technical data"
section to find out whether this applies to your
vehicle (Y page 381). In the event of increased
rear axle load, the car/trailer combination may
not exceed a maximum speed of 100 km/ hfor
reasons concerning the operating permit. This
also applies in countries in which the maximum
permissible speed for car/trailer combinations
is greater than 100 km/h.
When towing a trailer, your vehicle's handling
characteristics will be different to when driving
without a trailer and the vehicle will consume
more fuel.
Shift to a lower gear in good time on long and
steep downhill gradients.
This also applies in the case of:
R activated DISTRONIC PLUS
R activated cruise control Towing a trailer
219Driving and parking Z
Page 289 of 389
Warning/
indicator
lamp
N N
Signal type
Possible causes/consequences and M
M Solutions !
N
The red indicator lamp for the electric parking brake flashes or is lit and/or the
yellow warning lamp for the electric parking brake is lit.
X Observe the additional display messages on the multifunction display. 6
N
The red restraint system warning lamp is lit while the engine is running.
The restraint system is malfunctioning.
G WARNING
The airbags or belt tensioners may either be triggered unintentionally or, in the
event of an accident, may not be triggered.
This poses an increased risk of injury.
X Observe the additional display messages on the multifunction display.
X Drive on carefully.
X Contact a qualified specialist workshop immediately and have the restraint sys-
tem checked.
Further information about the restraint system (Y page 41).Engine
Warning/
indicator
lamp
N N
Signal type
Possible causes/consequences and M
M Solutions ;
N
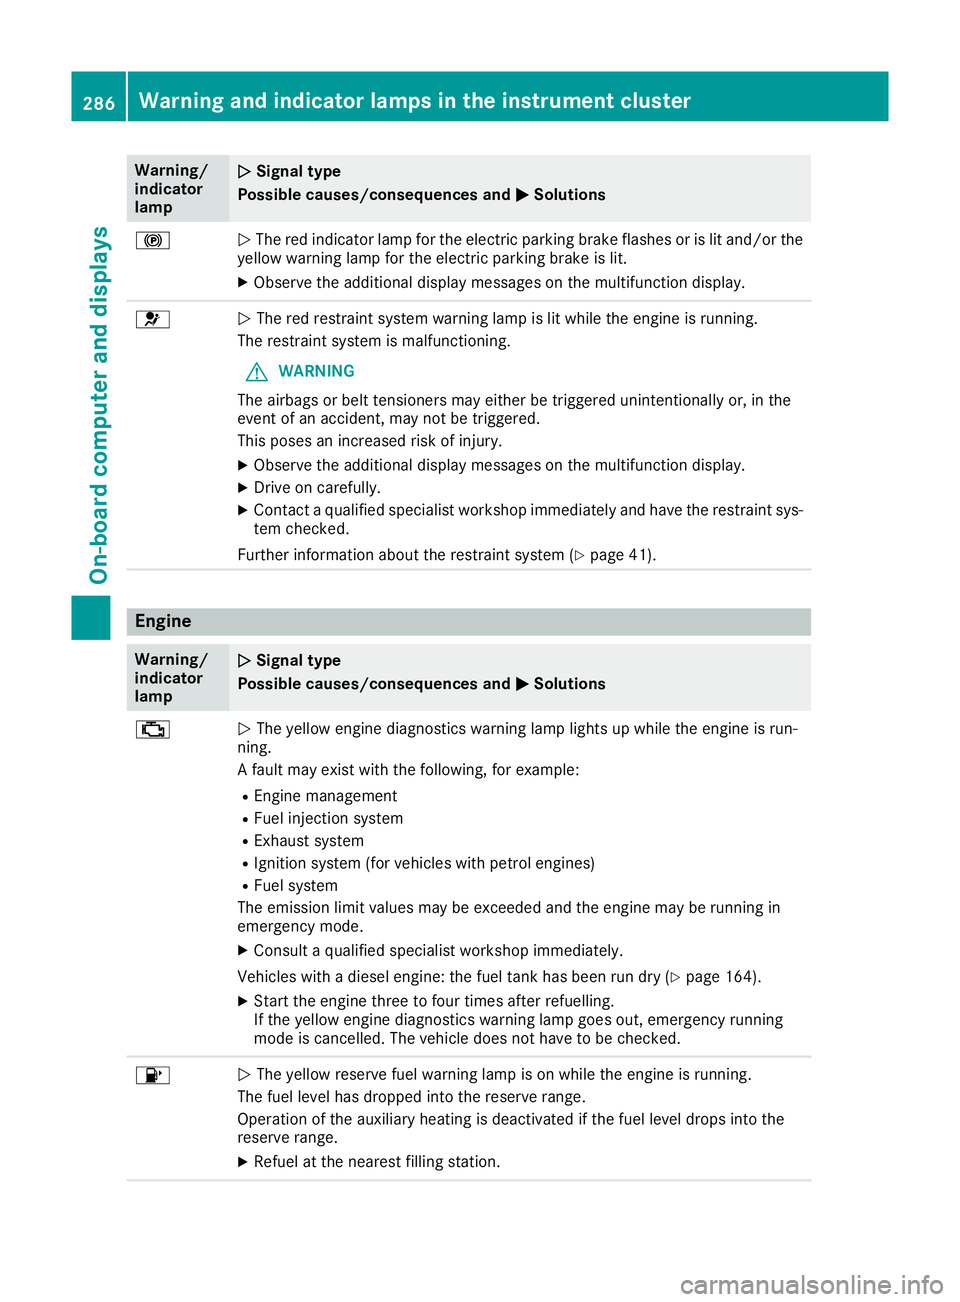
The yellow engine diagnostics warning lamp lights up while the engine is run-
ning.
A fault may exist with the following, for example:
R Engine management
R Fuel injection system
R Exhaust system
R Ignition system (for vehicles with petrol engines)
R Fuel system
The emission limit values may be exceeded and the engine may be running in
emergency mode.
X Consult a qualified specialist workshop immediately.
Vehicles with a diesel engine: the fuel tank has been run dry (Y page 164).
X Start the engine three to four times after refuelling.
If the yellow engine diagnostics warning lamp goes out, emergency running
mode is cancelled. The vehicle does not have to be checked. 8
N
The yellow reserve fuel warning lamp is on while the engine is running.
The fuel level has dropped into the reserve range.
Operation of the auxiliary heating is deactivated if the fuel level drops into the
reserve range.
X Refuel at the nearest filling station. 286
Warning and indicator lamps in the instrument clusterOn-board computer and displays
Page 359 of 389
Important safety notes
G
WARNING
If wheels and tyres of the wrong size are used, the wheel brakes or suspension components
may be damaged. There is a risk of an acci-
dent.
Always replace wheels and tyres with those
that fulfil the specifications of the original
part.
When replacing wheels, make sure to fit the
correct:
R designation
R type
When replacing tyres, make sure to fit the
correct:
R designation
R manufacturer
R type G
WARNING
A flat tyre severely impairs the driving, steer-
ing and braking characteristics of the vehicle.
There is a risk of accident.
Tyres without run-flat characteristics:
R do not drive with a flat tyre.
R immediately replace the flat tyre with your
emergency spare wheel or spare wheel, or
consult a qualified specialist workshop.
Tyres with run-flat characteristics:
R pay attention to the information and warn-
ing notices on MOExtended tyres (tyres
with run-flat characteristics).
Accessories that are not approved for your vehi-
cle by Mercedes-Benz or are not being used cor- rectly can impair operating safety.
Before purchasing and using non-approved
accessories, visit a qualified specialist work-
shop and enquire about:
R suitability
R legal stipulations
R factory recommendations Further information regarding wheels and tyres
can be found under "Wheel/tyre combinations"
(Y page 368).
You can ask for information regarding permitted
wheel/tyre combinations at a Mercedes-Benz
Service Centre.
Information on tyre pressure can be found:
R in the tyre pressure table in the fuel filler flap
(Y page 162)
R under "Tyre pressure" (Y page 359)
Modifications to the brake system and wheels
are not permitted. The use of spacers or brake
dust shields is not permitted. This invalidates
the general operating permit for the vehicle.
i Further information on wheels and tyres can
be obtained at any qualified specialist work-
shop. Operation
Information on driving
When the vehicle is heavily laden, check the tyre pressures and adjust them prior to a trip.
While driving, pay attention to vibrations, noises
and unusual handling characteristics, e.g. pull-
ing to one side. This may indicate that the
wheels or tyres are damaged. If you suspect that a tyre is defective, reduce your speed immedi-
ately. Stop the vehicle as soon as possible to
check the wheels and tyres for damage. Hidden tyre damage could also be causing the unusual
handling characteristics. If you find no signs of
damage, have the tyres and wheels checked at a
qualified specialist workshop.
When parking your vehicle, make sure not to
squash the tyre. If you cannot avoid driving over obstacles, e.g. kerbs, do so slowly and at an
obtuse angle only. You could otherwise damage
the wheel rims and tyres. Regular checking of wheels and tyres
G
WARNING
Damaged tyres can cause tyre inflation pres-
sure loss. As a result, you could lose control of your vehicle. There is a risk of accident.
Check the tyres regularly for signs of damageand replace any damaged tyres immediately. 356
OperationWheels and ty
res
Page 372 of 389
cannot guarantee vehicle safety if retreaded
tyres are fitted. Do not fit used tyres if you
have no information about their previous
usage.
! Large wheels: the lower the section width
for a certain wheel size, the lower the ride
comfort is on poor road surfaces. Roll comfort
and suspension comfort are reduced and the risk of damage to the wheels and tyres as a
result of driving over obstacles increases.
The recommended tyre pressures for various
operating conditions can be found on the tyre
pressure table on the fuel filler flap. Further
information on tyre pressure (Y page 359).
Check tyre pressures regularly and only when
the tyres are cold.
Notes on the vehicle equipment – always fit the
vehicle:
R with tyres of the same size across an axle
(left/right)
R with the same type of tyres at a given time
(summer tyres, winter tyres, MOExtended
tyres)
Exception: it is permissible to fit a different
type or make in the event of a flat tyre.
Observe the "MOExtended tyres (tyres with
run-flat characteristics)" section
(Y page 341).
Vehicles with MOExtended tyres are not equip-
ped with a TIREFIT kit at the factory. It is there-
fore recommended that you additionally equip
your vehicle with a TIREFIT kit if you fit tyres that do not feature run-flat characteristics, e.g. win-
ter tyres. A TIREFIT kit can be obtained from a
qualified specialist workshop. Emergency spare wheel
Important safety notes
G
WARNING
The wheel/tyre dimensions and the tyre type of the spare wheel/emergency spare wheel
and the wheel to be replaced may differ. Fit-
ting a spare wheel/emergency spare wheel
may severely impair the driving characteris-
tics. There is a risk of accident. To prevent hazardous situations:
R Adapt your driving style accordingly and
drive carefully.
R Never fit more than one spare wheel/emer-
gency spare wheel if the dimensions are
different to those of the wheel being
replaced.
R Only use a spare wheel/emergency spare
wheel briefly if the dimensions are different
to those of the wheel being replaced.
R Do not switch off ESP ®
.
R Have the spare wheel/emergency spare
wheel in question replaced at the nearest
qualified specialist workshop. Make sure
that the wheel/tyre dimensions and tyre
type are correct.
When using an emergency spare wheel or spare wheel of a different size, you must not exceed
the maximum speed of 80 km/h.
Snow chains must not be fitted to emergency
spare wheels. General notes
You can ask for information regarding permitted
emergency spare wheels at a Mercedes-Benz
Service Centre.
You should regularly check the pressure of all
your tyres, including the emergency spare
wheel, particularly prior to long trips, and cor-
rect the pressure as necessary (Y page 359).
The value on the wheel is valid.
An emergency spare wheel may also be fitted
against the direction of rotation. Observe the
time restriction on use as well as the speed lim- itation specified on the emergency spare wheel.
Replace the tyres after six years at the latest,
regardless of wear. This also applies to the
emergency spare wheel.
If you are driving with the emergency spare
wheel fitted, the tyre pressure loss warning sys- tem or the tyre pressure monitor cannot func-
tion reliably. Restart the tyre pressure loss warn-
ing system or tyre pressure monitor only once
the defective wheel has been replaced with a
new wheel.
Vehicles with tyre pressure monitor: after an
emergency spare wheel has been fitted, the sys- Emergency spare wheel
369Wheels and tyres Z