2016 MERCEDES-BENZ GLC COUPE key
[x] Cancel search: keyPage 127 of 389
For this reason, you should always switch off
the windscreen wipers in dry weather. 1
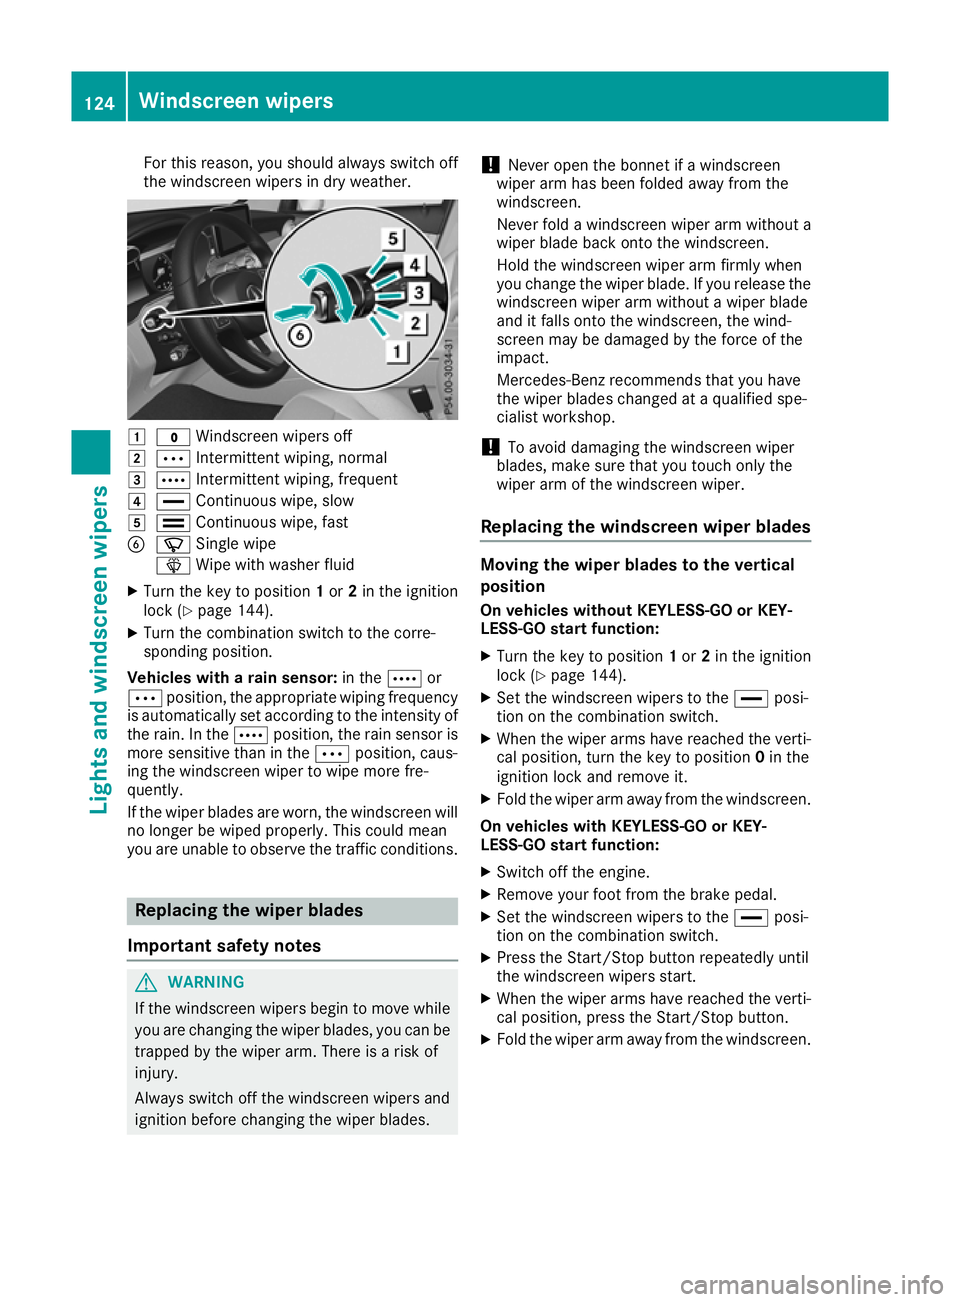
$ Windscreen wipers off
2 Ä Intermittent wiping, normal
3 Å Intermittent wiping, frequent
4 ° Continuous wipe, slow
5 ¯ Continuous wipe, fast
B í Single wipe
î Wipe with washer fluid
X Turn the key to position 1or 2in the ignition
lock (Y page 144).
X Turn the combination switch to the corre-
sponding position.
Vehicles with a rain sensor: in theÅor
Ä position, the appropriate wiping frequency
is automatically set according to the intensity of
the rain. In the Åposition, the rain sensor is
more sensitive than in the Äposition, caus-
ing the windscreen wiper to wipe more fre-
quently.
If the wiper blades are worn, the windscreen will no longer be wiped properly. This could mean
you are unable to observe the traffic conditions. Replacing the wiper blades
Important safety notes G
WARNING
If the windscreen wipers begin to move while
you are changing the wiper blades, you can be trapped by the wiper arm. There is a risk of
injury.
Always switch off the windscreen wipers and
ignition before changing the wiper blades. !
Never open the bonnet if a windscreen
wiper arm has been folded away from the
windscreen.
Never fold a windscreen wiper arm without a
wiper blade back onto the windscreen.
Hold the windscreen wiper arm firmly when
you change the wiper blade. If you release the
windscreen wiper arm without a wiper blade
and it falls onto the windscreen, the wind-
screen may be damaged by the force of the
impact.
Mercedes-Benz recommends that you have
the wiper blades changed at a qualified spe-
cialist workshop.
! To avoid damaging the windscreen wiper
blades, make sure that you touch only the
wiper arm of the windscreen wiper.
Replacing the windscreen wiper blades Moving the wiper blades to the vertical
position
On vehicles without KEYLESS-GO or KEY-
LESS‑GO start function:
X Turn the key to position 1or 2in the ignition
lock (Y page 144).
X Set the windscreen wipers to the °posi-
tion on the combination switch.
X When the wiper arms have reached the verti-
cal position, turn the key to position 0in the
ignition lock and remove it.
X Fold the wiper arm away from the windscreen.
On vehicles with KEYLESS-GO or KEY-
LESS‑GO start function:
X Switch off the engine.
X Remove your foot from the brake pedal.
X Set the windscreen wipers to the °posi-
tion on the combination switch.
X Press the Start/Stop button repeatedly until
the windscreen wipers start.
X When the wiper arms have reached the verti-
cal position, press the Start/Stop button.
X Fold the wiper arm away from the windscreen. 124
Windscreen wipersLights and windscreen wipers
Page 129 of 389
Problems with the windscreen wipers
Problem
Possible causes/consequences and
M
MSolutions The windscreen wipers
are jammed. Leaves or snow, for example, are obstructing windscreen wiper move-
ment. The wiper motor has been deactivated.
X Switch off the engine.
X Remove the key from the ignition lock.
or, on vehicles with KEYLESS-GO or KEYLESS ‑GO start function:
X Open the driver's door.
The vehicle electronics now have status 0. This is the same as the
key having been removed.
X Remove the cause of the obstruction.
X Switch the windscreen wipers back on. The windscreen wipers
fail completely. The windscreen wiper drive is malfunctioning.
X Select another wiper speed on the combination switch.
X Have the windscreen wipers checked at a qualified specialist work-
shop. The windscreen washer
fluid from the spray noz-
zles no longer hits the
centre of the wind-
screen. The spray nozzles are misaligned.
X Have the spray nozzles adjusted at a qualified specialist workshop. 126
Windscreen wipersLights and windscreen wipers
Page 130 of 389
Overview of climate control systems
General notes
Observe the settings recommended on the fol-
lowing pages. Otherwise, the windows could
mist up.
To prevent the windows from misting up:
R switch off climate control only briefly
R activate air-recirculation mode only briefly
R switch on "Cooling with air dehumidification"
R activate the "Windscreen demisting" function
briefly, if required
Climate control regulates the temperature and
air humidity in the vehicle interior. The interior
filter cleans the air, thus improving the interior
climate.
The "Cooling with dehumidification" function is
available only when the engine is running. Opti-
mum climate control is achieved only with the
side windows and roof closed.
The residual heat function can be activated or
deactivated only with the ignition switched off
(Y page 135). The integrated filter filters out most particles of
dust and soot and completely filters out pollen.
It also reduces gaseous pollutants and odours. A
clogged filter reduces the amount of air supplied to the vehicle interior. For this reason, you
should always observe the interval for replacing
the filter, which is specified in the Service Book-
let. As this depends on environmental condi-
tions, e.g. heavy air pollution, the interval may
be shorter than stated in the Service Booklet.
i Ventilate the vehicle for a brief period during
warm weather, e.g. using the convenience
opening feature (Y page 96). This will speed
up the cooling process and the desired inte-
rior temperature will be reached more
quickly.
i It is possible that the blower may be activa-
ted automatically 60 minutes after the key
has been removed depending on various fac-
tors, e.g. the outside temperature. The vehi-
cle is then ventilated for 30 minutes to dry the
automatic climate control.
i Hybrid vehicles:
observe the notes on cli-
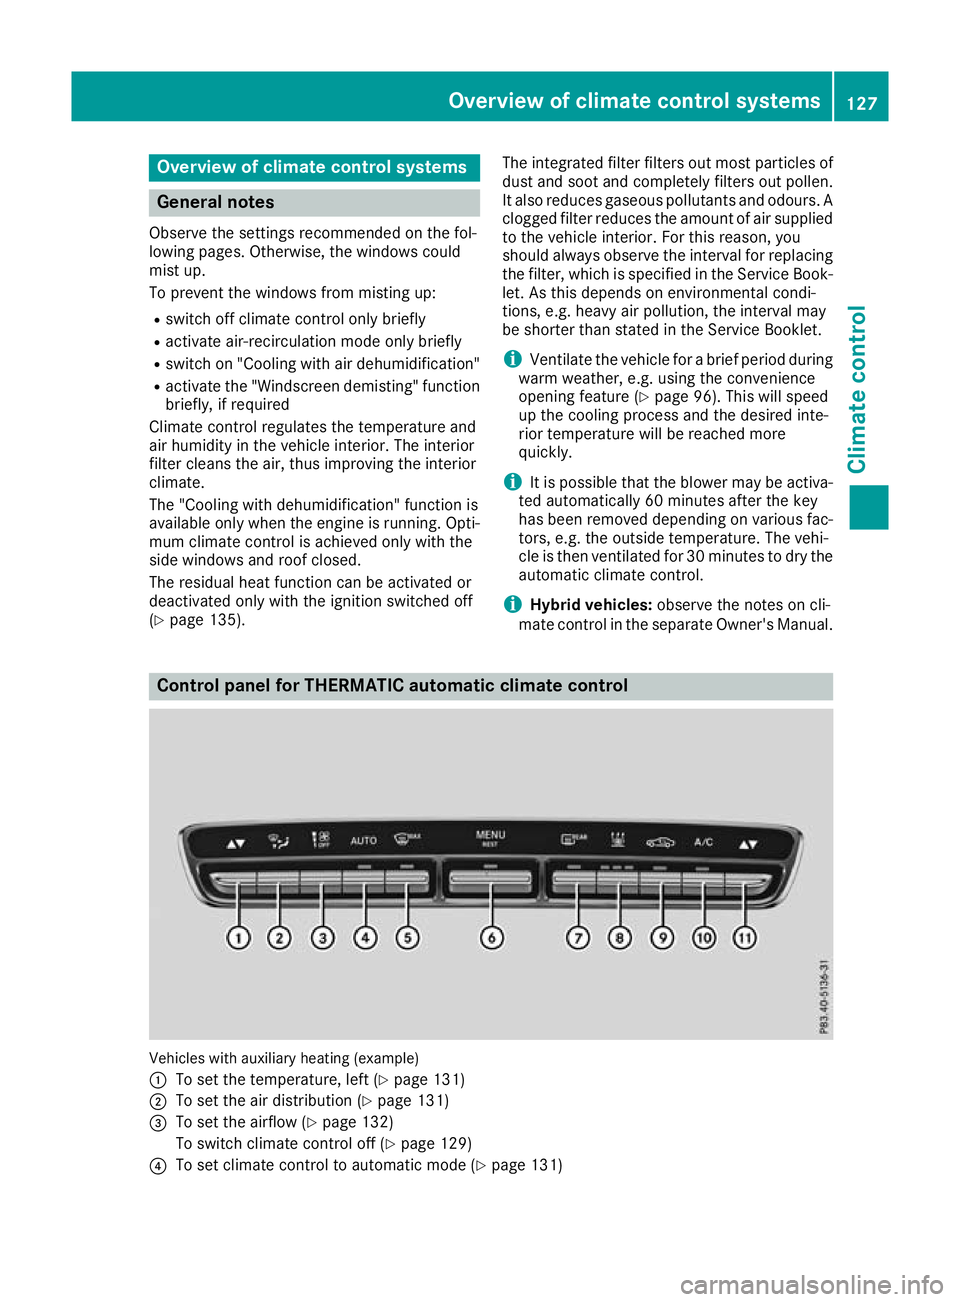
mate control in the separate Owner's Manual. Control panel for THERMATIC automatic climate control
Vehicles with auxiliary heating (example)
:
To set the temperature, left (Y page 131)
; To set the air distribution (Y page 131)
= To set the airflow (Y page 132)
To switch climate control off (Y page 129)
? To set climate control to automatic mode (Y page 131) Overview of climate control systems
127Climate control
Page 132 of 389
I
Display
J To set the airflow (Y page 132) Notes on using automatic climate
control
Optimum use of automatic climate con-
trol The following contains notes and recommenda-
tions on how best to use THERMATIC automatic
climate control or THERMOTRONIC.
R Activate climate control using the Ã
rocker switch. The indicator lamp above the
à rocker switch lights up. The "Cooling
with dehumidification" function is activated in
automatic mode.
R Set the temperature to 22 †.
R Use the "Windscreen demisting" function only
briefly until the windscreen is clear again.
R Use the "Air-recirculation mode" function only
briefly, e.g. if there are unpleasant outside
odours or when in a tunnel. The windows
could otherwise mist up as no fresh air is
drawn into the vehicle in air-recirculation
mode.
R Vehicles with THERMATIC with auxiliary heat-
ing or THERMOTRONIC: use the "Residual
heat" function if you want to heat or ventilate
the vehicle interior when the ignition is
switched off. The "Residual heat" function can
be switched on or off only with the ignition
switched off. The "Residual heat" function is
switched off when the ignition is switched on.
DYNAMIC SELECT switch (except
Mercedes-AMG vehicles) You can choose between various drive programs
with the DYNAMIC SELECT switch
(Y page 152).
If you have selected drive program E:
R during heating, the electrical heater booster
is deactivated and heat output is reduced as a
result
R the rear window heating running time is
reduced If you have selected drive program
C,Sor S+ ,
the current climate settings are maintained.
ECO start/stop function During automatic engine switch-off, the climate
control operates only at a reduced capacity. If
you require the full climate control output, you
can switch off the ECO start/stop function by
pressing the ECO button (Y page 149). Operating the climate control system
Switching the climate control on/off
General notes When climate control is switched off, the air
supply and air circulation are also switched off.
The windows could mist up. Therefore, switch
off climate control only briefly.
Switch on climate control primarily using the
à rocker switch (Y page 131).
Activating/deactivating X
Turn the key to position 2in the ignition lock
(Y page 144).
X To switch on: set the airflow to level 1 or
higher using the Hrocker switch.
X To switch off:set the airflow to level 0 using
the H rocker switch.
i THERMOTRONIC automatic climate control:
when climate control is switched off, "OFF"
appears in the rear-compartment display. Operating the climate control system
129Climate control
Page 134 of 389
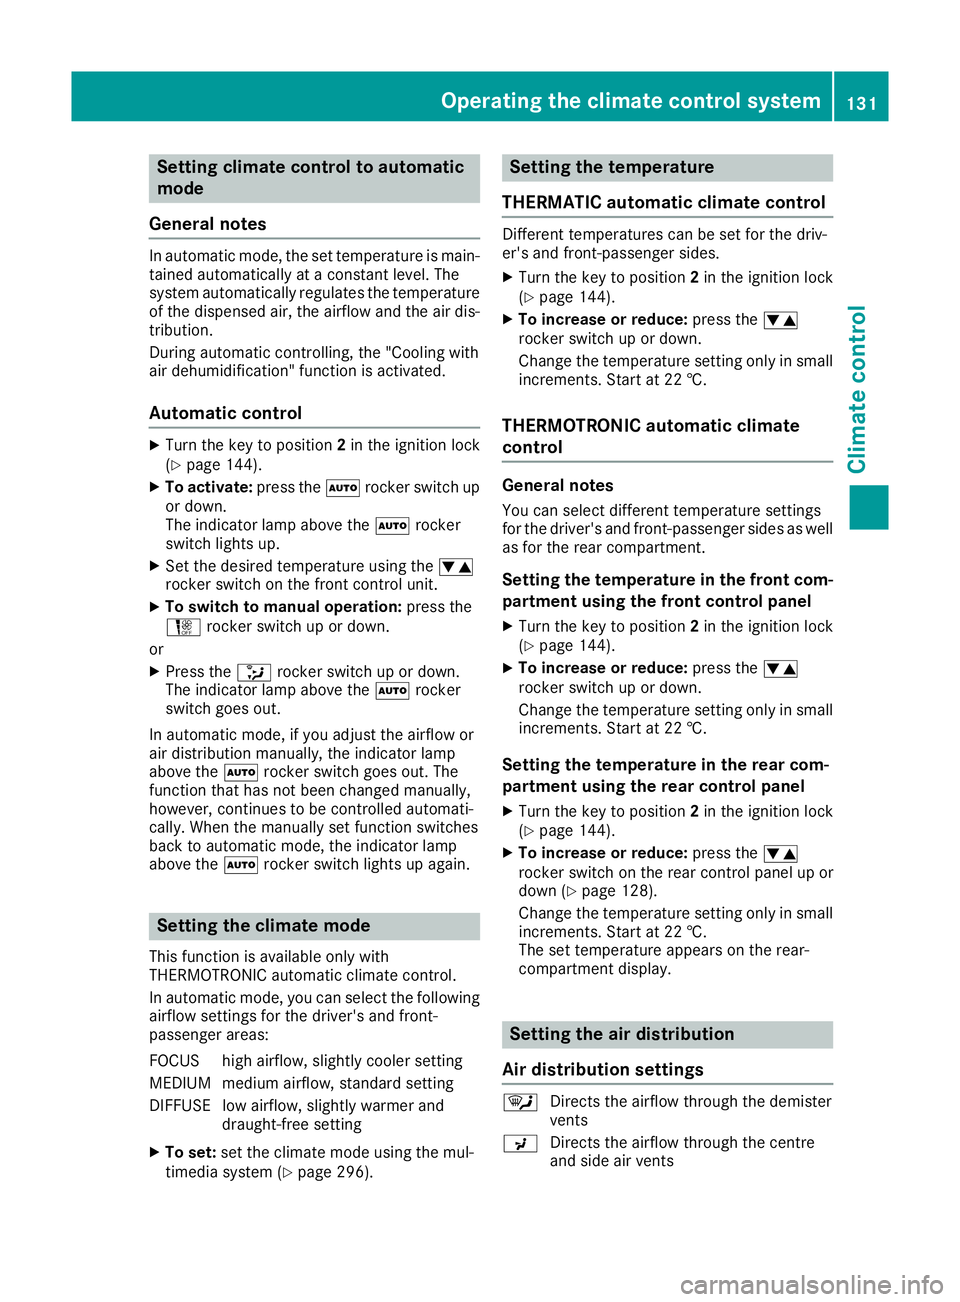
Setting climate control to automatic
mode
General notes In automatic mode, the set temperature is main-
tained automatically at a constant level. The
system automatically regulates the temperature of the dispensed air, the airflow and the air dis- tribution.
During automatic controlling, the "Cooling with
air dehumidification" function is activated.
Automatic control X
Turn the key to position 2in the ignition lock
(Y page 144).
X To activate: press theÃrocker switch up
or down.
The indicator lamp above the Ãrocker
switch lights up.
X Set the desired temperature using the w
rocker switch on the front control unit.
X To switch to manual operation: press the
H rocker switch up or down.
or
X Press the _rocker switch up or down.
The indicator lamp above the Ãrocker
switch goes out.
In automatic mode, if you adjust the airflow or
air distribution manually, the indicator lamp
above the Ãrocker switch goes out. The
function that has not been changed manually,
however, continues to be controlled automati-
cally. When the manually set function switches
back to automatic mode, the indicator lamp
above the Ãrocker switch lights up again. Setting the climate mode
This function is available only with
THERMOTRONIC automatic climate control.
In automatic mode, you can select the following airflow settings for the driver's and front-
passenger areas:
FOCUS high airflow, slightly cooler setting
MEDIUM medium airflow, standard setting
DIFFUSE low airflow, slightly warmer and draught-free setting
X To set: set the climate mode using the mul-
timedia system (Y page 296). Setting the temperature
THERMATIC automatic climate control Different temperatures can be set for the driv-
er's and front-passenger sides.
X Turn the key to position 2in the ignition lock
(Y page 144).
X To increase or reduce: press thew
rocker switch up or down.
Change the temperature setting only in small
increments. Start at 22 †.
THERMOTRONIC automatic climate
control General notes
You can select different temperature settings
for the driver's and front-passenger sides as well
as for the rear compartment.
Setting the temperature in the front com-
partment using the front control panel
X Turn the key to position 2in the ignition lock
(Y page 144).
X To increase or reduce: press thew
rocker switch up or down.
Change the temperature setting only in small
increments. Start at 22 †.
Setting the temperature in the rear com-
partment using the rear control panel X Turn the key to position 2in the ignition lock
(Y page 144).
X To increase or reduce: press thew
rocker switch on the rear control panel up or
down (Y page 128).
Change the temperature setting only in small
increments. Start at 22 †.
The set temperature appears on the rear-
compartment display. Setting the air distribution
Air distribution settings ¯
Directs the airflow through the demister
vents
P Directs the airflow through the centre
and side air vents Operating the climate control system
131Climate control
Page 135 of 389
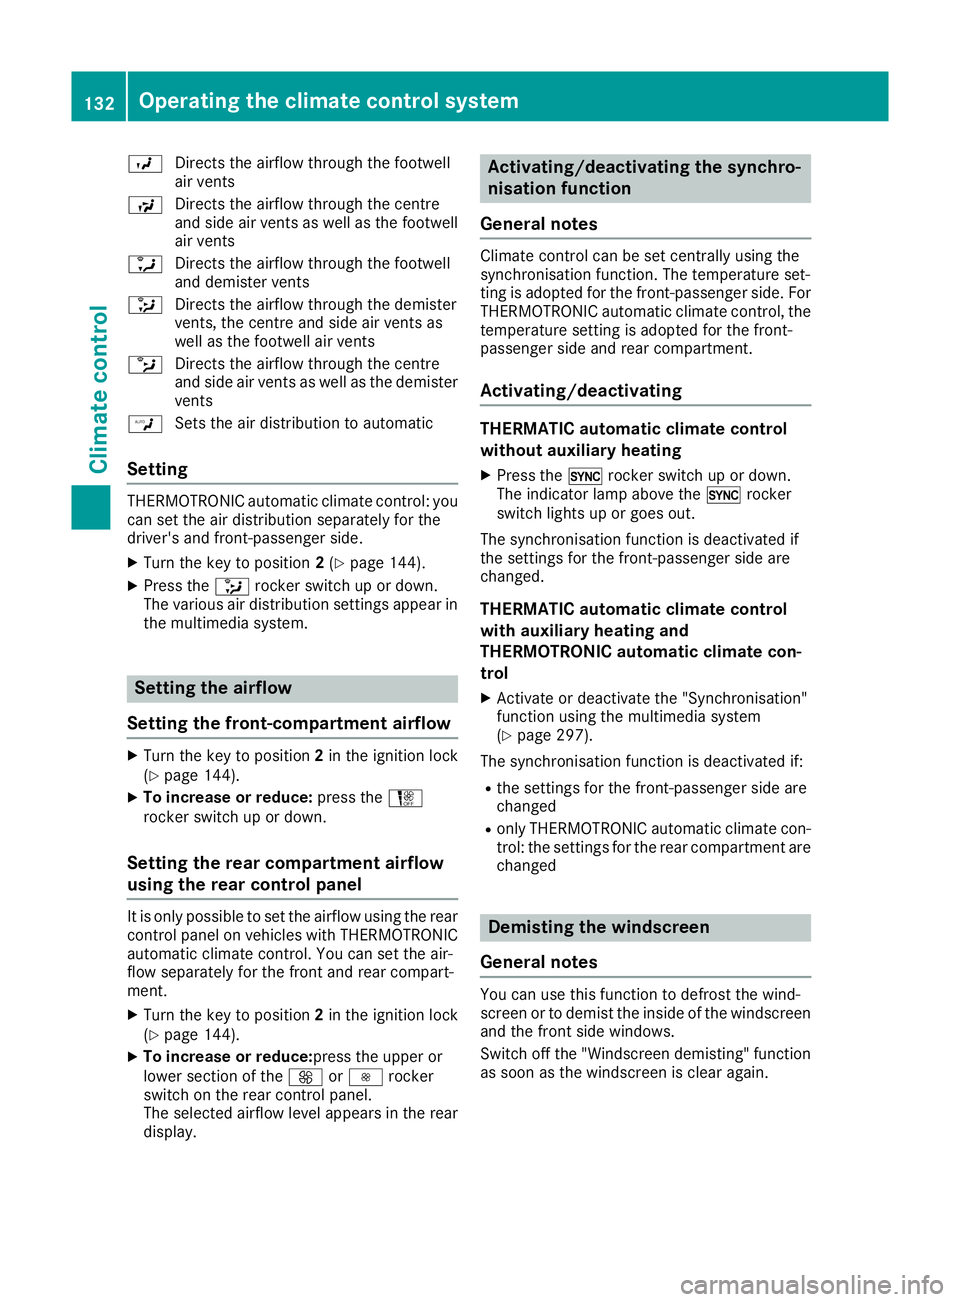
O
Directs the airflow through the footwell
air vents
S Directs the airflow through the centre
and side air vents as well as the footwell
air vents
a Directs the airflow through the footwell
and demister vents
_ Directs the airflow through the demister
vents, the centre and side air vents as
well as the footwell air vents
b Directs the airflow through the centre
and side air vents as well as the demister
vents
W Sets the air distribution to automatic
Setting THERMOTRONIC automatic climate control: you
can set the air distribution separately for the
driver's and front-passenger side.
X Turn the key to position 2(Y page 144).
X Press the _rocker switch up or down.
The various air distribution settings appear in the multimedia system. Setting the airflow
Setting the front-compartment airflow X
Turn the key to position 2in the ignition lock
(Y page 144).
X To increase or reduce: press theH
rocker switch up or down.
Setting the rear compartment airflow
using the rear control panel It is only possible to set the airflow using the rear
control panel on vehicles with THERMOTRONIC automatic climate control. You can set the air-
flow separately for the front and rear compart-
ment.
X Turn the key to position 2in the ignition lock
(Y page 144).
X To increase or reduce:press the upper or
lower section of the KorI rocker
switch on the rear control panel.
The selected airflow level appears in the rear
display. Activating/deactivating the synchro-
nisation function
General notes Climate control can be set centrally using the
synchronisation function. The temperature set-
ting is adopted for the front-passenger side. For
THERMOTRONIC automatic climate control, the
temperature setting is adopted for the front-
passenger side and rear compartment.
Activating/deactivating THERMATIC automatic climate control
without auxiliary heating
X Press the 0rocker switch up or down.
The indicator lamp above the 0rocker
switch lights up or goes out.
The synchronisation function is deactivated if
the settings for the front-passenger side are
changed.
THERMATIC automatic climate control
with auxiliary heating and
THERMOTRONIC automatic climate con-
trol
X Activate or deactivate the "Synchronisation"
function using the multimedia system
(Y page 297).
The synchronisation function is deactivated if:
R the settings for the front-passenger side are
changed
R only THERMOTRONIC automatic climate con-
trol: the settings for the rear compartment are
changed Demisting the windscreen
General notes You can use this function to defrost the wind-
screen or to demist the inside of the windscreen and the front side windows.
Switch off the "Windscreen demisting" functionas soon as the windscreen is clear again. 132
Operating the climate control systemClimate control
Page 136 of 389
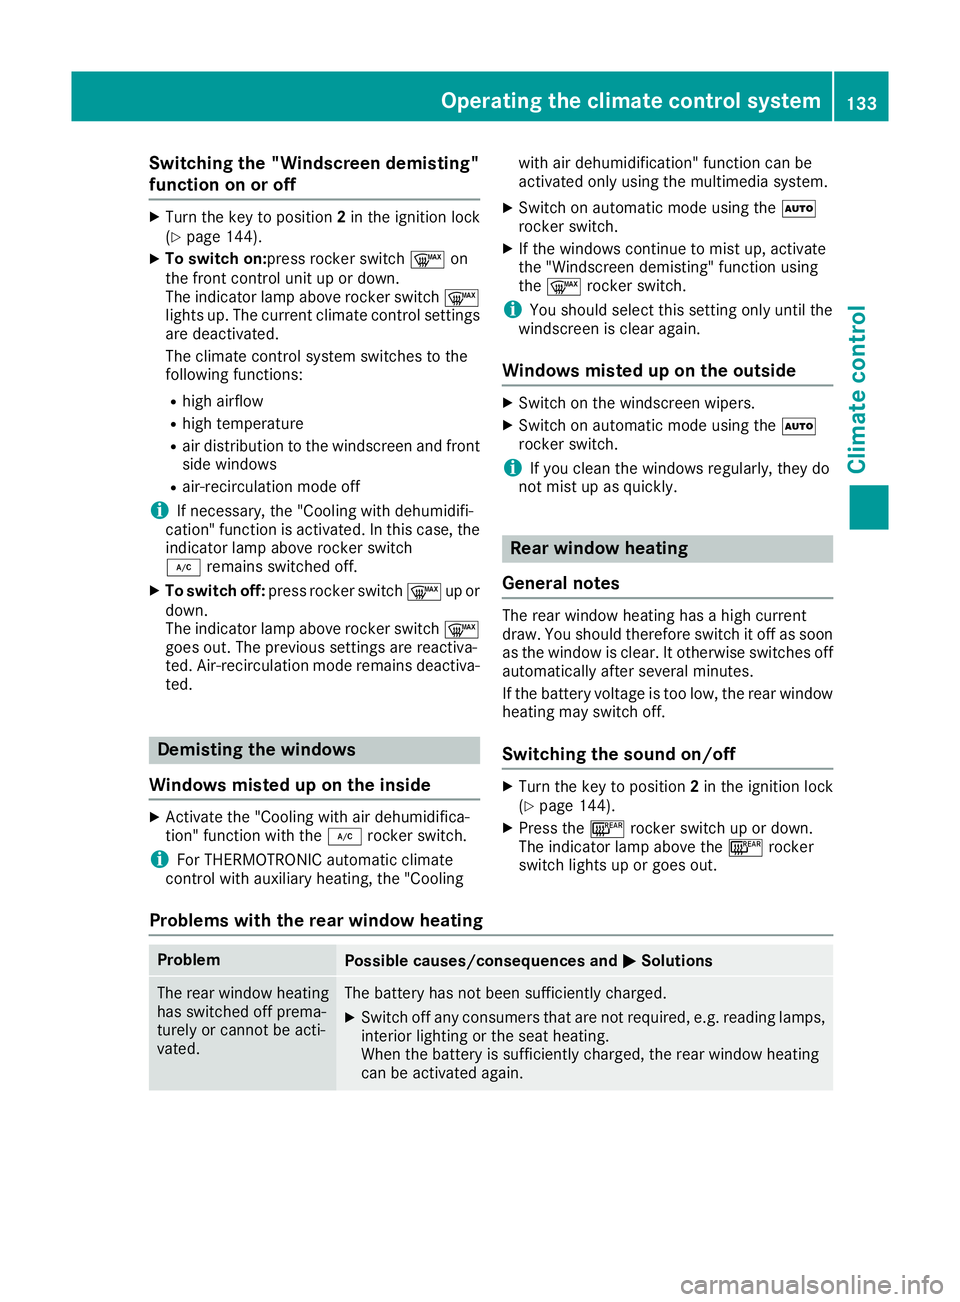
Switching the "Windscreen demisting"
function on or off
X
Turn the key to position 2in the ignition lock
(Y page 144).
X To switch on:press rocker switch ¬on
the front control unit up or down.
The indicator lamp above rocker switch ¬
lights up. The current climate control settings are deactivated.
The climate control system switches to the
following functions:
R high airflow
R high temperature
R air distribution to the windscreen and front
side windows
R air-recirculation mode off
i If necessary, the "Cooling with dehumidifi-
cation" function is activated. In this case, the
indicator lamp above rocker switch
¿ remains switched off.
X To switch off: press rocker switch ¬up or
down.
The indicator lamp above rocker switch ¬
goes out. The previous settings are reactiva-
ted. Air-recirculation mode remains deactiva- ted. Demisting the windows
Windows misted up on the inside X
Activate the "Cooling with air dehumidifica-
tion" function with the ¿rocker switch.
i For THERMOTRONIC automatic climate
control with auxiliary heating, the "Cooling with air dehumidification" function can be
activated only using the multimedia system.
X Switch on automatic mode using the Ã
rocker switch.
X If the windows continue to mist up, activate
the "Windscreen demisting" function using
the ¬ rocker switch.
i You should select this setting only until the
windscreen is clear again.
Windows misted up on the outside X
Switch on the windscreen wipers.
X Switch on automatic mode using the Ã
rocker switch.
i If you clean the windows regularly, they do
not mist up as quickly. Rear window heating
General notes The rear window heating has a high current
draw. You should therefore switch it off as soon
as the window is clear. It otherwise switches off
automatically after several minutes.
If the battery voltage is too low, the rear window heating may switch off.
Switching the sound on/off X
Turn the key to position 2in the ignition lock
(Y page 144).
X Press the ¤rocker switch up or down.
The indicator lamp above the ¤rocker
switch lights up or goes out.
Problems with the rear window heating Problem
Possible causes/consequences and
M MSolutions The rear window heating
has switched off prema-
turely or cannot be acti-
vated. The battery has not been sufficiently charged.
X Switch off any consumers that are not required, e.g. reading lamps,
interior lighting or the seat heating.
When the battery is sufficiently charged, the rear window heating
can be activated again. Operating the climate control system
133Climate control
Page 137 of 389

Activating/deactivating air-recircula-
tion mode
General notes You can also temporarily deactivate the flow of
fresh air manually if unpleasant odours are
entering the vehicle from outside. The air
already inside the vehicle will then be recircula-
ted.
If you activate air-recirculation mode, the win-
dows can mist up more quickly, particularly at
low outside temperatures. Use air-recirculation
mode only briefly to prevent the windows from
misting up.
Activating/deactivating X
Turn the key to position 2in the ignition lock
(Y page 144).
X To activate: press thegrocker switch up
or down.
The indicator lamp above the grocker
switch lights up.
Air-recirculation mode is activated automati-
cally:
R at high outside temperatures
R at high levels of pollution (THERMOTRONIC
automatic climate control only)
R in tunnels (vehicles with a navigation system
only)
The indicator lamp above the grocker
switch is not lit when automatic air-recirculation
mode is activated. Outside air is added after
approximately 30 minutes.
X To deactivate: press thegrocker switch
up or down.
The indicator lamp above the grocker
switch goes out.
Air-recirculation mode is deactivated automati-
cally:
R after approximately five minutes at outside
temperatures below approximately 5 †
R after approximately five minutes if "Cooling
with air dehumidification" is deactivated
R after approximately 30 minutes at outside
temperatures above approximately 5 †if the
"Cooling with air dehumidification" function is
activated Convenience opening or closing using
the air-recirculation button G
WARNING
When the convenience closing feature is oper- ating, parts of the body could become trapped
in the closing area of the side window and the
sliding sunroof. There is a risk of injury.
Observe the complete closing procedure
when the convenience closing feature is oper-
ating. When closing make sure that no parts of the body are in the closing area. G
WARNING
During convenience opening parts of the body could be drawn in or become trapped
between the side window and window frame.
There is a risk of injury.
When opening, make sure that nobody is
touching the side window. If someone
becomes trapped, immediately press
the W switch in the door to stop the move-
ment of the side windows. To continue closing
the side window, pull on the Wswitch.
X Convenience closing feature: press and
hold the grocker switch up or down until
the side windows start to close automatically. Vehicles with sliding sunroof: the sliding
sunroof closes simultaneously.
The indicator lamp above the grocker
switch lights up. Air-recirculation mode is
activated.
If you open the side windows or the sliding
sunroof manually after closing with the con-
venience closing feature, they will remain in
this position when opened using the conve-
nience opening feature.
If parts of the body are in the closing area during convenience closing, proceed as follows:
X Press the Wbutton to stop the side win-
dows.
The side windows stop.
X To then open the side windows, press the
W button again. 134
Operating the climate control systemClimate control