2016 MERCEDES-BENZ GLC COUPE key
[x] Cancel search: keyPage 300 of 389
Switching the ionisation on/off
The ionisation has a cleansing effect on the air in the vehicle interior. For further information, see (Y page 137).
X Call up the climate control menu
(Y page 296).
X To select Ionisation Ionisation: turn and press the
controller.
The setting element is active.
X To switch the ionisation on or off: turn the
controller.
X To exit the menu: press the%button.
Activating or deactivating pre-entry cli-
mate control via the key
This function is available for PLUG ‑IN HYBRID
vehicles.
Before getting in, the driver's seat area or the
whole vehicle interior is briefly warmed or ven-
tilated. The air from the vents is pre-cooled.
X Call up the climate control menu
(Y page 296).
X To select Pre-entry climate control
Pre-entry climate control
via key via key: turn and press the controller.
X To activate or deactivate: turn the control-
ler.
X To exit the menu: press the%button.
Activating or deactivating pre-entry cli-
mate control at departure time
This function is available for PLUG ‑IN HYBRID
vehicles.
The driver's seat and the vehicle interior are
heated or cooled prior to the set departure time.
X Call up the climate control menu
(Y page 296).
X To select Pre-entry climate control Pre-entry climate control
at depart. time
at depart. time: turn and press the con-
troller.
A rotary menu appears.
X To select the setting: turn the controller.
X To exit the menu: press the%button. Settings in the bottom bar of the cli-
mate control menu Activating/deactivating cooling with air
dehumidification
X Call up the climate control menu
(Y page 296).
X Slide 6the controller repeatedly until the
bottom bar is activated.
X To select O OA/C
A/C: turn and press the control-
ler.
X Switch cooling with air dehumidification on
O or off ª.
i The current status of the cooling function is
displayed in the climate control bar: A/C ON
– activated, A/C OFF – deactivated.
i Deactivating the cooling with air dehumidi-
fication function reduces fuel consumption.
Synchronising the climate control set-
tings Use O
O Sync. Sync. (synchronisation) to select the
climate control setting for all zones together O
or separately ª.
X Call up the climate control menu
(Y page 296).
X Slide 6the controller repeatedly until the
bottom bar is activated.
X To select O OSync. Sync.: turn and press the con-
troller.
X Switch the synchronisation function on Oor
off ª.
For further information on synchronising cli-
mate control settings, see (Y page 132). Navigation mode
Important safety notes G
WARNING
Operating the integrated information systems and communications equipment in the vehicle
while driving will distract you from traffic con-
ditions. You could then lose control of the
vehicle. There is a risk of an accident.
Only operate these devices if road traffic con-
ditions permit. If you are unsure about the Operating system
297Multimedia system
Z
Page 301 of 389
surrounding conditions, pull over to a safe
location and make entries only while the vehi- cle is stationary.
You must observe the legal requirements for the country in which you are currently driving whenoperating the navigation system.
General notes Correct functioning of the navigation system
depends, amongst other things, on GPS recep-
tion. In certain situations, GPS reception may be
impaired, there may be interference or there
may be no reception at all, e.g. in tunnels or
multi-storey car parks.
The following descriptions apply to navigation
with COMAND Online. Further information can
be found in the Digital Owner's Manual.
Selecting a route type and route options Multimedia system:
X Select Navi NaviQNavigation Navigation.
X Select Options
OptionsQRoute settings Route settings.
i If route guidance is active, first slide
6the
controller and show the menu.
X Select a route type.
Notes for route types:
R Eco route
Eco route
Calculates an economical route.
R Dynamic route
Dynamic route
Traffic reports on the route for the route guid-
ance are taken into account.
R Calculate alternative routes
Calculate alternative routes
Different routes are being calculated. Instead of Start
Start, select the Continue Continuemenu item.
X To avoid/use route options: selectAvoid
Avoid
options
options.
X Select a route option.
Notes for route options:
R Use toll roads
Use toll roads
The route calculation includes roads which
require you to pay a usage fee (toll).
R Use vignette roads
Use vignette roads (not available in all
countries)
The route calculation includes roads which
require you to pay a time-based fee (vignette).
A vignette allows temporary use of the route
network, e. g. 10 days or 1 year. Entering an address Multimedia system:
X Select Navi NaviQNavigation Navigation.
X Select Destination
DestinationQAddress entry Address entry.
i If route guidance is active, first slide
6the
controller and show the menu.
Enter an address, e.g. as follows:
R town or postcode, street, house number
R country, town or postcode
R town or postcode, centre
R street, town or postcode, junction
X Select Town
Town.
The town in which the vehicle is currently
located (current vehicle position) is at the top.
Below this, you will see locations for which
route guidance has already been carried out.
X Enter the town.
The Gsymbol: the location is contained on
the digital map multiple times.
X To switch to the list: slide5the control-
ler.
X Select the location.
If available, the postcode is shown. If there
are different postcodes available for the loca-
tion, the corresponding digits are displayed
with an X X.
X Enter the street and house number.
The address is in the menu.
Further options for destination entry:
R Keyword search
The keyword search finds destinations using
fragments of words.
R select the last destination
R select a contact
R select a POI
You can search for a POI by location, name or
telephone number.
R select destination on the map
R enter intermediate destination
You can map the route to the destination
yourself with up to four intermediate destina-
tions.
R select travel guide destination (only available
for selected European countries)
R select destinations from Mercedes-Benz
Apps
R select geo-coordinates 298
Operating systemMultimedia system
Page 302 of 389
Calculating the route
Prerequisite: the address has been entered and
is in the menu.
X Select Start
Start orContinue
Continue.
The route is calculated with the selected route
type and the selected route options.
If route guidance has already been activated,
a prompt will appear asking whether you wish to end the current route guidance.
X Select Yes
Yes orSet as intermediate des‐
Set as intermediate des‐
tination
tination.
Yes
Yes cancels the current route guidance and
starts route calculation to the new destina-
tion.
Set as intermediate destination
Set as intermediate destination adds
the new destination in addition to the existing
destination and opens the intermediate des-
tinations list. Connecting the mobile phone
Requirements For telephony via the Bluetooth
®
interface, you
require a Bluetooth ®
-capable mobile phone. The
mobile phone must support Hands-Free Profile
1.0 or above.
Multimedia system:
X Select Vehicle
VehicleQSystem set‐ System set‐
tings tingsQ Activate Bluetooth
Activate Bluetooth .
X Activate Bluetooth ®
O.
Mobile phone:
X Activate Bluetooth ®
and, if necessary, Blue-
tooth ®
visibility for other devices (see the
manufacturer's operating instructions).
The Bluetooth ®
device names for all of one man-
ufacturer's products might be identical. To
make it possible to clearly identify your mobile
phone, change the device name (see the man-
ufacturer's operating instructions).
If the mobile phone supports the PBAP (Phone
Book Access Profile) and MAP (Message
Access Profile) Bluetooth ®
profiles, the follow-
ing information will be transmitted after you
connect:
R Phone book
R Call lists
R Messages i
Further information on suitable mobile
phones can be obtained on the Internet at:
http://www.mercedes-benz.com/
connect
Searching for and authorising a mobile
phone Before using your mobile phone with the multi-
media system for the first time, you will need to
search for the phone and then authorise (con-
nect) it. Depending on the mobile phone, author- isation takes place by means of Secure Simple
Pairing or by entering a passkey. The multimedia
system automatically makes the procedure that is relevant for your mobile phone available. The
mobile phone is always connected automati-
cally after authorisation. Further information on
using a mobile phone with the multimedia sys-
tem (see the Digital Owner's Manual).
If the multimedia system does not detect your
mobile phone, this may be due to particular
security settings on your mobile phone (see the manufacturer's operating instructions).
Only one mobile phone can be connected to the
multimedia system at any one time.
Searching for a mobile phone
Audio 20:
X Select Tel/
Tel/®Q Connect Connect
device
device QSearch for phonesSearch for phones QStartStart
search
search .
The available mobile phones are displayed.
COMAND Online:
X Select Telephone
Telephone QConnectConnect
device
device QSearch for phonesSearch for phones QStartStart
search
search .
The available mobile phones are displayed.
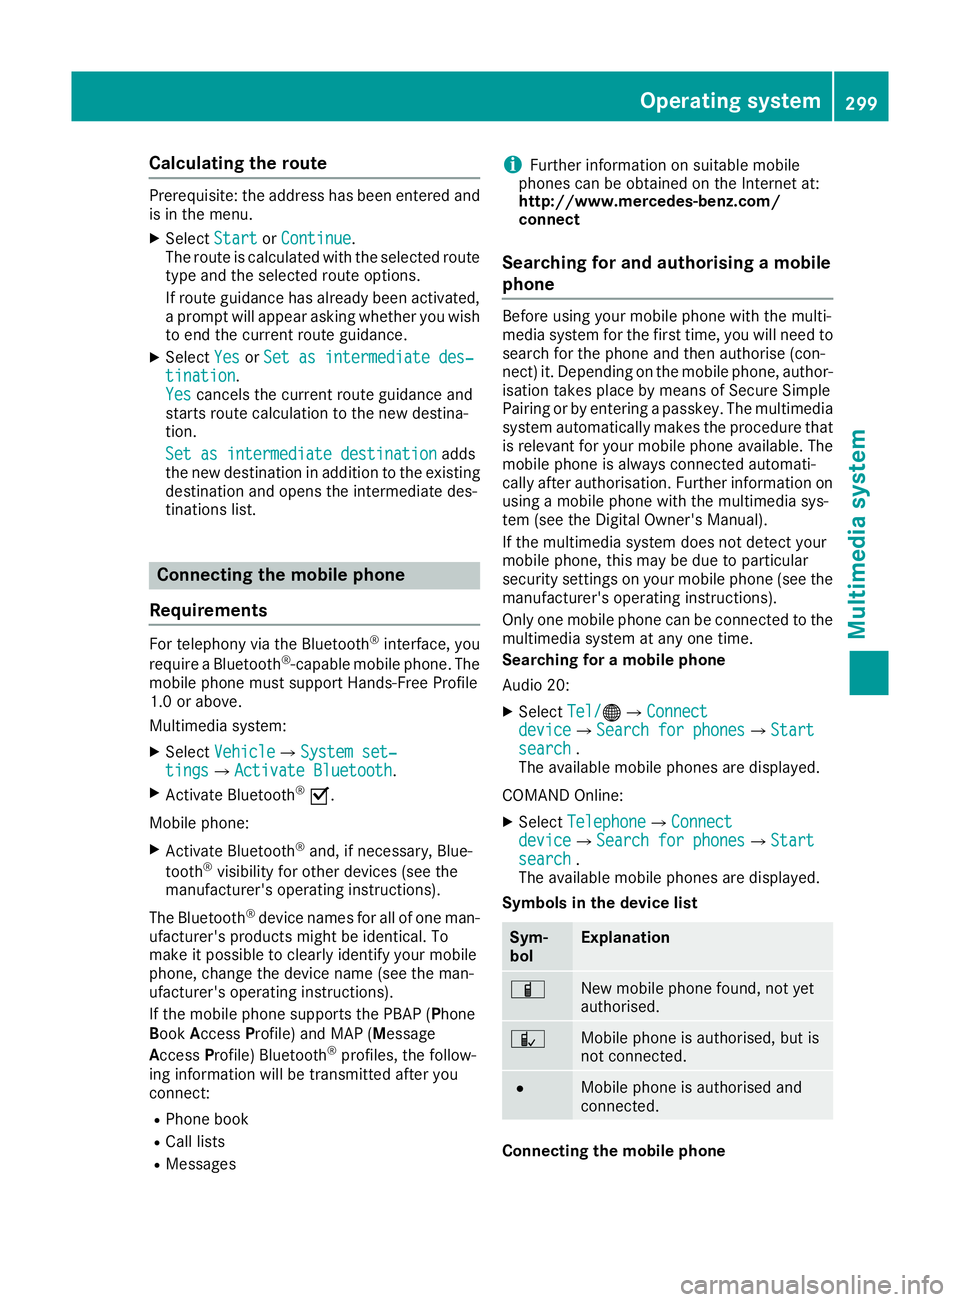
Symbols in the device list Sym-
bol Explanation
Ï
New mobile phone found, not yet
authorised.
Ñ
Mobile phone is authorised, but is
not connected.
#
Mobile phone is authorised and
connected.
Connecting the mobile phone Operating system
299Multimedia system Z
Page 303 of 389
Authorisation using Secure Simple Pairing:
X Select the mobile phone.
A code is displayed in the multimedia system
and on the mobile phone.
X If codes match: selectYes Yeson the multimedia
system.
X Confirm the code on the mobile phone.
Depending on the mobile phone used, con-
firm the connection to the multimedia system
and for the PBAP and MAP Bluetooth ®
pro-
files. The prompt to confirm may take up to
two minutes to be displayed (see the manu-
facturer's operating instructions).
X If the codes are different: selectNo
No on the
multimedia system.
The process is cancelled.
Repeat authorisation.
Authorisation by entering a passkey (passcode): X Select the Bluetooth ®
name of the mobile
phone.
The input menu for the passkey is displayed.
X Choose a one- to sixteen-digit number com-
bination as a passkey.
X Enter the passkey on the multimedia system.
X Press ¬to confirm.
X Enter and confirm the passkey on the mobile
phone. Depending on the mobile phone used,
confirm the connection to the multimedia sys-
tem and for the PBAP and MAP Bluetooth ®
profiles. The prompt to confirm may take up
to two minutes to be displayed (see the man- ufacturer's operating instructions).
i Mobile phones that are connected to the
optionally available telephone module with
Bluetooth ®
(SAP profile) are displayed sepa-
rately in the device list. These are found below
the entry MB SAP module phones
MB SAP module phones .
Switching between mobile phones If you have authorised more than one mobile
phone, you can switch between the individual
phones.
Multimedia system:
X Select Connect device Connect device .
X Select a mobile phone from the device list. Telephone module with Bluetooth
®
(SAP profile)
Introduction The module can be used as a permanently instal-
led telephone with its own SIM card
(Y page 301) or in conjunction with a mobile
phone (Y page 301).
If you wish to use the module in conjunction with
your mobile telephone, the mobile phone must
support the Bluetooth ®
SAP profile (SIM Access
Profile).
The following functions are available using the
module:
R data modem mode (Y page 302)
R sending and receiving text messages
(Y page 302)
R accessing the phone book of the mobile
phone (Y page 302)
R charging a mobile phone via the USB connec-
tion (Y page 303)
A list of compatible mobile phones can be found at:
http://www.mercedes-benz.com/connect
i The module is not available in all vehicles,
depending on the equipment.
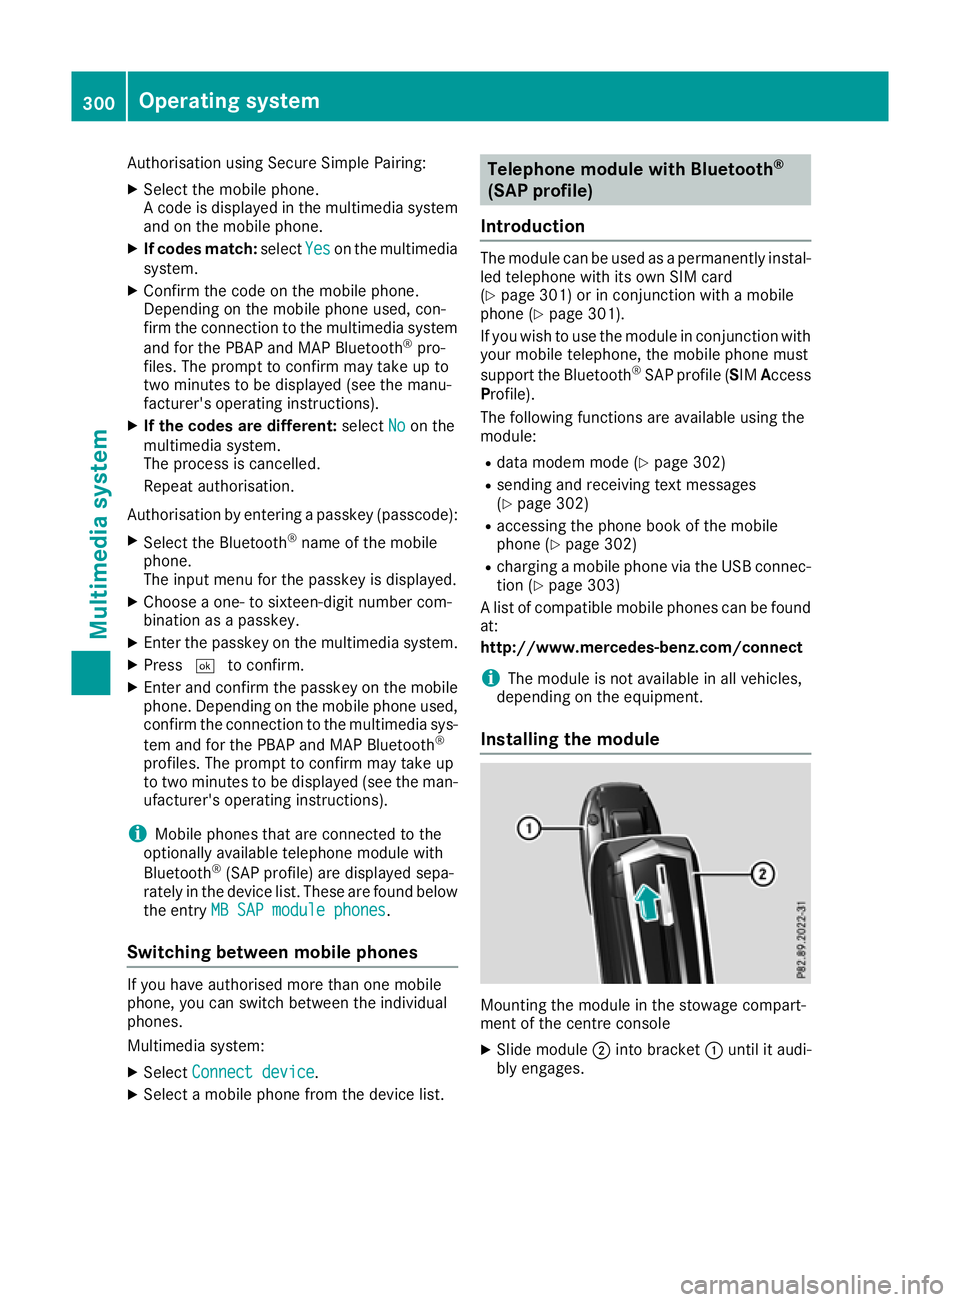
Installing the module Mounting the module in the stowage compart-
ment of the centre console
X Slide module ;into bracket :until it audi-
bly engages. 300
Operating systemMultimedia system
Page 309 of 389
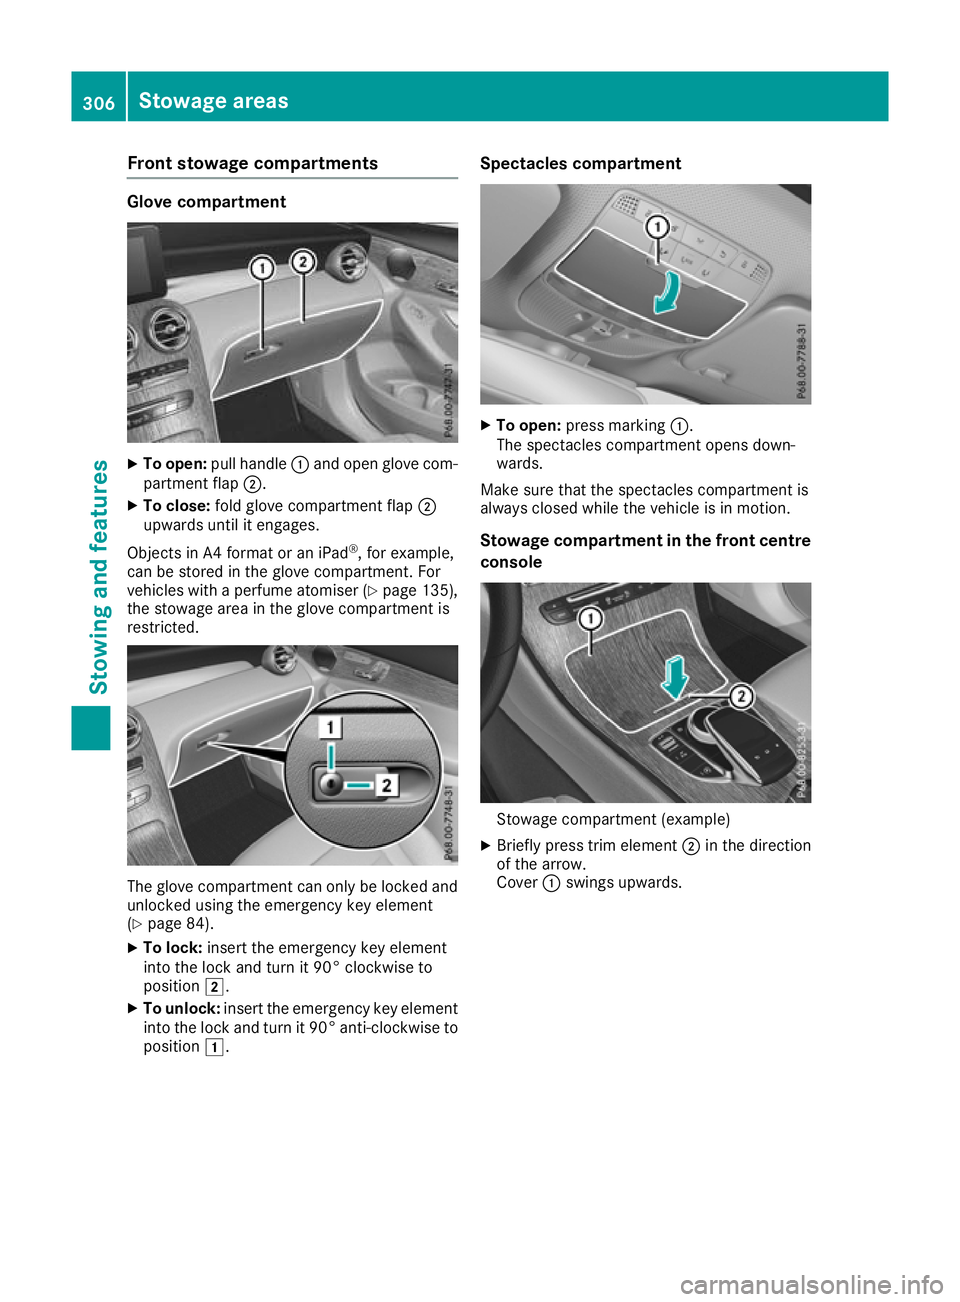
Front stowage compartments
Glove compartment
X
To open: pull handle :and open glove com-
partment flap ;.
X To close: fold glove compartment flap ;
upwards until it engages.
Objects in A4 format or an iPad ®
, for example,
can be stored in the glove compartment. For
vehicles with a perfume atomiser (Y page 135),
the stowage area in the glove compartment is
restricted. The glove compartment can only be locked and
unlocked using the emergency key element
(Y page 84).
X To lock: insert the emergency key element
into the lock and turn it 90° clockwise to
position 2.
X To unlock: insert the emergency key element
into the lock and turn it 90° anti-clockwise to
position 1. Spectacles compartment
X
To open: press marking :.
The spectacles compartment opens down-
wards.
Make sure that the spectacles compartment is
always closed while the vehicle is in motion.
Stowage compartment in the front centre
console Stowage compartment (example)
X Briefly press trim element ;in the direction
of the arrow.
Cover :swings upwards. 306
Stowage areasStowing and featu
res
Page 318 of 389
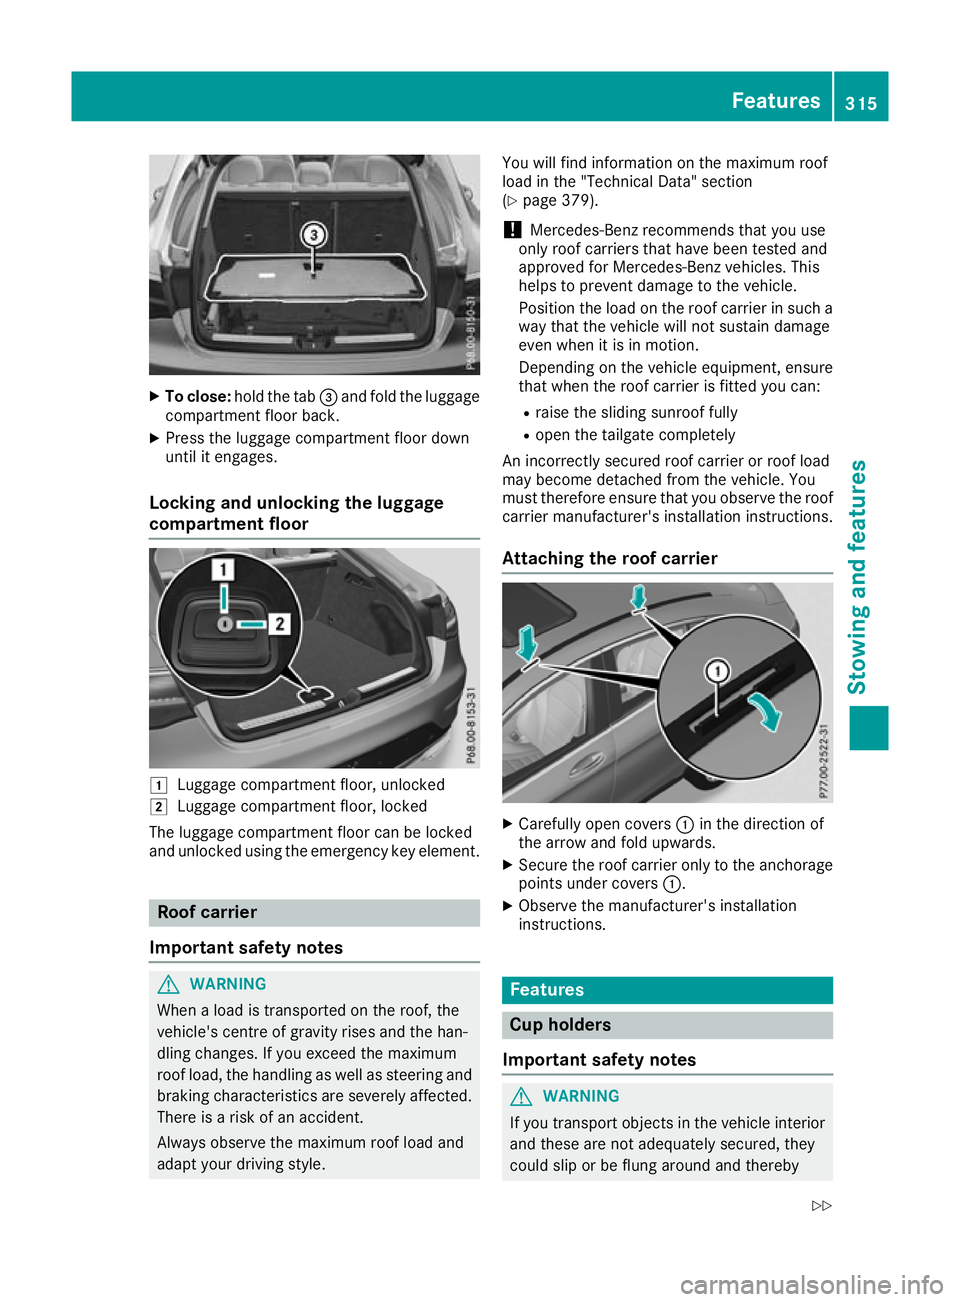
X
To close: hold the tab =and fold the luggage
compartment floor back.
X Press the luggage compartment floor down
until it engages.
Locking and unlocking the luggage
compartment floor 1
Luggage compartment floor, unlocked
2 Luggage compartment floor, locked
The luggage compartment floor can be locked
and unlocked using the emergency key element. Roof carrier
Important safety notes G
WARNING
When a load is transported on the roof, the
vehicle's centre of gravity rises and the han-
dling changes. If you exceed the maximum
roof load, the handling as well as steering and braking characteristics are severely affected.
There is a risk of an accident.
Always observe the maximum roof load and
adapt your driving style. You will find information on the maximum roof
load in the "Technical Data" section
(Y
page 379).
! Mercedes-Benz recommends that you use
only roof carriers that have been tested and
approved for Mercedes-Benz vehicles. This
helps to prevent damage to the vehicle.
Position the load on the roof carrier in such a way that the vehicle will not sustain damage
even when it is in motion.
Depending on the vehicle equipment, ensure
that when the roof carrier is fitted you can:
R raise the sliding sunroof fully
R open the tailgate completely
An incorrectly secured roof carrier or roof load
may become detached from the vehicle. You
must therefore ensure that you observe the roof carrier manufacturer's installation instructions.
Attaching the roof carrier X
Carefully open covers :in the direction of
the arrow and fold upwards.
X Secure the roof carrier only to the anchorage
points under covers :.
X Observe the manufacturer's installation
instructions. Features
Cup holders
Important safety notes G
WARNING
If you transport objects in the vehicle interior and these are not adequately secured, they
could slip or be flung around and thereby Features
315Stowing an d features
Z
Page 321 of 389
i
You can remove the ashtray insert and use
the resultant compartment for stowage.
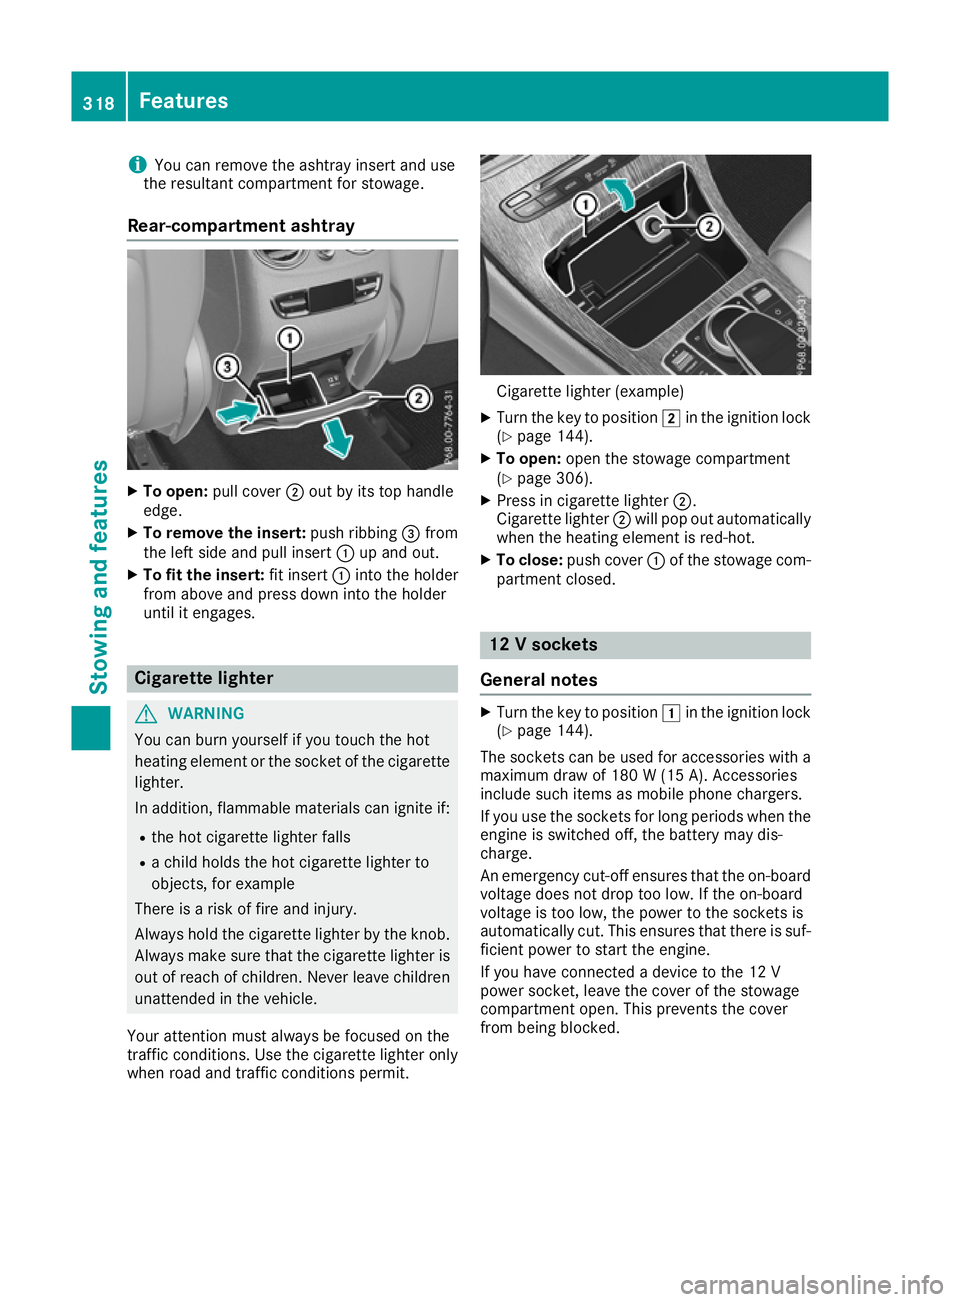
Rear-compartment ashtray X
To open: pull cover ;out by its top handle
edge.
X To remove the insert: push ribbing=from
the left side and pull insert :up and out.
X To fit the insert: fit insert:into the holder
from above and press down into the holder
until it engages. Cigarette lighter
G
WARNING
You can burn yourself if you touch the hot
heating element or the socket of the cigarette lighter.
In addition, flammable materials can ignite if:
R the hot cigarette lighter falls
R a child holds the hot cigarette lighter to
objects, for example
There is a risk of fire and injury.
Always hold the cigarette lighter by the knob.
Always make sure that the cigarette lighter is
out of reach of children. Never leave children unattended in the vehicle.
Your attention must always be focused on the
traffic conditions. Use the cigarette lighter only when road and traffic conditions permit. Cigarette lighter (example)
X Turn the key to position 2in the ignition lock
(Y page 144).
X To open: open the stowage compartment
(Y page 306).
X Press in cigarette lighter ;.
Cigarette lighter ;will pop out automatically
when the heating element is red-hot.
X To close: push cover :of the stowage com-
partment closed. 12 V sockets
General notes X
Turn the key to position 1in the ignition lock
(Y page 144).
The sockets can be used for accessories with a
maximum draw of 180 W (15 A). Accessories
include such items as mobile phone chargers.
If you use the sockets for long periods when the engine is switched off, the battery may dis-
charge.
An emergency cut-off ensures that the on-board
voltage does not drop too low. If the on-board
voltage is too low, the power to the sockets is
automatically cut. This ensures that there is suf- ficient power to start the engine.
If you have connected a device to the 12 V
power socket, leave the cover of the stowage
compartment open. This prevents the cover
from being blocked. 318
FeaturesStowing and features
Page 326 of 389
cause you to lose control of the vehicle. There
is a risk of an accident.
Use this device only when the vehicle is sta-
tionary.
You must observe the legal requirements for the country in which you are currently driving whenoperating mobile communications equipment in
the vehicle.
If it is permitted by law to operate communica-
tions equipment while the vehicle is in motion,
you may do so only if the traffic situation per-
mits. You may otherwise be distracted from the traffic conditions, cause an accident and injure
yourself and others.
Excessive levels of electromagnetic radiation
may cause damage to your health and to the
health of others. The use of an exterior aerial
takes into consideration the scientific discus-
sion surrounding the possible health risk posed
by electromagnetic fields.
Mercedes-Benz recommends the use of an
approved exterior aerial. This ensures:
R optimal mobile phone reception quality in the
vehicle
R that mutual interference between the vehicle
electronics and mobile phones is minimised
An exterior aerial has the following advantages:
R it conducts the electromagnetic fields gener-
ated by a wireless device to the exterior
R the field strength in the vehicle interior is
lower than in a vehicle that does not have an exterior aerial
Information on retrofitting two-way radios and
mobile phones (RF transmitters) (Y page 371).
General notes Depending on the vehicle equipment, there are
various mobile phone brackets that may be fit-
ted in your vehicle; in some cases, these are
country-specific.
More information on suitable mobile phones,
mobile phone brackets and on connecting Blue-
tooth ®
-capable mobile phones with the multi-
media system can be obtained:
R at a qualified specialist workshop
R on the internet at http://www.mercedes-
benz.com/connect The functions and services available when you
use the phone depend on your mobile phone
model and service provider.
Using a mobile phone To connect a mobile phone to the exterior aerial
and charge it, insert it into the mobile phone
bracket.
X Open the telephone compartment
(Y page 307).
X Place the mobile phone bracket into the pre-
installed fitting; see the separate installation
instructions for the mobile phone fitting.
X Insert the mobile phone into the mobile phone
bracket; see the separate installation instruc-
tions for the mobile phone fitting.
i The mobile phone can also be operated
without being in the bracket. However, the
charging function and aerial function are not
available.
In order to use Bluetooth ®
(SAP profile) on your
telephone module, you must first insert the tele-
phone module into the pre-installed fitting. This connects it to the exterior aerial. If you wish to
charge the mobile phone, you must connect it to
a USB port.
Further information on the telephone module
with Bluetooth ®
(SAP profile) can be found in the
Digital Owner's Manual.
Operating the mobile phone You can operate the phone using the
6and
~ buttons on the multifunction steering
wheel. You can operate other mobile phone
functions via the on-board computer
(Y page 238).
When you remove the key from the ignition lock, the mobile phone is disconnected from the vehi-cle. You can then no longer make calls using the
hands-free system.
If a call is active and you remove the key from
the ignition lock, the conversation is transferred
over to the mobile phone. It is then possible to
continue the conversation on the mobile phone. Features
323Stowing and features Z