2016 MERCEDES-BENZ GLC COUPE key
[x] Cancel search: keyPage 69 of 389
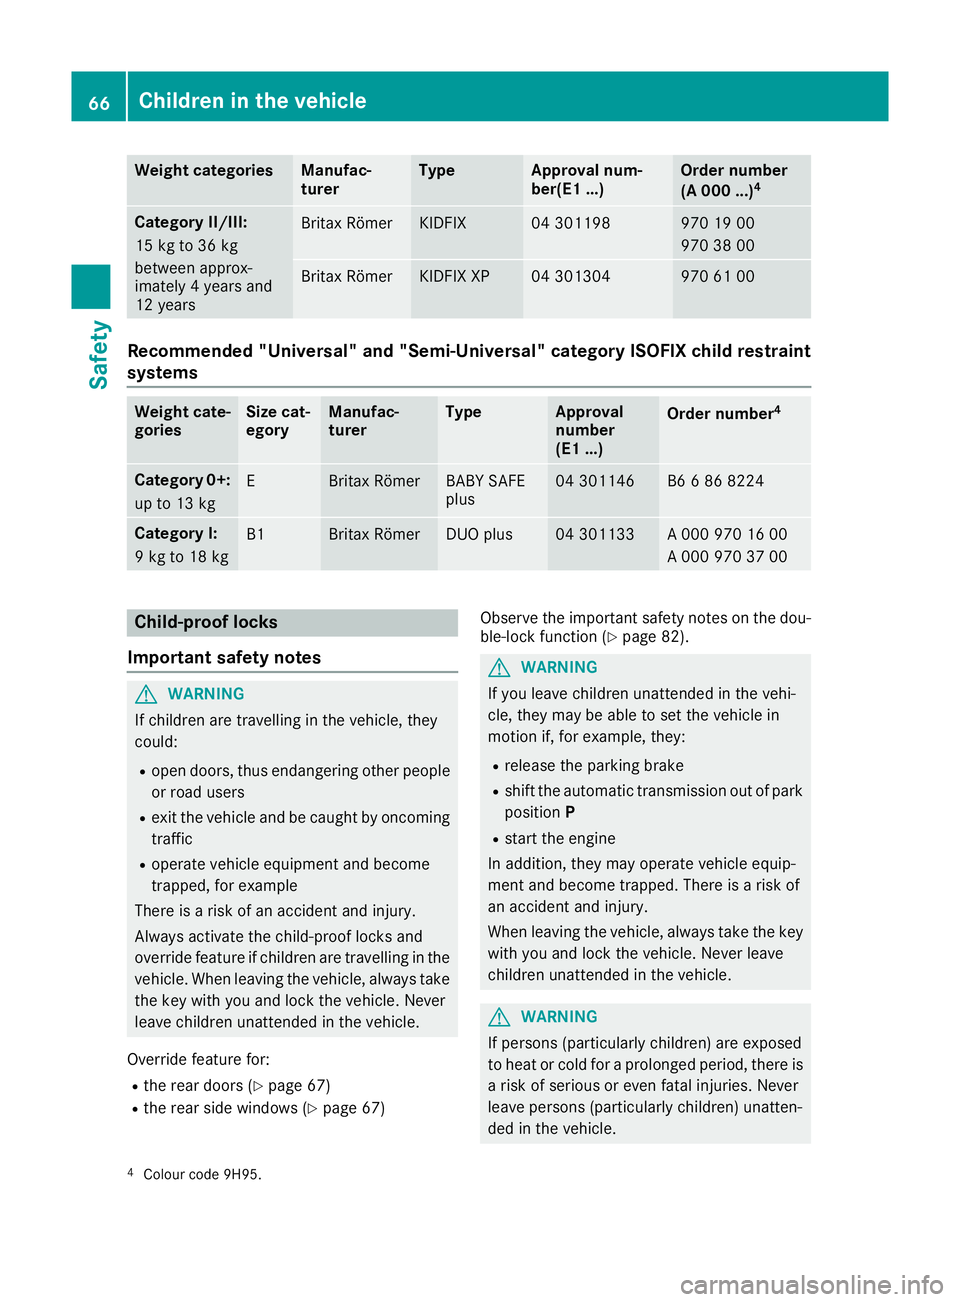
Weight categories Manufac-
turer Type Approval num-
ber(E1 ...) Order number
(A 000 ...)
4 Category II/III:
15 kg to 36 kg
between approx-
imately 4 years and
12 years Britax Römer KIDFIX 04 301198 970 19 00
970 38 00
Britax Römer KIDFIX XP 04 301304 970 61 00
Recommended "Universal" and "Semi-Universal" category ISOFIX child restraint
systems Weight cate-
gories Size cat-
egory Manufac-
turer Type Approval
number
(E1 ...)
Order number
4 Category 0+:
up to 13 kg E Britax Römer BABY SAFE
plus 04 301146 B6 6 86 8224
Category I:
9 kg to 18 kg
B1 Britax Römer DUO plus 04 301133 A 000 970 16 00
A 000 970 37 00
Child-proof locks
Important safety notes G
WARNING
If children are travelling in the vehicle, they
could:
R open doors, thus endangering other people
or road users
R exit the vehicle and be caught by oncoming
traffic
R operate vehicle equipment and become
trapped, for example
There is a risk of an accident and injury.
Always activate the child-proof locks and
override feature if children are travelling in the vehicle. When leaving the vehicle, always take the key with you and lock the vehicle. Never
leave children unattended in the vehicle.
Override feature for:
R the rear doors (Y page 67)
R the rear side windows (Y page 67)Observe the important safety notes on the dou-
ble-lock function (Y page 82). G
WARNING
If you leave children unattended in the vehi-
cle, they may be able to set the vehicle in
motion if, for example, they:
R release the parking brake
R shift the automatic transmission out of park
position P
R start the engine
In addition, they may operate vehicle equip-
ment and become trapped. There is a risk of
an accident and injury.
When leaving the vehicle, always take the key
with you and lock the vehicle. Never leave
children unattended in the vehicle. G
WARNING
If persons (particularly children) are exposed
to heat or cold for a prolonged period, there is a risk of serious or even fatal injuries. Never
leave persons (particularly children) unatten-
ded in the vehicle.
4 Colour code 9H95. 66
Children in the vehicleSafety
Page 82 of 389
The PRE-SAFE
®
Brake function can also brake
the vehicle automatically under the following
conditions:
R the driver and front passenger have their seat
belts fastened
R the vehicle speed is between approximately
7 km/h and 200 km/h
At speeds of up to approximately 70 km/h, PRE-
SAFE ®
Brake can also detect:
R stationary objects in the path of your vehicle,
e.g. stopped or parked vehicles
R pedestrians in the path of your vehicle
i If an increased danger of collision exists,
preventative passenger protection measures
(PRE-SAFE ®
) are triggered (Y page 55).
If the danger of collision with the vehicle in front remains and you do not brake, take evasive
action or accelerate quickly, the vehicle may
perform automatic emergency braking up to the
point of full brake application. Automatic full
brake application is not performed until imme-
diately prior to an imminent accident.
You can prevent the engagement of PRE-SAFE ®
Brake at any time by:
R depressing the accelerator pedal further
R activating kickdown
R releasing the brake pedal
The braking action of PRE-SAFE ®
Brake is ended
automatically if:
R you manoeuvre to avoid the obstacle
R the danger of collision has passed
R an obstacle is no longer detected in front of
your vehicle STEER CONTROL
General information STEER CONTROL helps you by transmitting a
noticeable steering force to the steering wheel
in the direction required for vehicle stabilisation.
This steering support is provided in particular if:
R both right wheels or both left wheels are on a
wet or slippery road surface when you brake
R the vehicle begins to skid Important safety notes i
Observe the "Important safety notes" sec-
tion (Y page 68).
No steering support is provided from STEER
CONTROL, if: R ESP ®
is deactivated
R ESP ®
is malfunctioning
R the steering is faulty
If ESP ®
is malfunctioning, you will be assisted
further by the electrical power steering. Protection against theft
Immobiliser
The immobiliser prevents your vehicle from
being started without the correct key.
X To activate with the key: remove the key
from the ignition lock.
X To activate with KEYLESS-GO start func-
tion or KEYLESS-GO:
switch the ignition off
and open the driver's door.
X To deactivate: switch on the ignition.
When leaving the vehicle, always take the key
with you and lock the vehicle. Anyone can start
the engine if a valid key has been left inside the vehicle.
i The immobiliser is always deactivated when
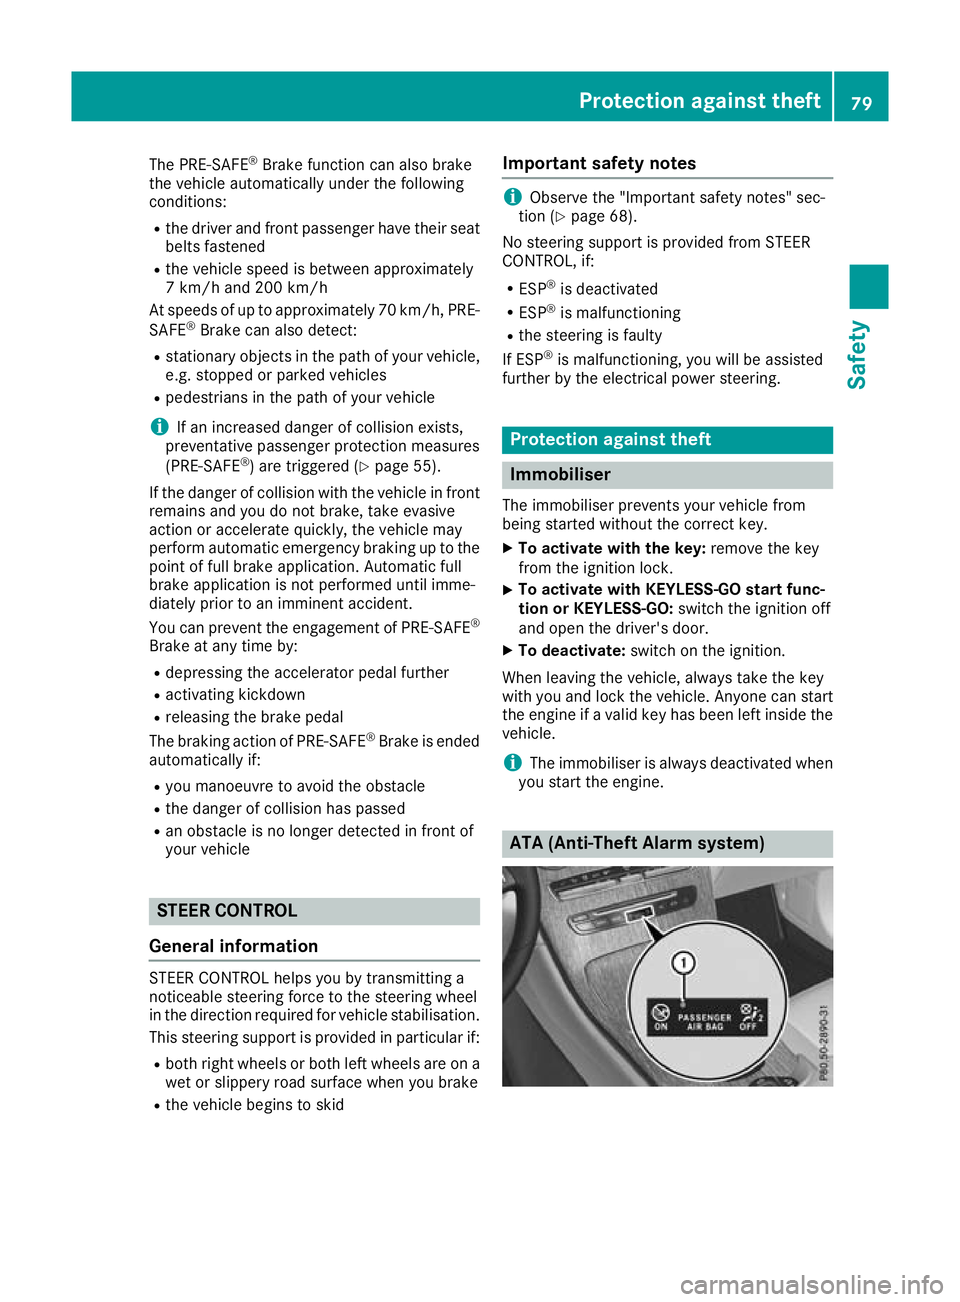
you start the engine. ATA (Anti-Theft Alarm system) Protection against theft
79Safety Z
Page 83 of 389
X
To activate: lock the vehicle with the key or
KEYLESS-GO.
Indicator lamp :flashes. The alarm system
is activated after approximately ten seconds.
X To deactivate: unlock the vehicle with the
key or KEYLESS-GO.
or X Insert the key into the ignition lock.
or X Press the Start/Stop button.
The key must be in the vehicle.
A visual and audible alarm is triggered if the
alarm system is activated and you open:
R a door
R the vehicle with the emergency key element
R the tailgate
R the bonnet
X To stop the alarm with the key: press the
% or& button on the key.
The alarm stops.
or X Remove the Start/Stop button from the igni-
tion lock (Y page 144).
X Insert the key into the ignition lock.
The alarm stops.
X To stop the alarm using KEYLESS-GO:
grasp the outside door handle. The key must
be outside the vehicle.
The alarm stops.
or X Press the Start/Stop button on the dash-
board. The key must be inside the vehicle.
The alarm stops.
The alarm does not stop, even if you close the
open door that has triggered it, for example.
i If the alarm stays on for more than
30 seconds, the Mercedes‑Benz emergency
call system automatically sends a message to the Customer Centre. This is sent via text
message or a data connection. The emergency call system sends a message
or establishes a data connection provided
that:
R you have subscribed to the Mercedes ‑Benz
emergency call system
R the Mercedes‑Benz emergency call system
has been activated properly
R the necessary mobile phone network is
available Tow-away protection
Function An audible and visual alarm is triggered if your
vehicle's angle of inclination is altered while
tow-away protection is primed. This can occur if
the vehicle is jacked up on one side, for exam-
ple.
Activating/deactivating Tow-away protection is automatically switched
on and off with the ATA (anti-theft alarm system)
when:
R the doors are closed
R the tailgate is closed
Tow-away protection is active around
60 seconds after the ATA has been switched on (Y page 79).
Deactivating To prevent a false alarm, deactivate tow-away
protection if you lock your vehicle and it:
R is being transported
R is being loaded, e.g. onto a ferry or car trans-
porter
R is parked on a movable surface, e.g. in a split-
level garage
The tow-away alarm remains deactivated until
you switch the ATA on again after opening a
door.
You can deactivate tow-away protection via the multimedia system (see the Digital Owner's
Manual). 80
Protection against theftSafety
Page 85 of 389
Key
Important safety notes
United Kingdom only: G
WARNING
When the double locks are activated, the
doors can no longer be opened from the
inside. People in the vehicle can no longer get out, e.g. in hazardous situations. There is a
risk of injury.
Therefore, do not leave any people unsuper-
vised in the vehicle, particularly children, eld-
erly people or people in need of special assis-
tance. Do not activate the double lock when
people are in the vehicle.
If the vehicle has been locked from the outside, the double lock function is activated as stand-
ard. It is then not possible to open the doors
from inside the vehicle. You can deactivate the
double lock function by deactivating the interior
motion sensor (see Digital Owner's Manual).
The doors can then be opened from the inside
after the vehicle has been locked from the out-
side. The anti-theft alarm system is triggered if
the door is opened from the inside. Switch off
the alarm (Y page 79).
All countries: G
WARNING
If children are left unsupervised in the vehicle, they can:
R open doors and endanger other persons or
road users
R climb out and be injured by the traffic
R operate vehicle equipment and, for exam-
ple, trap themselves.
Children could also set the vehicle in motion, for example by:
R releasing the parking brake
R shifting the automatic transmission out of
park position P
R starting the engine.
There is a risk of an accident and injury.
When leaving the vehicle, always take the key
with you and lock the vehicle. Never leave children unattended in the vehicle. Always
keep the key out of reach of children. G
WARNING
If you attach heavy or large objects to the key, the key could be unintentionally turned in the
ignition lock. This could cause the engine to
be switched off. There is a risk of an accident.
Do not attach any heavy or large objects to the
key. Remove any bulky keyrings before insert-
ing the key into the ignition lock.
! Keep the key away from strong magnetic
fields. Otherwise, the remote control function could be affected.
Strong magnetic fields can occur in the vicin-
ity of powerful electrical installations.
Do not keep the key: R with electronic devices, e.g. a mobile phone
or another key
R with metallic objects, e.g. coins or metal foil
R inside metallic objects, e.g. a metal case
This can impair the key's function.
Vehicles with KEYLESS-GO start function: do
not keep the key in the luggage compartment.
Otherwise, the key may not be detected, e.g.
when starting the engine using the Start/Stop
button.
A check that periodically establishes a radio
connection between the vehicle and the key
determines whether a valid key is in or in the
direct vicinity of the vehicle. This occurs, for
example:
R during engine start
R during driving
R when using HANDS-FREE ACCESS
R when the external door handles are touched
R during convenience closing 82
KeyOpening and closing
Page 86 of 389
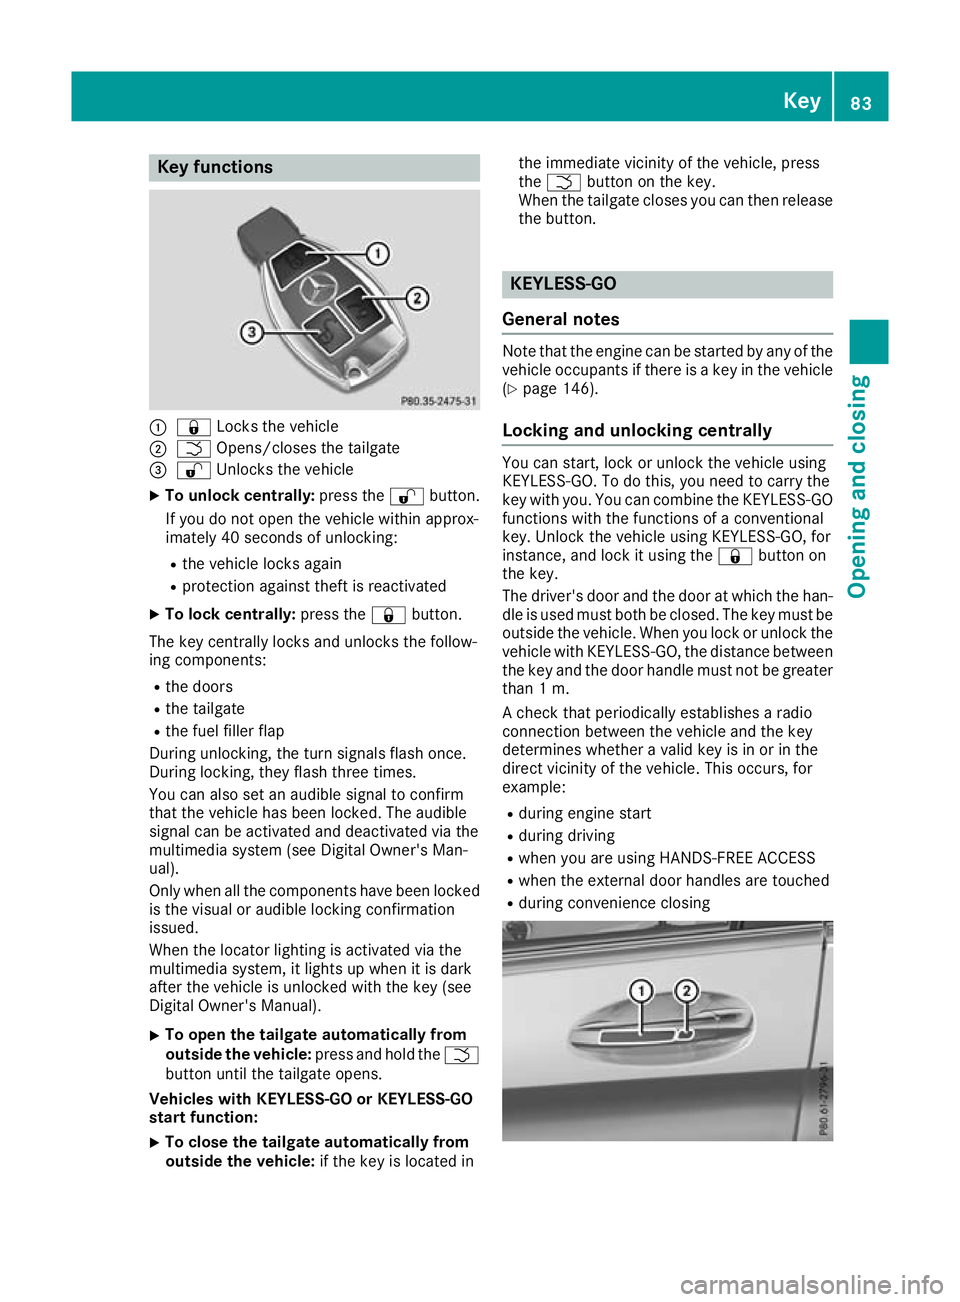
Key functions
:
& Locks the vehicle
; F Opens/closes the tailgate
= % Unlocks the vehicle
X To unlock centrally: press the%button.
If you do not open the vehicle within approx-
imately 40 seconds of unlocking:
R the vehicle locks again
R protection against theft is reactivated
X To lock centrally: press the&button.
The key centrally locks and unlocks the follow-
ing components: R the doors
R the tailgate
R the fuel filler flap
During unlocking, the turn signals flash once.
During locking, they flash three times.
You can also set an audible signal to confirm
that the vehicle has been locked. The audible
signal can be activated and deactivated via the
multimedia system (see Digital Owner's Man-
ual).
Only when all the components have been locked
is the visual or audible locking confirmation
issued.
When the locator lighting is activated via the
multimedia system, it lights up when it is dark
after the vehicle is unlocked with the key (see
Digital Owner's Manual).
X To open the tailgate automatically from
outside the vehicle: press and hold theF
button until the tailgate opens.
Vehicles with KEYLESS-GO or KEYLESS-GO
start function:
X To close the tailgate automatically from
outside the vehicle: if the key is located in the immediate vicinity of the vehicle, press
the
F button on the key.
When the tailgate closes you can then release the button. KEYLESS-GO
General notes Note that the engine can be started by any of the
vehicle occupants if there is a key in the vehicle
(Y page 146).
Locking and unlocking centrally You can start, lock or unlock the vehicle using
KEYLESS-GO. To do this, you need to carry the
key with you. You can combine the KEYLESS-GO functions with the functions of a conventional
key. Unlock the vehicle using KEYLESS-GO, for
instance, and lock it using the &button on
the key.
The driver's door and the door at which the han- dle is used must both be closed. The key must beoutside the vehicle. When you lock or unlock the
vehicle with KEYLESS-GO, the distance between the key and the door handle must not be greater
than 1 m.
A check that periodically establishes a radio
connection between the vehicle and the key
determines whether a valid key is in or in the
direct vicinity of the vehicle. This occurs, for
example:
R during engine start
R during driving
R when you are using HANDS-FREE ACCESS
R when the external door handles are touched
R during convenience closing Key
83Opening and closing Z
Page 87 of 389
X
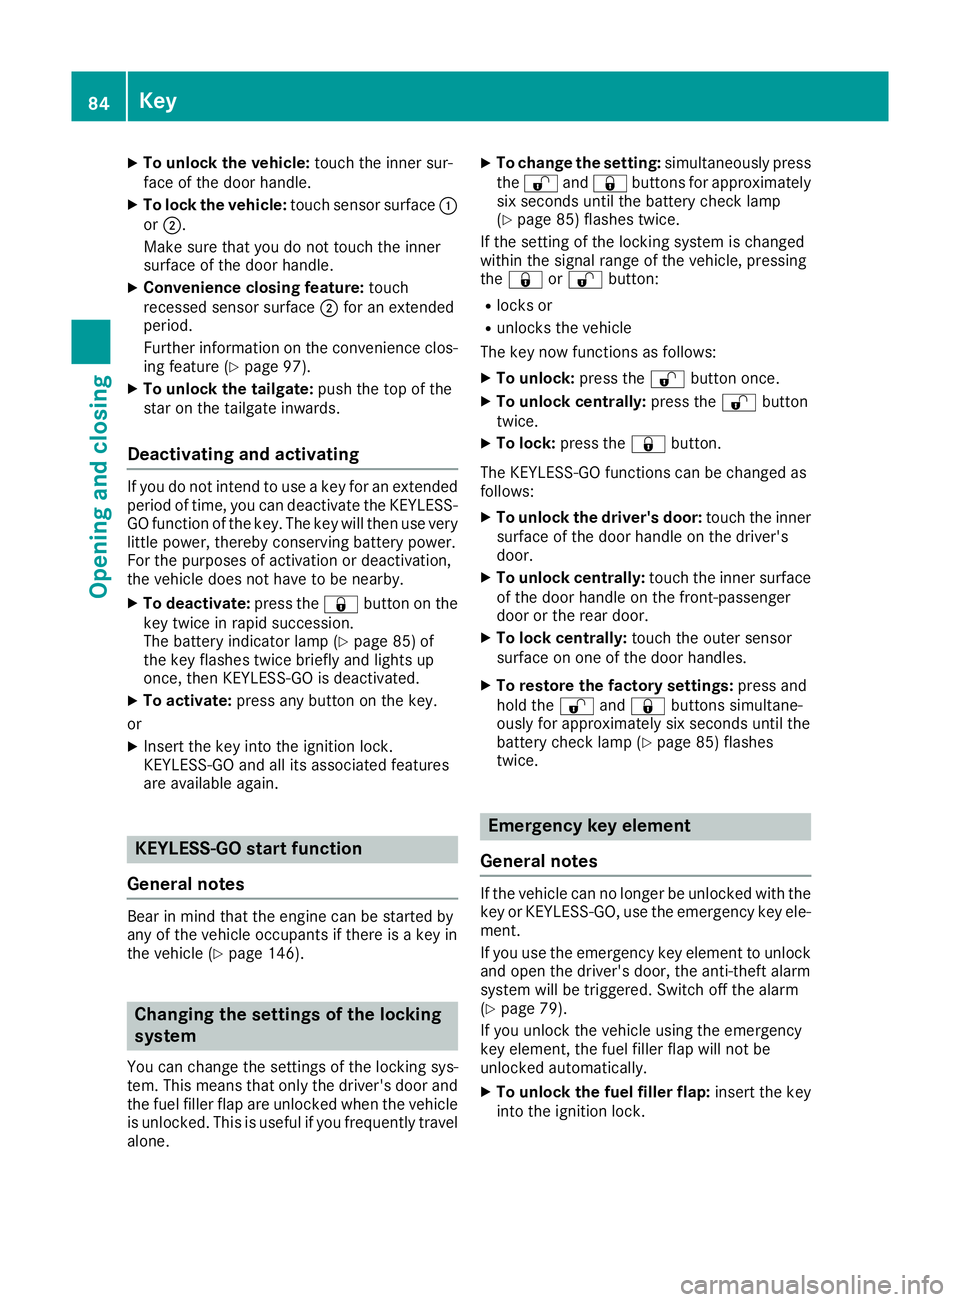
To unlock the vehicle: touch the inner sur-
face of the door handle.
X To lock the vehicle: touch sensor surface :
or ;.
Make sure that you do not touch the inner
surface of the door handle.
X Convenience closing feature: touch
recessed sensor surface ;for an extended
period.
Further information on the convenience clos-
ing feature (Y page 97).
X To unlock the tailgate: push the top of the
star on the tailgate inwards.
Deactivating and activating If you do not intend to use a key for an extended
period of time, you can deactivate the KEYLESS-
GO function of the key. The key will then use very
little power, thereby conserving battery power.
For the purposes of activation or deactivation,
the vehicle does not have to be nearby.
X To deactivate: press the&button on the
key twice in rapid succession.
The battery indicator lamp (Y page 85) of
the key flashes twice briefly and lights up
once, then KEYLESS-GO is deactivated.
X To activate: press any button on the key.
or X Insert the key into the ignition lock.
KEYLESS-GO and all its associated features
are available again. KEYLESS-GO start function
General notes Bear in mind that the engine can be started by
any of the vehicle occupants if there is a key in
the vehicle (Y page 146). Changing the settings of the locking
system
You can change the settings of the locking sys-
tem. This means that only the driver's door and
the fuel filler flap are unlocked when the vehicle is unlocked. This is useful if you frequently travel
alone. X
To change the setting: simultaneously press
the % and& buttons for approximately
six seconds until the battery check lamp
(Y page 85) flashes twice.
If the setting of the locking system is changed
within the signal range of the vehicle, pressing
the & or% button:
R locks or
R unlocks the vehicle
The key now functions as follows:
X To unlock: press the%button once.
X To unlock centrally: press the%button
twice.
X To lock: press the &button.
The KEYLESS-GO functions can be changed as
follows: X To unlock the driver's door: touch the inner
surface of the door handle on the driver's
door.
X To unlock centrally: touch the inner surface
of the door handle on the front-passenger
door or the rear door.
X To lock centrally: touch the outer sensor
surface on one of the door handles.
X To restore the factory settings: press and
hold the %and& buttons simultane-
ously for approximately six seconds until the
battery check lamp (Y page 85) flashes
twice. Emergency key element
General notes If the vehicle can no longer be unlocked with the
key or KEYLESS-GO, use the emergency key ele-
ment.
If you use the emergency key element to unlock
and open the driver's door, the anti-theft alarm
system will be triggered. Switch off the alarm
(Y page 79).
If you unlock the vehicle using the emergency
key element, the fuel filler flap will not be
unlocked automatically.
X To unlock the fuel filler flap: insert the key
into the ignition lock. 84
KeyOpening and closing
Page 88 of 389
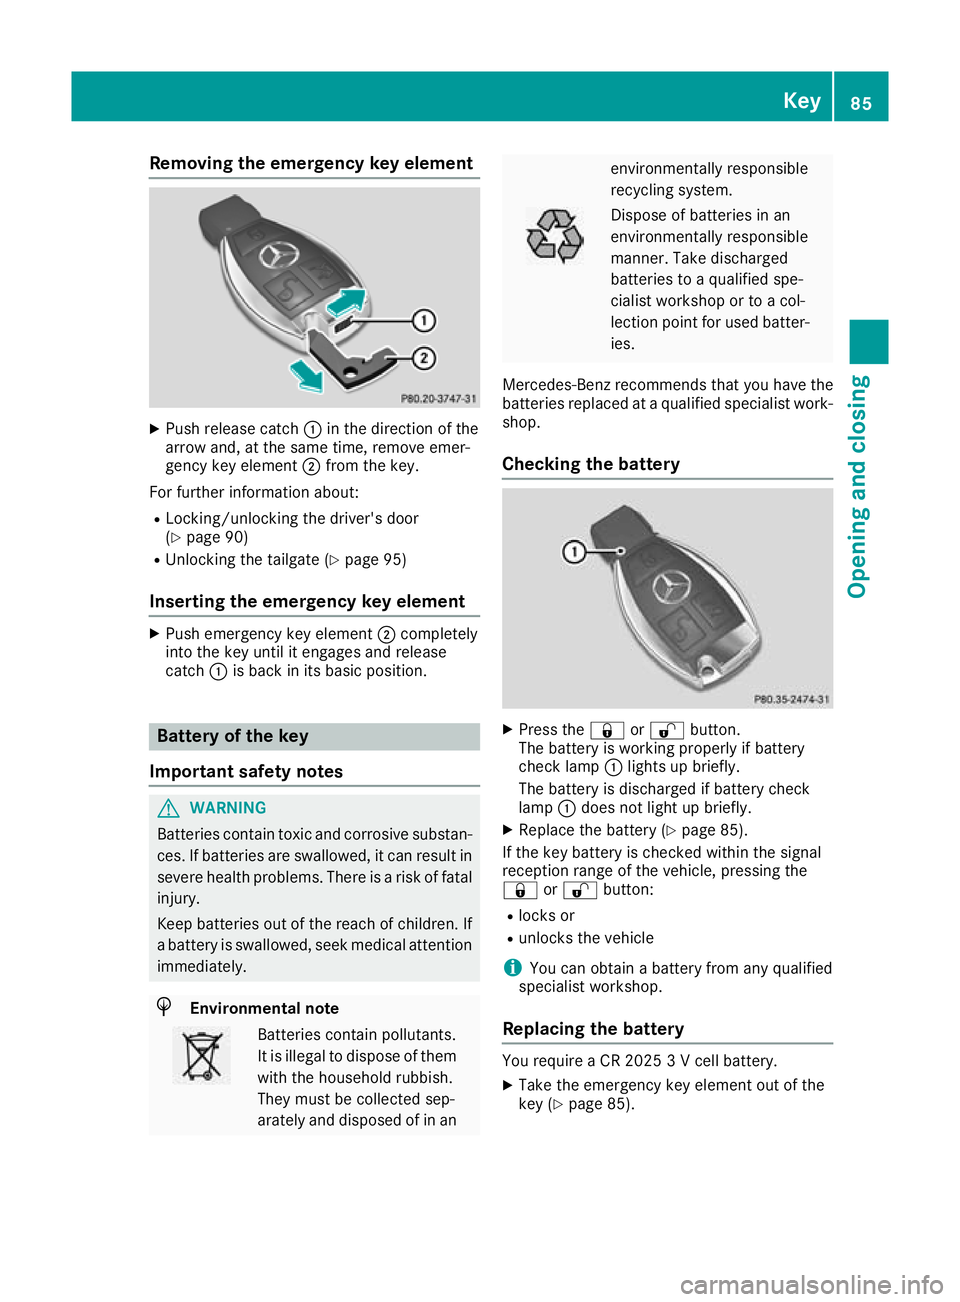
Removing the emergency key element
X
Push release catch :in the direction of the
arrow and, at the same time, remove emer-
gency key element ;from the key.
For further information about:
R Locking/unlocking the driver's door
(Y page 90)
R Unlocking the tailgate (Y page 95)
Inserting the emergency key element X
Push emergency key element ;completely
into the key until it engages and release
catch :is back in its basic position. Battery of the key
Important safety notes G
WARNING
Batteries contain toxic and corrosive substan- ces. If batteries are swallowed, it can result in
severe health problems. There is a risk of fatal injury.
Keep batteries out of the reach of children. If
a battery is swallowed, seek medical attention immediately. H
Environmental note Batteries contain pollutants.
It is illegal to dispose of them with the household rubbish.
They must be collected sep-
arately and disposed of in an environmentally responsible
recycling system.
Dispose of batteries in an
environmentally responsible
manner. Take discharged
batteries to a qualified spe-
cialist workshop or to a col-
lection point for used batter-
ies.
Mercedes-Benz recommends that you have the
batteries replaced at a qualified specialist work- shop.
Checking the battery X
Press the &or% button.
The battery is working properly if battery
check lamp :lights up briefly.
The battery is discharged if battery check
lamp :does not light up briefly.
X Replace the battery (Y page 85).
If the key battery is checked within the signal
reception range of the vehicle, pressing the
& or% button:
R locks or
R unlocks the vehicle
i You can obtain a battery from any qualified
specialist workshop.
Replacing the battery You require a CR 2025 3 V cell battery.
X Take the emergency key element out of the
key (Y page 85). Key
85Opening and closing Z
Page 89 of 389
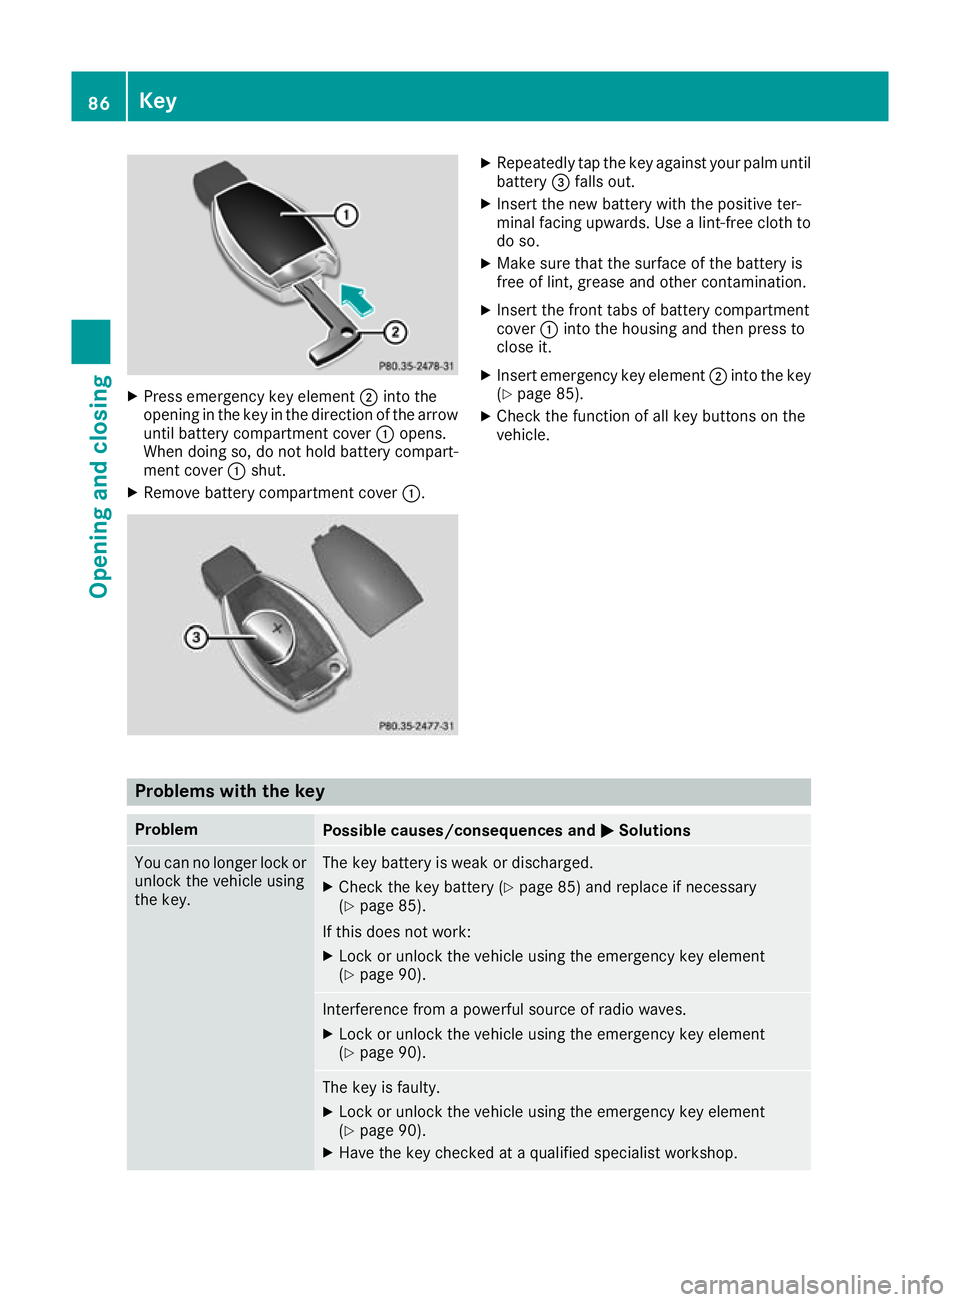
X
Press emergency key element ;into the
opening in the key in the direction of the arrow
until battery compartment cover :opens.
When doing so, do not hold battery compart-
ment cover :shut.
X Remove battery compartment cover :. X
Repeatedly tap the key against your palm until
battery =falls out.
X Insert the new battery with the positive ter-
minal facing upwards. Use a lint-free cloth to
do so.
X Make sure that the surface of the battery is
free of lint, grease and other contamination.
X Insert the front tabs of battery compartment
cover :into the housing and then press to
close it.
X Insert emergency key element ;into the key
(Y page 85).
X Check the function of all key buttons on the
vehicle. Problems with the key
Problem
Possible causes/consequences and
M MSolutions You can no longer lock or
unlock the vehicle using
the key. The key battery is weak or discharged.
X Check the key battery (Y page 85) and replace if necessary
(Y page 85).
If this does not work: X Lock or unlock the vehicle using the emergency key element
(Y page 90). Interference from a powerful source of radio waves.
X Lock or unlock the vehicle using the emergency key element
(Y page 90). The key is faulty.
X Lock or unlock the vehicle using the emergency key element
(Y page 90).
X Have the key checked at a qualified specialist workshop. 86
KeyOpening and closing