2016 MERCEDES-BENZ GLC COUPE wheel size
[x] Cancel search: wheel sizePage 10 of 389

Important safety notes .................. 171
Parking brake ................................ 168
Warning lamp .................................2
82
Breakdown
Where will I find...? ........................ 338
see Flat tyre
see Towing away
Brightness control (instrument
cluster lighting) ................................... 32
Buttons on the steering column ...... 229C
Calling up a fault see Display messages
Calling up the climate control bar
Multimedia system ........................ 296
Calling up the climate control
menu
Multimedia system ........................ 296
Camera
see 360° camera
see Reversing camera
Car
see Vehicle
Car wash (care) ................................. 331
Care
360° camera ................................. 335
Automatic car wash ....................... 331
Carpets .......................................... 337
Display .......................................... .336
Exhaust pipe .................................. 335
Exterior lighting ............................ .334
General notes ................................ 331
High-pressure cleaner .................... 332
Interior .......................................... .336
Matt paintwork .............................. 333
Paint .............................................. 333
Plastic trim ................................... .336
Reversing camera .......................... 335
Roof lining ...................................... 337
Seat belt ........................................ 337
Seat cover ..................................... 337
Selector lever ................................ 336
Sensors ......................................... 335
Side running board ........................ 335
Steering wheel ............................... 336
Trim pieces ................................... .336 Washing by hand ........................... 332
Wheels ..........................................
.334
Windows ........................................ 334
Wiper blades .................................. 334
Wooden trim .................................. 336
CD
See also Digital Owner's Manual ... 292
CD player (on-board computer) ........237
Central locking
Locking/unlocking (key ).................. 83
Centre console
Lower section .................................. 37
Upper section .................................. 36
Changing the media source ............. 236
Charge-air pressure (on-board
computer, Mercedes-AMG vehi-
cles) .................................................... 245
Child
Restraint system .............................. 57
Child seat
Forward-facing restraint system ...... 61
i-Size ................................................ 58
ISOFIX .............................................. 58
On the front-passenger sea t............ 60
Rearward-facing restraint system .... 61
Recommendations ........................... 65
Suitable positions ............................ 61
Top Tether ....................................... 59
Child-proof locks
Important safety notes .................... 66
Rear doors ....................................... 67
Children in the vehicle
Important safety notes .................... 56
Cigarette lighter ................................ 318
Cleaning
Mirror turn signal ........................... 335
Trailer tow hitch ............................. 336
Climate control
Auxiliary heating/ventilation .......... 137
Control panel for THERMATIC
automatic climate control (2-
zone) .............................................. 127
Controlling automaticall y............... 131
Convenience opening/closing
(air-recirculation mode) ................. 134
Cooling with air dehumidification .. 130
Cooling with air dehumidification
(multimedia system )...................... 297 Index
7
Page 26 of 389
Switching on/of
f........................... 117
TV
Operating (on-board computer) ..... 238
Two-way radio
Frequencies ................................... 371
Installation ..................................... 371
Transmission output (maximum) .... 371
Type identification plate
see Vehicle identification plate
Tyre changing tool kit ....................... 340
Tyre inflation compressor
see TIREFIT kit
Tyre pressure
Calling up (on-board computer) ..... 361
Display message ............................ 273
Not reached (TIREFIT) .................... 344
Reached (TIREFIT) .......................... 344
Recommended ............................... 359
Tyre pressure loss warning
General notes ................................ 360
Important safety notes .................. 361
Restarting ...................................... 361
Tyre pressure monitor
Checking the tyre pressure elec-
tronically ........................................ 362
Function/note s............................. 361
General notes ................................ 361
Important safety notes .................. 362
Radio type approval for the tyre
pressure monitor ........................... 364
Restarting ...................................... 363
Warning lamp ................................. 290
Warning message .......................... 363
Tyres
Changing a whee l.......................... 364
Checking ........................................ 356
Direction of rotation ...................... 365
Display message ............................ 273
Important safety notes .................. 356
Information on driving .................... 356
MOExtended tyre s......................... 358
Replacing ....................................... 364
Service life ..................................... 357
Snow chains .................................. 359
Storing ........................................... 365
Summer tyres in winter ................. 358
Tyre size (data ).............................. 368
Tyre tread ...................................... 357 Wheel and tyre combinations ........ 368
see Flat tyre U
Unlocking Emergency unlocking ....................... 90
From inside the vehicle (central
unlocking button) ............................. 89
USB devices
Connecting to the Media Inter-
face ............................................... 304
Using the TIREFIT
tyre pressure kit ............................ 343 V
Vanity mirror (in sun visor) .............. 317
Variable SPEEDTRONIC
see SPEEDTRONIC
Vehicle
Correct use ...................................... 30
Data acquisition ............................... 30
Display message ............................ 275
Electronics ..................................... 371
Equipment ....................................... 27
Implied warranty .............................. 30
Individual settings .......................... 240
Leaving parked up ......................... 170
Locking (in an emergency) ............... 90
Locking (key) ................................... 83
Lowering ........................................ 368
Operating safety .............................. 27
Parking .......................................... 167
Pulling away ................................... 146
Raising ........................................... 366
Registration ..................................... 30
Securing from rolling away ............ 365
Technical data ............................... 371
Towing away .................................. 350
Transporting .................................. 353
Unlocking (in an emergency) ........... 90
Unlocking (key) ................................ 83
Vehicle data ................................... 379
Vehicle dimensions ........................... 379
Vehicle emergency locking ................ 90
Vehicle identification number
see VIN Index
23
Page 27 of 389
Vehicle identification plate
.............. 372
Vehicle level
AIR BODY CONTROL ...................... 188
Display message ............................ 266
Video
Operating the DVD ......................... 237
See also Digital Owner's Manua l... 292
VIN
Seat ............................................... 373
Type plate ...................................... 372 W
Warning and indicator lamps ABS ................................................ 283
Brakes ........................................... 282
Distance warning signal ................. 289
ESP ®
.............................................. 283
ESP ®
OFF ....................................... 285
Fuel tank ........................................ 286
General notes ................................ 280
LIM (cruise control) ........................ 174
LIM (DISTRONIC PLUS) .................. 179
LIM (variable SPEEDTRONIC) ......... 176
Overview .......................................... 34
Parking brake ................................ 286
PASSENGER AIR BAG ...................... 42
Reserve fue l................................... 286
Seat belt ........................................ 280
Steering ......................................... 291
Tyre pressure monitor ................... 290
Warning triangle ................................ 339
Washer fluid
Display message ............................ 279
Weather display (COMAND Online)
See also Digital Owner's Manua l... 292
Wheel and tyre combinations
Tyres .............................................. 368
Wheel bolt tightening torque ........... 368
Wheel chock ...................................... 365
Wheels
Changing a whee l.......................... 364
Changing/replacing ....................... 364
Checking ........................................ 356
Cleaning ......................................... 334
Emergency spare whee l................. 369
Fitting a new wheel ........................ 367
Fitting a wheel ............................... 365 Important safety notes .................. 356
Information on driving .................... 356
Removing a whee l.......................... 367
Snow chains .................................. 359
Storing ........................................... 365
Tightening torque ........................... 368
Wheel size/tyre size ...................... 368
Windowbag
Display message ............................ 258
Operation ......................................... 48
Windows
Cleaning ......................................... 334
see Side windows
Windscreen
Demisting ...................................... 132
Windscreen washer fluid
see Windscreen washer system
Windscreen washer system
Important safety notes .................. 378
Topping up ..................................... 329
Windscreen wipers
Problem (malfunction) ................... 126
Replacing the wiper blades ............ 124
Switching on/of f........................... 123
Winter operation
Important safety notes .................. 358
Radiator cover ............................... 326
Slippery road surfaces ................... 173
Snow chains .................................. 359
Summer tyres ................................ 358
Winter tyres
Limiting the speed (on-board com-
puter) ............................................. 244
M+S tyres ...................................... 358
Wiper blades
Cleaning ......................................... 334
Important safety notes .................. 124
Replacing ....................................... 124
Wooden trim (cleaning instruc-
tions) .................................................. 336
Workshop
see Qualified specialist workshop 24
Index
Page 59 of 389

Using the radar sensor system, PRE-SAFE
®
PLUS is able to detect that a head-on or rear-end
collision is imminent. In certain hazardous sit-
uations, PRE-SAFE ®
PLUS takes pre-emptive
measures to protect the vehicle occupants.
Important safety notes The intervention of PRE-SAFE
®
PLUS cannot
prevent an imminent collision.
The driver is not warned before the intervention
of PRE-SAFE ®
PLUS.
PRE-SAFE ®
PLUS does not intervene:
R if the vehicle is reversing
R when the vehicle is towing a trailer and there
is a risk of a rear-end collision
When driving, or when parking or exiting a park- ing space with assistance from Active Parking
Assist, PRE-SAFE ®
PLUS will not apply the
brakes.
Function PRE-SAFE
®
PLUS intervenes in certain situa-
tions if the radar sensor system detects an
imminent head-on or rear-end collision.
PRE-SAFE ®
PLUS takes the following measures
depending on the hazardous situation detected:
R if the radar sensor system detects that a
head-on collision is imminent, the seat belts
are pre-tensioned
R if the radar sensor system detects that a rear-
end collision is imminent:
- the rear hazard warning lamps are activa-
ted and flash at a higher frequency
- the brake pressure is increased if the driver
applies the brakes when the vehicle is sta-
tionary
- the seat belts are pre-tensioned
The PRE-SAFE ®
PLUS braking application is can-
celled:
R if the accelerator pedal is depressed when a
gear is engaged
R if the risk of a collision passes or is no longer
detected
R if DISTRONIC PLUS indicates an intention to
pull away
If the hazardous situation passes without result- ing in an accident, the original settings are
restored. Automatic measures after an acci-
dent
Immediately after an accident, the following
measures are implemented, depending on the
type and severity of the impact:
R the hazard lamps are switched on
R the emergency lighting is switched on
R the vehicle doors are unlocked
R the front side windows are lowered
R vehicles with the memory function: the elec-
trically adjustable steering wheel is raised
R the engine is switched off and the fuel supply
is cut off
R vehicles with the Mercedes-Benz emergency
call system: automatic emergency call Children in the vehicle
Important safety notes
Accident statistics show that children secured
in the rear seats are safer than children secured in the front-passenger seat. For this reason,
Mercedes-Benz strongly advises that you install
a child restraint system on a rear seat. Children are generally better protected there.
If a child younger than twelve years old and
under 1.50 min height is travelling in the vehi-
cle:
R always secure the child in a child restraint
system suitable for Mercedes-Benz vehicles.
The child restraint system must be appropri-
ate to the age, weight and size of the child.
R be sure to observe the instructions and safety
notes in this section in addition to the child
restraint system manufacturer's installation
instructions.
R be sure to observe the instructions and safety
notes on the automatic front-passenger front airbag deactivation system (Y page 49).56
Children in the vehicleSafety
Page 77 of 389

Drive on carefully. Have ESP
®
checked at a
qualified specialist workshop.
If the å ESP®
OFF warning lamp lights up
continuously, ESP ®
is deactivated.
If the ÷ ESP®
warning lamp lights up contin-
uously, ESP ®
is not available due to a malfunc-
tion.
Read the information on warning lamps
(Y page 283 )and display messages that may be
shown in the instrument cluster (Y page 250).
Only use wheels with the recommended tyre
sizes. Only then will ESP ®
function properly.
Characteristics of ESP ®General notes
If the ÷ ESP warning lamp goes out before
beginning the journey, ESP ®
is automatically
active.
If ESP ®
engages, the ÷ESP®
warning lamp
flashes in the instrument cluster.
If ESP ®
engages:
X Do not deactivate ESP ®
under any circum-
stances.
X When pulling away, only depress the acceler-
ator pedal as far as is necessary.
X Adapt your driving style to suit the prevailing
road and weather conditions.
ECO start/stop function
The ECO start/stop function switches the
engine off automatically if the vehicle stops
moving. When the vehicle pulls away again, the
engine starts automatically. ESP ®
remains in its
previously selected status, e.g. if ESP ®
was
deactivated before the engine was automati-
cally switched off.
Activating/deactivating ESP ®
(except
Mercedes‑AMG vehicles) Important safety notes
i Observe the "Important safety notes" sec-
tion (Y page 68). You can select between the following ESP
®
sta-
tuses:
R ESP ®
is activated
R ESP ®
is deactivated G
WARNING
If you deactivate ESP ®
, ESP ®
no longer sta-
bilises the vehicle. There is an increased risk
of skidding and an accident.
Only deactivate ESP ®
in the situations descri-
bed in the following.
It may be best to deactivate ESP ®
in the follow-
ing situations:
R when snow chains are used
R in deep snow
R on sand or gravel
Spinning the wheels results in a cutting action,
which enhances traction.
i Activate ESP ®
as soon as the situations
described above no longer apply. ESP ®
will
otherwise not be able to stabilise the vehicle
if the vehicle starts to skid or a wheel starts to
spin.
Activating/deactivating ESP ® X
To deactivate: press button:.
The å ESP®
OFF warning lamp on the
instrument cluster lights up.
X To activate: press button :.
The å ESP®
OFF warning lamp on the
instrument cluster goes out.
Characteristics when ESP ®
is deactivated
If ESP ®
is deactivated and one or more wheels
start to spin, the ÷ESP®
warning lamp on 74
Driving safety systemsSafety
Page 114 of 389
Exterior mirrors
Important safety notes G
WARNING
You could lose control of the vehicle while
driving if you:
R adjust the driver's seat, steering wheel or
mirrors
R fasten the seat belt
There is a risk of an accident.
Adjust the driver's seat, head restraint, steer-
ing wheel and mirrors and fasten your seat
belt before starting the engine. G
WARNING
The exterior mirrors reduce the size of the
image. Objects visible in the mirrors are
closer than they appear. You could misjudge
the distance from road users driving behind
you when changing lanes, for instance. There is a risk of an accident.
You should therefore always look over your
shoulder to determine the actual distance
from road users driving behind you.
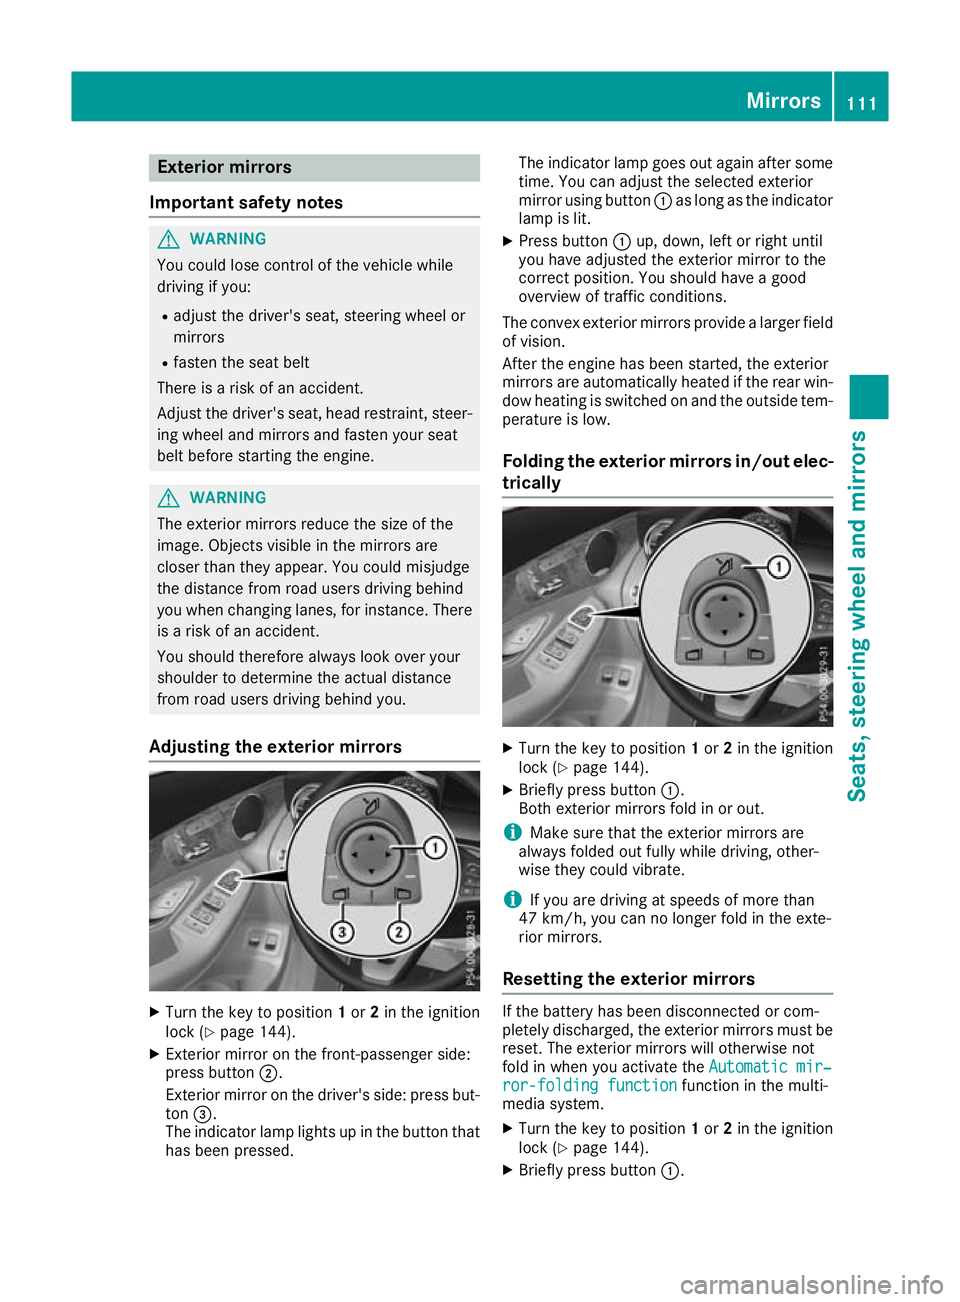
Adjusting the exterior mirrors X
Turn the key to position 1or 2in the ignition
lock (Y page 144).
X Exterior mirror on the front-passenger side:
press button ;.
Exterior mirror on the driver's side: press but-
ton =.
The indicator lamp lights up in the button that has been pressed. The indicator lamp goes out again after some
time. You can adjust the selected exterior
mirror using button :as long as the indicator
lamp is lit.
X Press button :up, down, left or right until
you have adjusted the exterior mirror to the
correct position. You should have a good
overview of traffic conditions.
The convex exterior mirrors provide a larger field of vision.
After the engine has been started, the exterior
mirrors are automatically heated if the rear win-
dow heating is switched on and the outside tem- perature is low.
Folding the exterior mirrors in/out elec- trically X
Turn the key to position 1or 2in the ignition
lock (Y page 144).
X Briefly press button :.
Both exterior mirrors fold in or out.
i Make sure that the exterior mirrors are
always folded out fully while driving, other-
wise they could vibrate.
i If you are driving at speeds of more than
47 km/h, you can no longer fold in the exte-
rior mirrors.
Resetting the exterior mirrors If the battery has been disconnected or com-
pletely discharged, the exterior mirrors must be reset. The exterior mirrors will otherwise not
fold in when you activate the Automatic mir‐ Automatic mir‐
ror-folding function
ror-folding function function in the multi-
media system.
X Turn the key to position 1or 2in the ignition
lock (Y page 144).
X Briefly press button :. Mirrors
111Seats, steering wheel and mirrors Z
Page 198 of 389
G
WARNING
If there are objects above the detection range:
R Active Park Assist may steer too early
R the vehicle may not stop in front of these
objects
This could cause a collision. There is a risk of
an accident.
If objects are located above the detection
range, stop and deactivate Active Parking
Assist.
Further information on the detection range
(Y page 191).
Active Parking Assist does not assist you with
parking in spaces at right angles to the direction
of travel if:
R two parking spaces are located directly next
to one another
R the parking space is directly next to a low
obstacle such as a low kerb
R you forward-park
Active Parking Assist does not assist you with
parking in spaces that are parallel or at right
angles to the direction of travel if:
R the parking space is on a kerb
R the system reads the parking space as being
blocked, such as by foliage or grass paving
blocks
R the area is too small for the vehicle to
manoeuvre into
R the parking space is bordered by an obstacle,
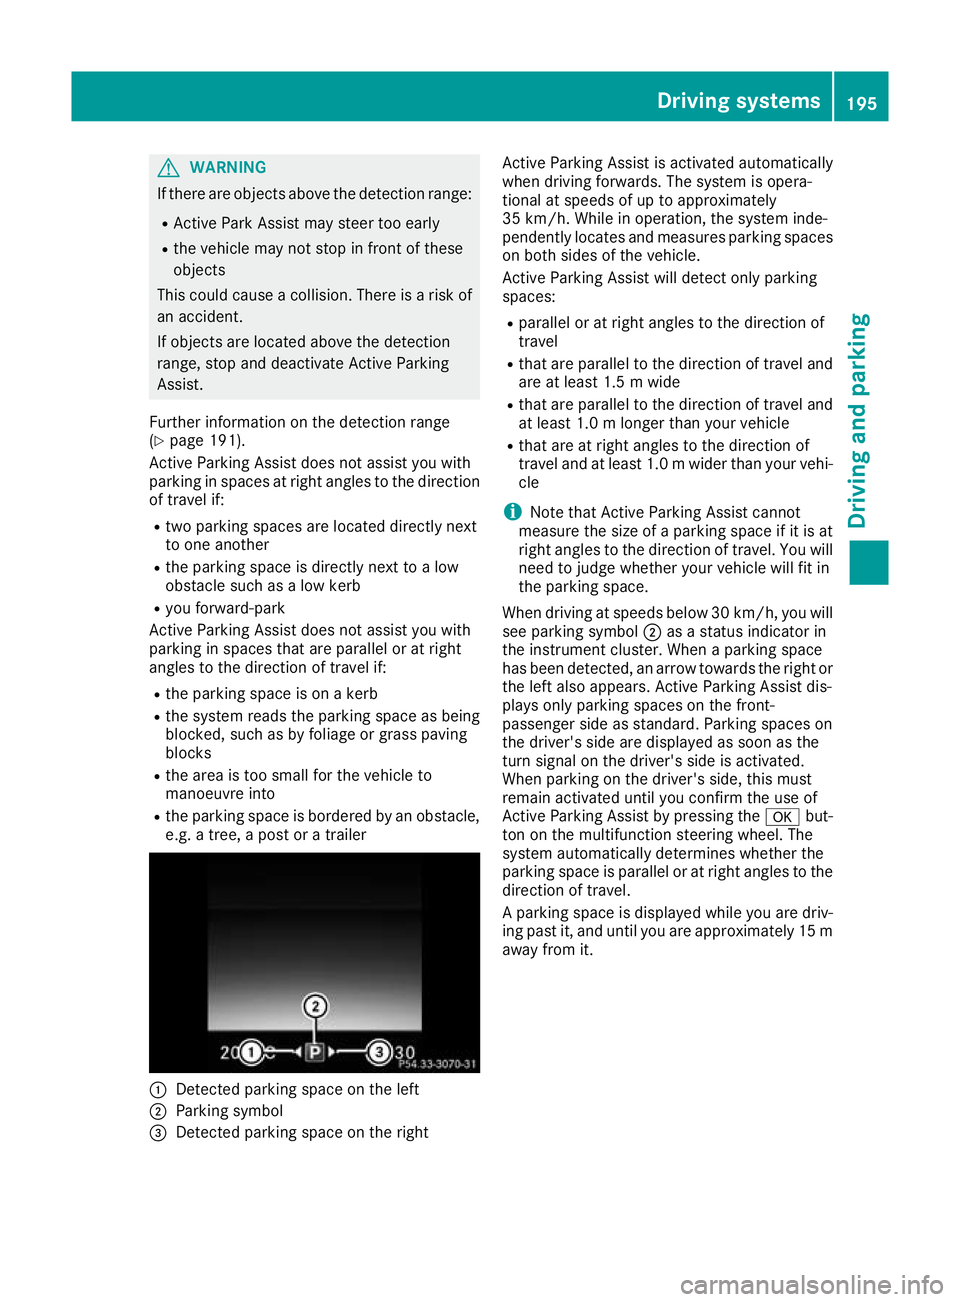
e.g. a tree, a post or a trailer :
Detected parking space on the left
; Parking symbol
= Detected parking space on the right Active Parking Assist is activated automatically
when driving forwards. The system is opera-
tional at speeds of up to approximately
35 km/h. While in operation, the system inde-
pendently locates and measures parking spaces on both sides of the vehicle.
Active Parking Assist will detect only parking
spaces:
R parallel or at right angles to the direction of
travel
R that are parallel to the direction of travel and
are at least 1.5 m wide
R that are parallel to the direction of travel and
at least 1.0 m longer than your vehicle
R that are at right angles to the direction of
travel and at least 1.0 mwider than your vehi-
cle
i Note that Active Parking Assist cannot
measure the size of a parking space if it is at
right angles to the direction of travel. You will
need to judge whether your vehicle will fit in
the parking space.
When driving at speeds below 30 km/h, you will see parking symbol ;as a status indicator in
the instrument cluster. When a parking space
has been detected, an arrow towards the right or
the left also appears. Active Parking Assist dis-
plays only parking spaces on the front-
passenger side as standard. Parking spaces on
the driver's side are displayed as soon as the
turn signal on the driver's side is activated.
When parking on the driver's side, this must
remain activated until you confirm the use of
Active Parking Assist by pressing the abut-
ton on the multifunction steering wheel. The
system automatically determines whether the
parking space is parallel or at right angles to the
direction of travel.
A parking space is displayed while you are driv-
ing past it, and until you are approximately 15 m away from it. Driving systems
195Driving and parking Z
Page 344 of 389
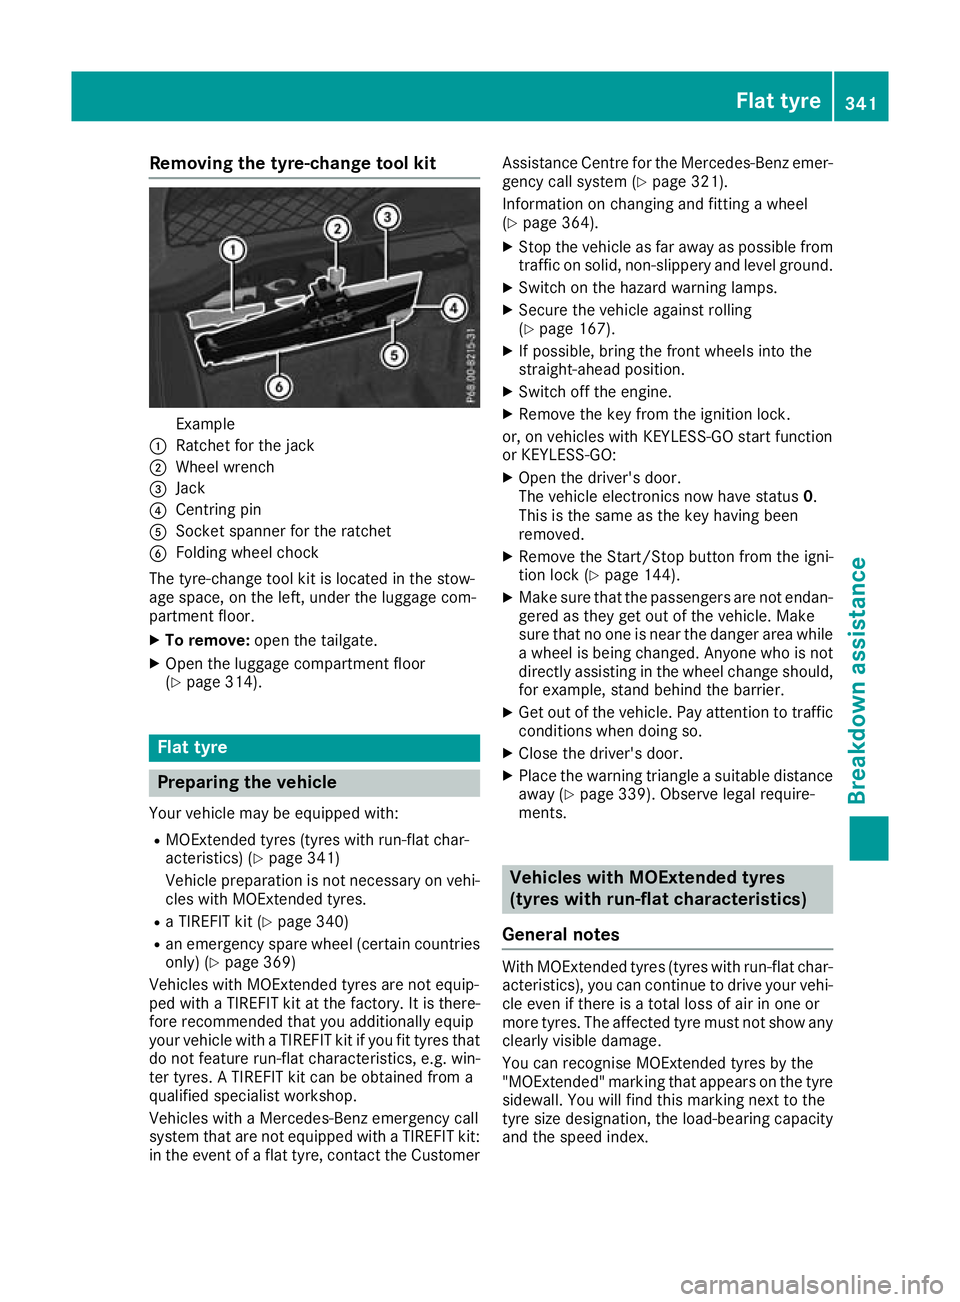
Removing the tyre-change tool kit
Example
: Ratchet for the jack
; Wheel wrench
= Jack
? Centring pin
A Socket spanner for the ratchet
B Folding wheel chock
The tyre-change tool kit is located in the stow-
age space, on the left, under the luggage com-
partment floor.
X To remove: open the tailgate.
X Open the luggage compartment floor
(Y page 314). Flat tyre
Preparing the vehicle
Your vehicle may be equipped with: R MOExtended tyres (tyres with run-flat char-
acteristics) (Y page 341)
Vehicle preparation is not necessary on vehi- cles with MOExtended tyres.
R a TIREFIT kit (Y page 340)
R an emergency spare wheel (certain countries
only) (Y page 369)
Vehicles with MOExtended tyres are not equip-
ped with a TIREFIT kit at the factory. It is there-
fore recommended that you additionally equip
your vehicle with a TIREFIT kit if you fit tyres that do not feature run-flat characteristics, e.g. win-
ter tyres. A TIREFIT kit can be obtained from a
qualified specialist workshop.
Vehicles with a Mercedes-Benz emergency call
system that are not equipped with a TIREFIT kit:
in the event of a flat tyre, contact the Customer Assistance Centre for the Mercedes-Benz emer-
gency call system (Y page 321).
Information on changing and fitting a wheel
(Y page 364).
X Stop the vehicle as far away as possible from
traffic on solid, non-slippery and level ground.
X Switch on the hazard warning lamps.
X Secure the vehicle against rolling
(Y page 167).
X If possible, bring the front wheels into the
straight-ahead position.
X Switch off the engine.
X Remove the key from the ignition lock.
or, on vehicles with KEYLESS-GO start function
or KEYLESS ‑GO:
X Open the driver's door.
The vehicle electronics now have status 0.
This is the same as the key having been
removed.
X Remove the Start/Stop button from the igni-
tion lock (Y page 144).
X Make sure that the passengers are not endan-
gered as they get out of the vehicle. Make
sure that no one is near the danger area while a wheel is being changed. Anyone who is notdirectly assisting in the wheel change should,
for example, stand behind the barrier.
X Get out of the vehicle. Pay attention to traffic
conditions when doing so.
X Close the driver's door.
X Place the warning triangle a suitable distance
away (Y page 339). Observe legal require-
ments. Vehicles with MOExtended tyres
(tyres with run-flat characteristics)
General notes With MOExtended tyres (tyres with run-flat char-
acteristics), you can continue to drive your vehi-
cle even if there is a total loss of air in one or
more tyres. The affected tyre must not show any clearly visible damage.
You can recognise MOExtended tyres by the
"MOExtended" marking that appears on the tyre
sidewall. You will find this marking next to the
tyre size designation, the load-bearing capacity
and the speed index. Flat tyre
341Breakdown assistance