2016 MERCEDES-BENZ GLC COUPE check engine
[x] Cancel search: check enginePage 349 of 389
The highly flammable gas mixture is created
while the battery is charging and when jump-
starting.
Always make sure that neither you nor the bat-
tery is electrostatically charged. Electrostatic
charge is created, for example:
R by wearing synthetic-fibre clothing
R by friction between clothing and the seat
R if you pull or push the battery across carpet or
other synthetic materials
R if you rub the battery with a cloth G
WARNING
During the charging process, a battery produ- ces hydrogen gas. If a short circuit occurs or
sparks are created, the hydrogen gas can
ignite. There is a risk of an explosion.
R Make sure that the positive terminal of a
connected battery does not come into con- tact with vehicle parts.
R Never place metal objects or tools on a bat-
tery.
R It is important that you observe the descri-
bed order of the battery terminals when
connecting and disconnecting a battery.
R When jump-starting, make sure that the
battery poles with identical polarity are
connected.
R It is particularly important to observe the
described order when connecting and dis-
connecting the jump leads.
R Never connect or disconnect the battery
terminals while the engine is running. G
WARNING
Battery acid is caustic. There is a risk of injury. Avoid contact with the skin, eyes or clothing.
Do not breathe in any battery gases. Do not
lean over the battery. Keep the batteries out
of the reach of children. Immediately rinse off
battery acid thoroughly with plenty of clean
water and seek medical attention at once.
All vehicles: H
Environmental note Batteries contain pollutants.
It is illegal to dispose of them
with the household rubbish.
They must be collected sep-
arately and disposed of in anenvironmentally responsible
recycling system. Dispose of batteries in an
environmentally responsible
manner. Take discharged
batteries to a qualified spe-
cialist workshop or to a col-
lection point for used batter-
ies.
! Have the battery checked regularly at a
qualified specialist workshop.
Observe the service intervals in the Service
Booklet or contact a qualified specialist work- shop for more information.
! Always have work on the batteries carried
out at a qualified specialist workshop. Should
it, in exceptional circumstances, be abso-
lutely necessary to disconnect the 12-volt
battery yourself, please observe the follow-
ing:
R Secure the vehicle to prevent it from rolling
away.
R Switch off the ignition
R Disconnect the negative terminal first and
then the positive terminal
The transmission is locked in position Pafter
disconnecting the battery.
After the work is completed, securely refit the battery and the postive terminal cover.
Comply with safety notes and take protective
measures when handling batteries. Risk of explosion.
Fire, naked flames and smoking are
prohibited when handling the bat-
tery. Avoid creating sparks. 346
Battery (vehicle)Breakdown assistance
Page 350 of 389
Electrolyte or battery acid is corro-
sive. Avoid contact with the skin,
eyes and clothing.
Wear suitable protective clothing; in
particular, gloves, an apron and a
face mask.
Immediately rinse electrolyte or acid
splashes off with clean water. Con-
sult a doctor if necessary. Wear eye protection.
Keep children at a safe distance.
Observe this Owner's Manual.
For safety reasons, Mercedes-Benz recom-
mends that you use only batteries that have
been tested and approved for your vehicle by
Mercedes-Benz. These batteries provide
increased impact protection to prevent vehicle
occupants from suffering acid burns should the battery be damaged in the event of an accident.
In order for the battery to achieve the maximum possible service life, it should always be suffi-
ciently charged.
Like other batteries, the vehicle battery may
discharge over time if you do not use the vehicle. In such cases, have the battery disconnected ata qualified specialist workshop. However, you
can also charge the battery with a charger rec-
ommended by Mercedes-Benz. For more infor-
mation, please contact a qualified specialist
workshop.
Have the battery charge checked more fre-
quently if you use the vehicle mainly for short
trips or if you leave it standing idle for an exten-
ded period. Consult a qualified specialist work-
shop if you wish to leave your vehicle parked up for a long period of time.
When you park the vehicle, remove the key if you
do not require any electrical consumers. The
vehicle will then use very little energy, thus con- serving battery power. Charging the 12 V battery
Vehicles with a lithium-ion battery:
! Only use battery chargers with a maximum
charging voltage of 14.4 V.
All ve hicles except vehicles with a lithium-
ion battery:
! Only use battery chargers with a maximum
charging voltage of 14.8 V. G
WARNING
During charging and jump-starting, explosive
gases can escape from the battery. There is a risk of an explosion.
Particularly avoid fire, naked flames, creating
sparks and smoking. Ensure there is sufficient
ventilation while charging and jump-starting.
Do not lean over a battery. G
WARNING
Battery acid is caustic. There is a risk of injury. Avoid contact with the skin, eyes or clothing.
Do not breathe in any battery gases. Do not
lean over the battery. Keep the batteries out
of the reach of children. Immediately rinse off
battery acid thoroughly with plenty of clean
water and seek medical attention at once. G
WARNING
A discharged battery can freeze at tempera-
tures below freezing point. When jump-start-
ing the vehicle or charging the battery, gases can escape from the battery. There is a risk of
an explosion.
Allow the frozen battery to thaw out before
charging it or jump-starting.
All vehicles: ! Only charge the battery using the jump-start
connection point.
The jump-starting connection point is in the
engine compartment (Y page 348).
X Open the bonnet.
X Connect the battery charger to the positive
terminal and earth point in the same order as
when connecting the donor battery in the
jump-starting process (Y page 348). Battery (vehicle)
347Breakdown assistance Z
Page 351 of 389
Keep away from fire and naked flames. Do not
lean over the battery. Never charge the battery
if it is still fitted to the vehicle, unless you are
using a battery charger that has been tested and
approved by Mercedes-Benz. A battery charger
unit specially adapted for Mercedes-Benz vehi-
cles and tested and approved by Mercedes-
Benz is available as an accessory. This device
permits charging of the battery while it is instal- led. Contact a Mercedes-Benz Service Centre
for information and availability. Read the battery charger's operating instructions before charg-
ing the battery.
All vehicles except vehicles with a lithium-
ion battery: if the warning and indicator lamps
on the instrument cluster do not light up at low temperatures, it is very likely that the dis-
charged battery has frozen. In this case, you
may neither jump-start the vehicle nor charge
the battery. The service life of a battery that has
been thawed may be reduced. The starting char-
acteristics may be impaired, especially at low
temperatures. Have the thawed battery
checked at a qualified specialist workshop.
Vehicles with a lithium-ion battery: at low
temperatures, do not use a battery charger to
charge a battery that has been removed. Allow
the battery to warm up gently first, if necessary. Otherwise, the service life may be reduced and
the starting characteristics impaired, especially
at low temperatures. Jump-starting
Hybrid vehicles: make sure that you read the separate Owner's Manual. You could otherwise fail
to recognise dangers, e.g. due to high voltage.
For the jump-starting procedure, use only the jump-starting connection point, consisting of a pos- itive terminal and an earth point, in the engine compartment.
All vehicles except vehicles with a lithium-ion battery: G
WARNING
Battery acid is caustic. There is a risk of injury.
Avoid contact with the skin, eyes or clothing. Do not breathe in any battery gases. Do not lean over the battery. Keep the batteries out of the reach of children. Immediately rinse off battery acid
thoroughly with plenty of clean water and seek medical attention at once. G
WARNING
During charging and jump-starting, explosive gases can escape from the battery. There is a risk of an explosion.
Particularly avoid fire, naked flames, creating sparks and smoking. Ensure there is sufficient
ventilation while charging and jump-starting. Do not lean over a battery. G
WARNING
During the charging process, a battery produces hydrogen gas. If a short circuit occurs or sparks
are created, the hydrogen gas can ignite. There is a risk of an explosion.
R Make sure that the positive terminal of a connected battery does not come into contact with
vehicle parts.
R Never place metal objects or tools on a battery.
R It is important that you observe the described order of the battery terminals when connecting
and disconnecting a battery.
R When jump-starting, make sure that the battery poles with identical polarity are connected. 348
Jump-startingBreakdown assistance
Page 352 of 389
R
It is particularly important to observe the described order when connecting and disconnecting
the jump leads.
R Never connect or disconnect the battery terminals while the engine is running. G
WARNING
A discharged battery can freeze at temperatures below freezing point. When jump-starting the
vehicle or charging the battery, gases can escape from the battery. There is a risk of an explosion.
Allow the frozen battery to thaw out before charging it or jump-starting.
If the warning and indicator lamps do not light up on the instrument cluster when temperatures are low, it is probably because the discharged battery has frozen. In this case, you may neither jump-
start the vehicle nor charge the battery. The service life of a battery that has been thawed may be
reduced. The starting characteristics may be impaired, especially at low temperatures. Have the
thawed battery checked at a qualified specialist workshop.
All vehicles:
! Vehicles with a petrol engine:
avoid repeated and lengthy starting attempts. Otherwise, the
non-combusted fuel may damage the catalytic converter.
Do not use a rapid charging device to start the vehicle. If your vehicle's battery is discharged, the
engine can be jump-started from another vehicle or from a second battery using jump leads.
Observe the following points:
R The battery is not accessible in all vehicles. If the other vehicle's battery is not accessible, jump-
start the vehicle using a second battery or a jump-starting device.
R Vehicles with a petrol engine: jump-start the vehicle only when the engine and exhaust system
are cold.
R All vehicles except vehicles with a lithium-ion battery: do not start the engine if the battery
is frozen. Let the battery thaw first.
R Jump-starting may be performed only using batteries with a nominal voltage of 12 V.
R Use only jump leads that have a sufficient cross-section and insulated terminal clamps.
R If the battery is fully discharged, leave the battery that is being used to jump-start connected for
a few minutes before attempting to start. This charges the empty battery a little.
R Make sure that the two vehicles do not touch.
Make sure that:
R The jump leads are not damaged.
R Non-insulated parts of the terminal clamps do not come into contact with other metal parts while
the jump leads are connected to the battery.
R The jump leads cannot come into contact with parts that can move when the engine is running,
such as the V-belt pulley or the fan.
X Secure the vehicle by applying the electric parking brake.
X Shift the transmission to position P.
X Make sure that the ignition is switched off . All indicator lamps on the instrument cluster must be
off. When using the key, turn the key to position 0in the ignition lock and remove it (Y page 144).
X Switch off all electrical consumers, e.g. rear window heating, lighting etc.
X Open the bonnet. Jump-starting
349Breakdown assistance Z
Page 353 of 389
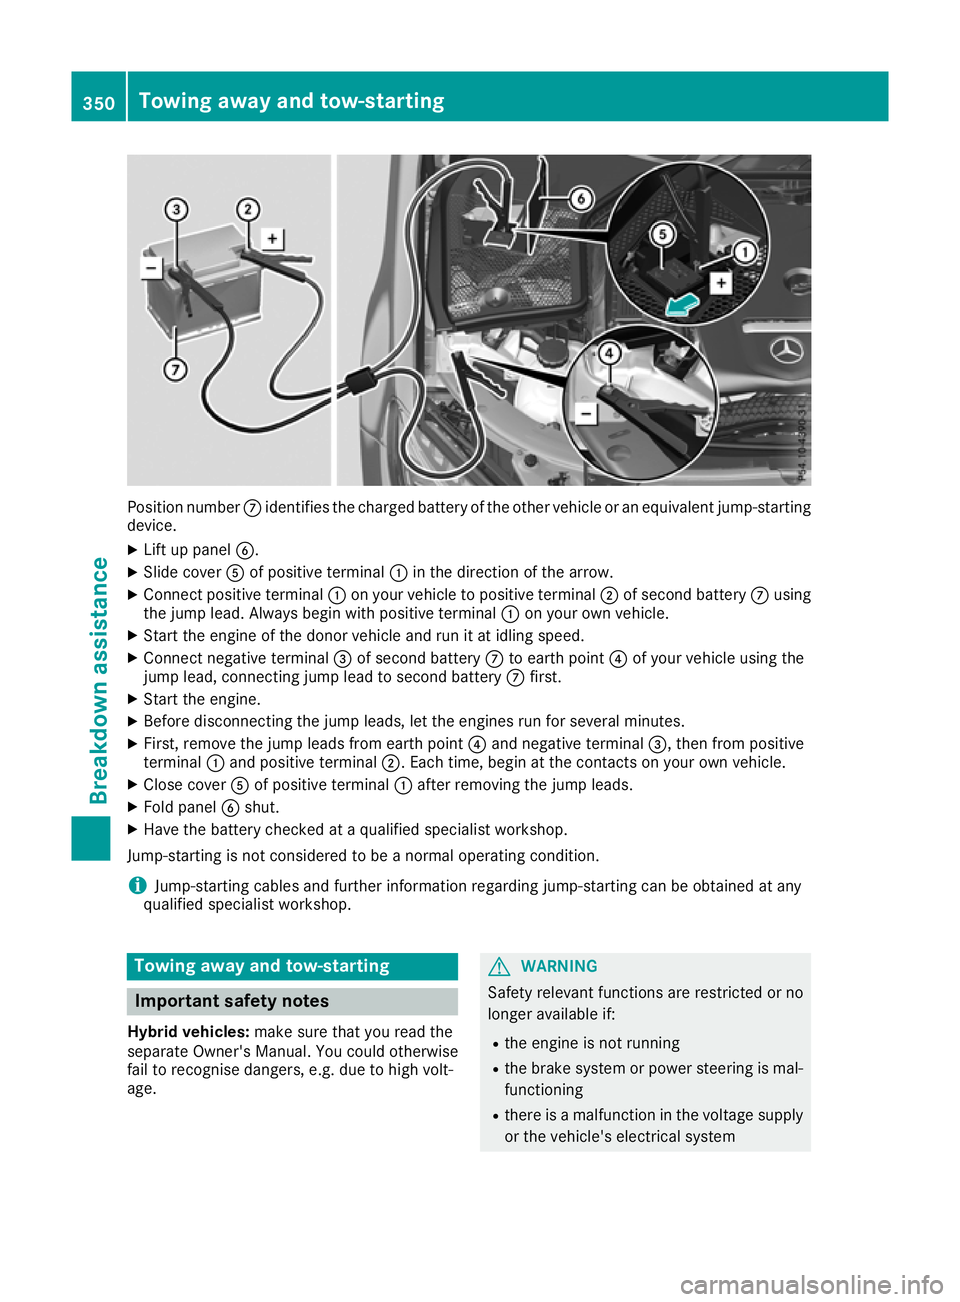
Position number
Cidentifies the charged battery of the other vehicle or an equivalent jump-starting
device.
X Lift up panel B.
X Slide cover Aof positive terminal :in the direction of the arrow.
X Connect positive terminal :on your vehicle to positive terminal ;of second battery Cusing
the jump lead. Always begin with positive terminal :on your own vehicle.
X Start the engine of the donor vehicle and run it at idling speed.
X Connect negative terminal =of second battery Cto earth point ?of your vehicle using the
jump lead, connecting jump lead to second battery Cfirst.
X Start the engine.
X Before disconnecting the jump leads, let the engines run for several minutes.
X First, remove the jump leads from earth point ?and negative terminal =, then from positive
terminal :and positive terminal ;. Each time, begin at the contacts on your own vehicle.
X Close cover Aof positive terminal :after removing the jump leads.
X Fold panel Bshut.
X Have the battery checked at a qualified specialist workshop.
Jump-starting is not considered to be a normal operating condition.
i Jump-starting cables and further information regarding jump-starting can be obtained at any
qualified specialist workshop. Towing away and tow-starting
Important safety notes
Hybrid vehicles: make sure that you read the
separate Owner's Manual. You could otherwise
fail to recognise dangers, e.g. due to high volt-
age. G
WARNING
Safety relevant functions are restricted or no
longer available if:
R the engine is not running
R the brake system or power steering is mal-
functioning
R there is a malfunction in the voltage supply
or the vehicle's electrical system 350
Towing away and tow-startingBreakdown assistance
Page 358 of 389
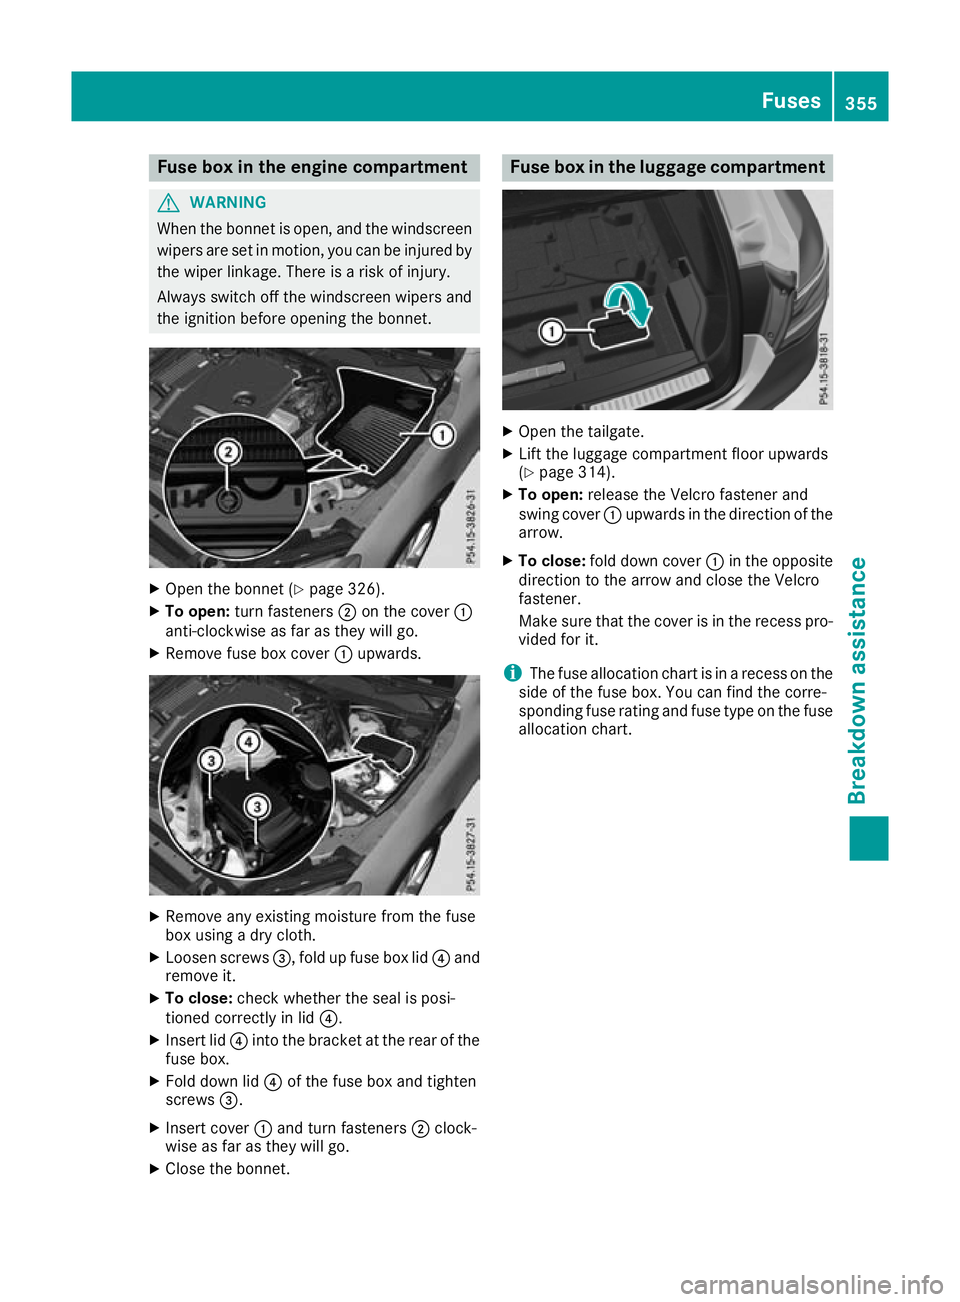
Fuse box in the engine compartment
G
WARNING
When the bonnet is open, and the windscreen wipers are set in motion, you can be injured by
the wiper linkage. There is a risk of injury.
Always switch off the windscreen wipers and
the ignition before opening the bonnet. X
Open the bonnet (Y page 326).
X To open: turn fasteners ;on the cover :
anti-clockwise as far as they will go.
X Remove fuse box cover :upwards. X
Remove any existing moisture from the fuse
box using a dry cloth.
X Loosen screws =, fold up fuse box lid ?and
remove it.
X To close: check whether the seal is posi-
tioned correctly in lid ?.
X Insert lid ?into the bracket at the rear of the
fuse box.
X Fold down lid ?of the fuse box and tighten
screws =.
X Insert cover :and turn fasteners ;clock-
wise as far as they will go.
X Close the bonnet. Fuse box in the luggage compartment
X
Open the tailgate.
X Lift the luggage compartment floor upwards
(Y page 314).
X To open: release the Velcro fastener and
swing cover :upwards in the direction of the
arrow.
X To close: fold down cover :in the opposite
direction to the arrow and close the Velcro
fastener.
Make sure that the cover is in the recess pro-
vided for it.
i The fuse allocation chart is in a recess on the
side of the fuse box. You can find the corre-
sponding fuse rating and fuse type on the fuse
allocation chart. Fuses
355Breakdown assistance Z
Page 368 of 389
The wear patterns on the front and rear tyres
differ depending on the operating conditions.
Interchange the wheels before a clear wear pat-
tern has formed on the tyres. Front tyres typi-
cally wear more on the shoulders, while rear
tyres wear more in the centre.
On vehicles that have front and rear wheels of
the same size, you can interchange the wheels
every 5,000 to 10,000 km depending on the
degree of tyre wear. Ensure the direction of
rotation is maintained.
Clean the contact surfaces of the wheel and the
brake disc thoroughly every time a wheel is
interchanged. Check the tyre pressure and, if
necessary, restart the tyre pressure loss warn-
ing system (Y page 361) or the tyre pressure
monitor (Y page 363). Direction of rotation
Tyres with a specified direction of rotation have additional benefits, e.g. if there is a risk of aqua- planing. These advantages can only be gained if
the tyres are fitted corresponding to the direc-
tion of rotation.
An arrow on the sidewall of the tyre indicates its correct direction of rotation. Storing wheels
Store wheels in a cool, dry and preferably dark
place if they are not being used. Protect the
tyres against oil, grease, petrol and diesel. Fitting a wheel
Preparing the vehicle X
Stop the vehicle on solid, non-slippery and
level ground.
X Apply the electric parking brake manually.
X Move the front wheels to the straight-ahead
position.
X Shift the transmission to position P.
X Make sure that the vehicle level is set to "Nor-
mal" on vehicles with AIR BODY CONTROL
(Y page 188).
X Switch off the engine.
X Vehicles without KEYLESS-GO: remove the
key from the ignition lock. X
Vehicles with KEYLESS-GO start-function
or KEYLESS-GO: open the driver's door.
The vehicle electronics now have status 0.
This is the same as the key having been
removed.
X Vehicles with KEYLESS-GO start function
or KEYLESS-GO: remove the Start/Stop but-
ton from the ignition lock (Y page 144).
X If included in the vehicle equipment, remove
the tyre-change tool kit from the vehicle.
X Safeguard the vehicle against rolling away.
i Apart from some country-specific variants,
vehicles are not equipped with tyre-changing
tools. Some tools for changing a tyre are spe- cific to the vehicle. For more information on
which tools are required to perform a wheel
change on your vehicle, consult a qualified
specialist workshop.
Necessary tyre-changing tools may include,
for example:
R Jack
R wheel chock
R Wheel wrench
R Centring pin
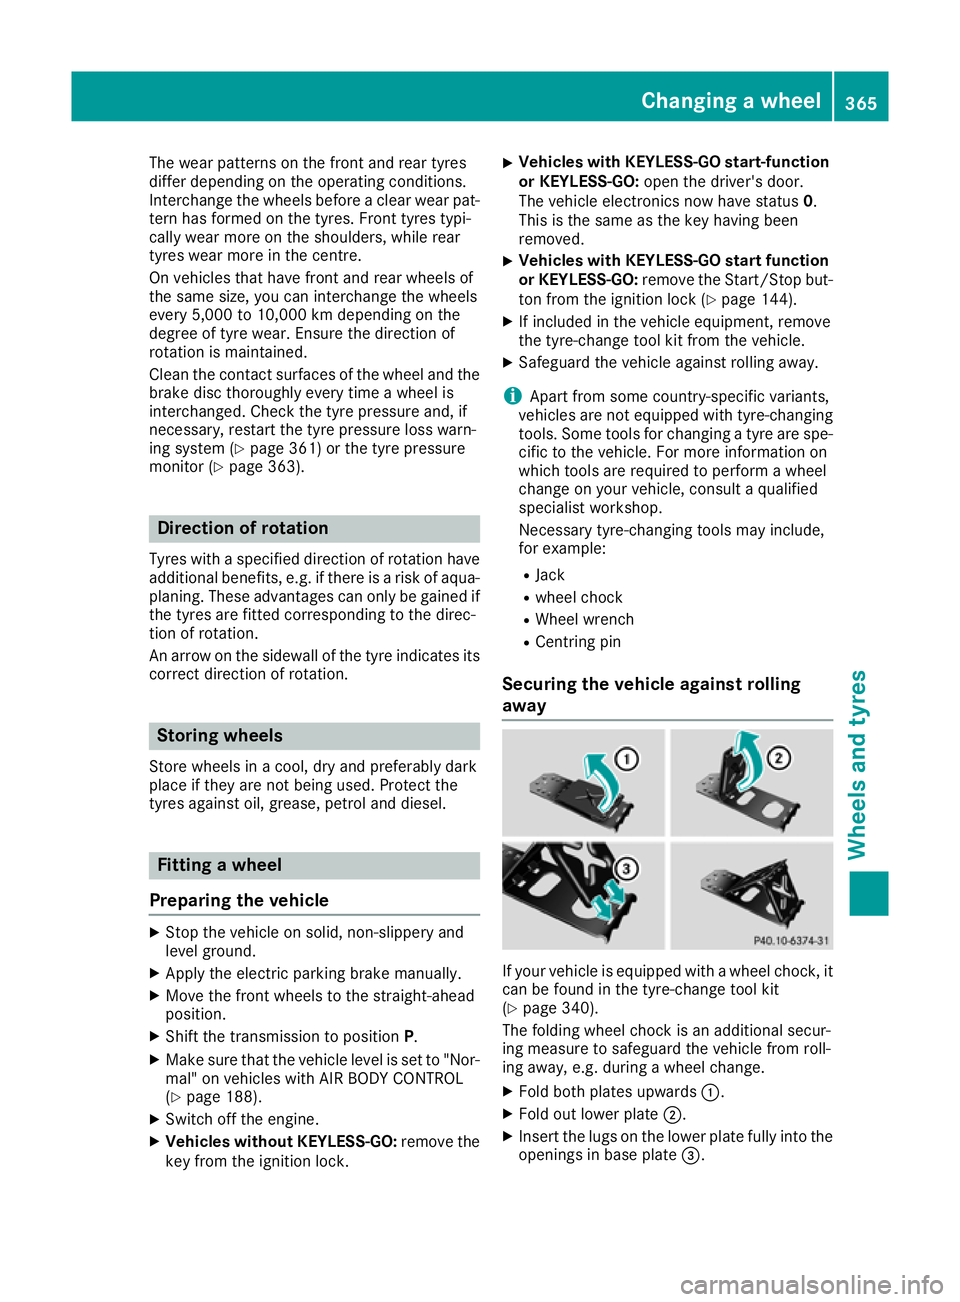
Securing the vehicle against rolling
away If your vehicle is equipped with a wheel chock, it
can be found in the tyre-change tool kit
(Y page 340).
The folding wheel chock is an additional secur-
ing measure to safeguard the vehicle from roll-
ing away, e.g. during a wheel change.
X Fold both plates upwards :.
X Fold out lower plate ;.
X Insert the lugs on the lower plate fully into the
openings in base plate =. Changing a wheel
365Wheels and tyres Z
Page 381 of 389

pockets may form when the brakes are sub-
jected to a heavy load. This would impair brak-
ing efficiency. There is a risk of an accident.
Have the brake fluid renewed at the prescri-
bed intervals.
When handling brake fluid, observe the impor-
tant safety notes on service products
(Y page 373).
The brake fluid change intervals can be found in the Service Booklet.
Only use brake fluid approved by Mercedes-
Benz in accordance with MB-Freigabe or MB-
Approval 331.0.
Information about approved brake fluid can be
obtained at any qualified specialist workshop or on the Internet at
http://bevo.mercedes-benz.com.
i Have the brake fluid regularly replaced at a
qualified specialist workshop in accordance
with the replacement intervals and the
replacement confirmed in the Service Book-
let. Coolant
Important safety notes G
WARNING
If antifreeze comes into contact with hot com- ponents in the engine compartment, it may
ignite. There is a risk of fire and injury.
Let the engine cool down before you top up
the antifreeze. Make sure that antifreeze is
not spilled next to the filler neck. Thoroughly
clean the antifreeze from components before
starting the engine.
! Only add coolant that has been premixed
with the desired antifreeze protection. You
could otherwise damage the engine.
Further information on coolants can be found in the Mercedes-Benz Specifications for Ser-
vice Products, MB Specifications for Service
Products 310.1, e.g. on the Internet at
http://bevo.mercedes-benz.com. Or contact
a qualified specialist workshop.
! Always use a suitable coolant mixture, even
in countries where high temperatures prevail. Otherwise, the engine cooling system is not
sufficiently protected from corrosion and
overheating.
i Have the coolant regularly replaced at a
qualified specialist workshop and the replace-
ment confirmed in the Service Booklet.
Comply with the important safety notes for ser- vice products when handling coolant
(Y page 373).
The coolant is a mixture of water and anti-
freeze/anti-corrosion additive. It is responsible
for the following:
R anti-corrosion protection
R antifreeze protection
R raising the boiling point
If antifreeze/anti-corrosion additive is present
at the correct concentration, the boiling point of
the coolant during operation will be approx-
imately 130 †.
The antifreeze concentrate/anti-corrosion addi-
tive concentration in the engine cooling system should:
R be at least 50%. This will protect the engine
cooling system against freezing down to
approximately -37 †.
R not exceed 55% (antifreeze protection down
to -45 †). Heat will otherwise not be dissipa-
ted as effectively.
Mercedes-Benz recommends an antifreeze/
anti-corrosion additive concentration in accord-
ance with MB Specifications for Service Prod-
ucts 310.1.
i When the vehicle is first delivered, it is filled
with a coolant mixture that ensures adequate
antifreeze and corrosion protection.
i The coolant is checked at every mainte-
nance interval at a qualified specialist work-
shop. Windscreen washer system
Important safety notes G
WARNING
If windscreen washer concentrate comes into contact with hot components of the engine or
the exhaust system, it can ignite. There is a
risk of fire and injury. 378
Service products and capacitiesTechnical data