2016 MERCEDES-BENZ G-CLASS SUV lock
[x] Cancel search: lockPage 103 of 261
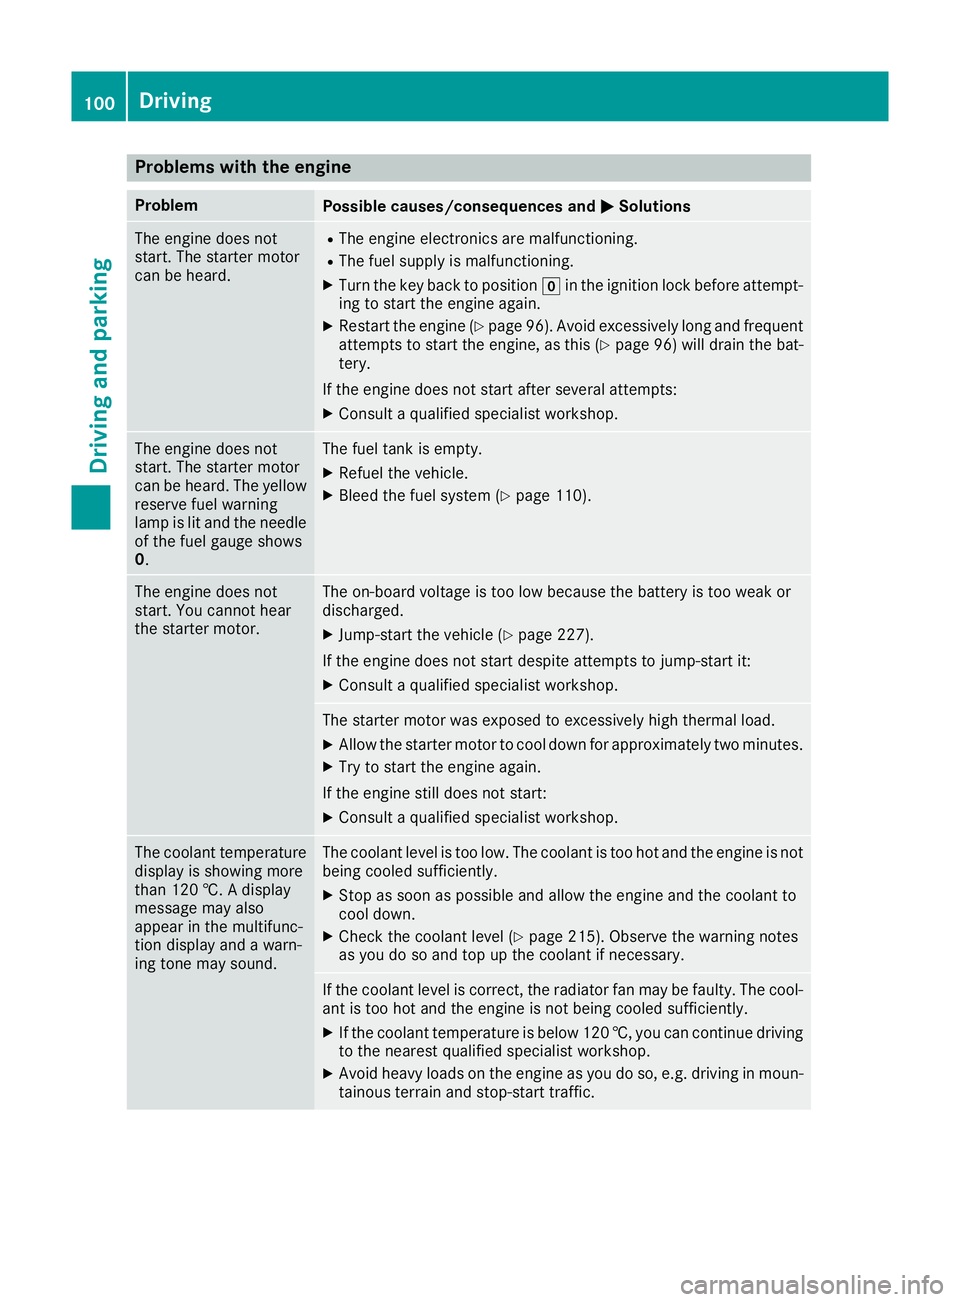
Problems with the engine
Problem
Possible causes/consequences and
M
MSolutions The engine does not
start. The starter motor
can be heard. R
The engine electronics are malfunctioning.
R The fuel supply is malfunctioning.
X Turn the key back to position gin the ignition lock before attempt-
ing to start the engine again.
X Restart the engine (Y page 96). Avoid excessively long and frequent
attemptstos tart the engine, as this (Y page 96) will drain the bat-
tery.
If the engine does not start after several attempts:
X Consult aqualified specialist workshop. The engine does not
start
.The starter motor
can be heard. The yellow reserve fuel warning
lamp is lit and the needle
of the fuel gauge shows
0. The fuel tank is empty.
X Refuel the vehicle.
X Bleed the fuel system (Y page 110).The engine does not
start
.You cannot hear
the starter motor. The on-board voltage is too low because the battery is too weak or
discharged.
X Jump-start the vehicle (Y page 227).
If the engine does not start despite attempt stojump-start it:
X Consult aqualified specialist workshop. The starter motor was exposed to excessively high thermal load.
X Allow the starter motor to cool down for approximately two minutes.
X Try to start the engine again.
If the engine still does not start:
X Consult aqualified specialist workshop. The coolant temperature
display is showing more
than 120 †. Adisplay
message may also
appear in the multifunc-
tion display and awarn-
ing tonem ay sound. The coolant level is too low. The coolant is too hot and the engine is not
being cooled sufficiently.
X Stop as soon as possible and allow the engine and the coolant to
cool down.
X Check the coolant level (Y page 215). Observe the warning notes
as you do so and top up the coolant if necessary. If the coolan
tlevel is correct, the radiator fan may be faulty. The cool-
ant is too hot and the engine is not being cooled sufficiently.
X If the coolant temperature is below1 20 †, you can continue driving
to the nearest qualifieds pecialist workshop.
X Avoid heavy loadsont he engine as you do so, e.g. driving in moun-
tainous terrain and stop-start traffic. 100
DrivingDriving and parking
Page 104 of 261
Automati
ctransmission Important safety notes
G
WARNING
If th eengine spee disabove the idling speed
and you engag etransmission position Dor R,
the vehicl ecouldp ulla wa ysuddenly .There is
ar isk of an accident.
When engaging transmission position Dor R,
alwaysf irmly depress the brake peda land do
not simultaneously accelerate. G
WARNING
The automatic transmission switches to neu-
tral position Nwhen you switch off the engine.
The vehicl emay roll away. There is arisk of an
accident.
After switching off the engine, alwayss witch
to parking position P.Prevent the parked vehi-
cle from rolling awaybya pplying the parking
brake.
i Bear in mind that power transmission
between the engine and the transmission is
interrupted when the engine is switched off.
For this reason, shift the automatic transmis-
sion to Pwhen the engine is switched off and
the vehicl eisstationary. Apply the parking
brake to prevent the vehicl efrom rolling
away. Selector lever
Overview of transmission positions !
If the engine speed is too high or if the vehi-
cle is rolling ,donot shift the transmission
directly from Dto R,f rom Rto Dor directly to
P.
Do not open the driver's door while the vehi-
cle is in motion. At low speeds in transmission position Dor R,p ark position Pis otherwise
engaged automatically.
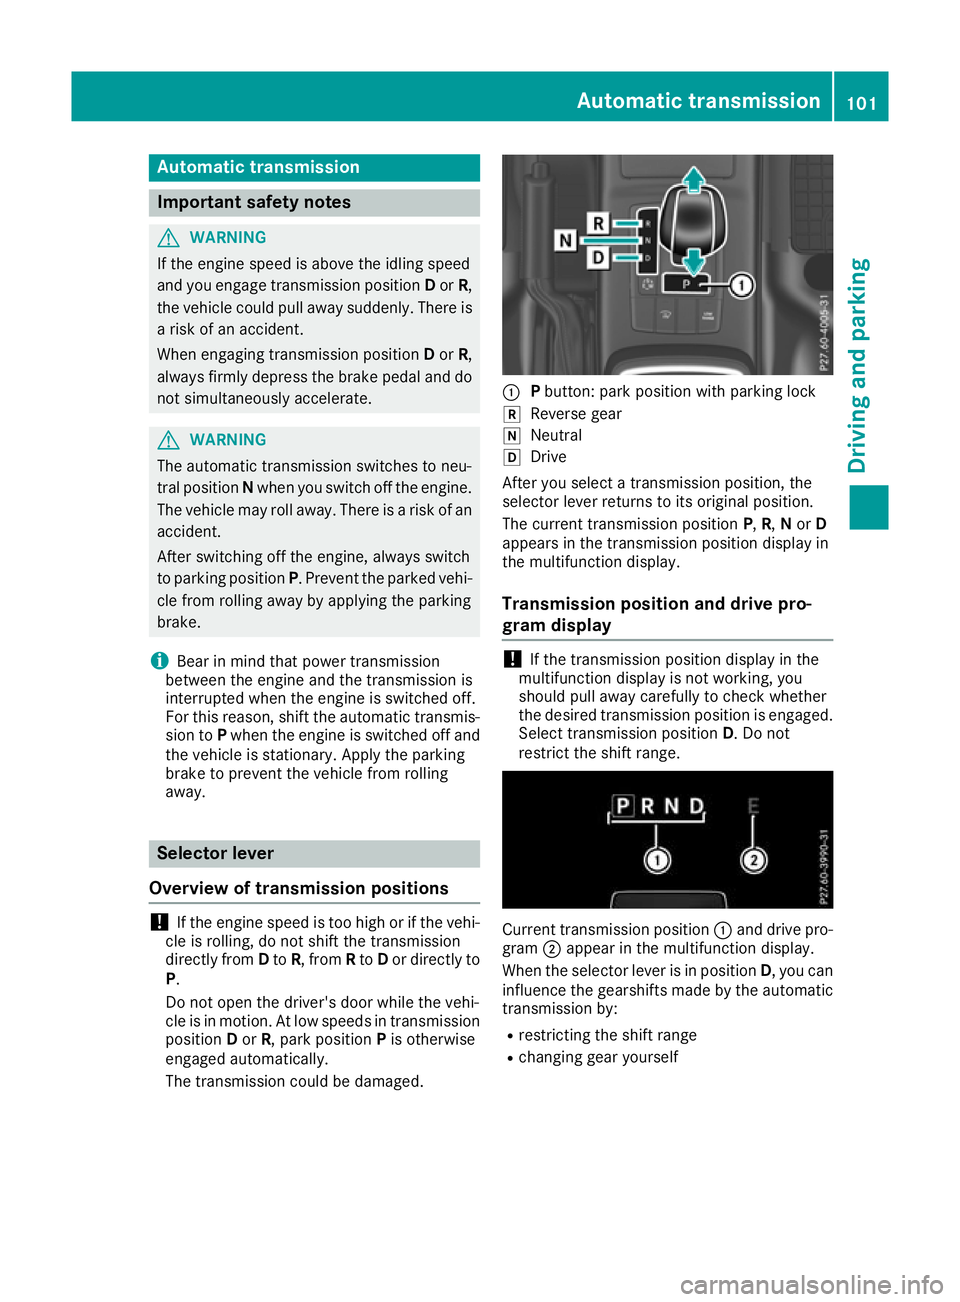
The transmission could be damaged. :
Pbutton: park position with parking lock
k Revers egear
i Neutral
h Drive
After you select atransmission position ,the
selector lever return stoits original position.
The curren ttransmission position P,R, Nor D
appears in the transmission position display in
the multifunction display.
Transmission position and drive pro-
gram display !
If the transmission position display in the
multifunctio ndisplayisn ot working, you
should pull awayc arefully to check whether
the desired transmission position is engaged.
Select transmission position D.Donot
restrict the shift range. Current transmission position
:and dri vepro-
gram ;appear in th emultifunction display.
When th eselector leve risinposition D,you can
influence th egearshifts made by th eautomatic
transmission by:
R restricting th eshiftrange
R changing gear yourself Automatic transmission
101Driving and parking Z
Page 105 of 261
Shifting to parkp
osition PX
Make sure that the vehicle is stationary.
X Depress the brake pedal and keep it
depressed.
X Press the Pbutton in the centre console.
If you depress the brake pedal and push the
selector lever forwards or back to the first point of resistance, park position Pis disengaged. The
transmission shifts to neutral N.
Shifting to reverse gear R !
Only move the automatic transmission to
k when the vehicle is stationary.
X Make sure that the vehicle is stationary.
X Depress the brake pedal and keep it
depressed.
X Push the selector lever forwards past the first
point of resistance.
The transmission position Ris engaged.
If you engage reverse gear and the ECO start/
stop function is activated, the engine starts
automatically (Y page 97).
Shifting to neutral N G
WARNING
If children are left unsupervised in the vehicle, they can:
R open doors and endanger other persons or
road users
R climb out and be injured by the traffic
R operate vehicle equipment and, for exam-
ple, trap themselves.
Children could also set the vehicle in motion, for examp leby:
R releasing the parking brake
R shifting the automatic transmission out of
park position P
R starting the engine.
There is arisk of an accident and injury.
When leaving the vehicle, alwayst ake the key
with you and lock the vehicle. Never leave
children unattended in the vehicle. Always
keep the key out of reach of children. X
Make sure that the vehicl eisstationary.
X Depress the brake pedal and keep it
depressed.
X Push the selector lever forwards or pull it back
to the first point of resistance, depending on
the current transmission position.
The automatic transmission shifts into N.
When the engine is switched off, the automatic
transmission shifts to Nautomatically.
If the vehicle is braked to astandstill in neutral
N,t he ECO start/stop function switches off the
engine automatically (Y page 97).
Staying in neutral( N) G
WARNING
If children are left unsupervised in the vehicle, they can:
R open doors and endanger other persons or
road users
R climb out and be injure dbythe traffic
R operate vehicl eequipment and, for exam-
ple,t rap themselves.
Childre ncoulda lsos et the vehicl einmotion,
for exampl eby:
R releasing the parking brake
R shifting the automatic transmission out of
park position P
R starting the engine.
There is arisk of an accident and injury.
When leaving the vehicle, alwayst ake the key
with you and lock the vehicle. Never leave
children unattended in the vehicle. Always
keep the key out of reach of children.
X Make sure that the vehicl eisstationary.
X Make sure that the ignitio nisswitched on.
X Depress the brake peda land keep it
depressed.
X Shift neutral N.
X Release the brake pedal.
X Make sure that the parking brake is released.
X Switch off the ignitio nand leave the key in the
ignitio nlock. 102
Automatic transmissionDrivinga
nd parking
Page 106 of 261
Shifting to drive position D
X
Make sure that the vehicle is stationary.
X Depress the brake pedal and keep it
depressed.
X Push the selector lever back past the first
point of resistance.
The automatic transmission shifts into D.
If the vehicle is braked to astandstill in trans-
mission position D,the ECO start/stop function
switches off the engine automatically
(Y page 97). Transmission positions
B Park
This safeguards the vehicle against
rolling away when stopped.
Only shift the transmission into posi-
tion Pwhen the vehicle is stationary
(Y page 101). The parking lock
should not be used as abrake when
parking. Always apply the parking
brake in addition to the parking lock
in order to secure the vehicle.
The key can only be removed if the
transmission is in position P.When
there is no key in the ignition lock, the selector lever is locked in position P.C Rev
erse gear
Only shift the transmission into posi- tion Rwhe nthe vehicle is stationary. A
!
Coasting in neutral
imay
caus edamage to the drive train.
Neutral
Do not shift the transmission to N
while driving. Otherwise, the auto-
matic transmission could be dam-
aged.
No power is transmitted from the
engine to the drive wheels.
Releasing the brakes will allow you to
move the vehicle freely, e.g. to push
it or tow it.
If ESP ®
is deactivated or faulty and
the vehicle is in danger of skidding
e.g. on icy roads: shift the transmis-
sion to position N.
If you engage the transfer case, shift briefly into N(Ypage 124). 7 Drive
The automatic transmission changes
gea rautomatically. Al lforward gears
are available. Changing gear
The automatic transmission shifts throug hthe
individua lgear sautomaticall ywhen it is in trans-
mission position D.Gearshiftin gisdetermined
by:
R as hiftrange restriction ,ifselected
R thep ositio nofthetransfer cas e(HIGH
RANGE orLOW RANGE)
R thep ositio noftheaccelerato rpedal
R ther oad speed Drivin
gtips
Accelerator pedal position Your drivi
ngstyle influences how the automatic
transmission shift sgear:
R little throttle: early upshifts
R more throttle: late upshifts Automatic transmission
103Driving and parking Z
Page 111 of 261
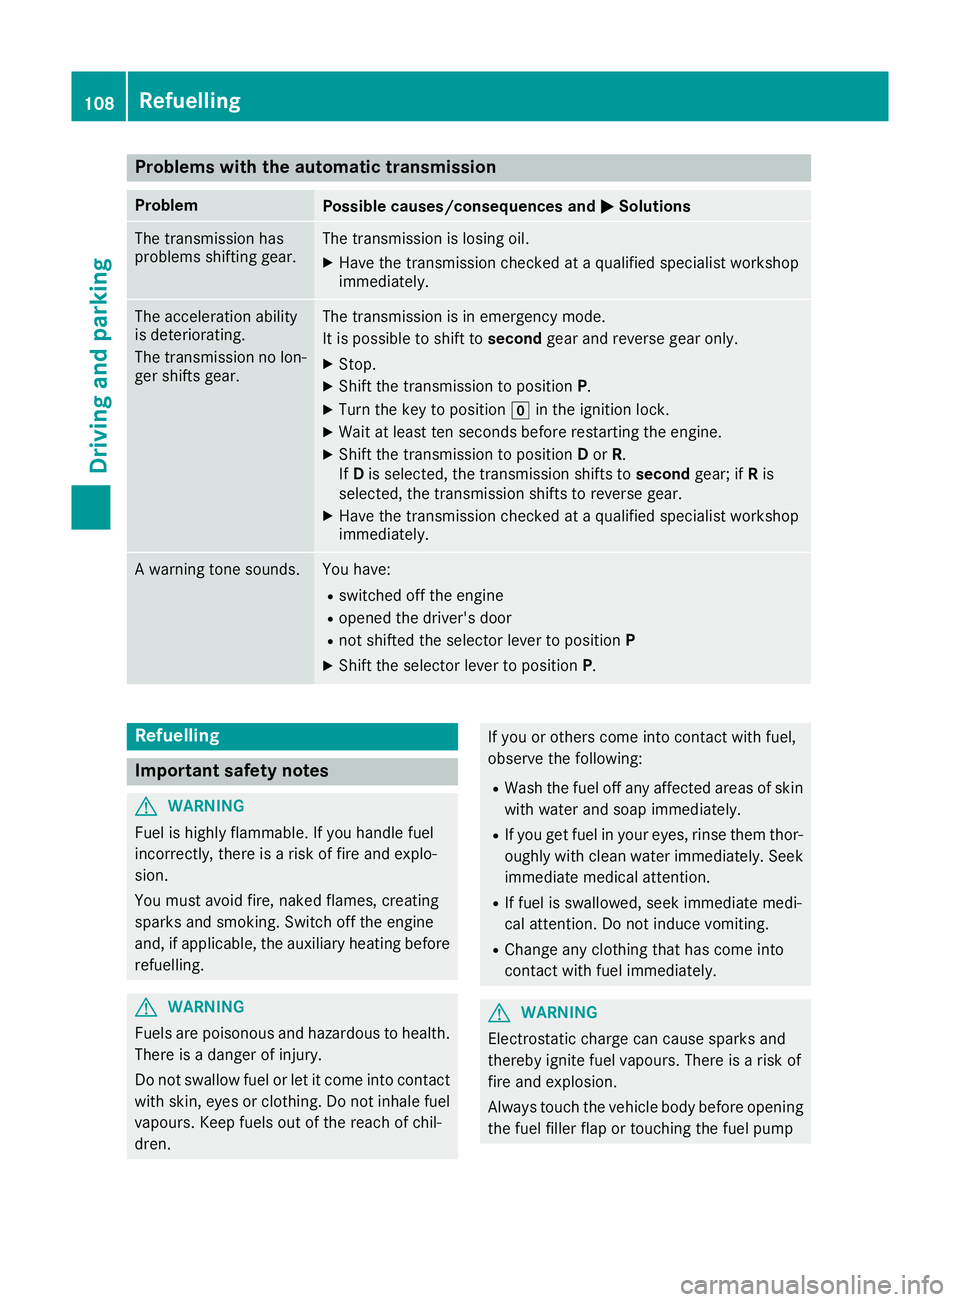
Problems with the automatic transmission
Problem
Possible causes/consequences and
M
MSolutions The transmission has
problems shifting gear. The transmission is losing oil.
X Have the transmission checked at aqualified specialist workshop
immediately. The acceleration ability
is deteriorating.
The transmission no lon-
ger shifts gear. The transmission is in emergenc
ymode.
It is possible to shift to secondgear and reverse gear only.
X Stop.
X Shift the transmission to position P.
X Turn the key to position gin the ignition lock.
X Wait at least ten seconds before restarting the engine.
X Shift the transmission to position Dor R.
If D is selected, the transmission shifts to secondgear; ifRis
selected, the transmission shifts to reverse gear.
X Have the transmission checked at aqualified specialist workshop
immediately. Aw
arning tone sounds. Yo
uh ave:
R switched off the engine
R opene dthe driver's door
R not shifted the selector lever to position P
X Shif tthe selector lever to position P.Refuelling
Important safety notes
G
WARNING
Fue lish ighly flammable.Ify ou handlefuel
incorrectly ,there is arisk of fire and explo-
sion.
You must avoi dfire, naked flames, creating
sparks and smoking. Switch off the engine
and, if applicable,t he auxiliary heating before
refuelling. G
WARNING
Fuel sare poisonous and hazardous to health.
There is adange rofinjury.
Do not swallowf uel or let it come into contact
with skin, eyesorc lothing. Do not inhal efuel
vapours. Keep fuel sout of the reach of chil-
dren. If you or others come into contact with fuel,
observe the following:
R Wash the fuel off any affected area sofskin
with water and soap immediately.
R If you get fuel in youre yes,rinse them thor-
oughlyw ith clean water immediately.S eek
immediate medica lattention.
R If fuel is swallowed, seek immediate medi-
cal attention. Do not induce vomiting.
R Change any clothing that has come into
contact with fuel immediately. G
WARNING
Electrostatic charge can cause sparks and
thereby ignite fuel vapours. There is arisk of
fire and explosion.
Always touch the vehicl ebody before opening
the fuel filler flap or touching the fuel pump 108
RefuellingDrivinga
nd parking
Page 112 of 261
nozzle. Thi
sdischarge sany electrostatic
charge tha tmayhave buil tup.
Do not get back into the vehicl eduring the refu-
elling process ;otherwise, electrostatic charge
could buil dupagain. G
WARNING
If yo umix diesel fuel with petrol, the flash
point of this fuel mixture is lower than that of pure diesel fuel .When the engine is running,
components in the exhaust system may over-
heatu nnoticed. There is arisk of fire.
Never refue lwith petrol. Never add petrol to
diesel fuel.
! Do not use petrol to refue
lvehicles with a
diesel engine. Do not switch on the ignitio nif
you accidentally refue lwith the wrong fuel.
Otherwise, fuel can enter the fuel system.
Even smal lamounts of the wrong fuel could
result in damage to the fuel system and the
engine. The repair costs are high .Notify a
qualified specialist worksho pand have the
fuel tank and fuel lines drained completely.
! Overfilling the fuel tank coul
ddamage the
fuel system.
! Take care not to spil
lany fuel on painted
surfaces. You coul dotherwise damage the
paintwork.
! Use
afilter when adding fuel from afuel can.
The fuel lines and/or the fuel injection system coul dotherwise be blocked by particles from
the fuel can.
If you overfil lthe fuel tank, some fuel may spray
out when you remove the fuel pump nozzle.
Further information on fuel and fuel quality
(Y page2 50). Refuelling
General information Observe the important safety notes
(Y
page 108).
If you unlock/lock the vehicle from the outside, the fuel filler flap also unlocks/locks.
The positio nofthe8 fuel filler cap is dis-
played on the instrument cluster. The arrow next to the filling pump indicates the side of the vehi-
cle.
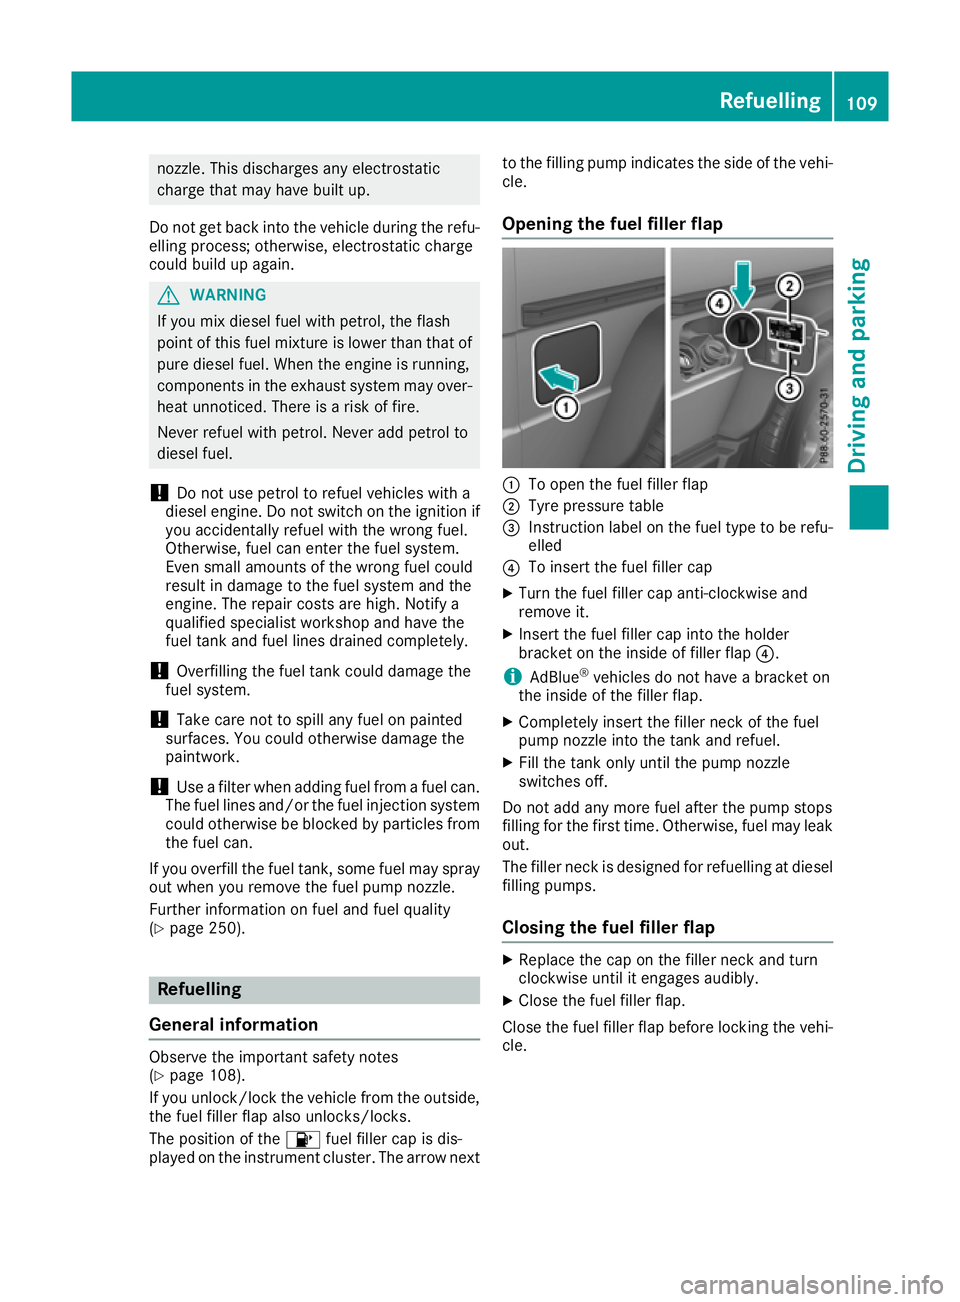
Opening the fuel filler flap :
To open the fuel filler flap
; Tyre pressure table
= Instruction label on the fuel type to be refu-
elled
? To insert the fuel filler cap
X Turn the fuel filler cap anti-clockwise and
remove it.
X Insert the fuel filler cap into the holder
bracket on the inside of filler flap ?.
i AdBlue ®
vehicles do not have abracket on
the inside of the filler flap.
X Completely insert the filler neck of the fuel
pump nozzle into the tank and refuel.
X Fill the tank only until the pump nozzle
switches off.
Do not add any more fuel after the pump stops
filling for the first time. Otherwise, fuel may leak out.
The filler neck is designed for refuelling at diesel
filling pumps.
Closing the fuel filler flap X
Replace the cap on the filler neck and turn
clockwise until it engages audibly.
X Clos ethe fuel filler flap.
Close th efuel filler flap before lockin gthe vehi-
cle. Refuelling
109Driving and parking Z
Page 115 of 261
to the fuel tank, thi
scan lead to engine dam-
age.
! Do not fil
lthe AdBlue ®
containe rwitha
pump nozzle.
! If there ar
esteep gradients whil edrivin goff-
road, asufficient filling level in the AdBlue ®
tank must be ensured .Makes uref or thi srea-
son tha tthere is aminimum fil llev el of ten
litres befor edrivin goff-road.
Hav ethe AdBlue ®
tank refille dataqualified
specialis tworkshop .However, yo ucan also top
up the AdBlue ®
tank:
R with AdBlue ®
refil lbottles
R with an AdBlue ®
refil lcanister
To avoi dtransporting already opene drefil lcon-
tainers in the vehicle, completel yempty refill
bottle sorcanisters when filling the AdBlue ®
tank, if possible.
Furthe rinformation on AdBlue ®
(Y page 251).
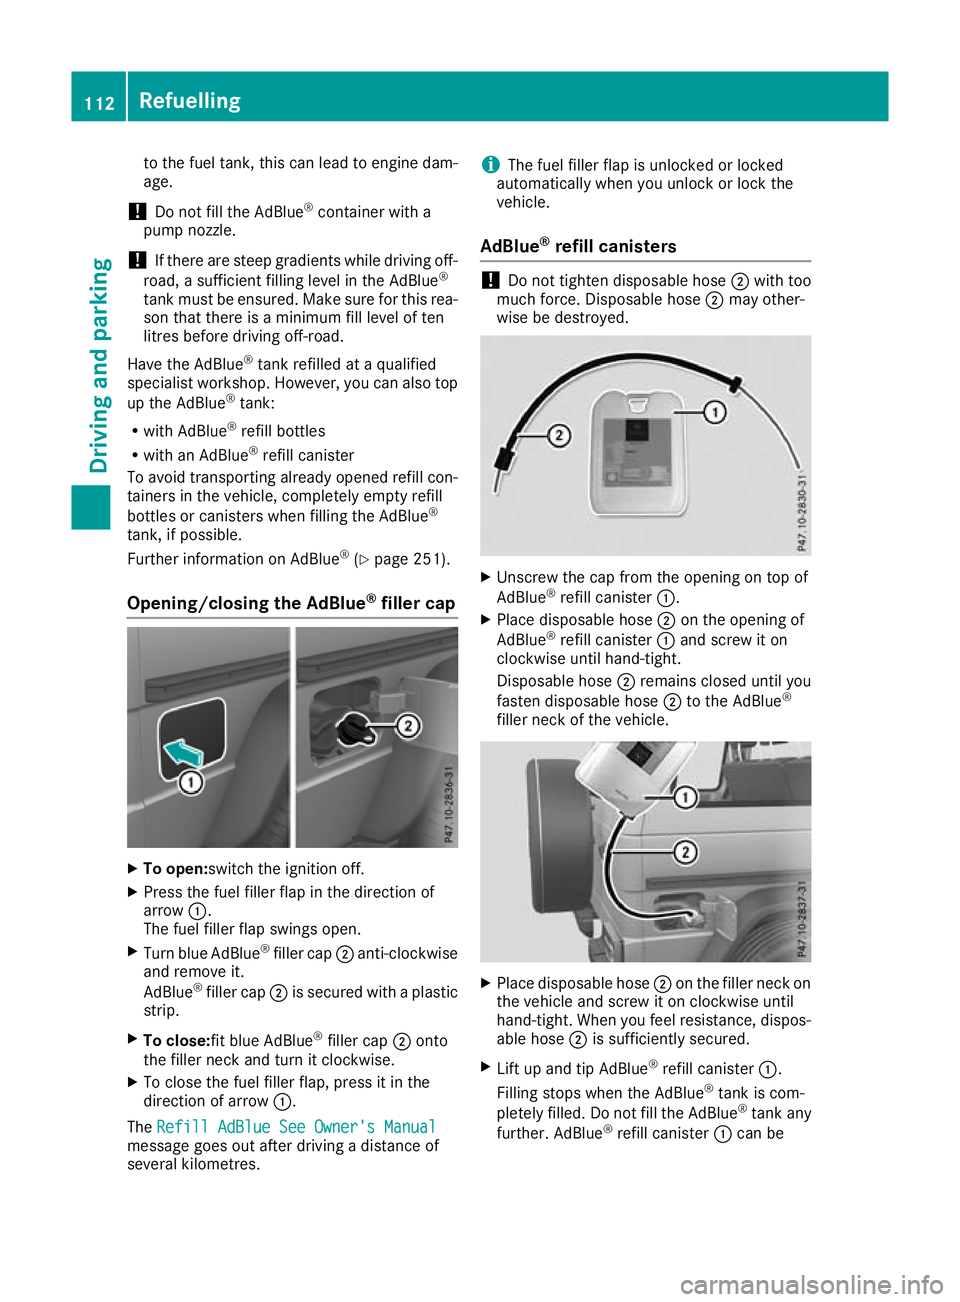
Opening/closing the AdBlue ®
fille rcap X
To open:switch the ignition off.
X Press the fue lfille rflapint he direction of
arrow :.
The fue lfille rflaps wing so pen.
X Turn blue AdBlue ®
fille rcap ; anti-clockwise
and remove it.
AdBlue ®
fille rcap ; is secured with aplast ic
strip.
X To close:fit blue AdBlue ®
fille rcap ; onto
the fille rneck and turn it clockwise.
X To close the fue lfille rflap, press it in the
direction of arrow :.
The Refill AdBlue See Owner' sManual
Refill AdBlue See Owner' sManual
message goe soutafte rdriving adistance of
severa lkilometres. i
The fue
lfiller flap is unlocked or locked
automatically when you unlock or lock the
vehicle.
AdBlue ®
refill canisters !
Do not tighten disposable hose
;with too
much force. Disposable hose ;may other-
wise be destroyed. X
Unscrew the cap from the opening on top of
AdBlue ®
refill canister :.
X Place disposable hose ;on the opening of
AdBlue ®
refill canister :and screw it on
clockwise until hand-tight.
Disposable hose ;remains closed until you
fasten disposable hose ;to the AdBlue ®
filler neck of the vehicle. X
Place disposable hose ;on the filler neck on
the vehicle and screw it on clockwise until
hand-tight. When you feel resistance, dispos- able hose ;is sufficiently secured.
X Lift up and tip AdBlue ®
refill canister :.
Filling stops when the AdBlue ®
tank is com-
pletely filled. Do not fill the AdBlue ®
tank any
further. AdBlue ®
refill canister :can be 112
RefuellingDriving and parking
Page 116 of 261
removed when it has been only partially emp-
tied.
X Turn disposable hose ;on the filler neck of
the vehicl eanti-clockwise and remove it.
X Turn disposable hose ;on the opening of
AdBlue ®
refil lcanister :anti-clockwise and
remove it.
X Reseal AdBlue ®
refil lcanister :with the cap.
AdBlue ®
refil lcanisters are available at many
filling stations or at aqualified specialist work-
shop. AdBlue ®
refil lcanisters are often sold with
af iller hose. Afiller hose that does not exactly fit
the vehicle's AdBlue ®
tank offers no overfil lpro-
tection. AdBlue ®
may leako ut asaresul tof
overfilling. Mercedes-Benz offers aspecia ldis-
posable hose with overfil lprotection. You can
obtai nthis from any Mercedes-Benz Service
Centre. AdBlue ®
is available in avariety of con-
tainers and receptacles. Use the disposable
hose only with the Mercedes-Benz AdBlue ®
refill
canisters.
AdBlue ®
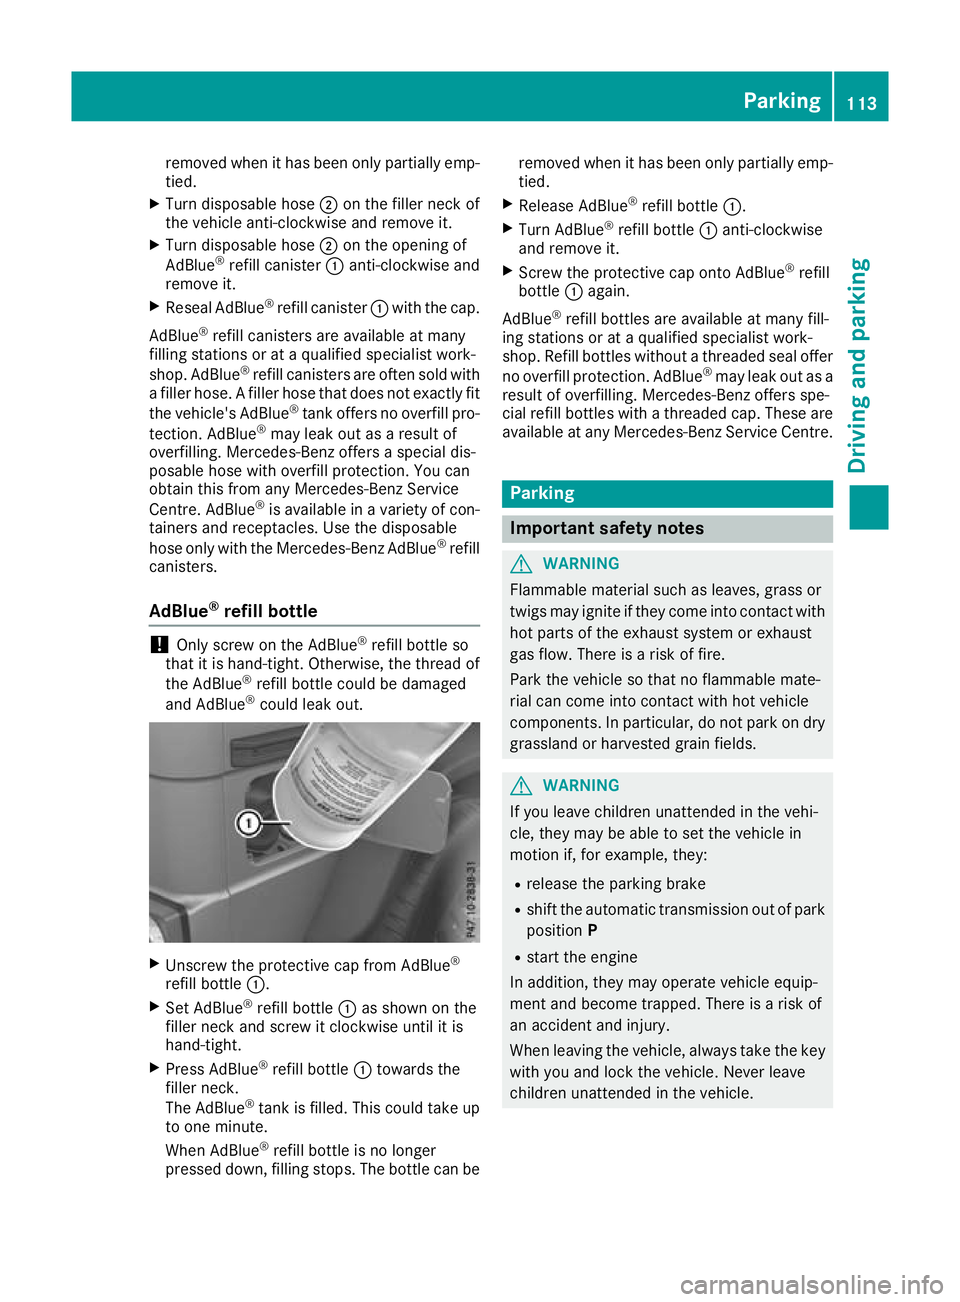
refill bottle !
Only screw on the AdBlue ®
refill bottle so
that it is hand-tight. Otherwise, the thread of
the AdBlue ®
refill bottle could be damaged
and AdBlue ®
could leak out. X
Unscrew the protective cap from AdBlue ®
refill bottle :.
X Set AdBlue ®
refill bottle :as shown on the
filler neck and screw it clockwis euntil it is
hand-tight.
X Press AdBlue ®
refill bottle :towards the
filler neck.
The AdBlue ®
tank is filled. This could take up
to one minute.
When AdBlue ®
refill bottle is no longer
pressed down, filling stops. The bottle can be removed when it has been only partially emp-
tied.
X Release AdBlue ®
refill bottle :.
X Turn AdBlue ®
refill bottle :anti-clockwise
and remove it.
X Screw the protective cap onto AdBlue ®
refill
bottle :again.
AdBlue ®
refill bottles are available at many fill-
ing stations or at aqualified specialist work-
shop. Refill bottles withou tathreade dseal offer
no overfil lprotection. AdBlue ®
may leako ut as a
resul tofo verfilling. Mercedes-Benz offers spe-
cial refil lbottles with athreade dcap. These are
available at any Mercedes-Benz Service Centre. Parking
Im
portant safety notes G
WARNING
Flammable material such as leaves ,grass or
twigs may ignite if they come into contact with hot parts of the exhaust system or exhaust
gas flow .There is arisk of fire.
Park the vehicl esothat no flammable mate-
rial can come into contact with hot vehicle
components. In particular, do not park on dry grassland or harvested grai nfields. G
WARNING
If you leave children unattended in the vehi-
cle, they may be abletos et the vehiclein
motion if, for example, they:
R release the parking brake
R shift the automatic transmission out of park
position P
R start the engine
In addition, they may operate vehicl eequip-
ment and become trapped. There is arisk of
an accident and injury.
When leaving the vehicle, alwayst ake the key
with you and lock the vehicle. Never leave
children unattended in the vehicle. Parking
113Drivingand parking Z