2016 MERCEDES-BENZ G-CLASS SUV light
[x] Cancel search: lightPage 63 of 261
X
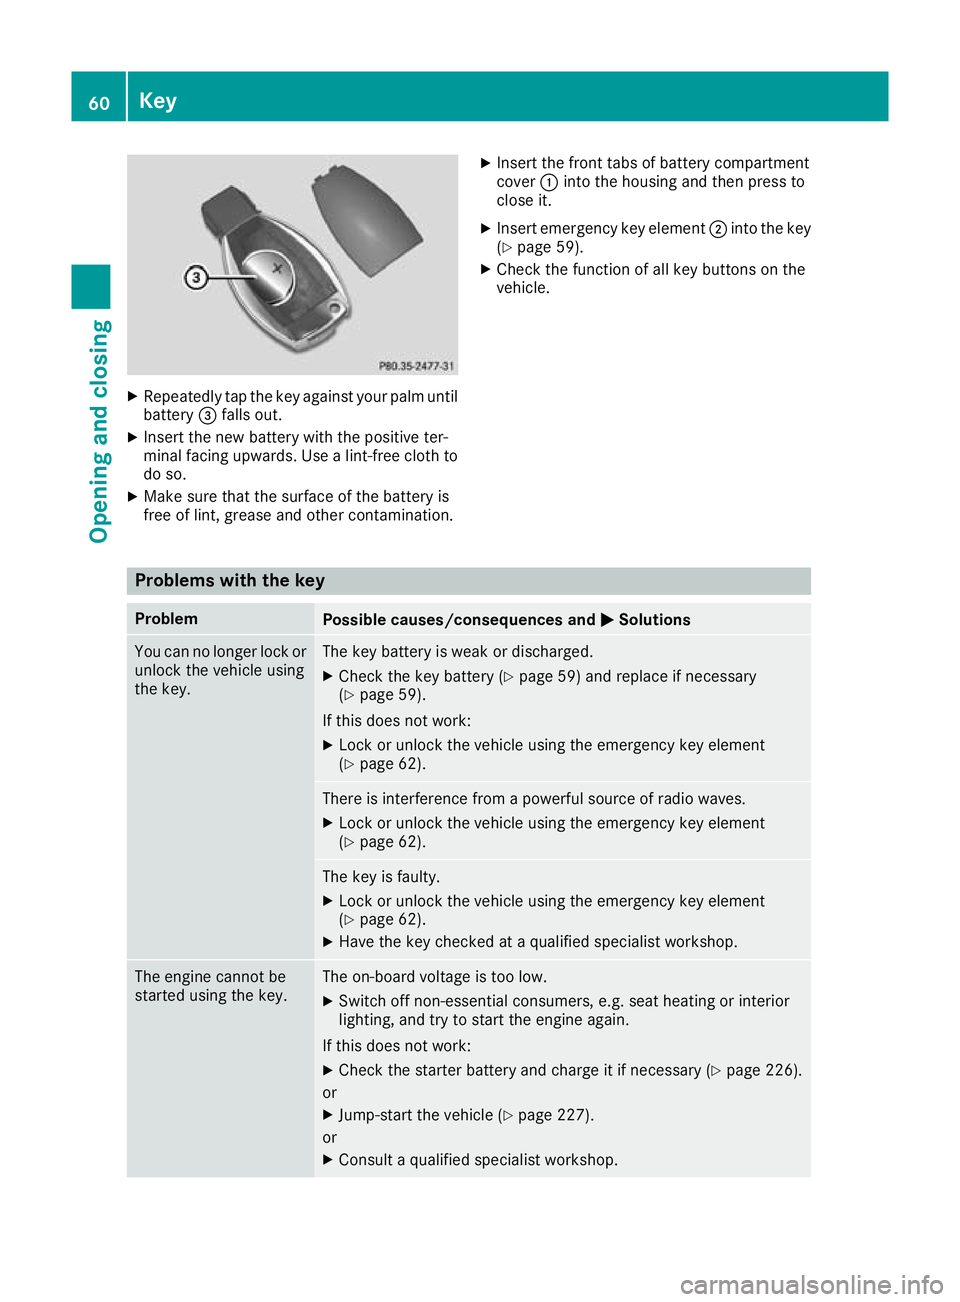
Repeatedly tap th ekeyagainst your palm until
battery =falls out.
X Inser tthe newb attery wit hthe positive ter-
minal facing upwards. Use alint-free cloth to
do so.
X Mak esuret hatthe surfac eofthebattery is
free of lint, grease and other contamination. X
Insert th efront tabs of battery compartment
cover :into the housing and then press to
close it.
X Insert emergency key element ;into the key
(Y page 59).
X Check the function of all key buttons on the
vehicle. Problem
swith the key Problem
Possible causes/consequences and
M MSolutions You can no longer lock or
unlock the vehicle using
the key. The key battery is weak or discharged.
X Check the key battery (Y page 59) and replace if necessary
(Y page 59).
If this does not work: X Lock or unlock the vehicle using the emergency key element
(Y page 62). There is interferenc
efrom apowerful source of radio waves.
X Lock or unlock the vehicle using the emergenc ykey element
(Y page 62). The key is faulty.
X Lock or unlock the vehicle using the emergenc ykey element
(Y page 62).
X Have the key checked at aqualified specialist workshop. The engine cannot be
started using the key. The on-board voltage is too low.
X Switch off non-essential consumers, e.g. seat heating or interior
lighting, and try to start the engine again.
If this does not work:
X Check the starter battery and charge it if necessary (Y page 226).
or X Jump-start the vehicle (Y page 227).
or X Consult aqualified specialist workshop. 60
KeyOpening and closing
Page 68 of 261
i
On the front-passenger side, the window
crank must be turned in the opposite direc-
tion. Sliding sunroof
Important safety notes
G
WARNING
While opening and closing the sliding sunroof, body parts in close proximity could become
trapped. There is arisk of injury.
Make sure that no body parts are in close
proximity during the opening and closing pro- cedures.
If somebody become strapped:
R release the switch immediately, or
R during automatic operation, press the
switch briefly in any direction
The opening or closing procedure willbes top-
ped. G
WARNING
If children operate the sliding sunroof they
coul dbecome trapped, particularl yifthey are
left unsupervised. There is arisk of injury.
When leaving the vehicle, alwayst ake the key
with you and lock the vehicle. Never leave
children unattended in the vehicle.
! Only open the panorama sliding sunroof if it
is free of snow and ice. Otherwise, malfunc-
tions may occur.
Do not allow anything to protrud efrom the
sliding sunroof. Otherwise, the seal scouldbe
damaged.
Resonance noises can occur in addition to the
usual airflow noises when the sliding sunroof is
open. They are caused by minor pressure fluc-
tuations in the vehicl einterior. Change the posi-
tion of the sliding sunroof or open aside window
slightly to reduce or eliminate these noises. Opening and closing the sliding sun-
roof
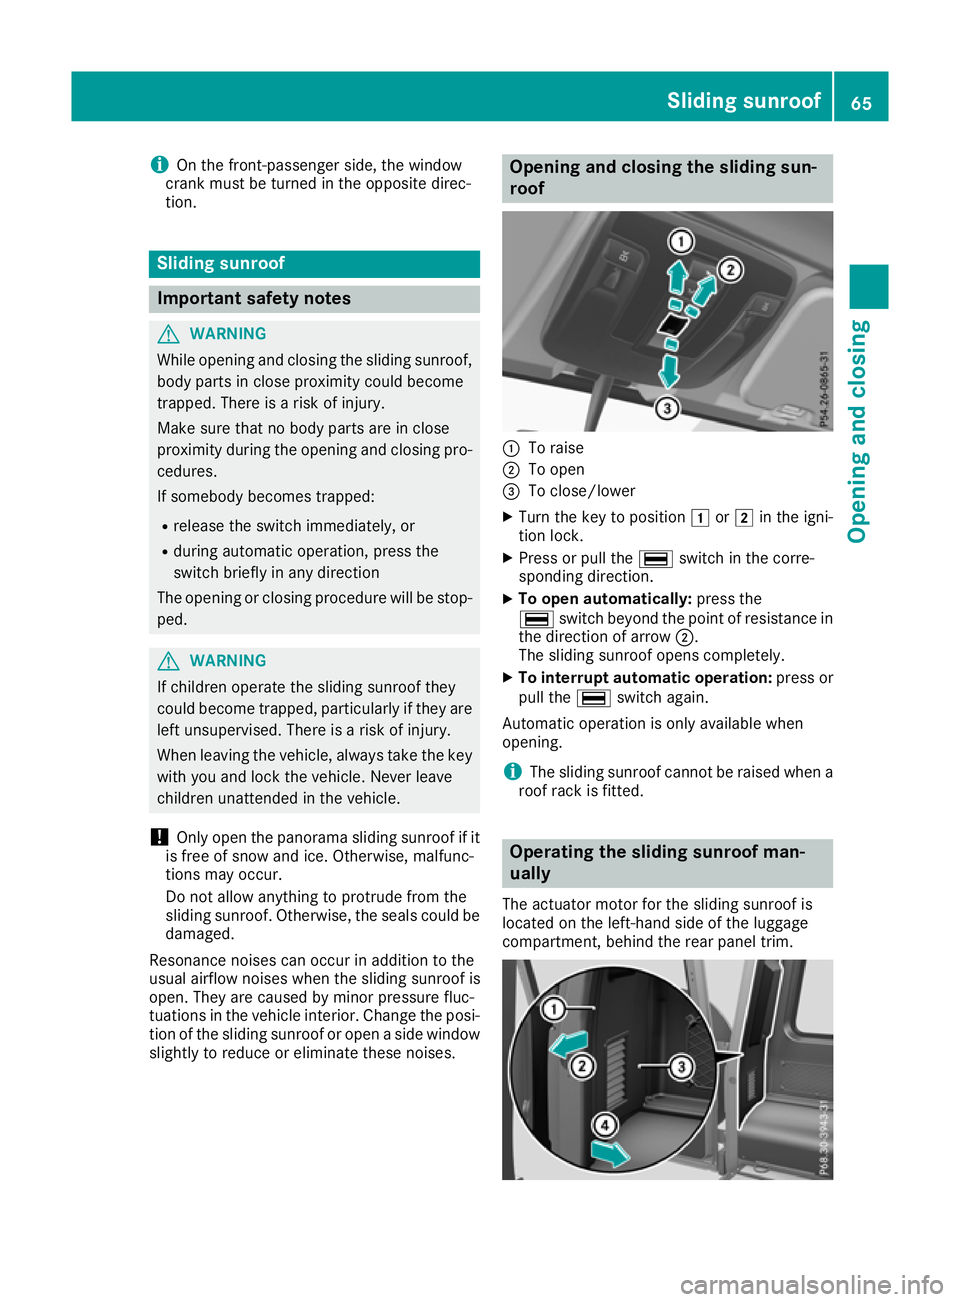
:
To raise
; To open
= To close/lower
X Turn the key to position 1or2 in the igni-
tion lock.
X Press or pull the ¡switchinthe corre-
sponding direction.
X To open automatically: press the
¡ switch beyond the point of resistanc ein
the direction of arrow ;.
The sliding sunroof opens completely.
X To interrupt automatic operation: press or
pull the ¡switch again.
Automatic operation is only availabl ewhen
opening.
i The sliding sunroof cannot be raised when a
roof rack is fitted. Operating the sliding sunroof man-
ually
The actuator motor for the sliding sunroof is
located on the left-hand side of the luggage
compartment,b ehind the rear panel trim. Sliding sunroof
65Opening and closing Z
Page 69 of 261
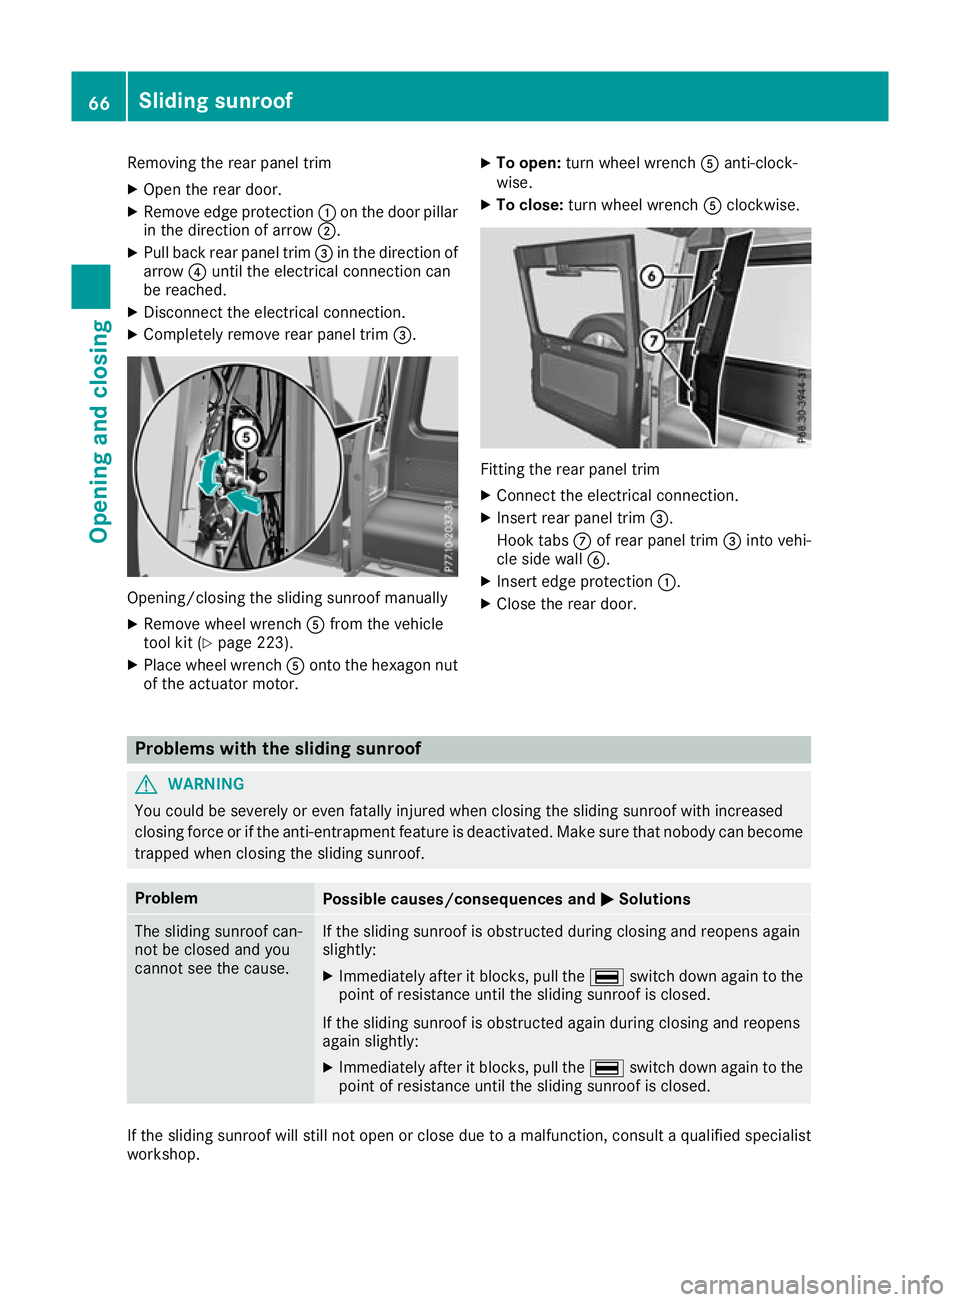
Removin
gthe rear panel trim
X Open th erear door.
X Remove edge protection :on th edoor pillar
in th edirection of arrow ;.
X Pull bac krear panel trim =in th edirection of
arrow ?until th eelectrical connection can
be reached.
X Disconnect th eelectrical connection.
X Completely remove rear panel trim =.Opening/closing the slidin
gsunroof manually
X Remove wheel wrench Afrom the vehicle
tool kit (Y page 223).
X Place wheel wrench Aonto the hexagon nut
of the actuator motor. X
To open: turnw heel wrench Aanti-clock-
wise.
X To close: turn wheelwrench Aclockwise. Fitting the rea
rpanel trim
X Connect the electrica lconnection.
X Insert rea rpanel trim =.
Hook tabs Cof rea rpanel trim =into vehi-
cle sid ewallB.
X Insert edg eprotection :.
X Close the rea rdoor. Problems wit
hthe sliding sunroof G
WARNING
You could be severely or even fatally injured when closing the sliding sunroof with increased
closing force or if the anti-entrapment feature is deactivated .Make sure that nobody can become
trappe dwhen closing the sliding sunroof. Problem
Possible causes/consequences and
M
MSolutions The sliding sunroof can-
not be close
dand you
cannot see the cause. If the sliding sunroo
fisobstructed during closing and reopens again
slightly:
X Immediately after it blocks, pullt he¡ switch down again to the
point of resistance until the sliding sunroof is closed.
If the sliding sunroof is obstructed again during closing and reopens
again slightly: X Immediately after it blocks, pullt he¡ switch down again to the
point of resistance until the sliding sunroof is closed. If the sliding sunroof wills
till not open or close due to amalfunction, consult aqualifieds pecialist
workshop. 66
Sliding sunroofOpening and closing
Page 70 of 261
Correct driver's seat position
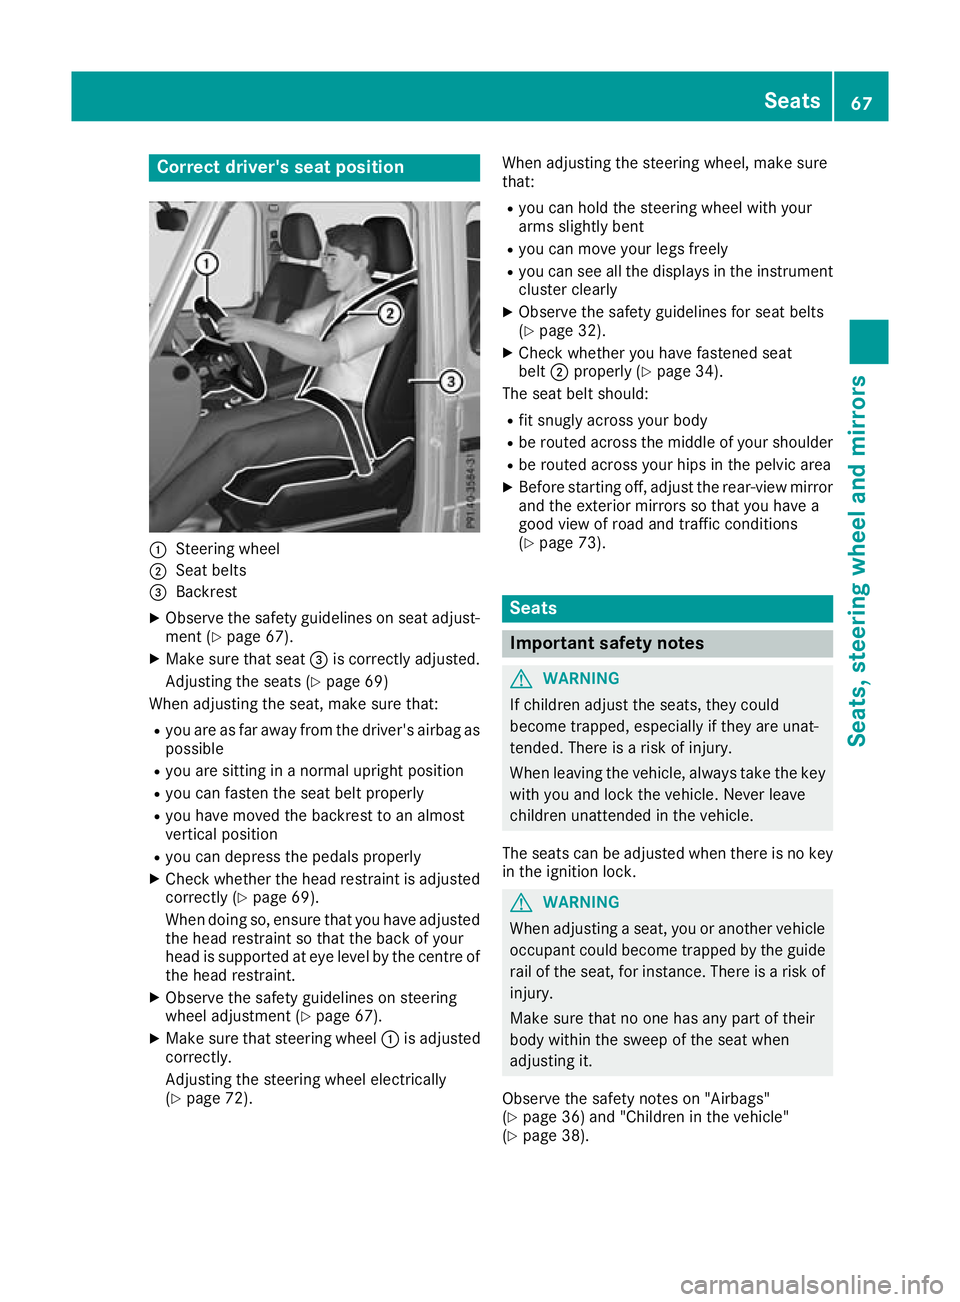
:
Steerin gwheel
; Seatbelts
= Backrest
X Observe the safety guideline sonseata djust-
ment (Y page 67).
X Make sure that seat =is correctly adjusted.
Adjusting the seats (Y page 69)
Whe nadjusting the seat, make sure that:
R youa re as far away from the driver' sairba gas
possible
R youa re sitting in anorma lupright position
R youc an fasten the sea tbeltp roperly
R youh avem ovedthe backrest to an almost
vertical position
R youc an depress the pedal sproperly
X Check whethe rthe hea drestraint is adjusted
correctly (Y page 69).
Whe ndoing so, ensure that yo uhavea djusted
the hea drestraint so that the back of your
hea diss upported at ey elev el by the centre of
the hea drestraint.
X Observe the safety guideline sonsteering
wheel adjustment (Y page 67).
X Make sure that steering wheel :is adjusted
correctly.
Adjusting the steering wheel electrically
(Y page 72). Whe
nadjustin gthe steerin gwheel, make sure
that:
R you can hold the steerin gwheel with your
arms slightly bent
R you can move your legs freely
R you can see all the displays in the instrument
cluster clearly
X Observe the safety guidelines for seat belts
(Y page 32).
X Check whether you have fastened seat
belt ;properly (Y page 34).
The seat belt should:
R fit snugly across your body
R be routed across the middle of your shoulder
R be routed across your hips in the pelvic area
X Befor estarting off, adjust the rear-view mirror
and the exterior mirrors so that you have a
good view of road and traffic conditions
(Y page 73). Seats
Important safety notes
G
WARNING
If children adjust the seats, they could
become trapped, especially if they are unat-
tended. Ther eisarisk of injury.
When leaving the vehicle, alwayst ake the key
with you and lock the vehicle. Never leave
children unattended in the vehicle.
The seats can be adjusted when there is no key
in the ignitio nlock. G
WARNING
When adjusting aseat, you or another vehicle
occupant coul dbecome trappe dbythe guide
rail of the seat, for instance. There is arisk of
injury.
Make sure that no one has any part of their
body withi nthe swee pofthe seat when
adjusting it.
Observe the safety notes on "Airbags"
(Y page3 6) and "Children in the vehicle"
(Y page3 8). Seats
67Seats,steering wheela nd mirrors Z
Page 74 of 261
even suffer burn-like injuries. There is
arisk of
injury.
Therefore, do not switch on the seat heating
repeatedly.
The red indicator lamps in the button indicate
the heating level you have selected.
X Make sure that the key is in position 1or2
in the ignition lock.
i If the batter
yvoltage is too low, the seat
heating may switch off.
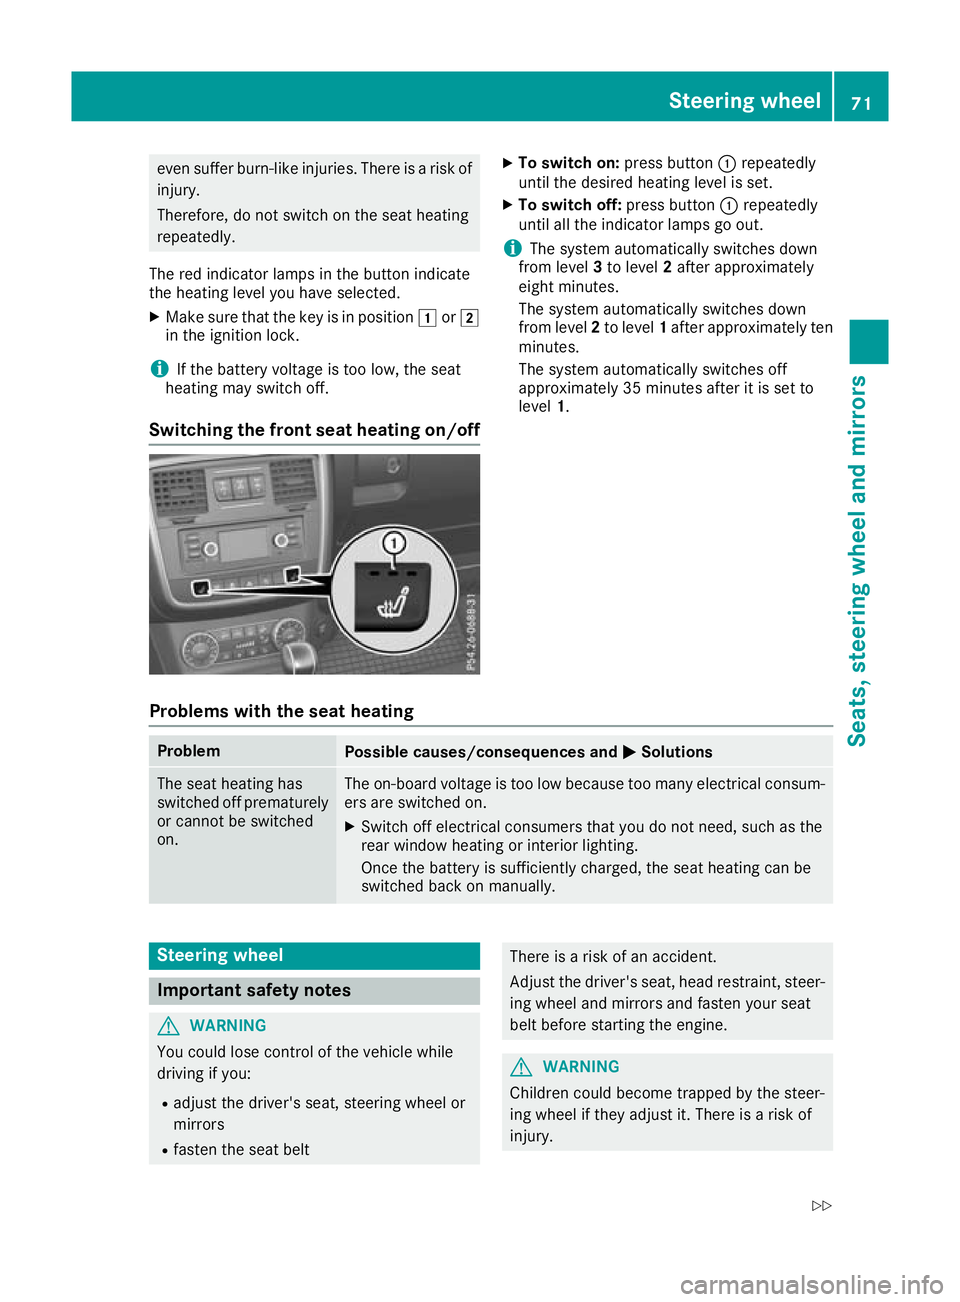
Switching the front seat heating on/off X
To switch on: press button:repeatedly
until th edesir ed heating level is set.
X To switc hoff:press button :repeatedly
unti lallthe indicator lamps go out.
i The system automaticall
yswitches down
from level 3to level 2afte rapproximately
eight minutes.
The system automaticall yswitches down
from level 2to level 1afte rapp roximatel yten
minutes.
The system automaticall yswitches off
approximatel y35minutes afte ritisset to
level 1.
Problems wit hthe seat heating Problem
Possible causes/consequences and
M MSolutions The seat heating has
switched off prematurely
or cannot be switched
on. The on-board voltage is too low because too many electrical consum-
ers are switched on.
X Switch off electrical consumers that you do not need, such as the
rear window heating or interior lighting.
Once the battery is sufficiently charged, the seat heating can be
switched back on manually. Steering wheel
Important safety notes
G
WARNING
You could lose control of the vehicle while
driving if you:
R adjust the driver's seat, steering wheel or
mirrors
R faste nthe seat belt There is
arisk of an accident.
Adjust the driver's seat, head restraint, steer- ing wheel and mirrors and fasten your seat
belt before starting the engine. G
WARNING
Children could becom etrappe dbythe steer-
ing whee lifthey adjust it. There is arisk of
injury. Steering wheel
71Seats,steering wheela nd mirrors
Z
Page 76 of 261
The last position of the steerin
gcolumn is stored
when you switch off the ignition. Mirrors
Rear-view mirror
G
WARNING
Electrolyte may escape if the glass in an auto- matic anti-dazzle mirro rbreaks. The electro-
lyte is harmfu land causes irritation. It must
not come into contact with yours kin, eyes,
respiratory organs or clothing or be swal-
lowed. There is arisk of injury.
If you come into contact with the electrolyte,
observe the following:
R Rinse off the electrolyte from yours kin
immediatel ywith water.
R Immediately rinse the electrolyte out of
youre yest horoughly with clea nwater.
R If the electrolyte is swallowed,i mmediately
rinse yourm outh out thoroughly.Don ot
induce vomiting.
R If electrolyte comes into contact with your
skin or hairoriss wallowed,seek medical
attention immediately.
R Immediately change out of clothing which
has come into contact with electrolyte.
R If an allergic reactio noccurs, seek medical
attention immediately.
X Adjust the rear-view mirror in such away that
you have agood view of road and traffic con-
ditions behind you.
The rear-view mirror automatically goes into
anti-dazzle mode if:
R the ignitio nisswitched on
R incident light from headlamps strikes the sen-
sor in the rear-view mirror
The rear-view mirror does not go into anti-dazzle
mode if reverse gearise ngaged or if the interior
lighting is switched on. Exterior mi
rrors
Adjusting th eexterio rmirror smanually X
Adjust th eexterio rmirrors in such awaythat
yo uc an get agoodo verview of roa dand traf-
fic conditions. Mirrors
73Seats, steering wheel and mirrors Z
Page 77 of 261

Exterio
rlighting General notes
For reasons of safety, Mercedes-Benz recom-
mends tha tyou drive with lights switched on
even during the daytime. In some countries,
operation of the headlampsv ariesdue to legal
requirements and voluntary recommendations. Driving abroad
Converting to sy mmetricald ipped
beam Whe
ndriving in countries where vehicles are
driven on the opposite side of the road to the
country in which the vehicle is registered, the
headlamps must be switched to symmetrical
dipped beam. This prevent soncoming traffic
from being dazzled. Symmetrical lights do not
illuminate as large an area of the edge of the
carriageway.
Have the headlamps switched at aqualified spe-
cialist workshop as close to the border as pos-
sible before driving in these countries.
Converting to asymmetrical dipped
beam after returning Hav
ethe headlamps switched back to asym-
metrica ldipped bea mataqualifiedspecialist
workshop as soon as possible after crossing the border again. Ligh
tswitch
Operation 1
W
Left-hand parkin glamps
2 X
Right-hand parking lamps 3
T
Side lamps,l icence plate and instru-
ment cluster lighting
4 Ã
Automati cheadlamp mode, controlled
by the light sensor
5 L
Dipped-beam/main-beam headlamps
B R
Rear foglamp
If yo uhearaw arning tone when yo uleave the
vehicle, the lights may stil lbeswitched on.
X Turn the light switch to the Ãposition.
The exterior lighting, excep tthe sid elam ps/
parking lamps ,switches off automaticall yifyou:
R remove the key from the ignition lock
R ope nthe driver' sdoorw itht he key in position
u in the ignition lock
Dipped-beam headlamps G
WARNING
When the light switch is set to Ã,the
dipped-beam headlamp smay not be switched
on automatically if there is fog, snow or other causes of poor visibility due to the weather
conditions such as spray. There is arisk of an
accident.
In such situations, turn the light switch to
L.
When the ignitio nisswitched on and the light
switch is in the Lposition, the side lamps
and dipped-beam headlamp sare switched on
even if the light sensor does not sense dark
ambient light conditions. This is advantageous
when there is fog or rain.
X To switch on the dipped-beam headlamps:
turn the key in the ignitio nlock to position 2
or start the engine.
X Turn the light switch to the Lposition.
The green Lindicator lamp on the instru-
ment cluster lights up.
Daytime driving lights You can set the
Daytime driving lights
Daytime driving lights
fun ction via the on-board computer
(Y page 138).
X To switch on th
edaytim edriving lights:
switc hont heDaytime driving lights
Daytime driving lights
function via the on-board computer. 74
Exterior lightingLights and windscreen wipers
Page 78 of 261
Automati
cheadlamp mode G
WARNING
When th elight switch is set to Ã,the
dipped-beam headlamps may not be switched on automatically if there is fog, snow or othercauses of poor visibility due to the weather
conditions such as spray. There is arisk of an
accident.
In such situations, turn the light switch to
L.
The automatic headlamp feature is only an aid.
The drive risresponsibl efor the vehicl elighting
at all times.
à is the preferre dlight switch position.
The light setting is automatically selected
according to the brightness of the ambient light,
but not in the event of poor visibility due to
weather conditions such as fog, snow or spray.
X To switch on the automatic headlamps:
turn the light switch to the Ãposition.
With the key in position 1in the ignitio nlock,
the side lamp sare switched on or off auto-
matically depending on the brightness of the
ambient light.
If you have switched on the Daytime driv‐ Daytime driv‐
ing lights
ing lights functionvia the on-board com-
puter, the daytime driving lights or the side
lamps and dipped-beam headlamps will
switch on or off automaticallyw hile the
engine is running.
When the dipped-beam headlamps are
switched on, the green Lindicator lamp in
the instrument cluster lights up. Rear foglamp
The rear fog lamp improves the visibility of your vehicle for the traffic behind in the event of
heavy fog. You must observe the legal require-
ment sfor the country in which yo uare currently
driving when operating the rea rfog lamp.
X To switc honthe rear fog lamp: turn the key
in the ignition lock to position 2or star tthe
engine.
X Turn the light switch to the Lposition.
X Press the Rbutton.
The yellow Rindicator lamp on the instru-
ment cluster lights up. Sid
elamps
! When the battery is discharged heavily,t
he
side lamps or parking lamps are automatically
switched off to facilitate an engine start.
Always park your vehicle safely and in awell lit
area, in accordance with the relevant legal
stipulations. Avoid using the Tside lamps
for periods lasting several hours. Where pos-
sible, switch on the right Xor left W
parking lamp.
X To switch on: turn the light switch to the
T position.
The green Tindicator lamp on the instru-
ment cluster lights up. Parking lamps
Switching on the parking lamps ensures that the
correspondin gside of the vehicle is illuminated.
X To switch on the parking lamp: turn the key
to position uin the ignition lock or remove
the key.
X Turn the light switch to the W(left-hand
side of the vehicle) or X(right-hand side of
the vehicle) position. Headlamp cleaning system
The headlamps are cleaned automatically if the
"Wipe with washer fluid" function is operated
ten times (Y page 81) while the lights are on
and the engin eisrunning. When you switch off
the ignition, the automatic headlamp cleaning
system is reset and counting is resumed from 0. Exterior lighting
75Lightsand windscreen wipers Z