2016 MERCEDES-BENZ G-CLASS SUV headlamp
[x] Cancel search: headlampPage 78 of 261
Automati
cheadlamp mode G
WARNING
When th elight switch is set to Ã,the
dipped-beam headlamps may not be switched on automatically if there is fog, snow or othercauses of poor visibility due to the weather
conditions such as spray. There is arisk of an
accident.
In such situations, turn the light switch to
L.
The automatic headlamp feature is only an aid.
The drive risresponsibl efor the vehicl elighting
at all times.
à is the preferre dlight switch position.
The light setting is automatically selected
according to the brightness of the ambient light,
but not in the event of poor visibility due to
weather conditions such as fog, snow or spray.
X To switch on the automatic headlamps:
turn the light switch to the Ãposition.
With the key in position 1in the ignitio nlock,
the side lamp sare switched on or off auto-
matically depending on the brightness of the
ambient light.
If you have switched on the Daytime driv‐ Daytime driv‐
ing lights
ing lights functionvia the on-board com-
puter, the daytime driving lights or the side
lamps and dipped-beam headlamps will
switch on or off automaticallyw hile the
engine is running.
When the dipped-beam headlamps are
switched on, the green Lindicator lamp in
the instrument cluster lights up. Rear foglamp
The rear fog lamp improves the visibility of your vehicle for the traffic behind in the event of
heavy fog. You must observe the legal require-
ment sfor the country in which yo uare currently
driving when operating the rea rfog lamp.
X To switc honthe rear fog lamp: turn the key
in the ignition lock to position 2or star tthe
engine.
X Turn the light switch to the Lposition.
X Press the Rbutton.
The yellow Rindicator lamp on the instru-
ment cluster lights up. Sid
elamps
! When the battery is discharged heavily,t
he
side lamps or parking lamps are automatically
switched off to facilitate an engine start.
Always park your vehicle safely and in awell lit
area, in accordance with the relevant legal
stipulations. Avoid using the Tside lamps
for periods lasting several hours. Where pos-
sible, switch on the right Xor left W
parking lamp.
X To switch on: turn the light switch to the
T position.
The green Tindicator lamp on the instru-
ment cluster lights up. Parking lamps
Switching on the parking lamps ensures that the
correspondin gside of the vehicle is illuminated.
X To switch on the parking lamp: turn the key
to position uin the ignition lock or remove
the key.
X Turn the light switch to the W(left-hand
side of the vehicle) or X(right-hand side of
the vehicle) position. Headlamp cleaning system
The headlamps are cleaned automatically if the
"Wipe with washer fluid" function is operated
ten times (Y page 81) while the lights are on
and the engin eisrunning. When you switch off
the ignition, the automatic headlamp cleaning
system is reset and counting is resumed from 0. Exterior lighting
75Lightsand windscreen wipers Z
Page 79 of 261
Combination switch
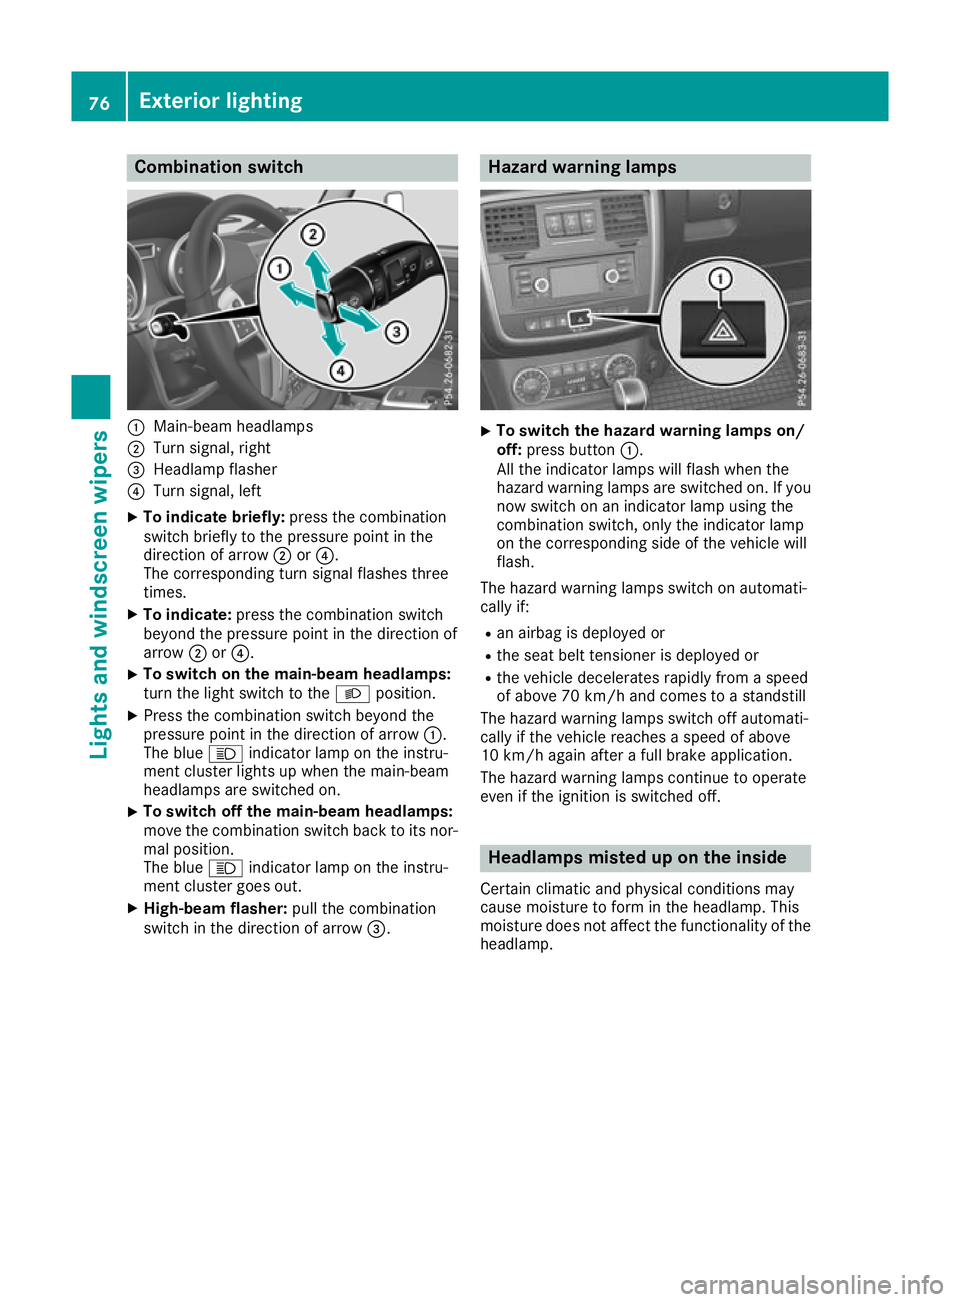
:
Main-beam headlamps
; Turnsignal, right
= Headlamp flasher
? Turn signal, left
X To indicate briefly: press the combination
switch briefly to the pressure point in the
direction of arrow ;or?.
The corresponding turn signal flashes three
times.
X To indicate: press the combination switch
beyond the pressure point in the direction of
arrow ;or?.
X To switch on the main-beam headlamps:
turn the light switch to the
Lposition.
X Press the combination switch beyond the
pressure point in the direction of arrow :.
The blue Kindicator lamp on the instru-
ment cluster lights up when the main-beam
headlamps are switched on.
X To switch off the main-beam headlamps:
move the combination switch back to its nor-
mal position.
The blue Kindicator lamp on the instru-
ment cluster goes out.
X High-beam flasher: pull the combination
switch in the direction of arrow =. Hazard warning lamps
X
To switch the hazard warning lamps on/
off: press button :.
All the indicator lamps will flash when the
hazard warnin glam ps are switched on. If you
now switch on an indicator lamp using the
combinatio nswitch ,onlyt he indicator lamp
on the corresponding side of the vehicl ewill
flash.
The hazard warning lamps switch on automati-
cally if: R an airba gisdeploye dor
R the sea tbeltt ensioner is deployed or
R the vehicl edecelerates rapidly from aspeed
of above 70 km/h and come stoastandstill
The hazard warning lamps switch off automati-
cally if the vehicl ereache saspeed of above
10 km/h agai nafteraf ullb rake application.
The hazard warning lamps continue to operate
eve nift he ignition is switched off. Headlamps miste
duponthe inside
Certain climatic and physical conditions may
caus emoisture to form in the headlamp. This
moisture does not affect the functionality of the headlamp. 76
Exterior lightingLigh
tsand windscreen wipers
Page 82 of 261
the xeno
nbulbs carrie doutataq uali fied spe-
cialist workshop. G
WARNING
Bulbs, lamp sand plugc onnectors can
become very hot during use. When replacing a bulb, you coul dburn yourself on these com-
ponents. There is arisk of injury.
Allow these components to cool downb efore
replacing the bulb.
Do not use abulbifith as been dropped or if its
glass has been scratched.
The bulbm ay explode if:
R you touch it
R it is hot
R you drop it
R you scratch it
Use bulbs only in closed lamp sthat have been
designed for this purpose. Fit only spar ebulbs of
the same type and the specified voltage.
Marks on the glass reduce the service life of the bulbs. Do not touch the glass tube with your
bare hands. If necessary, clea nthe glass tube
when cold with alcohol or spiri tand rub it off
with alint-free cloth.
Protect bulbs from moisture during operation.
Do not allow bulbs to come into contact with
liquids.
Xeno nbulbs and LED modules: you cannot
replace xenon bulbs or LED modules yourself.
Have the following bulbs replaced at aqualified
specialist workshop:
R third brake lamp
R side lamps/parking lamp s(front)
R main-beam/dipped-beam headlamps (xenon
headlamps)
R daytime driving lights
R licence plate lamp
i Individuals
egments of the licence plate
lamp LEDs may fail without adisplay message
appearing in the multifunction display.R egu-
larl ycheck the licence plate lighting. If nec-
essary, visit aqualified specialist workshop.
You can replace the following bulbs: R turn signa llamp (front)
R brake/tai llamp
R turn signa llamp (rear) R
tail lamp/parking lamp
R reversing light
R rear foglamp
Replace only the bulb sliste d( Ypage 79).
Hav ethe bulb stha tyou cannot change yourself
replaced at aquali fied specialis tworkshop.
If yo urequire assistance replacing bulbs, con-
sult aquali fied specialis tworkshop.
If the new bulb still does not light up ,consul ta
qualified specialis tworkshop.
Headlamps and lights ar eanimportant aspect of
vehicl esafety .You must therefore make sure
tha tthese functio ncorrectl yatalltimes .Have
the headlamp setting verified regularly. Overview of bulb types
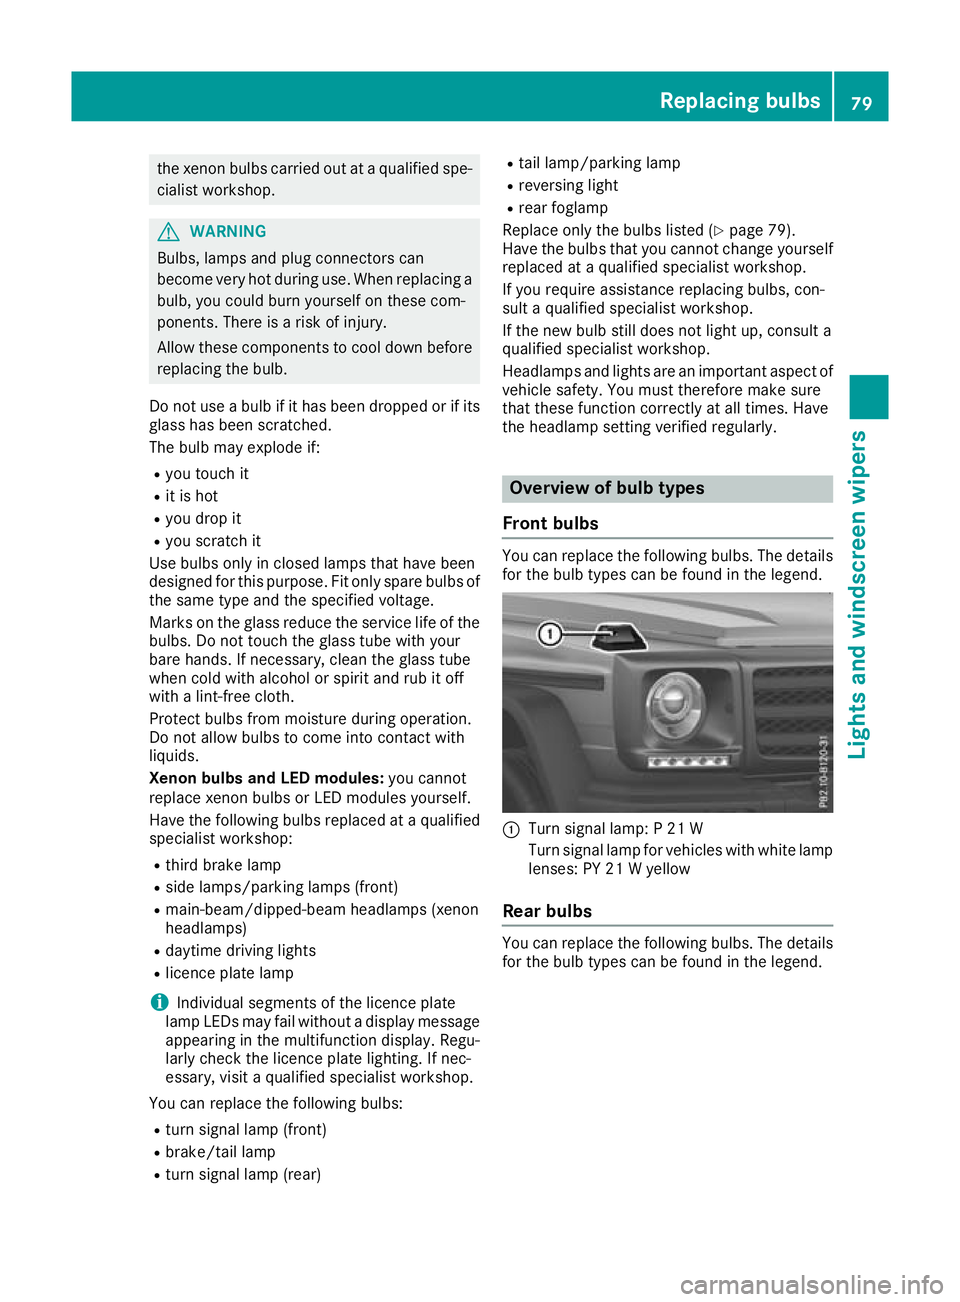
Fron tbulbs You can replace the following bulbs. The details
for the bulb types can be found in the legend. :
Turn signal lamp: P21W
Turn signal lamp for vehicles with white lamp lenses: PY 21 Wyellow
Rear bulbs You can replace the following
bulbs. The details
for the bulb types can be foun dinthe legend. Replacing bulbs
79Lights and windscreen wipers Z
Page 123 of 261
Observe the following notes:
R stop the vehicle before you drive off-road and,
if necessary, shift the transfer case to the
LOW RANGE off-road driving position
(Y page 124)
R engage the differential locks if necessary
(Y page 126)
i ABS,4
ETS, ESP ®
and BAS are deactivated
while the differential locks are engaged. This
allowst he front wheels to lock briefly, so that
they can dig into aloose surface. However,
please note that locked wheels skid and can
no longer steer.
R Make sure that items of luggage and loads are
stowed safely and are well secured
(Y page 203).
R To avoid damaging the vehicle, make sure
there is always sufficient ground clearance.
R Alwaysk eep the engine running and in gear
when driving on adownhill gradient.
R Alwaysk eep the engine running and in gear
when driving on aslope.
R Drive slowly and evenly, if necessary at walk-
ing pace.
R Ensure that the wheels are in contact with the
ground at all times.
R Drive with extreme care on unknown off-road
routes where visibility is poor. For safety rea- sons, get out of the vehicle first and survey
the off-road route.
R Check the depth of water before fording rivers
and streams.
R Watch out for obstacles.
R Alwaysk eep the doors, the rear door, the side
windows and the sliding sunroof closed while
the vehicle is in motion.
R Do not deviate from marked routes.
R Match your speed to the terrain. The rougher,
steeper or more ruts on the terrain, the slower your speed should be.
R Do not jump with the vehicle. This will inter-
rupt the vehicle's propulsion.
R Avoid high engine speeds. Drive at appropri-
ate engine speeds.
R Alwaysc heck the vehicle for damage after off-
road driving.
Do not use the HOLD function when driving off- road, on steep uphillord ownhill gradients or on
slippery or loose surfaces. The HOLD function
cannot hold the vehicle on such surfaces. You can obtain further information aboutr
etro-
fittin gspecial all-terrain tyres from aqualified
specialis tworkshop.
Checklist before off-roa ddriving X
Engine oil level: check the engine oil and top
it up if necessary.
When driving on steep gradients, the oil level must be sufficiently high to ensure acorrect
oil supply in th evehicle.
X Hav ethe AdBlue ®
level checked at aqualified
specialist workshop (Y page 111).
X Tyre-change tool kit: check that thejackis
working and mak esure that th ewheel
wrench, arobus ttow cable and afolding
spade are in th evehicle.
X Wheels and tyres: check thetyret read
dept hand tyr epressure.
X Chec kfor damage and remove any foreign
objects, e.g .small stones, fro mthewheels/
tyres.
X Replace any missing valv ecaps.
X Replace dented or damage dwheels .Also
check th espare wheel.
X Wheels: dented or ben twheels can lead to a
loss of tyr epressure and damage to th etyre
bead. Before driving off-road, check the
wheels and replac ethemifn ecessary.
Checklist after off-roa ddriving !
If you detect damage to the vehicl
eafter
driving off-road, have the vehicle checked
immediately at aqualified specialist work-
shop.
Driving over rough terrain places greater
demands on your vehicle than driving on normal
roads. After driving off-road, check the vehicle.
This allowsy ou to detect damage promptly and
reduce the risk of an accident to yourselfa nd
other road users.
X Shift the transfer case to the on-road position
HIGH RANGE (Ypage 124).
X Disengage the differential locks
(Y page 127).
X Cleant he headlamps and rear lights and
check for damage.
X Cleant he front and rear licence plates.
X Cleant he wheels and tyres with awater jet
and remove any foreign objects. 120
Drivingt
ipsDriving and parking
Page 142 of 261
i
Depending on your vehicle's equipment,
when the surround lighting and exterio rlight-
ing delaye dswitch-off ar eon, the following
light up:
R side lamps
R dipped-beam headlamps
Switchin gthe interior lighting delayed
switch-off on/off
If yo uactivate the Lighting
Lighting delayed
delayedsw.-off
sw.-off
function, the interio rlighting remains on for
20 second safter yo uremove the key fro mthe
ignition lock.
X Press the =or; button on the steering
whee ltoselect theSettings
Settings menu.
X Press the :or9 button to select the
Lights
Lights submenu.
X Press ato confirm.
X Press the :or9 button to select the
Lighting delaye dsw.-off
Lighting delayed sw.-off function.
If the Lighting delayed sw.-off
Lighting delayed sw.-off function
has been activated, the vehicle interior is dis-
played in red in the multifunction display.
X Press ato save the setting.
Vehicle Activating/deactivating the automatic
locking feature
If you activate the Automatic door locks Automatic door locks
function, the vehicle is centrallyl ockedabov ea
spee dofa pproximately 15 km/h.
X Press the =or; buttononthesteering
whee ltos elect the Settings
Settings menu.
X Press the :or9 buttontos elect the
Vehicle
Vehicle submenu.
X Press ato confirm.
X Press the :or9 button to select the
Automatic doo rlocks
Automatic door locks function.
When the Automatic
Automatic door
doorlocks
locks function is
activated, the vehicle doors are displayed in
red in the multifunction display.
X Press ato save the setting.
For further information on the automatic locking
feature; see (Y page 62). Activating/deactivating the acoustic
locking confirmation
If you swi tchont heAcoustic Acoustic Lock
Lockfunction ,an
acoustic signal sounds when you loc kthe vehi-
cle.
X Press the =or; buttononthesteering
whee ltos elect the Settings
Settings menu.
X Press the :or9 buttontos elect the
Vehicle
Vehicle submenu.
X Press ato confirm.
X Press the :or9 button to select the
Acoustic Lock
Acoustic Lock function.
If the Acoustic Lock
Acoustic Lock function is activated,
the & symbol in the multifunctio ndisplay
lights up red.
X Press ato save the setting.
Heating Auxiliary heating departure time
G
DAN
GER
If th eexhaust pipe is blocke dorsufficient
ventilation is no tpossible, toxic exhaust
fumes can ente rthe vehicle, especially car-
bon monoxide. This is th ecase, e.g. in
enclosed spaces, or if th evehicl eiss tuck in
snow. There is ariskoff atal injuries.
You should switch off th eauxiliary heating in
enclosed spaces whic hdonothav eane xtrac-
tion system, e.g. agarage. If th evehicl eis
stuck in snow and you mus tleav ethe auxiliary
heating running, keep th eexhaust pipe and
th ea rea around th evehicl eclear of snow. To
guarantee asufficien tsupply of fresh air, open
aw indow on th eside of th evehicl eaway from
th ew ind. G
WARNING
When th eauxiliary heating is switched on,
parts of the vehicl ecan become very hot.
Flammable materials such as leaves, grass or twigs may ignite if they come into contact
with:
R hot parts of the exhaust system
R the exhaust gas itself
There is arisk of fire. Menus and submenus
139On-boardcomputer and displays
Z
Page 211 of 261
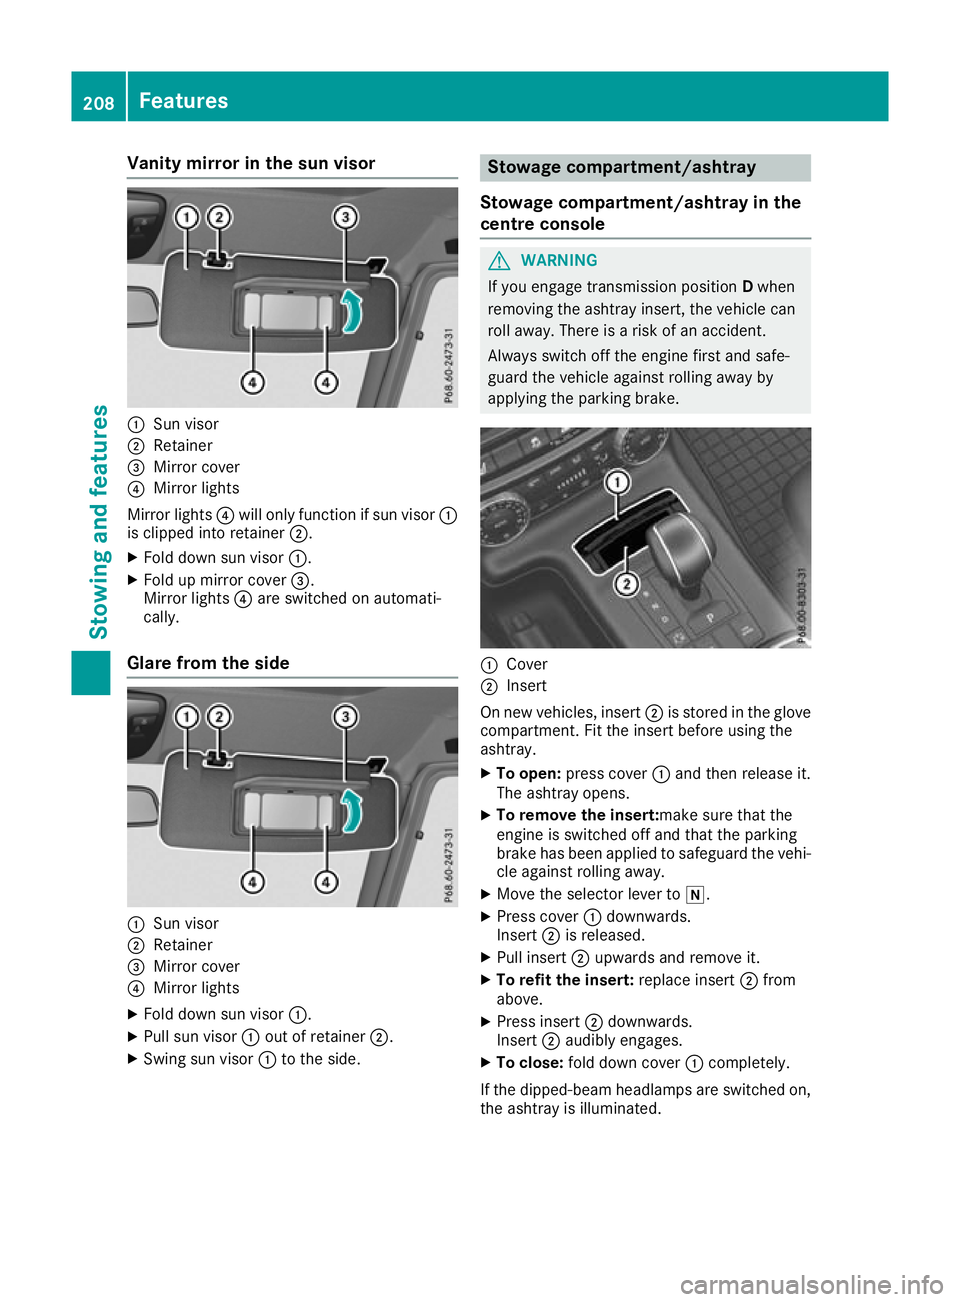
Vanity mirro
rint he sun visor :
Sun visor
; Retainer
= Mirror cover
? Mirror lights
Mirror lights ?will only function if su nvisor :
is clippe dinto retainer ;.
X Fol dd owns un visor :.
X Fol dupm irror cover =.
Mirror lights ?are switched on automati-
cally.
Glare from the side :
Sun visor
; Retainer
= Mirror cover
? Mirror lights
X Fol dd owns un visor :.
X Pull su nvisor :outofr etainer ;.
X Swing su nvisor :to the side. Stowag
ecompartment/ashtray
Stowage compartment/ashtray in the
centre console G
WARNING
If you engage transmission position Dwhen
removing the ashtray insert, the vehicle can
roll away. There is arisk of an accident.
Always switch off the engine first and safe-
guard the vehicl eagainst rolling awayby
applying the parking brake. :
Cover
; Insert
On new vehicles, insert ;is stored in the glove
compartment. Fi tthe insert before usin gthe
ashtray.
X To open: press cover :and then release it.
The ashtray opens.
X To remove th einsert:ma ke sure that the
engin eisswitched off and that th eparking
brak ehas been applied to safeguard th evehi-
cle against rolling away.
X Mov ethe selector leve rtoi.
X Press cover :downwards.
Insert ;is released.
X Pull insert ;upward sand remove it.
X To refit th einsert: replace insert ;from
above.
X Press insert ;downwards.
Insert ;audibly engages.
X To close: fold down cover :completely.
If th edipped-beam headlamps are switched on,
th ea shtray is illuminated. 208
Featu
resStowing and features
Page 218 of 261
Allow an overheating engine to coo
ldown
before opening the bonnet. If ther eisafirein
the engine compartment, leav ethe bonnet
closed and notify the fir ebrigade.
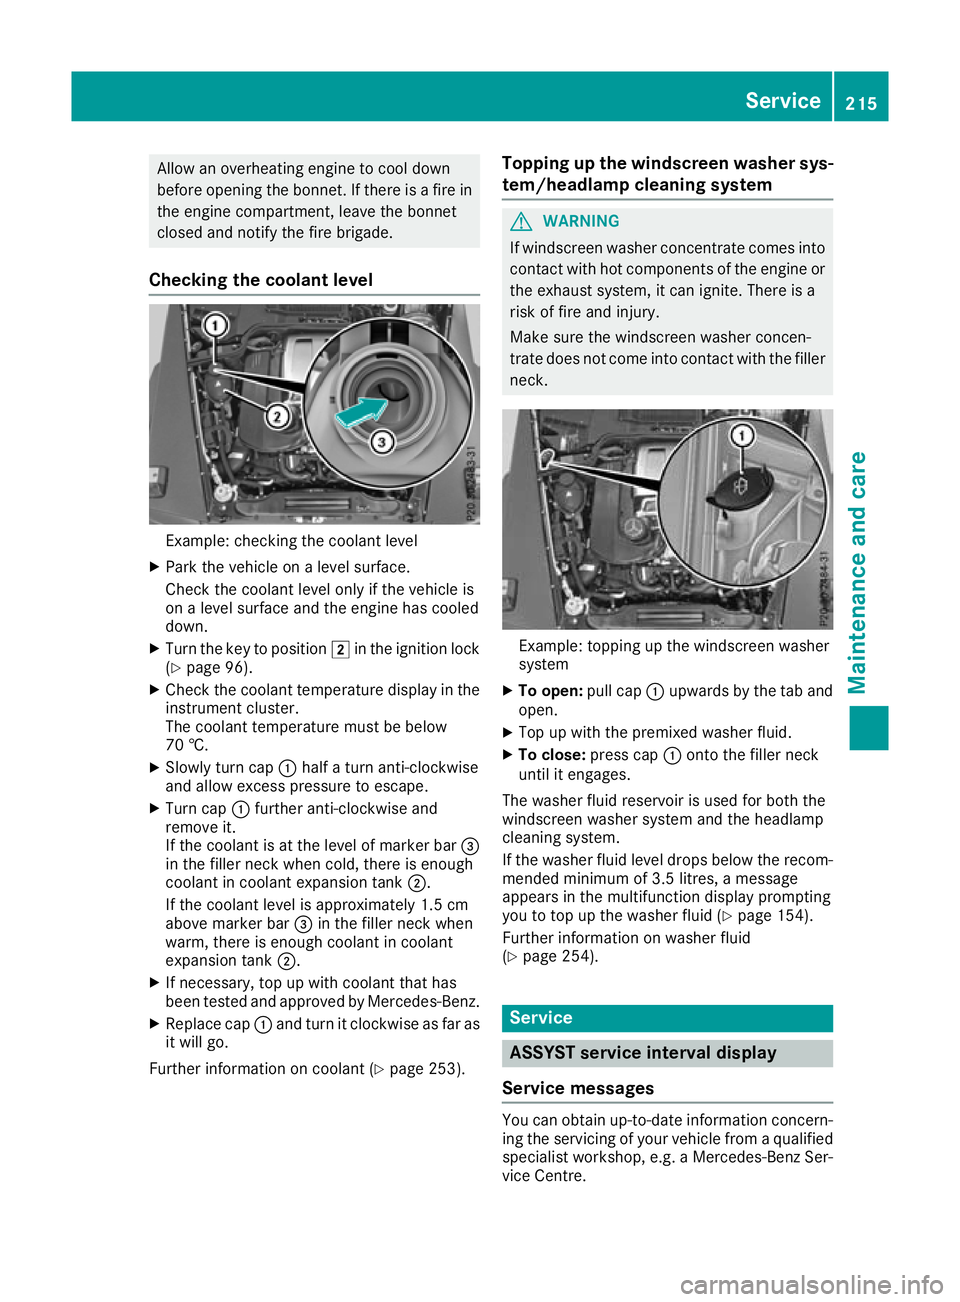
Checkin gthe coolant level Example: checking the coolant level
X Park the vehicl eonalevel surface.
Check the coolant level onl yifthe vehicl eis
on alevel surface and the engine ha scooled
down.
X Turn the key to position 2in the ignition lock
(Y page 96).
X Check the coolant temperatur edisplay in the
instrument cluster.
The coolant temperatur emustbeb elow
70 †.
X Slowl yturnc ap : half aturna nti-clockwise
and allo wexcess pressure to escape.
X Turn cap :furthe ranti-clockwise and
remove it.
If the coolant is at the level of marker bar =
in the fille rneck when cold, there is enough
coolant in coolant expansio ntank ;.
If the coolant level is approximately 1.5 cm
above marker bar =in the fille rneck when
warm, there is enoug hcoolant in coolant
expansio ntank ;.
X If necessary ,top up with coolant tha thas
been teste dand approved by Mercedes-Benz.
X Replace cap :and tur nitclockwise as fa ras
it will go.
Furthe rinformatio noncoolant (Y page 253). Topping up the windscreen washe
rsys-
tem/headlamp cleanin gsystem G
WARNING
If wind screen washer concentrate comes into
contact with hot components of the engine or
the exhaust system, it can ignite. There is a
risk of fire and injury.
Make sure the windscreen washer concen-
trate does not come into contact with the filler neck. Example: topping up the windscreen washer
system
X To open: pull cap:upwards by the tab and
open.
X Top up with the premixed washe rfluid.
X To close: press cap :onto the fille rneck
unti lite ngages.
The washe rfluid reservoi risusedf or both the
windscree nwashe rs ystem and the headlamp
cleaning system.
If the washe rfluid level drops belo wthe recom-
mended minimu mof3.5 litres ,amessage
appear sinthe multifunctio ndisplay prompting
yo utot op up the washe rfluid (Y page 154).
Furthe rinformatio nonwashe rfluid
(Y page 254). Service
ASSYST service interval display
Service messages Yo
uc an obtain up-to-dat einformation concern-
ing the servicin gofyour vehicle from aqualified
specialis tworkshop, e.g. aMercedes-Ben zSer-
vice Centre. Service
215Maintenance and care Z
Page 257 of 261

The antifreeze/corrosion inhibitor concentra-
tion in the engine cooling system should:
R be at least 50%. This will protec tthe engine
cooling system against freezin gdown to
approximately -37 †.
R not exceed 55% (antifreez eprotection down
to -45 †). Heat will otherwise not be dissipa-
ted as effectively.
Mercedes-Benz recommends an antifreeze/
corrosion inhibitor in accordanc ewith MB Spec-
ifications for Servic eProducts 310.1.
i When the vehicle is first delivered, it is filled
with acoolant mixture that ensures adequate
antifreeze and corrosion protection.
i The coolant is checked at specified intervals
at aq ualified specialist workshop. Windscreen and headlamp cleaning
system
Importants afety notes G
WARNING
If windscreen washer concentrate comes into contact with hot components of the engine or
the exhaust system, it can ignite. There is a
risk of fire and injury.
Make sure the windscreen washer concen-
trate does not come into contact with the filler neck.
! Do not use distille
dorde-ionised water in
the washer flui dreservoir. Otherwise, the
leve lsensor may be damaged.
! Only the washer fluids SummerFi
tand Win-
terFit can be mixed. Otherwise, the spraying
nozzles coul dbecome blocked.
Do not use distilledord e-ionised water.Other-
wise, the leve lsensor may give afalser eading.
When handling washer fluid, observe the impor- tant safety notes on service products
(Y page2 50).
At temperatures above freezing:
X Fill the washer flui dreservoir with amixture of
water and washer fluid, e.g. MB SummerFit.
Mix 1part MB SummerFi tto100 parts water. At temperatures belo
wfreezing:
X Fillthe washe rfluid reservoi rwitham ixture of
water and washe rfluid ,e.g.MBW interFit.
For the correct mixing ratio ,refer to the infor-
matio nont he antifreeze reservoir.
i Add washe
rfluid concentrate ,e.g.MBS um-
merFit or MB WinterFit, to the washe rfluid all
year round. Vehicl
edata General notes
Please note that for the specified vehicle data:
R the heig htss pecified may vary as aresulto f:
- tyres
- load
- condition of the suspension
- items of optional equipment
R items of optional equipment reduce the max-
imum payload
R vehicle-specific weight information can be
found on the vehicle identification plate
(Y page 249)
R onlyf or certain countries: you can find vehi-
cle-specific vehicle data in the COC docu-
ments (CERTIFICATE OF CONFORMITY).
These documents are delivered with your
vehicle. Dimensions and weights254
Vehicle dataTechnical data