2016 MERCEDES-BENZ G-Class key
[x] Cancel search: keyPage 70 of 302
Closing
XPush the rear door closed from outside the
vehicle.
XIf necessary, lock the vehicle with the&
button on the SmartKey.
Side windows
Important safety notes
GWARNING
While closing the side windows, body parts in
the closing area could become trapped. There is a risk of injury.
When closing make sure that no parts of the
body are in the closing area. If somebody
becomes trapped, release the switch or press
the switch to open the side window again.
GWARNING
While opening the side windows, body parts
could become trapped between the side win-
dow and the door frame as the side window
moves. There is a risk of injury.
Make sure that nobody touches the side win-
dow during the opening procedure. If some-
body becomes trapped, release the switch or
pull the switch to close the side window again.
Opening and closing the side win-
dows
The switches for all side windows are located on
the driver's door. There is also a switch on each
door for the corresponding side window.
The switches on the driver's door take prece-
dence.
The side windows cannot be operated from the
rear when the override feature for the side win-
dows is activated (
Ypage 54).
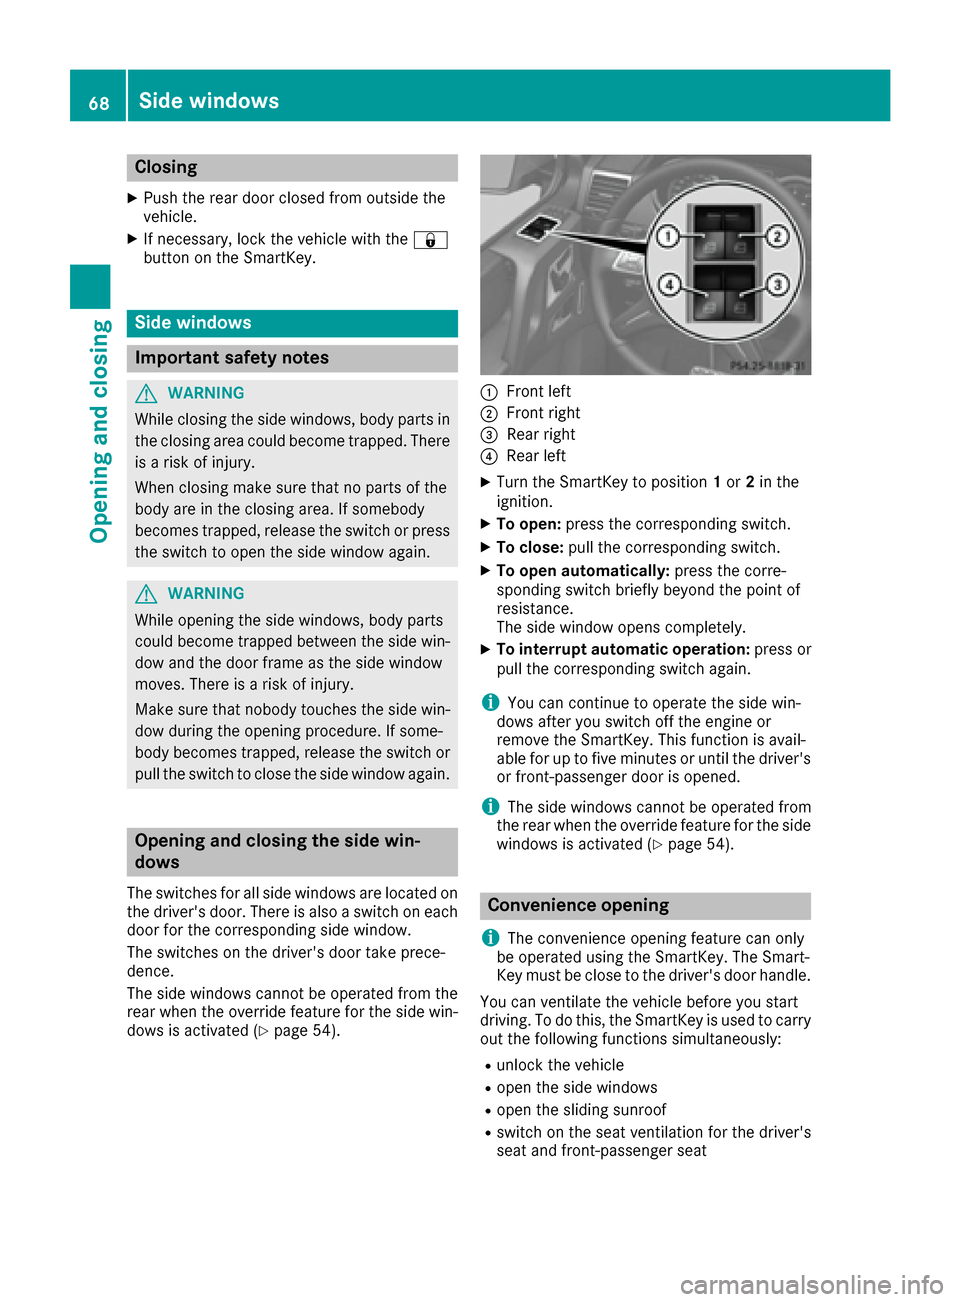
:Front left
;Front right
=Rear right
?Rear left
XTurn the SmartKey to position 1or 2in the
ignition.
XTo open: press the corresponding switch.
XTo close: pull the corresponding switch.
XTo open automatically: press the corre-
sponding switch briefly beyond the point of
resistance.
The side window opens completely.
XTo interrupt automatic operation: press or
pull the corresponding switch again.
iYou can continue to operate the side win-
dows after you switch off the engine or
remove the SmartKey. This function is avail-
able for up to five minutes or until the driver's
or front-passenger door is opened.
iThe side windows cannot be operated from
the rear when the override feature for the side windows is activated (
Ypage 54).
Convenience opening
i
The convenience opening feature can only
be operated using the SmartKey. The Smart-
Key must be close to the driver's door handle.
You can ventilate the vehicle before you start
driving. To do this, the SmartKey is used to carry
out the following functions simultaneously:
Runlock the vehicle
Ropen the side windows
Ropen the sliding sunroof
Rswitch on the seat ventilation for the driver's
seat and front-passenger seat
68Side windows
Opening and closing
Page 71 of 302
XPoint the tip of the SmartKey at the driver's
door handle.
XPress and hold the%button until the side
windows and the sliding sunroof are in the
desired position.
XTo interrupt convenience opening: release
the % button.
Convenience closing feature
Important safety notes
GWARNING
When the convenience closing feature is oper- ating, parts of the body could become trapped
in the closing area of the side window and the
sliding sunroof. There is a risk of injury.
Observe the complete closing procedure
when the convenience closing feature is oper-
ating. Make sure that no body parts are in
close proximity during the closing procedure.
Operation
iThe "convenience closing feature" can only
be operated using the key. The SmartKey
must be close to the driver's door handle.
When you lock the vehicle, you can simultane-
ously:
Rclose the side windows
Rclose the sliding sunroof
XPoint the tip of the SmartKey at the driver's
door handle.
XPress and hold the &button until the side
windows and the sliding sunroof are fully
closed.
XMake sure that all the side windows and the
sliding sunroof are closed.
XTo interrupt convenience closing: release
the & button.
Problems with the side windows
GWARNING
Closing the side windows with increased force
or without the anti-entrapment feature could
lead to serious or even fatal injury. Make sure
that nobody can become trapped when clos-
ing the side windows.
Problem: a side window cannot be closed
because objects are trapped between the
side window and the door frame.
XRemove the objects.
XClose the side window.
Problem: a side window cannot be closed
and you cannot see the cause.
If a side window is obstructed during closing and
reopens again slightly:
XImmediately after the window blocks, pull the
corresponding switch again until the side win-
dow has closed.
If a side window is obstructed again during clos-
ing and reopens again slightly:
XImmediately after the window blocks, pull the
corresponding switch again until the side win-
dow has closed.
iIf a side window no longer opens or closes
due to a malfunction, contact a qualified spe-
cialist workshop.
Sliding sunroof
Important safety notes
!
Only open the sliding sunroof if it is free of
snow and ice. Otherwise, malfunctions may
occur.
Do not allow anything to protrude from the
sliding sunroof. Otherwise, the seals could be
damaged.
!If the sliding sunroof still cannot be opened
or closed as a result of a malfunction, contact
a qualified specialist workshop.
!The weather can change abruptly. It could
start to rain or snow. Make sure that the slid- ing sunroof is closed when you leave the vehi-
cle. The vehicle electronics can be damaged if
water enters the vehicle interior.
iResonance noises can occur in addition to
the usual airflow noises when the sliding sun- roof is open. They are caused by minor pres-
sure fluctuations in the vehicle interior.
Change the position of the sliding sunroof or
open a side window slightly to reduce or elim-
inate these noises.
Sliding sunroof69
Opening and closing
Z
Page 72 of 302
Opening and closing the sliding sun-
roof
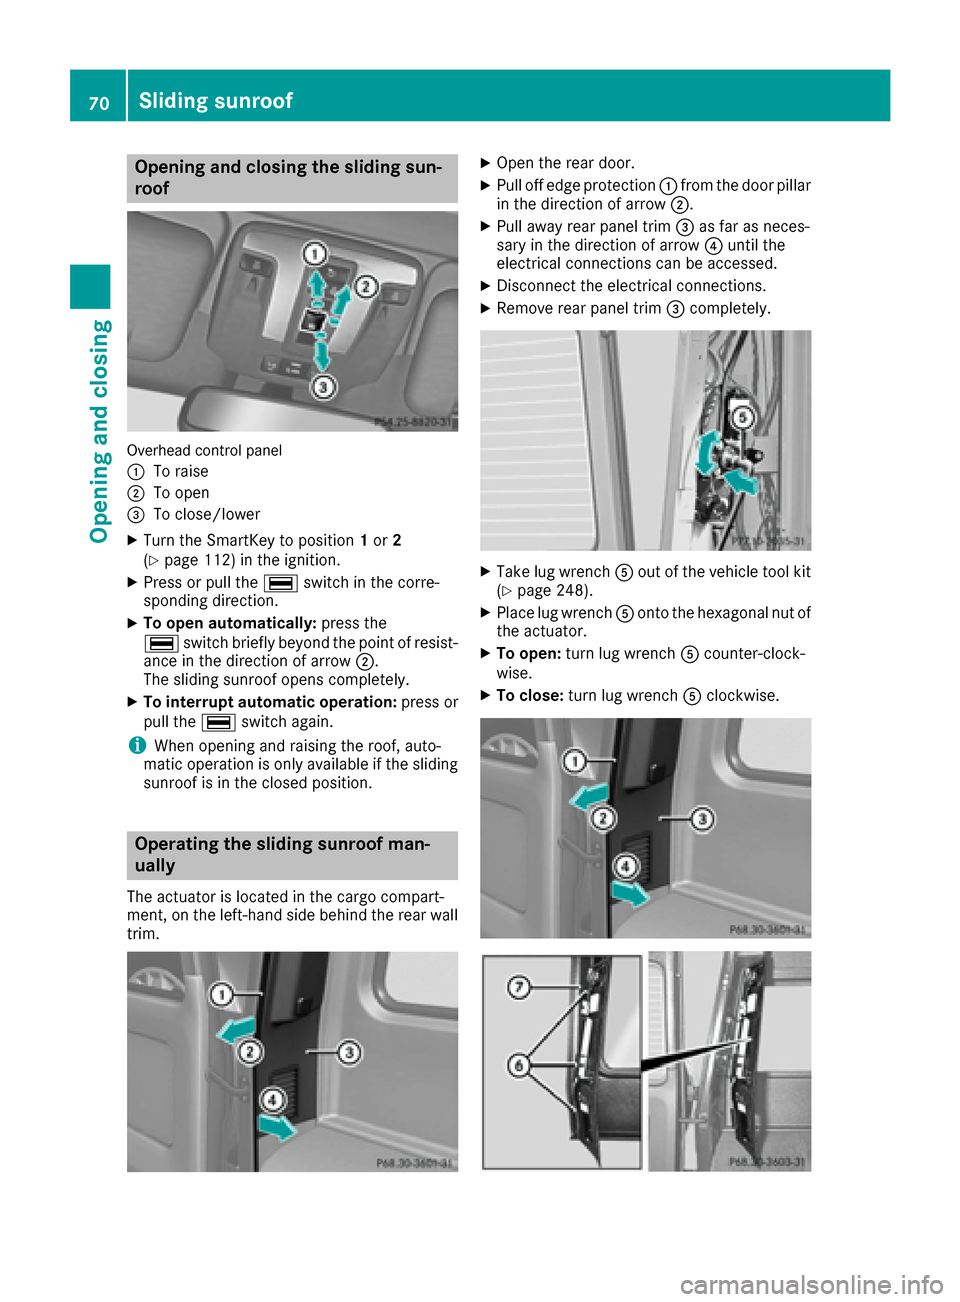
Overhead control panel
:
To raise
;To open
=To close/lower
XTurn the SmartKey to position1or 2
(Ypage 112) in the ignition.
XPress or pull the ¡switch in the corre-
sponding direction.
XTo open automatically: press the
¡ switch briefly beyond the point of resist-
ance in the direction of arrow ;.
The sliding sunroof opens completely.
XTo interrupt automatic operation: press or
pull the ¡switch again.
iWhen opening and raising the roof, auto-
matic operation is only available if the sliding
sunroof is in the closed position.
Operating the sliding sunroof man-
ually
The actuator is located in the cargo compart-
ment, on the left-hand side behind the rear wall trim.
XOpen the rear door.
XPull off edge protection :from the door pillar
in the direction of arrow ;.
XPull away rear panel trim =as far as neces-
sary in the direction of arrow ?until the
electrical connections can be accessed.
XDisconnect the electrical connections.
XRemove rear panel trim =completely.
XTake lug wrench Aout of the vehicle tool kit
(Ypage 248).
XPlace lug wrench Aonto the hexagonal nut of
the actuator.
XTo open: turn lug wrench Acounter-clock-
wise.
XTo close: turn lug wrench Aclockwise.
70Sliding sunroof
Opening and closing
Page 75 of 302
When leaving the vehicle, always take the
SmartKey with you and lock the vehicle. Never
leave children unsupervised in the vehicle.
The seats can still be adjusted when there is no
SmartKey in the ignition lock.
GWARNING
When you adjust a seat, you or other vehicle
occupants could become trapped, e.g. on the seat guide rail. There is a risk of injury.
Make sure when adjusting a seat that no one
has any body parts in the sweep of the seat.
Observe the safety notes on "Air bags"
(
Ypage 40) and "Children in the vehicle"
(Ypage 46).
GWARNING
You could lose control of your vehicle if you do the following while driving:
Radjust the driver's seat, head restraint,
steering wheel or mirrors
Rfasten the seat belt
There is a risk of an accident.
Adjust the driver's seat, head restraint, steer-
ing wheel and mirror and fasten your seat belt before starting the engine.
GWARNING
If the head restraints are not installed or not
adjusted correctly, they cannot provide pro-
tection as intended. There is an increased risk
of injury in the head and neck area, e.g. in the event of an accident or when braking.
Always drive with the head restraints instal-
led. Before driving off, make sure for every
vehicle occupant that the center of the head
restraint supports the back of the head at
about eye level.
Make sure that you do not rotate the head
restraints of the front and rear seats when
adjusting the head restraints. Otherwise, you
cannot adjust the height and angle of the head
restraints correctly.
Adjust the head restraint so that it is as close as
possible to your head.
GWARNING
According to accident statistics, children are
safer when properly restrained on the rear
seats than on the front-passenger seat. Thus,
we strongly recommend that children be
placed in the rear seat whenever possible.
Regardless of seating position, children 12
years old and under must be seated and prop-
erly secured in an appropriately sized child
restraint system or booster seat recommen-
ded for the size and weight of the child. For
additional information, see the "Children in
the vehicle" section.
A child's risk of serious or fatal injuries is sig-
nificantly increased if the child restraints are
not properly secured in the vehicle and/or the
child is not properly secured in the child
restraint.
!To avoid damage to the seats and the seat
heating, observe the following information:
Rkeep liquids from spilling on the seats. If
liquid is spilled on the seats, dry them as
soon as possible.
Rif the seat covers are damp or wet, do not
switch on the seat heating. The seat heat-
ing should also not be used to dry the seats.
Rclean the seat covers as recommended;
see the "Interior care" section.
Rdo not transport heavy loads on the seats.
Do not place sharp objects on the seat
cushions, e.g. knives, nails or tools. The
seats should only be occupied by passen-
gers, if possible.
Rwhen the seat heating is in operation, do
not cover the seats with insulating materi-
als, e.g. blankets, coats, bags, seat covers,
child seats or booster seats.
!Make sure that there are no objects in the
footwell under or behind the seats when mov-
ing the seats back. There is a risk that the
seats and/or the objects could be damaged.
!When the rear bench seat is folded for-
wards, the front seats cannot be moved to
their rearmost position. You could otherwise
damage the seats and the rear bench seat.
!Make sure that the sun visor is folded up
before adjusting the backrest and head
restraint height. The head restraint and sun
Seats73
Seats, steering wheel and mirrors
Z
Page 78 of 302
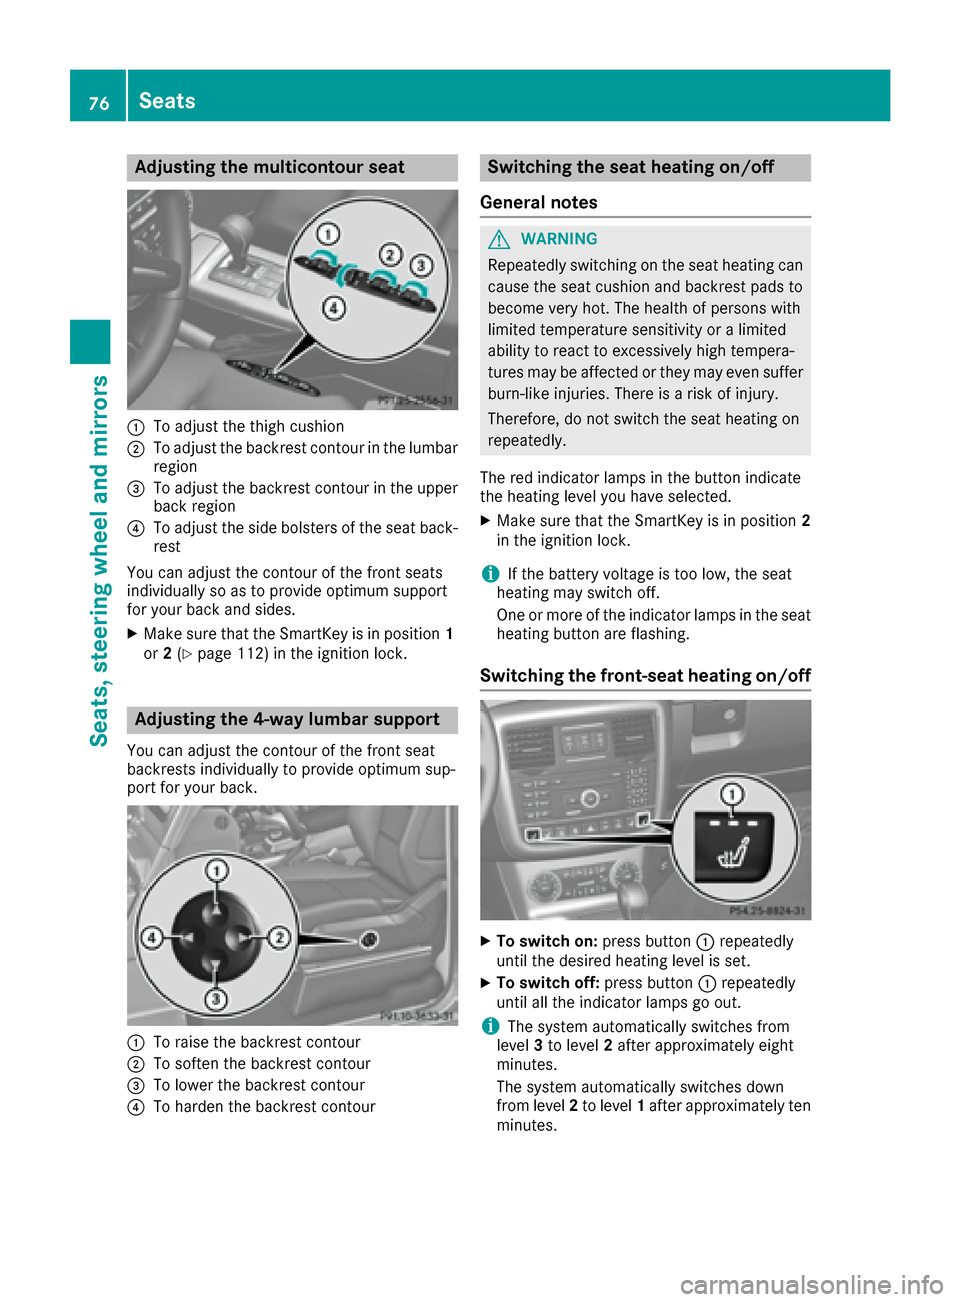
Adjusting themulticontour seat
:To adjust th ethigh cushion
;To adjust th ebackrest contour in th elumbar
region
=To adjust th ebackrest contour in th eupper
bac kregion
?To adjust th eside bolsters of th eseat back-
res t
You can adjust th econtour of th efron tseat s
individually so as to provid eoptimum support
for your bac kand sides.
XMak esur ethat th eSmartKey is in position 1
or 2(Ypage 112) in th eignition lock.
Adjusting the 4-way lumbar support
You can adjust th econtour of th efron tseat
backrest sindividually to provid eoptimum sup-
por tfor your back.
:To rais eth ebackrest contour
;To softe nth ebackrest contour
=To lower th ebackrest contour
?To harden th ebackrest contour
Switching the seat heating on/off
Gene ral notes
GWARNIN G
Repeatedly switching on th eseat heating can
caus eth eseat cushion and backrest pads to
become ver yhot .The healt hof person swit h
limite dtemperature sensitivit yor alimite d
abilit yto reac tto excessivel yhigh tempera-
tures may be affecte dor they may eve nsuffer
burn-like injuries. There is aris kof injury.
Therefore ,do no tswitch th eseat heating on
repeatedly.
The red indicator lamp sin th ebutto nindicat e
th eheating level you hav eselected.
XMak esur ethat th eSmartKey is in position 2
in th eignition lock.
iIf th ebattery voltag eis to olow, th eseat
heating may switch off .
On eor mor eof th eindicator lamp sin th eseat
heating butto nare flashing.
Switching the front-seat heating on/off
XTo switch on: press button: repeatedly
until th edesired heating level is set .
XTo switch off:press butto n: repeatedly
until all th eindicator lamp sgo out .
iThe system automatically switches from
level 3to level 2after approximately eigh t
minutes.
The system automatically switches down
from level 2to level 1after approximately te n
minutes.
76Seats
Seats, steering wheel and mirrors
Page 79 of 302
The system automatically switches off
approximately 35 minutes after it is set to
level1.
Switching the rear-seat heating on/off
XTo switch on: press button:repeatedly
until the desired heating level is set.
XTo switch off: press button:repeatedly
until all the indicator lamps go out.
iThe system automatically switches from
level 3to level 2after approximately eight
minutes.
The system automatically switches down
from level 2to level 1after approximately ten
minutes.
The system automatically switches off
approximately 35 minutes after it is set to
level 1.
Problems with the seat heating
If the on-board voltage is too low, the seat heat-
ing is switched off automatically.
XSwitch off electrical consumers that you do
not need, such as the rear window defroster
or interior lighting.
If the on-board voltage is only interrupted
briefly, the seat heating will switch back on
automatically. If the seat heating is not
switched on automatically:
XSwitch on the seat heating manually
(Ypage 76)
Switching the seat ventilation on/off
Switching on/off
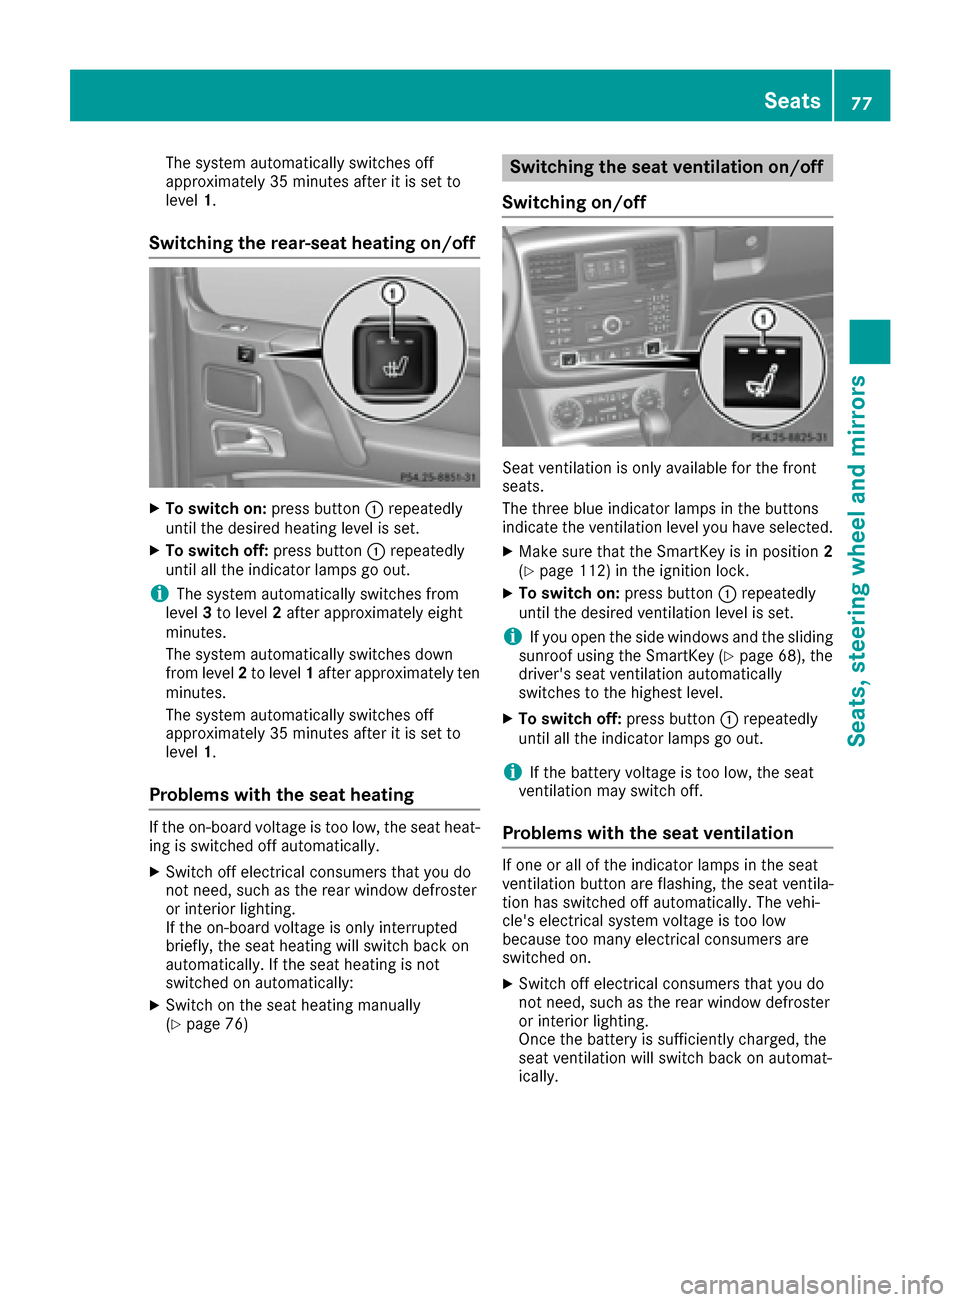
Seat ventilation is only available for the front
seats.
The three blue indicator lamps in the buttons
indicate the ventilation level you have selected.
XMake sure that the SmartKey is in position 2
(Ypage 112) in the ignition lock.
XTo switch on: press button:repeatedly
until the desired ventilation level is set.
iIf you open the side windows and the sliding
sunroof using the SmartKey (Ypage 68), the
driver's seat ventilation automatically
switches to the highest level.
XTo switch off: press button:repeatedly
until all the indicator lamps go out.
iIf the battery voltage is too low, the seat
ventilation may switch off.
Problems with the seat ventilation
If one or all of the indicator lamps in the seat
ventilation button are flashing, the seat ventila-
tion has switched off automatically. The vehi-
cle's electrical system voltage is too low
because too many electrical consumers are
switched on.
XSwitch off electrical consumers that you do
not need, such as the rear window defroster
or interior lighting.
Once the battery is sufficiently charged, the
seat ventilation will switch back on automat-
ically.
Seats77
Seats, steering wheel and mirrors
Z
Page 80 of 302
Steering wheel
Important safety notes
GWARNING
You could lose control of your vehicle if you do the following while driving:
Radjust the driver's seat, head restraint,
steering wheel or mirrors
Rfasten the seat belt
There is a risk of an accident.
Adjust the driver's seat, head restraint, steer-
ing wheel and mirror and fasten your seat belt before starting the engine.
GWARNING
Children could injure themselves if they
adjust the steering wheel. There is a risk of
injury.
When leaving the vehicle, always take the
SmartKey with you and lock the vehicle. Never
leave children unsupervised in the vehicle.
The electrically adjustable steering wheel can
still be adjusted when there is no SmartKey in
the ignition lock.
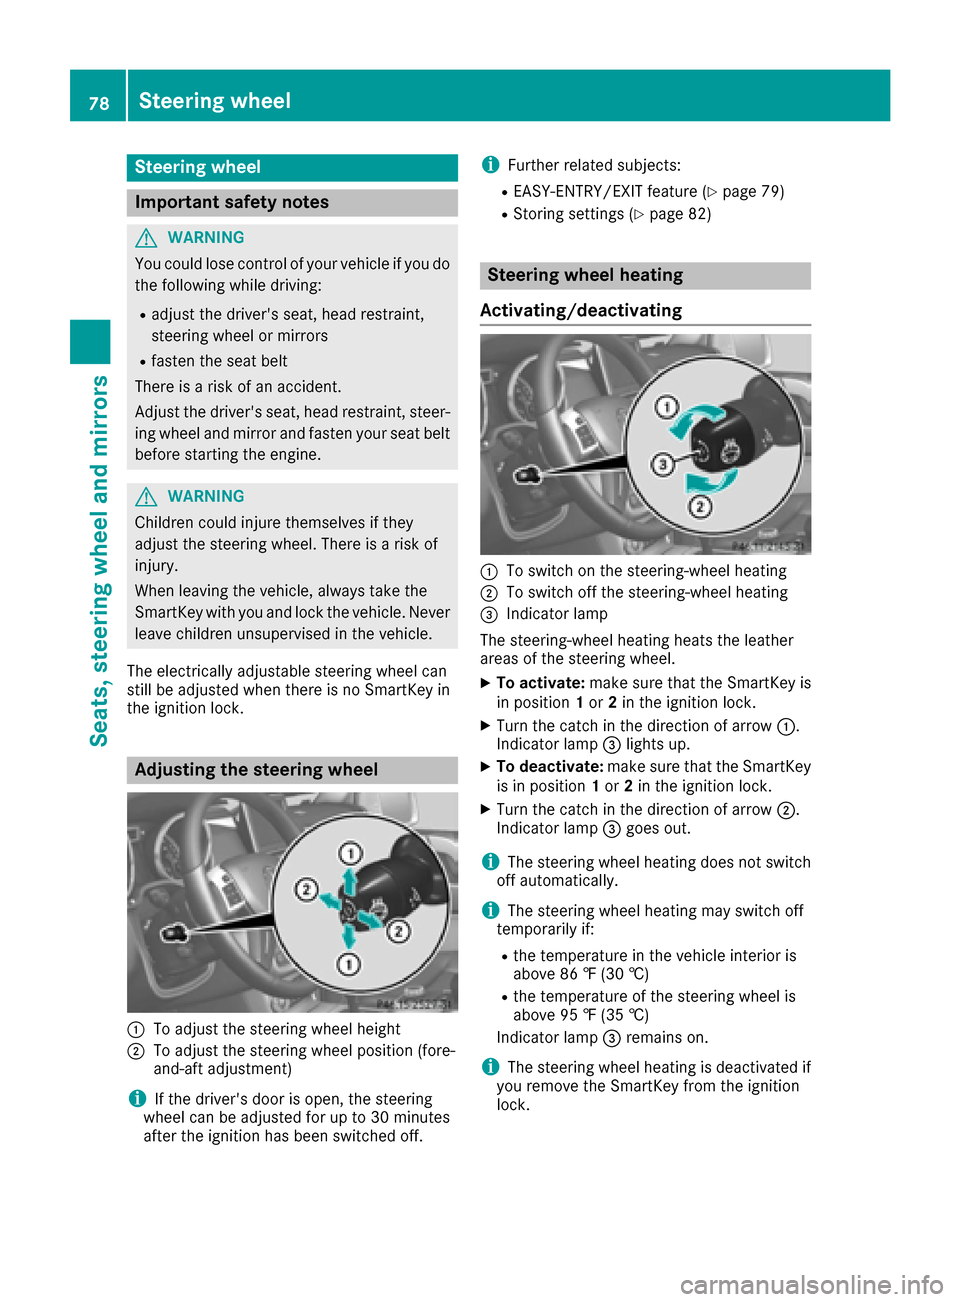
Adjusting the steering wheel
:To adjust the steering wheel height
;To adjust the steering wheel position (fore-
and-aft adjustment)
iIf the driver's door is open, the steering
wheel can be adjusted for up to 30 minutes
after the ignition has been switched off.
iFurther related subjects:
REASY-ENTRY/EXIT feature (Ypage 79)
RStoring settings (Ypage 82)
Steering wheel heating
Activating/deactivating
:To switch on the steering-wheel heating
;To switch off the steering-wheel heating
=Indicator lamp
The steering-wheel heating heats the leather
areas of the steering wheel.
XTo activate: make sure that the SmartKey is
in position 1or 2in the ignition lock.
XTurn the catch in the direction of arrow :.
Indicator lamp =lights up.
XTo deactivate: make sure that the SmartKey
is in position 1or 2in the ignition lock.
XTurn the catch in the direction of arrow ;.
Indicator lamp =goes out.
iThe steering wheel heating does not switch
off automatically.
iThe steering wheel heating may switch off
temporarily if:
Rthe temperature in the vehicle interior is
above 86 ‡ (30 †)
Rthe temperature of the steering wheel is
above 95 ‡ (35 †)
Indicator lamp =remains on.
iThe steering wheel heating is deactivated if
you remove the SmartKey from the ignition
lock.
78Steering wheel
Seats, steering wheel and mirrors
Page 81 of 302
Problems with the steering wheel heat-
ing
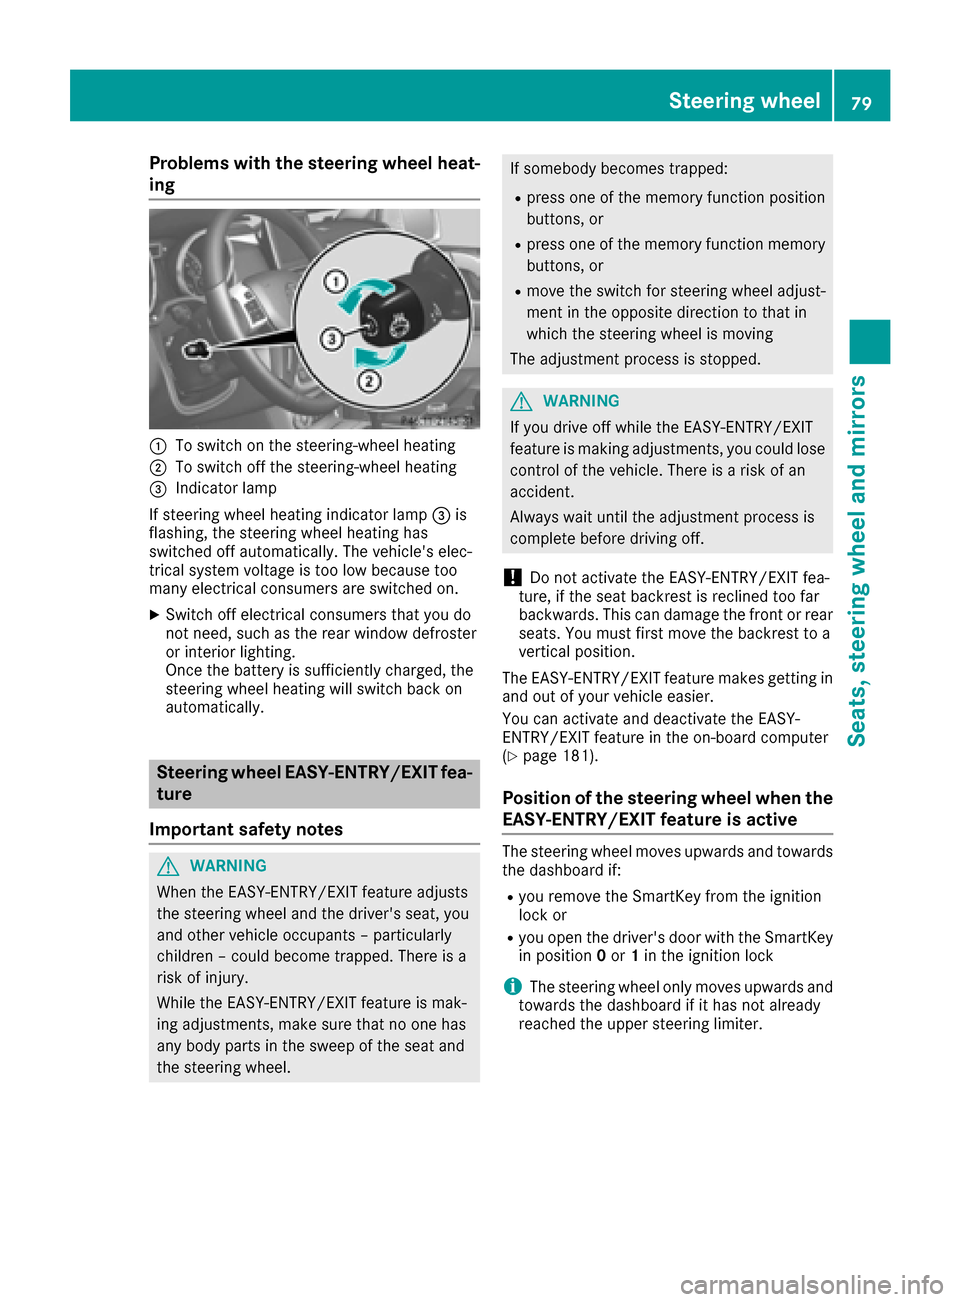
:To switch on the steering-wheel heating
;To switch off the steering-wheel heating
=Indicator lamp
If steering wheel heating indicator lamp =is
flashing, the steering wheel heating has
switched off automatically. The vehicle's elec-
trical system voltage is too low because too
many electrical consumers are switched on.
XSwitch off electrical consumers that you do
not need, such as the rear window defroster
or interior lighting.
Once the battery is sufficiently charged, the
steering wheel heating will switch back on
automatically.
Steering wheel EASY-ENTRY/EXIT fea-
ture
Important safety notes
GWARNING
When the EASY-ENTRY/EXIT feature adjusts
the steering wheel and the driver's seat, you
and other vehicle occupants – particularly
children – could become trapped. There is a
risk of injury.
While the EASY-ENTRY/EXIT feature is mak-
ing adjustments, make sure that no one has
any body parts in the sweep of the seat and
the steering wheel.
If somebody becomes trapped:
Rpress one of the memory function position
buttons, or
Rpress one of the memory function memory
buttons, or
Rmove the switch for steering wheel adjust-
ment in the opposite direction to that in
which the steering wheel is moving
The adjustment process is stopped.
GWARNING
If you drive off while the EASY-ENTRY/EXIT
feature is making adjustments, you could lose
control of the vehicle. There is a risk of an
accident.
Always wait until the adjustment process is
complete before driving off.
!Do not activate the EASY-ENTRY/EXIT fea-
ture, if the seat backrest is reclined too far
backwards. This can damage the front or rear
seats. You must first move the backrest to a
vertical position.
The EASY-ENTRY/EXIT feature makes getting in
and out of your vehicle easier.
You can activate and deactivate the EASY-
ENTRY/EXIT feature in the on-board computer
(
Ypage 181).
Position of the steering wheel when the
EASY-ENTRY/EXIT feature is active
The steering wheel moves upwards and towards
the dashboard if:
Ryou remove the SmartKey from the ignition
lock or
Ryou open the driver's door with the SmartKey
in position 0or 1in the ignition lock
iThe steering wheel only moves upwards and
towards the dashboard if it has not already
reached the upper steering limiter.
Steering wheel79
Seats, steering wheel and mirrors
Z