2016 MERCEDES-BENZ G-Class key
[x] Cancel search: keyPage 129 of 302

Problems with the automatic transmission
ProblemPossible causes/consequences andMSolutions
The acceleration ability
is deteriorating.
The transmission no lon-
ger changes gear.The transmission is in emergency mode.
It is only possible to shift intosecondgear and reverse gear.
XStop the vehicle.
XShift the transmission to position P.
XTurn the SmartKey to position0in the ignition lock.
XWait at least ten seconds before restarting the engine.
XShift the transmission to position Dor R.
If D is selected, the transmission shifts into secondgear; ifRis
selected, the transmission shifts into reverse gear.
XHave the transmission checked at a qualified specialist workshop
immediately.
You hear a warning tone.You have:
Rswitched off the engine
Ropened the driver's door
Rnot shifted the selector lever to position P
XShift the selector lever to positionP.
Refueling
Important safety notes
GWARNING
Fuel is highly flammable. If you handle fuel
incorrectly, there is a risk of fire and explo-
sion.
You must avoid fire, open flames, creating
sparks and smoking. Switch off the engine
and, if applicable, the auxiliary heating before refueling.
GWARNING
Fuel is poisonous and hazardous to health.
There is a risk of injury.
You must make sure that fuel does not come into contact with your skin, eyes or clothing
and that it is not swallowed. Do not inhale fuel
vapors. Keep fuel away from children.
If you or others come into contact with fuel,
observe the following:
RWash away fuel from skin immediately
using soap and water.
RIf fuel comes into contact with your eyes,
immediately rinse them thoroughly with
clean water. Seek medical assistance with-
out delay.
RIf fuel is swallowed, seek medical assis-
tance without delay. Do not induce vomit-
ing.
RImmediately change out of clothing which
has come into contact with fuel.
!Do not use diesel to refuel vehicles with a
gasoline engine. Even small amounts of the
wrong fuel result in damage to the fuel system
and engine.
!Do not switch on the ignition if you acciden-
tally refuel with the wrong fuel. Otherwise, the
fuel will enter the fuel lines. Notify a qualified
specialist workshop and have the fuel tank
and fuel lines drained completely.
Refueling127
Driving and parking
Z
Page 130 of 302

!Overfilling the fuel tank could damage the
fuel system.
!Take care not to spill any fuel on painted
surfaces. You could otherwise damage the
paintwork.
!Use a filter when refueling from a fuel can.
Otherwise, the fuel lines and/or injection sys-
tem could be blocked by particles from the
fuel can.
If you overfill the fuel tank, pressure may build
up in the fuel tank. This could cause fuel to spray
out when the fuel pump nozzle is removed.
There is a risk of injury. The fuel tank is full when
the fuel pump nozzle first switches off. End the
refueling process.
For further information on fuel and fuel quality
(
Ypage 289).
Refueling
Vehicles with a fuel filler flap
Example: G 550 fuel filler cap
:
To open the fuel filler flap
;Tire pressure table
=Fuel type
?To insert the fuel filler cap
When you open or close the vehicle with the
SmartKey, the fuel filler flap is automatically
unlocked or locked.
The position of the fuel filler cap is displayed
8 in the instrument cluster. The arrow next
to the filling pump indicates the side of the vehi-
cle. The fuel filler flap is located to the rear on
the right.
Opening the fuel filler cap
:To open the fuel filler flap
;Tire pressure table
=Fuel type
?To insert the fuel filler cap
XSwitch the engine off.
iWhen the engine is running and the fuel filler
flap is open, the yellow reserve fuel warning
lamp and the =(USA only) or ;(Can-
ada only) Check Engine warning lamp may
light up.
Further information about warning and indi-
cator lamps in the instrument cluster can be
found in the Digital Operator's Manual.
XRemove the SmartKey from the ignition lock.
XTurn the fuel filler cap counterclockwise and
remove it.
XInsert the fuel filler cap into the holder
bracket on the inside of filler flap ?.
Refueling
XCompletely insert the filler neck of the fuel
pump nozzle into the tank and refuel.
iDo not add any more fuel after the pump
stops filling for the first time. Otherwise, fuel
may leak out.
Closing
XReplace the fuel filler cap and turn it clock-
wise. The fuel filler cap audibly engages.
XClose the fuel filler flap.
iClose the fuel filler flap before locking the
vehicle. A locking pin otherwise prevents the
fuel filler flap from closing after the vehicle
has been locked.
128Refueling
Driving and parking
Page 132 of 302

Problems with the fuel and fuel tank
ProblemPossible causes/consequences andMSolutions
Fuel is leaking from the
vehicle.The fuel line or the fuel tank is defective.
GWARNING
Risk of explosion or fire.
XTurn the SmartKey to position 0(Ypage 112) immediately and
remove it.
XDo not restart the engine under any circumstances.
XConsult a qualified specialist workshop.
The fuel filler flap cannot
be opened.The fuel filler flap is not unlocked.
or
The SmartKey batteries are discharged.
XUnlock the vehicle (Ypage 60).
or
XUnlock the vehicle using the mechanical key (Ypage 61).
XOpen the rear door.
XManually unlock the fuel filler flap using the emergency release
(Ypage 129).
The fuel filler flap is unlocked, but the opening mechanism is jammed.
XManually unlock the fuel filler flap using the emergency release
(Ypage 129).
XConsult a qualified specialist workshop.
Parking
Important safety notes
GWARNING
If you leave children unsupervised in the vehi-
cle, they could set it in motion by, for example:
Rrelease the parking brake.
Rshift the automatic transmission out of the
parking position P.
Rstart the engine.
In addition, they may operate vehicle equip-
ment and become trapped. There is a risk of
an accident and injury.
When leaving the vehicle, always take the
SmartKey with you and lock the vehicle. Never
leave children unsupervised in the vehicle.
GWARNING
Flammable material such as leaves, grass or
twigs may ignite if they come into contact with
hot parts of the exhaust system or exhaust
gas flow. There is a risk of fire.
Park the vehicle so that no flammable mate-
rials come into contact with parts of the vehi-
cle which are hot. Take particular care not to
park on dry grassland or harvested grain
fields.
GWARNING
If you switch off the ignition while driving,
safety-relevant functions are only available
with limitations, or not at all. This could affect, for example, the power steering and the brake
boosting effect. You will require considerably
more effort to steer and brake. There is a risk
of an accident.
130Parking
Driving and parking
Page 133 of 302

Do not switch off the ignition while driving.
Switching off the engine
Important safety notes
GWARNING
If you switch off the ignition while driving,
safety-relevant functions are only available
with limitations, or not at all. This could affect, for example, the power steering and the brake
boosting effect. You will require considerably
more effort to steer and brake. There is a risk
of an accident.
Do not switch off the ignition while driving.
GWARNING
The automatic transmission switches to neu-
tral position Nwhen you switch off the engine.
The vehicle may roll away. There is a risk of an
accident.
After switching off the engine, always switch
to parking position P. Prevent the parked vehi-
cle from rolling away by applying the parking
brake.
Vehicles with automatic transmission
XShift the transmission to position P.
XTurn the SmartKey to position 0in the ignition
lock and remove it (Ypage 112).
The immobilizer is activated.
XApply the parking brake firmly.
XTurn the steering wheel until the steering
wheel lock engages.
iIf you switch off the engine using the Smart-
Key and then remove the SmartKey from the
ignition lock or open one of the front doors,
the automatic transmission automatically
shifts to park position P.
iThe SmartKey can only be removed if the
automatic transmission is in position P.
Parking brake
GWARNING
If you must brake the vehicle with the parking brake, the braking distance is considerably
longer and the wheels could lock. There is an
increased danger of skidding and accidents.
Only use the parking brake to brake the vehi-
cle when the service brake is faulty. Do not
apply the parking brake too firmly. If the
wheels lock, release the parking brake until
the wheels begin turning again.
GWARNING
If you leave children unsupervised in the vehi-
cle, they could set it in motion by, for example:
Rrelease the parking brake.
Rshift the automatic transmission out of the
parking position P.
Rstart the engine.
In addition, they may operate vehicle equip-
ment and become trapped. There is a risk of
an accident and injury.
When leaving the vehicle, always take the
SmartKey with you and lock the vehicle. Never
leave children unsupervised in the vehicle.
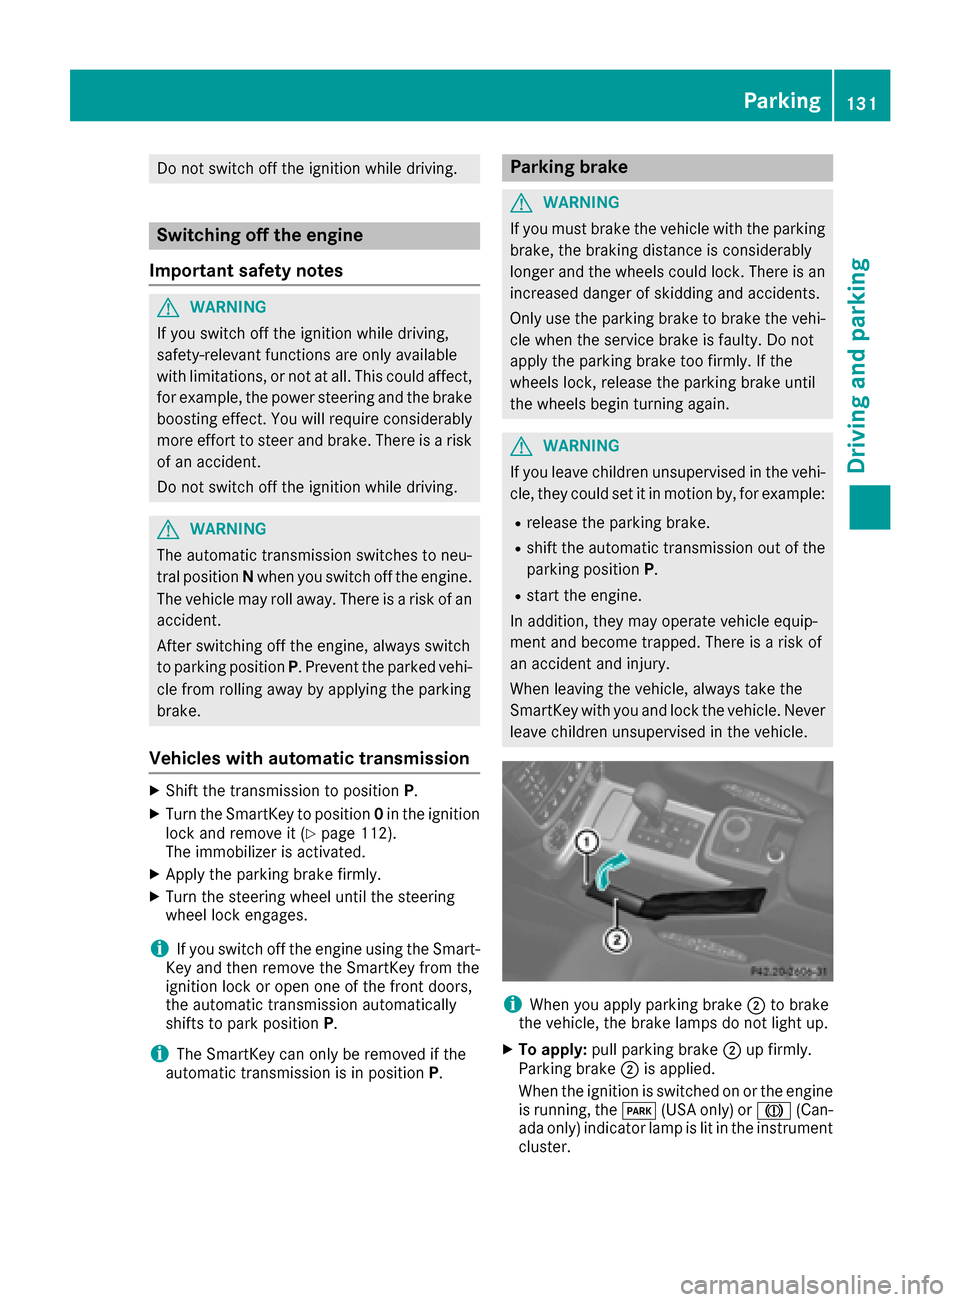
iWhen you apply parking brake ;to brake
the vehicle, the brake lamps do not light up.
XTo apply: pull parking brake ;up firmly.
Parking brake ;is applied.
When the ignition is switched on or the engine
is running, the F(USA only) or J(Can-
ada only) indicator lamp is lit in the instrument
cluster.
Parking131
Driving an d parking
Z
Page 136 of 302

Never use the brake pedal as a footrest. Never
depress the brake pedal and the accelerator
pedal at the same time.
!Depressing the brake pedal constantly
results in excessive and premature wear to
the brake pads.
If the brakes have been subjected to a heavy
load, do not stop the vehicle immediately, but
drive on for a short while. This allows the airflow
to cool the brakes more quickly.
Wet roads
If driving in heavy rain for a prolonged period of time without braking, there may be a delayed
reaction from the brakes when braking for the
first time. This may also occur after the vehicle
has been washed.
You have to depress the brake pedal more
firmly. Maintain a greater distance from the
vehicle in front.
After driving on a wet road or having the vehicle washed, brake firmly while paying attention to
the traffic conditions. This will warm up the
brake discs, thereby drying them more quickly
and protecting them against corrosion.
Limited braking performance on salt-
treated roads
If you drive on salted roads, a layer of salt resi-
due may form on the brake discs and brake
pads. This can result in a significantly longer
braking distance.
RBrake occasionally to remove any possible
salt residue. Make sure that you do not
endanger other road users when doing so.
RCarefully depress the brake pedal and the
beginning and end of a journey.
RMaintain a greater distance to the vehicle
ahead.
Servicing the brakes
!If the brake warning lamp lights up in the
instrument cluster and you hear a warning
tone even though the parking brake has been released, the brake fluid level may be too low.
Observe additional warning messages in the
multifunction display.
The brake fluid level may be too low due to
brake pad wear or leaking brake lines. Have the brake system checked immediately.
This work should be carried out at a qualified
specialist workshop.
!A function or performance test should only
be carried out on a 2-axle dynamometer. If
you are planning to have the vehicle tested on
such a dynamometer, contact an authorized
Mercedes-Benz Center to obtain further infor-
mation first. Otherwise, you could damage
the drive train or the brake system.
!As the ESP®system operates automatically,
the engine and the ignition must be switched
off (the SmartKey must be in position 0or 1in
the ignition lock) if the parking brake is tested
on a brake dynamometer (for a maximum of
ten seconds).
Braking applications triggered automatically
by ESP
®may otherwise seriously damage the
brake system.
Mercedes-Benz recommends that you only have
brake pads/linings installed on your vehicle
which have been approved for Mercedes-Benz
vehicles or which correspond to an equivalent
quality standard. Brake pads/linings which have
not been approved for Mercedes-Benz vehicles
or which are not of an equivalent quality could
affect your vehicle's operating safety.
Mercedes-Benz recommends that you only use
brake fluid that has been specially approved for
your vehicle by Mercedes-Benz, or which corre-
sponds to an equivalent quality standard. Brake
fluid which has not been approved for
Mercedes-Benz vehicles or which is not of an
equivalent quality could affect your vehicle's
operating safety.
All checks and maintenance work on the brake
system must be carried out at a qualified spe-
cialist workshop.
Have brake pads installed and brake fluid
replaced at a qualified specialist workshop.
If your brake system is subject only to moderate
loads, you should test the functionality of your
brakes at regul ar interva
ls by pressing firmly on
the brake pedal at high speeds. This improves
the grip of the brake pads.
You can find a description of Brake Assist (BAS)
on (
Ypage 56).
134Driving tips
Driving and parking
Page 158 of 302

Indicator and warning display
GWARNING
Blind Spot Assist does no treac tto :
Rvehicles overtake nto oclosely on th eside ,
placing them in th eblin dspo tarea
Rvehicles bein govertake nat aspee ddiffer -
ence of mor ethan 7. 5mph (12 km/h)
Rvehicles whic happroac hwit h a larg espee d
differential and overtake your vehicl e
As aresult ,Blind Spot Assist may no tgiv e
warning sin suc hsituations. Ther eis aris kof
an accident.
Always observ eth etraffic condition scare-
fully, and maintai n asafelateral distance.
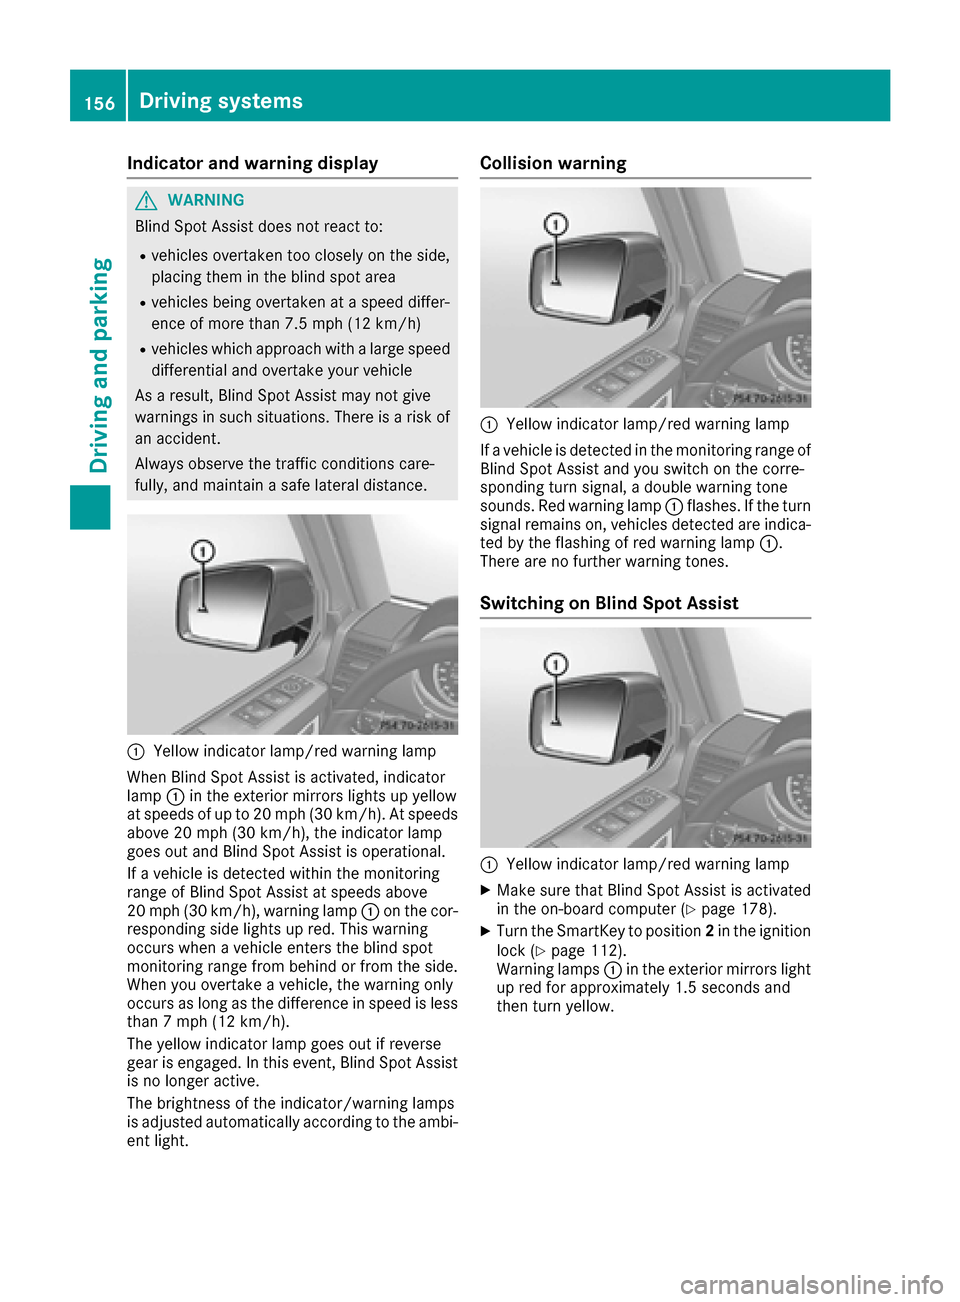
:Yello windicator lamp/red warning lamp
When Blind Spot Assist is activated, indicator
lamp :in th eexterio rmirror slights up yellow
at speeds of up to 20 mph (30 km/h). At speeds
above 20 mph (30 km/h), the indicator lamp
goes out and Blind Spot Assist is operational.
If a vehicle is detected within the monitoring
range of Blind Spot Assist at speeds above
20 mph (30 km/h), warning lamp :on the cor-
responding side lights up red. This warning
occurs when a vehicle enters the blind spot
monitoring range from behind or from the side.
When you overtake a vehicle, the warning only
occurs as long as the difference in speed is less
than 7 mph (12 km/h).
The yellow indicator lamp goes out if reverse
gear is engaged. In this event, Blind Spot Assist
is no longer active.
The brightness of the indicator/warning lamps
is adjusted automatically according to the ambi- ent light.
Collision warning
:Yellow indicator lamp/red warning lamp
If a vehicle is detected in the monitoring range of
Blind Spot Assist and you switch on the corre-
sponding turn signal, a double warning tone
sounds. Red warning lamp :flashes. If the turn
signal remains on, vehicles detected are indica- ted by the flashing of red warning lamp :.
There are no further warning tones.
Switching on Blind Spot Assist
:Yellow indicator lamp/red warning lamp
XMake sure that Blind Spot Assist is activated
in the on-board computer (Ypage 178).
XTurn the SmartKey to position 2in the ignition
lock (Ypage 112).
Warning lamps :in the exterior mirrors light
up red for approximately 1.5 seconds and
then turn yellow.
156Driving systems
Driving and parking
Page 159 of 302

HOLD function
General notes
The HOLD function can assist the driver in the
following situations:
Rwhen pulling away, especially on steep slopes
Rwhen maneuvering on steep slopes
Rwhen waiting in traffic
The vehicle is kept stationary without the driver having to depress the brake pedal.
The braking effect is canceled and the HOLD
function deactivated when you depress the
accelerator pedal to pull away.
iDo not use the HOLD function when driving
off-road, on steep uphill or downhill gradients
or on slippery or loose surfaces. The HOLD
function cannot hold the vehicle on such sur-
faces.
Activation conditions
You can activate the HOLD function if:
Rthe vehicle is stationary
Rthe engine is running or if it has been auto-
matically switched off by the ECO start/stop
function
Rthe engine is running
Rthe driver's door is closed or your seat belt is
fastened
Rthe transmission is in position D,R or N
RDISTRONIC PLUS is deactivated
Activating the HOLD function
The vehicle's brakes are applied when the HOLD
function is activated. For this reason, deactivate
the HOLD function while in the car wash or while
towing.
XMake sure that the activation conditions are
met.
XDepress the brake pedal.
XQuickly depress the brake pedal further until
ë appears in the multifunction display.
The HOLD function is activated. You can
release the brake pedal.
iIf depressing the brake pedal the first time
does not activate the HOLD function, wait
briefly and then try again.
Deactivating the HOLD function
GWARNING
When leaving the vehicle, it can still roll away despite being braked by the HOLD function if:
Rthere is a malfunction in the system or in
the voltage supply.
Rthe HOLD function has been deactivated by
pressing the accelerator pedal or the brake
pedal, e.g. by a vehicle occupant.
Rthe electrical system in the engine com-
partment, the battery or the fuses have
been tampered with.
Rthe battery is disconnected
There is a risk of an accident.
If you wish to exit the vehicle, always turn off the HOLD function and secure the vehicle
against rolling away.
The HOLD function is deactivated automatically if:
Ryou accelerate and the transmission is in
position Dor R.
Ryou shift the transmission to position P.
Ryou depress the brake pedal again with a cer-
tain amount of pressure untilëdisap-
pears from the multifunction display.
Ryou activate DISTRONIC PLUS.
On steep uphill or downhill gradients or if there
is a malfunction, the transmission may also be
automatically shifted into position P.
Permanent all-wheel drive
!
Never tow the vehicle with one axle raised.
This may damage the transfer case. Damage
of this sort is not covered by the Mercedes-
Benz Limited Warranty. All wheels must
remain either on the ground or be fully raised.
Observe the instructions for towing the vehi-
cle with all wheels in full contact with the
ground.
!When testing the parking brake, operate the
vehicle only briefly (for a maximum of ten sec-
onds) on a brake test dynamometer. When
doing this, turn the SmartKey to position 0or
1 in the ignition. Failure to do this can cause
damage to the drive train or the brake system.
Driving systems157
Driving and parking
Z
Page 162 of 302

This indicates that you have now reached the
minimum distance.
Deactivating/activating PARKTRONIC
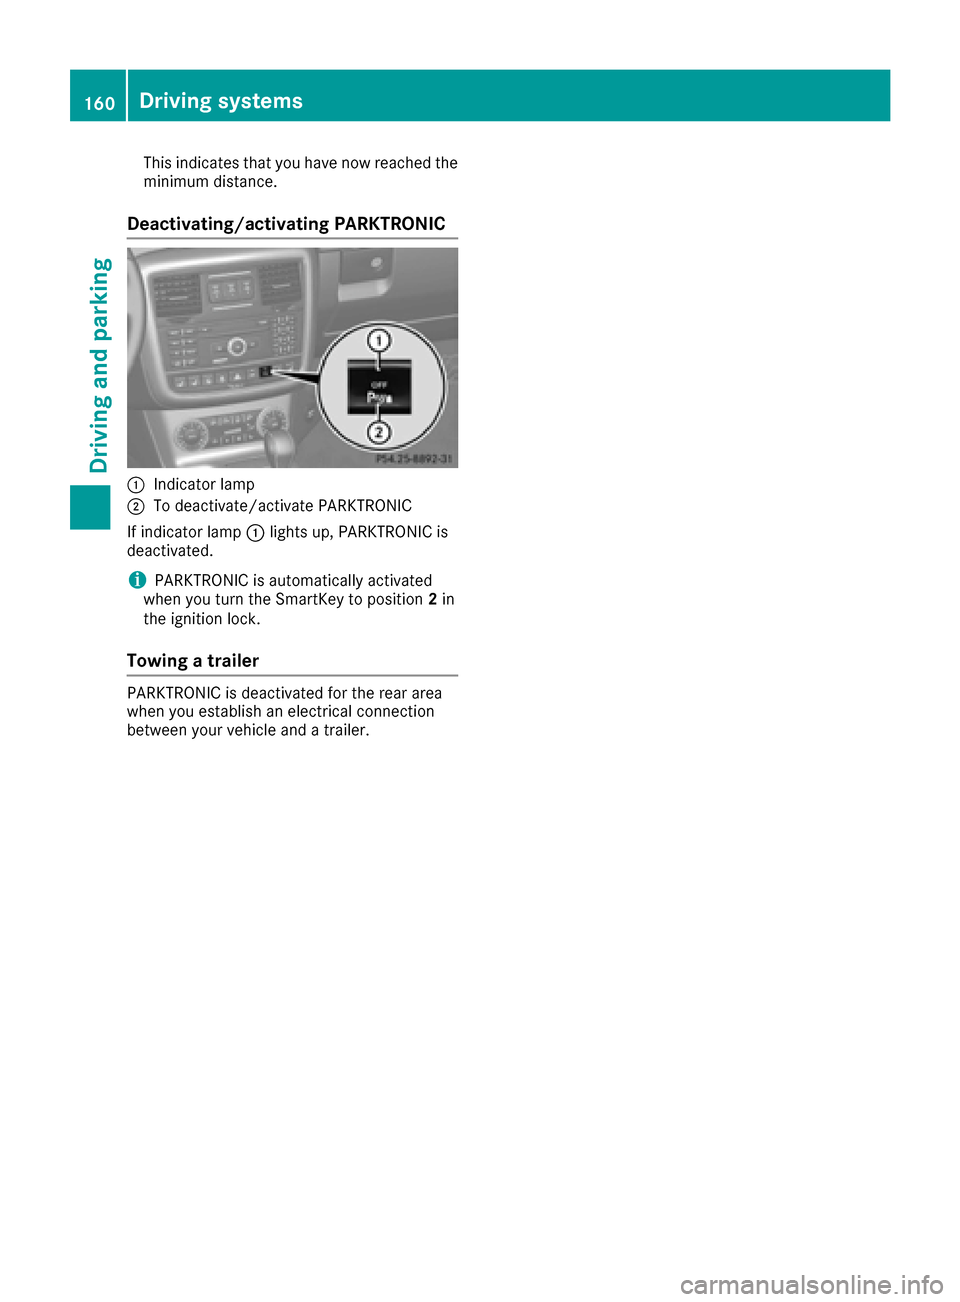
:Indicator lamp
;To deactivate/activate PARKTRONIC
If indicator lamp :lights up, PARKTRONIC is
deactivated.
iPARKTRONIC is automatically activated
when you turn the SmartKey to position 2in
the ignition lock.
Towing a trailer
PARKTRONIC is deactivated for the rear area
when you establish an electrical connection
between your vehicle and a trailer.
160Driving systems
Driving and parking